background image

Nuclias Connect Hub Plus User Manual 


AP Network 


84 


System 

Device Management 

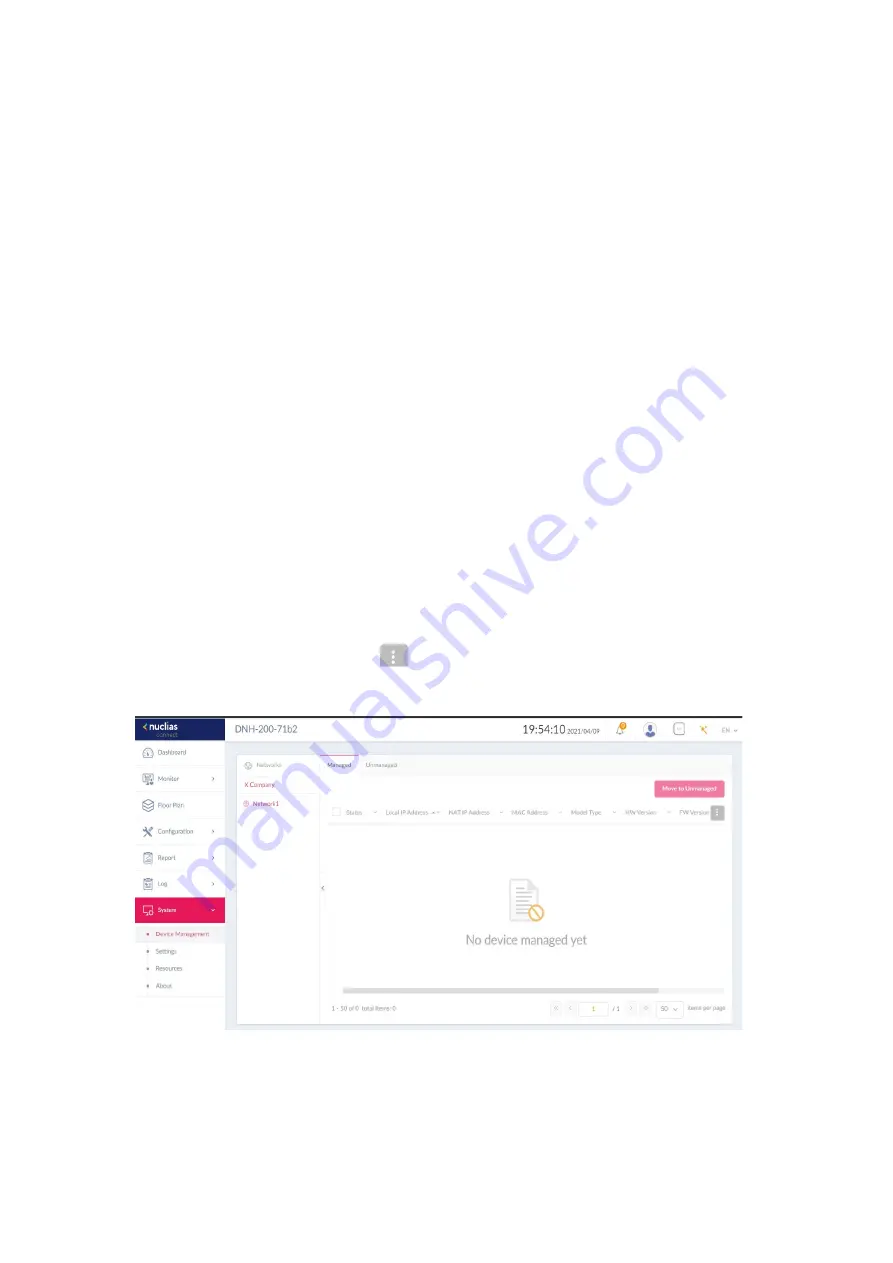
The Device Management page allows you to view the list of all devices on a selected network 
for both managed and unmanaged devices. Navigate to 

System > Device Management


>

[Site] > [Network]

. For a selected network, click the managed or unmanaged tab to view 

devices under each category. 

To move devices to 

Unmanaged 

or the other way, use the 

Move

 tab in the upper-right 

corner. You can also click on an entry to launch its web management interface. 
To delete a managed AP device, you need to move it to the Unmanaged List first. 

The list provides the following information: 

Status, Local IP Address, NAT IP Address, MAC 

Address, Model Type, HW Version, FW Version, Managed Time, 

and

 Backup FW Version

. To 

customize the displayed fields, click 

. To order by a field, click the field name at the top 

of the list. To reverse the order, click the field name again. 


Summary of Contents for Nuclias Connect Hub Plus DNH-200

Page 1: ...NUCLIAS CONNECT HUB PLUS DNH 200 User Manual 2021 Business Class Networking V 1 00 ...

Page 2: ...Installation 12 Mounting to a Solid Wall or Ceiling 12 Basic Configuration 13 Launch Nuclias Connect 13 Home 16 System Settings 17 Dashboard 17 Settings 19 General 19 Date and Time 20 Network Settings 21 Mail Server Settings 23 Firmware Update 24 System Operation 25 Single Sign On 27 Log Backup 30 Backup Restore 31 Syslog Settings 32 Event Settings 33 User Management 35 Log 38 System Log 38 Audit ...

Page 3: ...t Gateway 75 Report 76 Peak Network Activity 76 Hourly Network Activity 76 Daily Network Activity 77 Most Active AP 78 Log 80 Device Syslog 80 System Event Log 81 Device Log 81 Audit Log 82 Alerts 83 System 84 Device Management 84 Settings 85 Resources 86 About 87 Camera Surveillance 88 Camera 88 Live View 96 Playback 98 Timeline 98 Event Recording 100 E Map 102 LOG 104 Camera Surveillance Log 104...

Page 4: ...nfigure APs Using the Nuclias Connect App 118 Quick Setup 118 Nuclias Connect 123 Standalone Access Point 125 Nuclias Protect App 129 Discover and Configure Cameras Using the Nuclias Protect App 129 Access Camera List 133 Camera Management 133 Hub Dashboard 135 Hub Settings 137 Troubleshooting 141 The Live View is not working if it is accessed from the Safari browser on macOS using IPv6 141 What i...

Page 5: ...Connect minimizes the hassle of deployment configuration and administration tasks The DNH 200 is a successor to the DNH 100 Nuclias Connect Hub equipping with a hardware controller with pre loaded Nuclias Connect software plus camera surveillance capability In addition to the centralized management of wireless networks the new camera surveillance facilitates surveillance applications with greater ...

Page 6: ...s Macintosh or Linux based operating systems Browser support for H 264 video stream Microsoft Edge Google Chrome Mozilla Firefox Mac Safari Browser support for H 265 video stream Microsoft Edge Mac Safari Notes 1 DNH 200 can manage IP cameras compatible with H 265 and H 264 but does not provide any coding or decoding services for video streaming live view or playback Video coding and decoding need...

Page 7: ...ecovery Mode Red and Green blinking alternately Normal Speed Uplink and IP provision Red blinking Normal Speed Power Off Orange blinking Normal Speed 2 HD LED HDD is Present Green solid HDD Read Write Green blinking Normal Speed HDD Power Off Light off HDD Failure Red solid 3 SSO LED Connect to Nuclias Server 1 Light Off DNH 200 does not connect to the Nuclias server in the cloud with a Single Sig...

Page 8: ...AN connection 3 USB Port USB 2 0 supports flash drive for video export and configuration backup 4 Reset Device Reboot Press the Reset button once to reboot the DNH 200 Reset to Factory Default Hold the Reset button for 5 seconds all LEDs will turn on at the same time After 1 second all the LEDs will turn off and the DNH 200 will reboot and reset back to factory defaults Recovery Press and hold the...

Page 9: ...CP server and DNH 200 must be in the same network Ethernet Connection You need the following equipment to access the web interface of the DNH 200 A PC with a RJ 45 Ethernet connection An Ethernet cable A power adapter 1 Pull out the hard disk tray of the DNH 200 device 2 Insert a 2 5 inch hard disk into the tray and secure the HDD with the supplied screws 3 Reinsert tray back into the device ...

Page 10: ...at the management computer is connected to 6 Configure the DNH 200 from a computer Enter https DNH 200 XXXX local in the address field of your browser where XXXX are the last four digits of your device s MAC address You can find the MAC address printed on the label on the bottom of the DNH 200 7 Log into the device s web interface The default username is admin and password is admin 8 Configure the...

Page 11: ...uired for serial communication 1 Connect the RS 232 interface to the serial port of the management PC 2 Connect the RJ 45 interface to the console port of the device 3 Open a terminal emulation program on the management PC and configure the properties for connection as follows The speed baud 115200 bps The data bits 8 The parity None The stop bits 1 The flow control should be None Start the commun...

Page 12: ...t on the wall by using the wall mount keyholes on the rear of the unit or by using the supplied mounting bracket The following procedure explains how to use the keyholes 1 Use the wall mount template to mark the screw positions on the wall 2 Drill the 2 supplied wall anchors into the wall at the marked positions and screw the 2 supplied screws into them Make sure they stand out 6 7mm 3 Hang the de...

Page 13: ...ge enter admin for both username and password Enter the CAPTCHA code as shown on the screen then click Login to proceed Notes 1 In the default domain name https DNH 200 XXXX local XXXX is the last four digits of your DNH 200 s MAC address The MAC address and web management URL are printed on the label on the bottom of the DNH 200 2 The IP address can be obtained from the client list of the uplink ...

Page 14: ...a different language can be selected After the web browser opens and connects successfully to the server a change password dialog appears You are required to change your password It must be 8 30 characters and contains both and uppercase and lowercase letters and numbers Also avoid using common words or names In the New Password field enter a new password Enter the same password in the Confirm Pas...

Page 15: ...w If you do not already have a Nuclias account you can click Create Account and a browser window will open to a link where you can create one The Single Sign On allows you to use a Nuclias account to access Nuclias Cloud and the Nuclias Connect portal After entering your Nuclias account information click OK to confirm it ...

Page 16: ... 3 modules of the Nuclias Connect Hub Plus may be referred to as the Hub hereafter AP Network Manage your current sites and networks through Nuclias Connect System Settings Manage system wide configurations and operations Camera Surveillance Monitor and manage network cameras centrally and maintain recordings on the Hub ...

Page 17: ... Ethernet port Managed AP s The number of managed APs through the AP Network module of the Hub Online Total Managed Managed Camera s The number of managed network camera s through the Camera Surveillance module of the Hub Online Total Managed You can also obtain basic device information of the Hub Device Name The descriptive name of the Hub Model Number The model number of the Hub IPv4 The IP addr...

Page 18: ...twork Connection Status with Nuclias Connect Server Shows whether the Hub is connected to the Nuclias server in the cloud System Settings FW Version The firmware version of the System Settings module Camera Surveillance Version The firmware version of the Camera Surveillance module AP Network Version The firmware version of the AP Network module DDPv5 Client Version The DDPv5 D Link Discovery Prot...

Page 19: ...lows you to add the logo of the DNH 200 and configure the connection settings for serial communication Navigate to Settings General to configure settings for these functions In the Customized Settings configure the device name and logo Device Name Click the text field to modify the name of the Hub Logo Drag and Drop Logo File in the box or browse to locate the logo file Note that the logo file mus...

Page 20: ...save the values and update the screen Date and Time Setting the time is essential for proper maintenance and troubleshooting of a network device by checking system logs and alerts Navigate to Settings Date and Time to configure these settings You can configure the time zone adjust for daylight saving time and configure the Network Time Protocol NTP server to synchronize the date and time with a ti...

Page 21: ...plays device connection parameters and enables you to configure or modify network related parameters These parameters are essential for the management computer to connect to the Hub Navigate to Settings Network Settings In the Connection Settings section the following parameters can be configured Web Access Port Enter the port number for communicating with the Hub s web interface The default is 44...

Page 22: ... is the address of a router interface connected to the Hub that forwards packets out to another subnet or network Primary DNS Enter the IP address of a DNS server Secondary DNS Enter the IP address of a DNS server as a backup if the primary DNS server fails IPv6 Settings Provision Select Static IPv6 Address IPv6 Auto Configuration or Local Connectivity Only DHCP automates the assignment of IP addr...

Page 23: ...ngs page lets you configure outgoing email service using the simple mail transfer protocol SMTP It is a standard for sending emails on behalf of the system such as validation emails for password reset Setting an SMTP server is also necessary for email notification of events to work Navigate to Settings Mail Server Settings Set an SMTP server and a sender s email account for password reset SMTP Hos...

Page 24: ...Email Enter the recipient s email address to initiate a test email through the SMTP configuration Click Test to send a test mail to the specified account Please check your inbox to verify if the test mail has been sent successfully Once the outgoing email has been configured properly email messages can then be distributed to pre configured recipients on a per alert basis using Event Notification R...

Page 25: ...ues and update the screen Or choose From a Local storage and perform the manual update Firmware File Click Browse to locate the firmware file The firmware is a bin file type Update Click this button to start the update process immediately Note The firmware update will update the firmware for all 3 modules of the Hub During a firmware update do not power off or reset the device or interrupt the pro...

Page 26: ...ess and the port number for accessing web interface will be preserved after factory reset In the HDD Operation section the following can be performed HDD Status Indicates HDD operation status such as normal or Empty Format Please format the HDD to ext3 filesystem to be recognized by the system Please be aware that you will lose all information on the HDD once you proceed with the operation Unmount...

Page 27: ...lready have a Nuclias account you can click Create Account where a browser window will open to a link where you can create one To register a Nuclias account follow these steps 1 Selecting server region and country The account is created on the servers within the selected region and the selected country Your account data will be stored in the regional server based on your selected region and countr...

Page 28: ...the user organization and site page Enter the required information and agree to the Terms of Use and Privacy agreement Click Create account to continue 3 Finish the registration Click Close to complete the process The registered account is now available for use The verification information will be delivered to the registered email of the account ...

Page 29: ... you with an easy way to access and check the status of all your Hub s Requirements for use include A Nuclias account DNH 200 device s with Single Sign On enabled The portal can be found at https connect nuclias com After logging in to the portal you can view the following information Number Order on the list Status Displays whether the Nuclias Connect portal can link to the Hub Name Name of the H...

Page 30: ... Log Backup configure the following Enable Auto Backup Check this option to enable automatic backup Auto Backup Interval Specify the frequency of automatic backup The valid range is 1 to 365 days Auto Log Backup File Management Select the directory to store backup files My Computer or DNH 200 USB storage Please ensure that a USB disk is installed on the device You can also specify to Download Dele...

Page 31: ...ings and restore the system to an earlier state with previously stored configuration In the Configuration Backup section click Back Up Now to back up the current system configuration The file will be saved in your browser s download directory and named as date_configuration tar In the Configuration Restore section device configuration can be restored from a local hard drive or USB storage Specify ...

Page 32: ...Syslog Server Settings section enter the IP address or domain name of an external syslog server In the Syslog Content Settings section select the log type to be backed up from the 3 major modules of the Hub Function Group Log Type System Settings System Log Audit Log Alerts Camera Surveillance Camera Surveillance Log Camera Log Audit Log Alerts Event Log AP Network Device Syslog System Event Log D...

Page 33: ...on Event Frequency Choose one of the following Never Always or Schedule Never no email notifications will be sent for this type of event Always designated users will receive email notifications whenever the event happens Schedule send notifications according to the defined schedule Contacts For Always and Schedule select users to receive email notifications whenever the event happens by keeping th...

Page 34: ...sers List is obtained from the users list in User Management of System Settings For email notifications the emails are obtained from the entered email addresses of the User s List Please refer to User Management for more information To configure alert notifications click the Alerts tab and follow the same steps for setting email notifications above To view system alerts go to Log Alerts ...

Page 35: ... administrator account cannot be deleted or have its username or privilege settings changed Once you have finished editing user settings click Save to confirm or Cancel to return to the previous menu Notes 1 The System Admin account cannot be deleted or have its username and privilege settings modified 2 The time limit for idle web sessions is 15 minutes You will be logged out when the limit has b...

Page 36: ...en without saving A user can be authorized to a selected AP Network or granted the permission to access selected channels in Camera Surveillance User Permission AP Network To grant an existing user the right to a network click an available site and the target network and select users and move them to the Unauthorized Users list or keep them in the original Authorized Users list Then click Save to ...

Page 37: ...Nuclias Connect Hub Plus User Manual System Settings 37 ...

Page 38: ... Log The System Log page allows administrators to view alert messages for events concerning system operation Log messages for the system can be viewed here Navigate to Log System Log to view the relevant information To generate a System Log report select the time period select the system event type enter a keyword to filter the log messages then click to display the search results Once a report ha...

Page 39: ...perations that performed on the object entities and object entity i e the objects associated with the functional tabs in the left pane and select username Then click to display the search results Once a report has been generated click to export it as a CSV file The file will be saved in your browser s download directory and will be named as follows System_Settings_Log Type_YYYY_MMDD_HHMMSS Note Th...

Page 40: ...s based on event frequency and authorized users Refer to Settings Event Settings for more information To generate an Alert report select the time period select the event type and enter a keyword to filter the log messages Then click to display the search results Once a report has been generated click to export it as a CSV file The file will be saved in your browser s download directory and will be...

Page 41: ...ers can be configured These settings allow the management computer to connect to the device Device Access Address Enter the Nuclias Connect Server application s IP address To manage remote APs the IP address must be a public IP address You may need to set port forwarding or IP address mapping between WAN and LAN for instances behind a firewall or router Device Access Port Enter the Nuclias Connect...

Page 42: ... to return to the previous screen 4 On the Network Configurations page enter the wireless and device settings to set up the wireless network such as the SSID and the device information Country Select your country Time Zone Select the time zone for your device Username Password Enter the administrative username password that is used to access the web management interface for all access points on th...

Page 43: ...the drop down menu to define either an IP or a network prefix 6 The Discovery AP page appears Click Start Discovery to list all available unmanaged devices If a device is found select it and click Apply to import the network profile Click the Managed tab to select already defined devices and add them to this network Then click Exit to end the wizard ...

Page 44: ...ge Sites Displays the number of created profiles also called sites Networks Displays the total number of created networks Access Points Displays the total number of availableand online access points Clients Displays the total number of currently connected wireless clients Information from the Last Hour Displays log information for the number of clients traffic usage downlink uplink traffic usage a...

Page 45: ...int To generate a report for a site or all sites select a specific site or All Sites from the menu then select All Networks in the second menu To generate a report for a network or all networks select the site that the network belongs to then select a specific network or All Networks Usage Displays the total amount of data downloaded and uploaded for the specified site andnetwork Total X Access Po...

Page 46: ...fields of the report by clicking The following field names are available Status Local IP Address IPv6 Address MAC Address Model Type FW Version Name Location Network Network ID Client Channel 2 4G Channel 5G 1 Channel 5G 2 tri band Power 2 4G Power 5G 1 Power 5G 2 tri band Download Upload Traffic Usage Traffic Usage CPU Usage Memory Usage Last Seen and Uptime ...

Page 47: ... report for captive portal clients or all clients select the site that the network belongs to select a specific network that the clients belong to and then select Captive Portal Clients or All Clients In the Search By field select an attribute IP Address or MAC Address to search by that field and enter a keyword in the Search field Then click to start your search The results will be displayed belo...

Page 48: ...nts that are detected on the network This function is useful if you want to verify the wireless coverage meets your floor plan with the information of APs within the radio range and their signal strength It can also help detect unauthorized access points in your site to prevent from treats and attacks Navigate to Monitor Neighbor AP To generate a report select a property in the Search By list and ...

Page 49: ...ser Manual AP Network 49 meet the search criteria You can also customize the fields of the report by clicking The following fields are available BSSID Detected By Status SSID Security RSSI dBm BW MHz Channel and Supported Modes ...

Page 50: ...ers should be configured Name Give a name for this map Site Select the site associated with this map Network Select a network that belongs to the site Upload Image Place your image in the area to upload it to the system To position an AP click Select AP and drag and drop the selected access point on the map Then click Save to save your changes and update the screen You can create multiple maps for...

Page 51: ...igate to Configuration Create Profile To create a new site network click Add Network From the Site menu select an existing site or select newSite and enter the name of the site in the text field In the Network Name field enter a name for the new network In the Network ID field enter a unique key for REST API data communication credential Click Next to continue ...

Page 52: ...ut the device Click Next to continue The Discover Network Settings page appears Select the data link layer layer 2 or layer 3 for the capability of network devices for searching manageable access points If Layer 3 is selected click the drop down menu to define either an IP or a subnet prefix Click to add additional IP prefix or Next to continue Click Exit to discontinue the configuration process ...

Page 53: ...the network profile Click the Managed tab to select already defined devices and add them to the list The list should display all sites and networks that have been defined with the following information Site Name The site name of a network Network Name The network name Network ID A unique key for Restful API access Total Devices The total number of access points in this network that belongs to a si...

Page 54: ...rch for devices communicated based on L2 protocol layer or specific IP addresses Prefix subnet Once the criteria are defined click Next Click Start Discovery to find the results Configurable and Managed devices of the search Edit Network Opens the Edit Network page From this page you can edit the network settings or migrate the network to a new or selected site Delete Network Delete the selected n...

Page 55: ...d the settings immediately or at a configured time If Select Time is selected set the date and time to upload the configuration Then click Apply to save your settings In the Run Status section the status of the uploads will be listed Once an update is complete the results will be displayed in the Results area SSID The SSID page displays the properties of a wireless network Navigate to Configuratio...

Page 56: ...802 11 k v r Enable or disable fast roaming This function is only available for compatible models and specific software versions Encryption Enable or disable WEP Open System encryption The function is only available when Security is set as Open System Key Size for Open System Select the WEP key size 64 or 128 bits Key Type for Open System Select the WEP key type ASCII or HEX Key Value Enter the op...

Page 57: ...e maximum number of entries allowed is 512 Upload MAC Address List Click Browser to select the MAC address file located on the local computer that will be uploaded Click Upload to update the MAC address list Click Download to download the current MAC addresslist The MAC address list has to be a line break delimited txt file IP Filter Settings Enable or disable IP Filtering The maximum number of en...

Page 58: ...terface Go to Configuration Profile Settings VLAN Add Edit IP Interface to set IP interfaces Username Enter the username The function is only available when Authentication Type is set as Username Password Password Enter the password and click Add Click Clear to clear the entered fields This function is only available when Authentication Type is set as Username Password Upload Username Password Fil...

Page 59: ... Displays the configured front desk user accounts that have been assigned to this network and have already generated a passcode from the web login page This option is only available when Authentication Type is Passcode External Captive Portal Select HTTP or HTTPS and enter the URL of the website This option is only available when Authentication Type is External Captive Portal The captive portal di...

Page 60: ... style for wireless network authentication Notes Click Preview to preview the selected style Click Editor to edit the selected style Click Upload Login File to upload a new style Click to delete the selected style Click to download the selected style In the Hotspot 2 0 section the following parameters can be configured Hotspot 2 0 Enable or disable hotspot 2 0 Configure the following parameters fo...

Page 61: ...c upload and download speeds are the same WAN At Capacity Specify yes if the access point or the network is at its maximum capacity and specify no if not WAN Metrics DL Speed kps Set the downlink speed of the WAN connection in kbps If the downlink speed is not known set to 0 WAN Metrics UL Speed kps Set the uplink speed of the WAN connection in kbps If the uplink speed is not known set to 0 Networ...

Page 62: ...ethods with its language and the method name then click Add You can also delete it from the list OSU Config Choose the OSU Configuration OSU Language Code Choose a language OSU Friendly Name Choose a language and specify the OSU friendly name OSU Nai Specify the OSU NetworkAccessIdentifier NAI OSU Service Description Enter a service description for the OSU OSU Icon Language Code Specify the langua...

Page 63: ...to create a new VLAN identified by a VLAN ID and assign ports to that VLAN Use the following steps to configure a VLAN 1 Specify the VLAN ID and the name The VLAN ID is a unique value assigned to a VLAN Enter a value between 1 and 4094 2 Map the listed interfaces and SSIDs for different radio bands to this VLAN with the following options Untagged Make the interface SSID untagged from the VLAN For ...

Page 64: ... IP assignment method and the IP address Add Edit IP Interface In the Add Edit IP Interface tab you can assign a VLAN ID VID with an IP interface This is useful when authenticating users for network access through a captive portal You can configure Captive Portal for each virtual wireless subnet For other configuration parameters of controlled network access go to Configuration Profile Settings SS...

Page 65: ...tation Optimize bandwidth by averaging the allocated bandwidth for each client Allocate an upper limit of bandwidth for each station Specify the maximum bandwidth for each connected client while reserving available bandwidth for other uses Allocate different bandwidth limits for 11a b g n station The weights of 802 11b g n and 802 11a n clients are 10 20 70 and 20 80 respectively The AP will distr...

Page 66: ... Optimization page displays the configurable Radio Frequency RF settings for the access points of the wireless network Navigate to Configuration Profile Settings Site Network RF Optimization to view existing settings Adjust Frequency Set the rate in hours at which the RF frequency is adjusted Auto Channel Adjustment Enable the function to automatically adjust the channel of the client to avoid RF ...

Page 67: ...ek Select Day s Specify particular day s for availability of the wireless network Time s Select the active times of the day for the schedule All Day Enable the rule for the whole day Select Time s Specifies a start and end time for availability of the wireless network Start Time If Select Time s is selected enter the hours and minutes of the day End Time If Select Time s is selected enter the hour...

Page 68: ...nter the administrative password that is used to access configuration settings for all access points on the network The password must be 8 30 characters and contain both lowercase or uppercase alphabetic characters and numbers Console Settings Enable Check the box to enable the console function Console Protocol Select the console protocol that is applied to all access points on the network Telnet ...

Page 69: ... box to enable daylight saving in your time zone DST Start 24HR Specify the start date and time for Daylight Saving Time DST DST End 24HR Specify the end date and timefor Daylight Saving Time DST DST Offset minutes Specify DST Offset time External Syslog Server Settings External Syslog Server Captive Portal Log Enter the IP address or domain name of the external syslog server Click Save to save th...

Page 70: ...a Enableor disableWi Fi Multimedia ACK Timeout 64 200 Enter the ACK timeout value The default value is 64 microseconds Short GI Enable or disable short GI IGMP Snooping Enable or disable the IGMP snooping Multicast Rate Select the multicast rate value Multicast Bandwidth Control Enable or disable bandwidth limit for multicast This setting will be automatically applied to other band frequencies Max...

Page 71: ...this function for access points having multi LAN ports Once the settings are updated the configuration must be uploaded to the access points See Profile Settings for more information WLAN Partition The WLAN Partition page displays the wireless partitioning settings that allows you to enable or disable communication among clients within the same SSID or across different SSIDs Advanced wireless sett...

Page 72: ...work Wireless Resource ACL RSSI Threshold Check the box to enable ACL Received Signal Strength Indicator RSSI threshold function and click the menu to select the ACL RSSI threshold percentage Aging Out Select criteria to disconnect wireless clients Available options are RSSI and Data Rate RSSI Threshold When RSSI is selected for Aging out select a value between 10 and 100 This parameter sets the m...

Page 73: ...nce This function sacrifices network time from the slowest devices to boost overall performance of the network Navigate to Configuration Profile Settings Site Network Wireless Resource Then click the Airtime Fairness tab to view the existing settings Note Devices identified as having slow Wi Fi speed can be slow because of long physical distance from the AP weak signal strength or legacy hardware ...

Page 74: ...and update the screen Firmware Upgrade The Firmware Upgrade function allows users to perform firmware upgrade This is a useful feature that prevents future bugs and allows for new features to be added onto your device Please go to your local D Link website to see if there is a newer firmware available Navigate to Configuration Firmware Upgrade and click Site Network and configure the following for...

Page 75: ...d status and results will be displayed in Run Status area Payment Gateway The payment gateway allows e commerce services for network access The Payment Gateway page shows payment settings and options necessary to enable payment services for network access It facilitates the PayPal service to be used for billing Navigate to Configuration Payment Gateway To configure network authentication with paym...

Page 76: ...st 7 days Navigate to Report Peak Network Activity to view the information To generate a network activity report with peak usage select the site and network from the corresponding menu and click to viewthe report Once a report has been generated click to export it as a pdf file Hourly Network Activity The Hourly Network Activity page allows administrators to obtain wireless traffic based on the ho...

Page 77: ...ick to export it as a pdf file Daily Network Activity The Daily Network Activity page allows administrators to gain information about wireless traffic each day for the past 7 days Wireless activity shows the amount of traffic every day for the past 7 days Navigate to Report Daily Network Activity to generate and view the report To display traffic usage select a site and network and specify the sta...

Page 78: ...e settings on the screen Available maps can be edited or deleted by clicking or Mouse over an AP to obtain the following information about it Device Name IP Address MAC Address Location Unique Clients and Traffic Usage To view an active map report select a date and time from the past 7 days then click to view the report If an AP on the map is active during the selected time it will be colored with...

Page 79: ...Nuclias Connect Hub Plus User Manual AP Network 79 ...

Page 80: ...og function allows administrators to view alert messages for events concerning system operations such as services and daemons running on the system Navigate to Log Device Syslog to view the relevant information To start a syslog report select the event severity and facility system subsystems define the time period and choose either IP Address or Message as the filtering criteria Then enter a keywo...

Page 81: ...report has been generated click to export it as a local CSV file The file will be saved in your browser s download directory and will be named as follows Nuclias_Connect_Log Type_YYYY_MMDD_HHMMSS Device Log The Device Log allows administrators to view alert messages concerning changes or management tasks performed on the system The log messages include a time stamp and operation type e g device se...

Page 82: ...ds user activities that can be performed on an object entity such as profile and network creation or deletion To generate an Audit Log report select the entries by Operation Type operations that performed on the object entities and Object Entity i e the objects associated with the functional tabs in the left pane define the time period and select Username or Message as the filtering criteria Then ...

Page 83: ...al events for alert e g firmware update failure port linked or blocked and device online or offline To generate an Alert report select the alert events define the time period and select IP Address or Message as the filtering criteria Then enter a keyword and click to display the search results Once a report has been generated click to export it as a local CSV file The file will be saved in your br...

Page 84: ... To move devices to Unmanaged or the other way use the Move tab in the upper right corner You can also click on an entry to launch its web management interface To delete a managed AP device you need to move it to the Unmanaged List first The list provides the following information Status Local IP Address NAT IP Address MAC Address Model Type HW Version FW Version Managed Time and Backup FW Version...

Page 85: ... the network address and port number for communication Navigate to System Settings and click the Connection tab The following can be configured for device connection Device Access Address The current IP address of Nuclias Connect Server application is displayed Click Other to modify it If this IP is changed you need to perform AP discovery gain Device Access Port Enter the port number for communic...

Page 86: ...should generate an alert Navigate to System Settings and click the Alerts tab To view generated alerts go to Log Alerts to view alerts Configure whether alerts or email notifications should be generated for the following events Site Network Events Firmware Upgraded Failed Device Has Been Removed From Network Profile Has Been Changed and Profile Failed To Be Applied Device Events Device Restarted D...

Page 87: ...nect Hub Plus User Manual AP Network 87 About The About page displays compatible access points that you can manage and monitor on the Hub Navigate to System About The list can be updated by clicking Update Online ...

Page 88: ... such as their names and IP addresses The following table describes the information in detail Camera Name The displayed camera name for identification which can be modified by clicking on it Thumbnail A snapshot of the camera feed Channel Camera channel number which can be assigned as well as modified manually Status The operating status of the network camera online offline or authentication faile...

Page 89: ... a list by a field click the field name at the top of the column To reverse the order click the field name again To add a camera to the list click The Add Camera screen appears You can select Auto Discovery to let the system find network cameras in the LAN or Manual Discovery to enter camera information manually IP address Domain name the IP address or domain name of the network camera Port the po...

Page 90: ...nging its channel 2 Please verify and reconfigure the settings in System after a camera has been assigned by a different channel The recording and event settings in System is configured based on the channel number and the designated camera will be altered once its channel has been modified 3 The Add Camera Delete Camera and Channel Location functions can only be performed by users with the Root Ad...

Page 91: ...a Name Channel IPv4 Address IPv6 Address Model Type FW Version HW Version or MAC Address and enter a keyword then click to start your search Note that you can enter only one keyword at a time You can perform more operations with the camera by clicking its Camera Name Note that only users with administrative roles can modify the settings of the following camera detail tabs i e System Admin Root Adm...

Page 92: ... Sharpness Adjusts image sharpness value range 0 100 Contrast Adjusts the difference in brightness between light and dark areas of the live video A low contrast image retains detail whereas a high contrast image loses detail value range 0 100 IR CUT Controls the operation of infrared light IR on the network camera It enhances image brightness during nighttime When in auto mode it will be turned on...

Page 93: ... pan tilt and zoom control to move the camera s lens with the desired direction Video Quality Choose different video quality low or high The streaming quality can be found by referring to the Video tab Snapshot Take a snapshot The snapshot will be saved in your browser s download directory in PNG format Browser Speaker Receive sound via the camera s microphone with the application s browser suppor...

Page 94: ... 1 to 30 Note The available values for Video Profile parameters depend on the camera s specifications e g Max Frame rate Resolution and the codecs However experiment and adjust the above settings based on your streaming quality requirements and traffic conditions The higher the streaming quality the more bandwidth will be consumed The streaming parameters of Video Profile 2 are fixed at 640x 360 1...

Page 95: ...modate irregular shapes 4 Configure Sensitivity 0 not sensitive to motion the lowest and 100 the highest The higher the sensitivity the more sensitive the camera is to movements Lower sensitivity would require larger moving objects or bigger movements covering larger regions in the defined zone to trigger an alert 5 Click Save to apply your settings After the zones have been set whenever there is ...

Page 96: ...drop the selected camera on one of the channels on the grid To fix a channel on the grid click in the upper right corner of the Action toolbar The following table describes the functions that can be performed on the selected channel on the grid PTZ Control the movement of the camera lens if the camera supports this function Video Quality Choose low or high video resolution the exact resolutions va...

Page 97: ...ng i e System Admin Root Admin and Local Admin for authorized channels only OSD On Screen Display Display selected information on the screen Refer to System Display Settings OSD Settings for more information Standard Size Switch the display in standard or actual size Full Screen Enable full screen or actual size display Show Hide E Map Display the relative E Map of the camera The E map will pop ou...

Page 98: ... Playback tab allows you to play back video recordings stored in the HDD You can browse and play back the recordings directly from the screen Timeline This function retrieves video recordings based on date and time To play a recording with the specified date and time click ...

Page 99: ... timespan or to decrease the granularity of timespan Click to refresh the current playback screen You can also drag the timeline to play a recording indicated across the timeline 4 To control the speed of the playback click and select the speed 1 slowest or 2 fastest 5 Click On screen Display to show or hide camera information 6 To take a snapshot during the playback click The snapshot will be sav...

Page 100: ...en MP4 file to play exported recordings 2 The maximum duration of a single recording file is 60 minutes 3 Only users with administrative roles can perform recording export or removal i e System Admin Root Admin and Local Admin for authorized channels only Event Recording This function retrieves video recordings triggered by motion or digital input To search a recording 1 Click to select the start ...

Page 101: ...ad directory The default video format is MP4 You can also delete the selected recordings by clicking To play a recording click and the options for playback control will be presented Refer to Playback for more information Note Only users with administrative roles can perform recording export and removal i e System Admin Root Admin and Local Admin for authorized channels only ...

Page 102: ...n E Map 1 Click The screen shows a default floor map 2 To change the default geographic scene click to upload an image of the monitoring location from your local drive 3 Click to select camera channels and drag and drop the camera icon to the right place on the map Once you are done with the E map creation click to export the list of maps as a pdf file Up to 3 E Maps can be created Click an E Map ...

Page 103: ...from the Live View To search an E Map Enter a keyword in the search field to search E maps by camera name or channel E map Alert Once an alert event happens i e motion or digital input detection the camera icon will flash to alert you immediately to take necessary actions To reset the flashing alert click Clear Event To enable the flashing alert of events please enable motion detection notificatio...

Page 104: ...Log To navigate among log types select a respective tab In each log window you can apply type specific filters to see log entries of your interest for example channel or username Camera Surveillance Log This type of log records surveillance related management and events such as video recording start and stop time and disconnection of cameras For Camera Surveillance Log you can filter the entries b...

Page 105: ... camera and camera information such as name IP address MAC address and message Audit Log This type of log records user activities such as event trigger settings video export and start and stop of manual recording The Audit Log is only available to users with the System Admin and Root Admin role For Audit Log you can filter the entries by operation type operations that performed on the object entit...

Page 106: ... activities for alert i e Motion Event Digital Input Event and Connection Lost Event For Alerts you can filter the entries by channel number event type motion digital input or connection lost and camera name or message content The number of unread alerts will be indicated in the upper right corner by ...

Page 107: ...r interest especially from a large number of log entries To filter log entries select the start and end time for the search time period and click the filtering options specific for a log type enter the keyword for the selected field then click to start your search To order the list of entries by field click the field name at the top of the list and click it again to reverse the order Export logs E...

Page 108: ...ording Enable or disable audio recording to have sound in video clips The default is disabled Enable Automatic Overwrite Enable this function to overwrite old recordings and save storage space Enter the number of days for maximum recording retention range 1 99 The default is disabled Event Settings For event recording the system can record in advance before the actual event triggers the recording ...

Page 109: ... selected select Schedule Settings to record based on one of these conditions Continuous Record Motion Record Digital Input Record 4 Click the start time and drag to the end time of the selected days of the week to specify the time period for this type of recording Note that you can define different time periods for different recording conditions for each day of the week 5 Click to delete the set ...

Page 110: ...ttings The Event Settings tab allows you to configure automatic notifications based on event type To configure an event notification 1 Select a channel for event settings in the left pane 3 subtabs representing different categories of events appear i e Connection Lost Motion Detection and Digital Input Detection 2 For Connection Lost you can configure both email notifications and system alerts To ...

Page 111: ...ltiple time periods for each day of a week 7 You can replicate the scheduled time periods among different days of the week by clicking 8 Under Contacts select users to receive email notifications whenever the event happens in the specified time periods by keeping them in the Authorized Users list 9 Click Save to apply your settings Notes 1 The Authorized Unauthorized Users List is obtained from th...

Page 112: ...viewed in Log Alerts For Motion and Digital Input Detection event types configure an additional E Map notification method with schedules and contacts Refer to the above E mail Notifications for detailed instructions on Event Frequency setting And refer to E Map for flashing alert on the E map You can replicate the settings among different event types by clicking in the upper right corner of the le...

Page 113: ...to Scan Interval Enter the interval for scanning channel Range 3 99 seconds The Auto Scan is for automatic swapping among the screens of different channels Refer to Live View for more information OSD Settings To configure On screen Display first enable it Select the information to be displayed from the following Channel Number Channel Name Date Time Bitrate and Frame Rate Then select the color of ...

Page 114: ...ing Backup This tab allows you to back up recorded videos automatically or manually You can save recording files to a USB drive or an FTP server To configure an Auto Backup 1 Select Enable Auto Backup 2 Select the time to execute Daily Backup Time 3 Select the Time Range of Backup with the Start time and End Time for running automatic backup 4 Select the Channels for backup operation ...

Page 115: ... Select the Time Range of Backup with the Start time and End Time for the recording timespan of the videos 3 Select the Channels for backup operation 4 Select Backup Type USB or FTP To upload video clips to an FTP site enter the FTP Server s IP Address or Domain Name Port number the FTP directory and folders use to specify directories Enter the Username and Password to connect with the FTP Server ...

Page 116: ...on provides information on exporting the required network profiles from the Hub for managing the connected APs Export Network Profiles To add new access points to the Hub you must first export the required network profile from the Hub The network profile contains the authentication key and the IP address of the controller Select Configuration and then click the Export icon to export the network pr...

Page 117: ... Connect App 117 When access points are located on a public network and you are accessing the Hub remotely you must ensure the Hub uses a public IP address or domain name To verify the Hub s IP address go to AP Network System Settings Connection ...

Page 118: ... Nuclias Connect app is available for both iOS and Android smart devices The following functions are available Quick Setup Quickly and easily deploy your standalone AP to the Hub Nuclias Connect Manage your current sites and networks through Nuclias Connect Standalone Access Point You can change the configuration of individual APs and save the configuration profile to be deployed to multiple APs Q...

Page 119: ...red profile exists a pop up page will appear with further instructions on how to download a profile 3 Tap Download profile to specify a connection to the Hub 4 Once connected to a Hub you will see profiles listed next to Provision File Tap Provision File to select an AP provision profile 5 Select an available provision file Tap Done to continue ...

Page 120: ...covery of APs on the L2 or L3 network respectively For L3 network enter a range of IP addresses Tap add to create a new IP range Tap remove to delete a defined range Tap Next to initiate the discovery 8 The detected access points are listed Tap the radio button next to the AP to select it The provision file that you selected will be pushed to the selected AP ...

Page 121: ...ocess The Modify IP Information page appears The entries can be modified Cancel Discard any changes and continue Done Accept any changes and continue the process Model Name Displays the model name of the listed AP MAC Displays the MAC address of the listed AP DHCP Mode Enable or disable the DHCP mode function When enabled the AP establishes dynamic IP addressing with authorized clients IP Address ...

Page 122: ... default gateway DNS Enter the IP address of the DNS Domain Name Server server 11 Tap Done or Cancel to continue the process The provision file will be pushed to the selected APs Tap Finish to complete the process The screen displays the status of the push operation For failed operation tap Push Provision File to redo the operation again ...

Page 123: ...ct is a wireless access point management tool that allows you to manage your sites and networks 1 Tap Nuclias Connect to connect to a Nuclias Connect Hub 2 If no previous Nuclias Connect Hub has been paired it will ask you to create a new Nuclias Connect pairing Tap Add to start the process ...

Page 124: ...s Enter the secure URL IP address of the Nuclias Connect Hub to pair with the app Nuclias Connect Name Enter a descriptive name to easily identify the paired Hub Username Enter the username to access the Hub Password Enter the password for the user Login Initiate the login process Tap Login to initiate the login process 4 After a successful login the pairing result will be added to the list and wi...

Page 125: ... list the currently defined sites networks access points and clients The Nuclias Connect app is now paired with the Nuclias Connect Hub With the app profiles can be downloaded to the local device then it can be pushed to supported access points Standalone Access Point Discover Access Point This function allows you to discover access points in a L2 L3 wireless network 1 Tap the L2 or L3 button to e...

Page 126: ...t the bottom of the page to add or delete any local profiles Upon completing the scan a list of detected APs will be displayed Tap the radio button next to an AP to select it The selected local provision file will be pushed to the selected APs Tap Push Provision File to continue 3 The AP login window appears The IP and MAC address are shown at the top of the window Confirm the selection and enter ...

Page 127: ...ishes dynamic IP addressing with authorized clients IP Address Enter the IP address of the AP Subnet Mask Enter the subnet mask Default Gateway Enter the IP address of the default gateway DNS Enter the IP address of the DNS server The Wireless settings menu displays the following information Parameter Description Cancel Discard any changes and continue the process DAP Displays the model name and I...

Page 128: ...ific radio band Off 2 4G 5G or 2 4G 5G Radio 2 4G Mode Select a specific 2 4G radio mode Mixed 802 11n 80211g and 802 11b Mixed 802 11g 802 11b 802 11n Only Radio 5G Mode Select a specific 5G radio mode Mixed 802 11n 80211a 802 11a Only 802 11n Mixed 802 11ac Country Code Displays the assigned country for the AP Copy Save Configuration Apply Configuration Select an alternative AP in the discovered...

Page 129: ...e referred to as the Hub With the Nuclias Protect app you can perform essential surveillance functions as well as monitor the system health of the DNH 200 remotely Notes 1 You could select Access Local to have local management Or you will need a Nuclias SSO single sign on account to use this app remotely If you do not already have an account you can click Create New Account where a browser window ...

Page 130: ...fter logging in to the Nuclias Protect app the following screen appears To add a new device use the following procedure 1 Tap to add a new Hub device 2 The automatic discovery starts to find hubs and lists available devices 3 Tap the desired device to be connected ...

Page 131: ...ias Connect Hub Plus User Manual Nuclias Protect App 131 4 Enter device authentication information to add the device 5 If the device has been successfully added the following Setup Successful screen will be ...

Page 132: ...Nuclias Connect Hub Plus User Manual Nuclias Protect App 132 displayed Tap Done to go to the device list ...

Page 133: ...DNH 200 device icon to go to the camera list For advanced management options click Then select one of the following options Camera Management Hub Dashboard and Hub Settings Camera Management Tap this option to see a list of connected cameras Tap to add cameras to the list or sort the list ...

Page 134: ... The model number of the network camera Channel The channel number assigned to the network camera Camera Status The operating status of the camera online offline or authentication failed IPv4 The IP address of the network camera in IPv4 addressing scheme IPv6 The IP address of the network camera in IPv6 addressing scheme MAC Address The MAC address of the network camera FW Version The firmware ver...

Page 135: ...system health information such as CPU loading and temperature It allows you to monitor system operation and proactively prevent failures You can update the information instantly by tapping the refresh icon in the upper right corner Tap each icon for the respective type of information as described in the following table ...

Page 136: ...ows whether the Hub is connected or disconnected Nuclias Connect Server Shows whether the Hub is connected with a Nuclias Connect Server IPv4 The IP address of the Hub in IPv4 addressing scheme IPv6 The IP address of the Hub in IPv6 addressing scheme MAC Address The MAC address of the Hub Uptime The amount of time that the Hub has been up and running HDD Model The model name of the HDD Firmware Ve...

Page 137: ... configure NTP Connection Configure the IP assignment and web access port of the Hub The IP assignment can be either DHCP or static IP address The default is 443 for secure HTTP Mail Server Settings Set an SMTP server including the server address and port number as well as security mechanism and encoding type for communication and the sender s email account in order to reset your password in the e...

Page 138: ...n the screen in OSD settings Note the configuration will overwrite the OSD settings on the Hub Refer to Camera Surveillance System Display Settings OSD Settings Remove Device Tap this button to remove the Hub from the device list From the Home screen tap the Hub and a list of channels with live videos from connected cameras appears You can perform the following functions on all channels Manual Rec...

Page 139: ... audio with the camera s microphone support Manual Recording Start recording or stop recording the live video Standard Actual Size Display the live view in standard or actual size Show Hide OSD Show or hide the on screen display of camera information Snapshot Take a snapshot of the live view image and store in your mobile device Zoom in out Zoom in or out with the camera s PTZ support You can also...

Page 140: ...e Home screen The main menu allows you to manage the devices or obtain more information on the app Add Device Add a device to the list Note that only users with the Root Admin or System Admin role can access the camera list on the device The app will scan for available devices in the network Sort Device Drag the device and place it in the desired order of the list Security Enable fingerprint to ac...

Page 141: ...ession WebSocket 1 Make sure that your Safari version is 14 0 and above Go to Safari About Safari 2 Open the Safari browser Choose Safari Preferences click Advanced then select Show Develop menu in menu bar 3 Choose Safari Develop in the menu bar then select Experimental Features and click NSURLSession WebSocket to enable it What is the storage requirement for DNH 200 The DNH 200 supports the inst...

Reviews: