background image

30

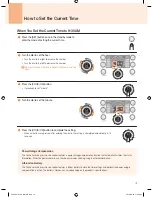
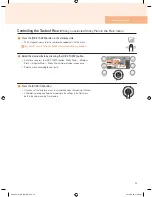
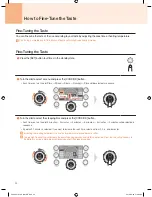
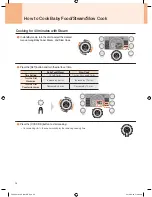
When setting economy warm 

(set economy warm at 7:30 a.m.)

Check to see if the clock setting is correct.

If you press the [PRESET] button for more than 1 second while warming, the system enters the 
Economy Warm mode.


In standby mode, press the [WARM/REHEAT] button and then the [PRESET] button for more than one second 
to enter the Economy Warm mode.

Turn the dial to set Economy Warm time.


Turn the dial clockwise: Increased 10 minutes


Turn the dial counterclockwise: Reduced 10 minutes

 When setting the time, check a.m. and p.m.

Blinking

Blinking

Press the [COOK/OK] button or the [WARM/REHEAT] button. If you do not press any button within 
15 seconds, the Economy Warm mode starts automatically.


If you have made a mistake in setting the completion time, press the [CANCEL] button and start over.

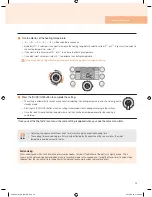
The mechanism of Economy Warm is that once you set the next time to eat, the system keeps the rice at low 

temperature and heats the rice before the set time. By doing this, discoloration and drying of the rice can be 

prevented and the taste of rice becomes better, and electricity is saved.


When the Economy Warm is completed or the [CANCEL] button is pressed, the Economy Warm setting is canceled.


If you want to eat while the Economy Warm is set, press [CANCEL] button to cancel Economy Warm and reheat the rice.


The temperature of the rice is kept low in the middle of Economy Warm and you may notice condensation of water on the lid.


If possible, use Economy Warm for servings of 6 or less.


The Economy Warm can be set up to 8 hours. (When you set the time in excess of 8 hours, the cooker automatically resets the 
time to 8 hours and starts Economy Warm.) 


When Economy Warm is completed, it switches to General Warm.

How to Keep the Rice Warm

FD06 SeZH+KR.indb   30

2018-06-25   �� 9:35:40

Summary of Contents for FD06 Series

Page 1: ...age as the shape of the product may be changed for improved performance Looks Good Easy Smart Prior to using your Cuchen Electric Pressure Rice Cooker please read this manual for proper use of the product Please keep this manual in an easily accessible location at all times FD06 Series_US ZH KR indb 1 2018 06 25 9 31 08 ...

Page 2: ...x 270 x 280 mm Weight 5 9 kg 6 9 kg when including packaging These specifications are subject to minor changes for product performance improvement purposes 2 Do not place a stainless steel plate planch cushion electric blanket steel plate tinfoil or platter made of steel or aluminum under this product It may cause fire or product malfunction Do not place the cooker on other appliances such as kimc...

Page 3: ... Control Taste 22 How to Fine Tune the Taste 24 How to Use the Preset Timer 26 Hot to Cook Baby Food Steam Slow 28 Keeping Warm and Reheating 29 How to Keep the Rice Warm 30 Adjusting Warming Temperature and Heating Intensity 31 How to Set Language and Volume Level 32 Auto Clean 33 Notification of when to replace packing 34 Food Recipes 35 Read this before contacting the service center 38 FD06 Ser...

Page 4: ... The use of accessory attachments not recommended by the appliance manufacturer may cause injuries Do not use outdoors this item may be omitted if the product is specifically intended for outdoor use Do not let cord hang over edge of table or counter or touch hot surfaces Do not place on or near a hot gas or electric burner or in a heated oven Extreme caution must be used when moving an appliance ...

Page 5: ...ime Do not excessively bend or extend the power cord Do not tie the power cord into a knot Do not plug the product into an outlet that is connected to multiple other products Use a dedicated outlet Do not place the product on a rice bin or on a multi purpose rack It may cause short circuit resulting in shock or fire There is a risk of overheating ignition electric shock or fire The power cord may ...

Page 6: ...teel plate or tinfoil under the product There is a risk of fire or deformation Do not clog the product s inlets or other openings with debris If clogged unplug the power cord and contact the service center There is a risk of electric shock fire or bodily injury Installation Danger Do not use the product near heat sources such as direct sunlight gas range lighter electric heating appliance or cooki...

Page 7: ...g press the CANCEL button for about 1 second then open it after the internal pressure has been completely removed Discoloration or deformation of the inner pot may cause the product to malfunction Do not use ingredients such as mixed grain to an amount that exceeds the appropriate proportion provided in the cooking instructions It can be a cause of bodily injuries or product malfunctions Caution C...

Page 8: ... the rice may smell bad when keeping the rice warm Consult your doctor before using this product if you are using an artificial heart pacemaker or other electrical medical assistive devices The operation of the product may affect the operations of these devices Do not use the product outdoors It may cause electric shock or fire Keep or remove PE bag packaging out of the reach of children Acts like...

Page 9: ...r Pressure Packing Forms a tight seal to prevent steam from escaping The pressure packing should be replaced at least once a year A pressure packing is a consumable product and replacement pressure packings are available for purchase in the service center or a large retail store Safety Sensor Monitors the internal temperature Clean Stainless Steel Steam Cap Inner Pot Has a special coating layer th...

Page 10: ...he 33 page 4 RICE TASTE Used to control the savoriness of the cooked rice in the Plain mode For more information on the function refer to the 22 page 5 SET Used to set the current time language voice warming temperature and heating amount and enter Fine Tune the Taste mode Caution Do not clean the Control Display panel with liquid containing volatile ingredients e g alcohol and acetone Otherwise i...

Page 11: ...nt 9 Notification of when to replace packing Displayed when packing replacement is needed Power Saving Mode This mode minimizes the power consumption in the standby state If there is no input for 1 minute in the standby state the Power Saving mode is activated automatically When the Power Saving mode is activated the lamp turns on green The Power Saving mode is not activated during cooking preset ...

Page 12: ... the lid or the inner pot This however does not pose any health risks While cooking a small amount of steam may be discharged from a side of the lid due to vaporization inside the cooker 1 If you hold the clean cover knob and pull in the direction of the arrow the cover easily detaches from the lid 2 When cleaning the clean cover hold the wings of the handle on its rear side and slightly pull to d...

Page 13: ... the clean cover knob align it on the center holder of the pressure lid in the direction of the arrow and apply pressure to fix it in place The text should appear properly and the handle of the clean cover should be shown on the front The letter FRONT of the packing should appear in the center of the clean cover The text is shown inverted Front of the Clean Cover Rear of the Clean Cover Text shown...

Page 14: ...ter and replace the old one The replacement cycle of a packing is 1 year Replace it once a year Packing is made of silicone 1 Pull out the pressure packing by hand as shown in the figure 2 Insert the pressure packing and the pressure lid by aligning them by their marks as shown in the figure 1 External fixing bump 2 Internal fixing bump Pressure packing insertion order 1 2 3 Now the four marks for...

Page 15: ...erted Properly Assembled Improperly Assembled Caution The above instructions should be followed after cleaning the packing to prevent steam leakage In case of improper insertion rice may be undercooked or burns can be caused due to steam leakage Check for its proper insertion before use The packing has a circular shape Before Getting Started FD06 Series_US ZH KR indb 15 2018 06 25 9 34 30 ...

Page 16: ... Be sure to remove matters on the bottom of the main body after taking out the inner pot If foreign substances are present at the auto temperature sensor or the hot plate the sensor may be unable to detect temperature preventing proper rice cooking or causing malfunction or fire Wipe it out with a dry kitchen towel being careful not to damage the auto temperature sensor Do not touch or clean the i...

Page 17: ... the steam cap on the cooker seat the steam cap on the lid and press the area indicated by the arrow until it is securely seated in place Pressure Cap Pressure Regulator Nozzle If water has collected here wipe it with a dry kitchen towel Steam Cap If the pressure regulator nozzle s packing is out of place as shown in the figure steam may leak Make sure that the packing is properly seated in place ...

Page 18: ... may take on the smell of the previously cooked food Make sure that the clean cover is securely engaged To wipe off grains of rice or other foreign substances use a dry kitchen towel Especially clean the steam vent frequently Getting rid of the smell when cooking using old rice Older rice tends to develop unpleasant smell when cooked which only gets worse when kept warm To solve the problem take o...

Page 19: ...ifications When You Set the Current Time to 9 30 AM 1 Press the SET button once in the standby mode to enter the mode of setting the current time 2 Turn the dial to set the hour Turn the dial to the right to increase the number Turn the dial to the left to decrease the number Be sure to check if the time is AM or PM when you set the hour Blinking 3 Press the COOK OK button It proceeds to set minut...

Page 20: ...make sure that the pressure cap is level Pressing the COOK OK button when the Lid Lock is not in the Lock position will not start cooking 3 Turn the dial to select the language Each time you turn the dial Plain Plain Quick Mixed Mixed Quick Brown Rice Slow Cook Steam Nurungji Baby Food Porridge Plain will be selected in sequence Blinking Blinking 4 Press the COOK OK button Once cooking starts the ...

Page 21: ...tes Cooking in the MIXED QUICK mode is recommended for servings of 4 or less Also note that rice cooked in the MIXED QUICK mode may not taste as good as rice cooked in normal mode Cooking rice mixed with thoroughly steepened black or red beans in the MIXED mode can produce a mushy result Using the Mixed Quick option can make less mushy rice The actual cooking time may vary depending on the ratio o...

Page 22: ...ked rice 3 Perfectly cooked Produces perfectly cooked rice which is Ideal for making rice rolls kimbap and sushi 2 A right balance between sticky rice and perfectly cooked rice Maintains a balance between sticky rice and perfectly cooked rice 1 Sticky rice Produces sticky and plump rice Caution The rice cooker may release steam while operating in this mode This is the result of the cooker regulati...

Page 23: ...ssing the RICE TASTE button Each time you press the RICE TASTE button Sticky Plain Medium Plain Regular Plain Sticky Plain will be selected in sequence Select a menu according to your taste Blinking Blinking Blinking 3 Press the COOK OK button Once you set the taste for a menu it is memorized when the cooking is finished Afterwards cooking is performed according to the settings in the Plain menu b...

Page 24: ...linking 3 Turn the dial to select the steeping time and press the COOK OK button Each time you turn the dial 0 minutes 2 minutes 4 minutes 6 minutes 8 minutes 0 minutes will be selected in sequence By default 0 minutes is selected If you want to increase the soak time select one from 2 4 6 and 8 minutes Increasing the soaking time allows the rice to absorb more water and become softer Using a high...

Page 25: ...ess the COOK OK button to complete the setting The setting is automatically saved 15 seconds after selecting the heating temperature and the system goes to standby mode Pressing the COOK OK button when the setting is completed starts cooking according to the settings Once the soak time and heating temperature are set they will be remembered even after the cooking is completed Once you set the fine...

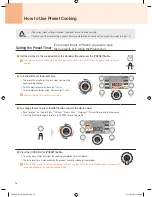
Page 26: ...kwise Decrease by 10 mins When setting the time check a m and p m Blinking Blinking 3 To change the menu press the SET button and turn the dial to select Each time you turn the dial Plain Mixed Brown Rice Nurungji Plain will be selected in sequence Press the SET button again to return to PRESET time setting mode Blinking 4 Press the COOK OK or PRESET button Once the preset timer is started the coo...

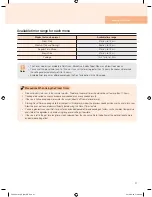
Page 27: ...ummer months Therefore the preset timer should not be set to more than 10 hours Cooking old or dried up rice can produce overcooked or unevenly cooked results If the rice is half cooked add more water than usual about half the water level more Starting Preset Timer cooking while the inner pot is still hot or warm from the previous cooking will cause the rice to turn sour Allow the inner pot to coo...

Page 28: ...3 Press the COOK OK button to start cooking Once cooking starts the cooker will display the remaining cooking time Baby Food Steam Slow Cook Time Setting 15 to 90 mins 1 hr to 12 hrs and 50 mins Turn the Dial Clockwise Increase by 5 mins Increase by 10 mins Turn the Dial Counterclockwise Decrease by 5 mins Decrease by 10 mins How to Cook Baby Food Steam Slow Cook FD06 Series_US ZH KR indb 28 2018 ...

Page 29: ... etc should be served immediately after cooking Reheating may cause the rice to discolor and or develop a smell Frequent reheating can cause the rice to discolor and or dry out Reheating starts only when the Lid Lock is placed at the Lock position When it is at the Open O position a warning sound is issued and the cooker remains in the Warm mode Keeping the Rice Warm Reheating Once cooking is fini...

Page 30: ...ver The mechanism of Economy Warm is that once you set the next time to eat the system keeps the rice at low temperature and heats the rice before the set time By doing this discoloration and drying of the rice can be prevented and the taste of rice becomes better and electricity is saved When the Economy Warm is completed or the CANCEL button is pressed the Economy Warm setting is canceled If you...

Page 31: ...no buttons are pressed in 15 seconds 4 Turn the dial to select the heating intensity 2 1 0 1 2 3 4 2 will be selected in sequence The default heating intensity is 0 When a lot of condensation occurs on the lid set the heating intensity between 1 and 4 When the rice spreads too much around the inner pot edge or smells sour set the heating intensity between 2 and 1 5 Press the WARM REHEAT or COOK OK...

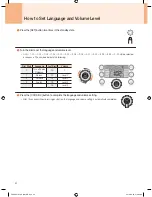
Page 32: ...ndicate the following 3 Press the COOK OK button to complete the language and volume setting After 15 seconds without pressing any button the language and volume setting is automatically completed First Digit Language Last Digit Volume 0 Turn off Voice Guidance 00 0 1 Korean 01 Level 1 2 Chinese 02 Level 2 3 English 03 Level 3 04 Level 4 How to Set Language and Volume Level FD06 Series_US ZH KR in...

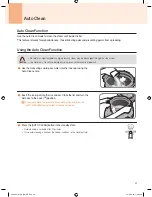
Page 33: ... position If you do not place the lid handle in the Lock position and press the AUTO CLEAN button auto clean will not be carried out 3 Press the AUTO CLEAN button in the standby state Auto cleaning is carried out for 20 minutes Once auto cleaning is finished the cooker switches to the standby state Using the Auto Clean Function Caution Be careful as high temperature high pressure steam may be disc...

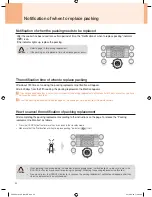
Page 34: ...fication as follows Press the CANCEL button for more than 5 seconds in the standby mode Make sure that the Notification of when to replace packing indicator is off After the cooker has been used for a certain period of time the Notification of when to replace packing indicator is on If the indicator lights up replace the packing Caution Refer to page 14 for packing replacement If the packing is no...

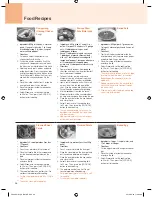
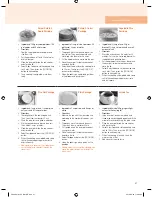
Page 35: ...ous millet and proso millet and put them separately on a strainer 2 Boil washed red beans and drain off the water used Put a sufficient amount of cold water in the pot again and boil the red beans until the kernels of red beans are about to burst off 3 Put together the sticky rice and mixed grains in the inner pot mix with the water used to boil the red beans and add some salt Fill the pot with wa...

Page 36: ...ents are cooked in their own juices and the marinade Adding more water may cause it to spew out during steam discharge Ingredients 600g of pork 1 green onion 1 ginger 5 cloves of garlic and 3 cups of water Directions 1 Trim fat off the pork and place inside the inner pot along with the green onion ginger and garlic Add 3 cups of water 2 Place the inner pot inside the rice cooker and close the lid ...

Page 37: ...ine Nut Porridge Plain Porridge Jujube Tea Ingredients 1 cup of rice cup of pine nuts salt and 6 cups of water Directions 1 Thoroughly wash the rice and pine nuts Then soak them in water for 30 min 2 Wash the pine nuts and grind in a blender 3 Mix the soaked rice and ground pine nuts Then add 6 cups of water 4 Place the inner pot inside the rice cooker and close the lid 5 Select Porridge and press...

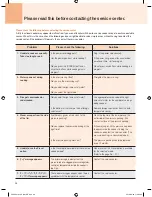
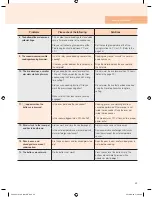
Page 38: ... the right amount of water for the number of servings being cooked Is the bottom of the inner pot free of foreign substances Remove foreign substances from the auto temperature sensor 4 Steam escapes from the side of the lid Are there any grains of rice stuck to the pressure packing Clean the top rim of the inner pot and the outer side of the pressure packing the contact surface of the pressure pa...

Page 39: ...g often Do not warm the rice that has been cooked using the Preset option with a long time setting Make sure that the clean cover is securely engaged 11 appears when the buttons are pressed Is the inner pot inside the rice cooker Cooking preset and warming functions cannot be performed if the inner pot is not inside the rice cooker Place the inner pot inside the rice cooker Is the cooker plugged i...

Page 40: ...40 MEMO FD06 Series_US ZH KR indb 40 2018 06 25 9 35 49 ...

Page 41: ...41 Memo FD06 Series_US ZH KR indb 41 2018 06 25 9 35 49 ...

Page 42: ...42 MEMO FD06 Series_US ZH KR indb 42 2018 06 25 9 35 49 ...

Page 43: ...43 Memo FD06 Series_US ZH KR indb 43 2018 06 25 9 35 49 ...

Page 44: ...FD06 Series_US ZH KR indb 44 2018 06 25 9 35 50 ...

Page 45: ...CUCHEN压力电饭煲使用说明书 E F061 GF NS4 V1 本产品图片可能与改进的实际产品存在差异 美观 便利 智能 请务必详细阅读本使用说明书 正确使用CUCHEN压力电饭煲 阅读后 请将其保管在用户随手可及处 FD06 Series_US ZH KR indb 45 2018 06 25 9 35 52 ...

Page 46: ...饭容量 1 08 L 6人份 调节装置压力 安全装置压力 81 06 kPa 166 7 kPa 产品体积 长 宽 高 380 x 270 x 280 mm 重量 5 9 kg 带包装总重量6 9 kg 为了改善产品的性能 产品规格有可能有所变动 46 请勿在产品下面放置不锈钢 板 垫板 坐垫 电热毯 铁板 锡箔纸 铁质和铝质 托盘等 可能导致火灾或产品故障 请勿将产品置于家用电器泡 菜冰箱 洗碗机 微波炉 冰箱 冰柜等上面 有火灾或变形的危险 托盘 铁板 锡箔纸 请勿将本品用于烹饪指定菜单以外的食物 豆类 红豆 番茄 粉状食品等 蒸气排放口可能堵塞 造成爆炸或燃烧的危险 FD06 Series_US ZH KR indb 46 2018 06 25 9 35 56 ...

Page 47: ...及功能 52 产品清洁方法 60 如何煮出美味的饭 61 如何调整当前时间 62 煮饭方法 63 调节饭味方法 65 细微调节饭味方法 67 预约煮饭方法 69 辅食 营养蒸 慢炖煮饭方法 71 保温及再加热 72 保温过程中 73 调节保温温度及加热量 74 语言及音量设置方法 75 自动清洗方法 76 密封圈更换时间提示 77 烹饪指南 78 申请故障前的确认事项 81 FD06 Series_US ZH KR indb 47 2018 06 25 9 35 56 ...

Page 48: ...源插头上沾有异物时 请用干布擦拭去 除 有触电 火灾的 危险 可能导致触电 漏电和 火灾 插头上若沾有灰尘或异 物导致接触不完整时 有可能引发火灾 请 随时确认电源插头的状 态 请勿过度弯曲 捆绑或拉拽电源线 请勿在一个插座上同时插入几个电子产 品 请使用专用插座 请勿将本产品放置在米桶或多功能搁板 上 冲击可能导致触电和火灾 有发热 点火 触电 火灾的危险 电源线压在缝隙中 可 能导致触电和火灾 蒸 汽排出时 多功能米桶 和多功能搁板可能造成 机身损伤或诱发触电 火灾 使用时请注意不要让宠物咬坏电源线和插 头 或受到钉子等锋利金属物体的冲击 电源线或电源插头破损时 请停止使用 并联系 A S 服务中心 在产品使用过程中 因不注意而导致电源线的外皮脱落或被划破时 可能导致火灾及触 电 请随时确认电源线和电源插头的状态 勿在电源线上放置重物 勿让电源线被产品 压住 电源线或者电源插头破损时 ...

Page 49: ...放置在 微波炉 泡菜冰箱等电器 或洗碗池上 请勿将 垫板 坐垫 电热毯 铁板 锡箔纸等垫在本产品下面使用 有火灾和变形的危险 请勿在产品的吸入口或夹缝间放入异物 有异物进入时 请拔下插头并联系服务中 心 有触电 火灾和受伤的危险 关于安装 危险 请勿将本产品放在有光线直射的地方或燃气灶 打火机 电热器 具 炉子等靠近热源的地方使用 请不要将产品安装在洗手池 浴室等容易进水之处 有漏电 触电 变色 变形的危险 请勿将电源线放在靠近热源的地方 因热 源造成电源线损伤时 有可能发生触电或 火灾危险 使用时 请与音响 电视等家电保持2米 以上的距离 有漏电 触电 火灾的危险 产品进水时 请停止使用 拔出电源插 头后 联系 A S 服务中心 请不要在产品附近使用或保管 可燃性气体和易燃物 有火灾危险 请不要将产品安装在灰尘多 或有化学物质之处 可能导致触电 火灾 产品性 能下降 注意 请不要将产品安...

Page 50: ...成产品出现异常 有烫伤和受伤的危险 煮饭或烹饪进行过程中 压力会使锅盖无 法打开 强制打开时 可能因压力造成爆炸或烫伤 的危险 煮饭或烹饪结束后 请在蒸汽完全排出 后 转动锅盖手柄 若必须打开锅盖 请长按 取消 键1秒左 右 待内部压力完全排出后再打开 除提供的烹饪方法外 请勿使用适量比率 以上的杂粮等煮饭 这可能会造成人身伤害和故障 注意 内锅镀膜脱落时 请联系客户 服务中心 如果长时间使用产品 内锅镀 膜可能会脱落 如果使用粗糙 的洗碗刷 金属洗碗刷清洗内 锅 镀膜会受到冲击 可能会 出现脱落 请使用厨房专用中 性洗涤剂和海绵进行清洗 请勿放入最大容量以上使用 可能会出现煮饭失败或饭水溢 出等故障 请勿在锅盖上放置磁性物体或 将本品置于磁性较强的物体附 近 可能导致故障 煮饭结束后 请务必擦净机体 上的积水 可能导致变色 异味及降低产 品性能 请擦干机身的接水槽中的积 水 煮饭或保温时...

Page 51: ... 使用本品前请咨 询医师 可能导致触电和火灾 因蟑螂和虫子导致产品故障 时 需要支付相应的维修费 用 可能出现煮饭状态不好或保温 时饭有异味 本产品工作时 可能会对心脏 起搏器和电医疗辅助装置的工 作造成影响 请不要在户外使用 可能导致触电和火灾 PE BAG 包装材料请放在儿童 碰触不到的地方进行保管和废 弃 若将其套在头上 可能导致鼻 子和嘴部堵塞 诱发窒息事 故 自动温度传感器必须保持干净 不能沾染异物 饭粒 其他食物 等 和水分 错误的温度感知 可能造成内锅异常加热 导致火灾 产品使用前 请检查是否有异物 将锅盖手柄放到锁定位置后 请勿放入内锅盖上锅盖 除塑料和木质饭勺外 请勿使 用金属材质的饭勺盛饭 请勿将刀 剪刀 夹子等尖锐 的厨房用金属工具放入内锅保 管 异物或食物沾到内锅上除不掉 时 请用水充分泡开后再去 除 锁定装置和内锅的变形 破损 等会造成蒸汽泄漏和爆炸的危 险 可能...

Page 52: ...分 有一个可操作产品所有 功能的按钮 使用说明书 计量杯 饭勺 自动蒸汽调节装置 蒸气排放口 带有自动蒸汽排放装置 可以自 动排放内锅蒸汽 压力圈 保持密封 防止内锅内部的蒸气 漏出 压力圈的使用寿命为一 年 建议定期更换使用 压力圈为消耗品 请通过A S客户服务 中心或大型超市购买进行更换 放心传感器 感应内锅内部温度 CLEAN STAINLESS 清洁用不锈钢 蒸气排放帽 内锅 特殊镀层 不易脱落 不 易粘锅 清洁盖手柄 内锅手柄 清洁盖 可拆卸清洗 打开锅盖按钮 按下按钮 打开锅盖 清洁盖压力圈 压力阀 调整内锅内部压力 锅盖结合手柄 煮饭时 手柄标示在 锁定 位置才能操作 配件 FD06 Series_US ZH KR indb 52 2018 06 25 9 38 57 ...

Page 53: ...再加热功 能 2 预约 用于预约煮饭 用于设置节能保温 3 自动清洗 用于自动清洗 关于自动清洗功能的详细说明 请参考第76页 4 饭味 在调节白米菜单的口味时 使用该按钮 关于饭味调节功能的详细说明 请参考第65页 5 设置 设置当前时间 语言 声音 保温温度 调节加热量 以及进入细微 调节饭味模式 注意 请勿使用内含挥发成分 酒精 丙酮等 物质 清洁操作部分 显示部分 可能导致变色或清除印刷物 使用前 4 5 2 6 7 3 1 8 9 FD06 Series_US ZH KR indb 53 2018 06 25 9 38 58 ...

Page 54: ...断乳食 营养蒸 慢煮菜单 和节能保温的时间 向右旋转时间增加 向左选择时间减少 用于调节细微饭味 在调节保温温度及加热热量时使用 9 密封圈更换提示 更换密封圈时会出现更换标示 省电模式功能 该功能是为了在电饭锅待机状态下 将待机电量最小化 在待机状态下 按钮无操作1分钟后 会进入省电模式 进入省电模式的话 绿色 指示灯亮起 在煮饭 预约煮饭 保温及自动洗涤状态下 不能进入省电模式 在省电模式下 操作按钮或操作连接盖子的手柄的话 省电模式便会解除 语音向导功能和语音调节功能 用语音提示产品运行状态 诸如煮饭开始 煮饭结束 排放蒸汽等 提示下一步操作方法 各部分名称及功能 FD06 Series_US ZH KR indb 54 2018 06 25 9 38 59 ...

Page 55: ...务必拔下电源插头 待产品冷却后进行清洗 请用干布擦拭机体和锅盖 请勿使用苯 辛那水等 使用过程中 米汤可能会粘附在清洁盖 锅盖和内锅内部产生淀粉膜 但并不影响清洁卫生 煮饭中 因内部水分的蒸发 锅盖侧面可能会漏出微蒸汽 1 握住清洁盖手柄 并沿箭头方向拉动即可方便地取下进行 清洗 2 清洗清洁盖时 握住清洁盖背面的手柄翼轻轻拉动取下 清洁手柄 并取下外侧的密封圈 3 请经常用厨房专用中性洗涤剂和海绵清洗 并用干布擦 干 FD06 Series_US ZH KR indb 55 2018 06 25 9 39 02 ...

Page 56: ...分 嵌入清洁盖 再 沿 号方向旋转一圈安装密封圈 密封圈正面部位 前面 的 正面 字样自下而上地显示 6 在压力锅盖上安装清洁盖时 握住清洁盖手柄 沿箭头 方向对准压力锅盖中央的支架后用力按压 文字端 正地显 示 保证文字端正的显示 可以在正面看到清洁盖手柄 并且 密封圈部分的 正面 字样位于清洁盖文字的中央 字体相反 清洁盖正面 清洁盖背面 清洁盖组装时 注意事项 必须确认清洁盖的正面和背面 请不要将螺丝和其他物品 放入清洁盖的孔内 产品清洁方法 FD06 Series_US ZH KR indb 56 2018 06 25 9 39 07 ...

Page 57: ... 按下列方法装上密封圈后进行确认 若之后仍出现漏气现象 请在代理 店或服务中心购买密封圈后进行替换 密封圈的更换周期为 1 年 请 1 年更换一次进行使用 密封圈由硅胶制成 1 如图 请用手按住并拖拽来取下压力圈 2 将压力圈的对齐标示部分和压力锅盖的对齐标示部 分如图所示对齐插入 1 外侧嵌入凸起 2 内侧嵌入凸起 压力圈插入顺序 1 2 3 4 处对齐标示部分均已插入的状态请按号码顺序进 行对齐 使用前 压力圈 4个对齐 标示部分 压力锅盖 4个对 齐标示部分 FD06 Series_US ZH KR indb 57 2018 06 25 9 39 09 ...

Page 58: ...58 4 按照图中箭头方向按揉压力圈的按压部 A B顺序 以完 成插入 A B 5 正常完成附着的状态 组装正确时 组装错误时 注意 清洗密封圈后 必须遵守以上内容才可以防止蒸汽泄漏 产品清洁方法 若未正常附着 使用中的蒸 汽泄漏会使米饭夹生或造成 烫伤 使用前请检查是否正 常附着 压力圈保持圆形状态 FD06 Series_US ZH KR indb 58 2018 06 25 9 39 11 ...

Page 59: ...用温水沾湿 拧干后擦拭异物 清洁压力圈 能有效保持产品性能 并抑制异味的产生 尽量不分离压力圈 用干净的软布擦拭即可 3 锅体内部 请取出内锅 并将底部沾有的异物清除后 再使 用 自动温度传感器或炉盘上有异物时 无法感应 温度 从而导致米饭夹生 异常操作和火灾 请使 用拧干的软布来擦拭自动温度传感器 避免损伤 请不要在煮饭或保温刚结束后触摸 清洁 有 烫伤的危险 4 接水槽 请分离接水槽后 进行清洗 用厨房专用的中性洗涤 剂和海绵 彻底清洗拆下的接水槽 5 配件 请将配件清洗干净 并晾干后 再进行保管 注意 请拔下电源插头后清洗 而且不要直接喷水或用苯 辛那水等擦拭产品 未清洁产品时 会在保温时产生异味 使用前 FD06 Series_US ZH KR indb 59 2018 06 25 9 39 15 ...

Page 60: ... 帽 2 将位于侧面的手柄向 的 方向按下 然后沿 的方 向取下经常清洗 3 组装蒸气排放帽时 请对 准 的孔 然后沿 方向 按压并套紧 4 将蒸气排放帽安装于产品 时 先将蒸气排放帽安装 至锅盖 然后按下箭头部 分将其牢牢固定 压力阀 压力调节喷嘴 有积水时 请用拧干的软 布擦拭 蒸气排放帽 如图所示 压力调节喷嘴的 密封圈脱落时 会出现蒸气 泄漏 请将密封圈安装在喷 嘴上 注意 煮饭刚结束后会烫 请不要触摸 会导致烫伤 注意 煮饭刚结束后蒸气排放帽会烫 请不要触摸 会导致烫伤 FD06 Series_US ZH KR indb 60 2018 06 25 9 39 36 ...

Page 61: ...内锅中加入水和醋的混合物 选择自动清洗 功能 最后洗净 配合比率 自动清洗刻度的水 1大匙食醋 汤或炖等烹饪后 如果不洗净后保温 饭里可能会入味 请必须确认清洁盖的结合状态 粘到饭粒或异物 时 请用拧去水 的抹布擦干净 蒸气排放口特别 需要经常清洗 如何消除陈米煮饭的异味 用陈米煮饭容易产生异味 使用保温功能时异味会加重 此时 请在 前一天傍晚提前浸泡次日早饭用米 并在水中滴一滴食醋 次日煮饭 时再用温水淘洗一遍 即可消除异味 米的保管方法 米的保管方法影响饭味 参考 使用保管时间较长或水分流失的米煮饭 会使饭松散或夹生 保温时容易产生异味 刚舂出的新米也会因疏于保管流失水分 变为干米 在米桶内放入大蒜可防止生米虫 适宜的场所 应避免的场所 保管场所 低温阴凉处 湿气较少 通风良好处 有锅炉管道经过的热处 光线直射处 洗涤槽 洗手池 下面 米购买量保管 期间 建议购买小包装米 5 10 k...

Page 62: ... 向右旋转时数字加大 向左旋转时数字减少 对准 时 的时候 请确认上午 下午 闪烁 3 按下 煮饭 确认 按钮 跳转到 分 设置 4 请旋转旋钮设置 分 闪烁 5 请按下 煮饭 确认 按钮完成设置 设置 分 后不按任何按键等待15秒 也可完成设置 停电补偿功能 CUCHEN压力电饭煲内置记忆停电前状态的功能 来电后会正常运转 锂离子电池 CUCHEN压力电饭煲为了保存时间设置以及停电补助功能 内置锂电池 电池寿命随产品性能略有不同 FD06 Series_US ZH KR indb 62 2018 06 25 9 39 46 ...

Page 63: ...请在清除内锅周围的水分及异物后 将内锅放入锅体中 请确认压力圈是否正确套紧 盖上锅盖之前 请确认是否已安装清洁盖 2 请将锅盖的结合手柄旋转至锁定 位置 请时刻确认压力阀是否水平 如果没有对准锁定 即使按下 煮饭 确认 按钮 也不 会工作 3 旋转旋钮选择菜单 按照白米 白米快速 杂粮 杂粮快速 糙米 慢炖 营养蒸 锅巴 辅食 健康粥 白米 的 顺序反复进行 闪烁 闪烁 4 按下 煮饭 确认 按钮 煮饭开始后 显示预计剩下时间 以最大容量煮饭时 压力阀可能无法旋转 这并非产品异常 煮饭完成 进入焖饭阶段后 圆形标示会随时间逐渐变小 煮饭结束后 自动转换为保温模式 煮好饭后 请立即进行均匀搅拌 FD06 Series_US ZH KR indb 63 2018 06 25 9 39 54 ...

Page 64: ...骨 参鸡汤 烤鸡蛋 蒸地瓜 蒸土豆 慢炖 大枣茶 各菜单煮饭时间 可在20分钟内快速煮熟杂粮 在杂粮菜单中 连续按下两次 煮饭 确认 按钮 即可运行快速煮饭 缩短煮饭时间 使用杂粮快速煮饭时 可以在20分左右的时间内煮好2人份量的饭 建议4人份量以下时 使用杂粮快速功能 杂粮煮熟的程度可能不如正常煮饭 用杂粮功能煮泡好的黑豆 红豆等时 煮出的杂粮饭可能会细软 此时 选用杂粮快速煮饭 便可缓解稀软现象 煮饭时间会受杂粮比率 水温或水量过多等因素的影响 杂粮快速菜单 分类 煮饭量随烹饪种类略有不同 请按照白米刻度对准白米快速 锅巴的水位 请按照杂粮刻度对准杂粮快速的水位 添加的水量超出标准值时 会在排出蒸气的同时溢出米汤 使用调节饭味功能时 煮饭时间可能会有所不同 使用快速煮饭功能时 如添加的水量超过标准值 则煮饭时间会延长 使用辅食 营养蒸 慢炖功能后 立即煮饭或保温会有异味混入饭内 菜单名...

Page 65: ...以调节白米菜单的饭味 参考 根据菜单特点 会发出温馨提示声 或按键音 黑化现象 煮饭过程中底部发生褐变 做出的饭喷香美味 3 软硬适中的饭 适合用于紫菜包饭和寿司等的粒粒爽口的硬饭 2 黏软且粒粒爽口的饭味 兼备黏软和粒粒爽口的饭味 1 偏软的饭 煮出稠软饱满的饭 注意 使用调节饭味功能时 会在煮饭过程中排出蒸气 该现象属 于调节内锅内部压力的正常操作 煮饭中 FD06 Series_US ZH KR indb 65 2018 06 25 9 40 11 ...

Page 66: ... 3阶段调节饭味功能只适用于白米菜单 正在煮饭时 不能使用调节饭味功能 2 按下 饭味 按钮 选择合口的口味 按下 饭味 按钮 按照 白米 偏软饭 白米 标准饭 白米 偏硬饭 白米 偏软饭 的顺序重复 请按个人口味 调节饭味 闪烁 闪烁 闪烁 3 按下 煮饭 确认 按钮开始煮饭 饭味在饭味设定 且煮饭结束后被储存 以后 在煮饭及预约煮饭时 白米菜单会按照设定的饭味烹制 调节饭味方法 FD06 Series_US ZH KR indb 66 2018 06 25 9 40 12 ...

Page 67: ...按四次 设置 按钮 2 旋转旋钮选择菜单 然后按下 煮饭 确认 按钮 旋转旋钮的话 以 白米 杂粮 糙米 锅巴 白米 的顺序重复 闪烁 闪烁 3 旋转旋钮选择浸泡时间 然后按下 煮饭 确认 按钮 旋转旋钮的话 以0分钟 2分钟 4分钟 6分钟 8分钟 0分钟的顺序重复 使用默认设定的浸泡时间时 选择0分钟 如果想增加浸泡时间 可以选择2 4 6 8分钟的任意一个 增加浸泡时间 可以帮助大米吸收水分 使做出的饭更加柔软 浸泡时间增加 则煮饭时间也会增加 使水溶性淀粉沉底 会导致褐变现象比一般煮饭时严重 FD06 Series_US ZH KR indb 67 2018 06 25 9 40 14 ...

Page 68: ...热温度 如果不想煮出喷香的饭味 选择 2 来降低加热温度 如果提高加热温度 褐变现象会比一般煮饭时严重 5 请按下 煮饭 确认 按钮完成设置 设置加热温度后过15秒将自动保存设置并移动至待机模式 按下 煮饭 确认 按钮完成设置 将按照设定值开始煮饭 设置的浸泡时间及加热温度将在一次煮饭完成后一直保存 设定了细微饭味的烹饪菜单会被保存 以后选择相同菜单时 会使用相同设定 细微调节饭味方法 黑化现象 用CUCHEN压力电饭煲煮出的饭底层略焦 呈浅褐色 即为 黑化 Melanoizing 现象 做出的饭喷香美味 味香纯 正 预约煮饭时 长时间浸泡米粒会使淀粉成分沉积于内锅底部 此时的黑化现象将比一般煮饭严重 敬请参考 FD06 Series_US ZH KR indb 68 2018 06 25 9 40 15 ...

Page 69: ...锁定位置时 按下 预约 按钮将无法执行预约 2 旋转旋钮 设定预约时间 预约时间是煮饭结束的时间 旋钮方向向右 每次增加10分钟 旋钮方向向左 每次减少10分钟 设定时间的时候 请确认上午 下午 闪烁 闪烁 3 如果想要变更菜单 请在按下 设置 按钮后 旋转旋钮选择 旋转旋钮的话 以 白米 杂粮 糙米 锅巴 健康粥 白米 的顺序重复 再次按下 设置 按钮将返回到预约时间设置模式 闪烁 4 请按下 煮饭 确认 或 预约 按钮 预约煮饭开始后 显示预约煮饭的结束时间 预约煮饭结束后 系统会保存最后设定的预约时间 预约煮饭结束的时间 随饭量和菜单 可能会产生约30分钟的差异 FD06 Series_US ZH KR indb 69 2018 06 25 9 40 17 ...

Page 70: ...养蒸 慢蒸菜单不可使用预约煮饭功能 预约时间最长能设定为13小时 预约超过13小时时 将被自动设定为当前时间开始的13小时后 根据饭味菜单的不同 白米的可预约时间也不同 预约煮饭时 注意事项 夏季米容易发馊 因此 请勿将预约时间设为10小时以上 使用开封已久或过于干燥的米煮饭 会做出夹生饭或硬饭 饭夹生时 请比原本的水量刻度多加半个刻度的水 在煮饭结束后 锅内较烫的状态下预约煮饭时 米可能发馊 请待锅内完全冷却后再预约 随气温和食材的种类及状态不同 可能发生变质 因此 请尽量避免长时间预约 米粒长时间沉淀时内锅底部沉淀了细微的淀粉和普通煮饭相比黑化现象 褐变 可能会更加严重 预约煮饭方法 FD06 Series_US ZH KR indb 70 2018 06 25 9 40 17 ...

Page 71: ...分钟时 1 待机状态下转动旋钮 从辅食 营养蒸 慢炖中选择 喜爱的菜单 闪烁 2 请按下 设置 按钮后旋转旋钮设置时间 闪烁 闪烁 3 按下 煮饭 确认 按钮 开始煮饭 开始煮饭时 显示剩余时间 辅食 营养蒸 慢炖 设定时间 15 90分钟 1小时 12小时50分钟 旋钮向右 每次增加5分钟 每次增加10分钟 旋钮向左 每次减少5分钟 每次减少10分钟 FD06 Series_US ZH KR indb 71 2018 06 25 9 40 19 ...

Page 72: ... 请安装清洁盖 参考 再加热结束后 请立即食用 除了白米以外的菜单 杂粮 糙米等 应在煮饭结束后立即食用 再加热时 可能会变色或有异味 频繁使用再加热功能时 可能导致米饭变色或干燥 只有在锅盖结合手柄对准锁定 位置时 可以进行再加热 对准打开 位置时 会发出警告音并保持保 温状态 保温 再加热 煮饭结束后 自动转换为保温模式 或者在待机状态下 按下 保温 再加热 按钮 开始保温 转换为保温后 将不再显示当前时间 而显示保温经过时 间 59分前以分钟为单位表示 此后以1小时为单位表示 最 长199小时 超过199小时后将停止在199小时 将保温中的饭变成像新做的一样 热气腾腾 在保温状态下 按下 保温 再加热 按钮 开始再加热 再加热只在保温模式下工作 再加热结束后 转换为保温状态 再加热过程中 再次按下 保温 再加热 即可取消再加 热 并转为保温 FD06 Series_US ZH KR ...

Page 73: ...保温 再加热 和 煮饭 确认 按钮 或不按按钮15秒以上 即可自动开始节能保温 节能保温结束时间输入错误时 按取消按钮 重新开始 保温过程中 根据下次吃饭的时间进行时间设定后 节能保温功能可以将饭保持低温状态 到设定的时间后重新加热 使饭不变 色 不变干 保持饭香的同时节能省电 节能保温结束或按下 取消 按钮后 节能保温设定即被解除 节能保温过程中 饭被保持低温状态 若此时想食用 请按下 取消 按钮解除节能保温状态 进行重新加热后再食用 节能保温状态时 因饭的温度较低 锅盖上可能产生水分 使用节能保温功能时 建议食材的量控制在4人份以下 节能保温功能最长可设定至8小时 若设定时间超过8小时 本品会自动重设为8小时后再开启节能保温功能 节能保温结束后 转入普通保温状态 FD06 Series_US ZH KR indb 73 2018 06 25 9 40 20 ...

Page 74: ...基础上提高2到3度 饭变黄时 请在默认温度的基础上降低2到3度 3 请按下 保温 再加热 或 煮饭 确认 按钮 完成温度设置并跳转至加热量设置阶段 设置温度后不按任何按钮等待15秒 也会跳转至下个阶段 4 旋转旋钮选择加热量 按照 2 1 0 1 2 3 4 2 的顺序 重复 基本设定加热量为0 锅盖上挂满水分时 请将加热量从1调节到4 内锅边缘溢饭现象严重或有馊味时 请选择 2 1的加 热量 5 按下 保温 再加热 或 煮饭 确认 按钮完成保温温度及加热量的调节 设置加热量后不按任何按钮等待15秒 也将完成保温温度及加热量的调节 FD06 Series_US ZH KR indb 74 2018 06 25 9 40 22 ...

Page 75: ... 0 00 1 01 1 02 1 03 1 04 2 01 2 02 2 03 2 04 3 01 3 02 3 03 3 04 0 00 的顺序重复 数字的含义如下 3 按下 烹饪 确认 按钮的话 语言及音量设置就完成了 即使不按任何按钮 15秒钟后 语言及音量设置也会完成 首位 语言 末位 音量 0 关闭声音指 南 00 0 1 韩文 01 1级 2 中文 02 2级 3 英语 03 3级 04 4级 FD06 Series_US ZH KR indb 75 2018 06 25 9 40 23 ...

Page 76: ...异物产生的异味 防止细菌滋生功能 1 请使用计量杯加水至内锅自动清洗的水位刻度 2 将内锅放入电饭煲后 盖上锅盖 并将手柄对准锁定 位置 锅盖手柄未对准锁定位置时 按下 自动清洗 按钮也无法启动自动清 洗功能 3 在待机状态时 按下 自动清洗 按钮 自动清洗将持续20分钟 自动清洗结束后 转换为待机状态 自动清洗功能使用 注意 蒸气排出口会排出高温 高压蒸气 敬请注意 切勿加入水以外的洗涤剂 肥皂 其他药品等 FD06 Series_US ZH KR indb 76 2018 06 25 9 40 25 ...

Page 77: ...封圈的提示 出现更换密封圈提示后 仍可使用煮饭和保温功能 按照57页的方法所示 更换密封圈后 按以下方法解除密封圈更换提示音 待机状态下 请按 取消 按钮5秒以上 请确认 密封圈更换提示灯 是否熄灭 饭锅使用一定时间后 如密封圈需要更换 密封圈更换提示灯 会闪烁 显示灯闪灯 请更换密封圈 注意 请参照第57页更换密封圈 如不及时更换密封圈 可发生漏电危险 注意 若将在密封圈更换提示灯亮起前更换密封圈 请一定在更换密封圈后 长按5秒 取消 按钮 将密封圈更换提示初始化 若未长按5秒 取消 按钮 则临近密封圈更换时间时 会出现密封圈更换提示 FD06 Series_US ZH KR indb 77 2018 06 25 9 40 26 ...

Page 78: ...米饭 豆芽饭 材料 糯米2杯 黑豆 红豆各 杯 食盐 大匙 黏高粱 糯谷 糯黄米混合1杯 水 煮红 豆的水混合3杯 烹饪方法 1 将糯米 黏高粱 糯谷 糯黄米 黑豆 分别洗净捞出 2 将豆洗净后放入小锅内加冷水用大火沸 煮 倒掉第一遍汤水后重新加入足量冷 水 煮至红豆即将绽开为止 3 将准备好的糯米和杂粮放入内锅 混入 煮红豆的水 加盐 添水至杂粮刻度3 4 请将内锅放入电饭煲内 并盖好锅盖 5 请在菜单中选择杂粮后 按下 煮饭 确 认 按钮 进行烹饪 6 烹饪结束后 请将饭搅拌均匀 将豆子在温水中浸泡15分钟以上 请将所有杂粮按适当比例进行烹饪 材料 大米 黑米 水 烹饪方法 1 请用计量杯量取所需人数份量的大米和 黑米 大米和黑米比例约为9 1 2 请将量取的大米和黑米淘洗至水清为 止 3 请将洗净的米和黑米放入内锅 然后加 水至人份数对应的白米水量刻度的位 置 4 请将内锅放入电饭煲...

Page 79: ...盖 7 请在菜单中选择营养蒸 并将时间设成 45分钟 再按下 煮饭 确认 按钮 用肉汁 调料酱和梨汁等烹制 无需加 水 另外加水可能会在排出蒸气的同时溢出 汤汁 敬请注意 材料 猪肉600g 大葱1根 姜1块 蒜 5瓣 水3杯 烹饪方法 1 请将猪肉剔除肥油后放入内锅 加入切 好的大葱 姜 蒜 再添3杯水 2 请将内锅放入电饭煲内 并盖好锅盖 3 请在菜单中选择营养蒸 并将时间设成 50分钟 再按下 煮饭 确认 按钮 根据各材料的特点会因肉汁和食盐产生 变焦现象 加水量超出标准值时会在排放蒸汽的同 时溢出肉汤 敬请注意 肉块过大时 请切2 3处深刀口 蒸红薯 蒸土豆 烤鸡蛋 材料 红薯 150g以下 3个 烹饪方法 1 请在内锅内中倒入2杯水 2 将蒸架放入内锅 再放入洗净的红薯 3 请将内锅放入电饭煲内 并盖好锅盖 4 请在菜单中选择营养蒸 并将时间设成 35分钟 再按下 煮饭 确认 按...

Page 80: ...煮饭 确认 按钮 4 请在煮饭结束后根据个人口味加入适量 的盐轻搅 松子粥 白米粥 大枣茶 材料 大米1杯 松子 杯 食盐少许 水6 杯 烹饪方法 1 请将洗净的米放入水中浸泡30分钟 2 请将松子用搅拌机搅碎 3 放入大米和搅碎的松子 添加6 杯水 4 请将内锅放入电饭煲内 并盖好锅盖 5 请在菜单中选择健康粥后 按下 煮饭 确认 按钮 进行烹饪 6 请在煮饭结束后根据个人口味加入适量 的盐轻搅 加水量超出标准值时 排出蒸气的同时 可能会溢出米汤 敬请注意 材料 米1杯 水6杯 烹饪方法 1 请用计量杯量取所需人数份量的米 2 请将洗净的米放入水中浸泡30分钟 3 请将泡好的大米放入内锅后添加6杯水 4 请将内锅放入电饭煲内 并盖好锅盖 5 请在菜单中选择健康粥后 按下 煮饭 确认 按钮 进行烹饪 6 烹饪结束后 请轻轻搅拌 加水量超出标准值时 排出蒸气的同时 可能会溢出米汤 敬请注意 ...

Page 81: ... 煮饭过程中饭水气溢出来 压力阀是否倾斜 请直立压力阀 是否使用计量杯 是否正确调节水气量 是否准确选择菜单 3 饭太硬或未熟或太熟时 是否正确调节水气量 请根据米量对准测定刻度调整水气位 内锅底部是否粘有异物 请清除自动温度传感器上的异物 4 锅盖旁边漏蒸气 压力圈部位是否粘有饭粒等 请清洁内锅上方侧面与压力圈外侧 触碰压力圈的部位 是否及时更换了压力圈 蒸汽外漏时 掀开压力阀 排出蒸汽 拔 掉电源插头后联系客服中心 密封圈时消耗品 压力圈是否旧了 密封圈的寿命大概12个月 建议每年更换 一次 5 不能预约时 是预约可能的菜单吗 请确认该菜单能否预约 参考第69 70页 6 显示标记时 当压力喷嘴被阻塞 而导致内部压力较高 或内部温度过高时出现 请向服务中心咨询 7 显示标记时 当温度感测器有异常时出现 请向服务中心咨询 申请故障前的确认事项 FD06 Series_US ZH KR i...

Page 82: ...是否长时间对预 约煮饭的饭进行保温 请不要保温12小时以上 参考第72页 是否使用烹饪功能 是否经常清洗压力 圈 请不要对长时间预约煮饭做出的饭进行保 温 请必须确认清洁盖的结合状态 11 按下按钮时出现 标示 产品中是否装入内锅 本产品在未装内锅的状态下不执行煮饭 预约煮饭和保温 请放入内锅后使用 是否在220 V电压下使用 本产品为120 V专用产品 请正确使用电 源 12 有黄褐色的饭粘在内锅上时 米是否充分经过淘洗 请将米淘净 自动温度传感器表面是否沾有水或异物 清除自动温度传感器表面的水和异物 13 豆类 杂粮 夹生时 豆类 杂粮 是否过于干硬 请将豆类 杂粮 浸泡或煮一会儿之后 再 煮饭 14 按钮不工作时 按钮不动作了吗 请正确触摸按钮的中央部分 使用木头或 塑料等按下按钮时 不会有反应 申请故障前的确认事项 FD06 Series_US ZH KR indb 82 2018...

Page 83: ...83 备忘录 FD06 Series_US ZH KR indb 83 2018 06 25 9 40 29 ...

Page 84: ...FD06 Series_US ZH KR indb 84 2018 06 25 9 40 29 ...

Page 85: ... F061 GF NS4 V1 본 제품 이미지는 성능향상을 위해 실제와 다소 차이가 날 수 있습니다 Looks Good Easy Smart 쿠첸 전기압력밥솥을 바르게 사용하기 위해 사용 전에 본 사용설명서를 반드시 읽어 주십시오 읽고 난 뒤에는 제품을 사용하는 사람이 항상 볼 수 있는 곳에 보관해 주십시오 FD06 Series_US ZH KR indb 85 2018 06 25 9 40 32 ...

Page 86: ...a 166 7 kPa 제품크기 길이 X 폭 X 높이 380 x 270 x 280 mm 중량 5 9 kg BOX 포장 중량 6 9 kg 제품의 성능 개선을 위하여 약간의 규격변동이 있을 수 있습니다 86 제품 밑에 스테인레스판 깔판 방석 전기장판 철판 은박지 철 종류 및 알루미늄 소재의 쟁반 등을 놓고 사용하지 마십시오 화재 및 고장의 원인이 됩니다 밥솥을 가전제품 김치냉장고 식기세척기 전자렌지 냉장 냉동고 등 위에 놓고 사용하지 마십시오 제품 화재 및 변형이 발생될 수 있습니다 쟁반 철판 은박지 지정된 메뉴 이외에 기타 음식물 콩 팥 토마토 밀가루 등 을 임의로 삶거나 조리하지 마십시오 자동 증기 배출구의 막힘으로 인해 폭발 및 화상의 위험이 있습니다 FD06 Series_US ZH KR indb 86 20...

Page 87: ...는 밥을 지으려면 101 현재 시간 맞추는 방법 102 밥 짓는 방법 103 밥맛 조절 방법 105 미세 밥맛 조절 방법 107 예약취사 방법 109 이유식 영양찜 슬로우쿡 취사 방법 111 보온 및 재가열하기 112 보온 중에 113 보온 온도 및 가열량 조절하기 114 언어 및 음량 설정 방법 115 자동세척 방법 116 패킹 교체 시기 알림 117 요리안내 118 고장신고 전에 확인 하십시오 121 FD06 Series_US ZH KR indb 87 2018 06 25 9 40 36 ...

Page 88: ...다 플러그에 먼지나 이물 때가 묻어 있으면 접속이 불완전 하여 화재의 원인이 될 수 있습니다 수시로 전원 플러그의 상태를 확인하십시오 전원 코드를 무리하게 구부리거나 묶거나 잡아당기지 마십시오 한개의 콘센트에 여러 전기 제품을 동시에 꽂아 사용하지 마시고 전용 콘센트를 사용하십시오 쌀통 및 다용도 선반 등 위에 제품을 놓고 사용하지 마십시오 합선으로 인한 감전 및 화재의 위험이 있습니다 발열 및 발화 감전 화재의 위험이 있습니다 틈새에 전원코드가 눌려 감전 및 화재의 원인이 됩니다 증기 배출 시에 다용도 쌀통 및 다용도 선반에 의해 기기의 손상 감전 화재의 위험이 있습니다 코드 및 전원플러그를 동물이 물어 뜯거나 못과 같이 날카로운 금속 물체로부터 충격을 받지 않도록 사용하십시오 전원코드나 전원플러그가 파손...

Page 89: ...판 철판 은박지 등을 제품 밑에 놓고 사용하지 마십시오 제품 화재 및 변형이 발생될수 있습니다 제품의 흡입구나 틈 사이에 이물질을 넣지 마시고 이물질이 들어간 경우 전원 플러그를 빼고 서비스 센터로 연락하십시오 감전 화재 신체 상해의 위험이 있습니다 설치관련 위 험 제품을 직사 광선이 쬐는 곳 가스레인지 라이터 전열기구 풍로등 열원 가까이에서 사용하지 마십시오 제품을 싱크대 목욕탕 등 물이 들어갈 수 있는 곳에 설치하거나 닦지 마십시오 전기 누전 감전 변색 변형의 위험이 있습니다 전원 코드를 열원 가까이 두지 마십시오 열원에 의해 코드가 손상될 경우 감전 및 화재의 위험이 있습니다 오디오 TV등과 같은 가전제품과 2m이상 거리를 유지하고 사용하십시오 전기누전 및 감전 화재의 위험이 있습니다 제품에 물이 들어...

Page 90: ...상 및 신체 상해의 위험이 있습니다 취사나 요리가 진행중일 때는 압력에 의해 뚜껑이 열리지 않습니다 강제로 열 경우 압력으로 인한 폭발 및 화상의 위험이 있습니다 취사나 요리 완료 후 증기가 완전히 배출된 후에 뚜껑 손잡이를 돌리십시오 부득이 하게 뚜껑을 열어야 할 경우 취소 버튼을 약 1초간 누른 후 내부 압력이 완전히 제거된 후 열어 주십시오 제공되는 요리 방법 외 잡곡류 등을 적정 비율 이상으로 사용하여 취사하지 마십시오 신체상해의 위험 및 고장의 원인이 됩니다 주 의 내솥 코팅이 벗겨진 경우 고객상담실로 문의하십시오 제품을 장시간 사용할 경우 내솥의 코팅이 벗겨질 수 있습니다 거친 수세미 금속성 수세미로 내솥을 씻을 경우 코팅에 충격이 가해지면 코팅이 벗겨질 수 있으니 반드시 주방용 중성 세제와 스폰...

Page 91: ...지 않거나 보온 시 밥에서 냄새가 날 수 있습니다 인공심장 박동기 및 전기 의료 보조장치를 사용하시는 분은 본 제품을 사용하기 전에 반드시 의사와 상담하여 주십시오 본 제품이 작동할 때 인공심장 박동기 및 전기 의료 보조기구의 동작에 영향을 미칠 경우가 있습니다 실외에서는 사용하지 마십시오 감전 및 화재의 원인이 됩니다 PE BAG 포장재는 어린이의 손이 닿지 않는 곳에 보관 또는 폐기하세요 머리에 쓰는 행위 등으로 코와 입이 막혀 질식의 원인이 됩니다 자동온도센서는 이물질 밥알 기타 음식물등 및 물기가 없도록 항상 깨끗하게 유지하세요 부정확한 온도감지를 통해 내솥이 이상가열 되어 화재의 위험이 있습니다 제품 사용 전 반드시 이물질을 여부를 확인하고 사용하십시오 뚜껑 손잡이를 잠금 위치에 놓은 후 내솥을 넣...

Page 92: ...배출구 자동증기배출 장치가 내장되어 있어 내솥의 증기를 자동으로 배출시켜 줍니다 압력 패킹 내솥 내부의 증기가 밖으로 새지 않게 밀폐시켜 줍니다 압력 패킹의 수명은 1년이므로 주기적으로 교체하여 사용하는 것이 좋습니다 압력 패킹은 소모품으로 반드시 A S 고객센터 또는 대형마트에서 구입 후 교체하여 주십시오 안심 센서 내솥 내부의 온도를 감지합니다 CLEAN STAINLESS 클린 스테인리스 스팀캡 내솥 특수 코팅으로 쉽게 벗겨지지 않고 잘 눌러 붙지 않습니다 클린커버 손잡이 내솥 손잡이 클린커버 분리하여 씻을 수 있습니다 뚜껑 열림버튼 버튼을 눌러 뚜껑을 엽니다 클린커버 패킹 압력추 내솥 내부의 압력을 일정하게 조절하여 줍니다 뚜껑 결합 손잡이 취사 시 손잡이 표시가 잠금 위치로 되어야 작동이 됩니다 부 ...

Page 93: ...할 경우에 사용합니다 3 자동세척 자동세척을 할 때 사용합니다 자동세척 기능에 대한 자세한 설명은 116 쪽을 참조하세요 4 밥맛 백미 메뉴의 밥맛을 조절할 때 사용합니다 밥맛 조절 기능에 대한 자세한 설명은 105 쪽을 참조하세요 5 설정 현재 시간 설정 언어 음성 설정 보온 온도 및 가열량 조절 미세 밥맛 조절 모드 진입 시 사용합니다 주 의 조작부 표시부는 휘발성분 알코올 아세톤 등 이 함유된 것으로 청소하지 마십시오 변색 또는 인쇄가 지워질 수 있습니다 사용하기 전에 4 5 2 6 7 3 1 8 9 FD06 Series_US ZH KR indb 93 2018 06 25 9 43 37 ...

Page 94: ... 돌리면 시간 증가 왼쪽으로 돌리면 시간 감소 미세 밥맛을 조절할 때 사용합니다 보온 온도 및 가열량을 조절할 때 사용합니다 9 패킹 교체 시기 알림 패킹 교체 시기가 되면 표시됩니다 절전 모드 기능 밥솥의 대기 상태에서의 대기 전력을 최소화하기 위한 기능입니다 대기 상태에서 버튼의 입력 없이 1분이 경과하면 절전 모드로 진입합니다 절전 모드로 진입하면 초록색 표시등이 켜집니다 취사 예약취사 보온 및 자동세척 중에는 절전모드로 진입하지 않습니다 절전 모드 중 버튼을 조작하거나 뚜껑 결합 손잡이를 조작하면 절전 모드가 해제됩니다 음성 네비게이션 기능 및 음성 조절 기능 취사 시작 취사 완료 증기 배출 등 제품의 작동 상태를 음성으로 알려주며 다음 조작 방법까지 알려 줍니다 각 부분의 이름 및 기능 FD06 S...

Page 95: ... 벤젠 신나 등은 사용하지 마십시오 사용 중 클린커버 및 뚜껑 내솥 내부에 밥물이 묻어 전분 막이 생기는 수가 있으나 위생상 아무런 영향이 없습니다 취사 중 내부 수분의 증발로 인해 뚜껑의 측면부로 미세 증기가 나올 수 있습니다 1 클린 커버 손잡이를 잡고 화살표 방향대로 당기면 뚜껑에서 쉽게 분리되어 세척이 가능합니다 2 클린 커버 세척 시 클린 커버 뒷면의 손잡이부의 날개를 잡고 살짝 당겨서 클린 커버 손잡이를 분리하고 외측의 패킹도 분리합니다 3 주방용 중성세제 및 스폰지로 자주 세척해 주시고 물기를 제거한 행주로 닦아 주십시오 FD06 Series_US ZH KR indb 95 2018 06 25 9 43 41 ...

Page 96: ...면부 앞면 에는 전면 이라는 글씨가 아래 위로 표시되어 있습니다 6 압력뚜껑에 클린커버를 장착 시에는 클린커버 손잡이를 잡고 화살표 방향대로 압력뚜껑 중앙의 홀더에 맞춘 후 힘 주어 눌러 주십시오 글자가 똑바로 보임 글자가 똑바로 적혀 있고 클린커버 손잡이가 앞에 보이며 패킹부의 전면 이라는 글자가 클린커버 글자의 중앙으로 위치해야 합니다 글자가 반대로 적혀 있습니다 클린커버 앞 모습 클린커버 뒷 모습 클린커버 조립 시 주의사항 클린커버의 앞면과 뒷면을 반드시 확인하십시오 클린커버의 구멍에 나사 및 다른 이물질을 넣지 마십시오 제품 손질 방법 FD06 Series_US ZH KR indb 96 2018 06 25 9 43 47 ...

Page 97: ... 주십시오 그 이후에도 김이 샐 때는 대리점 및 서비스 센터에서 패킹을 구입 하시어 교환하시기 바랍니다 패킹의 교환주기는 1년 입니다 1년에 한번씩 교환하여 사용하십시오 패킹은 실리콘으로 되어 있습니다 1 압력패킹을 그림과 같이 손으로 잡아 당겨서 제거해 주십시오 2 압력패킹 맞춤 표시부와 압력 뚜껑 맞춤 표시부를 그림과 같이 맞추어 삽입하여 주십시오 1 외측 안착 돌기 2 내측 안착 돌기 압력패킹 삽입순서 1 2 3 맞춤 표시부 4곳을 삽입한 상태입니다 번호순으로 맞춰 주십시오 사용하기 전에 압력패킹 맞춤 표시부 4곳 압력뚜껑 맞춤 표시부 4곳 FD06 Series_US ZH KR indb 97 2018 06 25 9 43 48 ...

Page 98: ...질러 삽입을 완료해 주십시오 A B 5 정상적으로 부착이 완료 된 상태 입니다 바르게 조립된 경우 잘못 조립된 경우 주의 패킹은 청소 후 위 내용을 지켜야 증기 누설을 방지할 수 있습니다 제품 손질 방법 잘못 부착을 하였을 경우 사용 중 증기누설에 의하여 밥이 설익거나 화상의 우려가 있습니다 바르게 부착되었는지 확인 후 사용하시기 바랍니다 압력 패킹이 원형 형상을 유지 FD06 Series_US ZH KR indb 98 2018 06 25 9 43 51 ...

Page 99: ...합니다 압력 패킹은 가능한 분리하지 말고 깨끗한 행주로 닦으세요 3 본체 내부 내솥은 들어내고 바닥 면의 이물질은 반드시 제거한 후 사용하세요 자동 온도 센서나 열판에 이물질이 끼어 있으면 온도감지를 못하여 밥이 안되거나 제품의 이상 작동 및 화재의 원인이 됩니다 물을 꼭 짠 행주로 닦고 자동 온도 센서가 손상되지 않게 주의하세요 취사나 보온 직후는 만지지 청소하지 마십시오 화상의 위험이 있습니다 4 물받이 물받이를 분리하여 깨끗하게 청소하세요 분리된 물받이를 주방용 중성세제와 스폰지로 깨끗하게 세척합니다 5 부속품 부속품을 깨끗이 손질하여 건조시킨 후 잘 보관하세요 주 의 전원플러그를 뺀 후 청소하고 물을 직접 뿌리거나 벤젠 신나 등으로 제품을 닦지 마십시오 청소를 깨끗이 하지 않으면 보온 중 냄새가 나는...

Page 100: ...분리하여 자주 세척하세요 3 스팀캡을 조립하여 끼울 때에는 의 홈부분을 맞춘 후 방향으로 눌러 확실히 끼우세요 4 제품에 스팀캡을 장착할 때는 뚜껑부에 스팀캡을 안착한 후 화살표 부분을 눌러 단단히 고정하세요 압력추 압력조절노즐 물이 고여있는 경우에는 물을 꼭 짠 행주로 닦으세요 스팀캡 그림과 같이 압력조절노즐의 패킹이 이탈되어 있는 경우 증기가 누설될 수 있으니 패킹을 노즐에 안착하세요 주의 취사 직후에는 뜨거우므로 만지지 마십시오 화상을 입을 수 있습니다 주의 취사 직후에는 스팀캡이 뜨거우므로 만지지 마십시오 화상을 입을 수 있습니다 FD06 Series_US ZH KR indb 100 2018 06 25 9 44 16 ...

Page 101: ...고 보온하면 밥에 냄새가 배어들 수 있습니다 클린커버의 결합 상태를 반드시 확인하세요 밥풀이나 이물질이 붙어 있는 경우 물을 꼭 짠 행주로 깨끗이 닦으세요 증기배출구는 특히 자주 청소하세요 묵은 쌀로 밥을 지었을 때 냄새를 없애려면 오래 묵은 쌀일수록 밥을 지으면 냄새가 나며 보온 시 더욱 심합니다 이럴 때는 아침밥을 지을 쌀을 그 전날 저녁에 미리 꺼내어 식초 한 방울을 떨어뜨린 물에 담갔다가 씻은 후 다음 날 아침밥을 지을 때 한번 더 미지근한 물로 헹군 뒤 밥을 지으면 냄새가 나지 않습니다 쌀 보관 방법 쌀의 보관 방법이 밥맛을 좌우합니다 참 고 오래 보관한 쌀 또는 쌀의 수분이 줄어든 마른 쌀로 밥을 지으면 밥이 퍼석하거나 설익고 보온 시 냄새가 빨리 날 수 있습니다 도정한지 오래되지 않은 햅쌀이라도...

Page 102: ...있습니다 배터리의 수명은 제품 성능에 따라서 차이가 날 수 있습니다 오전 9시 30분으로 현재 시간을 설정할 경우 1 대기 상태에서 설정 버튼을 한 번 눌러 시간 설정 모드로 진입하세요 2 다이얼을 돌려 시 를 맞추세요 오른쪽으로 다이얼을 돌리면 숫자가 올라갑니다 왼쪽으로 다이얼을 돌리면 숫자가 내려갑니다 시 를 맞출 때는 오전 오후를 확인하세요 깜빡 3 취사 확인 버튼을 누르세요 분 설정으로 넘어갑니다 4 다이얼을 돌려 분 을 맞추세요 깜빡 5 취사 확인 버튼을 눌러 설정을 완료하세요 분 을 설정한 후 아무런 버튼을 누르지 않고 15초가 지나도 설정이 완료됩니다 FD06 Series_US ZH KR indb 102 2018 06 25 9 44 25 ...

Page 103: ...넣으세요 압력 패킹이 바르게 끼워졌는지 확인하세요 뚜껑을 닫기 전에 클린 커버가 장착되어 있는지 확인하세요 2 뚜껑 결합 손잡이를 돌려 잠금 에 맞추세요 압력추가 수평인지 항상 확인하세요 잠금 으로 맞추지 않고 취사 확인 버튼을 누르면 작동되지 않습니다 3 다이얼을 돌려 메뉴를 선택하세요 백미 백미쾌속 잡곡 잡곡쾌속 현미 슬로우쿡 영양찜 누룽지 이유식 건강죽 백미 순으로 반복됩니다 깜빡 깜빡 4 취사 확인 버튼을 누르세요 취사가 시작되면 남은 예상 시간이 표시됩니다 최대 인분으로 밥짓기를 할 경우에는 압력추가 회전하지 않을 수 있으며 제품의 이상은 아닙니다 취사가 완료되어 뜸을 들이는 단계에서는 경과되는 시간에 따라 원 표시가 줄어듭니다 취사가 완료되면 보온으로 자동 전환됩니다 밥 짓기가 끝나는 즉시 골고루...

Page 104: ... 취사 시 2인분에서 20분대 취사가 가능합니다 잡곡쾌속은 4인분 이하를 권장하며 정상 취사보다 잡곡이 익은 상태가 좋지 않을 수 있습니다 충분히 불린 서리태나 팥 등을 잡곡으로 취사 시 잡곡밥이 질어지는 현상이 발생 할 수 있습니다 이때 잡곡쾌속 취사를 이용하면 질어지는 현상이 호전될 수 있습니다 잡곡 비율 수온 물양 과다 등으로 인하여 취사 시간이 달라질 수 있습니다 잡곡쾌속 메뉴 구분 취사량은 요리 종류에 따라 다를 수 있습니다 백미쾌속 누룽지의 물 높이는 백미 눈금으로 맞추세요 잡곡쾌속의 물 높이는 잡곡 눈금으로 맞추세요 기준치 이상으로 물을 넣으면 증기 배출 시 밥물이 뿜어져 나올 수 있습니다 밥맛 조절 기능 사용 시 취사 시간이 달라질 수 있습니다 쾌속취사 시 기준 물 눈금 이상으로 물을 넣으면 ...

Page 105: ...수 있습니다 멜라노이징 현상 밥을 짓는 과정에서 바닥 부분이 갈변되면서 구수한 향과 맛을 내는 것을 의미합니다 3 고슬고슬한 밥맛 김밥과 초밥 등에 적합한 고슬고슬한 밥을 지어 줍니다 2 찰기와 고슬고슬함을 동시에 찰진 밥맛과 고슬고슬한 밥맛이 동시에 느껴집니다 1 찰진 밥맛 찰지고 탱글탱글한 밥을 지어 줍니다 주 의 밥맛 조절을 하여 취사하는 도중 증기배출현상이 나타나는 것은 내솥의 내부 압력을 맞추기 위한 정상적인 작동입니다 취사중 FD06 Series_US ZH KR indb 105 2018 06 25 9 44 50 ...

Page 106: ...능합니다 취사가 진행 중일 때에는 밥맛 조절 기능을 사용할 수 없습니다 2 밥맛 버튼을 눌러 원하시는 밥맛을 선택하세요 밥맛 버튼을 누르면 백미찰진밥 백미중간밥 백미일반밥 백미찰진밥 순으로 반복됩니다 밥맛 조절은 입맛에 맞게 선택하세요 깜빡 깜빡 깜빡 3 취사 확인 버튼을 눌러 취사하세요 밥맛은 밥맛 설정 후 취사 완료 시 기억됩니다 이후 취사 및 예약 취사 시 백미 메뉴는 설정된 밥맛으로 진행됩니다 밥맛 조절 방법 FD06 Series_US ZH KR indb 106 2018 06 25 9 44 51 ...

Page 107: ...메뉴를 선택하고 취사 확인 버튼을 누르세요 다이얼을 돌리면 백미 잡곡 현미 누룽지 백미 순으로 반복됩니다 깜빡 깜빡 3 다이얼을 돌려 불림 시간을 선택하고 취사 확인 버튼을 누르세요 다이얼을 돌리면 0 분 2 분 4 분 6 분 8 분 0 분 순으로 반복됩니다 기본 설정되어 있는 불림 시간으로 취사할 때는 0분으로 선택하고 불림 시간을 늘리고 싶을 때는 2 4 6 8분 중 하나를 선택합니다 불림 시간을 늘리면 쌀의 수분 흡수를 도와 밥이 부드러워집니다 불림 시간을 늘리면 취사 시간이 길어지며 수용성 전분이 용출되어 가라앉아 갈변 현상이 일반 취사보다 심하게 나타날 수 있습니다 FD06 Series_US ZH KR indb 107 2018 06 25 9 44 53 ...

Page 108: ... 가열 온도를 높이면 갈변 현상이 일반 취사보다 심하게 나타날 수 있습니다 5 취사 확인 버튼을 눌러 설정을 완료하세요 가열 온도를 설정하고 15초가 경과하면 자동으로 설정이 저장되고 대기 모드로 이동합니다 취사 확인 버튼을 눌러 설정을 완료하면 설정된 값으로 취사가 시작됩니다 설정된 불림 시간 및 가열 온도는 한 번 취사가 완료된 다음에도 계속 기억됩니다 미세 밥맛을 설정한 메뉴는 이후 해당 메뉴 취사 시에 적용됩니다 멜라노이징 현상 쿠첸 전기압력밥솥은 밥의 밑부분이 눌게 되면서 옅은 갈색으로 변할 수 있습니다 멜라노이징 현상 이라고 하는데 향기있고 풍미있는 즉 밥의 구수한 향기와 맛을 내는 것을 의미합니다 참고로 예약취사의 경우 쌀알이 오랜 시간 가라앉아 있을 때에는 내솥 밑부분에 미세 전분이 가라앉아 ...

Page 109: ...않습니다 2 다이얼을 돌려 예약 시간을 설정하세요 예약 시간은 취사가 완료되는 시간입니다 다이얼 방향 오른쪽 10분씩 증가 다이얼 방향 왼쪽 10분씩 감소 시간을 설정할 때는 오전 오후를 확인하세요 깜빡 깜빡 3 메뉴를 변경하려면 설정 버튼을 누르고 다이얼을 돌려 선택하세요 다이얼을 돌리면 백미 잡곡 현미 누룽지 건강죽 백미 순으로 반복됩니다 설정 버튼을 다시 누르면 예약 시간 설정 모드로 돌아갑니다 깜빡 4 취사 확인 또는 예약 버튼을 누르세요 예약취사가 시작되면 예약취사 완료 시간이 표시됩니다 예약취사가 완료된 후에는 마지막으로 설정한 예약 시간이 기억됩니다 예약취사가 완료되는 시간은 밥의 양이나 메뉴에 따라 약 30분 정도 차이가 날 수 있습니다 FD06 Series_US ZH KR indb 109 2...

Page 110: ... 재설정됩니다 백미는 밥맛 메뉴에 따라 예약 가능 시간이 달라질 수 있습니다 예약취사 시 주의사항 여름철에는 쌀이 쉴 수가 있으므로 예약 시간을 10시간이 초과되지 않도록 예약하십시오 쌀이 개봉된지 오래되었거나 많이 말라버린 경우에는 층밥 또는 싸라기 밥이 되는 수도 있습니다 밥이 설익은 경우에는 물을 표시된 눈금보다 반 정도 더 넣어 주십시오 밥을 지은 후 밥솥 내부가 뜨거운 상태에서 예약 취사를 하면 쌀이 쉴 수 있으므로 충분히 열을 식힌 후 예약하십시오 기온과 식재료의 종류 및 상태에 따라 변질될 수 있으니 장시간 예약 설정은 피해 주십시오 쌀알이 오랜 시간 가라앉아 있을 때에는 내솥 밑부분에 미세 전분이 가라앉아 일반취사보다 멜라노이징 현상 갈변 이 심하게 나타날 수 있습니다 예약취사 방법 FD06 ...

Page 111: ... 돌려 이유식 영양찜 슬로우쿡 중에 원하시는 메뉴를 선택하세요 깜빡 2 설정 버튼을 누르고 다이얼을 돌려 시간을 설정하세요 깜빡 깜빡 3 취사 확인 버튼을 누르면 취사가 시작됩니다 취사가 시작되면 남은 시간이 표시됩니다 이유식 영양찜 슬로우쿡 시간 설정 15 90분 1시간 12시간 50분 다이얼 오른쪽 5분씩 증가 10분씩 증가 다이얼 왼쪽 5분씩 감소 10분씩 감소 FD06 Series_US ZH KR indb 111 2018 06 25 9 44 58 ...

Page 112: ... 끝나면 곧바로 밥을 드시는 것이 좋습니다 백미 이외의 메뉴 잡곡 현미 등 는 취사 후 바로 드시는 것이 좋으며 재가열을 하면 밥 색깔이 변하거나 냄새가 날 수 있습니다 재가열 기능을 너무 자주 사용하면 밥이 변색되거나 마르는 경우가 있습니다 뚜껑 결합 손잡이가 잠금 위치에 있을 때만 재가열이 진행되며 열림 위치에 있을 때는 경고음이 울린 후 보온이 계속 진행됩니다 보온하기 재가열하기 취사가 완료되면 보온으로 자동 전환됩니다 또는 대기 상태에서 보온 재가열 버튼을 누르면 보온이 시작됩니다 보온으로 전환되면 현재시간 대신 보온 경과 시간이 표시됩니다 59분까지는 분단위로 표시되며 이후부터는 1시간 단위로 199시간까지 표시됩니다 199시간에서 시간이 넘어갈 경우 199에서 시간 표시가 정지됩니다 보온 중인 밥...

Page 113: ...합니다 절약보온 완료시간을 잘못 입력하셨을 경우 취소 버튼을 누른 후 처음부터 다시 시작하십시오 보온 중에 절약보온은 밥을 다음에 다시 먹을 시간에 맞추어 시간 설정을 하면 밥을 저온 상태로 유지하다가 그 시간에 맞춰 다시 따뜻하게 가열해서 밥의 변색과 마름을 억제하여 밥맛을 좋게 하며 전기를 절약하는 기능입니다 절약보온이 완료되거나 취소 버튼을 누르면 절약보온 설정이 해제됩니다 절약보온 중에는 밥이 저온으로 유지되고 있으므로 만약 절약보온 중간에 식사를 하시려면 취소 버튼을 눌러 절약보온을 취소하고 재가열을 하여 드시기 바랍니다 절약보온 중간에는 밥의 온도가 낮게 유지되므로 뚜껑에 물이 생길 수 있습니다 절약보온은 되도록 4인분 이하에서 사용하십시오 절약보온은 최대 8시간까지 설정됩니다 8시간을 초과하여 ...

Page 114: ...3 보온 재가열 또는 취사 확인 버튼을 누르세요 온도가 설정되고 가열량 설정 단계로 넘어갑니다 온도를 설정한 후 아무런 버튼을 누르지 않고 15초가 지나도 다음 단계로 넘어갑니다 4 다이얼을 돌려 가열량을 선택하세요 2 1 0 1 2 3 4 2 순으로 반복됩니다 기본 설정 가열량은 0입니다 뚜껑에 물 맺힘이 많을 경우 가열량을 1에서 4로 선택하세요 내솥 테두리의 밥 퍼짐이 심하거나 쉰 냄새가 날 경우 가열량을 2에서 1로 선택하세요 5 보온 재가열 또는 취사 확인 버튼을 누르면 보온 온도 및 가열량 조절이 완료됩니다 가열량을 설정한 후 아무런 버튼을 누르지 않고 15초가 지나도 보온 온도 및 가열량 조절이 완료됩니다 FD06 Series_US ZH KR indb 114 2018 06 25 9 45 02 ...

Page 115: ... 02 1 03 1 04 2 01 2 02 2 03 2 04 3 01 3 02 3 03 3 04 0 00 순으로 반복됩니다 숫자의 의미는 다음과 같습니다 3 취사 확인 버튼을 누르면 언어 및 음량 설정이 완료됩니다 아무런 버튼을 누르지 않고 15초가 지나도 언어 및 음량 설정이 완료됩니다 앞자리 언어 뒷자리 음량 0 음성 안내 끄기 00 0 1 한국어 01 1단 2 중국어 02 2단 3 영어 03 3단 04 4단 FD06 Series_US ZH KR indb 115 2018 06 25 9 45 03 ...

Page 116: ... 계량컵을 이용하여 내솥의 자동세척 물 눈금에 맞춰 물을 넣어 주세요 2 내솥을 밥솥에 넣은 후 뚜껑을 닫고 손잡이를 돌려 잠금 에 맞추세요 뚜껑 손잡이를 잠금으로 맞추지 않고 자동세척 버튼을 누르면 자동세척 기능이 작동하지 않습니다 3 대기 상태에서 자동세척 버튼을 누르세요 자동세척은 20분 동안 진행됩니다 자동세척이 종료되면 대기 상태로 전환됩니다 자동세척 기능 사용하기 주 의 증기 배출구로 고온 고압의 증기가 배출되니 주의하십시오 물 이외의 세제 비누 기타 약품 등은 절대 넣지 마십시오 FD06 Series_US ZH KR indb 116 2018 06 25 9 45 04 ...

Page 117: ...법 안내에 따라 패킹 교체를 완료 하신 후에 다음과 같이 패킹 교체 알림 을 해제 합니다 대기 상태에서 취소 버튼을 5초 이상 눌러 주시기 바랍니다 패킹 교체 시기 알림 표시등 이 소등되었는지 확인해 주세요 밥솥을 일정 시간 사용 후 패킹 교체 시기가 되면 패킹 교체 시기 알림 표시등 이 점등됩니다 표시등이 점등되면 패킹을 교체 후 사용해 주시기 바랍니다 주 의 패킹 교체는 97쪽을 참조하세요 패킹 교체를 제때 하지 않으면 증기 누설이 발생 할 수 있습니다 주 의 패킹 교체 램프 표시 이전에 패킹을 교환하실 경우 반드시 패킹 교체 후 취소 버튼을 5초간 눌러주십시오 패킹 교체 알림 초기화 진행 취소 버튼을 5초간 누르지 않을 경우 패킹 교체 시기 이전에 패킹 교체 알림이 표시됩니다 FD06 Series_US...

Page 118: ...검정콩 붉은 팥 컵씩 소금 큰술 차수수 차조 찰기장 합해 1컵 물 팥 삶은 물 합해 3컵 조리방법 1 찹쌀 차수수 차조 찰기장 서리태는 각각 깨끗이 씻어 체에 받쳐 주십시오 2 팥은 깨끗이 씻어 센 불에 삶아 첫물을 따라 버리고 다시 찬물을 넉넉히 넣어 팥알이 터지기 직전까지 삶아 주십시오 3 내솥에 준비한 찹쌀과 잡곡을 담고 팥 삶은 물에 섞어 소금간을 한 뒤 잡곡 물 눈금 3까지 물을 부어 주십시오 4 내솥을 밥솥에 넣고 뚜껑을 닫아 주십시오 5 메뉴의 잡곡을 선택하여 취사 확인 버튼을 눌러 취사하여 주십시오 6 취사가 완료되면 밥을 잘 섞어 주십시오 콩은 미지근한 물에 15분 이상 불려 주십시오 모든 잡곡은 적정비율로 맞추어 요리하여 주십시오 재료 쌀 흑미 물 조리방법 1 쌀과 흑미를 쌀과 흑미의 비율...

Page 119: ...과 양념장 배즙으로 요리되므로 물을 넣을 필요가 없습니다 물을 추가로 넣으실 경우 증기배출 시 국물이 뿜어져 나올 수 있으니 주의해 주십시오 재료 돼지고기 600g 대파 1개 생강 1뿌리 마늘 5쪽 물 3컵 조리방법 1 기름을 떼낸 제육을 내솥에 넣고 손질한 대파 생강 마늘을 넣은 다음 물 3컵을 부어 주십시오 2 내솥을 밥솥에 넣고 뚜껑을 닫아 주십시오 3 메뉴의 영양찜을 선택한 후 시간을 50분으로 설정한 뒤 취사 확인 버튼을 눌러 요리하여 주십시오 재료 특성에 따라 육즙이나 염분에 의한 눌음이 발생할 수 있습니다 기준치 이상으로 물을 넣으면 증기 배출시 국물이 뿜어져 나올 수 있으니 주의해 주십시오 덩이가 큰 경우 2 3군데 깊게 칼집을 내어 주십시오 찐 고구마 찐 감자 구운 달걀 재료 고구마 150g...

Page 120: ...게 소금을 넣고 가볍게 저어 주십시오 잣죽 흰죽 대추차 재료 쌀 1컵 잣 컵 소금 약간 물 6 컵 조리방법 1 쌀을 깨끗이 씻어 30분 정도 불려 주십시오 2 잣은 깨끗이 씻어 믹서에 갈아 주십시오 3 불린 쌀과 갈은 잣을 넣고 물 6 컵을 부어 주십시오 4 내솥을 밥솥에 넣고 뚜껑을 닫아 주십시오 5 메뉴의 건강죽을 선택하여 취사 확인 버튼을 눌러 요리하여 주십시오 6 요리가 완료되면 기호에 맞게 소금을 넣고 가볍게 저어 주십시오 기준치 이상으로 물을 넣으면 증기 배출 시 밥물이 넘칠 수 있으니 주의하여 주십시오 재료 쌀 1컵 물 6컵 조리방법 1 쌀을 인분 수에 맞게 계량컵으로 계량하여 주십시오 2 분량의 쌀을 깨끗이 씻어 30분 정도 불려 주십시오 3 내솥에 불린 쌀을 넣고 물 6컵을 부어 주십시오 4...

Page 121: ...용하셨습니까 물 조절을 확실히 하셨습니까 메뉴 선택은 확실히 하셨습니까 3 밥이 너무 되거나 설익었을 때나 너무 진밥 일 때 밥물 조절은 제대로 되었나요 쌀의 양에 따라 측정 눈금에 맞게 수위 조절을 하여 주십시오 내솥 바닥에 이물질이 붙어있지는 않은가요 자동 온도 센서의 이물질을 제거해 주십시오 4 뚜껑 옆으로 증기가 샌다 압력 패킹 부위에 밥알 등이 붙어 있지 않나요 내솥의 상부측면과 압력 패킹 외측 면을 깨끗이 손질해 주십시오 압력 패킹이 닿는 부위 압력 패킹을 적기에 교환하셨나요 증기가 누설되면 압력추를 젖혀서 증기를 빼낸 후 전원 플러그를 뽑아 센터로 문의하십시오 패킹은 소모품입니다 압력 패킹이 낡지 않았습니까 패킹의 수명은 약 12개월이므로 1년에 한 번씩 교체하는 것이 좋습니다 5 예약이 안될 ...

Page 122: ...간 이상 보온하지 마십시오 112 쪽 참조 요리 기능을 사용하지 않았나요 압력 패킹을 자주 세척하셨나요 장시간 예약취사한 밥은 가능한 보온하지 마십시오 클린커버의 결합 상태를 반드시 확인하십시오 11 버튼 입력 시 표시가 나타날 때 내솥이 제품에 들어 있습니까 내솥이 들어 있지 않은 상태에서는 취사 예약취사 보온이 되지 않습니다 내솥을 넣어 주십시오 220 V용 전원 에 사용하지 않았습니까 본 제품은 120 V전용 제품입니다 전원을 바르게 사용하십시오 12 밥이 내솥에 황갈색으로 눌어 붙어 있을 때 쌀은 충분히 씻었나요 쌀을 항상 깨끗이 씻어 주십시오 자동온도센서 표면에 물기나 이물질이 묻어 있지 않습니까 자동온도센서 표면의 물기 및 이물질을 제거하십시오 13 콩 잡곡 이 설 익을 때 콩 잡곡 이 너무 마르...

Page 123: ...FD06 Series_US ZH KR indb 123 2018 06 25 9 45 09 ...

Page 124: ...FD06 Series_US ZH KR indb 124 2018 06 25 9 45 09 ...

Page 125: ...40 MÉMO FD06 Series_FR_171026 indd 40 2018 06 25 9 53 45 ...

Page 126: ...enceinte sous pression Ne chauffez pas du riz qui a été cuit avec l option Pré réglage sur une longue durée Assurez vous que le couvercle propre est bien enclenché 11 apparaît lorsqu on appuie sur les boutons Le récipient intérieur est il dans le cuiseur de riz Les fonctions de cuisson pré réglage et chauffage sont inopérantes si le récipient intérieur n est pas dans le cuiseur de riz Mettez le ré...

Page 127: ...elle appropriée et ajoutez la bonne quantité d eau correspondant au nombre de portions à cuire Le fond du récipient intérieur est il exempt de substances étrangères Éliminez les substances étrangères de la sonde automatique de température 4 De la vapeur s échappe sur le côté du capot Y a t il des grains de riz collés sur l enceinte sous pression Nettoyez le rebord supérieur du récipient intérieur ...

Page 128: ...Purée nature Thé au jujubes Ingrédients 1 gobelet de riz gobelet de pignons de pin du sel et 6 gobelets d eau Instructions 1 Lavez soigneusement le riz et les pignons de pin Laissez les tremper ensuite dans l eau pendant 30 minutes 2 Lavez les pignons de pin et écrasez les dans un mélangeur 3 Mélangez le riz trempé et les pignons de pin écrasés Ajoutez ensuite 6 gobelets d eau 4 Mettez le récipien...

Page 129: ...e Si vous ajoutez de l eau celle ci peut déborder lorsque la vapeur s échappe Ingrédients 600 g de porc 1 oignon vert 1 gingembre 5 gousses d ail et 3 gobelets d eau Instructions 1 Dégraissez le porc et mettez le dans le récipient intérieur avec l oignon vert le gingembre et l ail Ajoutez 3 gobelets d eau 2 Mettez le récipient intérieur dans le cuiseur de riz et fermez le capot 3 Sélectionnez Vape...

Page 130: ...ser séparément sur une passoire 2 Faites bouillir les haricots rouges lavés et égouttez l eau Remettez suffisamment d eau froide dans le récipient et faites bouillir les haricots rouges jusqu à ce que les grains soient sur le point d éclater 3 Mettez ensemble le riz collant et les céréales mélangées dans le récipient intérieur mélangez avec l eau utilisée pour faire bouillir les haricots rouges et...

Page 131: ...sur le bouton CANCEL pendant plus de 5 secondes en mode de veille Vérifiez que le témoin de l avis de remplacement de l enceinte est éteint Après avoir utilisé le cuiseur pendant un certain temps le témoin Avis de changement de l enceinte s allume Si le témoin s allume remplacez l enceinte Mise en garde Se reporter à la page 14 pour le remplacement de l enceinte Si l enceinte n est pas remplacée à...

Page 132: ... de verrouillage Si vous ne mettez pas la poignée du capot en position verrouillée Lock et que vous appuyez sur le bouton AUTO CLEAN le nettoyage automatique ne fonctionne pas 3 Appuyez sur le bouton AUTO CLEAN à l état de veille Le nettoyage automatique s effectue pendant 20 minutes Une fois le nettoyage automatique terminé le cuiseur passe à l état de veille Utilisation de la fonction Nettoyage ...

Page 133: ...rmations suivantes 3 Appuyez sur le bouton COOK OK pour confirmer la langue et le volume Après 15 secondes sans appuyer sur un bouton le réglage de la langue et du volume est terminé automatiquement Premier chiffre Langue Dernier chiffre Volume 0 Éteindre le guidage vocal 00 0 1 Coréen 01 Niveau 1 2 Chinois 02 Niveau 2 3 Anglais 03 Niveau 3 04 Niveau 4 Comment définir une langue et régler le volum...

Page 134: ...condes 4 Tournez le cadran pour sélectionner l intensité du chauffage 2 1 0 1 2 3 4 2 est sélectionné en séquence L intensité de chauffage par défaut est 0 Lorsque beaucoup de condensation se produit sur le capot réglez l intensité de chauffage entre 1 et 4 Lorsque le riz s étale trop autour des bords du récipient intérieur ou qu il dégage une odeur un peu aigre réglez l intensité de chauffage ent...

Page 135: ... Le mécanisme de chauffage économique est qu une fois que vous avez réglé l heure du prochain repas le système maintient le riz à basse température et réchauffe le riz avant l heure définie Ainsi vous pouvez empêcher le riz de se décolorer et de sécher le riz a meilleur goût et vous économisez de l électricité Lorsque le chauffage économique est terminé ou que le bouton CANCEL est enfoncé le param...

Page 136: ...s un mode autre que Nature Mélangé Brun etc doit être servi immédiatement après la cuisson Le réchauffage peut provoquer une décoloration du riz et ou dégager une odeur Un réchauffage fréquent peut décolorer le riz et ou le rendre sec Le réchauffage ne commence que lorsque le verrou du capot est mis en position de verrouillage Lorsqu il est en position ouverte O un avertissement sonore est émis et...

Page 137: ...arrer la cuisson Une fois que la cuisson commence le cuiseur affiche le temps de cuisson restant Aliments pour bébé Vapeur Cuisson lente Réglage de l heure 15 à 90 minutes 1 heure à 12 heures et 50 minutes Tourner le cadran dans le sens horaire pour augmenter de 5 minutes pour augmenter de 10 minutes Tourner le cadran dans le sens antihoraire pour diminuer de 5 minutes pour diminuer de 10 minutes ...

Page 138: ...nséquent le minuteur pré réglé ne doit pas être réglé sur plus de 10 heures La cuisson d un riz vieilli ou séché peut donner un riz trop cuit ou cuit de manière non uniforme Si le riz est à moitié cuit ajoutez plus d eau que d habitude environ la moitié du niveau d eau en plus En démarrant le minuteur pré réglé pour cuire lorsque le récipient intérieur est encore chaud ou tiède après la cuisson pr...

Page 139: ...ns le sens antihoraire pour diminuer de 10 minutes En réglant l heure vérifiez a m matin et p m soir Clignotement Clignotement 3 Pour changer de menu appuyez sur le bouton SET et tournez le cadran pour sélectionner À chaque fois que vous tournez le cadran Nature Mélangé Riz brun Nurungji Nature seront sélectionnés l un après l autre Appuyez à nouveau sur le bouton SET pour revenir au mode de régla...

Page 140: ...puyez sur le bouton COOK OK pour confirmer le réglage Le réglage est enregistré automatiquement 15 secondes après avoir sélectionné la température de chauffage et le système pas en mode de veille Une pression sur le bouton COOK OK une fois le réglage effectué démarre la cuisson selon les paramètres Une fois que le temps de trempage et la température de chauffage sont réglés ils sont mémorisés même...

Page 141: ...ez le cadran pour sélectionner la durée d infusion et appuyez sur le bouton COOK OK À chaque fois que vous tournez le cadran 0 minute 2 minutes 4 minutes 6 minutes 8 minutes 0 minute seront sélectionnés l un après l autre Par défaut 0 minute sélectionné Si vous voulez augmenter le temps de trempage choisissez 2 4 6 ou 8 minutes L augmentation du temps de trempage permet au riz d absorber davantage...

Page 142: ...uyant sur le bouton RICE TASTE À chaque pression sur le bouton RICE TASTE Nature collant Nature moyen Nature normal Nature collant seront sélectionnés tour à tour Sélectionnez un menu selon votre goût Clignotement Clignotement Clignotement 3 Appuyez sur le bouton COOK OK Une fois que vous avez défini le goût pour un menu il est mémorisé lorsque la cuisson est terminée Par la suite la cuisson se fa...

Page 143: ...itement cuit Produit un riz parfaitement cuit idéal pour préparer des rouleaux de riz kimbap et des sushi 2 Un parfait équilibre entre le riz collant et du riz parfaitement cuit Maintient l équilibre entre le riz collant et du riz parfaitement cuit 1 Riz collant Produit du riz collant et charnu Mise en garde Le cuiseur de riz peut dégager de la vapeur lorsqu il fonctionne dans ce mode Ce phénomène...

Page 144: ...e rapide est recommandée pour 4 portions au maximum Notez également que le riz cuit en mode MIXED QUICK peut ne pas avoir un goût aussi bon que le riz cuit en mode normal La cuisson du riz mélangé avec des haricots noirs ou rouges bien trempés en mode MIXED peut produire un résultat pâteux L option Mélange rapide permet de faire du riz moins pâteux Le temps réel de cuisson peut varier en fonction ...

Page 145: ...ession soit de niveau Une pression sur le bouton COOK OK lorsque le verrou du capot n est pas en position verrouillée ne permet pas de démarrer la cuisson 3 Tournez le cadran pour sélectionner la langue À chaque fois que vous tournez le cadran Nature Nature rapide Mélangé Mélangé rapide Riz brun Cuisson lente Vapeur Nurungji Aliments pour bébé Purée Nature sont sélectionnés l un après l autre Clig...

Page 146: ...e l appareil Lorsque vous réglez l heure sur 9 30 AM 1 Appuyez une fois sur le bouton SET en mode de veille pour passer au mode de réglage de l heure actuelle 2 Tournez le cadran pour régler l heure Tournez le cadran vers la droite pour augmenter le chiffre Tournez le cadran vers la gauche pour diminuer le chiffre Veillez à vérifier s il s agit du matin AM ou du soir PM lorsque vous réglez l heure...

Page 147: ... plats à la vapeur le riz peut prendre l odeur des aliments cuisinés précédemment Assurez vous que le couvercle propre est bien enclenché Pour essuyer les grains de riz ou d autres substances étrangères utilisez un torchon sec Notamment nettoyez souvent l évent de vapeur Pour se débarrasser de l odeur en cuisinant avec du vieux riz Le riz plus ancien a tendance à dégager une odeur désagréable lors...

Page 148: ...le cuiseur installez le bouchon de vapeur sur le couvercle et appuyez sur la zone indiquée par la flèche jusqu à ce qu il soit bien en place Bouchon sous pression Buse du régulateur de pression Si de l eau a été recueillie ici essuyez la avec un torchon sec Bouchon de vapeur Si l enceinte de la buse du régulateur de pression n est pas en place comme illustré sur la figure de la vapeur peut s échap...

Page 149: ... du fond de l élément principal après avoir sorti le récipient intérieur Si des substances étrangères se trouvent au niveau de la sonde de température automatique ou de la plaque chauffante la sonde peut ne pas pouvoir détecter la température et empêcher une bonne cuisson du riz ou provoquer un dysfonctionnement ou un incendie Essuyez la avec un torchon sec et veillant à ne pas endommager la sonde...

Page 150: ...ncorrectement monté Mise en garde Les instructions ci dessus doivent être suivies après le nettoyage de l enceinte pour éviter toute fuite de vapeur Si l insertion est incorrecte le riz peut être insuffisamment cuit et des brûlures peuvent être dues à une fuite de vapeur Vérifier si l insertion est correcte avant toute utilisation L enceinte a une forme circulaire Avant de démarrer FD06 Series_FR_...

Page 151: ...acement de l enceinte est de 1 an Remplacez le une fois par an L enceinte est en silicone 1 Retirez l enceinte sous pression à la main comme illustré sur la figure 2 Insérez l enceinte sous pression et le couvercle de pression en les alignant avec les repères comme illustré sur la figure 1 Tampon de fixation extérieur 2 Tampon de fixation intérieur Ordre d insertion de l enceinte sous pression 1 2...

Page 152: ...a molette du couvercle propre alignez la sur le support central du capot sous pression dans le sens de la flèche et exercez une pression pour le mettre en place Le texte doit apparaître correctement et la poignée du couvercle propre doit apparaître à l avant Le mot FRONT avant sur l enceinte doit apparaître au centre du couvercle propre Le texte est à l envers Avant du couvercle propre Arrière du ...

Page 153: ...t ou le récipient intérieur Cela ne présente toutefois aucun risque pour la santé Pendant la cuisson un peu de vapeur peut s échapper sur un côté du capot en raison de la vaporisation à l intérieur du cuiseur 1 Si vous tenez le bouton du couvercle propre et le tirez dans le sens de la flèche le couvercle se détache facilement du capot 2 Pour nettoyer le couvercle propre tenez les ailes de la poign...

Page 154: ... quantité de chaleur 9 Avis de changement de l enceinte S affiche lorsque l enceinte doit être remplacée Mode économie d énergie Ce mode permet de réduire la consommation d énergie en mode veille Si aucune entrée n a lieu pendant 1 minute en veille le mode Économie d énergie est activé automatiquement Lorsque le mode Économie d énergie est activé le témoin s allume en vert Le mode Économie d énerg...

Page 155: ...mations sur cette fonction se reporter à la 33 page 4 RICE TASTE goût du riz Sert à contrôler la saveur du riz cuit en mode Nature Pour d autres informations sur cette fonction se reporter à la 22 page 5 SET réglage Sert à régler l heure la langue voix la température de chauffage et la quantité de chaleur et à passer en mode de réglage fin du goût Mise en garde Ne nettoyez pas le panneau de comman...

Page 156: ...me un joint étanche pour empêcher la vapeur de s échapper L enceinte sous pression doit être remplacée au moins une fois par an Une enceinte sous pression est un produit consommable et des enceintes sous pression de rechange sont disponibles auprès du centre de service ou dans un grand magasin Sonde de sécurité Surveille la température intérieure Acier inoxydable propre Bouchon de vapeur Récipient...

Page 157: ...iz est conservé au chaud Consultez votre médecin avant d utiliser cet appareil si vous portez un stimulateur cardiaque ou d autres dispositifs électriques d assistance médicale Le fonctionnement de l appareil peut affecter ces dispositifs N utilisez pas l appareil à l extérieur Un choc électrique ou un incendie pourraient se produire Laissez ou mettez l emballage en polyéthylène hors de la portée ...

Page 158: ...la cuisson appuyez sur le bouton CANCEL pendant environ 1 seconde puis ouvrez le après avoir complètement évacué la pression intérieure Une décoloration ou une déformation du récipient intérieur peut provoquer un dysfonctionnement de l appareil N utilisez pas d ingrédients tels qu une quantité de mélange de céréales qui dépasse la proportion appropriée indiquée dans les instructions de cuisson Cel...

Page 159: ...ste un risque d incendie ou de déformation Ne laissez pas des débris obstruer les entrées de l appareil ou d autres ouvertures Si elles sont obstruées débranchez le cordon électrique et contactez le centre de réparation Il existe un risque de choc électrique d incendie ou de blessures corporelles Installation Danger N utilisez pas l appareil à proximité de sources de chaleur telles que la lumière ...

Page 160: ...état de la fiche d alimentation de temps en temps Ne pliez pas ou ne tirez pas excessivement le cordon d alimentation Ne faites pas de nœud au cordon d alimentation Ne branchez pas l appareil à une prise de courant déjà raccordée à plusieurs autres appareils Utilisez une prise de courant dédiée Ne posez pas l appareil sur un bac à riz ou sur un panier multi usages Cela pourrait provoquer un court ...

Page 161: ...ler L utilisation d accessoires non recommandés par le fabricant de l appareil peut entraîner des blessures Ne l utilisez pas à l extérieur cet élément peut être omis si l appareil est spécifiquement destiné à l extérieur Ne laissez pas le cordon suspendu au dessus du bord de la table ou du comptoir et ne touchez pas les surfaces chaudes Ne le placez pas sur ou à proximité d un brûleur à gaz ou d ...

Page 162: ...ge fin du goût 24 Comment utiliser la minuterie préréglée 26 Comment cuire des aliments pour bébé Vapeur Lent 28 Pour maintenir au chaud et réchauffer 29 Comment maintenir du riz chaud 30 Réglage de la température de chauffage et de l intensité de chaleur 31 Comment choisir une langue et régler le volume 32 Nettoyage automatique 33 Avis de changement de l enceinte 34 Recettes de plats 35 Lisez cec...

Page 163: ...vec l emballage Ces spécifications sont susceptibles de légères modifications pour l amélioration des performances de l appareil 2 Ne placez pas de plaque en acier inoxydable une planche un coussin une couverture électrique une plaque d acier du papier aluminium ou un plateau en acier ou en aluminium sous ce produit Cela pourrait provoquer un incendie ou un dysfonctionnement de l appareil Ne posez...

Page 164: ...de l appareil peut être modifiée pour améliorer ses performances Joli Facile Intelligent Avant d utiliser le cuiseur de riz électrique sous pression Cuchen veuillez lire ce manuel pour utiliser correctement l appareil Veuillez conserver ce manuel dans un endroit facilement accessible en permanence FD06 Series_FR_171026 indd 1 2018 06 25 9 48 30 ...

Reviews: