


User Manual: WaveLinx Lite (1.5)
www.cooperlighting.com
49
Calibrate Daylight Sets
The WaveLinx Lite (1.5) system supports daylight sensor control through fixture mount and integrated sensors. These sensors control the
attached fixture using a closed loop approach. For outdoor applications, the focus is typically on ensuring that the fixtures turn OFF at dawn
and turn ON or enable motion activity to turn ON lighting at dusk. For indoor applications, the focus is typically on trying to maintain a
consistent light level by adjusting the amount of electric light needed based on the amount of daylight present in the space.
For information on how a specific device operates with dimming and dim-to-off response, refer to “WaveLinx Lite Device Reference Sheets”
beginning on page 6 to locate the specific daylight response by device type.
•
Closed Loop Daylighting:
With the closed loop approach, the sensor controls only its connected light fixture. A closed loop sensor views the
surface directly below it. It reads the reflected light level from the surface including light contributed by the electric light and the daylight that
falls within the sensor’s view. As daylight contribution increases, the sensor dims the electric light to keep the light level on the surface as
consistent as possible. If bright daylight causes the surface light level to be above the desired level even after the light level has been fully
dimmed, after a period of time the fixture will dim to OFF. As daylight contribution decreases and the surface light level lowers, the fixture will
turn back ON and then raise the amount of electric light accordingly.
Note
: If the device allows dim-to-off, when the measured light level exceeds 150% of the calibrated light level for more than 30 minutes, the sensor will turn
lighting OFF. Lighting will be turned back ON when one of the two conditions occurs. Condition 1: The measured light level falls between 100% and 50% of the
calibrated light level for more than 10 minutes. Condition 2: The measured light level falls below 50% of the calibrated light level for longer than 30 seconds
•
Control Interactions with Daylighting:
Daylighting filters or inhibits the fixture’s response to other control commands. A command from the
onboard occupancy sensor or wallstation to go to 100% level will adjust the electric light level output to meet the calibrated daylight level
(calibrated light level = 100%). A command from the occupancy sensor or wallstation to go to 50% will adjust the electric light level to meet
50% of the calibrated daylight level. The actual electric light level output with these commands will vary based on the available amount of
daylight and how much electric light needs to be contributed to maintain the commanded target. If the electric light has daylight dimmed to
OFF, lighting will remain OFF if occupancy or wallstation commands are received, preventing unnecessary energy waste when adequate
daylight is present.
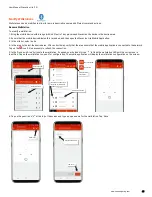
This section includes details on how to:
•
Identify and rename the daylight set being used for a specific device
•
Disable daylighting for specific sensors
•
Calibrate closed loop sensors
•
Test daylight sensor operation
Internet connection is not needed to calibrate daylight sets but connection to the WaveLinx Lite device/network is required. The mobile device
will need to be in range and as close as possible (within 60 feet) to one of the WaveLinx Lite devices that belongs to the same area
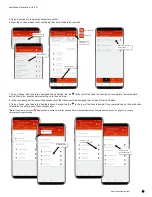
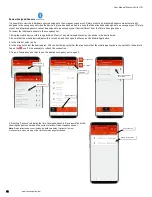
Identify and Rename the Daylight Set Being Used for a Specific Device
Before disabling or calibrating devices, make certain to identify the daylight set being used to control a specific device. The daylight set can be
renamed to be easily identified in the mobile application.
To identify the daylight set being used:
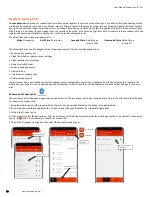
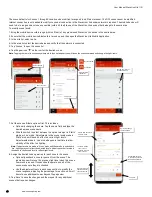
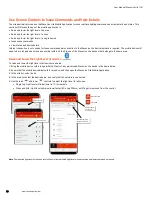
1: Bring the mobile device within range (within 60 feet) of any provisioned WaveLinx Lite device in the desired area.
2: Ensure that the mobile device Bluetooth is turned on, and then open the WaveLinx Lite Mobile Application.
3: In the site list, select a site.
4: In the area list, select the desired area. After a short delay, verify that the area shows that the mobile application is connected to the network.
Tap on the icon if it is necessary to refresh the connection.
5. In the zone list, select the zone where the fixture resides.
Select the site
Select the area
Select the zone
Verify network
connection
Connected
Not connected