7.4L engines:
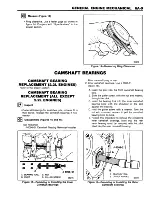
— J 7049-1: 0.08 mm (0.003 inch) oversize.
— J 7049-2: 0.38 mm (0.015 inch) oversize.
— J 7049-3: 0.76 mm (0.030 inch) oversize.
— These reamers also available in Reamer Set
J 7049.
ASSEMBLY
*
Assemble
Valves and components. Refer to the proper sec
tion.
MEASURING MAIN BEARING CLEARANCE
Main bearings are of the precision insert type and do
not use shims for adjustment. If clearances are found to
be excessive, new upper and lower inserts will be
required.
The simplest, most accurate way to measure main
bearing clearance is with the use of gaging plastic. This
wax-like material compresses evenly between the bear
ing and journal surfaces without damaging them. Pro
ceed as follows:
Clean
All oil from the crankshaft journal and main bearing
inserts.
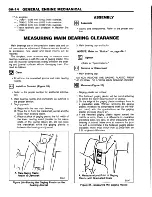
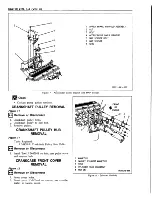
Install or Connect (Figure 26)
3. Main bearing cap and bolts.
NOTICE: Refer to “Notice” on page 6A-1.
Tighten
Bolts to “ Specifications.”
&
Remove or Disconnect
• Main bearing cap.
DO NOT REMOVE THE GAGING PLASTIC FROM
THE JOURNAL OR LOWER MAIN BEARING INSERT.
m
Measure (Figure 27)
• Refer to the proper section for additional informa
tion.
1. Main bearing inserts and crankshaft, as outlined in
the proper section.
2. Gaging plastic.
A. Begin with the rear main bearing.
B. Wipe the oil from the crankshaft journal and the
lower main bearing insert.
C. Place a piece of gaging plastic the full width of
the lower bearing insert (parallel to the crank
shaft) on the journal (figure 26). Do not rotate
the crankshaft w hile the gaging plastic is
between the bearing and journal.
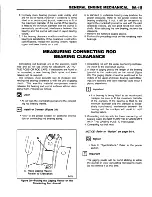
• Gaging plastic as follows:
1. The flattened gaging plastic will be found adhering
to either the lower bearing insert or journal.
2. On the edge of the gaging plastic envelope there is
a graduated scale. Without removing the gaging
plastic, measure its compressed width (at the wid
est point) with the graduations on the gaging
plastic envelope (figure 27).
3. If the flattened gaging plastic tapers toward the
middle or ends, there is a difference in clearance
indicating taper, low spot, or other irregularity of the
bearing or journal. Make sure to measure the jour
nal with a micrometer if the flattened gaging plastic
indicates more than 0.001-inch (0.0005-inch on
2.2L engines) difference.
Summary of Contents for Light Duty Truck 1994 Series
Page 1: ......
Page 11: ...VIEW A p n n n j VIEW C F7554 Figure 10 Hydra Matic 4L60 E Transmission I D Location ...
Page 24: ...NOTES ...
Page 26: ... ...
Page 69: ...NOTES ...
Page 71: ...3 2 STEERING ...
Page 73: ......
Page 84: ......
Page 102: ...40 ...
Page 130: ...NOTES ...
Page 146: ...NOTES ...
Page 162: ...NOTES ...
Page 166: ...Figure 5 Removing the Pinion Flange Figure 6 Pressing the Drive Pinion from the Cage ...
Page 178: ...Figure 3 Spreading the Differential Case Figure 4 Removing the Differential ...
Page 190: ...NOTES ...
Page 202: ...NOTES ...
Page 206: ...F5785 ...
Page 212: ...B Button Moved Out of Bearing Bore F5791 ...
Page 228: ...NOTES ...
Page 232: ......
Page 234: ......
Page 236: ...Adjuster 63 Bolt 64 Lock Figure 10 Turning the Adjuster Plug K3 Models ...
Page 237: ...Figure 13 Removing the Pinion Seal 39 Bearing Cup Figure 16 Removing the Inner Bearing Cap ...
Page 261: ...F7475 ...
Page 267: ...B Button Moved Out of Bearing Bore F5791 ...
Page 294: ...NOTES ...
Page 300: ...NOTES ...
Page 318: ...NOTES ...
Page 322: ...SR207LN2 EDS ...
Page 324: ......
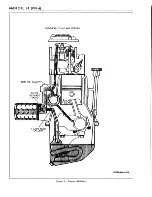
Page 326: ...OVERHEAD OILING AND RETURN MAIN OIL GALLERY N30005 6A2 J EDS ...
Page 368: ...103 153 127 V1200 ...
Page 370: ......
Page 372: ......
Page 374: ...F9375 Figure 7 Engine Lubrication Diagram Engines Without Balance Shaft ...
Page 376: ...Figure 9 Engine Lubrication Diagram Engines With Balance Shaft ...
Page 399: ...V2974 ...
Page 410: ......
Page 412: ...195 196 201 174 252 163 165 164 244 3706r3924 ...
Page 452: ......
Page 454: ...163 164 V1202 ...
Page 456: ...20 21x 302 210 4 0 41 2 5 2 5 1 2 51 4 2 e3 54 3 9 252 252 S 255 255 25 6 256 209 V1196 ...
Page 458: ...100 1 8 4 185 183 177 v 75 201 3706r1204 ...
Page 460: ......
Page 510: ......
Page 512: ...V2131 ...
Page 514: ...110 106 106 103 90 93 89 88 87 86 v 7 7 7 7 j A _ 111 f t 2 a a s 53 49 L 47 46 3706r4751 ...
Page 566: ...NOTES ...
Page 574: ...NOTES ...
Page 618: ...SPECIAL TOOLS ...
Page 620: ...NOTES ...
Page 672: ......
Page 682: ......
Page 686: ......
Page 694: ...RH0213 4L60 E ...
Page 695: ...657 659 m i J 8092 H J 34196 4 3 34196 5 657 658 665 J 23907 J 7004 1 J 8092 RH0214 4L60 E ...
Page 696: ...J 8092 J 34196 4 33 31 J 8092 RH0215 4L60 E ...
Page 697: ...SPECIAL TOOLS ...
Page 698: ...SPECIAL TOOLS ...
Page 758: ...RH0194 4L80 E ...
Page 764: ......
Page 770: ...SPECIAL TOOLS ...
Page 771: ...SPECIAL TOOLS CONT ...
Page 772: ......
Page 775: ......
Page 776: ......
Page 785: ......
Page 804: ...NOTES ...
Page 806: ......
Page 808: ......
Page 822: ...3707r5079 ...
Page 840: ......
Page 848: ...NOTES ...
Page 852: ......
Page 860: ...F5435 ...
Page 866: ......
Page 878: ...F9167 ...
Page 882: ...16 FrontOutputShaft 18 DrivtQNr 19 DrivenGm t 20 DriveChain 22 FrontOutputBearing V2836 ...
Page 890: ...F9168 ...
Page 908: ......
Page 919: ......


