background image

suction pressure  will  be  above the  control  point;  the  valve  will 

m aintain 

bleed 

from  

crankcase 

to 

suction: 

no 

crankcase-suction  pressure  differential;  and  the  com pressor 
will  have  m axim um   displacem ent.  W hen  the  A/C  capacity 
d em and  is  low er  and  the  suction  pressure  reaches  the  control 
point,  the  valve  will bleed  discharge gas  into the crankcase and 
close  o ff a  passage  from   the  crankcase  to  the  suction  plenum. 
T he  angle  o f the  w obble-plate  is  controlled  by  a  force  balance 
on  the  five  pistons.  A  slight  elevation  o f the  crankcase-suction 
p ressure  differential  creates  a  total  force  on  the  pistons 
resulting  in  a  m ovem ent  about the  w o b b le-p la te  pivot  pin  that 
reduces the  plate  angle.

T he  com pressor  has  a  unique  lubrication  system.  The 

crankcase-suction  bleed  is  routed  through  the  rotating 
w obble-plate  for  lubrication  o f the  w obble-plate  bearing.  The

rotation acts as an oil  separator,  w hich rem oves  som e o f the oil 
from  the  crankcase-suction  bleed,  rerouting  it to the crankcase 
where it can  lubricate  the com pressor m echanism .

METRIC THREAD SIZE INFORMATION

1. 

C om pressor to m ounting bracket bolts.

F ront 

M 10 x  1.5 -  6H

R ear 

M 8 x l . 2 5 - 6 H
M l O x   1.25 - 6 H

2. 

S uction-discharge  port  screw.

M l O x   1 . 5 - 6 H

3. 

C om pressor shaft.

M 9 x   1 .2 5 - 6 H

Internal  hub-clutch drive assem bly.

M 22  x  1 .5 - 6 H

UNIT REPAIR


MINOR VS COMPRESSOR  REPAIR

Illustrations  used  in  the  follow ing  operations  show  the 

com pressor rem oved  from   the  car  for  easier  viewing.  Refer  to 
A ir  C onditioning  (Section  IB )  for  com pressor  rem oval  w here 
necessary.

W hen  servicing  the  com pressor,  rem ove  only  the  parts 

that prelim inary diagnosis  show   in need o f service.

R em oval  and  installation  o f  external  com pressor  parts, 

and  disassem bly  and  assem bly  o f  internal  parts,  m ust  be 
perform ed  on  a  clean  w orkbench.  The  w ork  area,  tools  and 
parts  m ust be kept clean  at all  tim es.

COMPRESSOR CLUTCH  PLATE AND  HUB


ASSEMBLY

2

.

3.

4.

E3

2

.

3.

5.

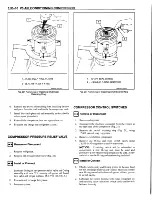
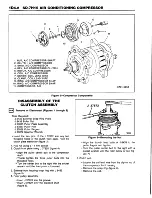
Fig.  2  V5 Compressor Rear Head  Details

Remove or Disconnect

C lam p  the  holding  fixture  J  34992  in  a  vise  and  attach 
com pressor  to  holding  fixture  w ith  thum b  screw s 

J  3 4 9 92-1  (Fig.  4).

K eep  the  clutch  hub  and  drive  plate  assem bly  from  
turning 

by  using  the 

clutch 

hub  holding  tool 

J  3 3 0 2 7 -A .  R em ove the  shaft  nut  using  shaft nut  socket 
J  33022  (Fig.  4).

Thread  the  C lutch  Plate  and  H ub  A ssem bly  R em over 
J  3 3 0 1 3 -B   into  the  hub.  H old  the  body  o f the  rem over 
w ith a  w rench and turn the center screw  into the rem over 
body  to  rem ove  the  clutch  plate  and  hub  assem bly 
(Fig.  5).

R em ove  the  shaft key and retain  for reassem bly.

Install  or Connect

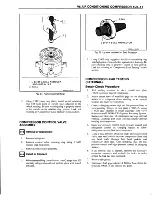
Install  the  shaft  key  into  the  hub  key  groove  (Fig.  6). 
A llow   the  key  to  project  approxim ately  3.2  m m   (1 /8 " ) 
out  o f  the  keyway.  The  shaft  key  is  curved  slightly  to 

provide an  interference  fit in the hub key  groove.

Be  sure  the  frictional  surface  o f the  clutch  plate  and  the 

clutch  rotor  are  clean  before  installing  the  clutch  plate 
and hub assem bly.

A lign  the  shaft  key  w ith  the  shaft  keyw ay  and  place  the 
clutch  plate  and  the  hub  assem bly  onto  the  com pressor 
shaft.

NOTICE: 

Do not drive or pound on the clutch hub or 

shaft.  Internal dam age to com pressor m ay result.

R em ove  the  J  3 3 0 1 3 -B   rem over-installer  center  screw  
and  reverse  the  body  direction  on  the  center  screw   as 

show n  in Figure  7.

Install  the  clutch plate  and  hub  installer J  3 3 0 1 3 -B   w ith 
bearing as  show n  in F igure  7.

The body o f the J 33013 -B  installer should be backed off 
sufficiently to allow  the center screw  to be threaded onto 
the end  o f the com pressor shaft.

Summary of Contents for Light Duty Truck 1994 Series

Page 1: ......

Page 2: ...igned for the purpose Accordingly anyone who intends to use a replacement part service procedure or tool that is not recom m ended by the veh icle manufacturer must first determine that neither his safety nor the safe operation of the vehicle will be jeopardized by the replacement part service procedure or tool selected It is important to note that this manual contains various Cautions and Notices...

Page 3: ... and electronic diagnosis for these models are published in the Driveability Emissions and Electrical Diagnosis Manual NATP 9444 This manual should be kept in a handy place for ready reference If properly used it will meet the needs of technicians and vehicle owners CAUTION GM service manuals are intended for use by professional qualified technicians Attempting repairs or service without the appro...

Page 4: ...ations contained in this manual are based on the latest product information available at the time of publication approval The right is reserved to make changes at any time without notice General Motors Corporation Detroit Michigan NATP 9437 1993 General Motors Corporation April 1993 Printed in U S A All rights reserved No part of this publication may be reproduced stored in any retrieval system or...

Page 5: ...9 1 4 INCH RING 4B3 10 1 2 INCH RING GEAR GEAR 4B4 DANA MODEL 80 11 INCH RING 4C3 ALL WHiEEL DRIVE FRONT AXLE 4B5 GEAR 7 1 4 1NC H RING GEAR c QDAI PQ 5A MASTER CYLINDER 5D2 HYDRAUilC BOOSTER O DnAIVCO 5D1 VACUUM BOOSTER 6A GENERAL ENGINE MECHANICAL 6C1 MODEL 220 TBI UNIT 6A2 2 2L L4 ENGINE VIN 4 6D ENGINE ELECTRICAL CRIS IME 6A3 4 3L V6 ENGINE VIN Z 6D2A SD STARTER MOTORS tiMUiinc 6A4 4 3L V6 ENG...

Page 6: ... information Your name Your dealership s name technicians only Your phone number Model year and vehicle line Publication book number if present Vehicle Identification Number of vehicle being worked on Section and page number s Description of problem This phone num ber cannot provide Technical Assistance Contact your Technical Assistance source The personnel who answer this phone number will provid...

Page 7: ...0 CALLSUN 225 5786 6 45 a m 7 00 p m CST SERVICE PARTS IDENTIFICATION LABEL The service parts identification label is provided on all models figure 1 It is located on the inside of the instrument panel storage compartment or on an inner body panel for Forward Control models The label lists the VIN Vehicle Identification Number wheelbase paint information and all production options or special equip...

Page 8: ...cle identification plate Stick on labels attached to the engine or laser etch ing or stampings on the engine block indicate the engine unit number or date code VEHICLE IDENTIFICATION NUMBER VIN Nation of Origin 1 US Built 2 Canadian Built Manufacturers G 6eneral Motors Coda Make A Chevrolet Bus B Chevrolet Incomplete C Chevrolet Truck D GMC Incomplete J GMC Bus K GMC MPV N Chevrolet MPV T GMC Truc...

Page 9: ...DEL IDENTIFICATION Models and body styles are shown in figures 15 through 19 METRIC FASTENERS Current model GM vehicles are primarily dimensioned in the metric system Many fasteners are metric and are very close in dimension to well known customary fas teners in the inch system It is most important that replacement fasteners be of the correct nominal diame ter thread pitch and strength Figure 5 2 ...

Page 10: ...g with other North American Industries has adopted a portion of the standard metric fastener sizes defined by ISO International Standards Organization This was done to reduce the number of fastener sizes used and yet retain the best strength qualities in each thread size For example the customary 1 4 20 and 1 4 28 screws are replaced by the metric M6 X1 screw which has nearly the same diameter and...

Page 11: ...VIEW A p n n n j VIEW C F7554 Figure 10 Hydra Matic 4L60 E Transmission I D Location ...

Page 12: ...RANSMISSION I D LOCATION 2 TRANSMISSION IDENTIFICATION TAG SERIAL NUMBER P 4 B 17 X z MODEL I NEWVENTUREGEAR 3500 5LM60 BUILDMONTH A JANUARY B FEBRUARY C MARCH D APRIL E MAY Ho JUNE K JULY M AUGUST P SEPTEMBER R OCTOBER S NOVEMBER T DECEMBER REBUILDMONTH USEDONLYWHENCASE ISREUSED SAME CODINGAS3RDDIGIT 2XXX PLANT 4 612XXXMXXXXXX DillIIIIIIIII 111 3700r4925 Figure 12 New Venture Gear 3500 5LM60 Tran...

Page 13: ...e United States and may be of a lower strength may not have the numbered head marking system and may be of a different thread pitch The metric fasteners used on GM products are designed to new international standards that may not yet be manufactured by some non domestic bolt and nut suppliers PREVAILING TORQUE FASTENERS A prevailing torque nut is designed to develop an interference between the nut...

Page 14: ...ic and English conversions refer to figure 23 DECIMAL AND METRIC EQUIVALENTS For determining decimal and metric equivalents refer to figure 24 J1930 WORD CONVERSION Starting with the 1993 model year General Motors will be complying with the Society of Automotive Engi neers SAE Recommended Practice J1930 J1930 is an industry wide standard that was adopted into gov ernment regulations and requires c...

Page 15: ...G VAN MODELS Rally Sportvan Cutaway Van Extended Van Vandura Chevy Van Magnavan Hi Cube Van F7569 ...

Page 16: ...PASSENGER VAN CARGO VAN EXTENDED VAN Figure 17 M L Models P3 MOTOR HOME CHASSIS P3 FORWARD CONTROL CHASSIS V1378 ...

Page 17: ...S T PICKUP REGULAR CAB 2 DOOR S T UTILITY VEHICLE S T PICKUP EXTENDED CAB 4 DOOR S T UTILITY VEHICLE 2900r4506 ...

Page 18: ...R INCH IN MILLIMETERS THREADS IN MILLIMETERS THREAD PITCH V1262 Figure 20 Thread Notation 1 Grade 2 GM 260 M 2 Grade 5 GM 280 M 3 Grade 7 GM 290 M 4 Grade 8 GM 300 M 5 Manufacturer s Identification 6 Nut Strength Identification 7 Identification Marks Posidriv Screw Head V1263 Figure 21 Fastener Strength Markings Identification ...

Page 19: ...37 500 562 625 750 4 5 N m 0 4 0 6 1 4 1 8 2 4 3 2 4 2 6 2 In Lbs 4 0 5 0 12 15 20 27 35 51 1 2 3 6 8 9 N m 0 4 0 6 1 0 1 4 1 8 2 6 3 4 5 2 In Lbs 4 0 5 0 9 0 12 15 22 28 43 A Metric Sizes 1 Top Lock Type 6 Nylon Strip Or Patch B Inch Sizes 2 Center Lock 7 Nylon Washer Insert 3 Dry Adhesive Coating 8 Nylon Patch 4 Out Of Round Thread 9 Nylon Insert 5 Deformed Thread Profile B2406 ...

Page 20: ... newtons Pound 4 448 newtons TEMPERATURE Degree Fahrenheit t F 32 7 1 8 degree Celsius C 4 CO 1 Multiply by to get equivalent number of ACCELERATION Foot sec2 0 304 8 meter sec2 m s2 Inch sec2 0 025 4 meter sec2 TORQUE Pound inch 0 112 98 newton meters Nm Pound foot 1 355 8 newton meters POWER Horsepower 0 746 kilowatts kW PRESSURE OR STRESS Inches of water 0 249 1 kilopascals kPa Pounds sq in 6 8...

Page 21: ...5 17 85937 7 32 0 21875 5 55625 23 32 0 71875 18 25625 15 64 0 234375 5 95312 47 64 0 734375 18 65312 1 4 0 250 6 3500 3 4 0 750 19 05000 17 64 0 265625 6 74687 49 64 0 765625 19 44687 9 32 0 28125 7 14375 25 32 0 78125 19 84375 19 64 0 296875 7 54062 51 64 0 796875 20 24062 5 16 0 3125 7 93750 13 16 0 8125 20 63750 21 64 0 328125 8 33437 53 64 0 828125 21 03437 11 32 0 34375 8 73125 27 32 0 84375...

Page 22: ...e ECM Controlled Canister Purge CCP Evaporative Emission Canister Purge EVAP Canister Purge Coolant Temperature Switch CTS Engine Coolant Temperature Switch ECT Switch Coolant Temperature Sensor CTS Engine Coolant Temperature Sensor ECT Sensor Cooling Fan Control Cooling Fan Control Cooling FC Detonation Sensor Knock Sensor KS Diagnostic Circuit Check Onboard Diagnostic System Check OBD System Che...

Page 23: ...Nitrogen Oxides NOx Nitrogen Oxides NOx Oxygen OJ Oxygen 02 Oxygen Sensor 02 1 Heated Oxygen Sensor H02S 2 Oxygen Sensor 02S Park Neutral Switch P N Switch Park Neutral Postion Switch PNP Switch Port Fuel Injection PFI Multiport Fuel Injection MFI Power Steering P S Power Steering PS Power Steering Switch Power Steering Pressure Switch PSP Switch Pulse Air Injection System PAIR Pulsed Secondary Ai...

Page 24: ...NOTES ...

Page 25: ...IR CONDITIONING CONTENTS SUBJECT PAGE HR100T HR110 MD Air Conditioning Compressor 1D1 1 HD6 HR6 HE Air Conditioning Compressor 1D2 1 V 5 Air Conditioning Compressor 1D3 1 SD 7H15 Air Conditioning Compressor 1D4 1 ...

Page 26: ... ...

Page 27: ... foreign material from getting on or into the compressor parts and system during disassembly or reassembly Clean tools and clean work area are very important for proper service The compressor connection areas and the exterior of the compressor should be cleaned off as much as possible prior to any on vehicle repairs or removal of the compressor for workbench service The parts must be kept clean at...

Page 28: ... ASSEMBLY 3 RETAINER RING ROTOR BEARING ASSEMBLY 4 PULLEY ROTOR 5 ROTOR BEARING 6 COIL HOUSING ASSEMBLY 7 RETAINER SHAFT SEAL 8 SHAFT SEAL 9 O RING SHAFT SEAL 10 PUMP ASSEMBLY 11 O RING PRESSURE RELIEF VALVE 12 PRESSURE RELIEF VALVE ...

Page 29: ...igerant system must be reclaimed evacuated and recharged to complete service Illustrations used in describing these operations show the compressor removed from the vehicle only to more clearly illustrate the various operations When servicing the compressor remove only the necessary components that preliminary diagnosis indicates are in need of service Refer to Figure 2 for information relative to ...

Page 30: ...tall the Clutch Plate and Hub Installer J 9401 illustrated in Figure 7 B as Hold the hex portion of the Installer Body J 9401 B with a wrench and tighten the center screw to press the hub onto the shaft until there is a 0 5 7 6m m 020 030 air gap between the frictional surfaces of the clutch plate and clutch rotor If operation is performed with compressor on vehicle connect drive belt tighten moun...

Page 31: ...lign the new bearing squarely with the hub bore and using Pulley and Bearing Installer J 9481 A with Universal Handle J 29886 drive the bearing fully into the hub Fig 12 The Installer will apply force to the outer race of the bearing if used as shown 1 3 Using a center punch with a 45 angle point stake 1 1 1 4mm 045 055 deep the bearing in three places 120 apart as shown in Figure 11 but do not st...

Page 32: ... line adjust or replace pulley rim 8 Tighten pulley rim mounting screws to 11 N m 100 in lbs torque and lock screw heads in place by bending screw head washer similar to original crimp 9 Reinstall Clutch Plate and Hub assembly as described in Compressor Clutch Plate and Hub Replacement procedures CLUTCH ROTOR AND OR BEARING 6 POLE CLUTCH Remove or Disconnect Remove the clutch plate and hub assembl...

Page 33: ...g if used as shown Place Bearing Staking Guide J 33019 1 and Bearing Staking Pin J 33019 2 in the hub bore as shown in Figure 19 Shift the rotor and bearing assembly on the J 21352 A Support Block to give full support of the hub under the staking pin location A heavy duty rubber band may be used to hold the stake pin in the guide Fig 19 and the stake pin should be properly positioned in the guide ...

Page 34: ...er Guide J 25031 to the front head and install Puller J 8433 with Poly V Belt Puller Leg Set J 24092 and remove the clutch coil from the front head Fig 24 Clutch coil may also be removed by using rotor and bearing puller guide J 25031 with puller tool J 25287 Fig 25 V Groove Drive 4 Pole Clutch Install or Connect Assemble the Clutch Coil Pulley Rim and the Clutch Rotor and Bearing assembly as show...

Page 35: ...AJOR REPAIR PROCEDURES Service repair procedures to the Compressor Shaft Seal and Pressure Relief Valve and Compressor Switches are considered MAJOR SINCE THE REFRIGERATION MUST BE RECOVERED EVACUATED AND RECHARGED to complete service When replacing the shaft seal assembly or pressure relief valve Fig 2 even if the compressor remains on the vehicle during the operation it will be necessary to reco...

Page 36: ...he knurled tangs of Seal Remover Installer J 23128 A into the recessed portion of the Seal by turning the handle clockwise Remove the Seal from the compressor with a rotary pulling motion Discard the Seal The handle must be hand tightened securely Do not use a wrench or plier Fig 27 7 Remove and discard the seal seat O ring from the compressor neck using O Ring Remover J 9553 01 8 Recheck the shaf...

Page 37: ...rigerant and repair as necessary Remove discard and later replace the shaft nut 7 Remove any excess oil resulting from installing the new seal parts from the shaft and inside the compressor neck 8 Install the Clutch Plate and Hub assembly as described in minor repair procedures 9 Reinstall compressor belt and tighten bracketry 10 Evacuate and Charge the Refrigerant System Fig 29 Compressor Leak Te...

Page 38: ...il to all cylinder and piston areas 10 Install a M9 x 1 25 threaded nut on the compressor crankshaft if the drive plate and clutch assembly are not installed 11 Using a box end wrench or socket and handle rotate the compressor crankshaft or clutch drive plate on the crankshaft several turns to ensure piston assembly to cylinder wall lubrication 12 Connect the Charging Station high pressure line or...

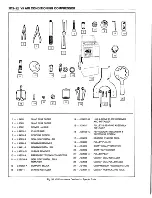
Page 39: ...R BEARING REMOVER 17 J 25031 ROTOR AND BEARING PULLER WITH 7 J33013 B HUB DRIVE PLATE ASSEMBLY GUIDE REMOVER 18 J 25287 CLUTCH COIL PULLER 8 J9401 B HUB DRIVE PLATE ASSEMBLY 19 J 26271 A ROTOR AND BEARING INSTALLER INSTALLER WITHOUT HANDLE 9 J 9481 A PULLEY BEARING AND PULLEY 20 J 33019 1 BEARING STAKING TOOL INSTALLER J 33019 2 BEARING STAKING PIN 10 J 9553 01 O RING REMOVER 21 J 33020 A PULLEY P...

Page 40: ...differences in installations mounting brackets pulleys torque cushions and switches none of which will affect the following overhaul procedures There are two clutch driver designs for these compressors The clutch driver without a torque cushion and the clutch driver having a thin torque cushion Fig I Service compressors are supplied with either the control switches assembled in the rear head or a ...

Page 41: ...MP ASSEMBLY 8 SWITCH O RING 9 SYSTEM CONTROL SWITCH 10 HIGH PRESSURE RELIEF VALVE 11 RETAINER RING SWITCH 12 SUCTION DISCHARGE PORT SEALING WASHERS 13 SPECIAL 134a SUCTION PORT 1 4 SPECIAL 134a DISCHARGE PORT OO M 1 12 I Compressor Rear Head As Viewed in Direction of Arrow A Fig 2 Compressor Components Disassembly ...

Page 42: ...r remove only the parts that preliminary diagnosis shows are in need of service Refer to Figures 2 and 5 for information relative to part names and location Removal and installation of external compressor parts and disassembly and assembly of internal parts must be performed on a clean workbench The work area tools and parts must be kept clean at all times COMPRESSOR CLUTCH PLATE AND HUB ASSEMBLY ...

Page 43: ...ace in the keyway before installing the clutch plate and hub assembly to its final position The air gap between frictional surfaces of the clutch plate and clutch rotor should be 0 50 0 76mm 020 030 NOTICE If the center screw is threaded fully onto the end of the compressor shaft or if the body of the installer is held and the center screw is rotated the key will wedjie and will break the clutch h...

Page 44: ...ly supported J 33020 PULLEY ROTOR AND BEARING PULLER G60120 1D2 EK R1 Fig 8 Removing Pulley Rotor and Bearing Assembly E l J 33020 LESS FORCING SCREW INVERTED AND USED TO SUPPORT HUB OF ROTOR FOR BEARING REMOVAL PULLER TANGS ENGAGED IN ROTOR SLOTS m m El PULLEY ROTOR FACE DOWN J 9398 A BEARING REMOVER J 29886 DRIVER HANDLE G60130 1D2 C R1 Fig 9 Pulley Rotor Bearing Removal Remove the forcing screw...

Page 45: ...sult if outer bearing race is deformed while staking The stake metal should not contact the outer race of the bearing Stake three places 120 degrees apart as shown in Figure 12 Q j J 33019 1 BEARING STAKING GUIDE m RUBBER BAND f i l J 33019 2 BEARING STAKING PIN _________________________ ________ G60150 1D2 EK R1 Fig 11 Staking Bearing In Rotor Hub Bore 5 With the compressor mounted to the J 33026...

Page 46: ...install J 8433 1 puller crossbar with J 33025 puller legs as show n in Figure 14 Tighten J 8 4 3 3 3 forcing screw against the puller pilot to remove the clutch coil 4 Install or Connect 1 Place the clutch coil assem bly on the front head with the terminals positioned at the m ark ed location 2 Place the J 33024 clutch coil installer over the internal opening of the clutch coil housing and align i...

Page 47: ...portant as is the use o f proper clean service tools NOTICE A ny attem pt to use m akeshift or inadequate service tools or equipm ent m ay result in dam ag e and or im proper co m p resso r operation All parts required for servicing the internal com pressor are protected by a preservative process and packaged in a m an n er w hich will elim inate the necessity o f cleaning w ashing or flushing o f...

Page 48: ...oroughly clean O ring seal groove in front head NOTICE Seals should not be re used Always use a new specification service seal on rebuild Fig 18 Be sure that the seal to be installed is not scratched or damaged in anyway Make sure that the seal seat and seal are free of lint and dirt that could damage the seal surface or prevent sealing Install or Connect 1 Dip the new seal seat O ring in clean 52...

Page 49: ...ve any excess oil resulting from installing the new seal parts from the shaft and inside the co m p resso r neck 7 Install the clutch plate and hub assem bly as described in m in o r repair procedures 8 Reinstall com pressor belt and tighten bracket 9 F vacuate and charge the refrigerant system COMPRESSOR PRESSURE RELIEF VALVE Remove or Disconnect 1 R ecover the refrigerant using J 39500 G M 2 R e...

Page 50: ...nt to the co m p resso r assembly Rotate the com plete co m p resso r assem bly not the crankshaft or drive plate hub slow ly several turns to distribute oil to all cylinder and piston areas 10 Install a M 9 x 1 25 threaded nut on the co m p resso r crankshaft if the drive plate and clutch assem b ly are not installed 11 Using a box end w rench or socket and handle rotate the com pressor crankshaf...

Page 51: ...A SUPPORT BLOCK 12 J 33011 O RING INSTALLER 13 J 33013 HUB DRIVE PLATE REMOVER INSTALLER 14 J 39500 GM R134a A C REFRIGERANT RECOVERY RECYCLING AND RECHARGING SYSTEM ACR4 1 5 J 33017 PULLEY BEARING ASSEMBLY INSTALLER 16 J 33019 BEARING STAKING TOOL 1 7 J 33020 PULLEY PULLER 18 J 34614 SHAFT SEAL PROTECTOR 19 J 33023 PULLER PILOT 20 J 33024 CLUTCH COIL INSTALLER ADAPTER 21 J 33025 CLUTCH COIL PULLE...

Page 52: ...mportant for proper service The compressor connections and the outside of the compressor should be cleaned before any on vehicle repairs or before removal of the compressor The parts must be kept clean at all times and any parts to be reassembled should be cleaned with Trichloroethane naphtha stoddard solvent kerosene or equivalent solvent and dried with dry air Use only lint free cloths to wipe p...

Page 53: ...ervice Removal and installation of external compressor parts and disassembly and assembly of internal parts must be performed on a clean workbench The work area tools and parts must be kept clean at all times COMPRESSOR CLUTCH PLATE AND HUB ASSEMBLY 2 3 4 E3 2 3 5 Fig 2 V5 Compressor Rear Head Details Remove or Disconnect Clamp the holding fixture J 34992 in a vise and attach compressor to holding...

Page 54: ...LLEY BEARING 5 PULLEY ROTOR 6 CLUTCH COIL ASM 7 SHAFT SEAL PARTS 8 SERVICE COMPRESSOR WITHOUT CLUTCH 9 COMPRESSOR CONTROL VALVE ASM 10 HIGH PRESSURE RELIEF VALVE 11 SYSTEM CONTROL SWITCHES 12 SUCTION PORT SCREEN 13 RETAINER RING SWITCH 1 4 O RING SWITCH Q l r ...

Page 55: ...________________________ 520006 1D3 R1 Fig 4 Removing Shaft Nut 1 CLUTCH PLATE AND HUB ASSEMBLY 2 J 33013 B HUB AND CLUTCH DRIVE PLATE ASSEMBLY REMOVER 3 J 34992 1 THUMB SCREW 4 J 34992 HOLDING FIXTURE Fig 6 Shaft Key Clutch Plate Hub Installation 1 CLUTCH PLATE AND HUB ASSEMBLY 2 J 33013 B DRIVE PLATE INSTALLER 3 DRIVE PLATE INSTALLER BEARING 4 AIR GAP 020 030 0 50 0 76mm ...

Page 56: ...h rotor should be 0 50 076mm 0 20 030 If the center screw is threaded fully onto the end of the compressor shaft or if the body of the installer is held and the center screw is rotated the key will assume the position as shown in Figure 6 and will break the clutch hub 7 Remove installer J 33013 B check for proper positioning of the shaft key even or slightly above the clutch hub Install the shaft ...

Page 57: ...maged Install or Connect Place the pulley rotor on the J 21352 A support block to fully support the rotor hub during bearing installation Fig 12 NOTICE Do Not support the rotor by resting the pulley rim on a flat surface during the bearing installation or the rotor face will be bent 2 Align the new bearing squarely with the hub bore and using puller and bearing installer J 9481 A with universal ha...

Page 58: ... Tighten the center screw in the J 8433 1 puller crossbar to force the pulley rotor and bearing assembly onto the compressor front head Fig 15 Should the J 33017 pulley rotor and bearing installer slip off direct in line contact with the inner face of the bearing loosen the J 8433 3 center forcing screw and realign the installer and pilot so that the J 33017 installer will properly clear the front...

Page 59: ...OCEDURES When replacing the shaft seal assembly Fig 20 pressure relief valve or rear head mounted pressure switches Fig 21 even if the compressor remains on the vehicle during the operation it will be necessary to discharge the system of refrigerant Other than clutch repair procedures the same holds true for any disassembly of the compressor A clean workbench covered with a sheet of clean paper an...

Page 60: ...ecification service seal kit Fig 20 Be sure that the seal to be installed is not scratched or damaged in any way Make sure that the seal is free of lint and dirt that could damage the seal surface or prevent sealing 2 5 Install or Connect Dip the new seal O ring in clean 525 viscosity refrigerant oil and assemble onto O ring installer J 33011 Insert the O ring installer J 33011 into the compressor...

Page 61: ...stem 3 Leak test system 1 2 3 4 5 2 Remove or Disconnect Recover refrigerant Disconnect the electrical connector from the switch in the rear head of the compressor Fig 21 Remove the switch retaining ring Fig 21 using J 5403 internal snap ring pliers Remove switch from compressor Remove old O ring seal from switch cavity using J 9553 01 O ring removal tool or equivalent NOTICE If existing switch wi...

Page 62: ...cedure 1 With sealing washers in place install test plate J 9625 A on rear head of compressor 2 Attach center hose of manifold gage set on charging station to a refrigerant drum standing in an upright position and open valve on drum 3 Connect charging station high and low pressure lines to corresponding fittings on test plate J 9625 A using J 5420 gage adapters or hoses equipped with valve depress...

Page 63: ...G CONNECTOR SEAL SEAT INSTALLER REMOVER SUPPORT BLOCK O RING INSTALLER 14 J 33013 B HUB DRIVE PLATE REMOVER AND INSTALLER 15 J 33017 PULLEY BEARING ASSEMBLY INSTALLER 16 J 38100 C REFRIGERANT RECOVERY RECYCLING SYSTEM 17 J 33019 BEARING STAKING TOOL 18 J 33020 PULLEY PULLER 19 J 34614 SHAFT SEAL PROTECTOR 20 J 33022 SHAFT NUT SOCKET 21 J 33023 A PULLER PILOT 22 J 33024 CLUTCH COIL INSTALLER 23 J 3...

Page 64: ...e date code is stamped on the front left mounting ear viewed as facing the clutch figure 1 It will be either a two digit number or a num ber letter combination The first number gives the year of manufacture This is followed by one of the numbers 1 through 9 indicating the months January through September October November and December are indicated by an X Y or Z Although certain service operations...

Page 65: ...he clutch front plate Hold the clutch plate stationary figure 3 1 Hex nut using a 14 mm socket 2 Clutch front plate using J 37825 figure 4 Align the puller center bolt to the compressor shaft Thumb tighten the three puller bolts into the threaded holes Turn the center bolt to the right with the socket wrench until the front plate is loosened 3 External front housing snap ring with J 6435 figure 5 ...

Page 66: ...29886 Driver Handle J 37872 Spanner Wrench J 38467 Bearing Remover and Installer Figure 8 Removing the Coil Snap Ring o J 29886 J 38467 F9443 Figure 9 Installing the Rotor Pulley 1 Clutch coil and snap ring retainer The coil flange protrusions must match the hole in the front housing to prevent coil movement and to correctly place the lead wire ...

Page 67: ...il the plate bottoms to the clutch shims NOTICE Refer to Notice on page 1D4 1 6 Shaft hex nut Hold the plate with J 37872 figure 3 Tighten Nut to 14 N m 124 lbs in Check the air gap with a feeler gauge It should be 0 49 to 0 79 mm 0 016 to 0 031 inch If the gap is not consistent all around pry up slightly at points of minimum variation Lightly tap down at points of maximum variation The gap is det...

Page 68: ...OOLS 1 J 8433 2 J 29886 3 J 37825 4 J 37872 1 PULLER SET 2 DRIVER HANDLE 3 PULLER PLATE ASSEMBLY 4 SPANNER WRENCH 5 PULLER FINGERS 6 BEARING REMOVER INSTALLER 7 PULLER PILOT 5 J 37828 J 38467 J 37827 2901 r4920 ...

Page 69: ...NOTES ...

Page 70: ...SECTION 3 STEERING CONTENTS SUBJECT PAGE Power Steering Gear Unit Repair 3B1A 1 Power Steering Pump Unit Repair 3B1B 1 Manual Steering Gear Unit Repair 3B2A 1 ...

Page 71: ...3 2 STEERING ...

Page 72: ...correct torque value must be used when installing fasteners that require it If the above conditions are not followed parts or system damage could result CONTENTS Subsection A 708 Power Steering Gear 708 Power Steering Gear Assembly 3B1 A 2 Steering Gear Adjustments 3B1A 3 Worm Thrust Bearing Preload Adjustment 3B1A 3 Pitman Shaft Over Center Preload Adjustment 3B1A 4 Steering Gear Service 3B1A 5 P...

Page 73: ......

Page 74: ...djustments The steering gear requires two adjustments The worm thrust bearing preload The pitman shaft over center preload adjustment The worm thrust bearing preload is controlled by the amount of compression force exerted by the adjuster plug on the conical worm bearing thrust races The pitman shaft over center preload is controlled by the pitman shaft adjuster screw which determines the clearanc...

Page 75: ...ate the stub shaft 40 from stop to stop using a 12 point socket and count the number of turns 6 Starting at either stop turn the stub shaft 40 back 112 the total number of turns This is the center of the gear When the gear is centered the flat on the stub shaft 40 should face upward and be parallel with the side cover 7 and the master spline on the pitman shaft should be in line with the adjuster ...

Page 76: ...MAN SHAFT AND SIDE COVER REPLACEMENT Figures 1and 2 Remove or Disconnect Steering gearfrom vehicle Referto PowerSteering Gear Replacement in Section 3B Pitman arm from steering gear Refer to Steering Linkage in Section 3B3 Rotate stub shaft back and forth to drain power steering fluid XjjjjL Clean Exposed end of pitman shaft and housing Use a wire brush to clean pitman shaft spline A FIRST INDEX M...

Page 77: ...10 to 60 N m 44 lb ft Adjust Pitman shaft Refer to Pitman Shaft Over Center Preload Adjustment in this section 1 Install or Connect Steering gear Refer to Power Steering Gear Replacement in Section 3B HOUSING END PLUG REPLACEMENT Figure 10 Remove or Disconnect Steering gear from vehicle Refer to Power Steering Gear Replacement in Section 3B 4j4j Disassemble Rotate stub shaft back and forth to drai...

Page 78: ...ing ring 50 Position adjuster plug 55 face down on a suitable support see Figure 13 Needle bearing 53 dust seal 51 and lip seal 52 using J 6221 to drive them from adjuster plug 55 Assemble Position adjuster plug 55 face up on a suitable support Notice Needle bearing must be installed with identification on bearing facing tool to prevent damage to bearing 2 3 4 5 6 7 Needle bearing 53 to adjuster p...

Page 79: ...Replacement in Section 3B 4 A VALVE ASSEMBLY 13 SHAFT WORM 15 RACE 16 BEARING 17 RACE 20 HOUSING 40 SHAFT STUB Important Do not move or rotate worm shaft 13 while valve assembly is removed Any rotation of the worm shaft may cause balls 25 to be lost from the gear circuit requiring complete tear down of the unit Stub shaft 40 from valve assembly if necessary Tap stub shaft 40 lightly on a wood bloc...

Page 80: ... Refer to Steering Gear Adjustments in this section Install or Connect Steering gear Refer to Power Steering Gear Replacement in Section 3B Figure 17 Remove and Install Spool RACK PISTON AND WORM SHAFT REPLACEMENT Figures 1 2 19 thru 22 Tools Required J 8947 Rack Piston Teflon Ring Compressor J 21552 Rack Piston Arbor Remove or Disconnect 1 2 Steering gear from vehicle Refer to Power Steer ing Gea...

Page 81: ...ack piston balls 25 are reinstalled in the rack piston Improper rack piston ball installation may result in personal injury Notice The black rack piston balls are smaller than the silver balls The black and silver balls must be installed alternately into the rack piston and ball guide to maintain rack piston to worm shaft preload Lubricate rack piston balls 25 with power steering fluid 3 Rack pist...

Page 82: ...l Installer J 4245 Internal Snap Ring Pliers Remove or Disconnect Pitman arm from steering gear Refer to Steering Linkage in Section 3B3 Clean Exposed end of pitman shaft 12 and housing 20 Use awire brush toclean pitman shaftsplines Disassemble 1 Retaining ring 35 using J 4245 Notice Use care not to score the housing bore when prying out seals and washers 2 3 Backup washer 33 and double lip seal 3...

Page 83: ...le Notice Use care not to damage threads of housing when removing check valve Check valve 18 by prying from housing with a small screwdriver Assemble Check valve 18 using a 3 8 inch diameter piece of tubing 100 mm 4 inches long to drive into housing Install or Connect Steering gear Refer to Power Steering Gear Re placement in Section 3B ...

Page 84: ......

Page 85: ... STUB SHAFT 33 WORM ASM PIN 34 RACE THRUST BEARING WORM 35 BEARING ASM ROLLER THRUST WORM 36 RACE THRUST BEARING WORM 37 SEAL O RING RELIEF VALVE 38 PLATE BYPASS 39 SEAL O RING RELIEF VALVE 40 VALVE ASM RELIEF 41 SEAL PITMAN SHAFT DUST 42 RING RETAINING PITMAN SHAFT SEAL 43 WASHER SEAL BACK UP PITMAN SHAFT 44 SEAL PITMAN SHAFT 45 BEARING ASM NEEDLE PITMAN SHAFT 46 GUIDE BALL RETURN 47 CLAMP BALL R...

Page 86: ...on 50 bottoms in housing 6 Align the end tooth of the pitman shaft 5 with the center groove of the rack piston 50 and 7 see Figure 7 Turn stub shaft 31 counterclockwise until the plug 12 separates from the housing 6 Secondary rack piston 7 see Figure 7 Important Do not remove the plug 8 from the rack piston 7 during this procedure Remove only for replacement Rotate the stub shaft 31 clockwise unti...

Page 87: ...35 14 Worm shaft 33 from valve assembly 15 Races 34 and bearing 35 from worm shaft 33 Important Do not attempt to reuse damaged or worn parts by welding or having them straightened Replace all bent broken or worn parts Clean All parts in a clean solvent and blow dry A HAMMER B DRIFT 14 NUT ADJUSTER PLUG LOCK Figure 8 Loosening Adjuster Plug Lock Nut 5 SHAFT PITMAN 7 PISTON SECONDARY RACK 50 PISTON...

Page 88: ...ug 19 loosely in the gear housing Retainer ring 15 see Figure 10 Dust seal 16 Seal 17 Pry with a screwdriver from the bore of the adjuster plug 19 Do not scratch or score the seal bore see Figure 11 17 SEAL STUB SHAFT 19 PLUG ADJUSTER 4 Retainer 25 Pry the retainer at the two raised areas see Figure 12 5 Spacer 24 6 Race 23 7 Bearing 22 8 Race 21 9 Seal 20 10 Needle bearing 18 if necessary Use J 8...

Page 89: ...aring 18 if required Place the new bearing over tools J 8524 1 and J 7079 2 with the manufacturer s ID against the tool Place a block of wood under the adjuster plug 19 then press the bearing into the adjuster plug until it bottoms see Figure 15 Lubricate seal 17 with power steering fluid 2 Seal 17 use tool J 8524 1 see Figure 16 3 Dust seal 16 A BEARING WITH IDENTIFICATION TOWARDS TOOL B WOOD BLO...

Page 90: ...e grooves of the spacer away from small race 23 see Figure 18 10 New bearing retainer 25 Tap on the flat surface of the retainer see Figure 19 m Important The retainer projections must not extend beyond the spacer when the retainer is seated The spacer must be free to rotate 16 SEAL STUB SHAFT DUST 15 RING RETAINING 22 BEARING ASM UPPER THRUST 23 RACE UPPER THRUST BEARING SMALL 24 SPACER THRUST BE...

Page 91: ...essively worn or broken replace the complete valve and shaft assembly Torsion bar and stub shaft 31 for leaking If there is leaking replace the valve assembly see Figure 23 Ground surface of the stub shaft 31 If a crocus cloth cannot clean the nicks or burrs replace the valve assembly Outside diameter of the valve spool and inside diameter of the valve body 28 If a crocus cloth cannot clean the ni...

Page 92: ...dy pin before installing the valve body into the gear assembly 6 Valve spool and shaft 31 assembly into the valve body 28 The shaft cap should be below the valve body notch see Figure 25 Lubricate a new shaft cap to the seal 32 7 New shaft cap and seal 32 into the valve body 28 assembly PITMAN SHAFT AND SIDE COVER Figure 1 b Inspect Bearing in side cover 3 Needles should rotate freely using finger...

Page 93: ...ing and exces sive wear Rack piston 50 teeth and external ground surfaces for scoring or excessive wear If condition exists replace the rack piston 50 and worm 33 1 Assemble New Seal 9 and ring 10 to rack piston 50 Lubricate new seal 9 and ring 10 with power steering fluid A INSTALL BALLS IN THIS HOLE WHILE SLOWLY ROTATING WORM COUNTERCLOCKWISE B WORM FLANGE 46 GUIDE BALL RETURN 47 CLAMP 48 SCREWS...

Page 94: ... seals be careful notto score the housing bore or leakage may result 4 L Inspect Brass inverted flare connectors 51 for looseness Remove or Disconnect Flare connectors 51 if necessary and discard A modified No 4 screw extractor may be used to remove the connectors 1 2 3 4 5 Disassemble Retaining ring 42 Use tool J 4245 Dust seal 41 Pry with a screwdriver Washer 43 Seal 44 using a screwdriver Beari...

Page 95: ...ol J 6222 A over the end of the stub shaft 3 Adjuster plug 19 assembly into the housing until it seats against the valve body 28 Adjust 1 Bearing preload Use tool J 7624 01 Turn the adjuster plug 19 clockwise until the plug and bearing 22 are firmly bottomed about 27 N m 29 lb ft Mark the housing in line with one ofthe holes in the adjuster plug Measure back counterclockwise 13 mm 1 2 inch and re ...

Page 96: ...e impossible to eliminate lash between the primary gear teeth Install a new seal 3 on the side cover and lubricate with power steering fluid Push the side cover 3 into the housing 6 until the adjuster screw on pitman shaft 5 contacts the cover Insert a hex wrench through the cover into the adjuster screw and turn it counterclockwise until the cover bottoms on the housing Then back off 1 2 turn Pre...

Page 97: ...the combined ball and bearing preload by turning the torque wrench through the center of travel and recording the highest reading 4 Tighten the adjusting screw on pitman shaft 5 until the torque wrench reading is 0 7 1 1 N m 6 19 lb in higher than the reading recorded in step 3 The total reading should not exceed 2 25 N m 20 lb in torque NOTICE See Notice on page 1 of this section 5 Tighten the nu...

Page 98: ...ack to vertical Subtract this reading from reading taken in step 5 If the reading in step 5 is 0 23 N m 2 lb in then the gear is adjusted properly Go to step 7 If less than 0 23 N m 2 lb in proceed with the following adjustments If the reading in step 5 is at least 0 23 N m 2 lb in and not more than 1 13 N m 10 lb in the gear is in proper adjustment Proceed with adjustment in step 7 If the reading...

Page 99: ...27 N m 29 lb ft 40 Relief Valve 47 N m 35 lb ft 48 Lockwasher Screws 8 N m 6 lb ft ADJUSTM ENT TIGHTENING SPECIFICATIONS 708 Power Steering Gear 40 Pitman Shaft Over Center Preload 0 7 1 I N m 6 10 lb in 55 Steering Gear Adjuster Plug 30 N m 22 lb ft Figure is in addition to worm shaft thrust bearing preload and valve and seal drag 710 Power Steering Gear 5 Pitman Shaft Over Center Preload New Gea...

Page 100: ...STALLER 2 INTERNAL SNAP RING PLIERS 11 SEAL AND BEARING REMOVER 3 SPANNER WRENCH 12 VALVE CONNECTOR SEAT INSTALLER 4 RACK PISTON TEFLON RING COMPRESSOR 13 SHAFT SEAL PROTECTOR 5 RACK PISTON ARBOR 14 DRIVER 6 ADJUSTER PLUG BEARING REMOVER AND INSTALLER 15 0 2 8 N M 0 25 LB IN TORQUE WRENCH 7 PITMAN SHAFT BEARING REMOVER AND INSTALLER 16 HANDLE 8 SEPARATOR PLATE 17 BEARING SEAL INSTALLER 9 BEARING I...

Page 101: ...ire it If the above conditions are not followed parts or system damage could result CONTENTS Subsection A P Series Power Steering Pump Subsection B CB Series Power Steering Pump P Series Power Steering Pump Assembly 3B1B 2 CB Series Power Steering Pump Assembly 3B1B 5 P Series Power Steering Pump Service 3B1B 3 CB Series Power Steering Pump Service 3B1B 6 Drive Shaft Seal Replacement 3B1B 3 Reserv...

Page 102: ...40 ...

Page 103: ... pump from vehicle Refer to Power Steering Pump Replacement in section 3B Disassemble Protect drive shaft 12 with shim stock Seal 11 by cutting with a chisel Assemble Lubricate seal 11 with power steering fluid Seal 11 using J 22670 Install or Connect Power steering pump Refer to Power Steering Pump Replacement in section 3B PUMP RESERVOIR REPLACEMENT Figure 1 Remove or Disconnect Power steering p...

Page 104: ... that might require replacement of the entire housing 4 Pressure plate 21 by using a rubber mallet to tap lightly on the drive shaft 12 5 Pump ring 20 6 Pump vanes 18 7 Shaft rotor and thrust plate assembly 8 Shaft retaining ring 17 9 Pump rotor 16 10 Thrust plate 15 11 Drive shaft 12 12 Dowel pins 13 13 O ring seals 3 and 5 A IDENTIFICATION ARROW 3 SEAL 5 SEAL 8 HOUSING 12 SHAFT DRIVE 13 PINS DOW...

Page 105: ...WEL 7 SHAFT DRIVE 8 SEAL O RING 10 HOUSING ASM HYD PUMP 11 SEAL DRIVE SHAFT 12 SPRING FLOW CONTROL 13 VALVE ASM CONTROL 15 SEAL O RING KEY NO PART NAME 16 FITTING O RING UNION 25 PLATE THRUST 26 RING PUMP 27 VANE 28 ROTOR PUMP 30 RING SHAFT RETAINING 31 PLATE PRESSURE 32 SEAL O RING 33 SPRING PRESSURE PLATE 35 SEAL O RING 36 COVER END 37 RING RETAINING ...

Page 106: ...6 4 Fitting 16 into hydraulic pump housing assembly 10 Q Tighten Fitting 16 to 75 N m 55 lb ft 5 Pump assembly to vehicle if removed DRIVE SHAFT SEAL without disassembly of pump Figures 2 and 3 Tool Required J 7728 Shaft Oil Seal Installer CONTROL VALVE ASSEMBLY Figure 1 Remove or Disconnect 1 Pump assembly from vehicle if necessary for access 2 O ring union fitting 16 and O ring 15 3 Control valv...

Page 107: ...1 Pump ring 26 and vanes 27 from drive shaft subassembly Shaft retaining ring 30 from drive shaft 7 Pump rotor 28 and thrust plate 25 from drive shaft 7 jgi Clean All parts in power steering fluid Dry parts 1 2 3 4 Adjust Fo Pressure plate 31 Pump ring 26 Vanes 27 Thrust plate 25 Drive shaft 7 scoring pitting or chatter marks If noted replace appropriate parts Assemble Lubricate new drive shaft se...

Page 108: ...ove in pump housing 10 with ring opening near access hole in pump housing see Figure 7 C RETAINING RING OPENING D BOLT HOLE 37 RING RETAINING Figure 7 Retaining Ring Installation Housing SPECIFICATIONS FLUID SPECIFICATIONS Lubricant Power Steering Fluid 1050017 or Equivalent meeting GM Specification 9985010 CB Series Pump Capacity Complete System 0 75 liter 1 1 2 pints CB Pump Only 0 5 liter 1 pin...

Page 109: ...he lower end of the steering shaft The ball nut is mounted on the worm and the steel balls act as a rolling thread between the worm and nut to provide a low friction drive between them Teeth on the ball nut engage teeth on the pitman shaft sector The teeth on the ball nut are made so that a tighter fit exists between the ball nut and pitman shaft sector teeth when the front wheels are in the strai...

Page 110: ...Ball Nut Worm Shaft Upper Worm Bearing Upper worm Bearing Cup Pitman Shaft Seal Housing Worm Shaft Seal Side Cover Gasket Pitman Shaft Needle Bearing Pitman Shaft Preload Adjuster Preload Adjuster Shim Side Cover Preload Adjuster Nut Side Cover Bolts Ball Guide Clamp Screw Ball Guide Clamp Ball Guide Balls Washer Spring Pitman A rm N ut Top Studed Side Cover Bolt Used on some models F6672 ...

Page 111: ...1 Before installing turn preload adjuster screw counterclockwise until it bottoms then back screw off one half turn 2 Install parts as shown Checking end clearance If clearance is greater than 05 mm 002 a steering gear lash adjuster kit is available PRELOAD ADJUSTER NUT If replacing gasket only do not remove PRELOAD ADJUSTER FEELER GAUGE Select to get proper clearance SHIM PITMAN SHAFT LUBRICATION...

Page 112: ...Cup Install Cup 4 DISASSEMBLE AND ASSEMBLE WORM BEARING ADJUSTER DISASSEMBLE 1 Pry lower bearing retainer out with screwdriver 2 Remove cup using J 29369 1 puller and slide hammer WORM BEARING ADJUSTER ASSEMBLE Press cup into adjust using Tool A Install parts as shown LOWER WORM BEARING CUP LOWER WORM f BEARING LOWER BEARING RETAINER 5 DISASSEMBLE AND ASSEMBLE WORMSHAFT AND BALL NUT DISASSEMBLE 1 ...

Page 113: ...rm bearing adjuster until it bottoms then loosen one quarter turn 2 Carefully turn the wormshaft all the way to end of travel then turn back one half turn 3 Tighten adjuster plug until torque wrench reads 0 6 to 1 0 N m 5 to 8 in lbs 4 Tighten locknut using punch against edge of slot 11 16 socket Due to tolerances some sockets require a wrapping of card stock around the serrations 8 ADJUST OVER CE...

Page 114: ...ECIFICATIONS SAGINAW MODEL 535 Manual Steering Gear N m Ft Lbs Side Cover Bolts 18 13 Pitman Shaft Adjusting Screw Locknut 30 22 Clamp to Ball Nut Screw 5 5 4 T2506 SPECIAL TOOLS J 6219 J 6278 J 8092 1 PITMAN SHAFT SEAL INSTALLER 2 PITMAN SHAFT BEARING REMOVER 3 THREADED UNIVERSAL DRIVER HANDLE 4 WORM BEARING ADJUSTER CUP PULLER 5 WORM BEARING CUP INSTALLER 6 PITMAN SHAFT BEARING INSTALLER J 29369...

Page 115: ...e requiring thread locking compound will be called out The correct torque value must be used when installing fasteners that require it If the above conditions are not followed parts or system damage could result CONTENTS SUBJECT PAGE General Description 4B1 2 Checking the Axle Before Disassembly 4B1 2 Disassembly of the Rear Axle 4B1 2 Cleaning 4B1 5 Inspection 4B1 5 Axle Housing 4B1 5 Differentia...

Page 116: ...e axle continues to transmit the driving force This prevents tire scuffing during turns and premature wear on internal axle parts The axle is sealed by a pinion seal a seal at each axle shaft end and a gasket between the cover and axle housing All corporate rear axles are identified by an alphabetic broadcast code on the right axle tube as shown in fig ure 1 The axle housing cover does not have a ...

Page 117: ...ifferential Case 7 Axle Shaft Oil Seal 25 Ring Gear Bolt 8 Axle Shaft Bearing 26 Differential Gears 9 Axle Housing 27 Pinion Thrust Washers 10 Axle Air Vent 28 Side Gear Thrust Washers 11 Pinion Nut 29 Pinion Shaft 12 Washer 30 Pinion Shaft Lock Bolt 13 Pinion Flange 31 Bearing Cap 14 Pinion Oil Seal 32 Bolt 15 Pinion Outer Bearing 33 Gasket 16 Plug 34 Cover 17 Collapsable Spacer 35 Bolt 18 Pinion...

Page 118: ... not to damage the cover gasket surface The differ ential case must be supported when it is being removed to prevent the case from fall ing and being damaged 11 Differential case Pry the case from the axle housing at the differ ential window figure 5 12 Bearing outer races shims and spacers Mark the races and the shims left and right and place them with the bearing caps 13 Differential side bearin...

Page 119: ...ham mer and punch in the slots provided for this pur pose Work the cups out of the housing evenly mov ing the punch back and forth between one side of the cup and the other Figure 10 Pinion Collapsible Spacer CLEANING Do not steam clean drive parts that have ground and polished surfaces such as gears bearings and shafts All parts should be disassembled before cleaning These parts should be cleaned...

Page 120: ...n ring gear and pinion gear are replaced to maintain proper system balance BEARINGS Inspect Bearings for smooth rotation after oiling them Bearing rollers for wear Bearing cups for wear cracks brinelling and scor ing Important When replacing worn or cracked bearings and cups make sure to to replace them in sets Ring gear and pinion gear for wear and replace them as a set if worn Important Low mile...

Page 121: ...m 0 067 inch to a dial reading of 0 84 mm 0 033 inch as shown in figure 15 record the dial reading of 0 84 mm 0 033 inch NOT 1 70 mm 0 067 inch The dial indicator should be in the 0 50 to 1 27 mm 0 020 to 0 050 inch range 17 All drive pinion gears are manufactured to a nomi nal depth There are no markings on the pinion for depth Dial indicator reading is the shim selection 18 Remove bearing caps a...

Page 122: ...t the differential case Drive the bearing onto the case using J 25299 and J 8092 11 Differential case to the axle housing Refer to Side Bearing PreLoad Adjustment SIDE BEARING PRELOAD ADJUSTMENT Figures 2 18 19 and 20 Tool Required J 22779 Side Bearing Backlash Gage The differential side bearing preload adjustment must be made before installing the pinion The differential case side bearing preload...

Page 123: ...res sively larger feeler gage sizes between the axle housing and service shim A Push the feeler gage downward so it contacts the shim at the top and bottom and then con tacts the axle housing B The point just before additional drag begins is the correct feeler gage thickness This is the zero setting without preload 6 Remove the strap J 22779 service spacer service shim feeler gage and differential...

Page 124: ...ion end play is just taken up Rotate the pinion while tightening the nut to seat the bearings Once there is no end play in the pinion the preload torque should be checked 20 Pinion F4686 B Remove J 8614 01 Using an inch pound torque wrench check the pinion preload by rotating the pinion with the wrench figure 23 Preload should be at or below 2 7 to 3 6 N m 24 to 32 lbs in on new bearings or 1 0 to...

Page 125: ... thicker than the one removed from the left side Insert this shim between the spacer and left bearing race figure 25 11 Install the left bearing cap and bolts Do not tighten 12 Select a shim 0 10 mm 0 004 inch thicker than the one removed from the right side Insert the shim between the spacer and right bearing race and drive the shim into place figure 25 13 Install the right side bearing cap and b...

Page 126: ...y closer to or farther from the drive pinion The adjusting shims are also used to set side bearing preload If the thickness of the right shim is increased along with decreasing the left shim thickness backlash will increase If the thickness of the left shim is increased along with decreasing the right shim thickness backlash will decrease FINAL ASSEMBLY NOTICE For steps 6 7 and 8 refer to No tice ...

Page 127: ...RN AND MAKE ANY NECESSARY CORRECTIONS CORRECTION NONE SERVICE HINTS PATTERNS THAT MAY VARY MAY BE CAUSED BY LOOSE BEARINGS ON THE PINION OR THE DIFFERENTIAL CASE CHECK THESE BEARING PRELOAD SETTINGS TOTAL ASSEMBLY DIFFERERTIAL CASE PINION IF THESE SETTINGS ARE GOOD LOOK FOR DAMAGED OR INCORRECTLY ASSEMBLED PARTS CONDITION BACKLASH CORRECT PINION DEPTH INCORRECT PINION GEAR IS TOO CLOSE TO RING GEA...

Page 128: ...ing Spacer Differential Side Bearing Shim Kits N m Lbs Ft 27 20 75 55 35 26 120 90 Size 0 170 inch 0 040 0 046 0 052 0 058 0 064 0 072 0 080 0 088 0 096 0 044 0 050 0 056 0 063 0 070 0 078 0 086 0 094 0 100 nch nch nch nch nch nch nch nch nch Pinion Bearing Shim Kits LUBRICATION Type Capacity 0 025 0 029 inch 0 030 0 034 inch 0 035 0 039 inch 0 040 0 045 inch 80W 90 Liters 1 85 GL 5 Pints 4 0 T250...

Page 129: ...er Plug 4 Pinion Flange Holder 5 Pinion Flange Remover 6 Side Bearing Remover 7 Rear Pinion Bearing Cone Installer 8 Axle Bearing Puller 9 Pinion Oil Seal Installer 10 Differential Side Bearing Installer 11 Rear Pinion Bearing Remover 12 Driver Handle 13 Dial Indicator 14 Axle Seal Installer 15 Slide Hammer 16 Axle Bearing Installer 15 16 22813 01 23911 25299 25320 8 0 9 2 8001 23771 f 2619 01 237...

Page 130: ...NOTES ...

Page 131: ...nch ring gear axle uses a con ventional ring and pinion gear set to transmit the driving force of the engine to the rear wheels This gear set transfers the driving force at a 90 degree angle from the propeller shaft to the axle shafts This axle is semi floating The axle shafts are sup ported at the wheel end of the shaft by a roller bearing pressed into the housing The shafts are retained in the h...

Page 132: ...01 The tangs of the tool should engage the bear ing outer race 8 Pinion gear 21 and side gears 22 Roll the pinion gears out of the case with the pinion thrust washers 20 Remove the side gears and side gear thrust washers 19 Mark the gears and the differen tial case as left and right 9 Bearing cap bolts 18 10 Bearing caps 10 Mark the caps and housing as left and right NOTICE Be careful when prying ...

Page 133: ...ED COVER 15 BOLT DIFF P GR SHF LK 17 SHAFT DIFF PINION 18 BOLT HEX 19 WASHER DIFF SIDE GEAR 20 WASHER DIFF PINION 21 GEAR DIFF PINION 22 GEAR DIFF SIDE 23 BOLT HYPOOID DRIVE GEAR 24 CASE DIFFERENTIAL 25 NUT HEX 26 WASHER LOCK 27 BEARING REAR WHEEL 28 SEAL REAR AXLE SHF OIL 29 PLATE BRAKE BACKING 30 BOLT HEX 31 DRUM REAR BRAKE 32 BOLT REAR 33 SHAFT AXLE 34 LOCK REAR AXLE SHF OIL 35 NUT PINION FLANG...

Page 134: ...d be cleaned in a suitable solvent Parts should be thoroughly dried immediately after cleaning Use soft clean lintless rags Parts may be dried with compressed air Do not allow the bearings to spin while drying them with compressed air INSPECTION It is critical to carefully and thoroughly inspect all drive unit parts before reassembly Thorough inspection of the drive parts for wear or stress and su...

Page 135: ...of either is necessary Figure 8 Removing the Drive Pinion Figure 9 Removing the Pinion Rear Bearing Important A new pinion flange must be replaced when ring gear and pinion gear are replaced to main tain proper system balance BEARINGS L Inspect Bearings visually and by feel The bearings should feel smooth when oiled and rotated while applying as much hand pres sure as possible The large end of the...

Page 136: ...old the stud stationary at the flats of the stud Tighten Stud nut to 2 2 N m 20 lbs in 5 Rotate the gauge plate and bearings several com plete revolutions to seat the bearings 6 Tighten the stud nut until a torque of 1 6 to 2 2 N m 15 to 25 lbs in is obtained to keep the gauge plate in rotation 7 Assemble J 21777 45 J 21777 1 and J 8001 to the differential bearing bore as shown in figure 13 The be...

Page 137: ... no plus or minus marked on it use the nominal pinion setting to select a shim 17 Remove bearing caps 10 and depth gauging tools 18 Install the correct pinion shim 6 to the pinion according to this procedure NOTICE Proper pinion depth setting is a two step procedure 1 Setup dimension arrived at with the indicator to be considered a starting point 2 Gear tooth pattern check is necessary to fine tun...

Page 138: ... or below 2 3 to 2 8 N m 20 to 25 lbs in on new bearings or 1 1 to 1 7 N m 10 to 15 lbs in for used bearings figure 17 C If the preload torque is below the preloads giv en above continue torquing the nut in small increments Check the preload after each tight ening Each tightening increases the bearing preload If the bearing preload is exceeded the pinion will have to be removed and a new col lapsi...

Page 139: ...al on the side opposite of bearing installation to protect the differential case B Drive the bearing onto the case using J 22761 and J 8092 8 Differential case 24 to the axle housing Refer to Side Bearing Preload Adjustment SIDE BEARING PRE LOAD ADJUSTMENT The differential side bearing preload is adjusted by changing the thickness of the left and right shims equally This will not change the origin...

Page 140: ...22779 the service spacer service shim feeler gauge and differential case from the axle housing 9 Measure J 22779 in three places using a microme ter Average the readings figure 23 10 Add the dimensions of the right side service spac er service shim and feeler gauge 11 For an initial backlash setting move the ring gear away from the pinion by subtracting 0 010 inch from the ring gear side shim pack...

Page 141: ...al check or instead of checking pin ion depth and backlash adjustments This check is only to be used to verify the correct adjustment of the gear set after setup 1 Wipe all oil out of the case and carefully clean each tooth of the ring gear figure 26 2 Apply gear marking compound GM P N 1052351 or equivalent sparingly to all ring gear teeth using a medium stiff brush When properly used the area of...

Page 142: ...IMES COUNTERCLOCKWISE OBSERVE THE TOOTH CONTACT PATTERN AND MAKE ANY NECESSARY CORRECTIONS CORRECTION NONE SERVICE HINTS PATTERNS THAT MAY VARY MAY BE CAUSED BY LOOSE BEARINGS ON THE PINION OR THE DIFFERENTIAL CASE CHECK THESE BEARING PRELOAD SETTINGS TOTAL ASSEMBLY DIFFERERTIAL CASE PINION IF THESE SETTINGS ARE GOOD LOOK FOR DAMAGED OR INCORRECTLY ASSEMBLED PARTS CONDITION BACKLASH CORRECT PINION...

Page 143: ...8 Lubricate the bearing with axle lubricant 2 Oil seal using J 23771 until the oil seal is flush with the axle tube figure 29 Lubricate the seal lips with gear lubricant 3 Axle shafts 33 into the axle housing 1 Be careful not to damage the oil seal The splines at the end of the axle shaft must engage with the splines of the axle side gear 4 C locks 34 on the axle shaft 33 Pull the axle shaft 33 ou...

Page 144: ...tial Side Bearing Spacer Differential Side Bearing Shim Kits Pinion Bearing Shim Kits Lubricant LUBRICATION N m Lbs Ft 27 20 80 60 35 26 120 90 Size 0 170 inch 0 040 0 044 nch 0 046 0 050 nch 0 052 0 056 nch 0 058 0 063 nch 0 064 0 070 nch 0 072 0 078 nch 0 080 0 086 nch 0 088 0 094 nch 0 096 0 100 nch 0 020 0 024 nch 0 025 0 029 nch 0 030 0 034 nch 0 035 0 039 nch 80W 90 GL 5 T2509 ...

Page 145: ... Backlash Gauge 3 Driver Handle 13 Rear Pinion Bearing Cone Installer 4 Dial Indicator Set Not Shown 5 Rear Pinion Bearing Cone Installer J 21777 1 Arbor 6 Pinion Flange Remover J 21777 29 Gauge Plate 7 Differential Side Bearing Remover Plug J 21777 35 Rear Pilot Washer 8 Rear Pinion Bearing Remover Plug J 21777 42 Front Pilot Washer 9 Side Bearing Remover J 21777 43 Stud Assembly Bolt 10 Pinion O...

Page 146: ...NOTES ...

Page 147: ...nd Shim Specifications 4B3 14 Lubrication 4B3 14 Special Tools 4B3 15 GENERAL DESCRIPTION The corporate 9 1 2 inch ring gear rear axle uses a conventional ring and pinion gear set to transmit the driving force of the engine to the rear wheels The gear set transfers this driving force at a 90 degree angle from the propeller shaft to the axle shafts This axle is semi floating The axle shafts are sup...

Page 148: ...ush the axle shaft 3 in towards the center of the differential case 27 5 Axle shaft 3 from the axle housing 12 6 Oil seal 4 using a seal removal tool behind the seal lip Be careful not to damage the housing 7 Bearing 5 using J 2619 01 and J 22813 01 The tangs of the tool should engage the bear ing outer race 8 Pinion 31 and side gears 33 A Roll the pinion gears out of the case with the pinion thru...

Page 149: ...ET RING AND PINION 16 LOCK DIFF BRG ADJ NUT 17 NUT DIFF BRG ADJ 18 SCREW HEX SERRATED WASHER 19 CAP DIFF BEARING 20 BOLT HEX 21 SHIM DIFF BEARING ADJ 22 BEARING DIFF 23 CLIP BRK CROSSOVER PIPE 24 BOLT HEX SERRATED COVER 25 COVER DIFF CARRIER 26 BOLT HYPOID DRIVE GEAR 27 CASE DIFFERENTIAL 28 SHAFT DIFF PINION 29 BOLT DIFF LOCK 30 WASHER DIFF PINION 31 GEAR DIFF PINION 32 WASHER DIFF SIDE GEAR 33 GE...

Page 150: ... with two bolts 24 to keep the pinion from falling C Drive the pinion out of the housing with a ham mer and soft drift figure 8 Remove the cover 25 and the pinion 15 21 Collapsible spacer 11 from the pinion 22 Outer seal 9 and outer pinion bearing 10 23 Inner bearing 13 and shim 14 from the pinion A Press the bearing off the pinion using J 22912 01 figure 9 B Remove the shim 24 Bearing cups 10 and...

Page 151: ...gear and side gear teeth for wear cracks scoring and spalling Thrust washers for wear The fit of the side gears in the differential case The fit of the side gears on the axle shafts Differential case for cracks and scoring All parts for wear and replace if necessary PINION AND RING GEAR Ring and pinion gears are matched sets and both are replaced any time a replacement of either is necessary A new...

Page 152: ...ired J 8001 Dial Indicator Gage Set J 21777 1 Arbor Figure 11 Installing the Rear Pinion Bearing Cup J 21777 8 Rear Pilot Washer J 21777 42 Front Pilot Washer J 21777 43 Stud Assembly Bolt J 21777 85 Gage Plate J 21777 86 Side Bearing Disc 1 Clean all gage parts 2 Lubricate the front and rear pinion bearings with axle lubricant 3 Place the bearings 10 and 13 into the pinion bearing cups 4 Install ...

Page 153: ...tween movement to the left and to the right 14 At the point of greatest deflection set the dial indi cator to zero Repeat the rocking action of the gage shaft to verify the zero setting 15 Rotate the gage shaft until the dial indicator rod does not touch the gage block 16 Record the actual number on the dial indicator and not the number which represents how far the nee dle travels This is the nomi...

Page 154: ...bearing onto the pinion 5 Pinion oil seal 9 using J 22388 and J 22804 01 figure 16 6 The pinion flange 8 to the pinion by tapping it with a soft faced hammer until a few threads show through the pinion flange NOTICE Refer to Notice on page 4B3 1 7 The pinion washer 7 and nut 6 while holding the pinion flange with J 8614 01 figure 17 Tighten The nut until the pinion end play is just taken up Rotate...

Page 155: ...ide as when removed 4 Pinion gears 31 to the differential without the pin ion thrust washers 30 A Install the pinion gears onto the side gears so the holes in the pinion gears are 180 degrees apart B Rotate the pinion gears into place and verify the pinion gears line up with the pinion shaft holes 5 Pinion thrust washers 30 Rotate the pinion gears toward the differential opening enough to slide in...

Page 156: ...semble the caps loosely B Turn the adjusting nut until the nut contacts the shim Then tighten the nut three additional slots figure 22 Bolts 20 to 80 N m 60 lbs ft 6 Adjusting nut lock 16 and lock bolt 18 Measure the ring gear to pinion backlash Refer to Backlash Adjustment Tighten Bolt 18 to 30 N m 22 lbs ft after setting the backlash BACKLASH ADJUSTMENT 1 Install a dial indicator on the case usi...

Page 157: ...hole Figure 24 Installing the Axle Bearing NOTICE For steps 6 7 and 9 refer to No tice on page 4B3 1 9 Important Anytime a differential pinion shaft locking screw is removed it is important to coat the screw threads with Loctite 242 before reinstalling These screws are coated with an adhesive which helps to prevent the screw from loosening in the case When this screw is removed the adhesive is als...

Page 158: ...n backlash and pinion depth The effects of bearing preloads are not readily apparent on hand load ed tooth contact pattern tests However these adjust ments should be within specifications before proceeding with backlash and drive pinion adjustments The position of the drive pinion is adjusted by increasing or decreasing the distance between the pin ion head and the centerline of the ring gear Decr...

Page 159: ...RVE THE TOOTH CONTACT PATTERN AND MAKE ANY NECESSARY CORRECTIONS CORRECTION NONE SERVICE HINTS PATTERNS THAT MAY VARY MAY BE CAUSED BY LOOSE BEARINGS ON THE PINION OR THE DIFFERENTIAL CASE CHECK THESE BEARING PRELOAD SETTINGS TOTAL ASSEMBLY DIFFERERTIAL CASE PINION IF THESE SETTINGS ARE GOOD LOOK FOR DAMAGED OR INCORRECTLY ASSEMBLED PARTS CONDITION BACKLASH CORRECT PINION DEPTH INCORRECT PINION GE...

Page 160: ...him Kits 5 59 mm 0 220 nch 5 64 mm 0 222 nch 5 69 mm 0 224 nch 5 74 mm 0 226 nch 5 79 mm 0 228 nch 5 84 mm 0 230 nch 5 89 mm 0 232 nch 5 94 mm 0 234 nch 5 99 mm 0 236 nch 6 05 mm 0 238 nch 6 10 mm 0 240 nch 6 15 mm 0 242 nch 6 20 mm 0 244 nch 6 25 mm 0 246 nch 6 30 mm 0 248 nch 6 35 mm 0 250 nch 6 40 mm 0 252 nch 6 45 mm 0 254 nch 6 50 mm 0 256 nch 6 55 mm 0 258 nch Pinion Bearing Shim Kits 0 5080...

Page 161: ...earing Cone Installer 6 Front Pinion Bearing Cup Installer 7 Driver Handle 8 Dial Indicator 9 Differential Side Bearing Installer 10 Side Bearing Remover 11 Rear Pinion Bearing Cone Installer 12 Pinion Oil Seal Installer 13 Pinion Flange Remover 14 J 22306 Rear Pinion Bearing Cup Installer Not Illustrated Refer to J 21777 1 J 21777 8 J 21777 42 J 21777 43 J 21777 85 J 21777 86 Figure 53 for these ...

Page 162: ...NOTES ...

Page 163: ...0 1 2 inch ring gear rear axle uses a conventional ring and pinion gear set to transmit the driving force of the engine to the rear wheels This gear set transfers this driving force at a 90 degree angle from the propeller shaft to the axle shafts This axle is full floating The axle shaft is supported at the wheel ends by the wheel hubs The bolts that attach the shaft to the hub also support the ax...

Page 164: ... ring gear from the case This will damage the ring gear and the differential case 12 Ring gear 14 from the differential Drive the ring gear off with a brass drift if nec essary 13 Side gears 29 and thrust washers 30 Mark the gears and the case halves as left and right 14 Pinion spider 33 15 Pinion gears 32 and thrust washers 31 from the spider 33 L Inspect Drive pinion bearing preload and record f...

Page 165: ...on Gear Thrust Washer 8 9 1 Pinion Nut 10 2 Washer 11 3 Pinion Flange 12 4 Slinger 13 5 Pinion Oil Seal 14 Pinion Front Bearing Bolt Washer Brake Line Clip Pinion Cage Shim Collapsable Spacer Pinion Rear Bearing Pinion and Ring Gear Set Pinion Gear Set Pinion Cross Shaft Differential Case Washer Ring Gear Bolt Brake Backing Plate Bolt Axle Shaft Seal Bearing Retaining Ring Bearing Lock Nut K ey Re...

Page 166: ...Figure 5 Removing the Pinion Flange Figure 6 Pressing the Drive Pinion from the Cage ...

Page 167: ...flange must be replaced when both ring gear and pinion gear are replaced to maintain proper system balance L Inspect Pinion and ring gear teeth for cracking chipping scoring or excessive wear Pinion splines for wear Pinion flange splines for wear The fit of the pinion gear splines on the pinion flange The sealing surface of the pinion flange for nicks burrs or rough tool marks which would cause da...

Page 168: ... Pinion oil seal 5 using J 24433 and J 8092 8 Pinion flange oil deflector 4 and pinion flange 3 to the pinion splines 9 Washer 2 and pinion nut 1 A Place the pinion cage assembly into the vise B Flange holder J 8614 01 to the pinion flange Tighten Figure 10 The nut until the pinion end play is taken up Rotate the pinion while tightening in order to seat the bearings Once there is no end play in th...

Page 169: ...st be clean 4 Pinion cage 10 to the axle housing figure 13 NOTICE Refer to Notice on page 4B4 1 5 Cage bolts 7 Tighten Bolts to 88 N m 65 lbs ft DIFFERENTIAL CASE ASSEMBLY 4 Install or Connect Figure 1 14 and 15 Tools Required J 24429 Side Bearing Adjustment Spanner J 8092 Driver Handle J 8107 Side Bearing Puller Plug Lubricate all parts with axle lubricant 1 Pinion gears 32 and pinion gear thrust...

Page 170: ...sting nut lock 21 and lock bolt 22 to the left nut A Do not tighten B Tighten the right adjusting nut firmly to force the case into solid contact with the left adjusting nut Rotate the pinion several times to seat the bearings C Loosen the right adjusting nut until it is free from its bearing D Tighten the right adjusting nut until it just con tacts the bearing Additionally tighten the nut two slo...

Page 171: ... the oppo site direction 5 Observe the pattern on the ring gear teeth and compare this with figure 19 ADJUSTMENTS AFFECTING TOOTH CONTACT Two adjustments can be made that affect tooth con tact pattern backlash and pinion depth The effects of bearing preloads are not readily apparent on hand load ed tooth contact pattern tests however these adjust ments should be within specifications before procee...

Page 172: ...RN AND MAKE ANY NECESSARY CORRECTIONS CORRECTION NONE SERVICE HINTS PATTERNS THAT MAY VARY MAY BE CAUSED BY LOOSE BEARINGS ON THE PINION OR THE DIFFERENTIAL CASE CHECK THESE BEARING PRELOAD SETTINGS TOTAL ASSEMBLY DIFFERERTIAL CASE PINION IF THESE SETTINGS ARE GOOD LOOK FOR DAMAGED OR INCORRECTLY ASSEMBLED PARTS CONDITION BACKLASH CORRECT PINION DEPTH INCORRECT PINION GEAR IS TOO CLOSE TO RING GEA...

Page 173: ...ng Gear Bolts SPACER AND SHIM SPECIFICATIONS Spacer and Shim Sizes Pinion Bearing Shims N m Lbs Ft 30 22 27 20 183 135 35 26 88 65 163 120 Size 0 006 0 007 0 008 0 009 0 010 0 011 0 012 0 013 0 014 0 015 0 016 0 017 0 018 0 019 0 020 0 021 0 022 0 023 nch nch nch nch nch nch nch nch nch nch nch nch nch nch nch nch nch nch 0 024 inch LUBRICATION Type 80W 90 GL 5 Capacity 3 4 Liters 7 2 Pints T2511 ...

Page 174: ...lange Remover 2 Side Bearing Remover 3 Rear Pinion Bearing Cup Installer 4 Driver Handle 5 Rear Pinion Bearing Cone Installer 6 Side Bearing Adjustment Spanner 7 Rear Pinion Bearing Cone Remover 8 Pinion Pilot Bearing Installer Not Illustrated J 24429 J 22912 01 F4662 ...

Page 175: ...ear Tooth Pattern Check 4B5 12 Adjustments Affecting Tooth Contact 4B5 12 Final Assembly 4B5 12 Specifications 4B5 14 Fastener Tightening Specifications 4B5 14 Ring Gear Bolts 4B5 14 Available Shim Sizes 4B5 14 Pinion Bearing and Differential Bearing Preload Specification 4B5 14 Lubrication 4B5 14 Special Tools 4B5 15 GENERAL DESCRIPTION The Dana 11 inch ring gear rear axle uses a conven tional ri...

Page 176: ... Pinion Flange Holder J 24385 01 Differential Housing Spreader J 29721 Differential Side Bearing Remover J 29721 70 Side Bearing Adapters C 4171 Universal Handle C 4307 Bearing Cup Remover Rear D 128 Dial Indicator Set or Equivalent D 159 Bearing Cup Remover CAUTION When disassembling the carrier make sure the entire axle is held tight in an approved stand or rack Improperly support ed axles can c...

Page 177: ...6 PRELOAD SHIMS 23 RING GEAR BOLT 7 BEARING 24 PINION GEAR 8 SLINGER 25 SIDE GEAR 9 PINION OIL SEAL 26 PINION THRUST WASHER 10 PINION FLANGE YOKE 27 SIDE GEAR THRUST WASHER 11 WASHER 28 PINION SHAFT 12 PINION NUT 29 ROLL PIN 14 COVER 30 SHIM 16 PLUG 31 BOLT 17 BOLT 32 GASKET 18 BEARING CAP 37 I D TAG 38 AXLE SHAFT V 3943 ...

Page 178: ...Figure 3 Spreading the Differential Case Figure 4 Removing the Differential ...

Page 179: ...ms left or right Check outboard spacers for damage e g bent or deep grooves caused by worn bearings If damaged they should be replaced with new ones at time of reassembly Note the ring gear fastener strength for later use Refer to Specifications at the rear of this section 10 Ring gear bolts 23 and discard figure 2 Important Ring gear bolts are to be replaced with new ones at time of reassembly Pl...

Page 180: ...fts All parts should be disassembled before cleaning These parts should be cleaned in a suitable solvent Parts should be thoroughly dried immediately after cleaning Use soft clean lintless rags Parts may be dried with compressed air Do not allow the bearings to spin while drying them with compressed air INSPECTION Carefully and thoroughly inspect all drive unit parts before reassembly Thorough ins...

Page 181: ...rential without the thrust washers 26 A Install the pinion gears to the side gears so the holes in the pinion gears are 180 degrees apart B Rotate the pinion gears into place and verify that the pinion gears line up with the pinion shaft holes 5 New pinion thrust washers 26 Rotate the pinion gears toward the differential opening enough to slide in the pinion thrust washers 6 Pinion shaft 28 Align ...

Page 182: ...h side they were removed They must be reassembled as removed or the reading taken in step 7 will not be correct PINION DEPTH ADJUSTMENT Tools Required D 115 Dial Indicator D 115 3 Arbor D 116 1 Pinion Height Block D 116 2 Master Discs D 6255 Master Pinion Block 1 Clean the carrier bores and all tools The pinion bore must be free of nicks and dirt 2 Install D 6255 to the pinion bore figure 17 3 Pla...

Page 183: ...gh 24 Tools Required J 5590 Rear Pinion Bearing Cone Installer J 7818 Front Pinion Bearing Cup Installer J 8092 Handle J 8614 01 Pinion Flange Remover D 128 Dial Indicator Set or Equivalent D 115 3 Arbor D 116 2 Arbor Discs C 4171 Handle C 4204 Rear Cup Installer 1 Place the required amount of shims and baffle if used in the inner bearing bore 2 Drive the inner bearing cup into the axle assembly u...

Page 184: ...que should be checked Figure 26 Installing Differential Bearings B Remove J 8614 01 Using an inch pound torque wrench check the pinion preload by rotating the pinion with the wrench figure 24 Preload should be at or below 2 7 to 3 6 N m 24 to 32 lbs in on new bearings or 1 0 to 1 4 N m 8 to 12 lbs in for used bearings C If the preload torque is below the specified values continue torquing the nut ...

Page 185: ...per shims on the differential side bearing hub ring gear side and drive the differen tial bearing onto the hub using J 8092 and J 23690 figure 26 11 Place the proper shims on the differential side bearing hub opposite the ring gear and drive the differential bearing onto the hub using J 8092 and J 23690 If installing a new bearing make sure it is the same width as the old one 12 Assemble J 24385 0...

Page 186: ...ge with a wrench until the ring gear rotates one full revolution then reverse the rotation until the ring gear rotates one revolution in the opposite direc tion 5 Observe the pattern on the ring gear teeth and compare this with figure 30 ADJUSTMENTS AFFECTING TOOTH CONTACT Two adjustments can be made that affect tooth con tact pattern backlash and drive pinion depth The effects of bearing preloads...

Page 187: ...TERN AND MAKE ANY NECESSARY CORRECTIONS CORRECTION NONE SERVICE HINTS PATTERNS THAT MAY VARY MAY BE CAUSED BY LOOSE BEARINGS ON THE PINION OR THE DIFFERENTIAL CASE CHECK THESE BEARING PRELOAD SETTINGS TOTAL ASSEMBLY DIFFERERTIAL CASE PINION IF THESE SETTINGS ARE GOOD LOOK FOR DAMAGED OR INCORRECTLY ASSEMBLED PARTS CONDITION BACKLASH CORRECT PINION DEPTH INCORRECT PINION GEAR IS TOO CLOSE TO RING G...

Page 188: ...0 5334mm 0 021 inch 0 5588mm 0 022 inch 0 5842mm 0 023 inch 0 762mm 0 030 inch Inner Pinion Bearing Shim 0 0762mm 0 003 inch 0 127mm 0 005 inch 0 254 mm 0 010 inch Inner Pinion Bearing Shim 0 005 inch 0 010 inch PINION BEARING AND DIFFERENTIAL BEARING PRELOAD SPECIFICATION N m Lbs In Torque to Rotate Drive Pinion Only New bearings 2 26 4 52 20 40 Ratios 4 63 to 5 13 68 90 6 8 Torque to Rotate Driv...

Page 189: ... HEIGHT BLOCK MILLER 4 SCOOTER GAGE MILLER 5 MASTER DIFFERENTIAL BEARINGS MILLER 6 MASTER PINION BLOCK MILLER 7 CUP INSTALLER MILLER 8 HANDLE MILLER 9 DIFFERENTIAL SIDE BEARING REMOVAL PLUG 10 FRONT PINION BEARING CUP INSTALLER 11 DRIVER HANDLE 12 REAR PINION BEARING CONE INSTALLER 13 PINION FLANGE REMOVER 14 DIFFERENTIAL SIDE BEARING INSTALLER 15 DIFFERENTIAL SIDE BEARING REMOVER 16 DIFFERENTIAL ...

Page 190: ...NOTES ...

Page 191: ...Assembly of the Differential 4B7 5 101 2 Inch Ring Gear 4B7 5 Disassembly of the Differential 4B7 5 Cleaning and Inspection 4B7 7 Cam Unit Assembly 4B7 7 Adjustment of the Differential 4B7 7 Assembly of the Differential 4B7 9 Specifications 4B7 10 Fastener Tightening Specifications 4B7 10 Thrust Block Sizes 4B7 10 Reaction Block Size 10 1 2 Inch 4B7 10 Right Side Gear Thrust W asher 4B7 10 Reactio...

Page 192: ...404r5914 Figure 1 Differential Components F4799 Figure 2 Removing the Governor Bushings 13 Left side gear 21 cam plate 16 and clutch plates 12 as an assembly cam unit 14 Side gear thrust washer 13 CAM UNIT DISASSEMBLY 7 1 2 7 5 8 AND 8 1 2 INCH I Remove or Disconnect Figures 1 and 3 1 Retaining ring 22 figure 3 2 Clutch plates 12 3 Guide clips 20 4 Wave washer 15 5 Cam plate 16 6 Side cam gear 21 ...

Page 193: ...eeve 14 using J 22910 01 Press the sleeve from the side gear figure 4 3 Clutch plates 12 4 Wave washer 15 5 Cam plate 16 6 Side cam gear 21 CLEANING AND INSPECTION Clean All parts with an approved solvent Inspect All parts for excessive wear and breakage Pinion gear and side gear teeth for wear cracks scoring and spalling Thrust washer for wear The fit of the side gears on the axle shafts ...

Page 194: ...Press down the side gear and install the pinion shaft 18 and lock screw 3 If the side gear cannot be pressed down far enough to install the pinion shaft replace the side gear thrust washer with a thinner washer 4 Rotate the pinion gear closest to the lock screw so one of the teeth is pointing downward perpendicu lar to the ring gear flange 5 Insert a large tapered tool like a screwdriver firmly be...

Page 195: ...e thrust block must face the small window opening 7 Pinion shaft 18 8 A new lockscrew 3 Install finger tight Tighten to specifications after installed in the vehicle 9 Governor assembly 11 and latching bracket 5 The straight end of the latching bracket spring must be over and outside the governor assem bly shaft figure 8 10 Stop pin 2 9 1 2 inch only Press the pin flush with the case 11 Governor b...

Page 196: ...rew 38 Pinion Thrust Washer 44 Plates 33 Cam Plate 39 Pinion Gear 45 Side Gear Thrust Washer 34 Guide Clip 40 Side Cam Gear 46 Side Gear 35 Thrust Sleeve 41 Reaction Block 47 Guide Clip 36 Side Gear Thrust Washer 42 Pinion Yoke 48 Governor F5915 Figure 9 Differential Components ...

Page 197: ...rd the overall length of the gear to the back of the thrust sleeve 35 including the side gear thrust washer 36 B Compare this reading with the reading obtained earlier C If the new reading is more than 0 0762 mm 0 003 inch higher or lower than the origi nal select a side gear thrust washer that will return the reading closest to the original reading ADJUSTMENT OF THE DIFFERENTIAL If it is necessar...

Page 198: ...to the differential 4 Clamp the side gear in place using a set of wash ers a nut and a bolt long enough to hold the side gear in place figure 13 5 Place the pinion gears and pinion thrust washers on the pinion yoke 6 Install the yoke firmly to the differential case half 7 Loosen the nut and index one pinion gear tooth to point downward perpendicular to the case half face Tighten the nut 8 Mount a ...

Page 199: ...e Gear Backlash Adjustment in this section Some older locking differentials had select fit reaction blocks without the thrust washer between them These models require replac ing the reaction blocks with the correct thick ness reaction block ASSEMBLY OF THE DIFFERENTIAL Install or Connect Figures 9 and 12 1 Right thrust washer 2 Right cam unit Refer to Cam Unit Assembly 3 Reaction blocks 41 reactio...

Page 200: ...015 inch 0 027 nch 0 020 inch 0 032 nch 0 025 inch 0 036 nch 0 030 inch 0 040 nch 0 035 inch 0 042 nch 0 040 inch 0 044 nch 0 045 inch 0 048 0 052 nch nch REACTION BLOCK THRUST WASHERS 0 787 inch 0 022 0 030 0 038 0 046 0 023 0 031 0 039 0 047 0 024 0 032 0 040 0 048 0 025 0 033 0 041 0 049 0 026 0 034 0 042 0 050 0 027 0 035 0 043 0 051 0 028 0 036 0 044 0 052 0 029 0 037 0 045 REACTION BLOCK THR...

Page 201: ...SPECIAL TOOLS 1 fo f J J 22912 01 2 J 26252 1 Rear Pinion Bearing Cone Remover 2 Locking Differential Governor Remover F4804 ...

Page 202: ...NOTES ...

Page 203: ... must be used when installing fasteners that require it If the above conditions are not followed parts or system damage could result CONTENTS SUBJECT PAGE General Description 4C1 2 Disassembly of The Axle 4C1 2 Inspection 4C1 2 Disassembly 4C1 3 Cleaning and Inspection 4C1 8 Cleaning 4C1 8 Inspection 4C1 8 Axle Housing 4C1 8 Differential 4C1 8 Ring and Pinion Gear 4C1 8 Bearings 4C1 8 Thrust Washe...

Page 204: ...ng a collapsible spacer between the pinion bearings in the axle housing The ring gear is bolted to the differential case with left hand thread bolts The differential case is supported in the axle housing by two tapered roller bearings The differential and ring gear are located in relationship to the pinion by thread ed adjusters The differential allows the wheels to turn at different rates of spee...

Page 205: ...e the case figure 6 17 Differential case 35 18 Bolts 18 and lock tabs 19 from the side bearing adjuster sleeves 32 figure 7 19 Bearing cups 33 and sleeves 32 from the case Turn the sleeves 32 using J 33792 until the cups are pushed out of the case figure 8 20 Bearings 30 from the sleeves 32 Use J 21551 figure 9 21 Pinion flange nut 46 and washer 45 using J 8614 01 figure 10 Mount the left carrier ...

Page 206: ...F5785 ...

Page 207: ...Ring and Pinion Gears 52 Shaft 8 Retaining Ring 23 Output Shaft 38 Shim 53 Thrust Washer 9 Carrier Connector 24 Washer 39 Bearing 54 Side Gear 10 Shift Cable 25 Plug 40 Spacer 55 Thrust Washer 11 Shift Cable Housing 26 Washer 41 Bearing 56 Differential Pinion 12 Gasket 27 Pin 42 Seal Gear 13 Indicator Switch 28 Bolt 43 Deflector 57 Cover 14 Spring 29 Carrier Case 44 Flange 58 Bolt 15 Seal 30 Beari...

Page 208: ... Carrier Case Halves 18 Bolt 29 Carrier Case 19 Lock Tab 32 Sleeve F1780 Figure 7 Removing the Lock Tabs 30 Bearing 32 Sleeve 30 J 21551 32 I _ F1782 Figure 9 Remove the Sleeve Bearing F5788 Figure 10 Removing the Pinion Nut ...

Page 209: ...Figure 11 Remove the Pinion Flange F4696 F4759 Figure 14 Removing the Differential Side Bearing ...

Page 210: ...ars are matched sets and both are replaced any time a replacement of either is necessary Inspect Pinion and ring gear teeth for cracking chipping scoring or excessive wear Pinion splines for wear Pinion flange splines for wear The fit of the pinion gear on the pinion flange The sealing surface of the pinion flange for nicks burrs or rough tool marks which would cause dam age to the seal s inside d...

Page 211: ... thrust washers 4 Shaft 52 and bolt 36 5 Ring gear 37 onto the differential case 35 NOTICE Refer to Notice on page 4C1 1 Install or Connect Figures 1 2 17 and 18 Tool Required J 33837 Pinion Bearing Remover and Installer 1 Bearing 41 into the case using J 33837 1 J 33837 3 and J 33837 4 figure 17 2 Bearing 39 into the case using J 33837 1 J 33837 3 and J 33837 4 figure 18 PINION DEPTH ADJUSTMENT T...

Page 212: ...B Button Moved Out of Bearing Bore F5791 ...

Page 213: ...st be of the proper size as select ed previously 2 Bearing 39 onto the pinion gear 37 using J 33785 figure 20 3 New spacer 40 onto the pinion gear 37 4 Bearing 41 into the case 5 Seal 42 into the case using J 33782 figure 21 6 Pinion gear with bearing and spacer to the case 7 Deflector 43 flange 44 washer 45 and nut 46 A Apply PST sealant GM P N 1052080 or equiv alent to the pinion gear threads an...

Page 214: ...ts 28 to 50 N m 37 lbs ft ADJUSTING BACKLASH Tools Required Figures 1 and 2 J 33792 Side Bearing Adjuster Wrench J 8001 1 Dial Indicator Clamp 1 Tighten the right sleeve 32 to 140 N m 100 lbs ft using J 33792 figure 24 2 Tighten the left sleeve 32 to 140 N m 100 lbs ft using J 33792 figure 24 3 Mark the location of the adjusting sleeves in rela tion to the carrier halves figure 25 so the notches i...

Page 215: ...e or both With a pattern check the best contact between the ring gear and the drive pinion for low noise level and long life can be ensured GEAR TOOTH NOMENCLATURE The side of the ring gear tooth which curves outward or is convex is referred to as the drive side The concave side is the coast side The end of the tooth nearest the center of ring gear is referred to as the toe end The end of the toot...

Page 216: ...ACT PATTERN AND MAKE ANY NECESSARY CORRECTIONS CORRECTION NONE SERVICE HINTS PATTERNS THAT MAY VARY MAY BE CAUSED BY LOOSE BEARINGS ON THE PINION OR THE DIFFERENTIAL CASE CHECK THESE BEARING PRELOAD SETTINGS TOTAL ASSEMBLY DIFFERERTIAL CASE PINION IF THESE SETTINGS ARE GOOD LOOK FOR DAMAGED OR INCORRECTLY ASSEMBLED PARTS CONDITION BACKLASH CORRECT PINION DEPTH INCORRECT PINION GEAR IS TOO CLOSE TO...

Page 217: ...bolts 28 2 Right carrier case half Clean Sealing surfaces on the carrier case halves Remove all oil and grease Use a chlorinated sol vent such as carburetor cleanej 4 Install or Connect Figures 1 2 29 and 30 through 33 NOTICE For steps 3 4 6 and 22 refer to Notice on page 4C1 1 Tools Required J 33844 Bearing Installer J 33893 Axle Seal Installer J 33799 Shift Housing Seal Installer J 33842 Differe...

Page 218: ...9 with retainer ring 8 Tap into place A Remove all oil and grease from the tube and carrier gasket surfaces Use carburetor cleaner or equivalent Figure 33 Checking the Shift Mechanism B Apply sealer GM P N 1052357 or equivalent to the carrier 20 Tube assembly 5 to the carrier 21 Two upper bolts 6 Leave finger tight 22 Shift cable housing 11 and remaining bolts 6 Tighten Bolts to 47 N m 35 lbs ft 2...

Page 219: ... seal 13 from C V joint race 18 at large diameter and slide seal away from joint along axle shaft 4 Wipe excess grease from face of C V inner race 18 5 Spread ears on race retaining ring 14 with J 8059 as shown and remove C V joint assembly from axle shaft 13 6 Seal 14 from axle shaft 12 7 Disassemble joint and flush grease before install ing new seal Refer to Outer Joint Assembly Install or Conne...

Page 220: ... 5 RETAINER NEEDLE 6 BALL TRI POT JOINT 7 ROLLER NEEDLE 8 RING SPACER 9 RING SWAGE 10 SEAL TRI POT JOINT 11 CLAMP SEAL RETAINING 12 SHAFT AXLE 13 SEAL C V JOINT 14 RING RACE RETAINING 15 BALL 16 RACE C V JOINT INNER 17 CAGE C V JOINT 18 RACE C V JOINT OUTER 19 RING SENSOR 20 RING DEFLECTOR F6721 ...

Page 221: ...HTEN NUT UNTIL RING BOTTOMS AGAINST SHOULDER OF OUTER RACE 20 C V Joint Outer Race 21 Deflector Ring A 3 Pipe Coupling B Sheet Steer 3mm Min Thickness With 28mm Drilled Hole C M24 x 2 0 Nut F7484 Figure 37 Installing Outer Deflector Ring ...

Page 222: ... IS SEATED IN GROOVE ON AXLE SHAFT 13 Axle Shaft 20 C V Joint Outer Race F7486 Figure 39 Installing C V Joint to Axle MAKE SURE SWAGE RING AND SWAGE RING CLAMP ARE IN PROPER ALIGNMENT 15 A B C D E Swage Ring Swage Ring Clamp Axle Assembly Housing Seal Vise F7488 ...

Page 223: ...t retaining ring side of inner race 16 faces axle shaft 12 3 Install outer joint seal Refer to Outer Joint Seal in this section Assemble Figures 34 43 and 44 Apply chassis grease to the ball grooves of the inner race 16 and outer race 20 figure 34 1 Inner race 18 to the cage 19 figure 44 A Rotate cage 19 with inner race 18 to the outer race 20 figure 43 B Align the cage windows B with the lands A ...

Page 224: ...l 10 from tripot housing by separating at large diameter and sliding seal away from joint along axle shaft 5 Tripot housing from spider 3 and shaft 6 Spread spacer ring 8 with J 8059 and slide spac er ring and tripot spider A back on axle shaft figure 46 7 Shaft retaining ring 2 from groove on axle shaft and slide spider assembly off of shaft SLIDE SPACER RING AND SPIDER ASSEMBLY BACK ON SHAFT REM...

Page 225: ...roove of axle shaft with J 8059 7 Slide tripot spider A towards end of shaft and reseat spacer ring 8 in groove on shaft figure 46 8 Place approximately half of grease provided in seal kit 10 and use remainder to pack tripot housing 1 9 Position larger clamp 9 on seal 10 10 Slide tripot housing over tripot spider assembly on shaft figure 47 11 Slide large diameter of seal 9 with larger clamp 9 in ...

Page 226: ...and Output Shaft Cover Bolts 25 18 Tube Attaching Bolts 48 35 AVAILABLE SHIM SIZES Pinion Shim Kits 0 53 0 64 mm 0 66 0 79 mm 0 81 0 94 mm PINION PRELOAD AND BACKLASH 1 7 2 8 N m 15 25 lbs in 0 08 0 25 mm 0 003 0 010 inch 0 13 0 18 mm 0 005 0 007 inch LUBRICATION 1 2 Liters 2 6 Pints SAE 80 W 90 GL 5 Gear Lubricant T2378 Pinion Preload Backlash Preferred Capacity Type ...

Page 227: ...ing Adjuster Wrench 8 Differential Side Bearing Installer 12 13 14 15 16 17 18 J 8614 01 J 33844 J 33893 J 29369 2 J 29307 J 33791 J 8001 5 J 25025 1 J 36652 9 Bearing Cup Installer 10 Pinion Bearing Cup Remover and Installer 11 Pinion Shim Setting Gage 12 Pinion Flange Remover 13 Axle Tube Bearing Installer 14 Output Shaft Seal Installer 15 Countshaft Roller Bearing Remover 16 Slide Hammer 17 Bus...

Page 228: ...NOTES ...

Page 229: ...inion and Ring Gear 4C2 3 Bearings 4C2 3 Shims Thrust Washers and Adjuster Sleeves 4C2 5 Shift Mechanism 4C2 5 Actuator Check 4C2 5 Assembly of the Axle 4C2 10 Pinion Bearing Cup Installation 4C2 10 Pinion Depth Adjustment 4C2 10 Pinion Installation 4C2 11 Differential Case Assembly 4C2 13 Differential Assembly Installation 4C2 13 Adjusting Backlash 4C2 15 Measuring Backlash 4C2 15 Gear Tooth Cont...

Page 230: ...axle problem It will also help when setting up the shim packs for locating and preloading the differential case 3 Inspect the case for metal chips Determine where the metal chips came from such as a broken gear or bearing cage 4 Determine the cause of the axle problem before disassembly if possible DISASSEMBLY Remove or Disconnect Figures 1 through 19 Tools Required J 29369 1 Bearing Remover K1 2 ...

Page 231: ...Do not allow the bearings to spin while drying them with com pressed air INSPECTION It is very important to carefully and thoroughly inspect all drive unit parts before assembly Thorough inspection of the parts for wear or stress and replacement of worn parts will help prevent costly drive component repair after reassembly AXLE HOUSING I Inspect Axle housing bore for nicks or burrs that would prev...

Page 232: ......

Page 233: ...from the power source The plunger should retract within several seconds If the actuator does not operate as specified it should be replaced 1 Right Output Shaft 2 Deflector 3 Seal 4 Output Shaft Bearing 5 Axle Tube 6 Bolt 7 Thrust Washer 8 Retaining Ring 9 Connector 10 Differential Actuator 13 Engagement Switch 14 Shifter Fork Spring 15 Shifter Shaft Ring 16 Shift Fork 17 Damper Spring 18 Shifter ...

Page 234: ......

Page 235: ...g 26 Washer 27 Pin 28 Bolt 29 Carrier Case 30 Differential Case Bearing 31 Insert 32 Sleeve 33 Side Bearing 34 Ring Gear Bolt 35 Differential Case 36 Pin 37 Ring and Pinion Gears 38 Pinion Shim 39 Pinion bearing 40 Spacer 41 Pinion Bearing 42 Seal 43 Deflector 44 Pinion Flange 45 Washer 46 Nut 48 Mounting Bushing 51 Lock 52 Pinion Shaft 53 Thrust Washer 54 Side Gear 55 Thrust Washer 56 Differentia...

Page 236: ...Adjuster 63 Bolt 64 Lock Figure 10 Turning the Adjuster Plug K3 Models ...

Page 237: ...Figure 13 Removing the Pinion Seal 39 Bearing Cup Figure 16 Removing the Inner Bearing Cap ...

Page 238: ...the forcing screw until the installer is snug against the bearing cup F Rotate the tool several times to make sure the bearing cup is not cocked in the bore Pull the bearing cup into place with the forcing screw figure 21 PINION DEPTH ADJUSTMENT Tools Required J 36601 Pinion Depth Setting Gauge J 29763 Dial Indicator J 21777 Pinion Setting Gauge Set 1 Refer to figures 1 through 4 and 22 2 Pinion d...

Page 239: ... Bearing Installer K1 2 Models J 36614 Bearing Installer K3 Models J 8614 01 Pinion Flange Remover J 36333 Seal Installer J 36598 3 K15 25 J 36598 4 K35 39 Bearinq Cup F5868 Figure 21 Installing the Inner Pinion Bearing Cup 1 Shim 38 to the pinion gear 37 The shim must be of the proper size as select ed previously 2 Bearing 39 onto the pinion gear using J 35512 K1 2 models or J 36614 K3 models fig...

Page 240: ...6601 4 K15 25 J 36601 3 K35 A Button Located In Bore B Bearing Swung Out of Bore C Nut D Washer E Pilot F Flats 39 Bearing Inner Pinion 41 Bearing Outer Pinion J 21777 35 K15 25 J 21777 8 K35 J 29763 F5869 ...

Page 241: ... pinion gear 56 between the side gears making sure the hole in both pinion gears line up 3 Thrust washers 55 Rotate the pinion gears toward the opening just enough to permit the sliding in of the thrust wash ers 4 Shaft 52 and pin 36 K1 2 models or bolt 24 K3 models 5 Ring gear 37 onto the differential case 35 NOTICE Refer to Notice on page 4C2 1 Figure 26 Installing the Differential Side Bearing ...

Page 242: ...0 5 Differential assembly to the carrier case half Place the differential assembly into the carrier case half which contains the pinion gear Turn the left sleeve 32 K1 2 models or adjuster plug 61 K3 models in until backlash is felt between the ring and pinion K1 2 models Use J 36599 figure 28 K3 models Use J 36615 figure 29 Remove the carrier case from J 36599 p i J 8092 J 36612 K15 25 J 36613 K3...

Page 243: ...ation of 0 13 0 18 mm 0 005 0 007 inch If the backlash is incorrect adjust the sleeves as necessary Always maintain the one notch preload on the side bearings Example If it is necessary to turn the RIGHT sleeve IN one notch the LEFT sleeve must be turned OUT one notch To increase backlash turn the left sleeve in and turn the right sleeve out an identical amount To decrease backlash turn the right ...

Page 244: ...n identical amount To decrease backlash turn the right sleeve in and turn the left sleeve out an identical amount It is important that the contact pattern be centrally located up and down on the face of the ring gear teeth CARRIER CASE ASSEMBLY Install or Connect Figures 1 through 4 Bend the lock 51 over the sleeves 32 Right side only on K3 models Bolt 64 and lock 63 K3 models Remove or Disconnect...

Page 245: ...THE TOOTH CONTACT PATTERN AND MAKE ANY NECESSARY CORRECTIONS CORRECTION NONE SERVICE HINTS PATTERNS THAT MAY VARY MAY BE CAUSED BY LOOSE BEARINGS ON THE PINION OR THE DIFFERENTIAL CASE CHECK THESE BEARING PRELOAD SETTINGS TOTAL ASSEMBLY DIFFERERTIAL CASE PINION IF THESE SETTINGS ARE GOOD LOOK FOR DAMAGED OR INCORRECTLY ASSEMBLED PARTS CONDITION BACKLASH CORRECT PINION DEPTH INCORRECT PINION GEAR I...

Page 246: ...re available in the following sizes K1 2 models 1 27 mm 1 78 mm 2 29 mm 2 70 mm 3 30 mm 3 81 mm K3 models 1 80 mm 2 30 mm 2 80 mm 3 30 mm 3 80 mm 4 30 mm 4 80 mm Alternate Method Use only if proper tools for calculating the shim size are not available 4 Install or Connect Figures 1 through 4 1 Original shim 20 to the shaft 1 Use chassis grease to hold it in place 2 Assembled axle tube and shaft to...

Page 247: ...C Measure with Axle Shaft Forced Outboard 1 Shaft 5 Tube 9 Carrier Connector 23 Output Shaft 29 Carrier Case F5877 ...

Page 248: ...im Size Install or Connect Figures 1 through 4 NOTICE For steps 6 7 8 and 10 refer to Notice on page 4C2 1 I S him 20 as selected previously to the output shaft 23 Use grease to hold it in place 2 Sleeve 22 3 Spring 14 4 Shift shaft 18 spring 17 shift fork 16 and clip 15 assembly to the carrier case ...

Page 249: ... 39245 1 Sensor Ring Installer J 39245 2 Sensor Ring Spacer K1 K2 1 Deflector ring 20 from C V outer race 18 and discard 2 Sensor ring 19 with a drift figure 43 4 Install or Connect 1 Light film of oil onto the inside of the sensor ring Ring must face with chamfer side up 2 Sensor ring with J 39245 On K1 K2 models use both the large fixture and smaller spacer On K3 models use only the larger fixtu...

Page 250: ... 5 RETAINER NEEDLE 6 BALL TRI POT JOINT 7 ROLLER NEEDLE 8 RING SPACER 9 RING SWAGE 10 SEAL TRI POT JOINT 11 CLAMP SEAL RETAINING 12 SHAFT AXLE 13 SEAL C V JOINT 14 RING RACE RETAINING 15 BALL 16 RACE C V JOINT INNER 17 CAGE C V JOINT 18 RACE C V JOINT OUTER 19 RING SENSOR 20 RING DEFLECTOR F6721 ...

Page 251: ...D TIGHTEN NUT UNTIL RING BOTTOMS AGAINST SHOULDER OF OUTER RACE 18 C V Joint Outer Race 19 Deflector Ring F6723 Figure 42 Installing Outer Deflector Ring PUSH C V JOINT ASSEMBLY ONTO AXLE SHAFT UNTIL RETAINING RING IS SEATED IN GROOVE ON AXLE SHAFT 12 Axle Shaft 18 C V Joint Outer Race Figure 45 Installing C V Joint F6725 F6726 ...

Page 252: ...ape the seal by hand and remove the tool D Refer to the chart in figure 46 and select the correct size swage clamp tool J 36652 E Mount the proper size swage clamp tool in the vise and proceed as follows a Position the outboard end of the axle assembly in the tool b Place the top half of the tool on the lower half of the tool and check for proper align ment figure 47 c Insert the bolts and tighten...

Page 253: ...e with a brass drift to tilt it enough to install the balls figure 48 B Pack the joint with chassis grease V Important PIVOT CAGE AND INNER RACE AT 90 TO CENTER LINE OF OUTER RACE WITH CAGE WINDOWS ALIGNED WITH LANDS OF OUTER RACE LIFT OUT CAGE AND INNER RACE 17 UND r f P L jlw rp la n d WINDOWS 17 Cage 18 Outer Race F6729 Figure 49 Separating Outer Race and Cage ROTATE INNER RACE UP AND OUT OF CA...

Page 254: ...nd the second groove as shown figure 52 Slide the tripot spider assembly against the spacer ring 8 and the shaft 12 Important Be sure that the counterbored face of the tripot spider 3 faces the end of the shaft 12 SPIDER ASSEMBLY SLIDE SPACER RING AND SPIDER ASSEMBLY BACK ON SHAFT REMOVE RETAINING RING AND SLIDE SPIDER ASSEMBLY OFF OF SHAFT 2 Shaft Retaining Ring 8 Spacer 12 Axle Shaft F6731 SLIDE...

Page 255: ...rt in figure 47 and select the proper size swage clamp tool J 36652 11 Mount the swage clamp tool in the vise and pro ceed as follows A Position the inboard end of the axle assembly in the tool B Place the top half of the proper size tool on the lower half of tool and check for proper align ment and dimension figures 47 and 54 C Insert the bolts and tighten by hand until snug Important Make sure t...

Page 256: ... 0 029 inch 0 030 0 034 inch 0 035 0 039 inch K35 Models 0 508 0 5842 mm 0 6096 0 7112 mm 0 7366 0 8382 mm 0 8386 0 9398 mm Output Shaft Shims K15 25 Models 1 27 1 78 2 29 2 70 3 30 3 81 mm K35 Models 1 80 2 30 2 80 3 30 3 80 4 30 4 80 mm PINION PRELOAD AND BACKLASH Pinion Preload 1 7 2 8 N m 15 25 lbs in Backlash 0 08 0 25 mm 0 003 0 010 inch Preferred 0 13 0 18 mm 0 005 0 007 inch LUBRICATION Ca...

Page 257: ...ilot K35 7 Pinion Bearing Remover K15 25 Models 8 Pinion Bearing Remover K35 Models 9 Pinion Flange Remover 10 Case Bushing Replacer 11 Differential Side Bearing Installer K15 25 Models 12 Differential Side Bearing Installer K35 Models 13 Differential Side Bearing Puller 14 Axle Tube Bearing Installer 15 Axle Tube Bearing and Seal Remover K15 25 Models 16 Axle Tube Bearing and Seal Remover K35 Mod...

Page 258: ...ler K35 Models 21 Pinion Seal Installer 22 Axle Seal Installer K15 25 Models 23 Axle Seal Installer K35 Models 24 Holding Fixture and Pinion Service Tool 25 Dial Indicator Adapter 26 Side Bearing Adjuster Wrench 27 Pinion Depth Setting Gage 28 Dial Indicator 29 Dial Indicator 30 Depth Gage 31 Side Bearing Adjuster Wrench 32 Dial Indicator Set 33 Clamp Swage Tool Set 34 Snap Ring Pliers 35 Drive Ax...

Page 259: ...xle 4C3 2 Inspection 4C3 2 Disassembly 4C3 2 Cleaning 4C3 4 Inspection 4C3 4 Axle Housing 4C3 4 Differential 4C3 5 Ring and Pinion Gears 4C3 5 Bearings 4C3 5 Thrust Washers Shims and Adjuster Sleeves 4C3 6 Assembly of the Axle 4C3 7 Differential Case Assembly 4C3 7 Pinion Bearing Installation 4C3 8 Pinion Depth Adjustment 4C3 8 Pinion Installation 4C3 8 Differential Case Installation 4C3 10 Adjust...

Page 260: ...he cause of the axle problem It will also help when setting up the shim packs for locat ing and preloading the differential case 3 Inspect the case and oil for metal chips Determine where the metal chips came from such as a bro ken gear or bearing cage 4 Determine the cause of the axle problem before disassembly if possible DISASSEMBLY Disassemble Figures 1 through 14 Tools Required J 2619 Slide H...

Page 261: ...F7475 ...

Page 262: ...ial case 35 23 Differential pinion gears 56 and thrust washers 55 24 Side gears 54 and thrust washers 53 Mark the side gears and case so they can be reinstalled in their original location 25 Bolts 34 26 Ring gear 37 Do not pry between the ring gear and case Drive the gear off with a brass drift and ham mer 27 Side bearings 33 using J 22912 01 figure 13 28 Bushings 48 Use J 33791 figure 14 CLEANING...

Page 263: ...NION GEARS Ring and pinion gears are matched sets and both are replaced any time a replacement of either is necessary 30 Bearing 32 Sleeve F1782 L Figure 8 Removing the Sleeve Bearing Inspect Ring and pinion gear teeth for cracking chipping scoring or excessive wear Pinion gear splines for wear Pinion flange splines for wear The fit of the pinion flange on the pinion gear Sealing surface of the pi...

Page 264: ...atches and pits on the rollers and the bearing cups from the initial preload Do not replace a bearing for this reason THRUST WASHERS SHIMS AND ADJUSTER SLEEVES L Inspect Shims and thrust washers for cracks and chips Damaged shims should be replaced with an equal size service shim Adjuster sleeves for damaged threads Replace if required ...

Page 265: ...rfaces with axle lubricant prior to assem bly DIFFERENTIAL CASE ASSEMBLY 44 Install or Connect Figures 1 2 and 15 Tool Required J 33790 Side Bearing Installer 1 Thrust washers 53 and side gears 54 into the differential case 35 If the same gears and washers are being reused install them on the side from which they were removed ...

Page 266: ...old the pinion bearings in position and install J 33838 and J 29763 figure 18 Set the dial indi cator at ZERO then position the indicator in J 33838 Push the dial indicator downward until the needle rotates approximately 3 4 turns clockwise 4 Tighten the dial indicator in this position 5 Set the button of J 33838 on the differential bear ing bore figure 18 6 Rotate the tool slowly back and forth u...

Page 267: ...B Button Moved Out of Bearing Bore F5791 ...

Page 268: ... rotate the pin ion several times to make sure that the bearings have seated Recheck the preload and adjust if necessary DIFFERENTIAL CASE INSTALLATION H Install or Connect Figures 1 2 and 22 through 25 Tools Required J 33788 Bearing Installer J 23423 A Bearing Cup Installer J 33792 Side Bearing Adjuster Wrench 1 Bearing 30 into the sleeve 32 using J 33788 figure 22 2 Sleeves 32 into the carrier c...

Page 269: ...h should be the same at each point within 0 05 mm 0 002 inch If the backlash J 33788 F1791 Figure 22 Installing the Sleeve Bearing varies more than 0 05 mm 0 002 inch check for burrs a distorted case flange uneven bolt ing conditions or foreign matter between the case and the ring gear Gear backlash should be between 0 08 0 25 mm 0 003 0 010 inch with a preferred specifi cation of 0 13 0 18 mm 0 0...

Page 270: ...cessive turning of the ring gear is not recommended 4 Observe the pattern on the ring gear teeth and compare with figure 28 ADJUSTMENTS AFFECTING TOOTH CONTACT Two adjustments can be made which will affect the tooth contact pattern These are backlash and pinion depth The effects of bearing preloads are not easily seen on hand loaded teeth pattern tests These adjust ments should be within specifica...

Page 271: ... THE TOOTH CONTACT PATTERN AND MAKE ANY NECESSARY CORRECTIONS CORRECTION NONE SERVICE HINTS PATTERNS THAT MAY VARY MAY BE CAUSED BY LOOSE BEARINGS ON THE PINION OR THE DIFFERENTIAL CASE CHECK THESE BEARING PRELOAD SETTINGS TOTAL ASSEMBLY DIFFERERTIAL CASE PINION IF THESE SETTINGS ARE GOOD LOOK FOR DAMAGED OR INCORRECTLY ASSEMBLED PARTS CONDITION BACKLASH CORRECT PINION DEPTH INCORRECT PINION GEAR ...

Page 272: ...25 N m 18 lbs ft 8 Shaft 59 with deflector 2 Tap into place Bolts to 48 N m 35 lbs ft 13 Shaft 1 Tap into place with a soft faced hammer 14 Bushings 48 Use J 33791 figure 14 DRIVE AXLE ASSEMBLY OUTER DEFLECTOR RING 4 f Remove or Disconnect Figures 30 and 31 1 Clamp the axle shaft 12 in a vise Use soft metal or wood to protect the shaft 2 Deflector ring from C V outer race 20 with a brass drift and...

Page 273: ... 5 RETAINER NEEDLE 6 BALL TRI POT JOINT 7 ROLLER NEEDLE 8 RING SPACER 9 RING SWAGE 10 SEAL TRI POT JOINT 11 CLAMP SEAL RETAINING 12 SHAFT AXLE 13 SEAL C V JOINT 14 RING RACE RETAINING 15 BALL 16 RACE C V JOINT INNER 17 CAGE C V JOINT 18 RACE C V JOINT OUTER 19 RING SENSOR 20 RING DEFLECTOR F6721 ...

Page 274: ...st shoulder of C V outer race 18 figure 32 OUTER JOINT SEAL Remove or Disconnect Figures 30 and 34 4 Tools Required J 8059 Snap Ring Pliers J 35910 Seal Clamp Tool J 37652 Swage Clamp Tool 1 Large swage ring 9 from C V joint using a chisel and discard Important Do not cut through seal 13 and damage seal ing surface of C V outer housing 18 with the chisel 2 Small seal retaining clamp 11 on axle sha...

Page 275: ...lip in housing groove Important Seal 13 must not be dimpled stretched or out of shape in any way If seal is not shaped cor rectly carefully insert a thin flat blunt tool no sharp edges between large seal opening and outer race 18 at a maximum clearance of oval ring 9 to let air escape Shape seal properly by hand and remove tool 8 Mount J 37652 1 swage clamp tool in vise and pro ceed as follows A P...

Page 276: ...FIRST BALL REMOVE OTHER BALLS IN SIMILAR MANNER 17 Ball 18 C V Joint Inner Race 19 C V Joint Cage 20 C V Joint Outer Race A Hammer B Brass Drift F7489 PIVOT CAGE AND INNER RACE AT 90 TO CENTER LINE OF OUTER RACE WITH CAGE WINDOWS ALIGNED WITH LANDS OF OUTER RACE LIFT OUT CAGE AND INNER RACE 19 C V Joint Cage 20 C V Joint Outer Race A Land B Window F7490 ...

Page 277: ... to install the balls B Pack the joint with chassis grease Important Be sure that retaining ring side of inner race 16 faces axle shaft 12 figure 30 3 Install outer joint seal Refer to Outer Joint Seal in this section INNER TRIPOT SEAL Remove or Disconnect Figures 30 41 and 42 Tools Required J 8059 Snap Ring Pliers J 35910 Seal Clamp Tool ROTATE INNER RACE UP AND OUT OF CAGE 18 18 C V Joint Inner ...

Page 278: ... on shaft Important Be sure that counterbore face of tripot spider 3 faces end of shaft 6 Install shaft retaining ring 2 in groove of axle shaft with J 8059 7 Slide tripot spider A towards end of shaft and reseat spacer ring 8 in groove on shaft figure 42 8 Place approximately half of grease provided in seal 10 and use remainder to pack tripot housing 1 9 Position larger clamp 9 on seal 10 10 Slid...

Page 279: ... Hand Output Shaft Cover Bolts 25 18 Tube Attaching Bolts 48 35 AVAILABLE SHIM SIZES Pinion Shim Kits 0 53 0 64 mm 0 66 0 79 mm 0 81 0 94 mm PINION PRELOAD AND BACKLASH 1 7 2 8 N m 15 25 lbs in 0 08 0 25 mm 0 003 0 010 inch 0 13 0 18 mm 0 005 0 007 inch LUBRICATION 2 3 Liters 5 0 Pints 80 W 90 GL 5 Gear Lubricant T3149 Pinion Preload Backlash Preferred Capacity Type ...

Page 280: ...9763 J 33782 J 33785 J 33788 J 33790 J 33792 J 22912 01 J 23423 A 12 13 15 16 17 18 14 S J 8614 01 J 33844 J 33893 J 29369 2 J 29307 J 33791 J 8001 3 J 25025 1 J 36652 9 Bearing Cup Installer 10 Pinion Bearing Cup Remover and Installer 11 Pinion Shim Setting Gage 12 Pinion Flange Remover 13 Axle Tube Bearing Installer 14 Output Shaft Seal Installer 15 Countshaft Roller Bearing Remover 16 Slide Ham...

Page 281: ...ICE Do not hone the master cylinder bore When the brake master cylinder is overhauled it is recommended that the cylinder body be replaced rather than cleaned up by honing the bore The master cylinder has a hard highly polished bearingized surface which is produced by diamond boring followed by ball or roller burnishing under heavy pressure Honing will destroy this hard smooth surface and cause ra...

Page 282: ... first digit indicates the plant where it was built The second digit digit shows the year it was built 1 means 1991 a 2 means 1992 etc The last digits show the day it was built Example 271 means it was the 271st day of the production year MASTER CYLINDERS COMPOSITE MASTER CYLINDER Remove or Disconnect Figures 1 2 and 3 1 Cover 1 2 Diaphragm 2 3 Brake fluid from reservoir 4 Reservoir 3 and grommets...

Page 283: ...come out of the bore with considerable force and cause personal injury 7 Secondary piston 9 With the rear port plugged apply a small amount of air pressure to the front port 8 Seals 8 and 10 9 Spring retainer 7 and spring 6 X jjJ I Clean All metal parts in denatured alcohol All rubber parts in clean brake fluid Stained or discolored cylinder bore with crocus cloth Figure 3 Removing the Reservoir I...

Page 284: ...onents 5 Snap ring 11 The primary piston must be compressed when installing the snap ring 6 Grommets 4 7 Reservoir 3 figures 4 or 5 Press on the body while using a rocking motion 8 Diaphragm 2 in cover 1 9 Cover 1 CAST IRON MASTER CYLINDER Remove or Disconnect Figures 6 and 7 1 Cover 22 2 Diaphragm 23 3 Brake fluid from reservoir 4 Snap ring 31 5 Primary piston assembly 30 ...

Page 285: ...iston 28 5 Primary piston assembly 30 6 Snap ring 31 The primary piston must be compressed to install the snap ring 7 Diaphragm 23 in cover 22 8 Cover 22 9 Tube seats if removed Seat the tube seats with a spare brake tube nut figure 8 BENDIX MASTER CYLINDER Remove or Disconnect Figure 9 1 Cover 41 2 Diaphragm 42 3 Drain brake fluid from reservoir 4 Bolts 54 and reservoir 44 5 O ring 55 and compens...

Page 286: ...e fluid 1 Secondary spring 48 2 Secondary piston assembly 49 3 Piston return spring 50 4 Primary piston assembly 51 and snap ring 52 The primary piston must be depressed to install the snap ring 5 O ring 55 and springs 47 6 Valve poppets 46 and compensating valve seals 45 7 Depress and hold primary piston assembly with a smooth rounded end tool 8 Reservoir 44 NOTICE Refer to Notice on page 5A 1 9 ...

Page 287: ...llows air at atmospheric pressure to enter one side of the diaphragm s This pressure difference pro vides the power assist Delco Moraine NDH vacuum boosters have a build date on a small paper label glued to the front housing The first digit indicates the plant where it was built and the second digit indicates the year 1 means 1991 2 means 1992 etc The last digits indicate the day it was built Exam...

Page 288: ...ct All parts for corrosion nicks cracks cuts scoring distortion or excessive wear Replace as needed Use crocus cloth to polish away minor corrosion of the housings or diaphragm support XJS jl Clean All parts in clean denatured alcohol Do not immerse the power piston assembly in alco hol Wipe it clean with an alcohol dampened cloth Dry all parts with dry unlubricated compressed air 4 Install or Con...

Page 289: ...10 6 Reaction body retainer 25 7 Power piston bearing 6 in rear housing 8 Lubricate inside and outside of bearing with Delco Silicone Lube GM P N 18010909 or equivalent 9 Power piston group in rear housing 7 10 Return spring 9 11 Front housing 8 to rear housing 7 A Align marks made during disassembly B Use J 23456 to apply force in a clockwise direc tion to lock the front and rear housings C Stake...

Page 290: ...mary support plate 17 from housing divider 19 12 Primary diaphragm 16 from the primary support plate 17 13 Secondary diaphragm 20 and secondary support plate 21 from housing divider 19 12 Piston Rod Gaged 13 Reaction Retainer 14 Power Head Silencer 15 Diaphragm Retainer 16 Primary Diaphragm 17 Primary Support Plate 18 Secondary Piston Bearing 19 Housing Divider 20 Secondary Diaphragm 21 Secondary ...

Page 291: ...Protector 1 Lubricate O ring 31 with a thin layer of Delco Silicone Lube GM P N 18010909 or equivalent and install on air valve pushrod assembly 32 2 Air valve pushrod assembly 32 in power piston 33 3 New retainer 30 and seat using J 29282 figure 8 4 Filter 29 over pushrod eyelet and in power piston 33 5 Retaining ring 28 on air valve pushrod assembly 32 6 Reaction bumper 27 and air valve spring 2...

Page 292: ...primary diaphragm 16 lip with a thin layer of Delco Silicone Lube GM P N 18010909 or equivalent 16 Primary diaphragm 16 into the primary support plate 17 figure 11 Fold primary diaphragm 16 up and away from primary support plate 17 13 RETAINER DIAPHRAGM 17 Primary diaphragm 16 and support plate 17 over power piston assembly 41 Unfold primary diaphragm 16 back in position and pull outside edge of d...

Page 293: ...or equiva lent 26 Grommet 4 and vacuum check valve 3 27 Front housing seal 7 28 Silencer 2 and boot 1 GAGING PROCEDURE Tool Required J 37839 Push Rod Height Gage Gage the piston rod using J 37839 figure 14 A Apply 85 0 kPa 25 In Hg vacuum or maxi mum engine vacuum to the booster Figure 14 Gaging the Piston Rod B Check the maximum and minimum rod length If the piston rod is not within limits obtain...

Page 294: ...NOTES ...

Page 295: ... located on the left front cowl and near the inlet valve UNIT REPAIR BOOSTER ASSEMBLY CAUTION The accumulator contains com pressed gas Always use the proper tools and follow the recommended procedures or personal injury may result Do not apply heat to accumulator Do not attempt to repair an inoperative accumulator Always replace an inoperative accumulator with a new one Dis pose of an inoperative ...

Page 296: ...Spring F0763 Figure 2 Removing the Accumulator 23 Return line fitting 12 and seal 10 lQg Clean All parts with power steering fluid Spool valve and spool valve bore for corrosion nicks and scoring Discoloration of the spool or bore is not harmful and is no cause for replacement Figure 3 Removing the Plug and Spring Housing and cover sealing surface for corrosion or nicks Tube seat in the housing fo...

Page 297: ... Seal 10 and return line fitting 12 3 Accumulator valve 11 4 Spool valve 13 5 Seal 23 and piston assembly 22 figure 7 Lubricate J 24551 A or J 25083 with clean pow er steering fluid Use the proper tool to install the piston assem bly 6 Seal 14 on piston assembly 22 7 Seal 15 on housing 8 8 Cover 16 on housing 8 9 Bolts 9 Figure 7 Installing the Piston Assembly Tighten 8 HOUSING _ 25 SPRING PISTON ...

Page 298: ...elease C clamp F Remove J 26889 17 Jam nut from repair kit on pedal rod 20 18 Eyelet on pedal rod 20 GAGING PROCEDURE Tool Required J 37839 Push Rod Height Gage 1 Gage the piston rod using J 37839 figure 9 SPECIFICATIONS F9232 Figure 9 Gaging the Piston Rod Check the maximum and minimum rod length 2 If the piston rod is not within limits obtain a service adjustable piston rod and adjust the rod to...

Page 299: ...SPECIAL TOOLS 1 POWER BRAKE PUSH ROD HEIGHT GAGE 2 PISTON SEAL PROTECTOR 3 PISTON SEAL PROTECTOR 4 ACCUMULATOR PISTON COMPRESSOR 5 VALVE CONNECTOR SEAL INSTALLER F9233 ...

Page 300: ...NOTES ...

Page 301: ... used Fasteners that are not reused and those requiring thread locking compound will be called out The correct torque value must be used when installing fasteners that require it If the above conditions are not followed parts or system damage could result CONTENTS SUBJECT PAGE General Information 6A 2 Statement on Cleanliness and Care 6A 2 Use of RTV Sealer and Anaerobic Gasket Eliminator 6A 2 Usi...

Page 302: ...derstood that proper cleaning and protection of machined surfaces and friction areas is part of the repair procedure This is considered standard shop practice even if not specifically stated USE OF RTV SEALER AND ANAEROBIC GASKET ELIMINATOR Two types of sealer are commonly used in the engines covered by this manual These are RTV sealer and anaerobic gasket eliminator sealer It is important that th...

Page 303: ...r equivalent If one or more cylinder bores are rough scored or worn beyond limits it will be necessary to smooth or true up such bores to fit new pistons No attempt should be made to cut down oversize pistons to fit cylinder bores as this will destroy the surface treatment and affect the weight The smal lest possible oversize service pistons should be used and the cylinder bores should be honed to...

Page 304: ...taper or wear they should be bored and honed to the smallest oversize that will permit complete resurfacing of all cylinders 4 Fine vertical scratches made by ring ends will not by themselves cause excessive oil consumption therefore honing to remove them is unnecessary 5 If the bore is glazed but otherwise serviceable break the glaze lightly with a hone and replace the piston rings Make sure the ...

Page 305: ...dded particles and torn or folded metal 6 By measuring the piston to be installed at the siz ing point specified in the proper section and adding the average of the clearance specification the finish hone cylinder measurement can be deter mined It is important that both the block and piston be measured at normal room temperature 7 It is of the greatest importance that refinished cylin der bores ar...

Page 306: ...ing wear etc Ring grooves for burrs nicks etc Skirts and pin bosses for cracking Skirts for scuffing Connecting rod bearing inserts for scratches or deep pitting MEASURING PISTON PIN TO PISTON CLEARANCE Measure Figures 7 and 8 Inspect Piston pin bore in the piston and connecting rod Check for scuffing burrs etc Piston for scratches wear etc Connecting rod for cracks nicks etc If a suitable jig is ...

Page 307: ...as fitted ASSEMBLY Assembling the Piston and Connecting Rod Assemble Figure 11 Tool Required J 24086 B Piston Pin Remover and Installer Set 1 Piston and connecting rod A The piston and connecting rod must be installed in the proper position 2 2L Engines Refer to proper section 5 0L and 5 7L Engines The flange on the connecting rod must face toward the front of the piston on a left side assembly an...

Page 308: ...ifications in the proper section for correct gap 5 If the gap between the ends of the ring is not as specified remove the ring and try another for fit Inspect Figure 13 B4979 Figure 12 Measuring the Ring End Gap i B5077 Ring fit as follows 1 Fit each compression ring to the piston on which it is going to be used 2 Slip the outer surface of the top and second compression ring into the respective pi...

Page 309: ...aring Remover Installer A BEARING TOOL C NUT B PILOT D PULLER SCREW J 6098 01 B5276 1 Rear camshaft plug or cap 2 Inner camshaft bearings Use J 6098 01 figure 15 A Insert the pilot into the front camshaft bearing bore B Slide the puller screw with the nut and washer through the pilot C Insert the bearing tool into the inner camshaft bearing bore with the shoulder of the tool against the bearing D ...

Page 310: ...ller screw with a wrench turn the nut with a second wrench to pull the camshaft bearing into place F Remove the puller screw pilot and bearing tool Important Make sure the camshaft bearing hole or holes align with the oil hole or holes in the block If it is difficult to see the alignment use a piece of brass rod as described in step 1 3 Camshaft rear plug or cap A Coat a new camshaft plug with sea...

Page 311: ...HEAD L DISASSEMBLY Disassemble Valves and components Refer to the proper sec tion CLEANING AND INSPECTION I Clean Figures 19 and 20 Tools Required J 8089 Wire Brush J 8101 Valve Guide Cleaning Tool Carbon from the combustion chambers using J 8089 figure 19 Valve guides using J 8101 figure 20 Valve stems and heads on a wire wheel Carbon and old gasket from the cylinder head gas ket surface Inspect ...

Page 312: ...ent of the valve stem from side to side crosswise to the head will cause a direct movement of the indicator stem The indicator stem must contact the side of the valve stem just above the valve guide bore C Drop the valve head about 1 6 mm 1 16 inch off the valve seat D Move the stem of the valve from side to side using light pressure to obtain a clearance read ing If clearance exceeds specificatio...

Page 313: ...ntial that valve guide bores be free from carbon or dirt to ensure proper centering of the pilot in the guide Refer to Specifications in the proper section for valve seat angle specifications NOTICE Valve seats on 5 0L exhaust only and 5 7L L D exhaust only are induction hardened The 5 7L H D and the 7 4L engines use hardened seat inserts exhaust only Excessive removal of stock may result in damag...

Page 314: ...ERT m Measure Figure 27 Refer to the proper section for additional informa tion 1 Main bearing inserts and crankshaft as outlined in the proper section 2 Gaging plastic A Begin with the rear main bearing B Wipe the oil from the crankshaft journal and the lower main bearing insert C Place a piece of gaging plastic the full width of the lower bearing insert parallel to the crank shaft on the journal...

Page 315: ...way to measure con necting rod bearing clearance is with the use of gaging plastic This wax like material compresses evenly between the bearing and journal surfaces without dam aging them Proceed as follows IQI Clean All oil from the crankshaft journal and the connect ing rod bearing inserts Install or Connect Figure 28 Refer to the proper section for additional informa tion on connecting rod bear...

Page 316: ...purpose thread repair kits are available commercially CAUTION Wear safety glasses to avoid eye damage 1 Determine size pitch and depth of damaged thread If necessary adjust stop collars on cutting tool and tap to required depth Important Refer to the kit manufacturer s instructions regarding the size of drill and tap to be used 2 Drill out damaged thread Clean out chips 3 Tap hole Lubricate tap wi...

Page 317: ... BRUSH 6 VALVE GUIDE CLEANING TOOL 7 DIAL INDICATOR 8 VALVE SPRING TESTER 9 VALVE GUIDE REAMER SET ALL ENGINES EXC 7 4L CONSISTS OF J 5830 1 0 08mm 0 003 INCH OVERSIZE J 5830 2 0 38mm 0 015 INCH OVERSIZE J 5830 3 0 76mm 0 030 INCH OVERSIZE 10 VALVE GUIDE REAMER SET 7 4L ENGINES CONSISTS OF J 7049 1 0 08mm 0 003 INCH OVERSIZE J 7049 2 0 30mm 0 015 INCH OVERSIZE J 7049 3 0 76mm 0 030 INCH OVERSIZE F...

Page 318: ...NOTES ...

Page 319: ... Shop Equipment 6A2 3 Accessory Removal 6A2 3 Cleaning 6A2 3 Draining the Engine 6A2 3 Oil Fill Tube Removal 6A2 9 Oil Filter Connector and By pass Valve Removal 6A2 9 Intake Manifold Removal 6A2 9 Exhaust Manifold Removal 6A2 9 Coolant Outlet Thermostat and Adapter Removal 6A2 9 Coolant Inlet Removal 6A2 9 Coolant Pump Removal 6A2 9 Crankshaft Pulley Removal 6A2 10 Crankshaft Pulley Hub Removal 6...

Page 320: ...A2 40 Start up Procedures 6A2 40 Specifications 6A2 41 Fastener Tightening Specifications 6A2 41 Special Sealers Adhesives Thread Lockers and Lubricants 6A2 41 Engine Specifications 6A2 43 Special Tools 6A2 45 GENERAL DESCRIPTION CYLINDER BLOCK The cylinder block is made of cast iron and has four cylinders arranged In Line Five main bearings support the crankshaft which is retained by recessed bea...

Page 321: ...arings by means of intersecting passages drilled in the crankshaft DISASSEMBLY OF ENGINE TOOLS AND SHOP EQUIPMENT A clean well lit work area should be available Other necessary aides include a suitable parts cleaning tank compressed air supply trays to keep parts and fasteners organized and an adequate set of hand tools An approved engine repair stand will help prevent personal injury or damage to...

Page 322: ...SR207LN2 EDS ...

Page 323: ... CRANKSHAFT BEARING 83 TENSIONER TIMING CHAIN 20 GASKET CAMSHAFT REAR CAP 84 BOLT CAMSHAFT SPROCKET COVER 52 CAP MAIN BEARING 85 WASHER CAMSHAFT SPOCKET 23 INLET COOLANT 53 SEALANT 86 SPROCKET CAMSHAFT 24 GASKET COOLANT INLET 54 NUT OIL PAN 87 BOLT CAMSHAFT THRUST 25 PLUG COOLANT DRAIN 55 MOTOR STARTER PLATE 26 BLOCK CYLINDER 56 BOLT STARTER MOTOR 88 PLATE CAMSHAFT THRUST 27 NUT CONNECTING ROD 57 ...

Page 324: ......

Page 325: ...OIL 61 BOLT CYLINDER HEAD 28 SEAT VALVE SPRING 62 TENSIONER SERPENTINE 29 STUD VALVE ROCKER ARM DRIVE BELT 30 GUIDE PUSH ROD 70 BOLT ACCELERATOR CABLE 31 GASKET COOLANT OUTLET BRACKET ADAPTER 71 NUT ACCELERATOR CABLE 32 GASKET EGR VALVE ADAPTER BRACKET 33 ADAPTER COOLANT OUTLET 72 BRACKET ACCELERATOR 34 STUD EGR VALVE CABLE 35 RETAINER SPRING VALVE 73 HARNESS VACUUM 36 NUT EGR VALVE 74 ARM VALVE R...

Page 326: ...OVERHEAD OILING AND RETURN MAIN OIL GALLERY N30005 6A2 J EDS ...

Page 327: ... EGR solenoid valve 2 Accelerator and T V cable bracket 3 Upper intake manifold assembly 4 EGR valve injector 5 Fuel injector retainer bracket regulator and injectors 6 Intake manifold nuts 7 Lower intake manifold and gasket EXHAUST MANIFOLD REMOVAL Figure 8 Remove or Disconnect 1 Oxygen Sensor 2 Oil fill tube refer to Oil Fill Tube in this section 3 Exhaust manifold nuts 4 Exhaust manifold and ga...

Page 328: ... Crankshaft pulley to hub bolt 3 Remove pulley CRANKSHAFT PULLEY HUB REMOVAL Figure 11 Tools Required J 24420 B Crankshaft Pulley Hub Puller 0Remove or Disconnect 1 Install Tool J 24420 B on hub turn puller screw and remove hub CRANKCASE FRONT COVER REMOVAL Figure 12 Remove or Disconnect 1 Front cover bolts 2 Front cover If difficult to remove use a rubber mallet to loosen cover 7 FRONT 4 OF ENGIN...

Page 329: ...02LN2 EDS Figure 9 Coolant Outlet Thermostat and Adapter 1 BOLT 25 N m 18 LBS FT L39100 68 J EDS Figure 10 Coolant Pump and Coolant Inlet Clean Sealing surface on block and crankcase front cover CRANKCASE FRONT COVER OIL SEAL REMOVAL Tool Required J 35468 Seal Centering Tool Remove or Disconnect 1 Oil seal Pry out with a large screwdriver 1 BOLT 2 WASHER 3 CRANKSHAFT PULLEY 4 CRANKSHAFT PULLEY HUB...

Page 330: ...lean Dirt from around mating area of cover E3Remove or Disconnect 1 Crankcase vent valve from cover by unscrewing retainer 2 Rocker arm cover bolts 3 Rocker arm cover 1 BOLT 2 SPROCKET CAMSHAFT 3 BOLT 4 TENSIONER 5 BOLTS 6 SPOCKET CRANKSHAFT A ALIGN TABS ON TENSIONER W ITH MARKS ON CAMSHAFT CRANKSHAFT SPROCKETS MC0015 6A2 L EDS Figure 13 Timing Chain and Sprockets O l Clean Sealing surface on cyli...

Page 331: ...EMOVAL Figure 54 B Remove or Disconnect 1 Oil pan bolts and nuts NOTICE Do not pry on oil pan when separating oil pan from block or damage to the oil pan will occur 1 BOLT 2 ROCKER COVER 3 GASKET 4 ROCKER STUD 5 FLANGE MUST BE FREE OF OIL UPON ROCKER COVER GASKET INSTALLATION 6 PUSHROD 7 ROCKER ARM 8 BALL 9 NUT 10 SUPPORT SPARK PLUG W IRE MCooio 6A2 l eos Figure 15 Rocker Arm and Cover 2 Using a n...

Page 332: ... travel this ridge must be removed with a ridge reamer before removing piston and connecting rod assembly 4 Connecting rod cap 1 BRACKET 2 BOLT 3 OIL PUMP DRIVE ASSEMBLY 4 O RING 5 SHAFT 6 RETAINER HEAT AND W ATER SOAK PRIOR TO INSTALLATION 7 BOLT 8 OIL PUMP 9 CYLINDER BLOCK MC0101 6A2 L EDS Figure 17 Oil Pump and Drive Assembly NOTICE Install thread protector to avoid damage to the crankshaft jou...

Page 333: ...s well as various bristle brushes and gasket scrapers A source of compressed air will also be helpful in the cleaning operations Special tools are listed and illustrated throughout this section with a complete listing at the end of the section These tools or their equivalents are specially designed to quickly and safely accomplish the operations for which they are intended They should not be used ...

Page 334: ...installed correctly with the arrows pointing toward the front of the engine Measure m 1 Bearing bores with a bore gage measure concentricity and alignment refer to Figure 21 If outside specification replace the block If an examination of the outside of the bearing inserts indicates minor spots in the bearing bore they may be carefully removed using emery cloth 2 Cylinder bore with bore gage J 8087...

Page 335: ...sassemble Tool required J 24086 B Piston Pin Remover Installer set CAUTION Use care when handling the piston Worn piston rings are sharp and may cause bodily injury 1 Piston rings Use a suitable tool to expand the rings Piston rings must not be reused 2 Place the piston and connecting rod assembly into fixture J 24086 B and press out the piston pin refer to Figure 23 3 Connecting rod bolts from ro...

Page 336: ...n to cylinder bore clearance as follows a Measure the cylinder bore diameter using J 8087 or equivalent refer to Figures 24 and 25 b Measure the piston diameter refer to Figure 24 c Subtract piston diameter from cylinder bore diameter to determine piston to bore clearance d Compare piston to bore clearance obtained with those specified refer to Engine Specifications in this section Figure 25 Measu...

Page 337: ...roove although high spots in the ring groove may be cleaned up by careful use of a point file CONNECTING ROD AND PISTON ASSEMBLY Tool Required J 24086 B Piston Pin Remover Installer The piston must be mounted on the connecting rod in such a manner that the piston mark indicating front of engine lines up with the side of the connecting rod that faces the front of the engine Assemble 1 Place piston ...

Page 338: ...ARANCE m Measure Bearing clearance To determine the correct replacement insert size the bearing clearance must be measured accurately Either of the following two methods may be used however method A gives more reliable results and is preferred Figure 29 Measuring Bearing Clearance f Important Method A yields measurements from which the bearing clearance can be computed Method B yields the bearing ...

Page 339: ...CE Bearing inserts must not be shimmed scraped or filed Do not touch the bearing surface of the insert with the bare fingers Skin oil and acids will each the bearing surface 6 Remove all traces of the gaging plastic after measuring 4 Install or Connect y Important Make sure the bearing cap bolt holes and the cap mating surfaces are clean and dry 1 Dip bearing cap bolts in clean engine oil 2 Lubric...

Page 340: ... V blocks instead 3 Install J 8520 and measure the cam lift refer to Figure 32 If any cam lift is out of specification replace the camshaft 4 Bearing journals With a micrometer measure run out and diameter If out of specification replace the camshaft m Important If a new camshaft has been installed add GM P N 1051396 EP lubricant or equivalent to the engine oil If a new camshaft is installed repla...

Page 341: ...d and cylinder head EGR passage of excessive carbon deposits Inspect Manifold for cracks broken flanges and gasket surface damage EXHAUST MANIFOLD Clean Mating surfaces at cylinder head and exhaust manifold Inspect Manifold for cracks broken flanges and gasket surface damage Alignment of exhaust manifold mating surfaces Use a straight edge and feeler gage If the flanges or mating surfaces do not a...

Page 342: ... remove all varnish soot and carbon DO NOT use a motorized wire brush Valve guides refer to Figure 36 Threaded holes Remains of sealer from plug holes Inspect 1 Cylinder head bolts for damaged threads and damaged cylinder heads caused by improper use of tools Important Do not attempt to weld the cylinder head replace it 2 Cylinder head deck intake and exhaust manifold mating surfaces for flatness ...

Page 343: ...and Figure 38 for reamer selection and usage NOTICE Avoid breaking reamer flutes or jamming the reamer into the valve guide due to packing of chips or carbon Clean the valve guides before reaming VALVE SERVICE Clean Valves of carbon oil and varnish Carbon can be removed with a wire brush varnish by soaking in carburetor cleaning fluid CAUTION Safety glasses must be worn when using a power wire bru...

Page 344: ...Guides in this section VALVE SEAT SERVICE Important Valve guides must be reconditioned prior to servicing valve seats Refer to Valve Guide Service in this section If the seats are reconditioned the valves also must be reconditioned or replaced refer to Valve Service in this section I Inspect Valve seats for excessive wear and burned spots Seat Grinding Valve seats may be reconditioned by grinding ...

Page 345: ...nning It will take a few seconds for the lifter to fill after the engine is started 2 Intermittently noisy on idle only disappearing when engine speed is increased Intermittent clicking may be an indication of a pitted check valve ball or it may be caused by dirt Correction Replace lifter 3 Noisy at slow idle or with hot oil quiet with cold oil or as engine speed is increased High leak down rate R...

Page 346: ...er end of pushrod Excessive wear of the spherical surface indicates one of the following conditions a Improper hardness of the pushrod ball The pushrod and rocker arm must be replaced b Improper lubrication of the pushrod The pushrod and rocker arm must be replaced The oiling system to the pushrod should be checked Excessive camshaft lobe or lifter wear Install a dial indicator on pushrod side of ...

Page 347: ... Scoring Sticking Burrs may be removed with a fine oil stone Pressure regulator valve spring for Loss of tension Bending If in doubt replace the spring Suction pipe and screen assembly for Looseness If the pipe is loose or has been removed the pump cover and pickup tube must be replaced Broken wire mesh or screen Gears for Chipping Galling Wear m Measure Refer to Oil Pump Specifications in this se...

Page 348: ...with petroleum jelly and reassemble Running the engine without measurable oil pressure will cause extensive damage 2 Start engine and observe oil pressure THREAD REPAIR Figure 46 Damaged threads may be reconditioned by drilling out rethreading and installing a suitable thread insert Tools Required General purpose thread repair kits are available commercially CAUTION Wear safety glasses to avoid ey...

Page 349: ... Main bearings 2 Lubricate main bearings and journals with engine oil 3 Crankshaft 4 Main bearing caps 5 Lubricate main bearing cap bolts NOTICE Refer to Notice on page 6A2 1 6 Main bearing cap bolts 7 With rubber mallet hit both ends of crankshaft to center thrust bearing rearward first then forward last Tighten Bolts to 95 N m 70 lbs ft Measure Crankshaft end play refer to Specifications in this...

Page 350: ...3Install or Connect 9 Important Old thread adhesive must be thoroughly removed from the flywheel bolts and bolt holes NOTICE Refer to Notice on page 6A2 1 1 Apply Loctite 271 GM P N 1052624 or equivalent to all flywheel bolts Carefully follow the instructions included with the thread locking compound to ensure proper bolt retention 2 Flywheel retainer automatic transmission and bolts Flywheel bolt...

Page 351: ...gine NOTICE Guide the lower connecting rod end carefully to avoid damaging the crankshaft journal while tapping the piston into the cylinder 6 Remove thread protectors 7 Bearing inserts to clean and dry connecting rod and cap NOTICE Bearing inserts must not be shimmed scraped or filed Do not touch the bearing surface of the insert with the bare fingers Skin oil and acids will etch the bearing surf...

Page 352: ...side clearance refer to Figure 52 and Engine Specifications in this section OIL PUMP DRIVE INSTALLATION Figure 17 Install or Connect 1 Oil pump drive by twisting NOTICE Refer to Notice on page 6A2 1 2 Oil pump drive bolt Q Tighten Bolt to 25 N m 18 lbs ft OIL PUMP INSTALLATION Figure 53 Install or Connect 1 Heat retainer in hot water prior to assembling extension shaft 2 Extension to oil pump 1 PI...

Page 353: ...parallel to the anti rotation bracket the roller at the bottom of each lifter is parallel to the camshaft Refer to Figure 16 2 Anti rotation bracket s to lifter s and block observing Step 1 NOTICE Refer to Notice on page 6A2 1 3 Bolt s retaining anti rotation bracket s Tighten Bolt s to 11 N m 97 lbs in CYLINDER HEAD INSTALLATION Figure 55 Tool Required J 36660 Torque Angle Meter M Install or Conn...

Page 354: ...and 15 Install or Connect 1 Gasket NOTICE Refer to Notice on page 6A2 1 2 Rocker cover Tighten Cylinder Head CRANKSHAFT SPROCKET INSTALLATION Tools Required J 5590 Crankshaft Sprocket Installer M Install or Connect 1 Crankshaft sprocket using J 5590 Important V Be sure sprocket is fully seated against crankshaft TIMING CHAIN TENSIONER AND CAMSHAFT SPROCKET INSTALLATION Figures 13 and 56 M Install ...

Page 355: ...area with engine oil 2 Apply RTV sealer GM P N 1052917 or equivalent to keyway in crankshaft 3 Place crankshaft pulley hub in position over key on crankshaft 4 Crankshaft pulley hub as follows Install tool J 29113 into crankshaft so that at least 6 mm 1 4 in of thread is engaged Pull pulley hub into position and remove tool from crankshaft Be sure hub is seated against crankshaft CRANKSHAFT PULLEY...

Page 356: ... page 6A2 1 2 Coolant outlet adapter to cylinder head bolts Bolts to 11 N m 97 lbs in 3 Thermostat 4 Coolant outlet and new gasket 5 Coolant outlet to adapter nuts Tighten Nuts to 10 N m 89 lbs in EXHAUST MANIFOLD INSTALLATION Figure 8 I I Install or Connect 1 New exhaust manifold gasket NOTICE Refer to Notice on page 6A2 1 2 Exhaust manifold Manifold nuts to 13 N m 115 lbs in 3 Oil fill tube and ...

Page 357: ...AL BLOCK ASM CYLINDER SR204LN2 EDS Nuts in sequence to 33 N m 24 lbs ft refer to Figure 57 3 Fuel injectors regulator and injector retainer bracket Bolts to 3 5 N m 31 lbs in 4 EGR valve injector so that the port is facing directly towards the upper intake manifold assembly 5 Upper intake manifold assembly Bolts in sequence to 30 N m 22 lbs ft refer to Figure 58 6 MAP sensor and EGR solenoid valve...

Page 358: ...nstalling it in the vehicle If a suitable test stand is not available the following procedure can be used after the engine has been installed 1 Fill the crankcase with the proper quantity and grade of engine oil Important If a new camshaft or hydraulic lifters were installed add Engine Oil Supplement GM P N 1052367 or equivalent to the engine oil 2 Fill the cooling system with the proper quantity ...

Page 359: ...eel Bolts Automatic 75 N m 55 lbs ft Flywheel bolts Manual 75 N m 55 lbs ft Intake Lower Manifold Nuts 33 N m 24 lbs ft Intake Upper Manifold Bolts 30 N m 22 lbs ft Knock Sensor 19 N m 14 lbs ft MAP Sensor 3 N m 27 lbs in Oil Fill Tube Nut 25 N m 18 lbs ft Oil Filter Connector 35 N m 26 lbs ft Oil Filter 3 4 to one turn after gasket contact Oil Pan Nuts and Bolts 10 N m 89 lbs in Oil Pan Drain Plu...

Page 360: ...bricant GM P N 1052367 Pan Oil to front cover RTV Sealer GM P N 1052914 Plug Camshaft Sealer GM P N 1052914 Plugs Cooling Jacket Sealer GM P N 1050026 Threads Rocker arm and ball Dri Slide Moly lubricant GM P N 1052948 ...

Page 361: ...0 0019 0 0082 PISTON PIN Diameter 20 320 20 325 0 8000 0 8002 Fit in Piston 0 010 0 022 0 0004 0 0009 Press Fit in Rod 0 025 0 045 0 00098 0 0017 CAMSHAFT Lift In 6 60 0 259 Ex 6 35 0 250 Journal Diameter 47 44 47 49 1 867 1 869 Journal Clearance 0 026 0 101 0 001 0 0039 CRANKSHAFT Main Journal Diameter All 63 360 63 384 2 4945 2 4954 Taper Max 0 005 0 00019 Out of Round Max 0 005 0 00019 Main Bea...

Page 362: ... Spring Free Length 48 1 89 Load Closed 350 380 N 41 58 mm 79 85 lbs 1 637 in Open 956 1036 N 31 67 225 233 lbs 1 247 in OIL PUMP Pressure 3000 rpm 65 C 150 F 384 kPa 56 psi Gear Lash 0 094 0 195 0 004 0 008 Gear Pocket Depth 30 36 30 44 1 195 1 198 Diameter 38 18 38 25 1 503 1 506 GEAR Length Drive Gear 30 45 30 48 1 199 1 20 Idler 30 45 30 48 1 199 1 20 Diameter Drive Gear 38 05 38 10 1 498 1 5 ...

Page 363: ...ANER 7 J 8520 CAMSHAFT LOBE LIFT INDICATOR 8 J 9666 VALVE SPRING TESTER 9 J 22888 20 TIMING GEAR PULLER 10 J 23590 SPARK PLUG PORT ADAPTER 11 J 23600 B BELT TENSION G A G E 12 J 24086 B PISTON PIN REMOVER INSTALLER SET 13 J 24420 B CRANKSHAFT PULLEY HUB PULLER 14 J 28467 A ENGINE SUPPORT FIXTURE 15 J 29113 CRANKSHAFT PULLEY HUB INSTALLER 16 J 33049 CAMSHAFT BEARING REMOVER INSTALLER SET MC0024 6A2...

Page 364: ...TERING TOOL 3 J 35953 SUPPORT FOOT 4 J 36295 ENGINE TRANSAXLE FRAME HANDLER 5 J 36660 TORQUE ANGLE METER 6A J 38847 VALVE GUIDE REAMER FOR 0 075 mm O S VALVE 6B J 38848 VALVE GUIDE REAMER FOR 0 150 mm O S VALVE 6C J 38849 VALVE GUIDE REAMER FOR 0 300 mm O S VALVE MC0105 6A2 L EDS ...

Page 365: ...e S haft 6A3 3 Valve Train 6A3 3 Intake Manifold 6A3 3 Engine Lubrication 6A3 3 Disassembly of the Engine 6A3 14 Tools and Shop Equipment 6A3 14 Accessory Removal 6A3 14 Cleaning 6A3 14 Draining the Engine 6A3 14 EGR Valve Removal 6A3 14 Exhaust Manifold Removal 6A3 14 Rocker Arm Cover Removal 6A3 14 Intake Manifold Removal 6A3 14 Valve Train Component Removal 6A3 15 Cylinder Head Removal 6A3 15 T...

Page 366: ...ainer Installation 6A3 29 Crankshaft Rear Oil Seal Installation 6A3 29 Balance Shaft Installation 6A3 30 Camshaft Timing Chain and Sprocket Installation 6A3 30 Front Cover Installation 6A3 30 Torsional Damper Installation 6A3 30 Piston And Connecting Rod Installation 6A3 31 Connecting Rod Bearing Selection 6A3 31 Oil Pump Installation 6A3 33 Oil Pan Installation 6A3 33 Cylinder Head Installation 6...

Page 367: ... as the connecting rod travels from one side of the piston to the other side after a stroke The pins are a press fit in the connecting rod and a floating fit in the piston BALANCE SHAFT S T Vehicles and C K Vehicles with light duty emissions The cast iron balance shaft is mounted in the crank case above and in line with the camshaft A camshaft gear drives the gear attached to the balance shaft The...

Page 368: ...103 153 127 V1200 ...

Page 369: ...t Plug 117 Clutch Driven Plate 118 Spring Lock Washer 119 Clutch Cover Bolt 120 Clutch Pressure Plate Cover 121 Dowel Pin 122 Retainer 123 Oil Pump Bolt 124 Spring Stop Plug 125 Nut 126 Gasket 127 Oil Pan Drain Plug 128 Oil Pan Stud 129 Bolt 130 Clip 131 Bolt 132 Main Bearing Cap Bolt 133 Groove Pin 134 Engine Flywheel 135 Flywheel Bolt 136 Lower Main Bearing Insert 137 Crankshaft Front Oil Seal 1...

Page 370: ......

Page 371: ... Bolt 171 Oil Pressure Sensor 41 Lifter Restrictor Retainer 172 Oil Pressure Fitting 42 Rocker Arm Nut 173 E G R Valve Gasket 43 Rocker Arm Ball 174 E G R Valve 44 Rocker Arm 175 Bolt 45 Push Rod 176 Intake Manifold Gasket 46 Valve Lifter Guide Restrictor 177 Nut 47 Lifter 178 Power Booster 48 Flat Washer Vacuum Pipe 50 Cylinder Head Bolt 179 Exhaust Manifold 51 Spark Plug 180 Power Booster Vacuum...

Page 372: ......

Page 373: ...93 BOLT 195 NUT CAMSHAFT SPROCKET 94 FITTING 196 STUD CAMSHAFT SPROCKET 100 CAP MAIN BEARING 207 PLUG HEX 101 CRANKSHAFT 208 SEAL BALANCE SHAFT REAR BEARING PLUG 102 FILTER OIL 209 PLUG EXPANSION CUP 103 RINGS PISTON 210 PLUG SQUARE 104 PISTON 211 PIN DOWEL 105 ROD CONNECTING 212 PLUG HEX 106 BEARING CONNECTING ROD 213 PLUG KNOCK SENSOR HOLE 107 CAP CONNECTING ROD BEARING 214 PLUG OIL PRESSURE 108...

Page 374: ...F9375 Figure 7 Engine Lubrication Diagram Engines Without Balance Shaft ...

Page 375: ...Front View Rear View Showing Path Of Oil To Timing Chain Showing Main Gallery Oil Filter And Crankshaft Oil Feed V0575 ...

Page 376: ...Figure 9 Engine Lubrication Diagram Engines With Balance Shaft ...

Page 377: ...SHOWN IN OPEN POSITION B SUCTION C OIL PRESSURE SWITCH D VALVE LIFTER GALLERY E MAIN OIL GALLERY F BYPASS VALVE FRONT VIEW SHOWING PATH OF OIL TO TIMING CHAIN REAR VIEW SHOWING MAIN GALLERY OIL FILTER AND CRANKSHAFT OIL FEED V0504 ...

Page 378: ...re removing accessories CLEANING Remove the engine accessories before cleaning to provide better access to the engines exterior surfaces After removing the TBI unit distributor etc cover the openings with tape to prevent the entry of contami nants Methods used to clean the engine will depend on the means which are available Steam cleaning pressure washing or solvent cleaning are some of the accept...

Page 379: ...r heads 4 Head gaskets TORSIONAL DAMPER REMOVAL NOTICE The inertial weight section of the torsional damper is assembled to the hub with a rubber sleeve The removal proce dures must be followed with the proper tools or movement of the inertia weight sec tion of the hub will destroy the tuning of the torsional damper and the engine timing refer ence 4 Remove or Disconnect Figure 13 Tool Required J 3...

Page 380: ...camshaft s threaded holes Use these bolts to handle the camshaft figure 16 B Use care to prevent damage to the camshaft bearings C Pull the camshaft out from the block BALANCE SHAFT REMOVAL For 4 3L engines with a balance shaft refer to the Balance Shaft Removal procedure in SECTION 6A4 PISTON AND CONNECTING ROD REMOVAL 4 4 Remove or Disconnect Figures 18 and 19 Tools Required J 5239 Guide Set J 2...

Page 381: ...ication marks Mark the parts if required Marking them from the front to the rear with the engine in an upright position and viewed from the front The right bank is numbered 1 3 5 The left bank is numbered 2 4 6 Important Store the connecting rod and cap together as mat ing parts so they may be reassembled in the same position from which they were removed 4 Connecting rod cap 5 Connecting rod and p...

Page 382: ...g guide rod of J 5239 to push the connecting rod and piston out of the bore through the top of the engine 6 Connecting rod bearings FLYWHEEL REMOVAL Remove or Disconnect 1 Flywheel bolts 2 Flywheel CRANKSHAFT REAR OIL SEAL REMOVAL Remove or Disconnect Figure 20 NOTICE When removing the crankshaft rear oil seal be careful to not damage the crank shaft sealing surface A minor scratch can cause a maj...

Page 383: ... CRANKSHAFT REAR OIL SEAL RETAINER REMOVAL Remove or Disconnect Figure 21 1 Screws 80 and nuts 81 2 Seal retainer 82 3 Gasket 84 CRANKSHAFT REMOVAL Important Check the main bearing caps for location markings Mark the caps if necessary The caps must be returned to their original locations during assembly Remove or Disconnect 1 Main bearing cap bolts 2 Main bearing caps and lower main bearing insert...

Page 384: ...nents These include micrometers torque wrenches feeler gages dial indica tor set etc The inspection work when performed with the proper methods and tools is most important The rebuilt engine cannot be expected to perform properly if the parts are worn beyond acceptable limits are reused BLOCK Clean Figure 23 1 Block with solvent 2 All traces of old gaskets 3 Cylinder bores 4 Threaded holes 5 Oil g...

Page 385: ...ASSEMBLY Notice The connecting rod and cap need to be stored together as mating parts so they may be reassembled in the same position from which they were removed Refer to SECTION 6A and perform the following Disassembly Cleaning Inspection Measuring Piston pin diameter and clearance Piston to bore clearance and fit of pistons Ring end gap and ring clearances Ring fit INTAKE AND EXHAUST MANIFOLDS ...

Page 386: ...ge Excessively worn sprockets will rapidly wear a new chain An excessively worn chain will rapidly wear a new set of sprockets CRANKSHAFT SPROCKET REPLACEMENT Remove or Disconnect Figure 27 Tool Required J 5825 A Crankshaft Sprocket Puller 1 Crankshaft sprocket using J 5825 A 2 Key if necessary Install or Connect Figure 27 Tool Required J 5590 Crankshaft Sprocket Installer 1 Key if removed 2 Crank...

Page 387: ...aining around the weep hole is normal Replace the coolant pump only if coolant is dripping from the weep hole while the engine is running or while the system is pressurized OIL PAN AND ROCKER ARM COVERS 1 Parts in solvent Remove all sludge and varnish Old gaskets from the gasket surfaces Inspect Gasket flanges for bending or damage Rubber grommets and parts on the rocker arm cov er for deteriorati...

Page 388: ...ing disassembly 6 Pump cover 5 NOTICE Refer to Notice on page 6A3 1 7 Screws 9 Tighten With the shaft extension 1 installed on the pump turn the drive shaft by hand to check for smooth operation NOTICE Be careful of twisting shearing or collapsing the pipe when installing it to the pump A damaged pipe can cause lack of lubrication and engine failure 8 Pickup screen and pipe A If the pickup screen ...

Page 389: ...ve components figure 30 A Cap 21 20 Valve Keeper 21 Cap 22 Shield 23 O Ring Seal 24 Seal 25 Damper 26 Spring 27 Intake Valve 28 Rotator 29 Exhaust Valve B7609 B Shield 22 C Seal 24 D Damper 25 E Spring 26 3 Exhaust valve components figure 30 A Rotator 28 B Shield 22 C Seal 24 D Damper 25 E Spring 26 4 O ring seals 23 5 Valves 27 and 29 Place the valves in an organizer rack so they can be replaced ...

Page 390: ...m stud J 5715 for 0 003 inch oversize studs J 6036 for 0 013 inch oversize studs 2 Lightly lubricate lower end press fit area of rocker arm stud with hypoid axle lubricant 3 Rocker arm stud A Use J 6880 figure 33 B Stud is installed to proper depth when the tool bottoms on the cylinder head ASSEMBLY Install or Connect Figures 30 31 34 and 35 Tools Required J 8062 Valve Spring Compressor J 23738 A ...

Page 391: ...h thick between the spring and cylinder head NEVER shim the spring so as to give an installed height under the specified amount THERMOSTAT AND COOLANT OUTLET til Remove or Disconnect 1 Bolts 2 Coolant outlet 3 Gasket 4 Thermostat I Inspect Coolant outlet for cracks Install or Connect 1 Thermostat 2 New gasket 3 Coolant outlet NOTICE Refer to Notice on page 6A3 1 4 Bolts Tighten Bolts to 28 N m 21 ...

Page 392: ...lective fitting of both rod and main bearing inserts is necessary in production to obtain close tolerances For this reason you may find one half of a standard insert with one half of a 0 001 inch undersize insert which will decrease the clearance 0 0005 inch from using a full standard bearing Some engines may have rear main bearings that are 0 008 inch wider than standard across the thrust faces T...

Page 393: ...aulty insert could cause a lack of clearance at the bearing Tighten A ll main bearing cap bolts to 100 N m 75 lbs ft CRANKSHAFT REAR OIL SEAL RETAINER INSTALLATION Clean Gasket surfaces on the block and seal retainer 4 Install or Connect Figure 38 1 New gasket 84 to the block It is not necessary to use sealant to hold the gasket in place 2 Seal retainer 82 NOTICE Refer to Notice on page 6A3 1 3 Sc...

Page 394: ...e figure 41 Handle the camshaft carefully to prevent damage to the cam shaft bearings 3 Thrust plate 87 and screws 88 Tighten Screws 88 to 12 N m 105 lbs in 4 Camshaft sprocket and timing chain Important Line up the timing marks on the camshaft and crankshaft sprockets figure 42 5 Camshaft sprocket bolts Tighten Camshaft sprocket bolts to 28 N m 21 lbs ft FRONT COVER INSTALLATION Install or Connec...

Page 395: ...on page 6A3 1 5 Torsional damper bolt and washer Tighten PISTON AND CONNECTING ROD INSTALLATION CONNECTING ROD BEARING SELECTION Connecting rod bearings are of the precision insert type and do not use shims for adjustment DO NOT FILE RODS OR ROD CAPS If clearances are exces sive install a new bearing Service bearings are avail able in standard size and 0 0014 mm undersize for use with new and used...

Page 396: ...o the crankpin with J 5239 figure 46 Hold the ring compressor against the block until all rings have entered the cylinder bore F Remove J 5239 from the connecting rod bolts Important Each connecting rod and bearing cap should be marked beginning at the front of the engine Cylinders 1 3 and 5 are the right bank and 2 4 and 6 are the left bank when viewed from the front of the engine The numbers on ...

Page 397: ...lt Oil pump to main bearing cap bolt to 90 N m 65 lbs ft Install or Connect Figure 48 Apply PST sealant GM P N 1052080 or equivalent to the front cover to block joint and to the crank shaft rear retainer seal to block joint Apply the sealant about 25 mm 1 inch in both directions from each of the four corners figure 48 1 Oil pan gasket to the oil pan 2 Oil pan to the engine NOTICE Refer to Notice o...

Page 398: ...en Cylinder head bolts in three steps using the sequence shown in figure 49 A The first sequence to 34 N m 25 ft lbs B The second sequence to 61 N m 45 ft lbs C Final torque sequence to 90 N m 65 lbs ft VALVE TRAIN COMPONENT INSTALLATION Important Replace all hydraulic lifters change the engine oil and filter and add GM Engine Oil Supplement GM P N 1052367 or equivalent to the engine oil when ever...

Page 399: ...V2974 ...

Page 400: ...the mark comes up to the timing tab the engine is in the number four firing position and should be turned over one more time to reach the number one position 2 With the engine in the number one firing position as determined above the following valves may be adjusted Exhaust valves 1 5 6 Intake valves 1 2 3 Even numbered cylinders are the left bank odd numbered cylinders are the right bank when vie...

Page 401: ...nifold 2 Heat shield NOTICE Refer to Notice on page 6A3 1 3 Exhaust manifold bolts washers and tab washers 1 Tighten A Bolts on center exhaust tube to 36 N m 26 lbs ft B Bolts on front and rear exhaust tubes to 28 N m 20 lbs ft C Bend the tab washers over the heads of all bolts EGR VALVE INS ION Install or Connect 1 New gasket 2 EGR valve 3 Bolts or studs and nuts FLYWHEEL INSTALLATION Install or ...

Page 402: ...rade of engine oil Important If a new camshaft or hydraulic lifters were installed add Engine Oil Supplement GM P N 1052367 or equivalent to the engine oil 3 Fill the cooling system with the proper quantity and grade of coolant 4 Crank the engine several times Listen for any unusual noises or evidence that parts are binding 5 Using the proper Truck Service Manual or Emis sion Control Label for spe...

Page 403: ...0027 Maximum PISTON RING c Production Top 0 0012 0 0032 U M Groove 2nd P R Clearance Service Limit 0 0042 Maximum E c Production Top 0 010 0 020 S 2nd 0 010 0 025 1 O N Service Limit 0 035 Maximum Groove Production 0 002 0 007 0 1 Clearance Service Limit 0 008 Maximum 1 L Production 0 015 0 055 Service Limit 0 065 PISTON PIN Diameter 0 9270 0 9273 Clearance Production 0 0002 0 0007 In Piston Servi...

Page 404: ...Production 0 0005 Round Service Limit 0 001 Maximum Rod Bearing Production 0 0013 0 0035 Clearance Service Limit 0 0030 Rod Side Clearance 0 006 0 014 CAMSHAFT Lobe Intake 0 234 Lift 0 002 Exhaust 0 257 Journal Diameter 1 8682 1 8692 0 004 0 012 VALVE SYSTEM Lifter Hydraulic Rocker Arm Ratio 1 50 1 Valve Lash Intake 1 3 4 Turn Down from Zero Lash Exhaust Face Angle Intake Exhaust 45 Seat Angle Int...

Page 405: ...Valve Stud 15 11 Engine Block Drain Plug Exhaust Manifold Bolts 30 22 Center Two Bolts 36 26 All Other Bolts 28 20 Flywheel Bolts 100 74 Flywheel Housing Bolts 44 32 Front Cover Bolts 14 124 Hydraulic Lifter Restrictor Retainer Bolts 16 12 Intake Manifold Bolts In Sequence 48 35 Main Bearing Cap Bolts 110 81 Oil Filter Adapter Bolts 20 15 Oil Pan Bolts 11 97 Oil Pan Drain Plug 25 18 Oil Pan Nuts 2...

Page 406: ...ONAL DAMPER REMOVER AND INSTALLER 2 VALVE SPRING COMPRESSOR 3 CRANKSHAFT SEAL INSTALLER 4 MAIN BEARING REPLACER 5 PISTON RING COMPRESSOR 6 GUIDE SET 7 VACUUM PUMP 8 STUD REMOVER 9 REAMER 0 003 INCH OVERSIZE 10 REAMER 0 013 INCH OVERSIZE 11 STUD INSTALLER 12 CRANKSHAFT GEAR PULLER 13 CRANKSHAFT GEAR INSTALLER 14 REAR CRANKSHAFT SEAL INSTALLER 15 TORQUE ANGLE METER 3706r4983 ...

Page 407: ...Train 6A4 3 Intake Manifolds 6A4 3 Engine Lubrication 6A4 8 Disassembly of the Engine 6A4 10 Tools and Shop Equipment 6A4 10 Accessory Removal 6A4 10 Cleaning 6A4 10 Draining the Engine 6A4 10 Exhaust Manifold Removal 6A4 10 Coolant Pump Removal 6A4 10 Rocker Arm Cover Removal 6A4 10 EGR Valve Removal 6A4 11 Upper Intake Manifold Rem oval 6A4 11 Lower Intake Manifold Removal 6A4 11 Valve Train Com...

Page 408: ...nd Main Bearing Installation 6A4 27 Crankshaft Rear Oil Seal Retainer Installation 6A4 28 Crankshaft Rear Oil Seal Installation 6A4 28 Camshaft Installation 6A4 28 Balance Shaft Installation 6A4 29 Timing Chain and Sprocket Installation 6A4 30 Front Cover Installation 6A4 31 Torsional Damper Installation 6A4 31 Piston and Connecting Rod Installation 6A4 31 Connecting Rod Bearing Selection 6A4 31 O...

Page 409: ...o reduce piston slap as the connecting rod travels from one side of the piston to the other side after a stroke The pins are a press fit in the connecting rod and a floating fit in the piston BALANCE SHAFT The cast iron balance shaft is mounted in the crank case above and in line with the camshaft A camshaft gear drives the gear attached to the balance shaft The front end of the balance shaft is s...

Page 410: ......

Page 411: ...GASKET 193 BEARING BALANCE SHAFT REAR 92 ADAPTER 194 PLUG CUP 93 BOLT 195 NUT CAMSHAFT SPROCKET 94 FITTING 196 STUD CAMSHAFT SPROCKET 100 CAP MAIN BEARING 207 PLUG HEX 101 CRANKSHAFT 208 SEAL BALANCE SHAFT REAR BEARING PLUG 102 FILTER OIL 209 PLUG EXPANSION CUP 103 RINGS PISTON 210 PLUG SQUARE 104 PISTON 211 PIN DOWEL 105 ROD CONNECTING 212 PLUG HEX 106 BEARING CONNECTING ROD 213 PLUG KNOCK SENSOR...

Page 412: ...195 196 201 174 252 163 165 164 244 3706r3924 ...

Page 413: ...BRACKET ENGINE LIFT FRONT 44 ARM VALVE ROCKER 206 MANIFOLD LOWER INTAKE 45 ROD VALVE PUSH 231 GROMMET CRANKCASE VENT VALVE 46 GUIDE VALVE LIFTER 232 VALVE CRANKCASE VENT 47 LIFTER VALVE 241 CAP OIL FILL 50 BOLT CYLINDER HEAD 242 GROMMET CRANKCASE VENT TUBE 54 GASKET CYLINDER HEAD 243 TUBE OIL FILL 60 SHIELD HEAT 244 SUPPORT SPARK PLUG WIRE 61 WASHER 245 SUPPORT SPARK PLUG WIRE 62 LOCK EXHAUST MANI...

Page 414: ...er In case of excessive oil pressure a bypass valve is provided Fil tered oil flows into the main gallery and then to the camshaft balance shaft rear bearing and crankshaft bearings The valve lifter oil gallery supplies oil to the valve lifters Oil flows from the hydraulic lifters through the hollow pushrods to the rocker arms Oil from over head drains back to the crankcase through oil drain holes...

Page 415: ...SHOWN IN OPEN POSITION B SUCTION C OIL PRESSURE SWITCH D VALVE LIFTER GALLERY E MAIN OIL GALLERY F BYPASS VALVE FRONT VIEW SHOWING PATH OF OIL TO TIMING CHAIN REAR VIEW SHOWING MAIN GALLERY OIL FILTER AND CRANKSHAFT OIL FEED V0504 ...

Page 416: ...rams of emissions and vacuum hose routings wiring harness routing accessory drive belt layout etc should be found or made before removing accessories CLEANING Remove the engine accessories before cleaning to provide better access to the engine s exterior surfaces After removing the distributor accessory brackets etc cover the openings with tape to prevent the entry of contaminants Methods used to ...

Page 417: ...r intake manifold 12 lift brackets 17 and gaskets 13 Do not disassemble the CPI unit It is only serviced as an assembly For information on the upper and lower intake manifold components refer to the Driveability Emissions and Electrical Diagnosis Manual for the appropriate model vehicle VALVE TRAIN COMPONENT REMOVAL Important Store all reusable components in an exact order so they can be reassembl...

Page 418: ...5 STUD 6 COIL 7 SUPPORT 8 BOLT 9 THERMOSTAT 10 GASKET 11 OUTLET 12 LOWER INTAKE MANIFOLD 13 GASKET 14 BOLT 15 NUT 16 GASKET 17 LIFT BRACKET 18 UPPER INTAKE MANIFOLD 81 PLASTIC COVER 85 EGR VALVE 86 SUPPORT 3706r4873 ...

Page 419: ...ber sleeve The removal proce dures must be followed with the proper tools or movement of the inertial weight sec tion of the hub will destroy the tuning of the torsional damper and the engine timing refer ence Remove or Disconnect Figure 10 Tool Required J 39046 Harmonic Balancer Remover and Installer 1 Torsional damper bolt 2 Torsional damper using J 39046 3 Crankshaft key Figure 10 Removing Tors...

Page 420: ...g chain free play If the timing chain 41 can be moved back and forth in excess of 16 mm 5 8 inch make a note that the timing chain 41 should be replaced during assembly 1 Camshaft sprocket bolts 39 and nut 34 2 Camshaft sprocket 40 and timing chain 41 together The sprocket has a light interference fit on the camshaft Tap the sprocket on its lower edge to loosen it CAMSHAFT REMOVAL Remove or Discon...

Page 421: ...the camshaft out from the block being care ful to prevent damage to the camshaft bearings The balance shaft with front bearing are serviced as an assembly Use only the correct tools for bearing and shaft installation Inspect the balance shaft driven gear and the drive gear for nicks and burrs PISTON AND CONNECTING ROD REMOVAL Remove or Disconnect Figures 17 and 18 Tools Required J 5239 Guide Set J...

Page 422: ...bank is numbered 1 3 5 The left bank is numbered 2 4 6 3 Check the connecting rod and cap for identification marks Mark the parts Marking them from the front to the rear with the engine in an upright position and viewed from the front The right bank is numbered 1 3 5 The left bank is numbered 2 4 6 Typical Important Store the connecting rod and cap together as mat ing parts so they may be reassemb...

Page 423: ...MOVAL Remove or Disconnect Figure 20 1 Screws 50 and nuts 51 2 Seal retainer 52 3 Gasket 54 CRANKSHAFT REMOVAL The crankshaft need not be removed for replacement of rear oil seal or main bearings These procedures are covered in other sections of this manual Important Check the main bearing caps for location markings Mark the caps if necessary The caps must be returned to their original locations d...

Page 424: ...ponents These include micrometers torque wrenches feeler gages dial indica tor set etc The inspection work when performed with the proper methods and tools is most important The rebuilt engine cannot be expected to perform properly if parts worn beyond acceptable limits are reused BLOCK 31 Clean Remove or Disconnect Figure 22 1 Oil pressure fitting and sensor 2 Coolant drain plugs 3 Oil filter ada...

Page 425: ...ularities may be carefully machined from the block 6 Oil pan timing cover and intake manifold mounting surfaces for nicks Minor irregularities may be cleaned up with a flat file CYLINDER BORE L Inspect Cylinder bores for scoring or other damage Measure Cylinder bore taper and out of round Refer to SECTION 6A Cylinder Bore Reconditioning Refer to SECTION 6A 4 Install or Connect NOTICE For steps 2 4...

Page 426: ...he same side when installed in the cylinder bore If a connecting rod is ever trans posed from block or cylinder to another new con necting rod bearings should be fitted and the connecting rod should be numbered to correspond with the new cylinder number L Inspect Ring fit UPPER AND LOWER INTAKE AND EXHAUST MANIFOLDS Disassemble Fuel control and all electrical components from the upper and lower in...

Page 427: ...ar Excessively worn sprockets will rapidly wear a new chain Timing chain for damage An excessively worn chain will rapidly wear a new set of sprockets CRANKSHAFT SPROCKET REPLACEMENT Remove or Disconnect Figure 26 Tool Required J 5825 A Crankshaft Gear Remover 1 Crankshaft sprocket using J 5825 A 2 Key if damaged Tool Required J 5590 Crankshaft Gear Installer 1 Key if removed 2 Crankshaft sprocket...

Page 428: ...weep hole Slight staining around the weep hole is normal Only replace the pump if coolant is dripping from the weep hole while the engine is running or while the system is pressurized OIL PAN AND ROCKER ARM COVERS Clean Parts in solvent Remove all sludge and varnish Old gaskets from the gasket surfaces Gasket flanges for bending or damage Rubber grommets and parts on the rocker arm cov er for dete...

Page 429: ...ump cover 2 Pressure regulator spring 60 into the pump cover 3 Plug 62 4 Retaining pin 59 into the pump cover 5 Drive gear and shaft 63 into the pump body 6 Idler gear 55 into the pump body Match together the index marks on the two gears made during disassembly 7 Pump cover 65 NOTICE Refer to Notice on page 6A4 1 8 Bolts 66 Bolts 66 to 5 N m 84 lbs in With the driveshaft 58 installed on the pump t...

Page 430: ...ous valve lifters Important Whenever the camshaft needs to be replaced a new set of hydraulic lifters must also be installed CYLINDER HEAD DISASSEMBLY Remove or Disconnect Figures 30 and 31 Tool Required J 8062 Valve Spring Compressor 1 Valve keepers 67 A Compress the springs with J 8062 figure 31 B Remove the keepers C Remove J 8062 2 Intake valve components A Cap 68 B Shield 69 C Seal 71 D Dampe...

Page 431: ...er valve stem groove B Assemble the two valve keepers into the upper groove using the grease to hold them in place C Release the compressor tool J 8062 making sure the valve keepers stay in place D Repeat the preceding steps on the remaining valves 1 Inspect O ring seals for leakage figure 32 A Place the suction cup supplied with J 23738 A over the shield B Connect J 23738 A to the suction cup and...

Page 432: ...In general the lower inserts except the 1 bearing show the greatest wear and distress from fatigue Upon inspection if a lower insert is suitable for reuse it can be assumed that the upper insert is also satisfactory If a lower insert shows evidence of wear or damage both the upper and lower inserts must be replaced L Main bearing and connecting rod journal diameters figure 33 Refer to Specificatio...

Page 433: ...0 001 inch undersize insert which will decrease the clearance 0 0005 inch from using a full standard bearing Some engines may have rear main bearings that are 0 008 inch wider than standard across the thrust faces The crankshaft on these engines can be identified by 008 stamped on the rear counterweight If the rear main bearings are replaced they must have the proper distance between thrust faces ...

Page 434: ...s to 15 N m 135 lbs in CRANKSHAFT REAR OIL SEAL INSTALLATION Install or Connect Figure 36 Tool Required J 35621 Rear Main Seal Installer Crankshaft rear oil seal A Lubricate the inner and outer diameter of the seal with engine oil B Install the seal on J 35621 C Position J 35621 against the crankshaft Thread the attaching screws into the tapped holes in the crankshaft D Tighten the screws securely...

Page 435: ...ed on case 3 Install balance shaft bearing retainer 43 and bolts 48 Tighten Balance shaft retainer bolts 48 to 14 N m 120 lbs in 4 Balance shaft driven gear 42 and bolt 49 Tighten a Balance shaft driven gear bolt 49 to 20 N m 15 lbs ft plus an additional turn of 35 degrees using J 36660 Rotate balance shaft 47 by hand to make sure there is clearance between the balance shaft 47 and retainer 43 If ...

Page 436: ...ct Figure 41 1 Camshaft sprocket and timing chain Important Line up the timing marks on the camshaft sprocket and crankshaft sprocket figure 41 The number 4 cylinder is at top dead center of the compression stroke with the timing marks in this position figure 41 NOTICE Refer to Notice on page 6A4 1 2 Camshaft sprocket bolts 39 and nut 34 Tighten ...

Page 437: ...r NOTICE Refer to Notice on page 6A4 1 5 Torsional damper bolt and washer Tighten Bolt to 95 N m 70 lbs ft PISTON AND CONNECTING ROD INSTALLATION CONNECTING ROD BEARING SELECTION Connecting rod bearings are of the precision insert type and do not use shims for adjustment DO NOT FILE RODS OR ROD CAPS If clearances are exces sive install a new bearing Service bearings are avail able in standard size...

Page 438: ...time from beneath the engine guide the connecting rod to Figure 46 Measuring Connecting Rod Side Clearance the crankpin with J 5239 figure 45 Hold the ring compressor against the block until all rings have entered the cylinder bore F Remove J 5239 from the connecting rod bolts Important Each connecting rod and bearing cap should be marked beginning at the front of the engine Cylinders 1 3 and 5 ar...

Page 439: ...he distributor shaft B The oil pump should slide easily into place C No gasket is used NOTICE Refer to Notice on page 6A4 1 2 Oil pump to main bearing cap bolt Tighten Oil pump to main bearing cap bolt to 88 N m 65 lbs ft OIL PAN INSTALLATION Install or Connect Figures 47 and 48 Apply sealant GM P N 1052080 or equivalent to the front cover to block joint and to the rear crank shaft retainer seal t...

Page 440: ... sequence to 61 N m 45 lbs ft C Final torque sequence to 88 N m 65 lbs ft VALVE TRAIN COMPONENT INSTALLATION 9 Important Replace all hydraulic lifters change the engine oil and filter and add GM Engine Oil Supplement GM P N 1052367 or equivalent to the engine oil when ever a new camshaft is installed Install or Connect Figure 50 NOTICE For steps 2 and 5 refer to Notice on page 6A4 1 Lubricate the ...

Page 441: ...2 RTV to the front and rear sealing surfaces on the block Apply a 5 mm 3 16 inch bead of RTV GM P N 1052366 or equivalent to the front and rear of the block Extend the bead 13 mm 1 2 inch up each cylinder head to seal and retain the gaskets 3 Lower intake manifold and lift brackets to the engine Apply sealer GM P N 1052080 or equivalent to the lower intake manifold bolts N O T IC E R e fe r to N o...

Page 442: ... upper and lower intake manifolds 3 Upper intake manifold bolts studs and support Tighten Upper intake manifold bolts and studs to 10 N m 88 lbs in in sequence figure 52 4 Coil and nuts Tighten Nuts to 10 N m 88 lbs in 5 Plastic cover ROCKER ARM COVER INSTALLATION 4 Install or Connect Figure 53 1 New gasket 3 2 Rocker arm cover 2 Figure 52 Upper Intake Manifold Bolt Tightening Sequence 1 BOLT 2 CO...

Page 443: ...t 1 New gasket 2 EGR valve N O T IC E R e fe r to N o tic e o n p a g e 6A 4 1 3 Bolts X Tighten Bolts to 20 N m 15 lbs ft FLYWHEEL INSTALLATION 4 Install or Connect 1 Flywheel N O T IC E R e fe r to N o tic e o n p a g e 6A 4 1 2 Flywheel bolts X Tighten Bolts to 100 N m 74 lbs ft COOLANT PUMP INSTALLATION Install or Connect 1 Gaskets 2 Coolant pump N O T IC E R e fe r to N o tic e o n p a g e 6A...

Page 444: ... Oil Supplement GM P N 1052367 or equivalent to the engine oil 3 Fill the cooling system with the proper coolant 4 Crank the engine several times Listen for any unusual noises or evidence that any parts are bind ing 5 Using the appropriate truck service manual or Emission Control Label for specifications adjust the base ignition timing 6 Start the engine and listen for unusual noises 7 Run the eng...

Page 445: ...7 Maximum PISTON RING C 0 M Production Top 0 0014 0 0032 Groove Clearance 2nd P R Service Limit 0 0042 Maximum E s Production Top 0 010 0 020 s 2nd 0 018 0 026 1 0 N Service Limit 0 035 Maximum 0 1 Groove Production 0 0014 0 032 Clearance Service Limit 0 008 Maximum 1 Gap Production 0 015 0 055 Service Limit 0 065 PISTON PIN Diameter 0 9270 0 9273 Clearance Production 0 0002 0 0007 In Piston Servi...

Page 446: ...ervice Limit 0 001 Maximum Rod Bearing Production 0 0013 0 0035 Clearance Service Limit 0 0030 Rod Side Clearance 0 006 0 014 CAMSHAFT Lobe Intake 0 288 Lift 0 002 Exhaust 0 294 Journal Diameter 1 8682 1 8692 0 001 0 009 VALVE SYSTEM Lifter Hydraulic Rocker Arm Ratio 1 50 1 Valve Lash Intake Torque Rocker Arm Nut to 27 N m 20 ft lbs Exhaust Face Angle Intake Exhaust 45 Seat Angle Intake Exhaust 46...

Page 447: ...olts Center Two Bolts 35 26 All Others 27 20 Flywheel Bolts 100 74 Front Cover Bolts 14 Hydraulic Lifter Restrictor Retainer Bolts 16 12 Intake Manifold Bolts Lower In Sequence 48 35 Intake Manifold Bolts and Studs Upper In Sequence 10 Main Bearing Cap Bolts 106 78 Oil Filter Adapter Bolts 22 16 Oil Gallery Plug Left Rear 24 18 Oil Gallery Plug Right Rear 31 23 Oil Gallery Plug Side Rear 18 13 Oil...

Page 448: ...LIGNER AND OIL SEAL INSTALLER 4 MAIN BEARING SHELL REMOVER AND INSTALLER 5 PISTON RING COMPRESSOR 6 CONNECTING ROD BOLTGUIDE SET 7 VALVE STEM SEALTESTER 8 BALANCE SHAFT BEARING SERVICE KIT 9 DIAL INDICATOR SET 10 NEEDLE BEARING PULLER 11 RIDGE REAMER 12 OIL SUCTION PIPE INSTALLER 13 CRANKSHAFT GEAR REMOVER 18 17 18 C D J 8092 J 38998 J 36660 14 CRANKSHAFTGEAR INSTALLER 15 REAR MAIN SEAL INSTALLER ...

Page 449: ...Shop Equipment 6A5 13 Accessory Removal 6A5 13 Cleaning 6A5 13 Draining the Engine 6A5 13 Exhaust Manifold Removal 6A5 14 Coolant Pump Removal 6A5 15 Intake Manifold Removal 6A5 15 Rocker Arm Cover Rem oval 6A5 15 Valve Train Component Removal 6A5 15 Cylinder Head Removal 6A5 15 Torsional Damper Removal 6A5 16 Oil Pan Removal 6A5 16 Oil Pump Removal 6A5 16 Front Cover Removal 6A5 16 Timing Chain a...

Page 450: ... Installation 6A5 42 Connecting Rod Bearing Selection 6A5 42 Installation 6A5 42 Oil Pump Installation 6A5 43 Oil Pan Installation 6A5 44 5 0L and 5 7L Engines 6A5 44 7 4L Engines 6A5 44 Cylinder Head Installation 6A5 44 Valve Train Component Installation 6A5 45 Valve Adjustment 6A5 46 5 0L and 5 7L Engines 6A5 46 Intake Manifold Installation 6A5 48 5 0L and 5 7L Engines 6A5 48 7 4L Engines 6A5 48...

Page 451: ...ures 1 2 and 3 ENGINE IDENTIFICATION Two basic types of engines with three different dis placements are covered in this section The first type is the small block engine which is available in 5 0L 305 CID and 5 7L 350 CID dis placements The second type is the 7 4L 454 CID engine which is sometimes referred to as the Mark engine To determine the displacement of the engine use the vehicle identificat...

Page 452: ......

Page 453: ...ooler From Oil Cooler From Oil Pump Camshaft Bearings Valve Lifters Oil Filter Oil Cooler Diverter Main Bearings Oil Cooler Bypass Valve J Oil Filter Bypass Valve F9477 Figure 3 Lubrication Diagram 7 4L Engines ...

Page 454: ...163 164 V1202 ...

Page 455: ...pening Cover 143 Fuel Pump Opening Cover Gasket 144 Engine Block 145 Fitting 146 Oil Pressure and Fuel Pump Switch Sensor 147 Plug 148 Nut 149 Connecting Rod Bearing Cap 150 Connecting Rod Bearing 151 Piston Pin 152 Connecting Rod 153 Piston 154 Piston Rings 155 Connecting Rod Bolt 156 Expansion Cup Plug 157 Plug 158 Drain Plug 159 Dowel Pin 160 Lock Washer 161 Clutch Cover and Pressure Plate Bolt...

Page 456: ...20 21x 302 210 4 0 41 2 5 2 5 1 2 51 4 2 e3 54 3 9 252 252 S 255 255 25 6 256 209 V1196 ...

Page 457: ...34 Rocker Arm Cover Gasket 250 Rocker Arm Stud 36 Rocker Arm Cover Bolt 251 Valve Stem Key 39 Inlet Valve Spring Cap 252 Valve Stem Oil Seal O Ring 40 Rocker Arm Nut 254 Exhaust Valve Rotator 41 Rocker Arm Ball 255 Valve Stem Oil Shield 42 Rocker Arm 256 Valve Spring with Damper 46 Cylinder Head 257 Valve Stem Oil Seal 47 Cylinder Head Gasket 258 Exhaust Valve 50 Plug 259 Inlet Valve 51 Cylinder H...

Page 458: ...100 1 8 4 185 183 177 v 75 201 3706r1204 ...

Page 459: ... Spring Retainer 178 Oil Pump Driveshaft 179 Connector 180 Oil Pump Body 182 Oil Pump Cover 183 Oil Pressure Regulator Valve 184 Oil Pressure Regulator Valve Spring 185 Spring Retaining Pin 187 Pick up Screen and Pipe 190 Gasket 191 Piston Rings 192 Piston 193 Connecting Rod Bolt 194 Connecting Rod 195 Connecting Rod Bearing 196 Connecting Rod Bearing Cap 197 Connecting Rod Nut 198 Engine Block 20...

Page 460: ......

Page 461: ...nd safely accomplish the operations for which they are intended The use of these tools will also minimize possible damage to engine components Some precision measuring tools are required for inspection of certain critical components Torque wrenches will be necessary for correct assembly of var ious parts ACCESSORY REMOVAL This manual assumes that the engine accessories have been removed These acce...

Page 462: ...s Tighten Block drain plugs to 12 N m 112 lbs in EXHAUST MANIFOLD REMOVAL Remove or Disconnect Figures 12 and 13 1 Oil dipstick tube On 5 0L and 5 7L engines bend back the tab washers 3 4 f r t 1 Exhaust Manifold 2 Washer 3 Lock 4 Bolt Stud 6 Spark Plug Wire Heat Shield F9367 Figure 12 Exhaust Manifold 5 0L and 5 7L Engines 1 Exhaust Manifold 4 Bolt Stud 6 Spark Plug Heat Shield F9328 ...

Page 463: ...Tools Required J 3049 A Valve Lifter Remover Plier Type J 9290 01 Valve Lifter Remover Slide Hammer Type 1 Nuts 40 5 0L and 5 7L engines or bolts 40 7 4L engines balls 41 rocker arms 42 and pushrods 43 or 210 On 7 4L engines the exhaust valve pushrods are longer than the intake valve pushrods Every effort should be made to ensure that these mating parts are installed in their original locations du...

Page 464: ...28 29 and 30 1 Oil pan bolts 72 or 75 nuts 73 5 0L and 5 7L only and clips 2 Oil pan 71 or 76 3 Gasket 74 5 0L and 5 7L Engines OIL PUMP REMOVAL Remove or Disconnect Figures 28 and 30 4 1 Bolt 2 Oil pump with drive shaft and connector FRONT COVER REMOVAL 4 Remove or Disconnect Figure 31 1 Bolts 93 2 Front cover 91 3 Gasket 90 TIMING CHAIN AND CAMSHAFT SPROCKET REMOVAL 4 Remove or Disconnect Figure...

Page 465: ...ect Figure 33 Camshaft A Install three 5 16 18 bolts 100 125 mm 4 5 inches long into the camshaft tapped holes Use these bolts to handle the camshaft B Pull the camshaft from the block C Use care to prevent damage to the camshaft and bearings PISTON AND CONNECTING ROD REMOVAL Remove or Disconnect Figures 34 and 35 Tool Required J 5239 Connecting Rod Guide Set 1 Ridge or deposits at the top of the ...

Page 466: ...gement of the connect ing rod markings to ensure they will be returned to their proper position during assem bly Mark the connecting rods with a scratch awl if necessary B Remove the connecting rod bolt nuts C To avoid mismatching the connecting rods and connecting rod caps remove only one connect ing rod cap at a time Place the piston at the bottom of its stroke D Remove the connecting rod cap E ...

Page 467: ...rom scoring the cylinder bore C Install the connecting rod cap onto the connect ing rod Do not tighten D Repeat this procedure on the remaining piston and connecting rod assemblies FLYWHEEL REMOVAL Remove or Disconnect Figures 36 and 37 1 Bolts 111 2 Flywheel 110 CRANKSHAFT REAR OIL SEAL RETAINER REMOVAL 5 0L and 5 7L ENGINES Remove or Disconnect Figure 38 1 Screws 80 and nuts 81 2 Seal retainer 8...

Page 468: ...1 4 inch C 40m m 11 2 inch D 10 mm 3 s inch drill 25 mm 1 inch deep E 22 mm 7 e inch drill 25 mm 1 inch deep F Material 50 mm x 200 mm 2 x 8 inch lumber B5267 Check the main bearing caps for location markings Mark the caps if necessary The caps must be returned to their original locations with the orienta tion arrow pointing forward during assembly 1 Bolts 134 2 Main bearing caps 132 and 133 ...

Page 469: ...shaft journals and thrust flange surfaces 4 Rear seal 131 70 Oil Pump 71 Oil Pan 72 Bolt 73 Nut 74 Gasket 75 Reinforcement F9364 Figure 28 Oil Pan 5 0L and 5 7L Engines 5 Main bearing inserts 135 and 136 If the main bearings are to be reused mark them to ensure they are installed in their original positions before removal ...

Page 470: ...70 Oil Pump 76 Nut 77 Bolt 79 Oil Pan Baffle F9365 Figure 29 Oil Pan Baffle A Sealing Compound A 74 Gasket 75 Bolt 76 Oil Pan F9331 Figure 30 Oil Pan 7 4L Engines 91 Front Cover 93 Bolt F9357 ...

Page 471: ...100 A 16 mm 5 s inch Maximum 100 Bolt 101 Camshaft Sprocket 102 Timing Chain B8012 Figure 32 Timing Chain and Sprockets Figure 34 Removing the Cylinder Ridge Rod ...

Page 472: ...YWHEEL AUTOMATIC TRANSMISSION 111 BOLT FLYWHEEL 168 PIN FLYWHEEL DOWEL 111 V2878 Figure 36 Flywheel 5 0L and 5 7L Engines 80 SCREW SEAL RETAINER 81 NUT SEAL RETAINER 82 RETAINER SEAL 83 STUD SEAL RETAINER 84 GASKET SEAL RETAINER 114 BLOCK ENGINE V2976 ...

Page 473: ...eeler gages dial indicator set etc The inspection work performed with the proper meth ods and tools is most important The rebuilt engine cannot be expected to perform properly if parts worn beyond acceptable limits are reused BLOCK Clean Figures 40 41 and 42 1 Block in solvent 2 Block gasket surfaces 3 Cylinder bores 4 Oil galleries and passages figures 40 and 42 5 Scale deposits from the coolant ...

Page 474: ... the milled surface at the top of the cylinder block The surface 175 144 BLOCK ENGINE 175 PLUG ENGINE BLOCK COOLANT DRAIN HOLE 144 V2879 Figure 41 Engine Block Coolant Drain Hole Plug 5 0L and 5 7L Engines 1 New main bearing cap The arrow on the main bearing cap faces the front of the engine opposite the flywheel N O T IC E R e fe r to N o tic e o n p a g e 6A 5 1 2 Main bearing cap bolts Q Tighte...

Page 475: ...Piston to bore clearance and fit pistons as outlined PISTON SELECTION 1 Check the used piston to cylinder bore clearance as follows A Cylinder bore diameter Use a telescoping bore gage located 65 mm 2 1 2 inches below the top of the cylinder bore B Piston diameter Measure the skirt at a right angle to the piston pin hole C Subtract the piston diameter from the cylinder bore diameter to determine p...

Page 476: ...nd gasket surface damage Alignment of exhaust manifold flanges Use a straight edge and feeler gage figure 44 If the flanges do not align the manifold is warped and should be replaced or resurfaced AIR system injection tubes for damage Replace as needed CAMSHAFT Important Whenever the camshaft needs to be replaced a new set of valve lifters must also be installed L Inspect Camshaft lobes and journa...

Page 477: ...t Puller J 28509 A Crankshaft Sprocket Puller 1 Crankshaft sprocket On 5 0L and 5 7L engines use J 5825 figure 47 On 7 4L engines use J 28509 A figure 48 2 Key if necessary Assemble Figures 47 and 48 Sprockets for chipped teeth and wear Timing chain for damage It should be noted that excessively worn sprockets will rapidly wear a new chain Likewise an exces sively worn chain will rapidly wear a ne...

Page 478: ...end play exceeds 0 381 mm 0 015 inch replace the coolant pump Coolant pump body at the drain weep hole Slight staining around the weep hole is normal Replace the coolant pump only if coolant is dripping from the weep hole while the engine is running or while the system is pressurized OIL PAN AND ROCKER ARM COVERS IJJI Clean Parts in solvent Remove all sludge and varnish Old gaskets from the gasket...

Page 479: ...eparately If the parts are damaged or worn replace the entire oil pump assembly Pressure relief valve 183 for fit The regulator valve should slide freely in its bore without sticking or binding figures 50 and 51 Assemble Figures 50 51 and 52 Tool Required J 21882 Pickup Tube 5 0L and 5 7L engines 1 Pressure relief valve 183 2 Spring 184 3 Spring retaining pin 185 4 Drive gear and shaft 181 and Scr...

Page 480: ... other damage Rocker arm areas that contact the valve stems and the sockets that contact the pushrods These areas should be smooth and free of damage and wear Rocker arm nuts or bolts The 5 0L and 5 7L engines use prevailing torque nuts At least 6 2 N m 55 lbs in of torque should be required to thread the nuts onto the rocker arm studs If not it is possible that the nut s could back off during eng...

Page 481: ... following Measure Valve stem clearance Valve spring tension and free length Other information outlined includes Valve and seat grinding Valve guide reaming ROCKER ARM STUD REPLACEMENT 5 0L AND 5 7L ENGINES Tools Required J 5802 01 Stud Remover J 5715 Reamer 0 0762 mm 0 003 inch over size or J 6036 Reamer 0 3302 mm 0 013 inch over size J 6880 Stud Installer Rocker arm studs that have damaged threa...

Page 482: ...J 8062 figure 55 Compress the spring enough so the lower valve stem groove can be clearly seen 7 O ring seals 252 and valve keepers 251 A Push a new O ring seal onto the valve stem The seal must be installed on the stem s lower groove Make sure the seal is flat and not twist ed B Apply a small amount of grease to the area of the upper valve stem groove Assemble the two valve keepers using the grea...

Page 483: ... keepers using the grease to hold the keys in place Make sure the keep ers seat properly in the groove D Release the compressor tools Make sure the valve keepers stay in place E Repeat this procedure on the remaining valves t f Measure Figures 60 and 61 Valve spring installed height of each valve spring 1 Use a narrow thin scale A cutaway scale fig ure 60 may be helpful 2 Measure from the spring s...

Page 484: ...rom the oil passages with com pressed air Main bearing inserts Wipe free of oil with a soft cloth Seal running surfaces with a non abrasive cleaner Inspect Crankshaft for cracks Use the magnaflux method if available Crankpins main bearing journals and thrust sur faces for scoring nicks or damage caused by lack of lubrication Main bearing inserts for scoring or other damage In general the lower ins...

Page 485: ...isassemble Figure 66 Crankshaft rear oil seal Insert a screwdriver into the notches provided in the seal retainer and pry the seal out figure 66 I Clean All traces of old gasket from the retainer Inspect Retainer for cracks porosity and damage to the sealing surfaces Important Install the new crankshaft rear oil seal with the proper tool after the retainer is assembled to the engine as outlined la...

Page 486: ...e identified by 008 stamped on the rear counterweight If the rear main bearings are replaced they must have the proper distance between thrust faces to obtain correct crankshaft end play Install or Connect Figures 67 68 and 69 N O T IC E F o r s te p s 4 a n d 5 re fe r to N o tic e o n p a g e 6A 5 1 1 Upper main bearing inserts to the block Important If any undersized bearings are used make sure...

Page 487: ... not turn freely loosen the main bearing cap bolts on one cap at a time until the tight bearing is located Burrs on the bearing cap foreign matter between the insert and the block or the bearing cap or a faulty insert could cause a lack of clearance at the bearing A bent crankshaft could cause binding Make sure the steps outlined above have been per formed before suspecting a bent crankshaft CRANK...

Page 488: ... J 35621 CAMSHAFT TIMING CHAIN AND SPROCKET INSTALLATION 4 Install or Connect Figures 72 and 73 Coat the camshaft lobes and journals with Engine Oil Supplement GM P N 1051396 or equivalent Camshaft figure 72 U se three 5 16 18 bolts 100 125 mm 4 5 inches long threaded into the camshaft s tapped holes to handle the camshaft Use care to avoid damaging the camshaft bear ings Remove the three bolts af...

Page 489: ...J 39046 Torsional Damper Puller and Installer 1 Crankshaft key N O T IC E T h e in e r tia l w e ig h t s e c tio n o f the to rs io n a l d a m p e r is a s s e m b le d to th e h u b w ith a r u b b e r ty p e m a te r ia l T h e c o r r e c t in s ta lla tio n p ro c e d u re s w ith th e p ro p e r to o l m u s t b e fo llo w e d o r m o v e m e n t o f th e in e rtia l w e ig h t s e c tio n ...

Page 490: ...Selective fitting of both rod and main bearing inserts is necessary to obtain close tolerances For this reason you may use for example one half of a standard insert with one half of a 0 2504 mm 0 001 inch undersize insert which will decrease the clearance 0 0127 mm 0 0005 inch from using a full standard bearing INSTALLATION H Install or Connect Figures 76 through 81 Tools Required J 5239 Connectin...

Page 491: ...ylinder 1 3 5 and 7 are the right bank and 2 4 6 and 8 are the left bank when viewed from the front of the engine The numbers on the connecting rod and bearing cap must be on the same side when installed in the cylinder bore If a con necting rod is ever transposed from one block or cylinder to another new connecting rod bearings should be fitted and the con necting rod should be numbered to corre ...

Page 492: ...0 Oil Pump 76 Nut 77 Bolt 79 Oil Pan Baffle F9365 Figure 84 Oil Pan Baffle 5 7L H D Engine Tighten Oil pan bolts 72 to 11 N m 100 lbs in Oil pan nuts 73 to 22 N m 200 lbs in 7 4L ENGINES Install or Connect Figure 85 4 Apply PST sealer GM P N 1052080 or equivalent in four places where the front and rear main bear ing caps meet the engine block as shown in figure 85 1 Gasket 74 to the block 2 Oil pa...

Page 493: ... 40 N m 30 lbs ft B The second sequence to 80 N m 60 ft lbs C The final torque sequence to 110 N m 80 lbs ft VALVE TRAIN COMPONENT INSTALLATION Important Replace all hydraulic lifters if a new camshaft was installed Install or Connect Figures 88 and 89 Lubricate the hydraulic lifter bodies and feet with Engine Oil Supplement GM P N 1051396 or equiv alent 1 Hydraulic lifters 44 or 209 to the block ...

Page 494: ...nd 5 7L engines only VALVE ADJUSTMENT 5 0L and 5 7L ENGINES 1 Remove the rocker arm covers 2 Crank the engine until the mark on the torsional damper lines up with the center or 0 mark on the timing tab figure 92 The engine must be in the number one firing position This may be determined by placing fingers on the number one cylinder s valves as the mark on the damper comes near the 0 mark on the cr...

Page 495: ...hen viewed from the front of the engine 4 Back out the adjusting nut until lash is felt at the pushrod then turn in the adjusting nut until all lash is removed This can be determined by rotating the pushrod while turning the adjusting nut figure 93 When the play has been removed turn the adjust ing nut in as follows 5 0L and 5 7L engines One full turn 5 Crank the engine one revolution until the po...

Page 496: ...ng sequence shown in figure 95 7 4L ENGINES Install or Connect Figures 96 and 97 4 1 Gaskets 22 to the cylinder heads Apply a 5 mm 3 16 inch spot of RTV sealer GM P N 1052289 or equivalent on the front and rear of the block in four places as shown in figure 96 2 Seals 23 to the block 3 Intake manifold 21 Engines N O T IC E R e fe r to N o tic e o n p a g e 6A 5 1 4 Bolts 20 Tighten 4 Bolts 20 to 4...

Page 497: ...s Two center bolts 36 N m 26 lbs ft Outside bolts 28 N m 20 lbs ft Bend the tab washers against the bolt heads 7 4L engines 54 N m 40 lbs ft COOLANT PUMP INSTALLATION Install or Connect Figures 102 and 103 1 Gaskets 11 2 Coolant pump 10 N O T IC E R e fe r to N o tic e o n p a g e 6 A 5 1 3 Bolts 12 Tighten ...

Page 498: ...e Manual Section Connect all vacuum hoses and electri cal equipment the same way as removed ENGINE SETUP AND TESTING After overhaul the engine should be tested before installation in the vehicle If a suitable test stand is not available the following procedure can be used after the engine is installed in the vehicle 1 Fill the crankcase with the proper quantity and grade of oil ...

Page 499: ... engine and listen for unusual noses 5 Run the engine speed at about 1000 until the engine is at operating temperature 6 Listen for improperly adjusted valves or sticking lift ers and other unusual noises 7 Check for oil and coolant leaks while the engine is running 8 Using the proper Truck Service Manual or Emis sion Control Label for specifications adjust the ignition timing 30 BOLT 32 ROCKER AR...

Page 500: ...ifold 4 Bolt Stud 6 Spark Plug Heat Shield F9328 Figure 101 Exhaust Manifold 7 4L Engines 10 Coolant Pump 12 Bolt 11 Gasket 13 Plug Figure 102 Coolant Pump 5 0L and 5 7L Engines Figure 103 Coolant Pump 7 4L Engines ...

Page 501: ... Maximum Taper Relief Side 0 001 Maximum Service 0 001 Maximum PISTON Production 0 0007 0 0021 Service Limit 0 0027 Maximum PISTON RING C 0 M Production Top 0 0012 0 0032 Groove Clearance 2nd P R Service Limit Hi Limit Production 0 001 E s Production Top 0 010 0 020 s 2nd 0 018 0 026 I 0 N uap Service Limit Hi Limit Production 0 010 Groove Production 0 002 0 007 0 1 Clearance Service Limit Hi Limi...

Page 502: ...duction 0 0005 Maximum Service Limit 0 001 Maximum Rod Bearing Clearance Production 0 0013 0 0035 Service Limit 0 003 Maximum Rod Side Clearance 0 006 0 014 CAMSHAFT Lobe Lift 0 002 Intake 0 2336 0 2565 Exhaust 0 2565 0 2690 Journal Diameter 1 8682 1 8692 Camshaft End Plav 0 004 0 012 VALVE SYSTEM Lifter Hydraulic Rocker Arm Ratio 1 50 1 Valve Lash Intake Exhaust One Turn Down From Zero Lash Face ...

Page 503: ...001 Maximum PISTON Production 0 0018 0 0030 Service Limit 0 005 Maximum PISTON RING C r Production Top 0 0012 0 0029 M Groove Clearance 2nd 0 0012 0 0029 P R Service Limit Hi Limit Production 0 001 E s Production Top 0 010 0 018 S 2nd 0 016 0 024 1 o N JCL J Service Limit Hi Limit Production 0 010 Groove Production 0 0050 0 0065 0 1 Clearance Service Limit Hi Limit Production 0 001 1 Gap Productio...

Page 504: ... Limit 0 001 Rod Bearing Clearance Production 0 0011 0 0029 Service Limit 0 003 Maximum Rod Side Clearance 0 0013 0 023 CAMSHAFT Lobe Lift 0 002 Intake 0 2343 Exhaust 0 2530 Journal Diameter 1 9482 1 9492 VALVE SYSTEM Lifter Hydraulic Rocker Arm Ratio 1 70 1 Valve Lash Intake Net Lash Exhaust Face Angle Intake Exhaust 45 Seat Angle Intake Exhaust 46 Seat Runout Intake Exhaust 0 002 Maximum Seat Wi...

Page 505: ... Nuts H D 5 7L Only 36 26 Oil Pan Bolts 11 100 Oil Pan Drain Plug 22 16 Oil Pan Nuts 22 16 Oil Pan Studs to Oil Seal Retainer or Engine Block 2 15 Oil Pump Bolt 90 65 Oil Pump Cover Bolts 9 80 Rocker Arm Cover Bolts 10 90 Spark Plugs 20 15 Torsional Damper Bolt 7 4L ENGINES 95 70 Item N m Lbs Ft Lbs Ii Camshaft Sprocket Bolts 26 20 Connecting Rod Bolt Nuts 66 48 Coolant Outlet Bolts 37 27 Coolant ...

Page 506: ...R 7 GUIDE SET 8 VACUUM PUMP 9 HYDRAULIC LIFTER REMOVER SLIDE HAMMER TYPE 10 HYDRAULIC LIFTER REMOVER PLIER TYPE 11 STUD REMOVER 5 0L AND 5 7L ENGINES 12 REAMER 0 003 INCH OVERSIZE 13 REAMER 0 013 INCH OVERSIZE 14 STUD INSTALLER 5 0L AND 5 7L ENGINES 15 CRANKSHAFT SPROCKET PULLER 5 0L AND 5 7L ENGINES 16 CRANKSHAFT SPROCKET INSTALLER 17 CRANKSHAFT REAR OIL SEAL INSTALLER 5 0L AND 5 7L ENGINES 18 CR...

Page 507: ... s te m d a m a g e c o u ld re su lt CONTENTS SUBJECT PAGE General Description 6A7 3 Engine Lubrication 6A7 3 Disassembly 6A7 12 Tools and Shop Equipment 6A7 12 Accessory Removal 6A7 12 Cleaning 6A7 13 Flywheel Removal 6A7 13 Draining the Engine 6A7 13 Oil Pump Drive Removal 6A7 13 Intake Manifold Removal 6A7 13 Injection Line Removal 6A7 13 Injection Nozzle Removal 6A7 14 Glow Plug Removal 6A7 1...

Page 508: ...njection Nozzle Tests 6A7 36 Opening Pressure Test 6A7 36 Leakage Test 6A7 37 Chatter Test 6A7 37 Spray Test 6A7 37 Injection Lines 6A7 37 Injection Pump 6A7 37 Injection Pump Repair 6A7 37 Crankshaft and Bearings 6A7 37 Cleaning and Inspection 6A7 37 Available Bearing Sizes 6A7 38 Flywheel 6A7 38 Torsional Dam per 6A7 39 Assembly 6A7 39 Oil Filter and Oil Cooler Bypass Valve Replacement 6A7 39 Ca...

Page 509: ...ree center main bearing The camshaft is supported by five plain type bearings and is chain driven Motion from the camshaft is trans mitted to the overhead valves by roller type hydraulic lifters pushrods and shaft mounted rocker arms The valve guides are integral to the cylinder head The connecting rods are forged steel with precision insert type crankpin bearings The piston pins are held in place...

Page 510: ......

Page 511: ...l Fill Tube 68 Nut 69 Oil Separator Grommet 70 Coolant Pump and Plate Stud 71 Fuel Injection Pump Stud 72 Bolt 73 Crankshaft Bearing Cap Bolt Outboard 74 Crankshaft Bearing Cap Bolt Inboard 75 Crankshaft Bearing Cap 76 Crankshaft Bearings 77 Crankshaft Bearing Thrust 78 Crankshaft Bearing Rear 79 Crankshaft Rear Oil Seal One Piece 80 Clutch Pilot Bearing 81 Flywheel Dowel Pin 82 Crankshaft Sprocke...

Page 512: ...V2131 ...

Page 513: ...Exhaust Manifold Bolt 204 Exhaust Manifold Bolt 205 Coolant Temperature Switch Hole Plug 206 Prechamber 207 Intake Valve 208 Exhaust Valve 209 Cylinder Head 210 Hydraulic Valve Lifter Guide Clamp Upper 211 Push Rod 212 Hydraulic Valve Lifter Guide Plate Upper 213 Valve Lifter 214 Engine Lifting Studs 215 Front Engine Lifting Bracket 216 Intake Manifold Gasket 217 Intake Manifold 218 Exhaust Manifo...

Page 514: ...110 106 106 103 90 93 89 88 87 86 v 7 7 7 7 j A _ 111 f t 2 a a s 53 49 L 47 46 3706r4751 ...

Page 515: ... 60 Coolant Pump 61 Thermostat By Pass Nipple 62 Clamp 63 Oil Fill Tube 64 Nut 65 Oil Filler Cap 69 Oil Separator Grommet 70 Coolant Pump and Plate Stud 71 Fuel Injection Pump Stud 72 Bolt 73 Crankshaft Bearing Cap Bolt Outboard 74 Crankshaft Bearing Cap Bolt Inboard 75 Crankshaft Bearing Cap 76 Crankshaft Bearings 77 Crankshaft Bearing Thrust 78 Crankshaft Bearing Rear 79 Crankshaft Rear Oil Seal...

Page 516: ...259 260 150 237 S lM 180 167180 J 1 82 183 170 169 1 1 78 1 7 9 213212 2 0 7 205 r i 3706r4752 ...

Page 517: ...haust Manifold Bolt 204 Exhaust Manifold Bolt 205 Coolant Temperature Switch Hole Plug 206 Prechamber 207 Intake Valve 208 Exhaust Valve 209 Cylinder Head 210 Hydraulic Valve Lifter Guide Clamp Upper 211 Push Rod 212 Hydraulic Valve Lifter Guide Plate Upper 213 Valve Lifter 214 Engine Lifting Studs 215 Front Engine Lifting Bracket 216 Intake Manifold Gasket 217 Intake Manifold 218 Exhaust Manifold...

Page 518: ...s end These tools or their equiva lents are specially designed to quickly and safely accomplish the operations for which they were intend ed The use of these tools will also minimize possible damage to engine components Some precision measuring tools are required for inspection of certain components Torque wrenches will be necessary for correct assembly of various parts ACCESSORY REMOVAL This manu...

Page 519: ...ortant that the engine be as clean as possible to prevent dirt from entering critical areas during disas sembly FLYWHEEL REMOVAL Remove or Disconnect Figures 1 and 10 1 Bolts 18 2 Flywheel 19 DRAINING THE ENGINE Remove or Disconnect 1 Oil pan drain plug Allow the oil pan to drain 2 Oil filter 3 Block drain plugs Allow the coolant to drain N O T IC E F o r s te p s 1 a n d 2 r e fe r to N o tic e o...

Page 520: ...to hold nozzle body while loosening injection line Cap the lines and nozzles immediately Do not bend injection lines 4 Injection lines at the pump Cap the lines and pump fittings immediately Tag the lines for installation 5 Injection line brackets INJECTION NOZZLE REMOVAL Remove or Disconnect Figure 14 Tool Required J 29873 Nozzle Socket 1 Fuel line clip A Left Bank B Right Bank B B8130 ...

Page 521: ... from pump 7 Fuel return lines as an assembly GLOW PLUG REMOVAL Remove or Disconnect Glow plugs Use a 3 8 inch deep socket EXHAUST MANIFOLD REMOVAL Remove or Disconnect Figures 15 16 and 17 1 Exhaust manifold bolts 2 Exhaust manifolds DIPSTICK TUBE REMOVAL Remove or Disconnect Figure 18 4 201 Exhaust Manifold 204 Bolts 204 V2133 Figure 15 Exhaust Manifold Left Side 209 204 201 Exhaust Manifold 204...

Page 522: ... E D o n o t p r y o n th e ro c k e r a rm co ver D a m a g e to s e a lin g s u rfa c e s m a y re s u lt U se a b lo c k o f w o o d a g a in s t th e s id e o f ro c k e r c o v e r a n d s trik e w ith a h a m m e r in a s id e w a y s d ire c tio n to s h e a r R T V s e a la n t 2 Rocker arm covers ROCKER ARM AND PUSHROD REMOVAL Remove or Disconnect Figure 21 1 Bolts 194 2 Rocker arm assemb...

Page 523: ...06 53 HOSE 62 CLAMP HOSE 103 GASKET 104 GASKET THERMOSTAT HOUSING 106 BOLT STUD 107 OUTLET COOLANT 108 THERMOSTAT 110 CROSSOVER COOLANT 3706r4644 Figure 19 Thermostat and Coolant Crossover L57 VIN Y Figure 20 Thermostat and Coolant Crossover L49 VIN P L56 VIN S and L65 VIN F 2 13 2122 i i 2 1 0 194 Bolt 210 Clamp 211 Pushrod 212 Guide Plate 213 Hydraulic Lifter 450 Rocker Arm Assembly V2141 ...

Page 524: ...s 238 Figure 23 Removing the Torsional Damper 3 Injection pump gear 241 4 Nuts 225 and throttle spring bracket 228 5 Injection pump 244 6 Gasket 242 FRONT COVER REMOVAL Remove or Disconnect Figure 22 1 Crankshaft sensor 500 from front cover 46 2 Oil pan to front cover bolts 3 Bolts 268 nut 269 4 Bolts 72 5 Front cover 46 TIM ING CHAIN AND SPROCKET REMOVAL mMeasure Timing chain free play as follows...

Page 525: ...CTION 271 HUB INJECTION PUMP 225 244 B8067 Figure 25 Injection Pump L57 VIN Y CAMSHAFT REMOVAL OIL PAN REMOVAL Remove or Disconnect Figures 1 and 26 Remove or Disconnect Figure 27 1 Bolts 86 and thrust plate 91 2 Camshaft 95 A The fuel pump lift pump and pushrod if used must be removed to remove the camshaft on engines with mechanical fuel pumps B Pull the camshaft from the block carefully to avoi...

Page 526: ...SPROCKET 93 SPACER CAMSHAFT SPROCKET B8068 Figure 26 Camshaft and Components OIL PUMP REMOVAL Remove or Disconnect Figure 27 1 Bolt 35 2 Oil pump 33 PISTON AND CONNECTING ROD REMOVAL Remove or Disconnect Figures 28 and 29 1 Ridge or deposits from the upper end of the cylin der bores A Turn the crankshaft until the piston is at BDC B Place a cloth on top of the piston ...

Page 527: ...aft journal during removal B Push the connecting rod and piston out of the bore C After removal assemble the connecting rod and cap REAR CRANKSHAFT SEAL REMOVAL Remove or Disconnect Figure 30 1 Oil seal 79 using a small screw driver Do not reuse old seal CRANKSHAFT REMOVAL Remove or Disconnect Figure 31 Check the main bearing caps for location markings Mark the caps if necessary The caps must be r...

Page 528: ...ual transmission applications a valley drain tube is used at the rear of the block This drain tube prevents fuel or oil that has collected in the valley from draining onto the clutch and flywheel Engines equipped with automatic transmissions do not use a drain tube OIL FILTER BYPASS VALVE AND BLOCK PLUG REMOVAL Remove or Disconnect 1 Block drain if used 2 Expansion plugs and block heater 3 Oil gal...

Page 529: ...oil galley plugs 5 Block heater 6 Block drain bolt if used i Bolt to 25 N m 18 lbs ft CYLINDER BORES Inspect Cylinder bores for scoring and other damage Measure Cylinder out of round and taper Refer to Cylinder Bore Reconditioning Guidelines and figures 33 and 34 CYLINDER BORE RECONDITIONING GUIDELINES If any of the cylinder bores are scored or worn to the extent that they will not clean up when b...

Page 530: ...da tion for the proper bore diameter taper and round ness and the rough honing operation removes the boring tool marks Refer to Rough Honing Completely disassemble and clean the block prior to boring Refer to Service Piston Specifications for selec tion of service replacement pistons and corre sponding bore diameters The pistons to be installed should be on hand and marked as to bore locations Ins...

Page 531: ..._______________ B2 ______________ C 155 mm 6 1 IN C1 __________________ C2 ______________ OUT OF ROUNDNESS CALCULATION A1 A2 __________________ B1 B2 __________________ NOT TO EXCEED 0 02 mm 0 0008 INCHES C1 C2 __________________ TAPER CALCULATION A1 C1 __________________ B1 C1 __________________ NOT TO EXCEED 0 02 mm 0 0008 INCHES B2 C2 __________________ IF THE CYLINDER BORE OUT OF ROUNDNESS OR ...

Page 532: ... and connecting rod Check for scuffing etc Piston for scratches wear etc Connecting rod for failure or piston pin bushing wear Measure the bushing for proper clearance Refer to Measuring Piston Pin to Piston Pin Bush ing Clearance Piston Ring land for cracking wear etc Ring grooves for burrs nicks etc Skirts and pin bosses for cracking Piston dome for cracking Piston skirt for scuffing or deep scr...

Page 533: ...Diameter Measure Figures 37 38 and 39 1 Piston pin diameter figure 37 Check against Specifications 2 Piston pin bushing ID Use an inside micrometer figures 38 and 39 3 Piston pin to bushing clearance Subtract the pis ton pin diameter from the piston pin bushing ID Compare with specifications at the rear of this sec tion If the clearance is excessive try a new piston pin If the clearance is excessi...

Page 534: ...ed in the ring groove INSTALLING THE PISTON RINGS All compression rings are marked on the upper side of the ring When installing the compression rings make sure the MARKED SIDE IS TOWARD THE TOP OF THE PISTON The top compression ring is a keystone type The oil ring is a two piece type consisting of an expander and a scraper ring Measure Figure 45 Ring end gap as follows 1 Select rings that will be...

Page 535: ...feeler gage as shown in figure 47 Compare with specifications at the rear of this section Figure 47 Measuring Ring Clearance INTAKE AND EXHAUST MANIFOLDS Clean Old pieces of gasket from the gasket surfaces Soot deposits from the intake manifold L Inspect Manifolds for cracks broken flanges and gasket surface damage CAMSHAFT Important Whenever the camshaft needs to be replaced a new set of hydrauli...

Page 536: ...Installer Set The outer camshaft bearings must be installed first These bearings serve as guides for the pilot and help center the inner bearings during the installa tion process Be sure to fit the correct cam bearing into the bore ALL BEARING LOCATIONS ARE VIEWED FROM THE FRONT OF THE BLOCK WITH THE BLOCK IN AN UPRIGHT POSITION The cam bearing bores vary in size The cam bearings are num bered 1 t...

Page 537: ... are replaced it will be necessary to re time the engine Refer to Front Cover Installation FRONT COVER Clean L Old sealer from the sealing surfaces Inspect Baffle for damage Front cover for cracks and damage to the sealing surfaces Disassemble Front crankshaft seal Pry the seal out with a large screwdriver Assemble Tool Required J 22102 Seal Installer A Front crankshaft seal Use J 22102 The open e...

Page 538: ...r screws Tighten Screws to 16 N m 12 lbs ft Inspect Oil pump operation Turn the drive shaft by hand and check for smooth rotation Figure 51 Removing the Rocker Arm Retainers VALVE TRAIN COMPONENTS IJJ Clean A Parts in solvent Blow dry with compressed air B Make sure the oil passages in the pushrods are clear Disassemble Figure 51 1 Rocker arm retainers 405 A Insert a screwdriver into the rocker ar...

Page 539: ...cylinder case above the lifter bore CYLINDER HEAD The 6 5L light duty naturally aspirated engine uses a 39 mm 1 53 inch non stellite exhaust valve Both tur bocharged and heavy duty naturally aspirated engines use a 39 mm 1 53 inch stellite face exhaust valve All engines use the same size intake valve that is 46 mm 1 81 inch Intake and exhaust valves with oversize stems are available in 0 09 mm 0 0...

Page 540: ...ION 6A 2 Cylinder head warpage Use a straightedge and a feeler gage figure 56 If the head is warped more than 0 15 m m 0 006 inch longitudinally or 0 08 mm 0 003 inch transversely replace the cyl inder head Resurfacing is not recommended due to the extremely close valve to piston clearances 3 Cylinder head thickness rocker arm cover gasket rail to head gasket surface must be at least 97 87 mm 3 85...

Page 541: ...s 408 7 Caps 407 intake valves only 8 Rotators 411 exhaust valves only 9 O ring seals 409 and valve keepers 406 A Compress the valve spring using J 8062 figure 53 Compress the spring enough so the lower valve stem groove can be clearly seen B Push a new seal onto the valve stem The seal is to be installed on the stem s lower groove Make sure the seal is flat and not twisted C Apply a small amount ...

Page 542: ...9 3 Adaptor Nut J 29079 18 Adaptor J 29079 13 Manifold Adaptor J 7660 101 Washer Nozzle testing is comprised of the following checks Nozzle opening pressure Leakage Chatter Spray pattern Each test should be considered independent of the others For example when checking opening pressure do not check for leakage If all of the above checks are okay the nozzle holder assembly can be reused If any one ...

Page 543: ...t stand slowly and note whether chatter noise can be heard 3 If no chatter is heard move the lever faster until it chatters At fast lever movement the nozzle may make a hissing or squealing sound rather than the normal chatter This is acceptable 4 These sounds indicate that the nozzle needle moves freely and that the nozzle seat guide and pintle are OK 5 Replace nozzles that do not chatter SPRAY P...

Page 544: ...es and stamped 1 2 or 3 on the pan rail The crankshaft is color marked red blue orange or white near the main bearing journal The proper bearing selection is made by using the number on the pan rail Color marking on the corresponding crankshaft jour nal for selecting the proper bearing halves are shown in the crankshaft main bearing specifications at the rear of this section Main Bearing Selection...

Page 545: ...SEMBLY OIL FILTER AND OIL COOLER BYPASS VALVE REPLACEMENT Install or Connect Figure 61 1 Oil filter bypass valve Tap into place using a 16 mm socket 2 Oil cooler bypass valve by pressing into place and retaining with cup plug 3 Oil filter CAMSHAFT INSTALLATION Install or Connect Figures 1 and 62 When a new camshaft is installed replacement of all hydraulic lifters engine oil and oil filter is rec ...

Page 546: ...fo re th e a tta c h in g b o lts a r e in s ta lle d D o n o t u s e th e a tta c h in g b o lts to p u ll th e m a in b e a r in g c a p s in to t h e ir s e a ts a s th is m a y d a m a g e th e b e a rin g c a p a n d o r b lo c k 18 BOLT FLYWHEEL 19 FLYWHEEL 73 BOLT 75 CAP CRANKSHAFT BEARING 76 BEARING CRANKSHAFT 77 BEARING CRANKSHAFT THRUST BEARING CRANKSHAFT REAR 79 SEAL REAR CRANKSHAFT 83 ...

Page 547: ...t forced forward measure at the front end of the number 3 main bearing with a feeler gage figure 64 The proper clearance is 0 10 0 25 mm Crankshaft for binding Try turning the crankshaft to check for binding If the crankshaft does not turn freely loosen the main bearing cap bolts one pair at a time until the tight bearing is located Burrs on the bearing cap foreign matter between the insert and th...

Page 548: ... to the front cover sealing area shown in figure 66 1 Front cover to the engine Install the bolts 70 Tighten St Bolts 70 to 45 N m 33 lbs ft 2 Crankshaft sensor with new O ring seal Tighten Retaining bolt to 25 N m 17 lbs ft Important If a new front cover was installed mark TDC on the cover as outlined following This is neces sary to provide a reference mark for timing the injection pump TORSIONAL...

Page 549: ... g e to th e lift e r s m a y r e s u lt i f th e y a r e d r y w h e n th e e n g in e is s ta rte d 1 Hydraulic lifters to the engine A Prime new hydraulic lifters before installation by working the lifter plunger while submerged in clean kerosene or diesel fuel B Coat the lifter roller and bearings with lubricant GM P N 1052365 or equivalent C Lifters MUST be installed in their original loca ti...

Page 550: ...which they were removed 1 Connecting rod bearings A Be certain that the bearings are the proper size B Install the bearings in the connecting rod and connecting rod cap 2 Piston and connecting rod to the proper bore A With the connecting rod cap removed install two short pieces of 10 mm 3 8 inch hose onto the connecting rod studs B Locate the piston ring end gaps figure 69 Lubricate the piston and...

Page 551: ...Connecting rod side clearance Use a feeler gage between the connecting rod and crank shaft figure 72 The correct clearance is 0 17 0 63 mm MARKING TDC ON THE FRONT COVER mMeasure TDC On Front Cover Figures 73 74 and 75 Tool Required J 33042 Timing Fixture 1 Set the engine so that number 1 cylinder is at TDC firing Figure 72 Measuring Connecting Rod Side Clearance 2 Install J 33042 in the injection...

Page 552: ...e fe r to N o tic e o n p a g e 6A 7 1 2 Bolt 35 Tighten Bolt 35 to 90 N m 65 lbs ft OIL PAN INSTALLATION 4 Install or Connect Figure 76 Apply a 5 mm 3 16 inch bead of RTV sealant GM P N 12345739 to the oil pan sealing surface inboard of the bolt holes figure 76 The sealer must be wet to the touch when the oil pan is installed 1 Oil pan rear seal to the oil pan 40 2 Oil pan 40 to the engine N O T ...

Page 553: ...l or Connect Figures 68 and 78 N O T IC E T h e p u s h ro d s m u s t b e in s ta lle d w ith th e m a rk e d o r p a in te d e n d up F a ilu re to d o s o m a y re s u lt in d a m a g e o r p re m a tu re w ear Figure 77 Head Bolt Tightening Sequence 1 Pushrods with the painted or marked end up 2 Rocker arm shaft assembly Make sure the ball ends of the pushrods seat in the rocker arms N O T IC ...

Page 554: ...over with carburetor cleaner or equivalent Install or Connect Figure 79 N O T IC E D o n o t a llo w R T V s e a la n t in to the ro c k e r a rm c o v e r b o lt h o les T h is m a y ca u s e a h y d ra u lic lo c k c o n d itio n w h e n th e b o lts a re tig h te n e d d a m a g in g th e c y lin d e r h e a d c a s tin g Apply a 5 mm 3 16 inch bead of RTV sealant GM P N 12345739 to the rocker ...

Page 555: ... the top of the engine front cover must be aligned with the marks on the injec tion pump flange figure 80 The engine must be off when the timing is reset a Tighten Nuts 225 to 40 N m 30 lbs ft figure 74 Plate COOLANT PUMP INSTALLATION TjlP Clean Sealing surfaces on the coolant pump plate and block Use carburetor cleaner or equivalent Install or Connect Figures 66 and 81 N O T IC E F o r s te p s 2...

Page 556: ...e intake manifold DIPSTICK TUBE INSTALLATION Install or Connect 1 New O ring seal to the dipstick tube 2 Dipstick to the engine 3 Dipstick bracket bolt 106 53 HOSE 62 CLAMP HOSE 103 GASKET 104 GASKET THERMOSTAT HOUSING 106 BOLT STUD 107 OUTLET COOLANT 108 THERMOSTAT 110 CROSSOVER COOLANT 3706r4644 Figure 83 Thermostat and Coolant Crossover L49 VIN P L56 VIN S and L65 VIN F EXHAUST MANIFOLD INSTALL...

Page 557: ... 0 m m h e x p o rtio n F a ilu re to d o s o w ill re s u lt in d a m a g e to th e in je c tio n n o z z le 1 Injection nozzle with gasket using J 29873 Nozzle to 70 N m 50 lbs ft 2 Fuel return hose 3 Fuel line clip INJECTION LINE INSTALLATION 4 Install or Connect Figures 85 and 86 1 Injection line brackets 2 Injection lines to the pump beginning from the bot tom of the pump using the following ...

Page 558: ...6 A 7 1 3 Intake manifold bolts studs and fuel line clips There are 4 bolts numbers 9 11 13 and 15 exposed to the crankcase and should be sealed with teflon sealer figure 87 Tighten Intake manifold bolts studs to 42 N m 31 lbs ft Use the tightening sequence shown in fig ure 87 A CYLINDER NUMBER 8 B CYLINDER NUMBER 7 C CYLINDER NUMBER 2 D CYLINDER NUMBER 6 E CYLINDER NUMBER 5 F CYLINDER NUMBER 4 G ...

Page 559: ...TALLATION Install or Connect Figure 88 Tool Required J 39084 Rear Crankshaft Seal Installer Important Coat the crankshaft surface with engine oil and lightly coat the lip of the new oil seal with engine oil or grease before installing the new oil seal Do not scratch or nick the sealing edge of the oil seal 1 The oil seal 79 with the spring cavity towards the engine onto the crankshaft 2 Using J 39...

Page 560: ...r Refer to SECTION OB Replacement of the engine oil and filter is recommended especially if a new camshaft was installed 3 Fill the cooling system with the proper coolant 4 With the shutdown solenoid disconnected crank the engine several times Listen for any unusual noises or evidence that any parts are binding 5 Start the engine and listen for unusual noises Run the engine at about 1000 rpm until...

Page 561: ... 33 Glow Plugs 18 Hydraulic Lifter Guide Plate Clamp Bolts 26 19 Intake Manifold Bolts 42 31 Injection Lines 25 19 Injection Nozzles 70 50 Injection Pump Gear Bolts 23 17 Injection Pump Nuts 42 31 Oil Filter Adapter B olt 65 47 Main Bearing Cap Bolts Inner 150 111 Outer 135 100 Oil Pan Bolts all except rear two bolts 10 rear two bolts 23 17 Oil Pump Bolt 90 66 Oil Pan Drain Plug 27 20 Oil Pump Cov...

Page 562: ...Type Ring 2nd 0 039 0 079 Gap2 Top 0 26 0 51 2nd 0 75 1 00 Oil Groove Clearance 0 040 0 090 Gap 0 25 0 51 PISTON PIN Diameter 30 9961 31 0039 Clearance Piston Pin to Piston Bore 0 0101 0 0153 Fit in Rod Piston Pin to Rod Pin Bushing 0 0081 0 0309 CRANKSHAFT Main Journal Diameter 1 2 3 4 Refer to Crankshaft Main Bearing Selection Specifi cations 5 Taper 0 005 Maximum Out of Round 0 005 Maximum Main...

Page 563: ...talled Height 46 Timing Chain Free Play New Chain 12 7 mm 0 500 inch Used Chain 20 3 mm 0 800 inch T2843 SERVICE PISTON AND CYLINDER BORE SPECIFICATIONS Note Cylinders 7 and 8 require 0 013mm 0 0005 additional clearance piston to bore ENGINE DISPLACEMENT PISTON GRADE SKIRT DIAMETER BORE DIAMETER 1 THRU 6 BORE DIAMETER 7 8 6 5L Production Std JT 102 867 102 880 102 974 102 987 102 987 103 000 Produ...

Page 564: ...ter Tolerance 038mm 55 050 55 050 55 050 55 050 51 045 118 118 118 118 113 Camshaft Bearing Clearance 025 025 025 025 020 59 17 58 92 58 67 58 42 50 42 Cam Bore Diameter Case 59 12 58 87 58 621 58 37 50 37 59 30 59 05 58 80 58 55 50 55 Cam Bearing O D 59 25 59 00 58 75 58 50 50 50 18 18 18 18 18 Press Fig Bearing to Case 08 08 08 08 08 Note In order to cover all possible service conditions i e old...

Page 565: ...NIVERSAL CAMSHAFT BEARING REMOVER AND INSTALLER SET 3 NOZZLE SOCKET 4 SEAL INSTALLER 5 NOZZLE TESTER 6 REAR CRANKSHAFT SEAL INSTALLER 7 TORSIONAL DAMPER REMOVER 8 MANIFOLD COVER SET 9 VALVE SPRING COMPRESSOR 14 J 39507 J 33042 10 CAMSHAFT BEARING REMOVER AND INSTALLER ADAPTER 11 RIDGE REAMER 12 OIL PRESSURE SENDING UNIT SOCKET 13 PISTON PIN RETAINER RING INSTALLER 14 TIMING FIXTURE ...

Page 566: ...NOTES ...

Page 567: ... o rre c t to rq u e v a lu e m u s t b e u s e d w h e n in s ta llin g fa s te n e rs th a t re q u ire it If th e a b o v e c o n d itio n s a re n o t fo llo w e d p a rts o r s y s te m d a m a g e c o u ld re s u lt CONTENTS SUBJECT PAGE General Description 6C1 2 Throttle Body Disassembly 6C1 4 Idle Air Control IAC Valve 6C1 4 Throttle Position Sensor TP Sensor 6C1 4 Idle Speed Control ISC A...

Page 568: ...l sensors to determine fuel requirements based on engine operating conditions The fuel is delivered under one of several conditions called modes All the modes are controlled by the ECM PCM Model 220 TBI Unit Model 220 used on V6 and V8 engines consists of three major casting assemblies Fuel meter cover with pressure regulator Fuel meter body with fuel injectors Throttle body with Idle air control ...

Page 569: ... 14 O R IN G FUEL RETURN LINE 15 SCREW ISC ACTUATOR ARM ATTACHING 16 ACTUATOR ASSY IDLE SPEED CO NTRO L ISC 17 BODY ASSY THROTTLE 18 SENSO R THROTTLE PO SITIO N TP 19 SCREW TP SENSO R ATTACH IN G 20 SEAL TP SENSOR 21 VALVE ASSY IDLE AIR CO NTRO L IAC THREAD M O UNTED 22 GASKET IAC VALVE 23 GASKET FLANGE 24 SCREW IAC VALVE ATTACH IN G 25 VALVE ASSY IDLE AIR CO NTRO L IAC FLANGE M O U N TED 26 O RIN...

Page 570: ... FUEL METER COVER The fuel meter cover assembly contains the fuel pres sure regulator assembly The regulator has been adjust ed at the factory and should only be serviced as a complete preset assembly CAUTION DO NOT remove the four screws securing the pressure regulator to the fuel meter cover The fuel pressure regulator includes a large spring under heavy com pression which if accidentally releas...

Page 571: ...r a s s e m b lie s in c le a n e r s in c e th e y m a y b e c o m e n o n fu n c tio n al 2 Blow out all passages in the castings with com pressed air Do not pass drill bits or wire through passages THROTTLE BODY REASSEMBLY FUEL METER BODY Install or Connect Figure 2 4 FUEL INJECTORS Install or Connect Figure 4 N O T IC E F o r s te p s 3 a n d 4 re fe r to N o tic e o n p a g e 6 C 1 1 1 New th...

Page 572: ... x te n d e d e le c tric a lly it m u s t a ls o b e re tra c te d e le c tric a lly B e fo re in s ta llin g a n IA C va lve m e a s u re th e d is ta n c e b e tw e e n th e tip o f th e v a lv e p in tle a n d th e m o u n tin g s u rfa c e A in fig u re s 5 a n d 6 i f th e d im e n s io n is g re a te r th a n 2 8 m m 1 1 0 in c h e s it m u s t b e r e d u c e d to p re v e n t d a m a g e ...

Page 573: ...rtant The ISC actuator nose screw must be adjusted after installation Refer to the TBI 220 On Vehicle Service section of the Driveability Emissions and Electrical Diagnosis Manual for the proper model vehicle SPECIFICATIONS FASTENER TIGHTENING SPECIFICATIONS Fastener N m Lbs Ft Flange Mounted IAC to Throttle Body Screw 3 2 Fuel Inlet Nut to Fuel Meter Body 40 30 Fuel Meter Body to Throttle Body Sc...

Page 574: ...NOTES ...

Page 575: ... value must be used when installing fasteners that require it If the above conditions are not followed parts or system damage could result CONTENTS SUBJECT PAGE General Description 6D2A 2 Delco Remy SD Starter Motors 6D2A 2 Identification 6D2A 2 Diagnosis 6D2A 3 Starter Motor Tests 6D2A 3 No Load Test 6D2A 3 Disassembly of the SD 300 Starter Motor 6D2A 4 Field Frame 6D2A 4 Drive End 6D2A 4 Brushes...

Page 576: ... has the drive end housing extended to enclose the shift lever and solenoid plunger The solenoid flange mounts to the extension of the drive end housing with sealing compound between the flange and the field frame The starter motor bearings are lubricated during motor assembly and do not require service except dur ing motor repair IDENTIFICATION The part number can be found either stamped on the o...

Page 577: ...urrent draw and no load speed indicates normal condition of the starter motor 2 Low free speed and high current draw indicates Too much friction Tight dirty or worn bear ings bent armature shaft or loose pole shoes allowing the armature to drag Shorted armature This can be further checked on a growler after disassembly Grounded armature or fields Check further after disassembly 3 Failure to operat...

Page 578: ...or end of the armature shaft 5 Field frame 57 from the drive housing 31 and the armature assembly 9 DRIVE END Disassemble Figures 5 6 and 7 1 Armature from the drive housing by tilting the armature to disengage the shift lever fingers 1 from the drive collar figure 5 2 Drive assembly 32 from the armature shaft 9 as follows A Remove the thrust collar 17 from the armature shaft B Drive the stop coll...

Page 579: ...isengaging the Drive Collar from the Shift Lever Fingers 3 Screws 36 attaching the solenoid 3 to the drive housing 4 Lever shaft 43 nut 44 and washer 5 Shift lever 1 and the attached solenoid plunger 2 from the drive housing 6 Roll pin 40 in order to separate the shift lever from the solenoid plunger 2 Ring BRUSHES Disassemble Figure 8 1 Brush holder pivot pins 63 2 Brush springs 64 3 Brushes 33 f...

Page 580: ...tact surface and BAT terminal 25 contact surface for wear Replace if worn DISASSEMBLY OF THE SD 210 AND SD 260 STARTER MOTORS If the motor does not perform to specifications it may need to be disassembled for further testing of the com ponents Normally the starter motor should be disas sembled only so far as is necessary to make repair or replacement of parts As a precaution it is suggested that s...

Page 581: ... buttons on the drive collar 6 Drive assembly 32 from the armature shaft 9 as follows A Remove the thrust collar 17 from the armature shaft B Drive the pinion stop collar 39 away from the pinion stop retainer ring 37 by sliding a metal cylinder onto the armature shaft and with a hammer striking the metal cylinder against the stop collar figure 7 C Spread the pinion stop retainer ring to remove it ...

Page 582: ...er motor Avoid excessive lubrication Do not lubricate roller bearings They are perma nently lubricated at time of manufacture 2 Armature shaft for runout or scoring Replace the armature assembly if the condition of the armature shaft is doubtful 3 Commutator for discolored or uneven conductors Do not turn the commutator Do not undercut the insulation Clean the commutator with No 240 grit emery clo...

Page 583: ... Brush springs for distortion or discoloring If the springs are weak bent or discolored replace them On the SD 260 replace the frame and field assembly 10 Field coils Look for burned or damaged insulation dam aged connections or loose poles If the condi tion of the coils is doubtful replace them On the SD 210 and SD 260 replace the field and frame assembly 11 Field coils for grounds Connect a self...

Page 584: ...ect the test lamp between the BAT termi nal and the case The lamp should not light terminal should not be grounded B Connect the test lamp between the S terminal and the case Then connect the test lamp between the M terminal and S terminal or M terminal and the case The lamp should light C If the solenoid does not pass these checks replace it 16 Hold in winding and pull in winding A With all the l...

Page 585: ... 1 Solenoid plunger 2 to the shift lever 1 with the roll pin 40 2 Lever assembly in the drive housing 31 with lever shaft 43 washer and nut 44 Make sure the shift lever pivots freely Important Lightly lubricate the end frame bushings Avoid excessive lubrication Use Delco Remy Lubri cant No 1960954 or equivalent Lightly lubricate the shaft underneath the drive assembly with a silicone grease Use De...

Page 586: ...aft 2 Pinion stop collar 39 with the flat side of the collar toward the drive pinion figure 20 3 New retaining ring 37 onto the armature shaft Slide the ring down the shaft until it seats in the shaft groove 4 Thrust collar 17 onto the shaft with the small flange toward the retaining ring Using two sets of pliers push the pinion stop collar and thrust collar together to snap the stop collar onto t...

Page 587: ... Recess the new bearing 2 mm 0 08 inch into the housing The bearing is pre lubricated so do not add lubricant 5 Identification tag over the hole in the end frame with the fluted end around the bearing well 6 Through bolts 58 in their original locations Tighten Through bolts to 8 5 N m 75 lbs in 7 Motor field lead over the motor terminal on the solenoid 8 Field lead attaching nut a Tighten Field le...

Page 588: ...00 10700 1114489 10455343 SD 300 65 110 6500 10700 1114577 SOLENOID SWITCHES Switch Pull In Winding Hold ln Winding Part No Volts Amps Volts Amps Volts 1114520 12 23 30 5 13 19 10 1114578 12 26 30 5 13 16 10 1114563 12 26 30 5 13 19 10 1114579 12 26 30 5 13 16 10 1114577 12 23 30 5 13 19 10 1114489 12 11 18 5 13 18 10 FASTENER TIGHTENING SPECIFICATIONS N m Lbs Ft Lbs In SD 210 and SD 260 Starter M...

Page 589: ...c o n d itio n s a r e n o t fo llo w e d p a rts o r s y s te m d a m a g e c o u ld resu lt CONTENTS SUBJECT PAGE General Description 6D2B 2 Starter M otor 6D2B 2 Identification 6D2B 2 Diagnosis 6D2B 2 No Load Test 6D2B 2 Disassembly 6D2B 4 Introduction 6D2B 4 Unit Disassembly 6D2B 4 Frame Field and Brush Holder Group 6D2B 4 Gear Reduction and Drive G roup 6D2B 4 Drive Shaft and Clutch Group 6D2...

Page 590: ...ft and body of the drive assembly should all rotate togeth er If necessary pry the pinion with a screwdriver to turn it Tight bearings a bent armature shaft or a loose pole screw will cause the armature to bind If the armature does not turn freely the motor should be disassembled If the armature rotates freely the motor should be given a no load test before disassembly Test Connections Connect the...

Page 591: ...3 3 Close the switch and observe the voltmeter Adjust the carbon pile load until the voltmeter reads 10 volts Record the ammeter and RPM readings Open the switch 4 Compare the ammeter and RPM readings to those listed under Specifications If the readings are outside the limits shown refer to the list below If the readings are within the limits the starter motor is operating normally Troubleshooting...

Page 592: ...ust be saved If it is lost it must be replaced with a 2 mm x 10 mm 0 079 inch x 0 394 inch long pin obtained or manufactured locally 5 Frame field and brush holder group A dowel pin 16 and O ring seal 17 The armature assembly 13 may come off with the frame field and brush holder group A or may be retained by the gear reduction and drive group B 6 Armature assembly 13 with bearings 12 and 14 Do not...

Page 593: ...L 17 SEAL O RING FIELD FRAME 18 SCREW SOLENOID 19 ASSEMBLY SOLENOID 20 LEVER SHIFT 21 PLUG DRIVE HOUSING 22 WASHER SHIFT LEVER 23 NUT SHIFT LEVER 24 PLATE IF USED 25 BOLT DRIVE HOUSING SHORT ON SOME MODELS 26 BOLT DRIVE HOUSING LONG 27 BRACKET ARMATURE SUPPORT 28 WASHER FIBER 29 WASHER THIN ONE OR TWO MAY BE USED 30 WASHER THICK 31 SHAFT DRIVE 32 BEARING CENTER SUPPORT 33 SUPPORT DRIVE SHAFT 34 AS...

Page 594: ...end down B Using an open tube slightly larger then the shaft drive the pinion stop 36 toward the clutch drive assembly 34 until it clears the stop rings 26 figure 8 C Pry the stop rings out of the drive shaft groove and slide them off the end of the shaft being careful not to scratch the drive shaft 31 D Inspect the edges of the shaft groove for burrs that may have been formed through repeated cra...

Page 595: ... BRACKET ARMATURE SUPPORT 28 WASHER FIBER 29 WASHER THIN ONE OR TWO MAY BE USED 30 WASHER THICK 37 BUSHING D E HOUSING 38 SCREW SHIFT LEVER 39 HOUSING DRIVE 40 PLUG BUSHING IF USED V3865 Figure 6 Gear Reduction and Drive Group 26 RINGS STOP TWO PIECES 31 SHAFT DRIVE 32 BEARING CENTER SUPPORT 33 SUPPORT DRIVE SHAFT 34 ASSEMBLY CLUTCH DRIVE 36 STOP PINION V3866 ...

Page 596: ...coring or other damage Replace the damaged bushing Refer to Repair Procedures 8 Ball bearings 12 14 and 32 as follows A Hold the armature 13 or drive shaft 31 and slowly rotate the outer bearing race by hand B Check that the bearing turns freely without bind ing or the feel of flat spots C Replace damaged bearings Refer to Repair Procedures 9 Armature assembly 13 for the following Gear teeth that ...

Page 597: ... r e p la c e d w ith n e w b e a r in g s T h e r e m o v a l p r o c e d u r e c a u s e s in te rn a l d a m a g e to th e b e a rin g s Commutator and and or drive end bearings 12 and 14 from the shaft of the armature 13 using a suitable bearing puller Install or Connect Figures 3 and 11 New commutator end and or drive end bearings 12 and 14 to the armature assembly 13 using a tube that bears ...

Page 598: ...elco Remy lubricant P N 196094 lubricate the following areas during assembly Avoid using excessive grease Drive end housing bushing in the drive housing Pivot hole and working surface on the ends of the shift lever Internal gear shaft and spline on the drive shaft ASSEMBLY DRIVE SHAFT AND CLUTCH GROUP If disassembled position the driveshaft on a work surface with the internal gear end down Assembl...

Page 599: ...lbs in FRAME FIELD AND BRUSH HOLDER GROUP 4 Install or Connect Figures 5 13 and 14 N O T IC E F o r s te p s 3 a n d 4 re fe r to N o tic e o n p a g e 6 D 2B 1 1 Brush springs 11 if removed A Start each brush spring onto the post on the brush holder assembly 7 just enough to hold the inside end of the spring from turning as shown in figure 13 B Grasp the free end of the spring with needle nose pl...

Page 600: ...n the brush holder assembly 7 with installed brushes over the terminal end of the frame and field assembly 15 B Attach the terminals of the insulated brush leads to the conductors in the frame and field assembly with insulated brush screws 9 Tighten Insulated brush screws to 1 5 N m 13 lbs in UNIT ASSEMBLY Support the gear reduction and drive group B with the pinion gear end down and proceed as fo...

Page 601: ...commutator end frame when installed This is the normal installed posi tion of the O ring seal B Carefully roll the O ring seal out of its nor mal installed position up onto the major out er diameter of the field frame Allow the seal to remain in this position until the commuta tor end frame is partially installed 6 Commutator end frame 3 A Align the marks on the commutator end frame and frame and ...

Page 602: ...witch Pull In Winding Hold ln Winding Part No Volts Amps Volts Ohms Amps Volts Ohms 10456454 12 52 59 10 0 17 0 19 12 14 10 0 76 0 81 LUBRICATION Use Delco Remy Gear and Shaft Lubricant No 1960954 or equivalent FASTENER TIGHTENING N m Lbs In Brush Plate Screws 2 8 25 Drive Housing Bolts 8 5 75 Grounded Brush Screws 1 5 13 Insulated Brush Screws 1 5 13 Shift Lever N ut 4 5 40 Solenoid Screws 2 8 25...

Page 603: ...10 Generator Specifications 6D3A 10 Fastener Tightening Specifications 6D3A 10 Special Tools 6D3A 10 GENERAL DESCRIPTION switches rotor field current on and off at a fixed fre quency of about 400 cycles per second to help control radio noise By varying on off time correct average field current for proper system voltage control is obtained At high speeds on time may be 10 percent and off time 90 pe...

Page 604: ...al is connected to the battery posi tive terminal through the ammeter and that the battery and generator are properly grounded 2 Connect a 30 to 500 ohm resistor between the positive battery terminal and the L terminal on the generator 3 Operate the generator through the test stand increasing speed slowly and observe the voltage 4 If the voltage is uncontrolled and increases above 16 volts the rot...

Page 605: ...ing 106 from the rotor If you have a slip ring end bearing on the shaft use J 28509 A figure 5 If you have a roller bearing in the slip ring end frame press it out Place the rotor in a vise and tighten only enough to permit removal of the pulley nut N O T IC E T he ro to r m a y b e d is to rte d if th e vise is o v e rtig h te n e d 4 Pulley nut 1 and the washer from the shaft 5 Pulley 229 collar...

Page 606: ... 117 Outside Collar 227 Rectifier Bridge 30 Screw 128 Retainer 228 Capacitor 31 Grounded Screw 131 Brush Holder 229 Pulley 35 Insulated Screw 216 Drive End Frame 230 Fan 76 BAT Terminal 217 Slip Ring End Frame 305 Spring 92 Regulator Connector 220 Stator 306 Fan Collar 106 Slip Ring End Bearing F7091 ...

Page 607: ... End Bearing F7083 Figure 5 Removing the Slip Ring End Bearing 14 Washer 216 Drive End Frame 107 Drive End Bearing 221 Rotor 116 Inside Collar 229 Pulley 117 Outside Collar 230 Fan 128 Retainer 306 Fan Collar F7082 ...

Page 608: ...he bearing is doubtful replace it 6 Windings for burned insulation Replace the rotor or stator if either looks burned Burned insulation appears as very dark or blackened wiring A strong acidic odor will be apparent 7 Terminal connectors for corrosion or breaks 8 Windings on the stator for chipped insulation If the chipped area is small and the rest of the stator is OK repair the stator with insula...

Page 609: ...generator fails to supply rated output the problem is in the rectifi er bridge stator or regulator If the rotor fails any of the above checks replace it STATOR CHECKS Check the stator with a self powered test lamp or an ohmmeter figure 11 If the ohmmeter reads low or if the lamp lights when connected from any stator lead to bare metal on the stator frame the stator is grounded An ohmmeter can not ...

Page 610: ...at sink 5 BAT terminal nut 1 with the flat side down to the insulated heat sink figure 8 If the brush holder regulator or connector has been replaced connect it by crimping the connec tors to the other component s Solder the con nection using as little heat as possible to avoid heat damage to the regulator figure 9 6 Brush holder 131 regulator 226 and connector assembly into the end frame figure 7...

Page 611: ...l b e a rin g o n th e ro to r sh aft th is b e a rin g m u s t b e re p la c e d w ith a n e w b e a rin g a n y tim e th e tw o h a lv e s o f th e g e n e ra to r a re s e p a ra te d If n o t re p la c e d th e b e a rin g m a y b in d a n d fa il d u e to d is to rtio n o f its o u te r to le ra n c e rin g s T h is d o e s n o t a p p ly to ro lle r ty p e s lip rin g e n d fra m e b e a rin...

Page 612: ...7 C 80 F Field Current 12 Volts 27 C 80 F AMPS Ampere Rating 1102635 CS 144 2 1 2 4 5 0 5 7 124 10479884 CS 144 2 1 2 4 5 0 5 7 124 FASTENER TIGHTENING SPECIFICATIONS N m Ft Lbs Pulley Nut 100 75 T2532 SPECIAL TOOLS 1 _ f J 28509 A p rf I humiiiiiiiuiiiiQ 5 3 1 Bearing Remover F7092 ...

Page 613: ...connects to the distributor cap through a high tension wire The distributor uses an internal magnetic pickup assembly that consists of a permanent magnet pole piece with internal teeth and pickup coil When the rotating teeth of the timer core line up with the teeth of the pole piece voltage is induced in the pickup coil This voltage signals the ignition control module ICM to trigger the primary ig...

Page 614: ...Figure 1 Distributor with Sealed Connectors 10 ROTOR 11 COIL PICKUP 13 PIECE POLE 14 MODULE 23 CAP 25 SCREW 26 SHAFT 27 PIN 29 GEAR 30 HOUSING 31 WASHER 33 WASHER TANG 49 RETAINER 50 SHIELD 56 PIN V2792 ...

Page 615: ... B Using a spray type varnish remover clean the drive gear end of the shaft DO NOT allow var nish remover to travel up the driveshaft to the grease pack in the top of the housing N O T IC E F a ilu r e to k e e p c le a n in g a g e n ts a w a y fro m th e g re a s e p a c k w ill re s u lt in p r e m a tu re d is trib u to r failu re 7 Retainer 49 from the housing 30 as follows CAUTION Wear eye p...

Page 616: ...gure 5 step 1 The reading should be infinite If not replace the coil B Connect an ohmmeter to both pickup coil leads as shown in figure 5 step 2 Flex the leads by hand at the coil and the connector to locate any intermittent opens The ohmmeter should read a constant value in the 500 to 1500 ohm range If not replace the coil 2 Electrical performance of the module The module can only be checked with...

Page 617: ...etainer when there is a groove in the center bushing A Place the retainer over the center bushing with the teeth pointing upward B Place a 15 mm 5 8 inch socket head onto the edge of the retainer Keep the socket centered on the retainer so the teeth are not damaged Use a small hammer to tap the retainer evenly down onto the center bushing When installing the square retainer make sure both teeth ar...

Page 618: ...SPECIAL TOOLS ...

Page 619: ...7B 1 New Venture Gear 3500 5LM60 Manual Transmission 7B1 1 New Venture Gear 4500 Manual Transmission 7B2 1 Borg Warner T5 Manual Transmission 7B3 1 Transfer Case 7D New Process 233 Transfer Case 7D1 1 New Process 241 Transfer Case 7D2 1 New Process 231 Transfer Case 7D3 1 Borg Warner 4401 Transfer Case 7D4 1 Borg Warner 4472 Transfer Case 7D5 1 Borg Warner 4470 Transfer Case 7D6 1 ...

Page 620: ...NOTES ...

Page 621: ... Turbine Shaft Seals 7A 14B 36 Lo and Reverse Clutch Parts 7A 14B 12 Reverse Input Clutch Assembly 7A 14B 37 Inner Manual Linkage 7A 14B 13 Reverse Input Clutch Backing Plate Manual Shaft Seal Replacement 7A 14B 13 Selection 7A 14B 39 Component Repair and Reverse Input and Input Clutches 7A 14B 40 Transmission Reassembly 7A 14B 14 2 4 Band Assembly 7A 14B 41 Case Assembly 7A 14B 14 Oil Pump Assemb...

Page 622: ...t washer and thrust bearing surfaces may appear to be polished This is a normal condition and should not be considered damage lg Clean Thoroughly clean the exterior of the trans mission Remove or Disconnect Torque Converter 1 B Install or Connect 1 J 8763 02 onto the transmission case 2 Holding fixture into the base B Remove or Disconnect Drain the transmission fluid out case extension by rotating...

Page 623: ...e 3 1 Install J 33037 as shown with apply pin 13 2 Install servo cover retaining ring 29 to secure tool 3 Apply 11 N m 98 lb in torque 4 If white line A appears in gage slot B pin length is correct 5 Use pin selection chart to determine correct pin length if new pin is needed J 33037 A WHITE LINE B GAGE SLOT PIN IS PRESET AT FACTORY AND MUST NOT BE READJUSTED 2 4 SERVO PIN SELECTION PIN LENGTH PIN...

Page 624: ...DESCRIPTION 12 SPRING SERVO RETURN 13 PIN 2ND APPLY PISTON 14 RING RETAINER 2ND APPLY PISTON 15 RETAINER SERVO CUSHION SPRING 16 SPRING SERVO CUSHION 17 PISTON 2ND APPLY 18 RING OIL SEAL 2ND APPLY PISTON OUTER 19 RING OIL SEAL 2ND APPLY PISTON INNER 20 HOUSING SERVO PISTON INNER 21 SEAL O RING 22 SPRING SERVO APPLY PIN 23 WASHER SERVO APPLY PIN 24 RING RETAINER APPLY PIN 25 PISTON 4TH APPLY 26 RIN...

Page 625: ...ng 30 4 Output shaft sleeve 690 and output shaft O ring seal 691 Not all models use an output shaft sleeve and seal ILL NO DESCRIPTION 8 CASE TRANSMISSION 30 SEAL CASE EXTENSION TO CASE 31 EXTENSION CASE 32 BOLT CASE EXTENSION TO CASE 33 BUSHING CASE EXTENSION 34 SEAL ASSEMBLY CASE EXTENSION OIL 35 BOLT SPEED SENSOR RETAINING 36 SPEED SENSOR INTERNAL TRANSMISSION 37 SEAL O RING ITSS TO CASE EXTENS...

Page 626: ... Body And Wiring Harness Figures 9 through 14 0 Remove or Disconnect Figures 9 and 10 1 Electrical connections from components 2 TCC Solenoid bolts 68 and solenoid assembly 66 with O ring seal 65 and wiring harness 3 Pressure switch assembly bolts 70 and pressure switch assembly 69 4 Accumulator cover bolts 58 and 59 and 1 2 accumulator cover and pin assembly 57 5 1 2 accumulator piston 56 and sea...

Page 627: ...54 5 Bolts 77 and plate 53 6 Spacer plate 48 and spacer plate gaskets 47 and 52 7 Spring 46 piston 44 and pin 43 Seven checkballs are located under the valve body and one is located in the case The large copper flash colored ball is 1 checkball 91 63 SPRING ASSEMBLY MANUAL DETENT 88 LEVER INSIDE DETENT 89 LINK MANUAL VALVE 340 VALVE MANUAL Figure 11 Manual Valve Link 43 PIN ACCUMULATOR PISTON 44 P...

Page 628: ...3 4 CLUTCH EXHAUST 5 OVERRUN CLUTCH FEED 6 OVERRUN CLUTCH CONTROL 8 1 2 UPSHIFT 12 FORWARD CLUTCH ACCUM RH0112 4L60 E 38 PLUG TRANSMISSION CASE ACCUM BLEED 40 RETAINER AND BALL ASSEMBLY 3RD ACCUM 91 NO 10 CHECKBALL 92 SCREEN TCC RH0113 4L60 E ...

Page 629: ... 11 inch bolt and locknut or J 25025 7A 2 Install J 25022 A or J 34725 as shown 3 Install J 24773 A as shown 4 Install dial indicator A Set to zero B Pull up on J 24773 A C End play should be 0 13 to 0 92 mm 0 005 to 0 036 inch A 298mm TURBINE SHAFT B 245mm TURBINE SHAFT RH0114 4L60 E Oil Pump Assembly Figures 17 and 18 Tools Required J 37789 A Oil Pump Remover and Installer J 39119 Adapter 0 Remo...

Page 630: ... through 20 Tools Required J 29837 Output Shaft Support Fixture J 34627 Snap Ring Pliers Remove or Disconnect Figures 18 and 20 1 Reverse input clutch 605 and input clutch 621 together Grasp the turbine shaft and lift 2 Band anchor pin 41 3 The 2 4 band assembly 602 4 Input sun gear 658 B Install or Connect Figures 19 and 20 J 29837 as shown j 9 Important Output shaft 687 may fall free when retain...

Page 631: ...ST INPUT CARRIER TO REACTION SHAFT RH0119 4L60 E Reaction Gear Set Figure 21 Q j Remove or Disconnect 1 Input internal gear 664 and reaction carrier 666 2 Reaction sun shell 670 and thrust washer 669 3 Reaction sun shell to inner race thrust washer 674 4 Lo and reverse support to case retainer ring 676 5 Lo and reverse clutch support retainer spring 680 6 Reaction sun gear 673 7 Lo and reverse inn...

Page 632: ...NTERNAL REACTION GEAR 692 BRG REACTION GEAR SUPPORT TO CASE 693 RING LO AND REVERSE CLUTCH RETAINER 694 SPRING ASSEMBLY LO AND REVERSE CLUTCH 695 PISTON LO AND REVERSE CLUTCH 697 DEFLECTOR OIL HIGH OUTPUT MODELS ONLY ____ _________ _____________ RH0120 4L60 E LoAnd Reverse Clutch Parts Figures 22 23 and 25 Tools Required J 34627 Snap Ring Remover Installer J 23327 Clutch Spring Compressor ZT Remov...

Page 633: ...ctuator assembly 85 and inside detent lever 88 89 3 78 PLUG STEEL CUP 79 SHAFT PARKING BRAKE PAWL 80 SPRING PARKING PAWL RETURN 81 PAWL PARKING BRAKE 82 SEAL MANUAL SHAFT 83 RETAINER MANUAL SHAFT 84 SHAFT MANUAL 85 ACTUATOR ASSEMBLY PARKING LOCK 86 BRACKET PARKING LOCK 87 BOLT PARKING LOCK BRACKET 88 LEVER INSIDE DETENT 89 LINK MANUAL VALVE 90 NUT HEX HEAD RH0123 4L60 E Figure 24 Parking Linkage M...

Page 634: ...nge transmission fluid characteristics and cause undesirable shift conditions and or filter clogging Case Assembly g Clean Thoroughly with solvent Air dry Do not wipe with cloth Figure 26 Case Vent Assembly Case Figures 26 27 and 28 y Inspect Case 8 exterior for cracks or porosity Case to valve body face for dam age interconnected oil passages and flatness Face flatness can be checked by inspectin...

Page 635: ...ase If leakage is observed replace the third accumulator retainer and ball assembly Replacement Procedure Third Accumulator Retainer and Ball Assembly Figures 29 and 30 Tools Required 6 3 mm 4 Screw Extractor 9 5 mm 3 8 inch diameter metal rod Remove or Disconnect Third accumulator retainer and ball assembly 40 Use 6 3 mm 4 screw extractor Install or Connect Figures 29 and 30 A new third accumulat...

Page 636: ...627 Figure 29 Leak Check 3rd Accumulator Figure 30 Third Accumulator Retainer and Ball Asm Installation Lo and Reverse Clutch Piston Figures 31 and 32 Tools Required J 34627 Snap Ring Remover Installer J 23327 Clutch Spring Compressor y Inspect Figure 31 Lo and reverse piston 695 for Porosity or damage Ring groove damage Piston seals 696 for nicks or cuts Spring assembly 694 for damage Retainer ri...

Page 637: ...78 into the case Coat the plug with Loctite sealant or equivalent and install it with a hammer and punch Reaction Internal Gear and Carrier Assembly Figures 34 35 and 36 y Inspect Reaction internal gear 684 and support 685 for Proper assembly Stripped splines Cracks Teeth or lug damage Thrust bearing assemblies 683 and 692 for damage Lo and reverse clutch plates 682 for Composition material wear h...

Page 638: ...ASE TRANSMISSION 681 CARRIER ASSEMBLY REACTION 683 BEARING ASSEMBLY THRUST REACTION CARRIER SUPPORT 685 SUPPORT INTERNAL REACTION GEAR 692 BRG REACTION GEAR SUPPORT TO CASE RH0133 4L60 E Figure 35 Captive Thrust Bearing Check Reaction Internal Gear and Support Figure 41 E3 Install or Connect 1 Reaction gear support to case bearing 692 onto the case hub as shown Outside bearing race goes toward cas...

Page 639: ...y an evenly distributed load to the top of the lo and reverse support assembly 679 Light pressure approximately 22 N or 5 lbs on the lo and reverse support assembly 679 will provide the correct dimension for measurement NOTICE Excessive pressure will start to flatten the wave plate resulting in an inaccurate measurement 3 Measure the height of the clutch pack from the work surface to the top of th...

Page 640: ...er plate 682B from selection procedure 3 Lo and reverse clutch plates 682 into case lugs Start with a composition plate and alternate with steel Index with the splines of the reaction carrier and the case as shown Figure 40 Lo and Reverse Clutch Plates Properly Installed 8 CASE TRANSMISSION 681 CARRIER ASSEMBLY REACTION 682 PLATE ASSEMBLY LO AND REVERSE CLUTCH 682A PLATE LO AND REVERSE CLUTCH WAVE...

Page 641: ...ce finish Support assembly for Cracks or damaged lugs Install or Connect Figures 42 43 and 44 1 Roller clutch assembly 678 into the cam and support assembly 679 2 Support and roller assembly into the case with the hub down 3 Inner race 675 into the roller assembly Turn inner race 675 while inserting A Push down for full engagement B Bottom tangs will be flush with carrier hub when properly install...

Page 642: ...ce Index the four locating ears into the inner race 4 Reaction sun gear shell 670 onto the reaction sun gear 5 Bronze thrust washer 669 onto the reaction sun gear shell Index tangs into the shell Input Internal Gear and Reaction Shaft Figures 46 and 47 E Remove or Disconnect Figure 46 1 Retainer ring 668 from input internal gear 664 2 Reaction carrier shaft 666 from the input internal gear 8 CAST ...

Page 643: ...ternal Gear and Reaction Shaft Transmission Output Speed Sensor Rotor Figure 47 Tools Required J 21427 01 Speedometer Gear Puller Adapter J 8433 Speedometer Gear Puller J 36352 6 C Washer J 36352 4 Rotor Installer Mechanical press I p Inspect Figure 47 Speed sensor rotor on output shaft for tooth damage f T Important If rotor is damaged replace it Do not reuse a rotor that has been removed B Remov...

Page 644: ... thrust bearing To check the captive thrust bearing in the carrier for wear place a bushing or an output shaft sleeve on the bearing race do not contact the pinion gears and turn it with the palm of your hand Any imperfections will be felt through the bushing Input sun gear 658 for Bushing damage or wear see Bushing Replacement Procedure Cracks Damaged spline or gear teeth B Install or Connect Fig...

Page 645: ...put clutch assembly 621 on the bench with the turbine shaft through the bench hole 2 The 3 4 clutch plate retainer ring 656 and the backing plate 655 3 The 3 4 clutch plates 654 4 Five 3 4 clutch boost spring assemblies 600 5 The 3 4 clutch apply plate 653 6 The 3 4 clutch ring retainer plate 652 7 Forward clutch backing plate retainer ring 651 and backing plate 650 8 Forward clutch sprag assembly...

Page 646: ...ely into the ring grooves Check valve retainer and ball assembly 617 for Damage The ball must move freely in the retainer The retainer must be tight in the turbine shaft Feed passages for Obstructions blow air through passages Check Valve Retainer and Ball Assembly Replacement Procedures Figures 53 through 64 Tools Required 6 3 mm 4 Screw extractor 9 5 mm 3 8 inch diameter metal rod 6 35 mm 1 4 in...

Page 647: ...654A PLATE ASSEMBLY 3RD AND 4TH CLUTCH FIBER 625 RING 3RD AND 4TH CLUTCH APPLY 654B PLATE 3RD AND 4TH CLUTCH STEEL 626 SPRING ASSEMBLY 3RD AND 4TH CLUTCH 655 PLATE 3RD AND 4TH CLUTCH BACKING SEL 627 RETAINER AND BALL ASSEMBLY FORWARD CLUTCH 656 RING 3RD AND 4TH CLUTCH BACKING PLATE HOUSING RETAINER 628 HOUSING FORWARD CLUTCH 698 PLUG ORIFICED CUP 630 PISTON FORWARD CLUTCH 632 PISTON OVERRUN CLUTCH...

Page 648: ...and a cause is not found during diagnosis or disassembly replacement of the retainer and checkball assembly may be required Figure 54 USED WITH USED WITH 298mm CONVERTER 245mm CONVERTER A SHAFT TURBINE 618 SEAL O RING TURBINE SHAFT SELECTIVE WASHER 621 HOUSING AND SHAFT ASSEMBLY INPUT RH0152 4L60 E Figure 54 Input Housing Check Valve Ball INSTALL REMOVE b A 4 EASY OFF B TURBINE SHAFT C 9 5mm 3 8 M...

Page 649: ...rom the piston hub Lubricate the seals with Transjel J 36850 or equivalent 2 The 3 4 clutch piston 623 into the input housing as shown Use care not to damage the seals Figure 58 Input Housing and 3 4 Piston y Inspect Figures 59 and 60 Forward clutch housing 628 for Proper checkball operation Damage or distortion Burrs in seal areas Cracks Forward clutch piston 630 and overrun clutch piston 632 for...

Page 650: ...ubricate with Transjel J 36850 or equivalent 3 Forward clutch piston 630 into the forward clutch housing Use care not to damage the outer lip seal 4 The 3 4 clutch spring assembly 626 onto the 3 4 clutch apply ring 5 Forward clutch assembly onto the 3 4 clutch spring assembly The forward clutch piston apply legs must be indexed with the 3 4 clutch apply ring legs 6 J 29883 on the input housing as ...

Page 651: ...errun clutch plates 645 for Com position plate dam aged tangs delamination or excessive wear Steel plate damaged tangs wear or heat damage Input sun gear bearing assembly 637 for Wear Flatness Damaged Assemble Figures 63 and 64 1 Overrun clutch plates 645 into the input housing Overrun clutch plates are the smallest of the three sets of plates in the input housing Index the plates as shown startin...

Page 652: ...G 642 FORWARD SPRAG ASSEMBLY 643 RETAINER RINGS SPRAG ASSEMBLY 644 RACE FORWARD CLUTCH OUTER RH0160 4L60 E Figure 65 Forward Clutch Sprag Assembly h Assemble Figures 66 6 7 an d 68 1 Forward clutch sprag assembly 642 into the outer race To correctly install the notches in the sprag cage must face upward as shown 2 One sprag retainer ring 643 onto the race and retainer assembly The flange on the re...

Page 653: ...dure y Assemble Forward clutch sprag assembly into the input clutch housing Index the overrun clutch hub into the overrun clutch plates Inspect Figures 69 and 70 Forward 649 and 3 4 clutch plates 654 for Com position plate dam aged tangs delamination or wear Steel plate damaged tangs wear or heat damage Forward 650 and 3 4 clutch backing plates 655 for Flatness Surface finish damage Burrs or nicks...

Page 654: ... plate 648 into the input clutch housing Index as shown The remaining forward clutch plates 649 into the input clutch housing Start with a steel plate and alternate with composition Forward clutch selective backing plate 650 Forward clutch retaining ring 651 Forward Clutch Piston Travel Check Figure 72 Measure With the overrun clutch and forward clutch fully assembled in the Input Housing check th...

Page 655: ...55 and retainer ring 656 Chamfered side up 3 4 CLUTCH INFORMATION CHART PLATETYPE THICKNESS QUANTITY REQUIRED ALLMODELS STEPPED APPLY PLATE 5 60mm 220 1 t FLAT STEEL CLUTCH PLATES 1 78mm 070 1 FLAT STEEL CLUTCH PLATE 2 71mm 107 5 COMPOSITION FACED CLUTCH PLATES 2 03mm 0 79 6 BACKING PLATE SELECTIVE 1 t SAME SPLINE CONFIGURATION AS APPLY PLATE RH0168 4L60 E R1 Figure 73 3 4 Clutch Plate Chart 3 4 C...

Page 656: ... Figure 74 3 4 Backing Plate Selection Chart Turbine Shaft Seals Figure 76 Tools Required J 36418 1 Seal Installer J 36418 2A Seal Sizer Assemble 1 Install four turbine shaft oil seal rings 619 using J 36418 1 1 Adjust Adjust screw to obtain proper height 2 Use J 36418 2A to size the seals after installation HOUSING AND SHAFT ASSEMBLY INPUT PLATE ASSEMBLY 3RD AND 4TH CLUTCH PLATE 3RD AND 4TH CLUTC...

Page 657: ...31 SEAL OVERRUN CLUTCH INNER AND OUTER 653 PLATE 3RD AND 4TH CLUTCH APPLY STEPPED 632 PISTON OVERRUN CLUTCH 654A PLATE ASSEMBLY 3RD AND 4TH CLUTCH FIBER 634 SPRING ASSEMBLY OVERRUN CLUTCH 654B PLATE 3RD AND 4TH CLUTCH STEEL 635 SNAP RING OVERRUN CLUTCH SPRING RETAINER 655 PLATE 3RD AND 4TH CLUTCH BACKING SEL 636 SEAL INPUT HOUSING TO OUTPUT SHAFT 656 RING 3RD AND 4TH CLUTCH BACKING PLATE 637 BEARI...

Page 658: ... 1 J 25018 A UNDER J 23327 1 RH0174 4L60 E Figure 79 Reverse Input Retainer Ring Removal jy Inspect Figures 78 and 80 Backing plate 613 for Damage Distortion or flatness Burrs or surface finish damage Clutch Plates 612 for C om position plate tang dam age delamination or wear Steel plate tang damage wear or heat damage Spring assembly 609 for distortion or damage Piston 607 for Damage or porosity ...

Page 659: ... load to the clutch pack in the direction shown in Figure 81 Medium pressure approximately 89 N or 20 lbs on the backing plate applied by hand on five evenly distributed points will obtain the backing plate travel for measurement NOTICE Excessive pressure will distort the Belleville plate resulting in an inaccurate measurement 2 Using a feeler gage measure between the snap ring and the backing pla...

Page 660: ...VE 621 HOUSING AND SHAFT ASSEMBLY INPUT RH0180 4L60 E Figure 84 Reverse Input Clutch Reverse Input and Input Clutches Figures 85 86 and 87 Assemble Figures 85 and 86 1 Selective thrust washer 616 onto the input housing 2 Bearing assembly 615 Inside black race goes toward the oil pump 3 Reverse input clutch assembly 605 onto the input clutch assembly Index the reverse input clutch plates with the i...

Page 661: ...in hole 2 Band anchor pin 41 into the case Index the pin into the 2 4 band Figure 88 2 4 Band Assembly Installed Oil Pump Assembly Figures 89 and 91 Remove or Disconnect 1 Thrust washer 601 2 Pump cover to case gasket 6 3 Pump to case oil seal 5 4 Pump cover bolts 233 5 Pump cover 215 from pump body 200 Oil Pump Body Figure 91 Disassemble 1 Pump slide springs 206 and 207 CAUTION Springs are under ...

Page 662: ...91 Pressure regulator valve assembly 216 221 and converter clutch apply valve assembly 222 226 for Chips burrs distortion plugged oil passage and free movement in bore Remove burrs with lapping compound Pressure relief assembly 227 229 for damage or distortion Pump cover 215 and pump body 200 for Worn or damaged bushings see Bushing Replacement Procedure Foreign material or debris Porosity Scored ...

Page 663: ...E BOOST VALVE RETAINING 222 RING OIL PUMP CONVERTER CLUTCH VALVE RETAINING 223 VALVE STOP 224 VALVE CONVERTER CLUTCH 225 SPRING CONVERTER CLUTCH VALVE INNER 226 SPRING CONVERTER CLUTCH VALVE OUTER 227 RIVET PRESSURE RELIEF BOLT 228 BALL PRESSURE RELIEF 229 SPRING PRESSURE RELIEF 230 RING OIL SEAL STATOR SHAFT 231 SEAL OIL PUMP COVER SCREEN 232 SCREEN OIL PUMP COVER 233 BOLT M 8X 1 25 X 40 COVER TO...

Page 664: ...ch in the slide with the pivot pin The oil seal ring must face downward into the pump pocket 4 Slide seal 209 and support 208 5 Vane guide ring 210 6 Rotor guide 211 onto the rotor Retain with Transjel J 36850 or equivalent 7 Rotor 212 With guide toward the pump pocket 8 Vanes 213 9 Vane guide ring 210 10 Pump slide spring 206 and 207 11 Oil seal assembly 2 retainer 94 Use J 25016 Figure 93 Slide ...

Page 665: ... screwdriver through a bolt hole and into a hole in the bench Tighten Attaching bolts to 24 N m 18 lb ft Retain with Transjel J 36850 or equivalent 4 Install two oil seal rings 233 using J38735 3 and J 39855 1 l 9 Adjust Adjust screw to obtain proper height 5 Use J 39855 2 to size seals after installation 216 VALVE PRESSURE REGULATOR 217 SPRING PRESSURE REGULATOR VALVE 218 SPRING PRESSURE REGULATO...

Page 666: ...re Adaptor 245 mm J 34725 End Play Checking Fixture Adaptor 298 mm J 25025 7A Post or 278 mm 11 inch Bolt and Nut Dial indicator j Measure Figures 99 through 102 1 Remove an oil pump to case bolt and install a 278 mm 11 inch bolt and lock nut or J 25025 7A 2 Install J 25022 A or J 34725 as shown 3 Install J 24773 A as shown 4 Install a dial indicator Set to zero 5 Pull up on J 24773 A End play sho...

Page 667: ...080 084 68 2 21 2 31 mm 087 091 69 2 38 2 48 mm 094 098 70 2 55 2 65 mm 100 104 71 2 72 2 82 mm 107 111 72 2 89 2 99 mm 113 118 73 3 06 3 16 mm 120 124 74 RH0192 4L60 E Figure 101 End Play Chart CORRECTLY 615 BEARING ASSEMBLY STATOR SHAFT SELECTIVE WASHER 616 WASHER THRUST SELECTIVE 621 HOUSING AND SHAFT ASSEMBLY INPUT RH0180 4L60 E Figure 102 Selective Washer and Thrust Bearing Properly Installed...

Page 668: ... accum ulator spring 54 and 3 4 accumulator spring 46 for distortion or damage Spacer plate 48 and gaskets 47 and 52 for damage Checkballs 61 for damage Manual detent spring 63 for damage Oil filter 72 for Cut or damaged filter seal 71 Cracks in the neck or body Casting flash in the neck Solenoid assembly 66 for Damage Cut or pinched wires Damaged connectors Cut or damaged O ring 65 621 Wm 0 i USE...

Page 669: ...ease the chance of a valve not operating 1993 MODELS 1 2ACCUMULATOR SPRINGCOLOR 3 4 ACCUMULATOR SPRINGCOLOR CHD CJD KCD ORANGE LT GREEN WHITE OR PLAIN VIOLET CAD CBD KAD MJD MND ORANGE LT GREEN WHITE OR PLAIN DK GREEN CCD CFD KBD ORANGE LT GREEN WHITE OR PLAIN RED SHD TLD DK GREEN LT BLUE CKD CLD KDD MDD MSD TAD TBD ORANGE LT GREEN WHITE OR PLAIN YELLOW R H 0194 4L60 E Figure 106 1 2 and 3 4 Accum...

Page 670: ...60 bore plug 359 and forward abuse valve train 357 and 358 10 Manual valve 340 11 3 2 control solenoid retainer clip 379 and solenoid 394 12 Bore plug retainer 395 bore plug 381 and 3 2 control valve train 391 393 13 3 2 downshift bore plug retainer 395 bore plug 381 and valve train 389 390 14 Reverse abuse bore plug retainer pin 360 bore plug 359 and valve train 387 388 15 3 4 shift valve bore pl...

Page 671: ...e black connector should be installed on the tab farthest from the valve body B Install or Connect 1 Parking bracket 86 P x l Tighten Bolts to 31 N m 23 lb ft 2 The 1 2 accumulator piston seal 55 onto the 1 2 accumulator piston 56 3 The 1 2 accumulator piston 56 into the 1 2 accumulator cover and pin assembly 57 The three legs on the piston must face toward the case when installed 4 The 1 2 accumu...

Page 672: ......

Page 673: ...LVE 2 3 SHUTTLE 370 SPRING 1 2 ACCUMULATOR VALVE 371 VALVE 1 2 ACCUMULATOR 372 SLEEVE 1 2 ACCUMULATOR VALVE 373 PLUG BORE 374 VALVE ACTUATOR FEED LIMIT 375 SPRING ACTUATOR FEED LIMIT VALVE 376 PLUG BORE 377 PRESSURE CONTROL SOLENOID 378 RETAINER PRESSURE CONTROL SOLENOID 379 RETAINER SOLENOID 380 VALVE CONVERTER CLUTCH SIGNAL 381 PLUG BORE 382 SPRING 4 3 SEQUENCE VALVE 383 VALVE 4 3 SEQUENCE 384 V...

Page 674: ...H0112 4L60 E 63 SPRING ASSEMBLY MANUAL DETENT 88 LEVER INSIDE DETENT 89 LINK MANUAL VALVE 340 VALVE MANUAL RH0110 4L60 E Figure 112 Manual Valve Link Figure 111 Valve Body Checkball Locations A M 6 X 1 0 X 6 5 0 B M 6 X 1 0 X 5 4 4 C M 6 X 1 0 X 4 7 5 D M6 X 1 0 X 18 0 E M 6 X 1 0 X 3 5 0 F M 8 X 1 25 X 20 0 G M 6 X 1 0 X 1 2 0 RH0197 4L60 E ...

Page 675: ...se Pan and Filter Assembly 2 4 Servo Assembly Figures 116 through 120 Tools Required J 33037 Band Apply Pin Tool Vernier calipers Scale J 22269 01 Piston Compressor J 29714 Servo Cover Compressor Iffi Measure Figure 116 1 Install J 33037 as shown with apply pin 13 2 Install servo cover retaining ring 29 to secure tool 3 Apply 11 N m 98 lb in torque 4 If white line A appears in the gage slot B pin ...

Page 676: ...ss in the seal groove Springs for distortion Pin for wear or burrs f f Important Check servo bore in the case for any wear which may cut the servo seals j Measure Figure 117 1 Measure piston 17 dimension A 2 Measure housing 20 dimension B 3 Check model application MODEL PISTON DIMENSION A HOUSING DIMENSION CHD CJD CKD CLD KCD KDD 44 64mm 1 78 45 54mm 1 79 CAD CBD CCD CFD KAD KBD MJD MDD MND MSD SH...

Page 677: ...nstall J 22269 01 A Compress the retainer past the snap ring groove in the 2nd apply piston B Install the retainer ring 14 4 The 2nd apply piston 17 onto the apply pin 13 Retainer goes toward the shoulder of the pin 5 Servo apply pin spring 22 on the pin 6 Servo apply pin washer 23 and retaining clip 24 7 Inner 19 and outer 18 seals on the 2nd apply piston 17 Retain with Transjel J 36850 or equiva...

Page 678: ...03 or J 25016 Seal Installer J 21426 Seal Installer J 38417 Speed Sensor Rem over and Installer 0 Install or Connect 1 O ring seal 691 on the output shaft sleeve 2 Output shaft sleeve 690 on the output shaft Use J 25016 or J 23103 Do not push the sleeve past the machined surface on the output shaft Seal ring 37 on the case extension Case extension 31 and bolts 32 Position extension so the speed se...

Page 679: ...ssembly Figure 126 Tool Required J 35138 Torque Converter End Play Checking Tool j Inspect The torque converter assembly must be replaced for any of the following conditions Evidence of damage to the pump assembly Metal particles are found after flushing the cooler and cooler lines External leaks in hub weld area Converter pilot is broken damaged or poor fit into crankshaft Converter hub is scored...

Page 680: ... possible B Replace the oil filter and pan gasket C Fill to proper level Refer to Section 7A The converter bolt hole threads are damaged Correct with thread insert Refer to Section 6A V Important Flushing the torque converter is not recommended B Install or Connect 1 Torque converter 2 J 21366 converter holding strap 3 Remove transmission from holding fixture ...

Page 681: ...L CLUTCH PLANETARY REVERSE CLUTCH A S S E M B L Y G EARSET CLUTCH A S S E M B L Y REACTION O U T P U T P LANETARY SHAFT GEARSET T O R Q U E TURBINE CONVERTER SHAFT A S S E M B L Y S TATOR I 2 4 ROLLER P U M P B A N D INSIDE M A N U A L C O N T R O L VALVE PARKING LOCK CLUTCH A S S E M B L Y A S S E M B L Y DETENT LEVER SHAFT A S S E M B L Y A C T U A T O R A S S E M B L Y 4L60 E AUTOMATIC TRANSMIS...

Page 682: ......

Page 683: ...LY PIN 68 BOLT HEX WASHER HEAD SOLENOID 23 WASHER SERVO APPLY PIN 69 SWITCH ASSEMBLY TRANSMISSION PRESSURE 24 RING RETAINER APPLY PIN 70 BOLT PRESSURE SWITCH ASSEMBLY 25 PISTON 4TH APPLY 71 SEAL FILTER 26 RING OIL SEAL 4TH APPLY PISTON OUTER 72 FILTER ASSEMBLY TRANSMISSION OIL 27 SEAL O RING 2 4 SERVO COVER 73 GASKET TRANSMISSION OIL PAN 28 COVER 2 4 SERVO 74 MAGNET CHIP COLLECTOR 29 RING SERVO CO...

Page 684: ...0 629 633 632 631 634 635 645A 645B 636 638 639 642 643 644 641 646 648 649A 649B 650 651 r 653 654A 654B 655 656 658 661 662 663 664 665 666 667 668 669 670 671 672 673 674 675 676 677 678 679 677 681 697 1 682C 682D 682B 682A 683 684 685 686 687 ...

Page 685: ...RWARD HSG ASSEMBLY CAM 623 PISTON 3RD AND 4TH CLUTCH 678 CLUTCH ASSEMBLY LO AND REVERSE ROLLER 624 SEAL 3RD AND 4TH CL INNER AND OUTER 679 SUPPORT ASM LO AND REVERSE CLUTCH 625 RING 3RD AND 4TH CLUTCH APPLY 680 SPRING TRANSMISSION LO AND REVERSE CLUTCH 626 SPRING ASSEMBLY 3RD AND 4TH CLUTCH SUPPORT RETAINER 627 RETAINER AND BALL ASSEMBLY FORWARD CLUTCH 681 CARRIER ASSEMBLY REACTION HOUSING 682A PL...

Page 686: ......

Page 687: ...LVE 2 3 SHUTTLE 370 SPRING 1 2 ACCUMULATOR VALVE 371 VALVE 1 2 ACCUMULATOR 372 SLEEVE 1 2 ACCUMULATOR VALVE 373 PLUG BORE 374 VALVE ACTUATOR FEED LIMIT 375 SPRING ACTUATOR FEED LIMIT VALVE 376 PLUG BORE 377 PRESSURE CONTROL SOLENOID 378 RETAINER PRESSURE CONTROL SOLENOID 379 RETAINER SOLENOID 380 VALVE CONVERTER CLUTCH SIGNAL 381 PLUG BORE 382 SPRING 4 3 SEQUENCE VALVE 383 VALVE 4 3 SEQUENCE 384 V...

Page 688: ...V A L V E S LO CATED IN TH E V A LV E BO D Y FORWARD ABUSE ACCUM VALVE 3 2 DOWNSHIFT LO OVERRUN ACTUATOR FEED LIMIT 1 2 SHIFT VALVE REV ABUSE 3 4 SHIFT VALVE 2 3 SHUTTLE VALVE 3 2 CONTROL RH0209 4L60 E ...

Page 689: ...SPRINGS LOCATED IN THE PUMP PRESSURE CONV CL REGULATOR VALVE SPRINGS LOCATED IN THE VALVE BODY 3 4 SHIFT ...

Page 690: ... OIL PUMP REVERSE BOOST VALVE 222 RETAINING RING OIL PUMP CONVERTER CLUTCH VALVE 224 223 RETAINING VALVE STOP 224 VALVE CONVERTER CLUTCH 225 SPRING CONVERTER CLUTCH VALVE INNER 226 SPRING CONVERTER CLUTCH VALVE OUTER 227 RIVET PRESSURE RELIEF BOLT 228 BALL PRESSURE RELIEF 223 229 SPRING PRESSURE RELIEF 230 RING OIL SEAL STATOR SHAFT 231 SEAL OIL PUMP COVER SCREEN 232 SCREEN OIL PUMP COVER 233 BOLT...

Page 691: ...TON OUTER 624 SEAL 3RD AND 4TH CL INNER AND OUTER 27 SEAL O RING 2 4 SERVO COVER 629 SEAL FORWARD CLUTCH INNER AND OUTER 30 SEAL CASE EXTENSION TO CASE 631 SEAL OVERRUN CLUTCH INNER AND OUTER 34 SEAL ASSEMBLY CASE EXTENSION OIL 636 SEAL INPUT HOUSING TO OUTPUT SHAFT 37 SEAL O RING ITSS TO CASE EXTENSION 691 SEAL OUTPUT SHAFT 230 RING OIL SEAL STATOR SHAFT 696 SEAL TRANSMISSION LO AND REVERSE 243 S...

Page 692: ...R 616 WASHER THRUST SELECTIVE 637 BEARING ASSEMBLY INPUT SUN GEAR 657 BUSHING INPUT SUN GEAR FRONT 659 BUSHING INPUT SUN GEAR REAR 663 BEARING ASSEMBLY THRUST INPUT CARRIER TO REACTION SHAFT 665 BUSHING REACTION CARRIER SHAFT FRONT 667 BUSHING REACTION CARRIER SHAFT REAR 669 WASHER THRUST REACTION SHAFT SHELL 672 BUSHING REACTION SUN 674 WASHER THRUST RACE REACTION SHELL 683 BEARING ASSEMBLY THRUS...

Page 693: ...D ASSEMBLY TO CASE 2 M6 1 0 x 12 0 11 N m 8 LB FT MANUAL SHAFT TO INSIDE DETENT LEVER 1 M10 1 50 NUT 31 N m 23 LB FT TRANSMISSION OIL PAN TO CASE 16 M8 1 25 x 19 3 11 N m 8 LB FT LINE PRESSURE PLUG 1 1 8 27 11 N m 8 LB FT VALVE BODY TO CASE 2 M6 1 0 X 35 0 11 N m 8 LB FT CONNECTOR COOLER PIPE 2 1 4 18 38 N m 28 LB FT VALVE BODY TO CASE 9 M6 1 0 x 47 5 11 N m 8 LB FT PRESSURE SWITCH ASM TO VALVE BO...

Page 694: ...RH0213 4L60 E ...

Page 695: ...657 659 m i J 8092 H J 34196 4 3 34196 5 657 658 665 J 23907 J 7004 1 J 8092 RH0214 4L60 E ...

Page 696: ...J 8092 J 34196 4 33 31 J 8092 RH0215 4L60 E ...

Page 697: ...SPECIAL TOOLS ...

Page 698: ...SPECIAL TOOLS ...

Page 699: ...bly 4L80 E 11 Unit Assembly 4L80 E 47 Direct Clutch Assembly 4L80 E 11 Rear Unit End Play Check 4L80 E 47 Intermediate Clutch Assembly 4L80 E 11 Intermediate Clutch Assembly Direct Center Support and Gear Unit Assembly Clutch Assembly 4L80 E 49 and Rear Band 4L80 E 12 Forward Clutch Assembly 4L80 E 49 Inspect Clean and Repair Subassemblies 4L80 E 13 4th Clutch Assembly 4L80 E 49 Parking Lock Pawl ...

Page 700: ...23 with 8 mm socket 4 Pump Body Seal Assembly 201 p 7 Install or Connect 1 Holding fixture J 8763 02 and J 38655 onto transmission NOTICE Overtightening of tool could cause case damage and inhibit disassembly 2 Transm ission and holding fixture into J 3289 20 3 Lock in place with fixture pin 22 SENSOR ASM A TRANS INPUT SPD AND VEH SPD 23 BOLT METRIC HEX 86 PLUG SENSOR BORE SOME MODELS RH0101 4L80 ...

Page 701: ... Twenty one bolts 35 using 10 mm socket from valve body assembly manual detent spring and roller assembly 41 5 Three wiring clips 33 fluid level indicator stop 43 one bolt 36 using 10 mm socket lube pipe 39 lube pipe retainer 37 and clamp 38 6 Control valve assembly 44 including the accumulator housing assembly 51 and connector wire harness assembly 34 valve body gaskets 45 and 48 spacer plate 46 ...

Page 702: ...S FLUID PRESS 41 SPRING ASSEMBLY MANUAL DETENT 43 STOP FLUID LEVEL INDICATOR DIPSTICK 44 BODY ASSEMBLY CONTROL VALVE 51 HOUSING ACCUMULATOR 75 SCREEN PWM SOLENOID 76 BOLT SPECIAL RH0103 4L80 E FRONTAND REAR SERVO Figures 5 and 6 Remove or Disconnect 1 Front servo piston assembly 55 through 60 2 Six rear servo bolts 61 using 10 mm socket cover 62 and gasket 63 3 Rear servo accumulator assembly 64 t...

Page 703: ...PLY SELECTIVE 74 SPRING REAR ACCUMULATOR BAND APPLYPIN CHECK Figures 7 8 and 9 Tools Required J 21370 10 Gage Pin J 38737 Band Apply Pin Checking Tool j Measure 1 Place J 21370 10 in the servo bore 2 Position J 38737 over the bore with the hex nut facing the parking pawl linkage 3 Fasten with two rear servo cover bolts 61 and torque to 24 N m 18 lb ft 4 Make sure J 21370 10 gage pin moves freely i...

Page 704: ...109 4L80 E Output shaft O ring seal 675 some models for damage Figure 10 Removing Case Extension Assembly PARKING LOCK PAWLAND ACTUATOR ASSEMBLY Figures 11 and 12 NOTICE Do not apply excessive force prying or hammering to any parking mechanism parts doing so could cause parking system failure w Remove or Disconnect Nut 712 using 15 mm wrench and pin 709 Detent lever 711 and actuator assembly 710 B...

Page 705: ...10 ACTUATOR ASSEMBLY PARKING LOCK 711 LEVER AND PIN ASSEMBLY INSIDE DETENT 712 NUT HEX HEAD 713 BRACKET PARKING LOCK 714 BOLT HEX HEAD M6 X 1 25 X 20 0 707 PLUG PARKING PAWL SHAFT HOLE SHAFT PARKING LOCK PAWL PAWL PARKING LOCK RETAINER PARKING PAWL SHAFT SPRING PARKING PAWL RETURN STUD PARKING PAWL RETURN SPRING SEAL ASSEMBLY MANUAL SHIFT SHAFT 708 SHAFT MANUAL 709 PIN MANUAL SHAFT RETAINING 710 A...

Page 706: ... 0 559 mm 0 004 to 0 022 inch Retain this measurement for future reference 5 Remove tools T Important During reassembly Front End Play Check must be repeated to verify accuracy of selective washer THICKNESS INCH STRIPE 057 061 BLUE 073 077 RED 089 093 BROWN 105 109 GREEN 121 125 PLAIN M H 0013 4L80 E Figure 14 Selective Thrust Washer Chart REAR UNIT END PLAYCHECK Figures 15 and 16 Tool Required J ...

Page 707: ...BLY Figures 17 and 18 Tool Required J 37789 Pump Remover E Remove or Disconnect 1 O ring turbine shaft 2 NOTICE Pump assembly can not be removed without damage to the O ring when in place 2 Seven bolt and O ring assemblies 13 mm socket 3 using 3 Attach tool J 37789 tightly to pump 11 mm wrench shaft with 4 Pump assembly 4 with seal 5 5 Tool J 37789 6 Gasket 6 7 Selective thrust washer 218 If front...

Page 708: ...e unit assembly 504 and turbine shaft 502 2 Recheck Fourth Clutch Bolt 26 Torque should be 15 N m minimum 133 lb in minimum 3 Fourth clutch bolt 26 using 40T torx head socket NOTICE Discard bolt do not reuse Damage could result to the Fourth Clutch Housing 4 Fourth clutch assembly complete 529 ...

Page 709: ...y or top of direct clutch housing fthT OTMnnnflr 601 BEARING ASM THRUST CARRIER FORWARD CLUTCH 602 HOUSING ASSEMBLY FORWARD CLUTCH R H 0120 4L80 E DIRECTCLUTCH ASSEMBLY Figure 22 Tool Required J 38733 Direct Clutch Assembly Remover Q Remove or Disconnect 1 Direct clutch housing assembly 623 2 Front band 628 Figure 22 Removing Direct Clutch Housing Assembly INTERMEDIATE CLUTCH ASSEMBLY Figure 23 0 ...

Page 710: ...t do not reuse Damage could result to the Center Support Housing 2 Snap ring 633 tapered 3 Attach tool J 38868 to main shaft 662 4 Center support assembly 634 641 and gear unit assembly 642 672 using tool J 38868 Secure tool J 38868 tight to shaft using wrench Place center support assembly and gear unit assembly into J 6116 01 fixture 5 Tool J 38868 6 Spacer 643 Location of thin spacer 643 located...

Page 711: ...ssembly lube It is recommended that TRANSJEL J 36850 or the equivalent of petroleum jelly be used during assembly NOTICE Do not use any type of grease to retain parts during assembly of this unit Greases other than the recommended assembly lube will change transmission fluid characteristics and cause undesirable shift conditions and or filter clogging ...

Page 712: ...78 Excess gasket material left on surfaces 2 Case extension 19 for Cracks Porosity Scored bushing 77 3 All threaded holes for Damage Heli coil to repair damage 4 Air check all fluid passages See Diagnosis Section for fluid passage identification 5 Front and rear servo bores for Porosity Burrs Damage 701 PLUG PARKING PAWL SHAFT HOLE 708 SHAFT MANUAL 702 SHAFT PARKING LOCK PAWL 709 PIN MANUAL SHAFT ...

Page 713: ...s 11 Pipe vent 9 12 PWM solenoid screen 75 13 Rear lube seal 13 and snap ring 14 Replace rear lube seal 13 with J 38693 if necessary 14 Manual shaft seal 707 ffi Clean All components m Important Use only clean solvent or cleaner Do not use dirty cleaner because additional sediment could damage transmission REARBAND AND SELECTIVE THRUST WASHER Figure 29 jy Inspect Rear band 657 and selective thrust...

Page 714: ... Damaged bushing Output carrier assembly 661 for Wear Damaged lugs Pinion gear damage Washer wear Pinion gear and pocket thrust surfaces damage Inspect Excess pinion washer wear end play should be 0 228 to 0 610 mm 0 009 to 0 024 inch using feeler gage Front internal gear ring 658 for Damage Cracks Thrust washers 659 673 and 674 bearings 647 and 664 and races 646 648 663 665 and 669 for Damage Rin...

Page 715: ...ASSEMBLY SUN GEAR GEAR SUN DRUM AND CARRIER ASSEMBLY REACTION WASHER PINION THRUST BRONZE WASHER PINION THRUST STEEL ROLLER NEEDLE BEARING PINION PLANET PIN PLANET PINION BAND ASSEMBLY REAR BRAKE RING FRONT INTERNAL GEAR WASHER FRONT INTERNAL REACTION CARRIER RING OUTPUT SPEED SENSOR CARRIER ASSEMBLY OUTPUT SHAFT TRANSMISSION MAIN RACE THRUST BEARING TO SUN GEAR BEARING NEEDLE THRUST RR INTERNAL G...

Page 716: ...0 and sun gear shaft 649 for Nicked scored or worn bushings 676 Damaged splines or teeth Cracks CENTER SUPPORT ASSEMBLY Figures 33 through 36 Tools Required J 6116 01 Rear Gear Assembly Holding Fixture J 21363 Intermediate Clutch Inner Seal Protector J 23327 Clutch Spring Compressor J 38734 Intermediate Clutch Piston Compressor Adapter J 38735 1 Solid Seal Installer J 38735 2 Seal Sizer J 38735 3 ...

Page 717: ... Center Support and Intermediate Clutch Piston h h Assemble Figures 33 35 and 36 1 Lubricate new inner and outer clutch piston seals 637 and 638 and seal pockets in housing with DEXRON IIE transmission fluid 2 Seals 637 and 638 on piston 636 with lips facing away from spring pockets 3 Clutch piston 636 on center support 640 with J 21363 4 Spring and retainer assembly 635 and snap ring 634 Using J ...

Page 718: ...ion fluid 6 Output shaft 671 into output carrier assembly 661 634 RING SNAP INTERMEDIATE CLUTCH 635 SPRING AND RETAINER ASM INTERMEDIATE CLUTCH 636 PISTON INTERMEDIATE CLUTCH 637 SEAL INTERMEDIATE CLUTCH INNER 638 SEAL INTERMEDIATE CLUTCH OUTER 639 RING OIL SEAL RH0134 4L80 E Figure 36 Center Support and Reaction Carrier Assembly 671 672 673 674 675 SOME MODELS 647 BEARING NEEDLE THRUST 648 RACE T...

Page 719: ...ASSEMBLY SUN GEAR 651 DRUM AND CARRIER ASSEMBLY REACTION 660 RING OUTPUT SPEED SENSOR RH0137 Figure 39 Installing Spacer Ring and Roller Clutch Assembly 7 Snap ring 672 in groove of output carrier assembly 661 8 Thrust washer 673 onto output shaft 671 9 Thrust washer 659 onto output carrier assembly 661 with tabs in pockets Retain with TRANSJEL J 36850 or equivalent 10 O ring seal 675 Some models ...

Page 720: ...hrough 49 Tools Required J 8001 Dial Indicator Set J 21362 Seal Protector inner J 23327 Spring Compressor J 25018 A Adapter Mechanical Press J 38695 Spiral Snap Ring Installer J 38732 Seal Protector outer m Important If spiral snap ring 627 is removed a new snap ring 627 must be usea Em Disassemble Figures 41 and 42 1 Spiral snap ring 627 2 Clutch retainer 626 and race 625 3 Sprag assembly 624 4 S...

Page 721: ...ss of inside diameter Spline damage 3 Clutch housing 623 for Cracks Wear Proper opening of oil passages Checkball 537 4 Clutch plates 611 and 618 for Wear Burned Flaking Scoring Pitting 5 Backing plate 617 and piston 619 for Damage Cracks 6 Spring and retainer assembly 607 for Collapsed coils Distortion p Assemble Figures 42 through 49 1 Lubricate clutch piston seals 605 604 and 622 and grooves wi...

Page 722: ...t clutch hub install tool J 38695 in hub hole rotate counterclockwise while pressing down until snap ring is in place 5 Dished plate 609 into direct clutch housing 623 Inner diameter dish down 6 Plate assemblies 611 and steel plates 618 0915 thickness Alternate plates starting with steel plate first 7 Direct clutch backing plate 617 and snap ring 616 623 HOUSING DIRECT CLUTCH 624 SPRAG ASSEMBLY IN...

Page 723: ...irect passage This condition is normal Apply 80 psi of air pressure to direct passage to actuate piston and move clutch plates 4 Piston travel should be 3 07 to 4 72 mm 0 121 to 0 186 inch 5 Remove direct clutch assembly 623 A DIRECT CLUTCH FLUID PASSAGE B REVERSE CLUTCH FLUID PASSAGE 623 HOUSING DIRECT CLUTCH 640 SUPPORT RACE ASSEMBLY CENTER RHoi45 4L80 E Figure 49 Air Checking Direct Clutch INTE...

Page 724: ... holes Damaged thrust faces 613 Clutch surface 615 INSPECT CHECKBALL SOME MODELS 685 605 606 607 608 601 BEARING ASM THRUST CARRIER FORWARD CLUTCH 602 HOUSING ASSEMBLY FORWARD CLUTCH 603 SEAL CLUTCH CENTER 604 SEAL CLUTCH OUTER 605 SEAL CLUTCH INNER 606 PISTON FORWARD CLUTCH 607 SPRING AND RETAINER ASSEMBLY 608 RING SNAP 609 PLATE CLUTCH 054 DISHED 610 PLATE CLUTCH 0775 FLAT 611 PLATE ASSEMBLY CLU...

Page 725: ...gure 51 1 Dished clutch plate 609 Inside dish down 2 Steel plates 610 0775 thickness and plate assemblies 611 Starting with steel plate first 3 Direct clutch hub 615 in forward clutch housing 602 4 Snap ring 616 5 Install forward clutch assembly onto turbine shaft 502 q I Measure Figures 53 54 an d 55 Measure piston travel with J 8001 dial indicator set by applying air to forward clutch passage Pi...

Page 726: ...AT STEEL PLATES NO OF DISHED PLATES NO OF COMPOSITION PLATES NO OF WAVED STEEL PLATES PISTON TRAVEL CHECK THICKNESS 1 97MM 0775 1 37MM 054 2 03MM 080 1 54MM 0605 3 07 4 27MM 0 121 0 186 ALL MODELS EXCEPT ZFP 5 1 5 ZFP 4 5 1 2 209 3 81MM 0 087 0 150 RH0149 4L80 E Figure 54 Forward Clutch Plate Chart A AIR SUPPLY 502 SHAFT TURBINE 602 HOUSING ASSEMBLY FORWARD CLUTCH 615 HUB DIRECT CLUTCH DRIVING 616...

Page 727: ...on 528 5 Place housing 529 on bench resting on piston 528 and piston spacer 6 Push and rotate down on housing do not force until piston is through housing exposing snap ring groove 7 Remove housing seal protector J 38731 1 8 Place snap ring 533 spring and retainer assembly 532 onto piston 528 9 Compress spring and retainer assembly using J 38882 Adapter and J 23327 10 Install snap ring 533 11 Remo...

Page 728: ...g 523 Measurement should be 1 016 to 2 540 mm 0 040 to 0 100 inch OVERDRIVE UNIT ASSEMBLY Figure 59 Disassem ble Snap ring 522 Turbine shaft 502 Overrun carrier assembly 514 from housing 504 1 2 3 523 524 523 RING SNAP 4TH CLUTCH 524 PLATE 4TH CLUTCH BACKING 525 PLATE ASSEMBLY 4TH CLUTCH 526 PLATE 4TH CLUTCH 527 SEAL 4TH CLUTCH INNER 528 PISTON 4TH CLUTCH 529 HOUSING 4TH CLUTCH 531 SEAL 4TH CLUTCH...

Page 729: ...lates 508 and 509 three steel and three fiber 4 Compress spring and retainer assembly 506 using J 23327 and J 38734 adapter 5 Snap ring 507 6 Remove tools 7 Spring and retainer assembly 506 8 Piston 505 505 PISTON ASSEMBLY OVERRUN CLUTCH 506 SPRING AND RETAINER ASSEMBLY 507 RING SNAP RETAINER 508 PLATE OVERRUN CLUTCH 509 PLATE ASSEMBLY OVERRUN CLUTCH 510 PLATE OVERRUN CLUTCH BACKING 511 RING SNAP ...

Page 730: ...lutch plates 508 and 509 3 of each backing plate 510 6 Snap ring 511 j Measure Figure 62 1 Feeler gage between backing plate and snap ring 2 Clearance should be between 0 838 to 2 38 mm 0 033 to 0 094 inch A GAGE FEELER 504 HOUSING ASSEMBLY OVERRUN CLUTCH 510 PLATE OVERRUN CLUTCH BACKING 511 RING SNAP RH0157 4L80 E Figure 62 Measuring Overrun Clutch Piston Travel 504 HOUSING ASSEMBLY OVERRUN CLUTC...

Page 731: ...ler clutch assembly 512 3 Pinion assembly 518 4 Thrust bearing assembly 513 5 Carrier 514 for Cracks Damage Wear i h Assemble 1 Needle bearing 517 and pinions 518 2 Washers 515 and 516 on pinion 518 9 Important Thrust bearing 513 must be installed before pinions 3 Thrust bearing 513 4 Pinion gear assemblies into carrier 514 5 Pinion pins 519 through pinion gear 518 and carrier 514 6 Retainer 520 a...

Page 732: ...shaft seals 501 and 503 Assemble Figures 68 and 69 1 Place seal installer J 38736 onto shaft 2 Push seals 501 and 503 over and down the installer until they are in place using pusher tool One at a time 3 Remove installer 4 Place sizer over shaft to size seals in place H Important Be sure to use small chamfer end of sizer to do the lower ring Then use larger chamfered end to size all other seals 5 ...

Page 733: ...NG SNAP 512 ROLLER CLUTCH ASSEMBLY OVERDRIVE 513 BEARING ASSEMBLY THRUST CARRIER OVERRUN CLUTCH 514 CARRIER ASSEMBLY OVERDRIVE 515 WASHER PINION THRUST 516 WASHER PINION THRUST STEEL 517 ROLLER NEEDLE BEARING 518 PINION OVERDRIVE PLANET 519 PIN OVERDRIVE PINION 520 RETAINER PINION PIN 521 RING SNAP 522 RING SNAP TURBINE SHAFT CARRIER 537 BALL CHECK 520 521 518 522 k 516 P I Z RH0162 4L80 E Figure ...

Page 734: ...mating surfaces Cross channel leaks 3 Pump body bolt threads for Damage 4 Oil seal 201 bushing 202 for Wear Damage Pump Cover Figure 70 y Inspect 1 Pump gear face for Wear Scoring 2 Stator shaft splines for Damage or stripped splines 3 Stator shaft bushings 233 and 234 for Wear Galling 4 Oil ring grooves for Nicks Burrs Debris 5 Pressure regulator assembly converter limit valve assembly TCC enable...

Page 735: ...LE VALVE 217 VALVE TCC ENABLE 218 WASHER THRUST SELECTIVE 219 RING OIL SEAL _____ 220 BOLT M 8X 1 25 X 40 5 221 RING SNAP 223 VALVE TCC 224 SPRING TCC VALVE 225 PLUG TCC VALVE BORE 226 RING RETAINER REV BOOST VALVE BUSHING 227 BUSHING REVERSE BOOST VALVE 228 VALVE REVERSE BOOST 229 RETAINER PRESSURE REGULATOR SPRING 230 SPRING PRESSURE REGULATOR 231 VALVE PRESSURE REGULATOR 232 PLUG VALVE BORE 233...

Page 736: ...TCC Enable Valve Spring Rod Location F 1 Assemble Figures 73 and 74 Tools Required J 21368 Alignment Band J 38739 Oil Pump Seal Ring Installer Sizer and Pusher J 25025 1 Guide Pins J 37789 Pump Install Remove 1 J 21368 on pump assembly J 25025 1 Guide pins in bolt hole Tighten Five bolts 220 to 24 N m 18 lb ft 2 Oil seal 5 NOTICE Coat the pump to case O ring seal 5 with TRANSJEL or petroleum jelly...

Page 737: ...r 59 3 Ring 56 piston pin 55 and piston 57 REARSERVO ACCUMULATOR Figure 76 Disassemble Retaining clip 64 from rear band apply pin 73 and inspect 3 1 2 3 Inspect Rear Accumulator piston 68 and Rear Servo piston 65 for Porosity or damage Ring groove damage Seals 66 67 and 69 for Nicks or cuts Cover 62 for Porosity Scored or damaged Springs 71 and 74 for Distortion Damage Pin 73 for wear Servo bore f...

Page 738: ... REAR SERVO 63 GASKET REAR SERVO COVER 64 CLIP RETAINING BOTTOM 65 PISTON REAR SERVO 66 RING OIL SEAL ACCUM PISTON OUTER 67 RING OIL SEAL ACCUM PISTON INNER 68 PISTON REAR ACCUMULATOR 69 SEAL REVERSE SERVO PISTON 70 WASHER SERVO PISTON 71 SPRING REAR SERVO 72 RETAINER REAR PISTON SPRING 73 PIN REAR BAND APPLY SELECTIVE 74 SPRING REAR ACCUMULATOR ...

Page 739: ...pensator valve 409 and spring 410 2 Snap ring 402 from outside housing pin 408 snap ring 402 piston 407 and spring 49 3 3rd clutch piston 405 and spring 50 4 Seals 404 and 406 l2 l Clean All components o s Inspect All valves pistons springs and seals for Porosity Scoring Nicks Scratches Assemble Accumulator housing assembly components exactly as shown Notice the positions of the valve and pistons ...

Page 740: ...MULATOR 53 BOLT ACCUM HOUSING TO VALVE BODY RH0171 4L80 E Figure 77 Control Valve Assembly Accumulator Housing 49 SPRING 4TH CLUTCH ACCUM PISTON 50 SPRING 3RD CLUTCH ACCUM PISTON 51 HOUSING ACCUMULATOR 53 BOLT ACCUM HOUSING TO VALVE BODY 402 RING SNAP 404 SEAL 1 615 SQUARE CUT 405 PISTON 3RD CLUTCH ACCUMULATOR 406 SEAL 859 SQUARE CUT 407 PISTON 4TH CLUTCH ACCUMULATOR 408 PIN 4TH CLUTCH ACCUMULATOR...

Page 741: ...SOLENOID RETAINING 308 VALVE 3 4 SHIFT 323 SOLENOID ASSEMBLY PWM 309 SPRING SHIFT VALVE RETURN 2 3 AND 3 4 324 VALVE TCC REGULATOR APPLY 310 BOLT SOLENOID 1 2 AND 2 3 SHIFT PRESSURE 325 SPRING TCC REGULATOR APPLY VALVE CONTROL SOLENOID 327 SPRING ACTUATOR FEED LIMIT VALVE 311 2 3 SHIFT SOLENOID AND O RING ASSEMBLY 328 VALVE ACTUATOR FEED LIMIT 312 VALVE 2 3 SHIFT 329 PLUG ACCUMULATOR VALVE BORE 31...

Page 742: ... Start accumulator housing bolts finger tight starting with bolt 52 and work towards opposite end Tighten sequence Figure 79 Tighten Bolts 52 and 53 to 11 N m 97 lb in 7 Remove guide pin J 25025 5 P A C E C V T C M C IA M A C C C M D IV VnOL LA I LIHUIVU nUULIVIUL I Figure 81 y Inspect 1 Bearings 17 bushing 13 and O ring 15 for Wear Damage SPEED SENSOR ASSEMBLIES Figure 8 2 y Inspect Speed Sensor ...

Page 743: ...ove the T handle forcing screw from the base 2 Place J 39195 base into the torque converter J 39195 will bottom itselfon the face of the stator 3 Insert the T handle forcing screw and hand tighten NOTE This will allow the spline of J 39195 to grip the spline of the stator for proper measurement 4 Position J 8001 Dial Indicator as shown To check end play push down on J 39195 handles to bottom stato...

Page 744: ...rking lock bracket 713 with two bolts 714 Tighten Bolts 714 to 24 N m 18 lb ft REAR BAND AND SELECTIVE THRUST WASHER Figure 85 Install or Connect 1 Selective thrust washer 674 determined by Rear End Play Measurement Smooth side facing up Retain with TRANSJEL J 36850 or equivalent 2 Rear band 657 Make sure band tab lines up with servo pin hole 707 70 S i 701 PLUG PARKING PAWL SHAFT HOLE 702 SHAFT P...

Page 745: ...sition align bolt hole in center support 640 with hole in case 7 and carefully lower gear unit center support assembly into case using J 38868 4 Beveled snap ring 633 Flat side down using J 28585 The end gap should be located at the nine o clock position with the beveled edge of the snap ring facing up REAR UNIT END PLAYCHECK Figures 89 and 90 g Measure Tool Required J 8001 Dial Indicator Set 1 At...

Page 746: ...ct clutch passage through case 7 Apply pressure on J 23093 seating the center support splines counterclockwise against the case splines Push tool toward rear servo bore 2 New case to center support bolt 25 Assure the bolt head 25 is seated to the bottom of the case 7 Tighten New center support bolt 25 to 43 N m 32 lb ft using 3 8 12 pt TORX head socket 9 Important DO NOT OVERTORQUE ...

Page 747: ...and 632 with J 24396 Leave tool in place 7 Apply air through center support bolt hole to engage intermediate clutch 8 Remove tool J 24396 9 Continue applying air to hold clutch plates in place 10 Direct clutch assembly into case with J 38733 HYDRA MATIC 4L80 E CLUTCH PLATE APPLICATION CHART INTERMEDIATE CLUTCH MODELS NO OF FLAT STEEL PLATES NO OF DISHED PLATES NO OF COMPOSITION PLATES PISTON TRAVE...

Page 748: ...IATE CLUTCH RETAINER 630 PLATE INTERMEDIATE CLUTCH BACKING 631 PLATE ASSEMBLY INTERMEDIATE CLUTCH 632 PLATE INTERMEDIATE CLUTCH RH0181 4L80 E Figure 92 Installing Intermediate Clutch Plates and Front Band Figure 93 Installing Direct Clutch Assembly ...

Page 749: ...her 218 onto top of overrun housing and straight edge to pump to cage surface The two surfaces should be flush FOURTH CLUTCH PLATES hhh Install or Connect Figures 97 and 98 1 Fourth clutch plates 525 and 526 starting with steel first into 4th clutch housing around overdrive carrier assembly NOTE Install steel plates with the narrow tang V notch at the 1 o clock position in the housing 2 Backing pl...

Page 750: ...p assembly is fully installed J 37789 2 3 4 5 6 218 219 SEAL O RING TURBINE SHAFT TURBINE HUB BOLT AND SEAL ASSEMBLY PUMP TO CASE PUMP ASSEMBLY COMPLETE SEAL OIL PUMP TO CASE GASKET PUMP COVER TO CASE WASHER THRUST SELECTIVE RING OIL SEAL RH0188 4L80 Figure 100 Gasket and Pump Assembly FRONT UNIT END PLAYCHECK Figures 100through 103 Tools Required J 8001 Dial Indicator J 38694 Pump Seal Installer ...

Page 751: ... inch 5 Remove tools and correct end play if necessary 6 Install O ring 2 on turbine shaft 7 Install seal assembly 201 using J 38694 if necessary THICKNESS INCH STRIPE 057 061 BLUE 073 077 RED 089 093 BROWN 105 109 GREEN 121 125 PLAIN RH0113 4L80 E Figure 103 Selective Washer 218 FRONTSERVOASSEMBLY Figure 104 E Install or Connect Front servo assembly into case Make certain tapered end of piston pi...

Page 752: ... 10 Gage Pin J 38737 Band Apply Pin Checking Tool Measure 1 Place J 21370 10 in the servo pin bore 2 Position J 38737 over the bore with the hex nut facing the parking pawl linkage 3 Fasten with two servo cover bolts 61 Tighten Bolts 61 to 24 N m 18 lb ft 4 Make sure J 21370 10 moves freely in the tool and pin bore 5 To determine correct pin length apply 25 lb ft torque to the nut on the gage 6 Fo...

Page 753: ...parts 64 73 in servo bore 3 New gasket 63 cover 62 and six 10 mm bolts 61 using 10 mm socket Tighten Bolts 61 to 24 N m 18 lb ft 61 BOLT REAR SERVO COVER 62 COVER REAR SERVO 63 GASKET REAR SERVO COVER 64 CLIP RETAINING BOTTOM 65 PISTON REAR SERVO 66 RING OIL SEAL ACCUM PISTON OUTER 67 RING OIL SEAL ACCUM PISTON INNER 68 PISTON REAR ACCUMULATOR 69 SEAL REVERSE SERVO PISTON 70 WASHER SERVO PISTON 71...

Page 754: ...sing 10 mm socket 8 Six bolts 76 using 8 mm socket into transmission fluid pressure switch assembly 40 9 Lube pipe 39 long end into case short end into valve body 10 Lube pipe clip 37 with short bolt 36 Tighten Bolts 35 36 and 76 to 11 N m 97 lb in NOTICE Torque valve body bolts in a spiral pattern starting from the center If bolts are torqued at random valve bores may be distorted and inhibit val...

Page 755: ...1 Seal 32 inside of case 7 2 Filter assembly 31 3 Bottom pan seal 29 4 Magnet 30 into bottom pan 5 Pan 29 6 Seventeen bolts 27 using 10 mm socket j l Tighten Bolts 27 to 24 N m 18 lb ft CASE EXTENSION ASSEMBLY Figure 113 Tool Required J 38693 Rear Lube Seal Installer Case J 38869 Case Extension Seal Installer Q j Install or Connect 1 O ring and orifice assembly 12 to rear of case 2 Seal 13 and sna...

Page 756: ...UBE PIPE 40 SWITCH ASM A TRANS FLUID PRESS 43 STOP FLUID LEVEL INDICATOR DIPSTICK 311 2 3 SHIFT SOLENOID AND O RING ASSEMBLY 313 1 2 SHIFT SOLENOID AND O RING ASSEMBLY 320 PRESSURE CONTROL SOLENOID 323 SOLENOID ASSEMBLY PWM RH0192 4L80 E ...

Page 757: ...HELIX SEAL ASSEMBLY CASE EXTENSION 21 BOLT HEX HD M 1 0 X 1 5X30 0 675 SEAL O RING OUTPUT SHAFT RH0109 4L80 E Figure 113 Installing Case Extension Assembly 22 SENSOR ASM A TRANS INPUT SPD AND VEH SPD 23 BOLT METRIC HEX 86 PLUG SENSOR BORE SOME MODELS RHQ L Figure 114 Installing Speed Sensor Assemblies TORQUE CONVERTER ASSEMBLY Tool Required J 21366 Converter Holding Strap p Install or Connect Torq...

Page 758: ...RH0194 4L80 E ...

Page 759: ...TENSION 65 PISTON REAR SERVO 21 BOLT HEX HD M10 X 1 5 X 30 0 66 RING OIL SEAL ACCUM PISTON OUTER 22 SENSOR ASM A TRANS INPUT SPD AND VEH SPD 67 RING OIL SEAL ACCUM PISTON INNER 23 BOLT METRIC HEX 68 PISTON REAR ACCUMULATOR 24 PLUG OIL TEST HOLE HEX HD 1 8 PIPE 69 SEAL REVERSE SERVO PISTON 25 BOLT CASE TO CENTER SUPPORT 70 WASHER SERVO PISTON 26 BOLT CASE 4TH CLUTCH 71 SPRING REAR SERVO 27 BOLT HEX...

Page 760: ...PLUG ORIFICED CUP 1 229 RETAINER PRESSURE REGULATOR SPRING 209 PLUG CUP 2 230 SPRING PRESSURE REGULATOR 211 PIN COILED SPRING 3 231 VALVE PRESSURE REGULATOR 212 PLUG CONVERTER LIMIT VALVE BORE 232 PLUG VALVE BORE 213 SPRING CONVERTER LIMIT VALVE 233 BUSHING STATOR SHAFT FRONT 214 VALVE CONVERTER LIMIT 234 BUSHING STATOR SHAFT REAR 215 SLEEVE SPRING RETAINER 235 SHAFT STATOR 216 SPRING TCC ENABLE V...

Page 761: ...NOID RETAINING 308 VALVE 3 4 SHIFT 323 SOLENOID ASSEMBLY PWM 309 SPRING SHIFT VALVE RETURN 2 3 AND 3 4 324 VALVE TCC REGULATOR APPLY 310 BOLT SOLENOID 1 2 AND 2 3 SHIFT PRESSURE 325 SPRING TCC REGULATOR APPLY VALVE CONTROL SOLENOID 327 SPRING ACTUATOR FEED LIMIT VALVE 311 2 3 SHIFT SOLENOID AND O RING ASSEMBLY 328 VALVE ACTUATOR FEED LIMIT 312 VALVE 2 3 SHIFT 329 PLUG ACCUMULATOR VALVE BORE 313 1 ...

Page 762: ...RE CUT 50 SPRING 3RD CLUTCH ACCUM PISTON 405 PISTON 3RD CLUTCH ACCUMULATOR 51 HOUSING ACCUMULATOR 406 SEAL 859 SQUARE CUT 53 BOLT ACCUM HOUSING TO VALVE BODY 407 PISTON 4TH CLUTCH ACCUMULATOR 402 RING SNAP 408 PIN 4TH CLUTCH ACCUMULATOR PISTON RH0196 4L80 E ...

Page 763: ...RDRIVE 515 WASHER PINION THRUST 516 WASHER PINION THRUST STEEL 517 ROLLER NEEDLE BEARING 518 PINION OVERDRIVE PLANET 519 PIN OVERDRIVE PINION 520 RETAINER PINION PIN 521 RING SNAP 522 RING SNAP TURBINE SHAFT CARRIER 523 RING SNAP 4TH CLUTCH 524 PLATE 4TH CLUTCH BACKING 525 PLATE ASSEMBLY 4TH CLUTCH 526 PLATE 4TH CLUTCH 527 SEAL 4TH CLUTCH INNER 528 PISTON 4TH CLUTCH 529 HOUSING 4TH CLUTCH 530 PLUG...

Page 764: ......

Page 765: ... 619 PISTON DIRECT CLUTCH 663 RACE THRUST BEARING TO SUN GEAR 622 SEAL CLUTCH CENTER 664 BEARING NEEDLE THRUST RR INTERNAL GEAR 623 HOUSING DIRECT CLUTCH 665 RACE THRUST BEARING TO RR INTERNAL GEAR 624 SPRAG ASSEMBLY INTERMEDIATE CLUTCH 666 GEAR REAR INTERNAL 625 RACE INTERMEDIATE CLUTCH OUTER 669 RACE THRUST BEARING TO OUTPUT SHAFT 626 RETAINER INTERMEDIATE CLUTCH 670 RING SNAP MAINSHAFT INTERNAL...

Page 766: ... SHAFT 711 LEVER AND PIN ASSEMBLY INSIDE DETENT 705 SPRING PARKING PAWL RETURN 712 NUT HEX HEAD 706 STUD PARKING PAWL RETURN SPRING 713 BRACKET PARKING LOCK 707 SEAL ASSEMBLY MANUAL SHIFT SHAFT 714 BOLT HEX HEAD M6 X 1 25 X 20 0 Figure 123 Parking Lock and Actuator Assembly 4L80 E OUTPUT SHAFT IDENTIFICATION CHART 4 WHEEL HEAVY FIXED SLIP LIGHT DRIVE DUTY YOKE YOKE HEAVY DUTY RH0200 4L80 E ...

Page 767: ...G STATOR SHAFT FRONT 664 BEARING NEEDLE THRUST RR INTERNAL GEAR 234 BUSHING STATOR SHAFT REAR 676 BUSHING SUN GEAR SHAFT 512 ROLLER CLUTCH ASSEMBLY OVERDRIVE 677 BUSHING OUTPUT SHAFT 513 BEARING ASSEMBLY THRUST CARRIER OVERRUN CLUTCH 678 BUSHING 535 BUSHING OVERRUN CLUTCH HSG 679 BUSHING 1 536 DIA X 3 52 536 BUSHING 1 12 O D X 0 50 681 BUSHING REACTION DRUM 00 o m 4 L 80 E AUTO M A TIC TRANSMISSIO...

Page 768: ... SEAL ASSEMBLY CASE EXTENSION RING OIL SEAL RING OIL SEAL ACCUM PISTON OUTER RING OIL SEAL ACCUM PISTON INNER SEAL REVERSE SERVO PISTON HELIX SEAL ASSEMBLY PUMP BODY RING OIL SEAL SEAL 1 615 SQUARE CUT SEAL 859 SQUARE CUT RING OIL SEAL TURBINE SHAFT STATOR HSG RING OIL SEAL TURBINE SHAFT FORWARD HSG 7A 17B 70 4 L 80 E AUTOM ATIC TRANSMISSION U N IT R EPAIR ...

Page 769: ...IN 15 MIN ACCUMULATOR HOUSING TO VALVE BODY SCREW 11 97 8 MIN 71 MIN FOURTH CLUTCH SCREW 16 12 15 MIN 133 MIN PAN TO CASE SCREW 24 18 15 MIN 133 MIN EXTENSION HOUSING TO CASE SCREW 34 25 27 MIN 20 MIN MANUAL SHAFT TO DETENT LEVER N U T 24 18 20 MIN 15 MIN SPEED SENSOR BRACKET ASM TO CASE SCREW 11 97 8 MIN 71 MIN CASE CENTER SUPPORT SCREW 39 29 34 MIN 25 MIN FLYWHEEL TO CONVERTER SCREW 44 32 44 MIN...

Page 770: ...SPECIAL TOOLS ...

Page 771: ...SPECIAL TOOLS CONT ...

Page 772: ......

Page 773: ...Mainshaft and Synchronizers 7B1 Countershaft 7B1 Reverse Idler G ear 7B1 Front and Rear Housings 7B1 Shift Shaft Rail and Fork assemblies 7B1 Shift Lever Housing 7B1 Assembly 7B1 Input Shaft Bearing Retainer Assembly 7B1 Rear Housing Assembly 7B1 Front Housing Assembly 7B1 Reverse Idler Gear Assembly 7B1 Synchronizer Assembly 7B1 Mainshaft Assembly 7B1 Transmission Assembly 7B1 Specifications 7B1 ...

Page 774: ...NG 134 NUT HEX JAM 136 HOUSING ASSEMBLY SHIFT LEVER 200 HOUSING FRONT 204 BOLT HEX HEAD 206 RETAINER INPUT SHAFT BEARING 209 SEAL INPUT SHAFT BEARING RETAINER OIL 210 RING SNAP SELECTIVE 213 RING INPUT SHAFT BEARING ASSEMBLY SNAP 216 BEARING INPUT SHAFT 219 PIVOT ASSEMBLY CLUTCH FORK 220 FITTING LUBE 222 PLUG OIL FILL 223 BREATHER ASSEMBLY 224 ADAPTER BREATHER HOSE 225 PLUG OIL DRAIN 228 BEARING S...

Page 775: ......

Page 776: ......

Page 777: ...Y 200 HOUSING FRONT 201 BEARING ASSEMBLY COUNTERSHAFT 202 RACE COUNTERSHAFT BEARING 203 BEARING COUNTERSHAFT 300 HOUSING REAR 2WD 302 RETAINER OUTPUT SHAFT BEARING 2WD 303 RETAINER OUTPUT SHAFT BEARING 4WD 304 BOLT HEX HEAD M8 X 50 2WD 306 BOLT HEX HEAD M8 X 25 4WD 310 SUPPORT IDLER SHAFT 311 BOLT HEX HEAD M8 X 50 312 BOLT HEX HEAD M8 X 50 3707r5153 Figure 4 Transmission Gear Components Legend J 3...

Page 778: ...ng pilot with a rubber mallet B Save the input bearing retainer washer 9 Snap ring 210 and shim 212 10 Position transmission horizontally 11 Front housing to rear housing bolts 312 figure 10 12 Drive dowels 321 into front housing 13 Front housing 200 14 Countershaft bearing 35 15 Idler shaft support 310 Snap out 16 Move all shift forks forward to engage fourth sec ond and reverse gears 17 Roll pin...

Page 779: ...m a g e th e re a r h o u s in g s h ift s h a ft b e a rin g 309 c a u s in g in c re a s e d s h ift e ffo rt 21 Shift shaft 108 shift shaft socket assembly 114 anti rotation bracket 112 biasing spring 109 lever 104 and shift shaft block out bushing 103 22 Rotate third fourth shift fork 102 counterclockwise and remove 23 Loosen but do not remove 3 bolts 304 on the rear of case 2WD only 24 Instal...

Page 780: ... MAINSHAFT DISASSEMBLY Disassemble Figures 16 through 21 Tools Required Hydraulic Press J 36513 Gear and Bearing Separator Plate 1 Snap ring 6 figure 16 N O T IC E O p tio n a l m e th o d in fig u re 16 c a n b e u s e d if th e s e rv ic e p re s s b e d is n o t w id e e n o u g h fo r th e firs t s p e e d to p a s s th ro u g h T h is m e th o d c a n b e u s e d to to ta lly d is a s s e m b...

Page 781: ...IRD A N D F O U R T H SHIFT 3707r5193 Figure 14 Gears and Shift Forks B Leave the synchronizer rings 2 on the first second synchronizer assembly 19 to pre vent the synchronizer detent balls 9 from pop ping out 8 First speed gear needle bearing assembly 17 9 Fifth speed gear 31 figure 19 10 Fifth speed gear bearing 30 11 Snap ring 29 figure 21 12 Reverse speed gear assembly 25 and fifth re verse sy...

Page 782: ...ER GEAR DISASSEMBLY Disassemble Figure 23 1 Snap ring 47 2 Thrust washer 48 3 Reverse gear 49 4 Bearing assembly 50 FRONT HOUSING DISASSEMBLY Disassemble Figures 1 2 24 through 27 Tools Required J 36183 Input Shaft Press Tube with Cap J 36184 Adapter Press Tube Reducer J 23907 Slide Hammer with Pilot Bearing Puller J 6125 1B Slide Hammer J 36510 Clutch Fork Pivot Remover Installer 2 RING SYNCHRONI...

Page 783: ...EDLE 18 GEAR ASSEMBLY 2ND SPEED 23 SHAFT OUTPUT 2WD 24 SHAFT OUTPUT 4WD 3707r5129 2 RING SYNCHRONIZER 17 BEARING ASSEMBLY SPEED GEAR NEEDLE 19 SYNCHRONIZER ASSEMBLY 1 2 22 GEAR 1ST SPEED 23 SHAFT OUTPUT 2WD 24 SHAFT OUTPUT 4WD 32 RING SNAP 3 7 0 7 r5 1 3 0 ...

Page 784: ...5TH SPEED GEAR NEEDLE MG5 31 GEAR ASSEMBLY 5TH SPEED MG5 3707r5131 2 RING SYNCHRONIZER 17 BEARING ASSEMBLY SPEED GEAR NEEDLE 23 SHAFT OUTPUT 2WDI 24 SHAFT OUTPUT 4WDI 25 GEAR ASSEMBLY REVERSE SPEED 26 SYNCHRONIZER ASSEMBLY 5TH REVERSE MG5 29 RING SNAP 3707r5132 ...

Page 785: ......

Page 786: ...ss 2 Shift rail front housing bushing 228 using J 36800 and J 23907 figure 24 3 Clutch fork pivot assembly 219 using J 36510 and J 6125 1B figure 25 A Put an additional nut 3 8 16 thread onto J 36510 and thread J 6125 1B onto nut B Tighten both nuts C Slide hammer out pivot 4 Two detent plunger bushings 242 if necessary using J 36507 figure 26 Remove ONE bushing at a time 5 Breather assembly 223 D...

Page 787: ...emover 2WD models only 1 Rear housing shift shaft bearing 309 using J 23907 with pilot bearing puller figure 28 A Position puller legs behind bearing lip B Tighten C Slide hammer out If the bearing lip breaks off position puller legs behind the inside outer end bearing lip and repeat procedure 2 Drive out dowel pins J 23907 309 BEARING REAR HOUSING SHIFT SHAFT 3707r5176 ...

Page 788: ...ee bolts 306 output shaft bearing retainer 303 and bearing assembly 33 using brass drift 4WD models only figure 29 4 Slip yoke seal 319 using J 26941 and J 23907 figure 30 2WD models only 5 Gasket material from the case using liquid gasket remover Figure 30 Removing 2WD Slip Yoke Oil Seal CLEANING AND INSPECTION MAINSHAFT AND SYNCHRONIZERS Clean All parts in a suitable solvent and air dry Importan...

Page 789: ... these conditions exist 4 Bearing races 202 for scoring wear or overheat ing If scuffed nicked or burred conditions cannot be removed with a soft stone or crocus cloth replace the component Fifth gear CANNOT be pressed off the counter shaft assembly 53 Replace as an assembly only REVERSE IDLER GEAR Clean I All parts in a suitable solvent and air dry Inspect 1 Gear teeth for scuffed nicked burred b...

Page 790: ... are serviced as an assembly only 1 Shaft for wear or scoring 2 Forks 100 101 and 102 for wear scoring or dis tortion The edges will turn black in color This is a normal condition 3 Shift lever and blockout bushing for wear 4 Pins 105 and 113 for wear or distortion 5 Shift shaft socket assembly 114 components for wear or distortion Important Wear or distortion requires replacement of assembly and ...

Page 791: ...aller Seal Replacement 1 Rubber seal lip with pliers Exposing the metal lip A Install J 29369 2 below metal lip of seal B Expand to finger tight C Turn five additional turns D Install J 23907 into J 29369 2 2 Input shaft bearing retainer oil seal 209 A Heat oil seal with J 25070 for minimum of 3 minutes B Hold the clutch release bearing pilot with a heat resisting glove or equivalent Remove the se...

Page 792: ...m 16 lbs ft 3 Two dowel pins 321 Drive until flush 4 Slip yoke oil seal 319 using J 36503 figure 37 2WD models only Fill between the seal lips with chassis grease FRONT HOUSING ASSEMBLY Assemble Figures 38 39 and 40 Tools Required J 36183 Input Shaft Press Tube with Cap J 36184 Adapter Press Tube Reducer J 36510 Clutch Fork Pivot Remover Installer J 36507 Detent Bushing Remover and Installer J 365...

Page 793: ...0 onto hub 12 21 or 28 Check scribe marks for correct positions Remove spiral lock ring 27 for easier assem bly fifth reverse only 2 Spring 10 into key 11 Assembly into the hub 3 Position assembly as in view A figure 22 4 Balls 9 Push the ball into the sleeve using a screwdriv er Push the sleeve 8 or 20 down just enough to retain the ball Slide the sleeve up just enough to install each of the two ...

Page 794: ...onizer rings 2 using J 36183 J 36184 J 22912 01 and hydraulic press Check scribe marks for correct positions Important The groove on the outside of the sleeve MUST GO TOWARDS THE SECOND SPEED GEAR to prevent gear clash during first and second gear shifts The teeth of the sleeve have differ ent angles 9 Bearing assembly 17 and second speed gear 18 figure 44 Make sure bearing cage is together 10 Spa...

Page 795: ... 4WD 30 BEARING ASSEMBLY 5TH SPEED GEAR NEEDLE MG5 31 GEAR ASSEMBLY 5TH SPEED MGS 3707r5134 2 RING SYNCHRONIZER 17 BEARING ASSEMBLY SPEED GEAR NEEDLE 19 SYNCHRONIZER ASSEMBLY 1 2 22 GEAR 1ST SPEED 23 SHAFT OUTPUT 2WD 24 SHAFT OUTPUT 4WD 3707r5135 ...

Page 796: ... GEAR NEEDLE 18 GEAR ASSEMBLY 2ND SPEED 23 SHAFT OUTPUT 2WD 24 SHAFT OUTPUT 4WD 3707r5136 2 RING SYNCHRONIZER 6 RING SNAP 7 SYNCHRONIZER ASSEMBLY 3 4 13 GEAR ASSEMBLY 3RD SPEED 14 BEARING ASSEMBLY 3RD SPEED GEAR NEEDLE 23 SHAFT OUTPUT 2WD 24 SHAFT OUTPUT 4WD 3707r5137 ...

Page 797: ... 2WD SHAFT ASSEMBLY MAIN 4WD 3707r5147 1 Pilot bearing 3 into input shaft 1 figure 46 A Turn the smaller diameter of the bearing cabe toward the input shaft B Retain with TRANSJEL J 36850 or equiva lent 2 Position onto J 36515 15 J 36515 fixture A Input shaft 1 B Pilot bearing 3 C Synchronizer ring 2 D Mainshaft assembly 4 2WD or 5 4WD 3 Position countershaft 53 onto J 36515 16 fixture figure 14 4...

Page 798: ...hole in the case B Rotate back and fourth while pulling down C Pull up on J 36515 10 while installing rear housing Important Bring the housing straight down If resistance is felt at about 7 mm 1 4 in then the rollers 203 are cocked Repeat above procedures to install Do not force housing down 13 Bolts 304 figure 50 2WD models only A Apply pipe sealant with Teflon GM P N 1050280 or equivalent to the...

Page 799: ... seal protector J 36502 2A onto output shaft 16 Output shaft oil seal 320 using J 36502 figure 51 4WD models only A Fill between the seal lip with chassis grease B Remove seal protector J 36502 2A Important The remaining assembly procedures apply to both 2WD and 4WD models 17 Lay the unit down on the workbench and remove J 36515 J 36515 15 and J 36515 16 J 36502 301 HOUSING REAR 4WD 320 SEAL OUTPU...

Page 800: ...ase opening Thin side of plate as viewed from the top should be installed towards the left side of the transmission 30 Shift tower 136 and bolts 204 figure 33 a Tighten Shift tower bolts to 10 N m 89 lbs in 31 Countershaft bearing 35 to countershaft race fig ure 10 A Install smaller diameter of bearing cage into the bearing race B Press each roller into cage and retain with TRANSJEL J 36850 or equ...

Page 801: ...mission Fluid or the equivalent 44 Oil fill plug 222 Tighten Oil fill plug 222 to 60 N m 44 lbs ft Figure 53 Installing External Components SPECIFICATIONS FASTENER TIGHTENING SPECIFICATIONS N m Lbs Ft Lbs In Backup Lamp Switch 9 80 Blockout Bushing Anchor Bolt 25 18 Front to Rear Housing Bolts 35 26 Idler Shaft Support Bolt 22 16 Input Shaft Bearing Retainer Bolts 8 5 75 Oil Drain Plug 60 44 Oil F...

Page 802: ...GEAR PULLER ADAPTER 7 SEPARATOR PLATE OF EQUIVALENT 8 SLIDE HAMMER WITH PILOT BEARING PULLER 9 GEAR PULLER 10 HEAT GUN OR EQUIVALENT 11 2WD OUTPUT SHAFT OIL SEAL REMOVER 12 INPUT SHAFT BEARING RETAINER OIL SEAL REMOVER 13 INPUT SHAFT REMOVER INSTALLER PRESS TUBE CAP J 29369 2 19 J 36504 J 36506 14 ADAPTER PRESS TUBE REDUCER 15 UNIVERSAL DRIVER HANDLE 16 4WD OUTPUT SHAFT OIL SEAL INSTALLER AND SEAL...

Page 803: ... REMOVER 22 CLUTCH FORK PIVOT REMOVER INSTALLER J 36825 23 OIL FILL DRAIN PLUG HEX BIT 17 MM 24 GEAR AND BEARING SEPARATOR PLATE 25 ASSEMBLY PALLET WITH COUNTER SHAFT ADAPTER 26 2WD OUTPUT SHAFT BEARING RETAINER ALIGNMENT CABLES 27 SHIFT RAIL BUSHING INSTALLING AND STACKING TOOL 28 SHIFT RAIL BUSHING REMOVER 29 TRANSMISSION HOLDING REMOVER 30 4WD OUTPUT SHAFT OIL SEAL REMOVER 3707r5186 ...

Page 804: ...NOTES ...

Page 805: ...8 Bearing Replacement 7B2 8 Seal Replacement 7B2 8 Shift Cover 7B2 9 Unit Assem bly 7B2 10 Specifications 7B2 13 Fastener Tightening Specifications 7B2 13 Lubrication Specifications 7B2 13 Special Tools 7B2 14 UNIT DISASSEMBLY Remove or Disconnect Figures 1 through 7 Tools Required J 23642 01 Transmission Holding Fixture J 24462 Transmission Adapter Plate J 38805 Output Shaft Nut Socket 4WD models...

Page 806: ......

Page 807: ... 56 TRUNION TRANSMISSION 29 RETAINER REAR OIL 3707r5169 Figure 2 Transmission Shift Mechanism and Case Components Legend 15 Overdrive gear assembly Slide overdrive fork 137 as far rearward as possible while working the overdrive gear assembly rearward If unable to remove overdrive gear assembly remove overdrive clutch gear 134 synchroniz er ring 133 spacer 126 and overdrive gear bearings 125 to lo...

Page 808: ......

Page 809: ...97 BEARING MAIN DRIVE GEAR PILOT 98 GEAR MAIN DRIVE 99 CONE DRIVE GEAR BEARING 100 BEARING COUNTERSHAFT REAR 101 PIN 102 SHAFT TRANSMISSION COUNTER 103 KEY COUNTER GEAR 104 GEAR THIRD COUNTER 105 GEAR COUNTER DRIVE 106 WASHER TRANSMISSION FLAT 107 BEARING COUNTERSHAFT FRONT 108 WASHER REVERSE IDLER GEAR 109 BEARING REVERSE IDLER GEAR 110 GEAR REVERSE IDLER 111 SPACER REVERSE IDLER GEAR BEARING 112...

Page 810: ...R Disassemble Figures 3 4 and 8 Inspect Parts for damage and wear Oil the bearings and check for roughness 1 Pilot bearing 97 2 Bearing 99 using suitable puller Clean All parts in a suitable solvent Important Do not spin dry the bearings Assemble Figures 3 4 and 8 Tool Required J 22828 Main Drive Gear Bearing Installer 1 Bearing 99 using J 22828 figure 8 2 Pilot bearing 97 MAINSHAFT Disassemble Fi...

Page 811: ...ve gear 58 and rotor 57 if equipped 2WD models only Do not let mainshaft fall to the floor 3 58 GEAR MAINSHAFT OVERDRIVE 59 BEARING MAINSHAFT REAR 60 WASHER THRUST 61 GEAR REVERSE SPEED 69 SHAFT MAIN V2946 Figure 9 Reverse Speed Gear Removal 20 Bearing 63 and spacer 64 21 Sleeve 62 22 Retaining ring 65 23 Mainshaft reverse clutch gear 66 24 First speed gear 68 and bearing 67 L Inspect 1 Gears for ...

Page 812: ...al Replacement in this section 2 Retaining ring 21 3 Bearing 20 from extension 18 or 23 Install or Connect Figures 1 and 2 Tool Required J 38807 Extension Housing Bearing Installer 1 Bearing 20 into extension 18 or 23 using J 38807 2 Retaining ring 21 3 Extension oil seal 22 or 24 Refer to Seal Replacement SEAL REPLACEMENT 2WD MODELS Remove or Disconnect Figures 1 and 2 1 Extension oil seal 22 or ...

Page 813: ...R Important Figure 14 Do not disassemble the shift cover Individual compo nents of the shift cover are not serviced If the shift cover is damaged or worn it must be replaced as a complete assembly Figure 12 Rear Oil Retainer Seal Installation 114 RETAINER MAIN DRIVE GEAR BEARING y2954 ...

Page 814: ...t lever retaining pin Hold overdrive shift lever back out of the way using a rubber band figure 15 Ensure the notches that retain the overdrive fork 137 are to the outside of the case 4 Countershaft front bearing cup 118 using J 38856 figure 15 5 Countershaft assembly 102 6 Countershaft rear bearing 100 using J 22828 fig ure 16 Raise and support the countershaft assembly 102 while installing the r...

Page 815: ...and countershaft thrust washer 124 17 Overdrive gear assembly 129 onto overdrive shift rail 139 Bearings 125 spacer 126 synchronizer ring 133 and clutch gear 134 into overdrive gear assembly 129 if removed Slide overdrive fork 137 and gear assembly 129 onto shift rail 139 18 Clutch gear retaining ring 135 19 Overdrive shift rod pins 138 Support the overdrive fork 137 and drive the pins 138 downwar...

Page 816: ...ite Dri Loc 201 or equivalent to the bolts and retorque 23 Vibration damper 30 using J 39314 figure 20 4WD models only Move synchronizer sleeves to lock transmission into two gears at once 24 Mainshaft washer 31 and nut 32 using J 38805 figure 21 4WD models only Tighten Nut 32 to 441 N m 325 lbs ft 25 Rear oil retainer 18 23 or 29 26 Retainer bolts 33 Tighten Bolts 33 to 54 N m 40 lbs ft 27 Yoke a...

Page 817: ... clockwise surfaces Install boot seal 32 Shift lever stub 1 SPECIFICATIONS FASTENER TIGHTENING SPECIFICATIONS Item N m Lbs Ft Countershaft Retainer Plate to Case Bolt 35 26 Main Drive Gear Retainer to Case Bolt 31 23 Mainshaft Retainer Plate to Case Bolt 35 26 Rear Oil Retainer to Case Bolt 54 40 Shift Lever Cover to Case Bolts 23 17 Vibration Damper Mounting Nut 4WD Models 441 325 Yoke Assembly M...

Page 818: ...TALLER COUNTERSHAFT BEARING CONE INSTALLER 2 EXTENSION HOUSING SEAL INSTALLER 2WD MODELS 3 INPUT SHAFT SEAL INS1ALLER 4 OUTPUT SHAFT NUT SOCKET 4WD MODELS 5 EXTENSION HOUSING BEARING INSTALLER 2WD MODELS 6 COUNTERSHAFT BEARING CUP AND RETAINER INSTALLER 7 VIBRATION DAMPER INSTALLER 4WD MODELS 3707r5173 ...

Page 819: ... and Spacers 7B3 9 Front and Rear Bearings 7B3 9 Synchronizer Blocker Rings 7B3 9 Synchronizer Keys and Springs 7B3 10 Extension Housing Oil Seal and Bushing Replacement 7B3 10 Drive Gear Bearing Retainer Oil Seal 7B3 11 Transmission Cover 7B3 11 Front Countershaft Bearing 7B3 12 Unit Assem bly 7B3 14 Drive Gear Assembly 7B3 14 Mainshaft Assembly 7B3 14 Transmission Assembly 7B3 14 Specifications ...

Page 820: ... type interlock blocks the other shafts when one is moved PRECAUTIONS Certain precautions should be followed when repair ing the transmission Unless proper care is taken the components may be damaged Repair of a transmission should be done in a clean work area The outside of the case should be clean to keep dirt out of the transmission On transmis sions with a standard gearshift lever install the ...

Page 821: ... 26 from the mainshaft 14 figure 9 Mark the front bearing retainer and the case for alignment 17 Front bearing retainer bolts 95 18 Front bearing retainer 96 19 Front bearing race 99 and the shim pack 98 figure 10 20 Main drive gear 100 Turn the gear so the cutout is toward the coun tershaft figure 11 B e careful not to drop the 15 roller bearings thrust bearing or race from the rear of the drive ...

Page 822: ...3707r5079 ...

Page 823: ... COUNTERSHAFT BEARING 51 BEARING COUNTERSHAFT 52 GEAR CLUSTER COUNTERSHAFT 53 RACE REAR COUNTERSHAFT 54 SHIM COUNTERSHAFT BEARING ADJUSTMENT 55 RETAINER COUNTERSHAFT 56 BOLT COUNTERSHAFT RETAINER 57 GEAR 5TH SPEED DRIVE 58 RING BLOCKER 5TH SYNCHRONIZER 59 SPRING 5TH SYNCHRONIZER 60 HUB 5TH SYNCHRONIZER 61 KEY 5TH SYNCHRONIZER 62 SLEEVE 5TH SYNCHRONIZER 63 RETAINER 5TH SYNCHRONIZER 64 RING SNAP 5TH...

Page 824: ... Speed and Reverse Shift Lever Retaining Clip 63 RETAINER 64 RING SNAP 3707r5086 Figure 7 Fifth Gear Synchronizer Retainer 62 SYNCHRONIZER FIFTH SPEED 65 FUNNEL OILING 73 FORK FIFTH SPEED SHIFT 3707r5108 75 RAIL FIFTH SPEED AND REVERSE SHIFT 77 LEVER FIFTH SPEED AND REVERSE SHIFT 3707r5157 ...

Page 825: ...ASE TRANSMISSION 3707r5081 Figure 9 Fifth Gear Snap Ring 98 SHIM MAIN DRIVE GEAR BEARING 99 RACE MAIN DRIVE GEAR BEARING 3707r5109 Figure 10 Main Drive Gear Shim Pack Figure 12 Mainshaft Removal Figure 13 Countershaft Retainer 100 GEAR MAIN DRIVE 3707r5110 ...

Page 826: ...9 BEARING DRIVE GEAR 100 GEAR MAIN DRIVE 101 BEARING PILOT 3707r5159 Figure 19 Main Drive Gear Bearings 12 Mainshaft rear bearing assembly 23 and 24 13 First gear 22 14 Needle bearing 21 and sleeve 20 15 Locating pin 46 16 Three piece first gear blocker ring assembly DRIVE GEAR DISASSEMBLY Disassemble Figure 19 Tool Required J 22912 01 Bearing and Gear Puller 1 Bearing race 30 2 Thrust bearing 29 ...

Page 827: ...specified Fifth gear blocker ring is brass and can be checked visually for wear and damage I Important Make certain the blocker rings are correctly identified before assembly The first second synchronizer blocker ring does not have friction material The third fourth synchronizer blocker ring has friction material Assembling one in place of the other will result in serious damage to the transmissio...

Page 828: ...T Remove or Disconnect Figure 26 Tool Required J 8092 Driver Handle J 23062 14 Extension Housing Bushing Remov er and Installer 1 Seal 88 2 Sealing compound from the flange of the extension housing 31 15 34 i r 15 SPRING 31 RING BLOCKER 32 HUB 33 KEYS 34 SLEEVE 3707r5092 Figure 22 Third Fourth Synchronizer Assembly 3 Bushing 89 if it is worn or damaged using J 8092 and J 23062 14 Inspect 1 Extensi...

Page 829: ...retainer 95 L Inspect 1 Retainer nose for scoring wear or cracks espe cially at the flange 2 Replace the retainer if it is worn or damaged Install or Connect Figure 28 Tool Required J 37375 Bearing Retainer Seal Installer New seal 97 using J 37375 Lubricate the inside diameter of the seal with transmission oil TRANSMISSION COVER Disassemble Figure 29 The shift rail and shift fork plates must be in...

Page 830: ...he plug with sealing com pound 2 Fit the inserts 11 and the fork plates 12 into the shift forks 3 First and second largest shift fork 10 Fit the shift rail into the cover rear bore Hold the shift fork in the cover with the fork offset to the rear Push the shift rail through the fork 4 Selector arm 8 and the interlock plate 9 Hold the selector arm and the interlock plate in the cover with the wides...

Page 831: ...J 8092 and a press figure 31 Install or Connect Figures 1 2 32 and 33 Tools Required J 37357 Countershaft Bearing and Race Remover and Installer J 22912 01 Bearing and Gear Puller J 8092 Universal Driver Handle Figure 32 Front Countershaft Bearing Assembly 1 Countershaft front bearing 51 onto the counter shaft 52 using J 37357 with J 22912 01 J 8092 and a press 2 New O ring 49 onto the the counter...

Page 832: ...ing J 25234 and a press Lubricate fifth gear splines with petroleum jelly Carefully align the mainshaft and gear splines If splines are improperly aligned damage could occur when the gear is pressed onto the main shaft 9 Fifth gear snap ring 10 Three piece second gear blocker ring assembly and thrust washer 44 11 Spiral snap ring 43 using J 37360 12 Second gear spacer 42 needle bearing 41 and gear...

Page 833: ...t bearing race 24 9 Drive drive gear in case 100 Make sure rollers thrust bearing and washer are in place Be sure to engage the third fourth synchronizer sleeve and blocker ring 10 Front bearing race 99 in the front bearing retainer 96 Do not install shims in front bearing retainer at this time 11 Temporarily install front bearing retainer 96 Be sure to align the marks made during disas sembly 12 ...

Page 834: ...bolts 93 to 30 N m 22 lbs ft 24 New pin 84 into the offset lever 85 and shift rail 6 25 Damper sleeve in offset lever 83 Turn transmission on end and mount a dial indica tor J 8001 on the extension housing with the indi cator on the end of the mainshaft Measure Mainshaft end play figure 36 Rotate the mainshaft and zero the dial indicator Pull upwards on the mainshaft until end play is removed and ...

Page 835: ...etainer Bolts 20 15 Drain Plug 27 20 Drive Gear Bearing Retainer Bolts 20 15 Extension Housing Bolts 30 22 Fill Plug 27 20 Pivot B olt 27 20 Transmission Cover Bolts 13 115 LUBRICATION SPECIFICATIONS Capacity 2 8L 2 96 qts Type Recommended Dexron HE Automatic Tranmission Fluid T2538 ...

Page 836: ...ION HOUSING SEAL INSTALLER 4 BEARING AND GEAR PULLER 5 EXTENSION HOUSING BUSHING REMOVER AND INSTALLER 6 FRONT AND REAR BEARING INSTALLER 7 HOLDING FIXTURE 8 INSTALLER 9 COUNTERSHAFT BEARING AND RACE REMOVER AND INSTALLER 10 BEARING RACE RECIEVER AND CASE SUPPORT 11 COUNTERSHAFT BEARING REMOVER 12 SPIRAL SNAP RING INSTALLER 13 SYNCHRONIZER AND GEAR INSTALLER 14 DRIVE GEAR BEARING RETAINER SEAL INS...

Page 837: ...a l s iz e a n d s tre n g th o r s tro n g e r m a y b e u s e d F a s te n e rs th a t a re n o t re u s e d a n d th o s e re q u irin g th re a d lo c k in g c o m p o u n d w ill b e c a lle d out T h e c o rr e c t to rq u e v a lu e m u s t b e u s e d w h e n in s ta llin g fa s te n e rs th a t re q u ire it If th e a b o v e c o n d itio n s a re n o t fo llo w e d p a rts o r s y s te m...

Page 838: ... the drive chain The plane tary gear assembly consists of a 4 pinion planetary car rier and an annulus gear that provide the four wheel drive low range when engaged The reduction ratio is 2 72 1 in this range The electronic shift mechanism is controlled by an electronic shift encoder motor mounted on the front half of the transfer case IDENTIFICATION An identification tag is attached to the rear h...

Page 839: ...housing bolts 7 4 Pump retainer housing 8 from the rear case half 17 5 Speedometer tone wheel 11 from the mainshaft 19 6 Case bolts 3 from the case halves Note the two longer case bolts and washers go into the doweled case holes 33 Important Some transfer case models to them by the case half bolts from the others and must be holes Separate the case halves into the slots cast into the Do not attemp...

Page 840: ......

Page 841: ...ODE SHIFT 87 RETAINER SNAP RING 26 CONNECTOR OIL PICK UP TUBE 55 SECTOR SHIFT 88 PIN MODE FORK GUIDE 27 WASHER 56 BUSHING SHIFT RAIL 89 CUP SHIFT FORK SPRING 28 RING MAIN DRIVE SYCHRONIZFR 57 BRACKET RANGE FORK 90 SPRING SHIFT FORK 29 SLEEVE SYCHRONIZER 58 CHAIN DRIVE 91 WASHER SHIFT RAIL SPRING 30 STRUT 3 SYCHRONIZER 59 RETAINER SNAP RING 92 WASHER SHIFT RAIL 31 HUB SYCHRONIZER 60 RETAINER SNAP R...

Page 842: ...ANING AND INSPECTION Clean 1 Bearings Remove all old lubricant and dirt 2 Shafts 3 Sprockets 4 Chain 5 Oil feed ports and channels in each case half Apply compressed air to each oil feed port and channel to remove any obstructions or cleaning solvent residue 6 All mating and sealing surfaces I Inspect 1 Bearings and thrust washers for spalling brinnel ing or corrosion 2 Gear teeth for excessive we...

Page 843: ...he front case half 45 using J 8092 and J 33833 4 Retainer 40 5 Bearing 6 to the pump retainer housing 8 using J 33833 and J 8092 figure 10 6 Bearing 84 into the input gear 38 using J 36372 and J 8092 7 Thrust washer 37 into planetary carrier 36 8 Input gear 38 and thrust washer into planetary carrier 36 9 Carrier lock ring 10 Bearing into front case half using J 36372 11 Oil seal 1 into the rear e...

Page 844: ... u m p failu re N O T IC E F o r s te p s 3 15 17 a n d 19 R e fe r to N o tic e o n p a g e 7D 1 1 1 Planetary input gear assembly 38 through the input bearing 40 into the annulus gear 62 using a soft faced hammer 2 Bearing retainer snap ring 39 to the input gear 38 3 Input bearing retainer 44 and input bearing retain er bolts 43 to front case half 45 Apply RTV sealer GM P N 1052366 or equiva len...

Page 845: ...extension housing bolts Tighten Bolts to 31 N m 23 lbs ft EXTERNAL COMPONENTS Install or Connect Figures 3 and 4 N O T IC E F o r a ll th e fo llo w in g s te p s re fe r to N o tic e o n p a g e 7D 1 1 1 Selection plunger 70 poppet spring 71 O ring seal 69 and poppet screw 68 into front case half 45 a Tighten Poppet screw to 15 N m 11 lbs ft 2 Speed sensor and O ring to the pump housing 8 Sensor ...

Page 846: ...Encoder Motor Bolts 18 13 Fill and Drain Plugs 47 35 Front Output Yoke Nut 149 110 Input Shaft Bearing Retainer Bolts 19 14 Mainshaft Extension Housing Bolts 31 23 Poppet Screw 15 11 Pump Housing Bolts 31 23 Shift Selector Lever Nut 31 23 Shift Selector Vacuum Switch 24 17 Vehicle Speed Sensor 31 23 LUBRICATION SPECIFICATIONS Capacity 1 18L 1 25 qts Type Recommended Dexron HE Automatic Transmissio...

Page 847: ...NDLE 8 BEARING INSTALLER 3 BEARING REMOVER 9 BEARING INSTALLER 4 BEARING REMOVER 10 SEAL INSTALLER 5 OUTPUT SHAFT BEARING REMOVER 11 EXTENSION HOUSING SEAL INSTALLER 6 ADAPTER 12 BEARING INSTALLER 7 BEARING INSTALLER 13 BEARING REMOVER V2831 ...

Page 848: ...NOTES ...

Page 849: ...41 is a part time four wheel drive unit Torque input in four wheel high and low ranges is undif ferentiated The range positions are selected by a floor mounted gearshift lever The Model 241 has a two piece aluminum case con taining front and rear output shafts two drive sprockets a shift mechanism and a planetary gear assembly The drive sprockets are connected and operated by the drive chain The p...

Page 850: ...ring seal 47 3 Speedometer sensor 9 and O ring seal 85 4 Poppet screw 68 O ring seal 69 poppet spring 71 and poppet plunger 70 MAINSHAFT EXTENSION AND OIL PUMP HOUSING Remove or Disconnect Figures 3 and 4 1 Rear extension housing bolts 3 and rear exten sion 4 2 Bearing retainer snap ring 5 from the mainshaft 19 3 Pump retainer housing bolts 7 Pump retainer bolts are shouldered 4 Pump retainer hous...

Page 851: ...ont case half 45 10 Retainer ring snap ring 41 from input gear 38 11 Bearing retainer snap ring 39 12 Planetary carrier 36 and input gear 38 from the annulus gear using a soft faced hammer 13 Input bearing 40 from the front case half 45 using J 36370 and J 8092 A Snap ring 87 B Carrier lock ring 78 C Thrust washer 37 14 Drive sprocket bearings 82 from drive sprocket 20 using J 29369 1 and J 2619 0...

Page 852: ......

Page 853: ...r 39 Retainer Snap Ring 40 Input Bearing 41 Retainer Snap Ring 42 Input Bearing Retainer Seal 43 Input Retainer Bolt 44 Input Bearing Retainer 45 Front Case Half 46 4WD Actuator Switch 47 O Ring Seal 48 Shift Rail 49 Pads 4 50 Pads Center 2 51 Range Shift Fork 52 Fork Shift Spring 53 Mode Shift Fork Pin 54 Mode Shift Fork 55 Sector With Shaft 56 Bushings 2 57 Range Fork Pin 58 Chain 59 Retainer Sn...

Page 854: ...izer Assembly F5391 65 63 51 Range Fork 52 Mode Fork Spring 54 Mode Fork 55 Sector With Shaft 63 Shift Lever Nut 65 Lever F5389 Figure 5 Mode Fork and Shaft Assembly Figure 6 Shift Rail Assembly 12 Oil Pump 17 Rear Case Half 18 Oil Pump Tube 35 Oil Filter if mtv c c ta F5390 ...

Page 855: ...excessive wear 8 Synchronizer hub and sleeve for cracks chips spalling or excessive wear 9 Pads on mode fork and range fork for wear and distortion 10 Oil pump gears and case halves for wear spalling cracks and damage Replace complete assembly if there is wear 11 Input gear planetary carrier and range shift hub tooth chamfers for excessive wear 4 ASSEMBLY BEARING AND SEAL REPLACEMENT Install or Co...

Page 856: ...ERNAL COMPONENTS Assemble Figures 15 through 19 1 Spring retainers 32 to the synchronizer hub 31 2 Synchronizer hub 31 to the synchronizer sleeve 29 along with the three struts 30 Align the previously scribed marks 3 Main drive synchronizer stop ring 28 to the syn chronizer sleeve 29 4 Install or Connect N O T IC E F o r s te p s 6 8 22 a n d 26 re fe r to N o tic e o n p a g e 7D 2 1 1 Drive spro...

Page 857: ...t 22 and chain 58 are installed into the front case half as a unit 13 Driven gear retainer snap ring 23 to front output shaft 21 14 Mode shift fork 54 onto shift rail 48 15 Mode shift fork assembly 54 through the range shift fork 51 onto the synchronizer sleeve and into the front case half 45 16 Fork shift spring 52 to the shift rail 48 17 Oil pump pickup tube 18 oil tube connector 26 and pump pic...

Page 858: ...pump housing bolts Pump bolts 7 are shouldered 25 Output bearing retainer snap ring 5 to the main shaft 19 26 Rear extension housing 4 and extension bolts 3 to the pump retainer housing 8 Apply RTV GM P N 1052366 to the mating surfaces Apply Loctite 242 or GM P N 12345382 to the extension housing bolts S XTighten Bolts to 31 N m 23 lbs ft EXTERNAL COMPONENTS n Install or Connect Figures 3 and 4 N ...

Page 859: ...17 Rear Case Half 18 Oil Pump Pick Up Tube 26 Connector Dowel Pin Location Pump Pick Up Screen F5434 ...

Page 860: ...F5435 ...

Page 861: ... O Ring Seal 23 Retainer Snap Ring 72 Front Output Shaft Seal 24 Front Output Rear Bearing 73 Deflector 27 Washer 74 Front Out Flange 28 Main Drive Synchronizer Stop Ring 75 Rubber Sealing Washer 29 Synchronizer Sleeve 76 Washer 30 Strut 77 Front Output Flange Nut 31 Synchronizer Hub 78 Carrier Lock Ring 32 Spring Retainer 79 Oil Pump Screw 33 Dowel 83 Mode Synchronizer Hub Snap Ring 34 Range Shif...

Page 862: ...373 1 SLIDE HAMMER 2 DRIVER HANDLE 3 BEARING REMOVE 4 OUTPUT SHAFT BEARING REMOVER 5 OUPUT SHAFT BEARING REMOVER 6 SLIDE HAMMER 7 BEARING INSTALLER REMOVER 8 FRONT AND REAR OUTPUT SHAFT BEARING INSTALLER 9 DRIVER SPROCKET NEEDLE BEARING INSTALLER 10 INPUT GEAR NEEDLE BEARING INSTALLER 11 INPUT GEAR BALL BEARING INSTALLER V2832 ...

Page 863: ...ansfer case is a chain driven four position unit It provides four wheel drive high and low ranges a two wheel high range and a neutral posi tion This model is a part time four wheel drive unit Torque input in four wheel high and low range is undif ferentiated The range positions are selected by a floor mounted shifter The case is a two piece aluminum case containing front and rear output shafts tw...

Page 864: ...inshaft through the synchronizer Torque is transmitted through the drive sprocket to the driven sprocket by the connecting drive chain Since the front output shaft is splined to the driven sprocket torque flows through the front output shaft to the front propeller shaft and axle resulting in high range four wheel drive In 4LO range the path of torque through the transfer case is exactly the same a...

Page 865: ...to the case 1 Oil pump 12 pickup tube 18 O ring 14 and pump pickup filter 35 from the rear case half fig ure 5 2 Fork shift spring 3 Mainshaft 19 chain 58 and driven sprocket 22 from the front case half 45 as a unit Mode shift fork 54 and shift rail 48 will be removed with the mainshaft 4 Retainer snap ring 83 from the mainshaft 19 5 Synchronizer assembly 81 6 Drive sprocket 20 from the mainshaft ...

Page 866: ......

Page 867: ...hift Fork 55 Sector With Shaft 56 Bushing 57 Range Fork Pin 58 Chain 59 Retainer Snap Ring 61 Front Output Bearing 62 Annulus Gear 63 Shift Lever Nut Prev Torque 64 Washer 65 Shift Lever 66 Washer Plastic 67 O Ring Seal 68 Poppet Seal 69 O Ring Seal 70 Selection Plunger 71 Poppet Spring 72 Front Output Shaft Seal 73 Deflector 74 Front Output Yoke 75 Rubber Sealing Washer 76 Washer 77 Nut Front Out...

Page 868: ... Rear Case Half 18 Oil Pump Pickup Tube 35 Oil Filter F5851 Figure 5 Oil Pump Pickup Tube and Screen 48 Shift Rail 51 Range Fork 52 Mode Fork Spring 54 Mode Fork 55 Sector With Shaft 63 Shift Lever Nut 65 Lever F5389 ...

Page 869: ... Synchronizer hub and sleeve for cracks chips spalling or excessive wear 9 Pads on mode fork and range fork for wear and distortion 10 Oil pump gears and case halves for wear spalling cracks and damage Replace complete assembly if there is wear 11 Input gear planetary carrier and range shift hub tooth chamfers for excessive wear ASSEMBLY BEARING AND SEAL REPLACEMENT Install or Connect Figures 10 t...

Page 870: ... Main drive synchronizer stop ring 28 to the syn chronizer sleeve 29 and the synchronizer hub 31 4 Drive sprocket 20 to mainshaft 19 5 Synchronizer assembly to mainshaft 19 6 Snap ring 83 to mainshaft Installation Figure 12 Front Output Shaft Seal Installation Install or Connect Figures 3 and 4 N O T IC E F o r s te p s 3 5 15 17 a n d 19 re fe r to N o tic e o n p a g e 7D 3 1 1 Planetary input g...

Page 871: ...eeve 31 Synchronizer Hub 48 Shift Rail 54 Mode Fork F5432 Figure 14 Synchronizer Hub Assembly and Mode Fork N O T IC E D o n o t d a m a g e th e O rin g d u rin g a s s e m b ly a s th is c o u ld re s u lt in p u m p failu re 13 Oil pump 12 to the oil pump pickup tube 18 Apply RTV sealer GM P N 1052366 to the case mating surfaces 14 Rear case 17 over mainshaft 19 and onto the front case half 45 ...

Page 872: ... 31 N m 23 lbs ft EXTERNAL COMPONENTS Install or Connect Figures 3 and 4 N O T IC E F o r s te p s 1 th ro u g h 4 re fe r to N o tic e o n p a g e 7D 3 1 1 Selection plunger 70 poppet spring 71 O ring seal 69 and poppet screw 68 into front case half 45 Poppet screw to 15 N m 11 lbs ft 2 Speedometer sensor and O ring to the pump hous ing 8 Sensor to 31 N m 23 lbs ft 3 Vacuum switch 46 and O ring 4...

Page 873: ...9 110 Input Shaft Bearing Retainer Bolts 19 14 Mainshaft Extension Housing Bolts 31 23 Poppet Screw 15 11 Pump Housing Bolts 31 23 Shift Selector Lever Nut 31 23 Shift Selector Vacuum Switch 24 17 Vehicle Speed Sensor 31 23 LUBRICATION SPECIFICATIONS Capacity 1 18L 1 25 qts Type Recommended Dexron HE Automatic Transmission Fluid T2541 ...

Page 874: ...NDLE 8 BEARING INSTALLER 3 BEARING REMOVER 9 BEARING INSTALLER 4 BEARING REMOVER 10 SEAL INSTALLER 5 OUTPUT SHAFT BEARING REMOVER 11 EXTENSION HOUSING SEAL INSTALLER 6 ADAPTER 12 BEARING INSTALLER 7 BEARING INSTALLER 13 BEARING REMOVER V2831 ...

Page 875: ...k in g c o m p o u n d w ill b e c a lle d o ut T h e c o rre c t to rq u e v a lu e m u s t b e u s e d w h e n in s ta llin g fa s te n e rs th a t re q u ire it If th e a b o v e c o n d itio n s a re n o t fo llo w e d p a rts o r s y s te m d a m a g e c o u ld re su lt CONTENTS SUBJECT PAGE General Description 7D4 2 4401 Transfer C ase 7D4 2 Identification 7D4 2 Power Flow 7D4 2 Disassembly ...

Page 876: ...date The information on this tag is neces sary for servicing information If the tag is removed or becomes dislodged during service operations be sure to keep the identification tag with the unit POWER FLOW In all drive range positions input torque is transmitted to the transfer case gear train through the transfer case input gear figure 3 In 2HI range torque flows from the input gear to the range ...

Page 877: ...alves Note these are self tapping screws and aluminum shavings are common upon removal 5 Rear case half 46 from the front case half 31 Using a suitable tool pry between the two pry bosses to separate the case halves 6 Clutch coil wire connector 5 from the clutch coil wire figure 7 7 Clutch coil nuts 6 from the clutch coil assembly 7 figure 7 8 Clutch coil 7 from the rear case half 46 9 Shift rail ...

Page 878: ...F9167 ...

Page 879: ...pring 40 Front Output Bearing Snap Ring 42 Front Output Shaft Seal 43 Front Input Bearing Snap Ring 44 Front Input Bearing 45 Rear Output Bearing 46 Rear Case 47 Rear Output Shaft Seal 48 Shift Lever 49 Detent Roller 50 Rear Bearing Retainer 51 Synchronizer Hub and Snap Ring 52 Lockup Hub 53 Compression Spring 54 Lock Up Collar 55 Synchronizer Hub 56 Flat Washer 57 Rubber Sealing Washer 58 Front O...

Page 880: ... I T t r 4 REAR OUTPUT OUTPUT BEARING SNAP RING 23 MAINSHAFT F6602 Figure 6 Removing the Output Bearing Snap Ring 5 Clutch Coil Wire Connector 6 Clutch Coil Nut F6603 ...

Page 881: ...Coil Housing Snap Ring 11 Clutch Coil Housing 23 Mainshaft F6604 Figure 8 Removing the Clutch Coil Housing 15 FrontOutput Shaft Snap Ring 16 FrontOutput Shaft 17 Flat Washer F6606 Figure 10 Removing the Front Output Shaft Snap Ring ...

Page 882: ...16 FrontOutputShaft 18 DrivtQNr 19 DrivenGm t 20 DriveChain 22 FrontOutputBearing V2836 ...

Page 883: ...y 25 InputCarrierAMwmbly 26 OilPumpPickup V2837 Figure 12 Removing the Mainshaft and Oil Pump 30 AnnulusGear Snap Ring 31 FrontCase 32 AnnulusGear F6610 Figure 14 Removing the Annulus Gear Snap Ring 31 FrontCase 32 AnnulusGear F6616 ...

Page 884: ...napRing F6617 Figure 16 Removing the Carrier Assembly Snap Ring 25 InputCarrierAssembly 35 PowerTakeOff Drive Gear F6618 36 36 Retainer Clip 37 Sector Shaft 38 Cam 39 Detent 48 Shift Lever 49 Detent Roller F7657 Figure 18 Sector and Shaft Assembly ...

Page 885: ...iner bolts 63 and oil pump retainer 69 from the oil pump rear cover 64 figure 25 2 Oil pump body 66 and pickup tube assembly from the mainshaft 23 3 Oil pump pins 67 and oil pump spring 68 from the mainshaft 23 Snap Ring 51 Synchronizer Hub Snap Ring 52 Lockup Hub Assembly 53 Compression Spring 54 Lockup Collar F6624 Figure 24 Synchronizer Hub Assembly 4 Oil pump front cover 70 from the mainshaft ...

Page 886: ...shaft 26 Strainer 63 Oil Pump Retainer Bolts 64 Oil PumpRearCover 66 Oil PumpHousing 67 Oil PumpPins 68 Oil PumpSpring 69 Oil PumpRetainer 70 Oil Pump FrontCover 71 PickupTube RetainerClip 72 PickupTube V1074 ...

Page 887: ...lines for excessive wear spalling cracks distortion or corrosion 5 Retainer rings for excessive wear distortion or damage 6 Case halves for damaged or warped mating sur faces cracks porosity or damaged thread holes 7 Synchronizer assembly for cracks chips spalling or excessive wear 8 Synchronizer hub and sleeve for cracks chips spalling or excessive wear 9 Pads on the mode fork and the range fork ...

Page 888: ...Inspect I Oil pump operation on the mainshaft The main shaft must turn freely within the oil pump If binding occurs loosen the four bolts and retor que SYNCHRONIZER HUB ASSEMBLY Assemble Figure 24 1 Compression spring 53 to the lockup collar 54 2 Lockup hub 52 compressing the compression spring 53 3 Synchronizer hub snap ring 51 INTERNAL COMPONENTS Install or Connect Figures 10 through 26 N O T IC...

Page 889: ... 6 to 10 N m 89 lbs in 29 Clutch coil wire through the rear case and clutch coil wire connector 5 to the clutch coil wire 30 RTV sealer GM P N 1052366 to the case sealing surfaces and the rear case half 46 to the front case half 31 31 Case bolts 62 to the case halves St Tighten Case bolts 62 to 31 N m 23 lbs ft 32 A new speedometer tone wheel 1 to the main shaft 23 using J 5590 Important The speed...

Page 890: ...F9168 ...

Page 891: ...t Bearing 58 Front Output Flange 23 Mainshaft 59 Speedometer Pick up Switch 24 Oil Pump Assembly 60 Four Wheel Indicator Switch 25 Input Carrier Assembly 61 Rear Bearing Retainer Bolts 28 Range Fork 62 Case Screw 29 Shift Hub 63 Oil Pump Retainer Bolts 30 Annulus Gear Snap Ring 75 Rear Output Yoke Nut 31 Front Case 76 Front Output Flange Nut 32 Annulus Gear 33 Mainshaft Front Oil Seal 34 Carrier A...

Page 892: ...32 J 37668 7 8 9 10 J 8092 J 5590 J 29369 1 J 2619 01 1 Bearing and Gear Puller 2 Puller 3 Snap Ring Pliers 4 Bearing Remover Installer 5 Bearing Remover Installer 6 Seal Installer 7 Driver Handle 8 Installer 9 Output Shaft Bearing Remover 10 Slide Hammer F7663 ...

Page 893: ...BW4472 Transfer Case 7D5 1 Identification 7D5 2 Power Flow 7D5 2 Disassembly 7D5 3 External Components 7D5 3 Internal Components 7D5 3 Bearings and Seals 7D5 7 Cleaning and Inspection 7D5 8 Assembly 7D5 8 Specifications 7D5 12 Fastener Tightening Specifications 7D5 12 Lubrication Specification 7D5 12 Special Tools 7D5 12 GENERAL DESCRIPTION BW4472 TRANSFER CASE The BW4472 is a three piece aluminum...

Page 894: ... is transmitted through the input shaft to the planet carrier assembly Torque flow continues through the ring gear to the rear output shaft Torque is trans mitted from the planet carrier assembly to the sun gear shaft which is splined to the drive sprocket The drive gear is connected to the driven sprocket by the drive chain Torque continues through the driven sprocket to the front output shaft fl...

Page 895: ... Sun gear shaft 18 sun gear shaft bearing 33 drive sprocket spacer 16 drive sprocket 17 vis cous clutch 20 and sun gear shaft thrust washer 21 as an assembly from the planet carrier assembly 22 6 Planet carrier assembly 22 and the planet carrier assembly thrust washer 23 from the output shaft assembly 24 7 Extension housing bolts 25 from the extension housing 8 6 Speed Sensor Bolt 7 Speed Sensor 8...

Page 896: ...put Shaft 20 Viscous Clutch 21 Sun Gear Shaft Thrust Washer 22 Planet Carrier Assembly 23 Planet Carrier Assembly Thru 24 Output Shaft Assembly 25 Extension Housing Bolts 27 Output Shaft Bearing Snap F 28 Output Shaft Bearing 29 Gear Ring Snap Ring 30 Gear Ring 31 Front Output Shaft Oil Seal 32 Input Shaft Oil Seal 33 Sun Gear Shaft Bearing 34 Output Shaft Bearing Snap F 35 Output Shaft Bearing 36...

Page 897: ...6 27 28 29 30 31 32 33 34 35 36 37 38 39 40 41 Input Shaft Viscous Clutch Sun Gear Shaft Thrust Washer Planet Carrier Assembly Planet Carrier Assembly Thrust Washer Output Shaft Assembly Extension Housing Bolts Breather Assembly Output Shaft Bearing Snap Ring Output Shaft Bearing Ring Gear Snap Ring Ring Gear Front Output Shaft Oil Seal Input Shaft Oil Seal Sun Gear Shaft Bearing Output Shaft Bear...

Page 898: ...rocket 17 Drive Sprocket 19 Input Shaft 20 Viscous Clutch 30 Gear Ring 33 Sun Gear Shaft Bearing F7566 24 Output Shaft Assembly 27 Output Shaft Bearing Snap Ring 28 Output Shaft Bearing 37 Speedometer Tone Wheel 42 Oil Scoop F7568 Figure 8 Removing the Output Shaft Rear Bearing ...

Page 899: ... bearing 35 from the front cover 11 using J 2619 01 and J 29369 1 figure 11 5 Output shaft oil seal 36 from the extension hous ing 8 6 Using J 22912 01 press the sun gear shaft bearing 33 from the sun gear shaft 18 Remove the drive sprocket spacer 16 drive sprocket 17 and the viscous clutch 20 from the sun gear shaft 18 7 Input shaft pilot bearing 38 from the output shaft assembly 24 using J 23907...

Page 900: ...luid or GM P N 9985286 Assemble Figures 12 through 17 1 Viscous clutch 20 drive sprocket 17 drive sprocket spacer 16 and the sun gear shaft bear ing 33 onto the sun gear shaft 18 figure 12 2 Input shaft pilot bearing 38 into the output shaft assembly 24 using J 7079 2 and J 38212 figure 13 3 Output shaft assembly 24 to the gear ring 30 4 Gear ring snap ring 29 to the gear ring 30 fig ure 14 5 Outp...

Page 901: ...ront Cover 34 Output Shaft Bearing Snap Ring 35 Output Shaft Bearing F7606 Figure 16 Installing the Front Output Shaft Front Bearing Snap Ring 10 10 Rear Case Half 39 Output Shaft Rear Bearing F7607 Figure 17 Installing the Front Output Shaft Rear Bearing 6 Output shaft oil seal 36 to the extension housing 8 using J 37668 Align the water drain hole in the output shaft oil seal 36 with the drain gr...

Page 902: ...sembly into the planet carrier assembly planet gears 22 and align the viscous clutch teeth 20 to the ring gear spline 30 figure 22 30 22 7 2 3 21 Sun Gear Shaft Thust Washer 22 Planet Carrier Assembly 23 Planet Carrier Assembly Thrust Washer 30 Gear Ring F7611 Figure 21 Installing the Planet Carrier Assembly 11 Input shaft 19 into the input shaft pilot bearing 38 aligning the input shaft with the ...

Page 903: ...olts 9 to the rear case half 10 4 Output Shaft 12 Front Output Shaft Spacer F7636 Figure 24 Installing the Front Output Shaft Spacer Tighten Front cover bolts 9 to 42 N m 30 ft lbs 19 Front output shaft oil seal 31 to the front cover 11 using J 37668 20 Input shaft oil seal 32 using J 38216 21 Front output flange 5 to the front output shaft 4 figure 25 22 Rubber sealing washer 3 steel flat washer ...

Page 904: ... Dexron HE Automatic Transmission Fluid T2380 SPECIAL TOOLS J 22912 01 J 23907 J 2619 01 7 8 9 J 37668 J 38216 P sa GM P N 1052366 4 J 29369 1 J 7079 2 10 11 J 38427 J 38423 J 38212 12 K ra re i m J 8092 1 BEARING REMOVER 2 PULLER 3 SLIDE HAMMER 4 OUTPUT SHAFT BEARING REMOVER 5 DRIVER HANDLE 6 NEEDLE BEARING INSTALLER 7 SEAL INSTALLER 8 SEAL INSTALLER 9 RTV 10 FRONT OUTPUT SHAFT REAR BEARING REMOV...

Page 905: ...roviding four wheel drive high and low ranges a two wheel high range and a neutral position The BW4470 is a part time four wheel drive unit Torque input in four wheel drive is undifferentiated The range positions are selected by a floor mounted gear shift lever The unit has a gear reduction ratio of 2 69 1 The BW4470 has a three piece aluminum case with provisions for a power take off PTO and uses...

Page 906: ...auses the input gear to rotate the planetary pinions inside the annulus gear causing the planetary carrier range shift hub and mainshaft to rotate at a gear reduction of 2 69 1 DISASSEMBLY EXTERNAL COMPONENTS jH Clean The transfer case using solvent and a stiff brush k Remove or Disconnect Figures 1 2 and 3 1 Front output flange nut 76 flat washer 56 rub ber sealing washer 57 and the front output ...

Page 907: ...17 Shift rail 9 range fork 28 and shift hub 29 from the input carrier assembly 25 figure 13 18 Annulus gear snap ring 30 from the front case 31 figure 14 19 Annulus gear 32 from the front case 31 figure 15 20 Input shaft front oil seal 33 from the front case 31 21 Carrier assembly snap ring 34 from the carrier assembly input shaft 25 figure 16 22 Input carrier assembly 25 and power take off drive ...

Page 908: ......

Page 909: ...pring 40 Front Output Bearing Snap Ring 42 Front Output Shaft Seat 43 Front Input Bearing Snap Ring 44 Front Input Bearing 45 Rear Output Bearing 46 Rear Case 47 Rear Output Shaft Seal 48 Shift Lever 49 Detent Roller 50 Rear Bearing Retainer 51 Synchronizer Hub and Snap Ring 52 Lockup Hub 53 Compression Spring 54 Lock Up Collar 55 Synchronizer Hub 56 Flat Washer 57 Rubber Sealing Washer 58 Front O...

Page 910: ...4 REAR OUTPUT OUTPUT BEARING SNAP RING 23 MAINSHAFT F6602 Figure 6 Removing the Output Bearing Snap Ring 5 Clutch Coil Wire Connector 6 Clutch Coil Nut F6603 ...

Page 911: ...Coil Housing Snap Ring 11 Clutch Coil Housing 23 Mainshaft F6604 Figure 8 Removing the Clutch Coil Housing 15 FrontOutput Shaft Snap Ring 16 FrontOutput Shaft 17 Flat Washer F6606 Figure 10 Removing the Front Output Shaft Snap Ring ...

Page 912: ...9 Driven Gear 20 Drive Chain 66 Oil Pump Body 70 Oil Pump Cover F6607 Figure 11 Removing the Drive Chain 23 Mainshaft 24 Oil Pump Assembly 25 Input Carrier Assembly F6608 9 Shift Rail 28 Range Fork 29 Shift Hub F6609 ...

Page 913: ...30 Annulus Gear Snap Ring 31 FrontCase 32 AnnulusGear F6610 Figure 14 Removing the Annulus Gear Snap Ring 31 Front Case 32 AnnulusGear F6616 Ring 25 inputCarrierAssembly 35 PowerTakeOff Drive Gear F6618 ...

Page 914: ...J 2619 01 46 Rear Case 85 Front Output Shaft Rear Bearing F7659 Figure 21 Removing the Front Output Shaft Rear Bearing ...

Page 915: ... and sleeve for cracks chips spalling or excessive wear 9 Pads on the mode fork and the range fork for wear or distortion 10 Oil pump gears housing and mainshaft for wear spalling cracks and damage Replace complete assembly if there is wear 11 Input gear planetary carrier and range shift hub tooth chamfers for excessive wear ASSEMBLY During assembly of the transfer case lubricate all necessary par...

Page 916: ...3832 6 Front input bearing snap ring 44 to the front case 31 using J 8092 and J 29169 figure 27 7 Front input bearing snap ring 43 to the front case 31 8 Sector 38 detent spring 39 and detent roller 49 to the front case 31 figure 18 9 Sector shaft 37 through the case and align with spline on the sector 38 10 Retainer clip 36 to the sector shaft 37 11 Power take off drive gear 35 and the input carr...

Page 917: ... th e E C M If it is re m o ve d it m u s t b e re p la c e d w ith a n e w p a rt a n d th e o ld p a r t s h o u ld b e d is c a rd e d U s e ca re n o t to d a m a g e it u p o n in s ta lla tio n 32 A new speedometer tone wheel 1 to the main shaft 23 using J 5590 EXTERNAL COMPONENTS Install or Connect N O T IC E F o r s te p s 2 th ro u g h 6 re fe r to N o tic e o n p a g e 7D 6 1 1 RTV seale...

Page 918: ...s 2 5 22 Speed Sensor Bolt 16 12 Vent 14 120 Yoke Nut Rear Output 170 125 LUBRICATION SPECIFICATIONS Capacity 3 1 L 3 3 q Type Recommended Dexron HE Automatic Transmission Fluid T2689 SPECIAL TOOLS 1 2 3 4 5 J 22912 01 J 8433 4 J 29169 J 33832 J 37668 6 7 J 8092 J 5590 J 29369 1 J 2619 01 1 Bearing and Gear Puller 2 Puller 3 Bearing Remover Installer 4 Bearing Remover Installer 5 Seal Installer 6 ...

Page 919: ......

Reviews: