background image

29

Intelect Transport® Combo Therapy System

6.1 SEPARATING TOP & BOTTOM


A. Part Numbers

   Top 

 ............................................................................ 27552

   Base 

 ......................................................................... 27983


B. Tools & Equipment Required

#1 Phillips Screwdriver

Flat Blade Screwdriver


C. Removing Top from Bottom


  1. Place system face down on a soft work 


surface.


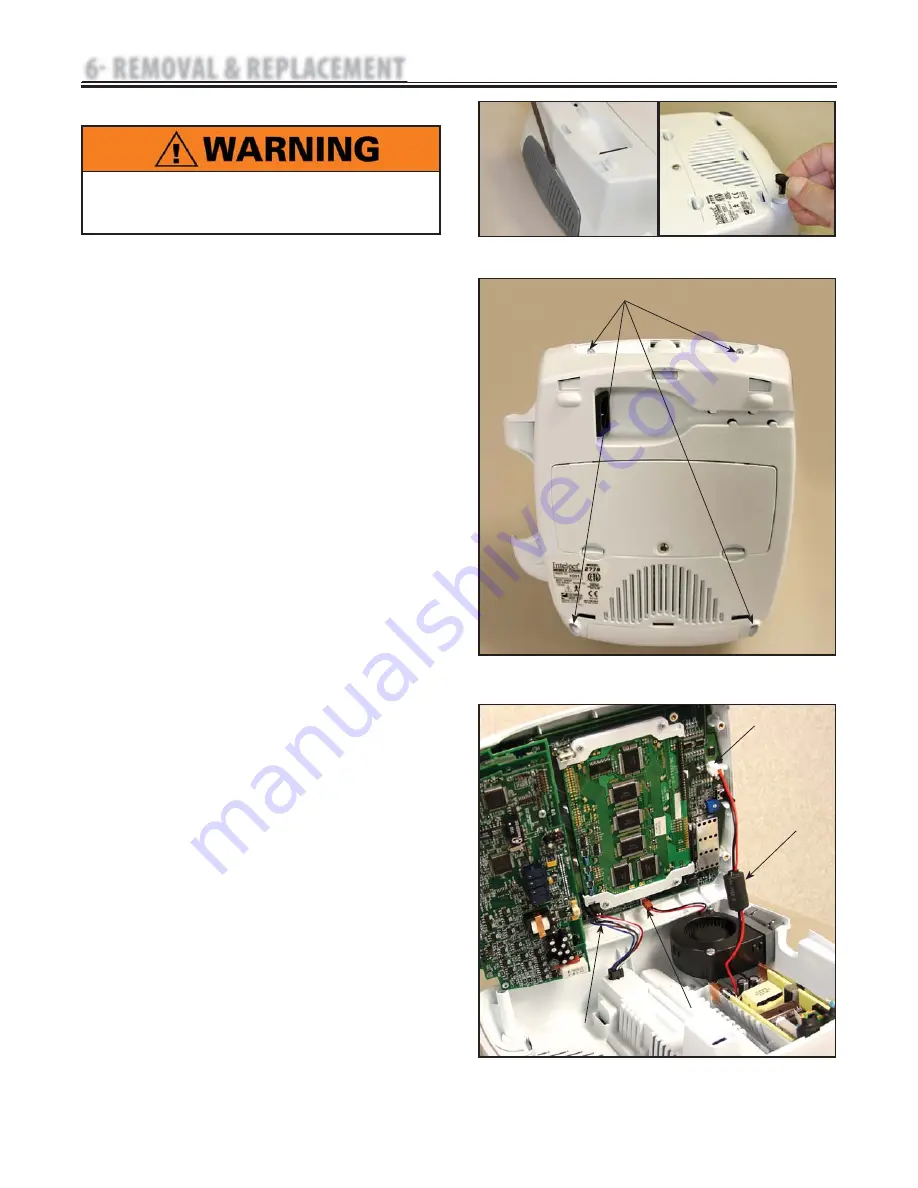
  2. Remove Lower Front Feet and Rear Fan Grill. 


    Use a Flat Blade Screwdriver to gently pry  


    the Fan Grill free. 

See Figure 6.1.


  3. Using a #1 Phillips remove the four mounting 


    screws securing the Top and Bottom together. 


See Figure 6.2.


  4. Turn system over on its feet and carefully 


    separate the System Top from the Bottom 


Housing.


  5. Raise the system Top and disconnect the Fan, 


    Power Supply, and Battery Harnesses from 


    the Control Board.

 See Figure 6.3.


6. Put the unit back together by reversing 

steps  


    1 through 5

.


 NOTE:


When assembling the unit, tuck the Ferrite 


    Bead between the power supply and the 


case.

 See Figure 6.3

FIGURE 6.1

FIGURE 6.2

FIGURE 6.3

REMOVE 4 SCREWS

POWER SUPPLY

CONNECTOR

Unplug the unit from the power source before 
attempting removal or replacement procedures to 
prevent electrical shock.

6 REMOVAL & REPLACEMENT

FAN

CONNECTOR

BATTERY

CONNECTOR

FERRITE BEAD

Summary of Contents for 2738

Page 1: ...ISO 13485 CERTIFIED Moving Rehabilitation Forward ...

Page 2: ......

Page 3: ... 17 5 4 Leakage Tests 17 5 5 Visual Inspection 18 5 6 Unit Startup and Fan Testing 18 5 7 Electrical Stimulator Test System Setup 19 5 8 Interferential Mode Test 20 5 9 Premodulated Mode Test 20 5 10 Russian Mode Test 21 5 11 High Voltage Pulsed Current HVPC Mode Test 22 5 12 Ultrasound Tests 23 28 5 13 Ultrasound Applicator Identification Test 23 5 14 Ultrasound Applicator Output Test 24 5 15 Ultr...

Page 4: ...periodic changes and improvements to their equipment and documentation without any obligation on the part of Chattanooga Group As significant changes occur to the Intelect Transport Combo Therapy System service bulletins may be made available on our web site chattgroup com in lieu of reprinted manuals Technicians repairing the Intelect Transport Combo Therapy System agree to assume all risk and li...

Page 5: ...ical Equipment DO NOT use sharp objects such as a pencil point or ballpoint pen to operate the buttons on the control panel This unit should be operated transported and stored in temperatures between 15 C and 40 C 59 F and 104 F with relative humidity ranging from 30 60 and where the atmospheric pressure is between 950 h Pa and 1050 h Pa The Intelect battery pack is designed for use only with Chat...

Page 6: ...er water when setting intensity Use ample conductive gel to ensure good coupling throughout the treatment If needed apply when setting intensity Be sure to read all instructions for operation before treating a patient Dispose of all products in accordance with local and national regulations and codes Use of controls adjustments or performance of procedures other than those specified herein may res...

Page 7: ... the patient Do not apply the Ultrasound Applicator to the patient during the Head Warming period Applicator must remain in Applicator Hook during the Head Warming period Use only accessories that are specially designed for this unit Do not use accessories manufactured by other companies on this unit Chattanooga Group is not responsible for any consequence resulting from using products manufacture...

Page 8: ...e is generated 2 5 ULTRASOUND BOARD AND APPLICATOR The Ultrasound Board generates the 1 or 3 3 MHz output to drive the Sound Head of the Applicator The Ultrasound Board is accessed through the proprietary bus by the Control Board It can provide current and voltage information about the ultrasound output of the board The calibration data for the Sound Head is passed through the Ultrasound Board fro...

Page 9: ... service to the Intelect Transport Combo System FIGURE 3 1 3 NOMENCLATURE 3 1 COMPONENTS AND CONTROLS Power On Off LCD TIME Clinical Library Back STOP Down Arrow PAUSE Accessory Panel Parameter Display Enter START INTENSITY Up Arrow LCD Intensity Contrast Dial Channel 1 Lead Wire Connection Channel 2 Lead Wire Connection Sound Head LED Indicator Output Power Applicator Ultrasound Applicator Connec...

Page 10: ...r Down arrow buttons to set total treatment time of therapy Back Use this button to return to the previous window STOP Select this button to stop a treatment session Down Arrow When the window displays a list of options press the Down Arrow button to scroll down the list PAUSE Use this button to pause the treatment session To restart therapy press the PAUSE button Sound Head The aluminum face of t...

Page 11: ...s press the Up Arrow button to scroll up the list Battery Indicator When displayed on the LCD this symbol indicates the battery pack option is present on the unit This symbol also displays the charge status of the battery LCD Intensity Contrast Dial If the intensity of the LCD display diminishes turn the dial until the display contrast is optimal Charge Indicator This symbol displays when the unit...

Page 12: ...ht 7 250 in 18 4 cm Depth 11 5 in 29 2 cm Weight StandardWeight with base 5 07 lb 2 3 kg Battery Pack 1 87 lb 0 85 kg Power Input 100 240VAC 50 60 Hz 100VA Output 24V 3 125 A Electrical Class CLASS I Electrical Type UltrasoundTYPE B ElectrotherapyTYPE BF BatteryType Nickel Metal Hydride NiMH 1 2V x 20 size AA Operating Environment Temperature Between 59 F and 104 F 15 C and 40 C Relative Humidity ...

Page 13: ...c 1 sec 2 sec 5 sec 2 sec Display Peak Current or Volts Volts Sweep Off 80 120 pps 1 120 pps 1 10 pps Off Frequency 10 120 pps 100 pps Cycle Time 5 5 4 12 10 10 10 20 10 30 10 50 and Continuous Continuous Constant Mode CV only CV Treatment Time 1 60 Minutes 20 min The specifications found in this section provide the necessary waveform specifications to aid in troubleshooting A waveform graphic fro...

Page 14: ...rent is distributed from one channel two electrodes The current intensity is modulated it increases and decreases at a regular frequency the Amplitude Modulation Frequency Output Mode Electrodes Amplitude 0 100 mA Carrier Frequency 2500 Hz 2500 Hz Ramp 2 sec 2 sec Display Peak Current or Volts Volts Sweep On 1 200 Hz On Cycle Time 5 5 4 12 10 10 10 20 10 30 10 50 and Continuous Continuous Beat Low...

Page 15: ...80Hz Beat High Frequency 2 200 Hz 150Hz Constant Mode CC or CV CC Treatment Time 1 60 minutes 20 min D Russian Figure 4 5 Factory Default Setting Russian Current is a sinusoidal waveform delivered in bursts or series of pulses This method was claimed by its author Kots to produce maximal muscle strengthening effects without significant discomfort to the patient Output Mode Electrodes Amplitude 0 1...

Page 16: ...tal 0 7 cm2 1 0 cm2 Treatment Time 1 30 Minutes Do not apply the Ultrasound Applicator to the patient during the Head Warming period Applicator must remain in Applicator Hook during the Head Warming period 4 3 INTELECT TRANSPORT COMBO THERAPY SYSTEM ULTRASOUND SPECIFICATIONS 4 SPECIFICATIONS This section provides the necessary Ultrasound Specifications to aid in troubleshooting Refer to these spec...

Page 17: ...ndChannelwasalreadyinuse UserattemptedtoselectCombotreatment butthe UltrasoundChannelwasalreadyinuse UserattemptedtoselectatwochannelElectrotherapy treatment butatleastoneofthetwostimchannelswere alreadyinuse Wait until Ultrasound treatment is completed or stop Ultrasound treatment and try again 106 WARNING Overcurrent Stimchannelhasexceededallowedcurrentlevelandthe treatmenthasbeenstopped Reset t...

Page 18: ...rrordetectingStimBoardonPowerup 1 Replace appropriate Stim Board 2 Replace Control Board 302 CRITICALERROR NoUltrasound Board Critical Error Error detectingUltrasoundBoardonPowerup 1 Replace Ultrasound Board 2 Replace Control Board 303 CRITICALERROR EEPROMCritical Error ErrorreadingEEPROMonPowerup ReplaceControlBoard 304 305 306 307 308 309 CRITICALERROR CRITICALERROR CRITICALERROR CRITICALERROR C...

Page 19: ...ed by Chattanooga Group C Equipment Required Oscilloscope and Probes ESTI 2 Load Test Fixture Digital Multi meter Intelect Transport Applicators Accessories Dielectric Withstand Hi Pot and ground resistance tester NOTE Adjust Dielectric Withstand tester to indicate fault with 120 k Ohm Load across the output when at specified test voltage 1 2 3 1 2 3 Milliohm Meter 10k Resistor Ohmic Instruments U...

Page 20: ...ontinuity and dielectric withstand Hi Pot limits as prescribed by IEC EN UL Hi Pot limits as prescribed by IEC EN UL 60601 1 and CSA CAN 601 1 Medical Electrical 60601 1 and CSA CAN 601 1 Medical Electrical Part 1 General Requirements for Safety Part 1 General Requirements for Safety Facility local and national limits and test Facility local and national limits and test methods may vary methods ma...

Page 21: ...esults 1 Unit will not start unit failed test a Possible bad Main Power Switch b Possible bad Power Supply c Possible bad power outlet or Mains Power Cord 2 Screen does not display unit failed test a Contrast Control needs adjusting b Possible bad display c Possible bad Control Board d Possible bad Power Supply e Visually check power LED LED should illuminate Blue Turn system off with Power button...

Page 22: ...ce ESTI 2 Load Switch in the 1 K position See Figure 5 3 5 Install Power Cord into system and plug into proper Power Supply Turn system On NOTE The ESTI 2 Load Box part number 2757 is used to simulate patient resistance when testing waveforms The ESTI 2 is set up for both a 1K and 10K load The 10K load is used for Microcurrent only which is not available on this unit See Figure 5 4 FIGURE 5 2 FIGU...

Page 23: ...re 5 5 amplitude dropped to zero when paused and Paused displayed below timer Unit passed test 2 No waveform or considerably different waveform Unit failed test Replace appropriate Stim Board 3 Amplitude failed to zero when paused Unit failed test Replace appropriate Stim Board 4 Paused did not display when unit paused Unit failed test Replace appropriate Stim Board 5 9 PREMODULATED MODE TEST Set ...

Page 24: ...s Press the Enter button 8 Increase Intensity until 100 is displayed 9 Press START button 10 Compare waveform on scope to Figure 5 7 11 Verify that both Channels reach 100 12 Press STOP button 13 Highlight Channel 2 and repeat steps 4 through 12 B Russian Mode Test Results 1 Waveform is the same between scope and Figure 5 7 and amplitude reached 100 volts peak Unit passed test 2 No waveform or con...

Page 25: ...until Positive is displayed 9 Compare waveform form on scope to Figure 5 9 10 The numbers displayed for amplitude must not exceed 1 5 Amps See Figure 5 10 11 Press STOP button 12 Highlight Channel 2 13 Press the Enter button and repeat steps 3 through 12 B High Voltage Pulsed Current HVPC Mode Test Results 1 Waveforms on scope the same as Figures 5 8 and 5 9 Amps do not exceed 1 5 Unit passed test...

Page 26: ...licator installed turn unit on 2 View the Ultrasound channel in the lower right corner of screen It should read Unplugged See Figure 5 11 3 Connect Ultrasound Applicator into Applicator receptacle See Figure 5 12 Watch Applicator LED while connecting to system The LED should flash Green five times 4 Look at the Ultrasound channel It should read Available See Figure 5 12 5 Highlight Ultrasound Pres...

Page 27: ... Applicators used with the System being tested A Ultrasound Applicator Output Test Procedures 1 Set up Ohmic Instruments DT 100 or UPM DT 10 Ultrasound Power Meter per Operator s Instructions and fill test reservoir with Degassed Water 2 Place an Applicator into the Power Meter retainer Make certain the Sound Head is completely submerged in the degassed water and centered directly over the Stainle...

Page 28: ...ble use of Power Meter other than Ohmic Instruments DT 100 or UPM DT 10 Ultrasound Power Meter c Sound Head not leveled and centered over cone in power meter d Possible bad or out of calibration Applicator e Use known good Applicator f Check Ultrasound Board internal connections g Replace Ultrasound Board h Replace Control Board FIGURE 5 15 APPLICATOR OUTPUT SPECIFICATIONS APPLICATOR SIZE POWER SE...

Page 29: ...e Figure 5 17 9 Compare Power Meter reading to Figure 5 17 10 Press the STOP button 11 Highlight Duty Cycle and press the Enter button Highlight the next level of Duty Cycle and repeat steps 6 through 10 Repeat for remaining Duty Cycle levels 12 Highlight Frequency Press the Enter button until 3 3 MHz is displayed beside Frequency Repeat steps 4 through 11 FIGURE 5 16 FIGURE 5 17 5 TROUBLESHOOTING...

Page 30: ...ble bad degassed water in Power Meter b Possible use of Power Meter other than Ohmic Instruments DT 100 or UPM DT 10 Ultrasound Power Meter c Possible bad or out of calibration Applicator Retest with known good Intelect Transport Applicator d Possible bad internal connection at Ultrasound Board e Replace possible bad Ultrasound Board f Replace possible bad Control Board 5 TROUBLESHOOTING 5 15 ULTR...

Page 31: ...splayed beside Display 3 Highlight Waveform Press the Enter button 4 Press the Up or Down Arrow button until IFC is highlighted Press the Enter button 5 Highlight Edit Stim Press the Enter button Increase Intensity until Channel 1 reads 50 mA 7 Press START button 8 Touch the Ultrasound Applicator to the Combo Contact on the ESTI 2 Load Test Box The Combo Indicator on the ESTI 2 should illuminate S...

Page 32: ...ogether See Figure 6 2 4 Turn system over on its feet and carefully separate the System Top from the Bottom Housing 5 Raise the system Top and disconnect the Fan Power Supply and Battery Harnesses from the Control Board See Figure 6 3 6 Put the unit back together by reversing steps 1 through 5 NOTE When assembling the unit tuck the Ferrite Bead between the power supply and the case See Figure 6 3 ...

Page 33: ... Screws securing the Fan to the system Bottom See Figure 6 4 3 Remove the Fan Baffle from the Fan Housing See Figure 6 5 4 Replace the Fan by reversing steps 1 through 3 NOTE Do not over tighten the screws Over tightening will damage the threads of the brass standoffs FIGURE 6 4 REMOVE SCREWS FIGURE 6 5 REMOVE BAFFLE 30 6 REMOVAL REPLACEMENT Unplug the unit from the power source before attempting ...

Page 34: ...acitor to discard See Figure 6 8 5 Watch the Multi meter to verify that the voltage across the capacitor discharges close to zero volts DC 6 REMOVAL REPLACEMENT REMOVE SCREWS ALIGNMENT POSTS CAPACITOR C4 POWER SUPPLIES RETAIN HIGH VOLTAGE WHEN REMOVING FROM SYSTEM HANDLE POWER SUPPLIES BY MOUNTING BRACKETS ONLY FIGURE 6 6 FIGURE 6 7 FIGURE 6 8 Unplug the unit from the power source before attemptin...

Page 35: ...hrough 5 NOTE Apply new 1 2 Copper Tape part number 28152 to replace the tape removed in Step 8 of this procedure FIGURE 6 9 6 REMOVAL REPLACEMENT 6 3 POWER SUPPLY CONTINUED Unplug the unit from the power source before attempting removal or replacement procedures to prevent electrical shock REMOVE HARNESSES When replacing the shield on the Power Supply Verify that the foil CONDUCTIVE SIDE of the s...

Page 36: ...ector Pins on the board below during removal See Figure 6 11 4 Replace Channel 1 Stim Board in reverse order of preceding steps Make certain all Header Connector Pins are properly engaged See Figure 6 11 NOTE Do not over tighten the screws Over tightening will damage the threads of the brass inserts and Stand Offs 6 REMOVAL REPLACEMENT REMOVE SCREWS HEADER CONNECTOR PINS FIGURE 6 10 FIGURE 6 11 Un...

Page 37: ...ound Board aligning the 40 Pin Header with the 40 Pin Connector See Figure 6 14 7 Press the Channel 2 Stim Board into position until the board rests against the Ultrasound Board Stand Offs 8 Secure the Channel 2 Stim Board using the Stand Offs removed in part C step 3 above 9 Install the Channel 1 Stim Board Refer to 6 4 part C 10 Re assemble Top to Bottom Refer to 6 1 part C NOTE Do not over tigh...

Page 38: ...der to back of new Ultrasound Board Make certain it is completely seated against board See Figure 6 17 8 Position the Ultrasound Board over the Control Board aligning the 40 Pin Header with the 40 Pin Connector on Control Board See Figure 6 16 9 Press the Ultrasound Board into position until the board rests against the Control Board Stand Offs Verify that it is well seated by pushing on the sides ...

Page 39: ...uring the Control Board Assembly in position See Figure 6 19 7 Remove the four LCD Bracket Mounting Screws See Figure 6 21 8 While lifting on the lower end of the Control Board Assembly with one hand release the four Tabs securing the Control Board with the other to remove the Control Board from the system Top Two of the Tabs are located above the LCD and two below See Figures 6 19 and 6 20 6 REMO...

Page 40: ... 22 11 Position the new Control Board Assembly over the Alignment Tabs of the system Top Press the Control Board Assembly until the Alignment Tabs lock the Control Board into position 12 Reverse steps 1 through 10 to install the replacement Control Board NOTE Do not over tighten the Stand Offs or screws Over tightening will damage the threads of the brass inserts and Stand Offs 6 REMOVAL REPLACEME...

Page 41: ...to 6 4 part C 3 Remove Channel 2 Stim Board Refer to 6 5 part C 4 Remove Ultrasound Board Refer to 6 6 part C 5 Remove Control Board Refer to 6 7 part C steps 1 through 10 6 Once the LCD is removed from the Control Board per step 5 remove the LCD mounting bracket from both sides of the LCD See Figure 6 23 7 Replace the LCD by reversing the steps above NOTE Always install the LCD Brackets prior to ...

Page 42: ...rasound Board Refer to 6 6 part C 5 Remove Control Board Assembly Refer to 6 7 part C 6 Lift out Keymat Assembly or On Off Button Keymat See Figure 6 24 7 Replace the Keymat by reversing steps 1 through 6 NOTE Do not over tighten the Stand Offs or screws Over tightening will damage the threads of the brass inserts and Stand Offs 6 REMOVAL REPLACEMENT FIGURE 6 24 Unplug the unit from the power sour...

Page 43: ...e five slots shown in Figure 6 25 1 Remove the Plynth by applying pressure to center of the top or wide part of the Plynth When pressing lift the Plynth out the three slots at the top and then remove the Plynth from the two slots at the bottom Refer to 6 26 7 Replace the Plynth by reversing this procedure 6 REMOVAL REPLACEMENT FIGURE 6 25 6 10 PLYNTH FIGURE 6 26 PLYNTH MOUNTING SLOTS ...

Page 44: ...spolish com on the internet Follow the instructions as given by NOVUS on their product Do Not Use alcohol or chlorine based solvents as this may damage the lens 7 2 CALIBRATION REQUIREMENTS Ultrasound Applicators Annual calibration is required for all Ultrasound Applicators Only the Applicators should be sent to the factory or a Field Technician certified by Chattanooga Group for this procedure 7 ...

Page 45: ...ration is highlighted 5 Press the Enter button 6 Place the Ultrasound Applicator being calibrated into the Ohmic Instruments UPM DT 100 or DT 10 Ultrasound Power Meter and set meter to Watts See Figure 8 3 7 Follow the instructions on the LCD Display 8 When calibration is complete follow the test procedures in 5 13 and 5 14 to verify that the Applicator is calibrated FIGURE 8 3 FIGURE 8 1 FIGURE 8...

Page 46: ...apy System Intelect Transport Combo Top Assembly ITEM PART NO DESCRIPTION QTY 1 27552 Top Assembly 1 2 See LCD Assembly Drawing Intelect Transport LCD Assembly 1 3 27560 Keymat 1 5 27142 M3 x 6mm Pan Head Screws 11 9 PARTS 3 5 2 3 1 ...

Page 47: ...nsport Top Assembly 1 2 28019 Header 1 3 27269 Ultrasound PCB 1 4 28020 Connector 1 5 27498 Channel 2 Stim PCB 1 6 28017 Standoff M3 x 19mm 4 7 27419 Channel 1 Stim PCB 1 8 27770 Standoff M3 x 16mm 4 9 27142 M3 x 6mm Pan Head Screws 4 9 PARTS NOTE INSERT 3LONGPINSDOWN INTOPCB 2FIRST NOTE INSERT 3LONGPINSDOWN INTOPCB 2FIRST THENINTO 1 THENINTO 1 1 3 5 7 2 6 8 9 4 ...

Page 48: ...st Knob 1 4 27264 LCD 1 5 27588 Header 1 9 PARTS 1 3 NOTE INSERT 4THROUGHTOP NOTE INSERT 4THROUGHTOP ROWOFSOCKETCONNECTOROF 1 ROWOFSOCKETCONNECTOROF 1 2 4 1 2 3 4 ON ON ON ON ON ON ON ON DIPSWITCHNO DIPSWITCHNO DIMSWITCHPOSITIONS DIMSWITCHPOSITIONS 5 INSERTLONGENDOFHEADERUPFROMBOTTOMOFDISPLAY SOLDERTODISPLAY INSERTLONGENDOFHEADERUPFROMBOTTOMOFDISPLAY SOLDERTODISPLAY ...

Page 49: ...ield T Port Power Supply 1 9 PARTS DETAILA SEEFIGURE6 9 DETAILA SEEFIGURE6 9 BL UE W IRE BL UE W IRE RE D W IRE RE D W IRE N L SEEDETAILA SEEDETAILA NOTE NOTE TUCKFERRITE TUCKFERRITE UNDERPOWER UNDERPOWER SUPPLY SUPPLY TUCKFERRITE TUCKFERRITE UNDERPOWER UNDERPOWER SUPPLYANDINTOCORNER SUPPLYANDINTOCORNER PLACEINSULATEDSIDEOFSHIELDNEXTTO PLACEINSULATEDSIDEOFSHIELDNEXTTO POWERSUPPLY POWERSUPPLY 9 4 5...

Page 50: ...ATTERY BATTERY CONNECTOR CONNECTOR 7 RIGHT RIGHT 10 10 10 10 10 10 2 9 FAN FAN CONNECTOR CONNECTOR POWERSUPPLYCONNECTOR POWERSUPPLYCONNECTOR 5 1 11 11 NOTE GRAYCOLOROVERLAY NOTE GRAYCOLOROVERLAY 12 12 10 10 6 14 14 LEFT LEFT OPTIONAL OPTIONAL NOTTOSCALE NOTTOSCALE ITEM PART NO DESCRIPTION QTY 7 27267 Optional Battery Pack 1 9 28018 Foam Baffle 1 10 27140 M3 x 8mm Pan Head Screws 4 11 27150 1 2 D x 1...

Page 51: ...ice technician Any malfunction or failure in the Product caused by product misuse including but not limited to the failure to provide reasonable and required maintenance or any use that is inconsistent with the Product User s Manual COMPANY SHALL NOT BE LIABLE IN ANY EVENT FOR INCIDENTAL OR CONSEQUENTIAL DAMAGES Some locations do not allow the exclusion or limitation of incidental or consequential...

Page 52: ......

Page 53: ...4717 Adams Road P O Box 489 Hixson TN 37343 U S A 1 800 592 7329 1 423 870 2281 1 423 875 5497 Fax chattgroup com 28157B 2008 Encore Medical L P ISO 13485 CERTIFIED Moving Rehabilitation Forward 28157 ...

Reviews: