


Axxius 800 - Release 2.2
12-7
Power Supply
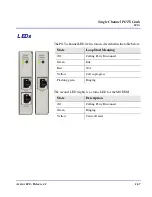
Installing/Replacing a Power Supply
Installing/Replacing a Power Supply
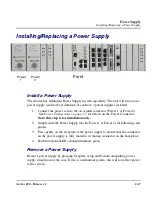
Install a Power Supply
The Axxius has redundant Power Supply System capability. The unit will run on one
power supply (and not be redundant) or can have 2 power supplies installed.
1. Connect the power cord to the associated connector (Power 1 or Power 2).
See Power Connections on page 3-7 for details on the Power Connector.
Note: this step is for installation only.
2. Simply slide the Power Supply into the Power 1 or Power 2 slot following card
guides.
3. Press gently on the faceplate of the power supply to ensure that the connector
on the power supply is fully mated to its mating connector on the backplane.
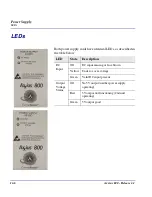
4. Both front panel LEDs should illuminate green.
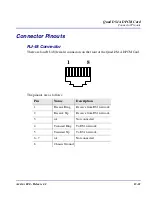
Remove a Power Supply
Remove power supply by grasping faceplate at top and bottom and pulling power
supply straight out of the case. If this is a redundant system, this will not effect power
to the system.
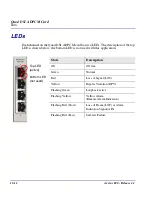
Front
Power
1
Power
2
Summary of Contents for Network Device Axxius 800
Page 1: ...Axxius 800 USER MANUAL Part Number 770 0104 AG Product Release 2 2 May 2004 ...
Page 32: ...xxxii Axxius 800 Release 2 2 Table of Contents ...
Page 50: ...1 18 Axxius 800 Release 2 2 Base Platform ACO ...
Page 101: ...CHAPTER CLI Commands In this Chapter n Command Line Interface Help n CLI Commands ...
Page 392: ...8 8 Axxius 800 Release 2 2 FXO Voice Card Channel Associated Signaling CAS Conversions ...
Page 430: ...12 8 Axxius 800 Release 2 2 Power Supply Installing Replacing a Power Supply ...
Page 472: ...15 20 Axxius 800 Release 2 2 Terminal Server Router Card LEDs ...
Page 500: ...18 12 Axxius 800 Release 2 2 Maintenance Hot Swap Service Card ...
Page 532: ...C 22 Axxius 800 Release 2 2 Loopback Tests V 35 V 54 Loop ...
Page 552: ...Glossary 20 Axxius 800 Release 2 2 Glossary ...


