Additional Information
!
161
• You can set Quick Start to [
'
Off], for example, if the camcorder is
set on a fixed position and you want to keep recording video with the
LCD panel closed in order to conserve the battery's power.
[Calendar Start Day]:
Select the day on which the week in the calendar
screen (
"
55).
[Battery Info]:
Displays a screen where you can verify the battery charge
(as a percentage) and the remaining recording time (
,
mode) or
playback time (
,
mode).
[Control for HDMI]:
Activates the HDMI-CEC (Consumer Electronics Con-
trol) function. When you connect the camcorder to an HDTV compatible
with HDMI-CEC using an HDMI cable, you can control the camcorder’s
playback using the remote control of the TV.
• If set to [
!
On], when the camcorder is connected to a compatible
HDTV using an HDMI cable, the video input on the TV will automatically
be set to the camcorder’s video input. Then, you can use the up/down/
left/right buttons and the OK or SET button on the TV’s remote control
to play back your recordings.
• Depending on the TV set, additional settings may be required on the TV
itself to activate the HDMI-CEC function. Refer to the TV’s instruction
manual.
• Correct operation of the HDMI-CEC function cannot be guaranteed
even when connecting the camcorder to compatible TV sets. If you
cannot use the remote control of the TV, set [Control for HDMI] to
[
'
Off] and operate the camcorder directly or use the camcorder’s
wireless controller.
• The remote control of the TV can only be used to play back movies or
photos (
or
mode only). If the camcorder is connected to the
TV while it is set to a recording mode, depending on the TV used, turn-
ing off the TV will automatically turn off the camcorder even if it is
recording at the time.
• We recommend not connecting more than 3 HDMI-CEC compatible
devices at a time.
[HDMI Status]:
Displays a screen where you can verify the standard of the
output signal from the HDMI OUT terminal.
[Distance Units]:
Selects the units to use for the focusing distance display
during manual focus.
!"
#$
162
!
Additional Information
[Demo Mode]:
The demonstration mode displays the camcorder's main
features. It starts automatically when the camcorder is powered with the
compact power adapter if you leave it turned on without a memory card
for more than 5 minutes.
• To cancel the demo mode once it has started, press any button or turn
off the camcorder.
[Reset All]:
Resets all the camcorder's settings to default values.
[Firmware]:
You can verify the current version of the camcorder's firm-
ware. This menu option is usually unavailable.
!"
#$
Additional Information
!
163
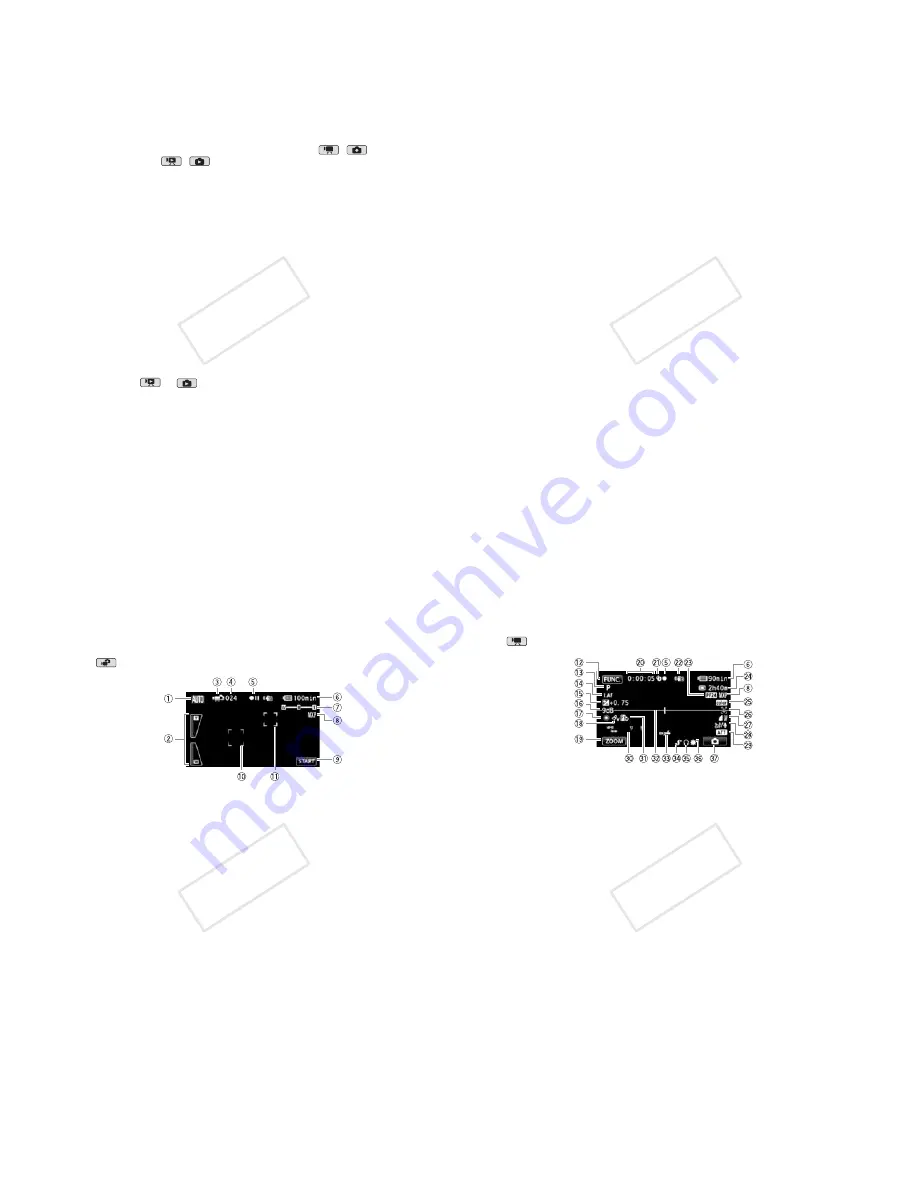
Appendix: Onscreen Icons and Displays
Recording Movies (in Dual Shot mode)
1
Smart AUTO mode (
"
43)
2
Onscreen zoom controls (
"
46)
3
Operating mode (
"
31)
4
In record pause mode:
Total number of scenes
5
Memory operation (
"
167)
6
Remaining battery time (
"
167)
7
Zoom (
"
46)
8
Recording mode (
"
59)
9
Control button: Start/Stop video
recording
A
q
Face detection frame (
"
66)
A
a
Touch & Track frame (
"
68)
!"
#$
164
!
Additional Information
Recording Movies (in
!
Manual mode)
A
s
Control button: Open the FUNC.
panel (
"
32)
A
d
Recording program (
"
60, 63, 70)
A
f
/
Instant AF (
"
152),
MF Manual focus (
"
74)
A
g
Manual exposure (
"
73)
A
h
AGC (automatic gain) limit (
"
74)
A
j
White balance (
"
76)
A
k
Image effect (
"
77)
A
l
Control button: Last function used
([ZOOM] in this case)
S
q
While recording/during playback:
Scene counter (hours : minutes :
seconds)
S
a
Pre-recording (
"
65)
S
s
Image stabilizer (
"
64)
S
d
PF24 progressive frame rate
(
"
63, 167)
S
f
Remaining recording time
"
On the memory card
#
In the built-in memory*
!
Relay recording* (
"
39)
*
!
only.
S
g
x.v.Color (
"
156)
S
h
Face detection (
"
66)
S
j
Photo quality/size
(simultaneous recording) (
"
110)
S
k
Wind screen off (
"
153)
S
l
Microphone attenuator (
"
153)
D
q
Audio level indicator (
"
80)
D
a
Digital effect (
"
69)
D
s
Level marker (
"
154)
D
d
Remote sensor off (
"
160)
D
f
Mini advanced shoe (
"
83)
D
g
Headphone output (
"
82)
D
h
Mini video light (
"
78)
D
j
Control button: Switch to photo
recording (
"
104)
!"
#$


