Video
!
53
Options
NOTES
• Fast/slow playback modes are not available for scenes converted to
standard definition. Scenes in the [SD Scenes] index screens can only
be played back at normal speed.
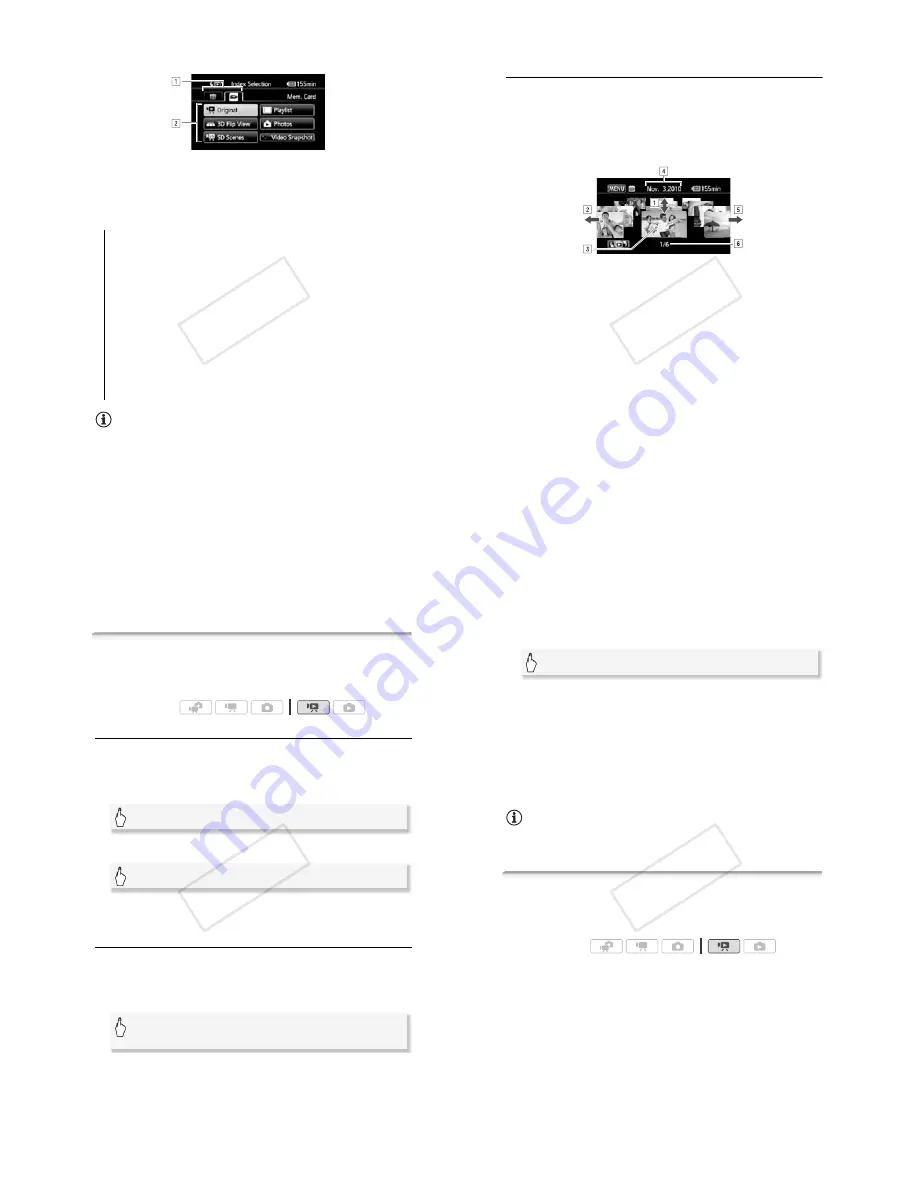
[Original]
Original movies as you recorded them.
[Playlist]
Scenes that were added to the playlist (
$
94) and may
have been rearranged to your liking.
[3D Flip View]
See the following section (
$
54).
[Photos]
Display the photo index screen.
[SD Scenes]
(
!
Only when the memory card is selected)
Scenes that were converted to standard definition to upload
them to the Web (
$
141) or to create standard DVD discs
(
$
135). Touch [SD Scenes] and then [For Web (MPEG-2)] or
[For DVD (SD-VIDEO)] as necessary.
[Video Snapshot]
To display only video snapshot scenes. Touch
this control button first and then [Original] or [Playlist] as neces-
sary.
"
!
Touch the tab of the desired memory: built-in
memory or memory card.
#
Touch a control button to select the content you want to
play back.
!"
#$
54
!
Video
3D Flip View
3D Flip View is a fun way to display your video recordings (original
scenes) in a 3D layout, organized by recording date.
In any index screen, touch [
!
]
(
[3D Flip View].
During single photo view, touch the screen once to display the controls
then touch [
&
] to open the [Photos] index screen.
"
Drag your finger up and down to browse through the
scenes recorded in the displayed date.
#
Drag your finger left to go to the next date with record-
ings.
$
Touch the scene in the front to play it back.
%
Currently selected recording date.
&
Drag your finger right to go to the previous date with
recordings.
'
Current scene / Total number of scenes recorded on the
selected date.
!"
#$
Video
!
55
Narrowing Down the Scenes Shown in the Index Screen
From the [Original] index screen, you can narrow down the scenes
shown, leaving only scenes that were recorded on a specific date or
only those scenes in which people's faces were detected.
Showing Only Scenes that Contain People’s Faces
This will narrow down the scenes shown in the [Original] index screen,
leaving only scenes that were recorded using face detection (
$
66)
and in which people's faces were detected.
1 Open the [Original] index screen, if it is not displayed.
2 Narrow down the scenes shown.
• [
'
Faces] appears instead of [All Scenes]. To show all scenes again,
touch [
$
'
Faces] and then [All Scenes].
Showing Only Scenes Recorded on a Specific Date
This will narrow down the scenes shown in the [Original] or [Video
Snapshot]
!
[Original] index screen, leaving only scenes that were
recorded on the date you choose.
1 Open the [Original] or [Video Snapshot]
!
[Original] index screen.
Operating modes:
[
!
]
(
[Original]
[
$
All Scenes]
(
[
'
Scenes with Faces]
[
!
]
(
[Original] or [
!
]
(
[Video Snapshot]
(
[Original]
!"
#$
56
!
Video
2 Open the calendar screen.
• Dates that contain scenes (that is, movies were recorded on that
date) appear in black against a silver background. Dates without
recordings appear grayed out.
• Touch [
%
] or [
&
] to jump to the previous/next calendar month that
contains recordings.
3 Touch the desired date.
The selected date appears instead of [All Scenes]. To show all scenes
again, touch [
$
(the date displayed on the screen)] and then [All
Scenes].
NOTES
• You can change on what day to start the week for the calendar display
with the
!
(
[Calendar Start Day] setting.
Deleting Scenes
You can delete those scenes that you are not interested in keeping.
Deleting scenes allows you also to free up space on the memory. See
also
Deleting Scenes from the Playlist
(
"
95
).
1 Open the index screen that contains the scenes you want to
delete.
• [Original] or [Video Snapshot]
!
[Original]
index screen: To delete all
the scenes recorded on a specific date, narrow down the scenes
shown to scenes recorded on that date (
"
55).
2 Touch [
%
] to open the scene selection screen.
[
$
All Scenes]
(
[Scenes by Date]
Operating modes:
!"
#$


