


Component
Function
7) Job Placement
Preview
Displays the selected print job with a preview that shows the place-
ment of that job on the printer.
8) Archived Jobs
Displays a list of all archived print jobs (they will remain in the list until
deleted).
9) Job Information
and Parameters panel.
This panel shows the parameters of the currently selected print job and
also allows changes to the parameters associated with that job.
10) Interface Tabs
Use these tabs to select the different modules of the printer user inter-
face.
11) Software Version
Number and Image
Upload Progress
Displays the current installed version of the printer software and the
current time.
Job Control Components Explained
1) Job and Printer Status Panel
The job status panel is in the top left corner of the display screen. It shows information about the
current state of the printer or job activities.
• Printer Status
• Job name currently printing
• Total copies, number of printed copies and copy progress
• Overprint progress and number of overprints if more than zero
All incoming jobs go directly into the active job list or job queue.
Selecting a job in the list highlights the job and updates the job information area.
The job information area contains offsets, print mode information, number of copies and
overprints, and the name of the ONYX profile used. The image to be printed is also displayed.
Jobs can be moved up or down in the list and can either be printed, held, canceled, or deleted.
2) Printer Messages (or Log) Panel
The printer status panel is in the top right corner of the display. It shows the last four lines of the
printer log that contains printer errors, warnings, and information messages. To see more of the
log, click on the "show more" link to bring up a new window that allows you to scroll through the
log.
3) Ink Status
Ink System Status
. Click the icon to open an ink system status dialog that displays ink-related
information. This includes, for each color of ink: an expiry date, ink type code, ink bag status, fill
status (whether ink fill is active), and whether the reservoir is full. The dialog also shows the
current printhead temperature, the meniscus vacuum level, and the purge pressure.
4 & 5) Command Toolbar
The toolbar contains icons that allow you to interact with the printer (icons are listed in the table
below in the order they are displayed on the command toolbar). Note that some of the icons have
a checked and unchecked state with a different appearance of the icon image to reflect their state.
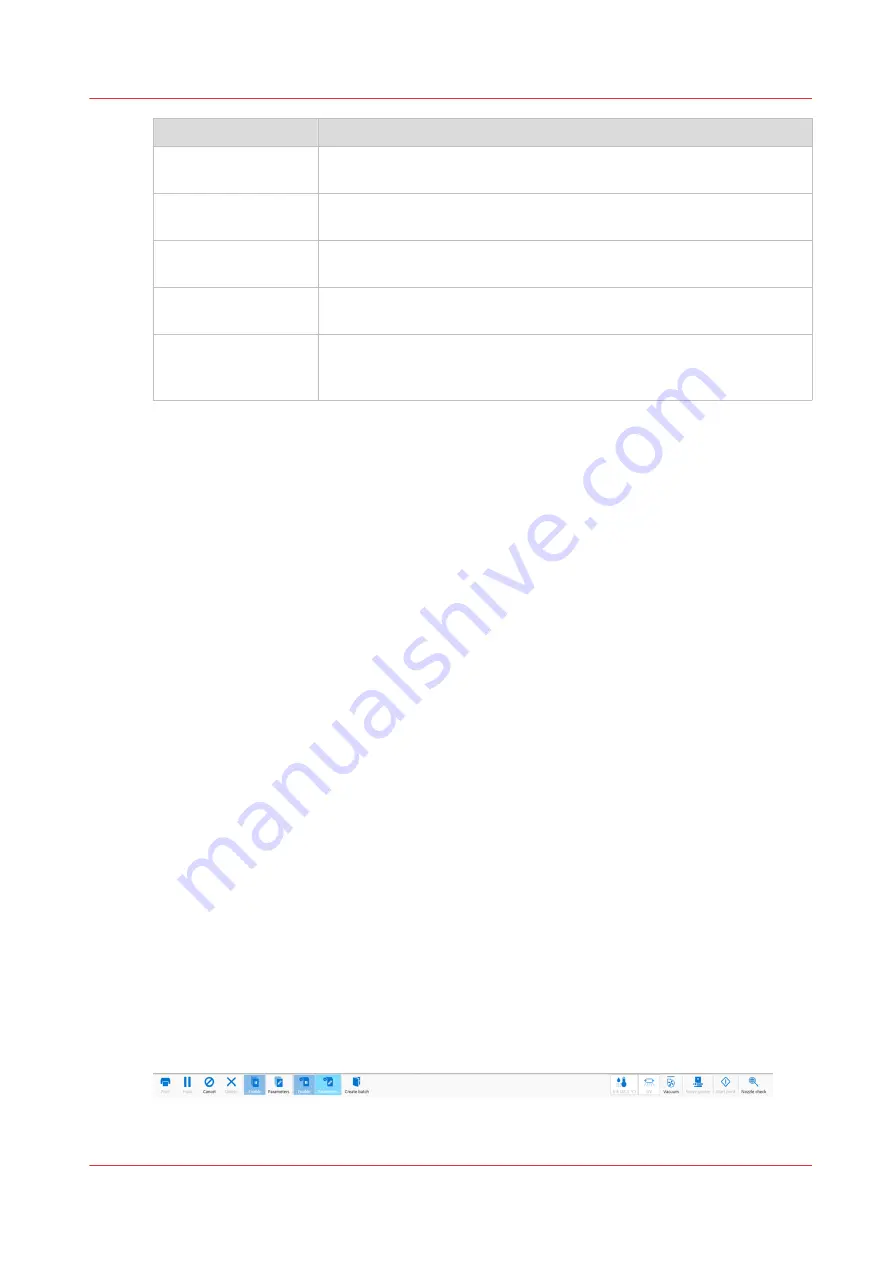
[21] Command Toolbar
Print Job Control Module
Chapter 4 - How to Navigate the User Interface
45
Océ Arizona 1200 Series
Summary of Contents for Oce Arizona 1200 Series
Page 1: ...Operation guide Oc Arizona 1200 Series User Manual...
Page 6: ...Contents 6 Oc Arizona 1200 Series...
Page 7: ...Chapter 1 Introduction...
Page 11: ...Chapter 2 Product Compliance...
Page 14: ...Product Compliance 14 Chapter 2 Product Compliance Oc Arizona 1200 Series...
Page 15: ...Chapter 3 Safety Information...
Page 39: ...Chapter 4 How to Navigate the User Interface...
Page 60: ...Software Update Module 60 Chapter 4 How to Navigate the User Interface Oc Arizona 1200 Series...
Page 61: ...Chapter 5 How to Operate Your Oc Arizona Printer...
Page 82: ...Media Registration 82 Chapter 5 How to Operate Your Oc Arizona Printer Oc Arizona 1200 Series...
Page 83: ...Chapter 6 Operating the Oc Arizona 1200 XT...
Page 89: ...Chapter 7 Roll Media Option...
Page 113: ...Chapter 8 Static Suppression Option...
Page 117: ...Chapter 9 How to Manage a White Ink Workflow...
Page 161: ...Chapter 10 Ink System Management...
Page 165: ...Chapter 11 Troubleshooting...
Page 167: ...Chapter 12 Printer Maintenance...
Page 213: ...Chapter 13 Regulation Notices...
Page 219: ...Appendix A Application Information...
Page 225: ......


