background image

Scanning in Basic Mode

Use the 

Basic Mode

 tab to scan easily by following the on-screen steps.

See "

Scanning Multiple Documents at One Time with ScanGear (Scanner Driver)

" to scan multiple

documents at one time from the Platen.

When scanning from the ADF (Auto Document Feeder), documents are scanned without preview.

Important

The following types of documents may not be scanned correctly. In that case, click 

 (Thumbnail)

on the Toolbar to switch to whole image view and scan.

Photos that have a whitish background
Documents printed on white paper, hand-written text, business cards, etc.
Thin documents
Thick documents

The following types of documents may not be scanned correctly.

Documents smaller than 1.2 inches (3 cm) square
Photos that have been cut to various shapes

Note

When using a model equipped with Auto Duplex ADF, you can scan both sides of the documents

automatically from the ADF.

1.

Place the document on the Platen or ADF, then start ScanGear (scanner driver).

Placing Items (When Scanning from a Computer)

Starting ScanGear (Scanner Driver)

2.

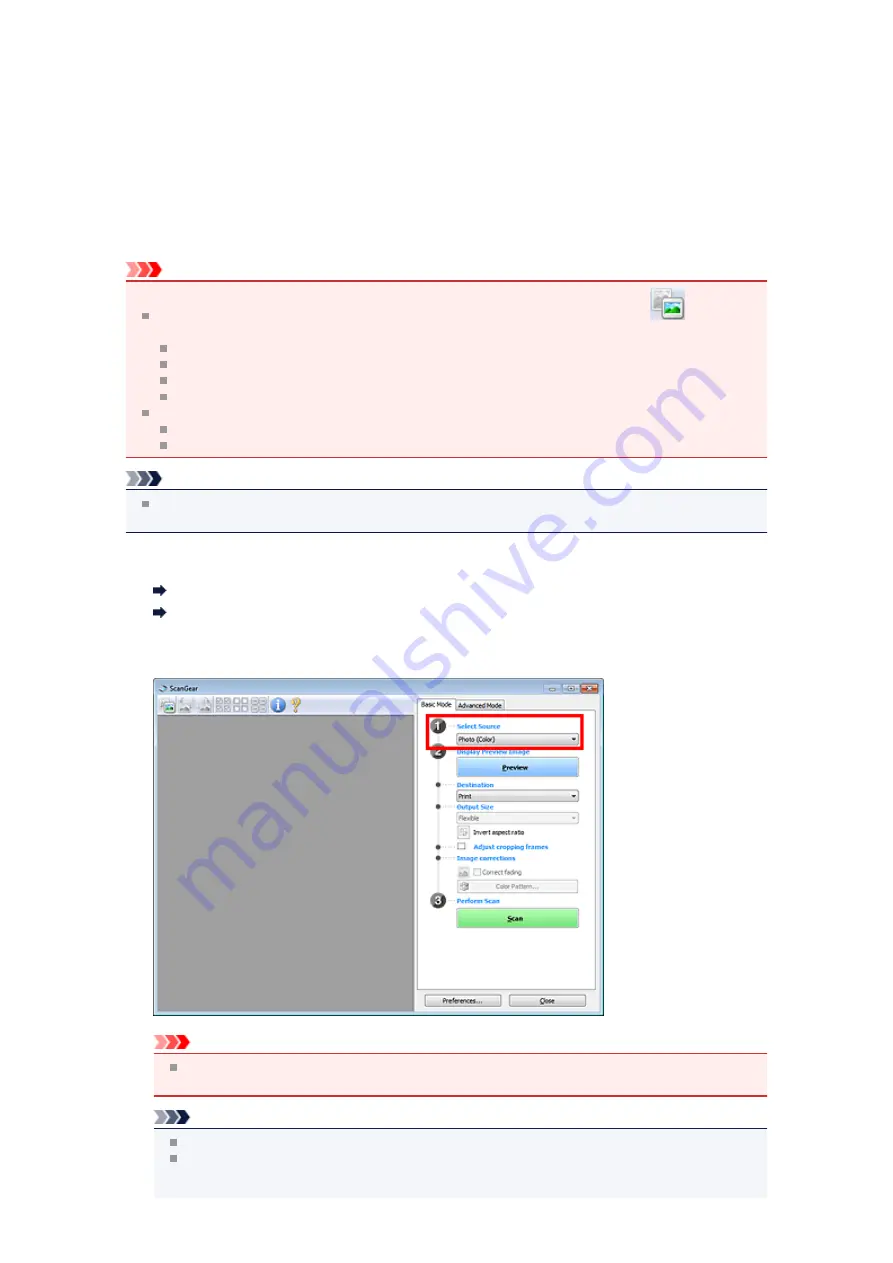
Set 

Select Source

 according to the document placed on the Platen or ADF.

Important

Some applications do not support continuous scanning from the ADF. For details, refer to the

application's manual.

Note

To scan magazines containing many color photos, select 

Magazine (Color)

.

When using a model equipped with Auto Duplex ADF, you can specify how to output the paper

upon scanning both sides from the ADF in 

ADF Duplex Paper Output Settings

 on the 

Scan

 tab

of the 

Preferences

 dialog box.

Summary of Contents for MX390 series

Page 1: ...MX390 series Online Manual Scanning English ...

Page 2: ... on Scanning Other Scanning Methods Placing Items When Scanning from a Computer Scanning from the Operation Panel of the Machine Forwarding Scanned Data to the Computer Using the Operation Panel of the Machine Basic Setting Items on the Operation Panel of the Machine Selecting a Response to Commands from the Operation Panel Using IJ Scan Utility ...

Page 3: ...g from a Computer Scanning with IJ Scan Utility Scanning with Application Software that You are Using ScanGear Useful Information on Scanning Other Scanning Methods Placing Items When Scanning from a Computer ...

Page 4: ... of the Machine Forwarding Scanned Data to the Computer Using the Operation Panel of the Machine Basic Setting Items on the Operation Panel of the Machine Selecting a Response to Commands from the Operation Panel Using IJ Scan Utility ...

Page 5: ...s Scanning Documents Scanning with Favorite Settings Scanning Items Larger than the Platen Image Stitch Scanning Multiple Items at One Time Scanning Multiple Documents at One Time from the ADF Auto Document Feeder Saving after Checking Scan Results Sending Scanned Images via E mail Extracting Text from Scanned Images OCR IJ Scan Utility Screens ...

Page 6: ... magazine for better readability according to the item type or your purpose Note See IJ Scan Utility Main Screen for details on the IJ Scan Utility main screen Save Scanned Images Automatically Scanned images are automatically saved in a preset folder You can change the folder as required Note The default save folders are as follows Windows 7 My Documents folder Windows Vista Documents folder Wind...

Page 7: ...Important Some functions are available only when My Image Garden is installed Note See Settings Dialog Box for how to set the applications to integrate with ...

Page 8: ...Starting IJ Scan Utility From the Start menu select All Programs Canon Utilities IJ Scan Utility IJ Scan Utility to start IJ Scan Utility ...

Page 9: ...tems on the platen or ADF of your scanner or printer Placing Items When Scanning from a Computer 3 Start IJ Scan Utility Starting IJ Scan Utility 4 Click Auto Scanning starts Note Click Cancel to cancel the scan To apply suitable corrections based on the item type click Settings then select the Apply recommended image correction checkbox in the Settings Auto Scan dialog box Scanned images are save...

Page 10: ...ettings Photo Scan dialog box then set the paper size resolution etc as required Settings Photo Scan Dialog Box When setting is completed click OK 4 Click Photo Scanning starts Note Click Cancel to cancel the scan Scanned images are saved in the folder set for Save in in the Settings Photo Scan dialog box displayed by clicking Settings In the Settings Photo Scan dialog box you can also make advanc...

Page 11: ... Document Scan dialog box then set the paper size resolution etc as required Settings Document Scan Dialog Box When setting is completed click OK 4 Click Document Scanning starts Note Click Cancel to cancel the scan Scanned images are saved in the folder set for Save in in the Settings Document Scan dialog box displayed by clicking Settings In the Settings Document Scan dialog box you can also mak...

Page 12: ...e resolution etc Settings Custom Scan Dialog Box When setting is completed click OK Note Once the settings are made you can scan with the same settings from the next time 3 Place the item on the platen Placing Items When Scanning from a Computer 4 Click Custom Scanning starts Note Click Cancel to cancel the scan Scanned images are saved in the folder set for Save in in the Settings Custom Scan dia...

Page 13: ... scan from the item to be placed on the left side 1 Start IJ Scan Utility Starting IJ Scan Utility 2 Click Settings select the Settings Scan and Stitch dialog box then set the item type resolution etc as required Settings Scan and Stitch Dialog Box When setting is completed click OK 3 Click Stitch The Image Stitch window appears 4 In Select Output Size select an output size according to the paper ...

Page 14: ...t side of the screen face down on the platen 7 Click Start Scanning Image 1 The first item is scanned and appears in 1 Note Click Cancel to cancel the scan 8 Place the item that is to be displayed on the right side of the screen face down on the platen ...

Page 15: ... Click Cancel to cancel the scan 10 Adjust the scanned images as required Use the Toolbar to rotate or zoom in out or drag the images to adjust their positions Note Select the Adjust cropping frames checkbox to specify the area to be saved Adjusting Cropping Frames IJ Scan Utility ...

Page 16: ...The selected image is deleted allowing you to scan the item again 11 Click Save The combined image is saved Note See Image Stitch Window for details on the Image Stitch window You can make advanced scan settings in the Settings Scan and Stitch dialog box displayed by clicking Settings Settings Scan and Stitch Dialog Box ...

Page 17: ...items Refer to Scanning Multiple Documents at One Time with ScanGear Scanner Driver for your model from Home of the Online Manual for details Using Auto Scan Whether there are multiple items or not is detected automatically Click Auto and scan Easy Scanning with Auto Scan Not Using Auto Scan In the Settings dialog box set Paper Size to Auto scan and scan Note The screens for scanning with favorite...

Page 18: ...5 Select Select Source according to the items to be scanned 6 Select Auto scan for Paper Size then click OK ...

Page 19: ... Box Settings Document Scan Dialog Box Settings Custom Scan Dialog Box 7 Click Custom Multiple items are scanned at one time Note Click Cancel to cancel the scan Scanned images are saved in the folder set for Save in in the corresponding Settings dialog box displayed by clicking Settings In each Settings dialog box you can also make advanced scan settings ...

Page 20: ... Home of the Online Manual for how to scan using ScanGear scanner driver Using Auto Scan The item type is detected automatically Click Auto and scan Easy Scanning with Auto Scan Not Using Auto Scan In the Settings dialog box set Select Source to ADF or Auto and scan Note The screens for scanning documents are used as examples in the following descriptions 1 Place the documents on the ADF Placing D...

Page 21: ...h document select Document ADF Manual Duplex 6 Set the color mode document size and scanning resolution as required Click Document Scan Orientation Settings to specify the orientation of the documents to be scanned In the displayed dialog box you can specify the Orientation and Binding Side How to place the documents when scanning the back sides depends on the Binding Side When setting is complete...

Page 22: ...Click Cancel to cancel the scan When Document ADF Manual Duplex is selected for Select Source proceed to Step 8 8 Follow the on screen instructions to place the documents Note The screens for scanning with Orientation set to Portrait are used as examples in the following descriptions When Long edge is Selected for Binding Side in Document Scan Orientation Settings Place the documents after rotatin...

Page 23: ...t changing the orientation of the output documents 9 Click OK Scanning starts Note Click Cancel to cancel the scan Scanned images are saved in the folder set for Save in in the corresponding Settings dialog box displayed by clicking Settings In each Settings dialog box you can also make advanced scan settings ...

Page 24: ... before saving when scanned using Auto scan or the operation panel Note The screens for scanning photos are used as examples in the following descriptions 1 Start IJ Scan Utility Starting IJ Scan Utility 2 Click Settings The Settings dialog box appears Settings Dialog Box 3 Click Photo Scan 4 Select the Check scan results checkbox then click OK ...

Page 25: ...ngs ScanGear Dialog Box 5 Click Photo Scanning starts When scanning is completed the Save Settings dialog box appears Note Click Cancel to cancel the scan 6 Change the image order or file save options as required You can change the image order or file save options in the Save Settings dialog box Save Settings Dialog Box Note The default save folders are as follows Windows 7 My Documents folder Win...

Page 26: ...Scanned images are saved according to the settings ...

Page 27: ...ns for scanning photos are used as examples in the following descriptions 1 Start IJ Scan Utility Starting IJ Scan Utility 2 Click Settings The Settings dialog box appears Settings Dialog Box 3 Click Photo Scan 4 Select Attach to e mail in Application Settings then select an e mail client ...

Page 28: ... scanned and saved images to e mail 5 Click OK The IJ Scan Utility main screen appears Note See the following pages for details on the setting items in the Settings dialog box Settings Auto Scan Dialog Box Settings Photo Scan Dialog Box Settings Document Scan Dialog Box Settings Custom Scan Dialog Box Settings ScanGear Dialog Box ...

Page 29: ...ade in the Settings dialog box When the Check scan results checkbox is selected in the Settings dialog box the Save Settings dialog box appears After you set the save options and click OK the scanned images are saved and automatically attached to a new message of the specified e mail client Save Settings Dialog Box 7 Specify the recipient enter the subject and message then send e mail For details ...

Page 30: ...ng via Document Custom or ScanGear The screens for scanning documents are used as examples in the following descriptions 1 Start IJ Scan Utility Starting IJ Scan Utility 2 Click Settings The Settings dialog box appears Settings Dialog Box 3 Click Document Scan 4 Select Start OCR for Application Settings then select the application in which you want to display the result ...

Page 31: ...ed and appears in Notepad included with Windows 5 Click OK The IJ Scan Utility main screen appears Note See the following pages for details on the setting items in the Settings dialog box Settings Document Scan Dialog Box Settings Custom Scan Dialog Box Settings ScanGear Dialog Box 6 Click Document ...

Page 32: ... image of the following types of documents may not be detected correctly Documents containing text with font size outside the range of 8 points to 40 points at 300 dpi Slanted documents Documents placed upside down or documents with text in the wrong orientation rotated characters Documents containing special fonts effects italics or hand written text Documents with narrow line spacing Documents w...

Page 33: ...cument Scan Dialog Box Settings Custom Scan Dialog Box Settings Scan and Stitch Dialog Box Settings ScanGear Dialog Box Settings Save to PC Auto Dialog Box Settings Save to PC Photo Dialog Box Settings Save to PC Document Dialog Box Settings General Settings Dialog Box Data Format Settings Dialog Box Save Settings Dialog Box Image Stitch Window ...

Page 34: ...puter Scan save settings and the response after scanning can be specified in the Settings Document Scan dialog box Settings Document Scan Dialog Box Custom Scans items with your favorite settings and saves the images to a computer The item type can be automatically detected Scan save settings and the response after scanning can be specified in the Settings Custom Scan dialog box Settings Custom Sc...

Page 35: ...r My Image Garden Settings Auto Scan Dialog Box Settings Photo Scan Dialog Box Settings Document Scan Dialog Box Settings Custom Scan Dialog Box Settings Scan and Stitch Dialog Box Settings ScanGear Dialog Box Scanning from the Operation Panel Tab You can specify how to respond when scanning from the operation panel Settings Save to PC Auto Dialog Box Settings Save to PC Photo Dialog Box Settings ...

Page 36: ...al Settings Tab You can set the product to use file size restriction on e mail attachment language to detect text in images and folder in which to save images temporarily Settings General Settings Dialog Box ...

Page 37: ...specify the item type and size in the Settings Photo Scan dialog box Settings Document Scan dialog box or Settings Custom Scan dialog box then click Photo Document or Custom in the IJ Scan Utility main screen You cannot scan correctly with Auto A4 size photos Text documents smaller than 2L 5 inches x 7 inches 127 mm x 178 mm such as paperback pages with the spine cut off Items printed on thin whit...

Page 38: ...ee Placing Items When Scanning from a Computer for details on how to place items Note You can change the data format from Settings Settings Click to display the Data Format Settings dialog box in which you can set the quality of the images to be saved keyword search of PDF files and their compression type and the data format in which to save images scanned with Auto Scan Data Format Settings Dialo...

Page 39: ... want to send e mails with the scanned images attached You can specify the e mail client you want to start from the pull down menu Do not start any application Saves to the folder specified in Save in Note Specify the application or folder in the Select Application or Select Destination Folder dialog box displayed by selecting Add from the pull down menu Instructions Opens this guide Defaults You ...

Page 40: ...e Settings dialog box is displayed from My Image Garden the setting items for Application Settings do not appear 1 Scan Options Area Select Source Photo is selected Color Mode Select the color mode in which to scan the item Important To select Black and White deselect the Compress scanned images upon transfer checkbox Paper Size Select the size of the item to be scanned When you select Custom a sc...

Page 41: ... the _20XX0101_0001 format Data Format Select the data format in which to save the scanned images You can select JPEG Exif TIFF or PNG Important You cannot select JPEG Exif when Color Mode is Black and White Settings Click to display the Data Format Settings dialog box in which you can set the quality of the images to be saved keyword search of PDF files and their compression type and the data for...

Page 42: ... down menu Send to a folder Select this when you also want to save the scanned images to a folder other than the one specified in Save in You can specify the folder from the pull down menu Attach to e mail Select this when you want to send e mails with the scanned images attached You can specify the e mail client you want to start from the pull down menu Do not start any application Saves to the f...

Page 43: ... Settings Area 3 Application Settings Area Important When the Settings dialog box is displayed from the Scan screen of My Image Garden the setting items for Application Settings do not appear 1 Scan Options Area Select Source Select the type of item to be scanned Scanning documents Document or Document ADF Platen Scanning magazines Magazine Scanning documents from the ADF Auto Document Feeder Docu...

Page 44: ...settings Resolution Select the resolution of the item to be scanned The higher the resolution value the more detail in your image Resolution Document Scan Orientation Settings This appears when you select ADF for Select Source Click to display the Document Scan Orientation Settings dialog box in which you can set the orientation and binding side of the documents to be scanned from the ADF Importan...

Page 45: ...hat appear between pages when scanning open booklets Important This function is available only when scanning from the platen Available only when the Compress scanned images upon transfer checkbox is not selected Note Use ScanGear scanner driver s Advanced Mode tab to correct gutter shadows when scanning non standard size items or specified areas Refer to Gutter Shadow Correction for your model fro...

Page 46: ...ple Pages Important You cannot select JPEG Exif when Color Mode is Black and White When Start OCR is selected in Application Settings you cannot select PDF or PDF Multiple Pages Settings Click to display the Data Format Settings dialog box in which you can set the quality of the images to be saved keyword search of PDF files and their compression type and the data format in which to save images sc...

Page 47: ...ls with the scanned images attached You can specify the e mail client you want to start from the pull down menu Start OCR Select this when you want to convert text in the image into text data using specified OCR software You can specify the application from the pull down menu Do not start any application Saves to the folder specified in Save in Note Specify the application or folder in the Select ...

Page 48: ...he setting items for Application Settings do not appear 1 Scan Options Area Select Source Select the type of item to be scanned When Auto is selected the item type is automatically detected Color Mode Paper Size and Resolution are automatically set as well Important Item types supported by Auto are photos postcards business cards magazines newspapers documents and BD DVD CD To scan the following t...

Page 49: ...ss scanned images upon transfer checkbox Note Only Color is available when Select Source is Auto Paper Size Select the size of the item to be scanned When you select Custom a screen in which you can specify the paper size appears Select a Unit then enter the Width and Height and then click OK Note Only Auto is available when Select Source is Auto Click Defaults in the screen in which you can speci...

Page 50: ...nt The color tone may differ from the source image due to corrections In that case deselect the checkbox and scan Note Scanning takes longer than usual when you enable this function When Select Source is Photo Important When Color Mode is Black and White Image Processing Settings is not available Sharpen outline Emphasizes the outline of the subjects to sharpen the image When Select Source is Maga...

Page 51: ...t The following types of documents may not be corrected properly since the text cannot be detected correctly Documents in which the text lines are inclined more than 10 degrees or the angles vary by line Documents containing both vertical and horizontal text Documents with extremely large or small fonts Documents with small amount of text Documents containing figures images Hand written text Docum...

Page 52: ...ays the folder in which to save the scanned images To change the folder specify the destination folder in the Select Destination Folder dialog box displayed by selecting Add from the pull down menu The default save folders are as follows Windows 7 My Documents folder Windows Vista Documents folder Windows XP My Documents folder Important When the Settings dialog box is displayed from My Image Gard...

Page 53: ...o text data using specified OCR software You can specify the application from the pull down menu Do not start any application Saves to the folder specified in Save in Note Specify the application or folder in the Select Application or Select Destination Folder dialog box displayed by selecting Add from the pull down menu Instructions Opens this guide Defaults You can restore the settings in the di...

Page 54: ...portant When the Settings dialog box is displayed from the Scan screen of My Image Garden the setting items for Application Settings do not appear 1 Scan Options Area Select Source Select the type of item to be scanned Scanning photos Photo Scanning documents Document Scanning magazines Magazine Note To reduce moire set Select Source to Magazine Color Mode Select the color mode in which to scan th...

Page 55: ...name in the _20XX0101_0001 format Data Format Select the data format in which to save the scanned images You can select JPEG Exif TIFF PNG PDF or PDF Multiple Pages Important You cannot select JPEG Exif when Color Mode is Black and White Settings Click to display the Data Format Settings dialog box in which you can set the quality of the images to be saved keyword search of PDF files and their com...

Page 56: ...lication from the pull down menu Send to a folder Select this when you also want to save the scanned images to a folder other than the one specified in Save in You can specify the folder from the pull down menu Do not start any application Saves to the folder specified in Save in Note Specify the application or folder in the Select Application or Select Destination Folder dialog box displayed by s...

Page 57: ...e the date and 4 digits are appended to the set file name in the _20XX0101_0001 format Data Format Select the data format in which to save the scanned images You can select JPEG Exif TIFF PNG PDF or PDF Multiple Pages Note When PDF or PDF Multiple Pages is selected images up to 9600 pixels x 9600 pixels can be scanned When the Enable large image scans checkbox is selected in Save Settings or when ...

Page 58: ...layed from My Image Garden this option does not appear 2 Application Settings Area Open with an application Select this when you want to enhance or correct the scanned images You can specify the application from the pull down menu Send to an application Select this when you want to use the scanned images as they are in an application that allows you to browse or organize images You can specify the...

Page 59: ...You can restore the settings in the displayed screen to the default settings ...

Page 60: ... a computer after scanning them from the operation panel by automatically detecting the item type 1 Scan Options Area 2 Save Settings Area 3 Application Settings Area 1 Scan Options Area Paper Size Auto is selected Resolution Auto is selected Document Scan Orientation Settings Click to display the Document Scan Orientation Settings dialog box in which you can set the orientation of the documents t...

Page 61: ...n which you can set the quality of the images to be saved keyword search of PDF files and their compression type and the data format in which to save images scanned with Auto Scan Data Format Settings Dialog Box Save in Displays the folder in which to save the scanned images To change the folder specify the destination folder in the Select Destination Folder dialog box displayed by selecting Add f...

Page 62: ...der in the Select Application or Select Destination Folder dialog box displayed by selecting Add from the pull down menu Instructions Opens this guide Defaults You can restore the settings in the displayed screen to the default settings ...

Page 63: ...ea Paper Size Set from the operation panel Resolution Set from the operation panel Compress scanned images upon transfer Compresses scanned images when transferring them to a computer This is useful when your scanner or printer and computer are connected with a slow interface such as USB1 1 Image Processing Settings Click Plus to set the following Sharpen outline Emphasizes the outline of the subj...

Page 64: ...with an application Select this when you want to enhance or correct the scanned images You can specify the application from the pull down menu Send to an application Select this when you want to use the scanned images as they are in an application that allows you to browse or organize images You can specify the application from the pull down menu Send to a folder Select this when you also want to ...

Page 65: ...d when saving images to a computer as documents after scanning them from the operation panel 1 Scan Options Area 2 Save Settings Area 3 Application Settings Area 1 Scan Options Area Paper Size Set from the operation panel Resolution Set from the operation panel Document Scan Orientation Settings Click to display the Document Scan Orientation Settings dialog box in which you can set the orientation...

Page 66: ... fine dots are scanned Note Scanning takes longer than usual when you enable Reduce moire Reduce gutter shadow platen Reduces gutter shadows that appear between pages when scanning open booklets Important This function is available only when scanning from the platen Available only when the Compress scanned images upon transfer checkbox is not selected Correct slanted text document Detects the scan...

Page 67: ...older in which to save the scanned images To change the folder specify the destination folder in the Select Destination Folder dialog box displayed by selecting Add from the pull down menu The default save folders are as follows Windows 7 My Documents folder Windows Vista Documents folder Windows XP My Documents folder 3 Application Settings Area Open with an application Select this when you want ...

Page 68: ...red product from the list E mail Attachment Size You can restrict the size of scanned images to be attached to an e mail You can select Small Suitable for 640 x 480 Windows Medium Suitable for 800 x 600 Windows Large Suitable for 1024 x 768 Windows or No Change Important When the Settings dialog box is displayed from My Image Garden this option does not appear Document Language Select the language...

Page 69: ...his checkbox to convert text in images into text data and create PDF files that support keyword search PDF Compression Select the compression type for saving PDF files Standard It is recommended that you normally select this setting High Compresses the file size when saving allowing you to reduce the load on your network server Important This option does not appear when Data Format on the Scanning...

Page 70: ... Left 90 Rotate Right 90 Rotates scanned images 90 degrees counter clockwise or clockwise Select the image you want to rotate then click Rotate Left 90 or Rotate Right 90 Important The preview operation buttons do not appear when the Enable large image scans checkbox is selected in the Settings ScanGear dialog box 2 Scan Results Area Displays the thumbnails of the scanned images You can change the...

Page 71: ...ar dialog box You cannot select JPEG Exif when Color Mode is Black and White Settings Click to display the Data Format Settings dialog box in which you can set the quality of the images to be saved keyword search of PDF files and their compression type and the data format in which to save images scanned with Auto Scan Data Format Settings Dialog Box Save in Displays the folder in which to save the...

Page 72: ...ms vary depending on the select source and view 1 Settings and Operation Buttons Select Output Size B4 B5 x 2 Scans the left and right halves of a B4 size item separately A3 A4 x 2 Scans the left and right halves of an A3 size item separately 11 x 17 Letter x 2 Scans the left and right halves of an item twice as large as Letter size separately Full Platen x 2 Scans the left and right halves of an ...

Page 73: ...ing frames You can adjust the scan area in preview If no area is specified the image of the size selected in Select Output Size will be saved If an area is specified only the image in the cropping frame will be scanned and saved Adjusting Cropping Frames IJ Scan Utility Save Save Saves the two scanned images as one image Cancel ...

Page 74: ...tes the preview image 90 degrees counter clockwise Invert Vertically Rotates the preview image 180 degrees Rotate Right Rotates the preview image 90 degrees clockwise Open Guide Opens this page 3 Thumbnail View Area Thumbnail View Area Displays the thumbnails of the scanned images Appears blank if none has been scanned 4 Preview Area Preview Area Displays the scanned images You can adjust the layo...

Page 75: ...Image 1 The image is scanned in the direction specified in Scan Direction and 2 appears next to it After scanning the second item by clicking Start Scanning Image 2 The two scanned images appear Related Topic Scanning Items Larger than the Platen Image Stitch ...

Page 76: ...ng in Basic Mode Scanning in Advanced Mode Scanning Multiple Documents from the ADF Auto Document Feeder in Advanced Mode Scanning Multiple Documents at One Time with ScanGear Scanner Driver Correcting Images and Adjusting Colors with ScanGear Scanner Driver ScanGear Scanner Driver Screens Placing Items When Scanning from a Computer Adjusting Cropping Frames ScanGear General Notes Scanner Driver ...

Page 77: ...view scan results or set document type and output size etc when scanning documents It is useful when you want to scan in a specific color tone as it allows you to make various corrections and adjust brightness contrast etc Screens There are two modes Basic Mode and Advanced Mode Switch modes by clicking a tab on the upper right of the screen Note ScanGear starts in the last used mode Settings are ...

Page 78: ......

Page 79: ...ge corrections and brightness color adjustments Scanning in Advanced Mode Scanning multiple documents placed on the ADF Auto Document Feeder after making advanced image corrections and brightness color adjustments Scanning Multiple Documents from the ADF Auto Document Feeder in Advanced Mode Scanning multiple documents at one time after making image corrections and color adjustments Scanning Multi...

Page 80: ...1 Start My Image Garden For how to start My Image Garden refer to My Image Garden Guide 2 Click the ScanGear icon in the Scan screen of My Image Garden The ScanGear screen appears Starting from an Application Follow these steps example to start ScanGear from an application The procedure varies depending on the application For details refer to the application s manual 1 Start the application 2 On t...

Page 81: ... correctly Documents smaller than 1 2 inches 3 cm square Photos that have been cut to various shapes Note When using a model equipped with Auto Duplex ADF you can scan both sides of the documents automatically from the ADF 1 Place the document on the Platen or ADF then start ScanGear scanner driver Placing Items When Scanning from a Computer Starting ScanGear Scanner Driver 2 Set Select Source acc...

Page 82: ...ose Output size options vary by the item selected in Destination 6 Adjust the cropping frames scan areas as required Adjust the size and position of the cropping frames on the preview image Adjusting Cropping Frames ScanGear 7 Set Image corrections as required 8 Click Scan Scanning starts Note Click Information to open a dialog box in which you can check the current scan settings document type etc...

Page 83: ...Related Topic Basic Mode Tab ...

Page 84: ... switch to whole image view and scan Photos that have a whitish background Documents printed on white paper hand written text business cards etc Thin documents Thick documents The following types of documents may not be scanned correctly Documents smaller than 1 2 inches 3 cm square Photos that have been cut to various shapes 1 Place the document on the Platen then start ScanGear scanner driver Pl...

Page 85: ...e Settings Color Adjustment Buttons 7 Click Scan Scanning starts Note Click Information to open a dialog box in which you can check the current scan settings document type etc A response of ScanGear after scanning can be specified in Status of ScanGear dialog after scanning on the Scan tab of the Preferences dialog box Scan Tab Related Topic Advanced Mode Tab ...

Page 86: ...ng Documents ADF Auto Document Feeder Starting ScanGear Scanner Driver 2 Click the Advanced Mode tab and select Document ADF Simplex or Document ADF Duplex for Select Source Note Settings are not retained when you switch modes You can select Document ADF Duplex when using a model equipped with Auto Duplex ADF 3 Set Input Settings according to the document or purpose Input Settings Note When using ...

Page 87: ...formation to open a dialog box in which you can check the current scan settings document type etc A response of ScanGear after scanning can be specified in Status of ScanGear dialog after scanning on the Scan tab of the Preferences dialog box Scan Tab Related Topic Advanced Mode Tab ...

Page 88: ...Image View The following types of documents may not be scanned correctly Documents smaller than 1 2 inches 3 cm square Photos that have been cut to various shapes Note You can also scan multiple documents at one time from the Advanced Mode tab Use the Advanced Mode tab to make advanced scan settings such as the color mode output resolution image brightness and color tone See the corresponding sect...

Page 89: ... scan in whole image view Scanning Multiple Documents in Whole Image View 7 Select the images you want to scan Select the checkboxes of the images you want to scan 8 Click Scan Scanning Multiple Documents in Whole Image View Follow these steps if thumbnails are not displayed correctly when previewed or if you want to scan multiple documents as a single image Note Positions of slanted documents are...

Page 90: ...e and position of the cropping frames on the preview image You can also create two or more cropping frames If an area is not specified the document will be scanned at the document size Auto Crop If an area is specified only the portion in the specified area will be scanned Adjusting Cropping Frames ScanGear 5 Set Image corrections as required 6 Click Scan Areas framed by broken lines are scanned N...

Page 91: ...a Color Pattern Brightening colors that have faded with time or due to colorcast Adjusting Saturation and Color Balance Adjusting images that are too dark or bright or too flat due to lack of contrast Adjusting Brightness and Contrast Adjusting the color tone using histogram a graph showing brightness distribution Adjusting Histogram Adjusting the image brightness using tone curve a graph of brigh...

Page 92: ...ick Arrow of a function and select an item from the pull down menu Important Do not apply these functions to images without moire dust scratches or faded colors The color tone may be adversely affected See Image Settings for details and precautions on each function Note See Scanning in Advanced Mode to start the Advanced Mode tab of ScanGear and scan Adjusting the image brightness and color tone S...

Page 93: ... and stripe patterns Set Descreen to ON OFF ON Note Printed photos and pictures are displayed as a collection of fine dots Moire is a phenomenon where uneven gradation or a stripe pattern appears when such photos or pictures printed with fine dots are scanned Descreen is the function for reducing this moire effect Reducing dust and scratches Set Reduce Dust and Scratches to Low Medium or High acco...

Page 94: ... degree of fading or colorcast None Medium Reducing graininess Set Grain Correction to Low Medium or High according to the degree of graininess None Medium Correcting shadows that appear between pages when scanning open booklets Set Gutter Shadow Correction to Low Medium or High according to the degree of shadows None Medium ...

Page 95: ...her or ambient strong colors Click an arrow in Color Adjustment to emphasize the corresponding color Cyan red magenta green and yellow blue are complementary color pairs each pair produces a shade of gray when mixed You can reproduce the natural colors of the scene by reducing the cast color and increasing the complementary color It is recommended that you find a portion in the image where it shou...

Page 96: ...rames scan areas or the frame selected in thumbnail view You can select multiple frames or cropping frames by clicking them while pressing the Ctrl key You can also select a color tone from the color pattern displayed on the left of the Color Pattern screen You can also use this function to add a specific tint to an image Increase the magenta to add a warm tint and increase the blue to add a cool ...

Page 97: ...en the image and to the right to increase the saturation brighten the image You can also enter a value 127 to 127 Saturation decreased Original image Saturation increased Note The natural color tone of the original image may be lost if you increase saturation too much Color Balance Adjust images that have a colorcast Colorcast is a phenomenon where a specific color affects the entire picture due t...

Page 98: ...y color It is usually difficult to correct the image completely by adjusting only one color pair It is recommended that you find a portion in the image where it should be white and adjust all three color pairs so that the portion turns white You can also enter a value 127 to 127 Below is an example of an image in which the Cyan Red pair has been adjusted Cyan is increased Red is increased ...

Page 99: ...ults to reset all adjustments in the current window Channel Each dot of an image is a mixture of Red Green and Blue in various proportions gradation These colors can be adjusted individually as a channel Master Adjust the Red Green and Blue combined Red Adjust the Red channel Green Adjust the Green channel Blue Adjust the Blue channel Note Only Grayscale will be displayed in Channel when Color Mod...

Page 100: ... between the brighter and darker parts of an image Increasing contrast will increase the difference thus sharpening the image Decreasing contrast will decrease the difference thus softening the image Move Slider under Contrast to the left to decrease and right to increase the contrast of the image You can also enter a value 127 to 127 Decreased contrast Original image Increased contrast Note Incre...

Page 101: ...colors can be adjusted individually as a channel Master Adjust the Red Green and Blue combined Red Adjust the Red channel Green Adjust the Green channel Blue Adjust the Blue channel Note Only Grayscale will be displayed in Channel when Color Mode is Grayscale Reading Histograms You can see the histogram of a specified area for each Channel The higher the histogram peak the more data is distributed...

Page 102: ...is set to anything but None the adjustments shown below are performed automatically Moving the Black point and White point Sliders Move the Black point Slider or White point Slider to adjust brightness Images with more data distributed to the highlight side Move the Black point Slider toward the highlight side Images with more data distributed to the shadow side Move the White point Slider toward ...

Page 103: ... darkest point You can also enter a value 0 to 245 The point clicked with Mid point Dropper will be the middle of the tonal range You can also enter a value 5 to 250 The point clicked with White point Dropper will be the brightest point You can also enter a value 10 to 255 Click Dropper for Gray Balance and click the area you want to adjust the color in the preview image The clicked point will be ...

Page 104: ...n These colors can be adjusted individually as a channel Master Adjust the Red Green and Blue combined Red Adjust the Red channel Green Adjust the Green channel Blue Adjust the Blue channel Note Only Grayscale will be displayed in Channel when Color Mode is Grayscale Reading Tone Curves With ScanGear scanning images via a scanner is the input and displaying to a monitor is the output Tone Curve sh...

Page 105: ...f the output side resulting in a bright toned image when viewed on a monitor Underexposure Concave curve The midtone data of the input side is stretched toward the shadow of the output side resulting in a dark toned image when viewed on a monitor High contrast S curve The highlight and shadow of the input side are enhanced resulting in a high contrast image Reverse the negative positive image Down...

Page 106: ...Edit custom curve You can drag specific points on the Tone Curve to freely adjust the brightness of the corresponding areas ...

Page 107: ...ld level you can sharpen text in a document or reduce show through in newspapers This function is available when Color Mode is Black and White In ScanGear scanner driver s Advanced Mode tab click Threshold Note Click Defaults to reset all adjustments in the current window Adjusting Threshold Move Slider to the right to increase the threshold value and thus increase the black areas Move the slider ...

Page 108: ...Gear Scanner Driver Screens Basic Mode Tab Advanced Mode Tab Input Settings Output Settings Image Settings Color Adjustment Buttons Preferences Dialog Box Scanner Tab Preview Tab Scan Tab Color Settings Tab ...

Page 109: ...lor Scan color photos Magazine Color Scan color magazines Document Color Scan documents in color Document Grayscale Scan documents in black and white Document Color ADF Simplex Scan documents from the ADF in color Document Grayscale ADF Simplex Scan documents from the ADF in black and white Document Color ADF Duplex Auto Duplex ADF models only Scan both sides of documents from the ADF in color Doc...

Page 110: ...arts automatically Wait a while until the preview image appears Destination Select what you want to do with the scanned image Print Select this to print the scanned image on a printer Image display Select this to view the scanned image on a monitor OCR Select this to use the scanned image with OCR software OCR software is software that converts text scanned as an image into text data that can be e...

Page 111: ... Name Width and Height then click Add For Unit you can select inches or mm when Destination is Print but you can only select pixels when Destination is Image display The name of the added size appears in Output Size List Click Save to save the items listed in Output Size List Delete To delete an item select it in Output Size List and click Delete Click Save to save the items listed in Output Size ...

Page 112: ...s that appear between pages when scanning open booklets Important For precautions on using this function see Gutter Shadow Correction Color Pattern Allows you to adjust the image s overall color You can correct colors that have faded due to colorcast etc and reproduce natural colors while previewing color changes Adjusting Colors Using a Color Pattern Important This setting is not available when y...

Page 113: ...ilable when two or more frames are displayed Deselects the checkboxes of the image in thumbnail view Select All Frames Available when two or more frames are displayed Selects the images in thumbnail view and outlines them in blue Select All Cropping Frames Available when two or more cropping frames are specified Turns the cropping frames into thick broken lines and applies the settings to all of t...

Page 114: ...ick a frame to zoom in on the image Click Frame Advance at the bottom of the screen to display the previous or next frame Double click the frame again to return the display to its non magnified state When Whole Image is displayed on the Toolbar Items on the Platen are scanned and displayed as a single image All portions in the cropping frames will be scanned Note You can specify the cropping frame...

Page 115: ...ote The displayed items vary by document type and view 1 Settings and Operation Buttons Favorite Settings You can name and save a group of settings Input Settings Output Settings Image Settings and Color Adjustment Buttons on the Advanced Mode tab and load it as required It is convenient to save a group of settings if you will be using it repeatedly You can also use this to reload the default sett...

Page 116: ...nts to its highlight and shadow values histogram or balance tone curve Color Adjustment Buttons Zoom Zooms in on a frame or zooms in on the image in the area specified with a cropping frame scan area When zoomed in Zoom changes to Undo Click Undo to return the display to its non magnified state In thumbnail view When multiple images are displayed in thumbnail view clicking this button zooms in on ...

Page 117: ...s if the total size of the scanned images exceeds a certain size In that case a warning message appears it is recommended that you reduce the total size To continue scan in whole image view Preferences Opens the Preferences dialog box in which you can make scan preview settings Preferences Dialog Box Close Closes ScanGear scanner driver 2 Toolbar Toolbar You can adjust or rotate preview images The...

Page 118: ...ts original state when you preview again Auto Crop Displays and adjusts the cropping frame automatically to the size of the document displayed in the Preview area The scan area is reduced every time you click this button if there are croppable areas within the cropping frame Check All Frames Available when two or more frames are displayed Selects the checkboxes of the image in thumbnail view Unche...

Page 119: ...on status Focus Frame thick blue outline The displayed settings will be applied Selected Frame thin blue outline The settings will be applied to the Focus Frame and Selected Frames simultaneously You can select multiple images by clicking them while pressing the Ctrl key Unselected no outline The settings will not be applied When Whole Image is displayed on the Toolbar Items on the Platen are scan...

Page 120: ...Related Topic Scanning in Advanced Mode Scanning Multiple Documents from the ADF Auto Document Feeder in Advanced Mode ...

Page 121: ...available in whole image view only When scanning both sides of the documents automatically from the ADF select A4 or Letter When you select a size the Preview area size changes accordingly Important Some applications have a limit to the amount of scan data they can receive Available scan range is as follows 21000 pixels x 30000 pixels or less If you change Paper Size after previewing the preview i...

Page 122: ...hold Input Size In thumbnail view the cropped document size is displayed after preview In whole image view the Paper Size is displayed before preview and the cropping frame scan area size is displayed after preview You can adjust the cropping frame size by entering the values into Width and Height Click Change Aspect Ratio and change it to Keep Aspect Ratio to maintain the aspect ratio when you sp...

Page 123: ...an select Document ADF Duplex when using a model equipped with Auto Duplex ADF Output Size Select an output size Select Flexible to set custom sizes or select a size for printing or displaying Select Add Delete to set custom size and save it as a new output size option Flexible You can specify the output resolution and scale and adjust the cropping frames scan areas In thumbnail view Drag the mous...

Page 124: ...hes or mm when Destination is Print but you can only select pixels when Destination is Image display The name of the added size appears in Output Size List Click Save to save the items listed in Output Size List Delete To delete an item select it in Output Size List and click Delete Click Save to save the items listed in Output Size List Important You cannot delete predefined output sizes such as ...

Page 125: ... optimized Images can be adjusted according to the automatically detected document type or the specified document type The result of the adjustment will be reflected in the entire image None Image Adjustment will not be applied Auto Applies Image Adjustment by automatically detecting the document type It is recommended that you normally select this setting Photo Applies Image Adjustment suitable f...

Page 126: ...age It is recommended that you normally select this setting Descreen Printed photos and pictures are displayed as a collection of fine dots Moire is a phenomenon where uneven gradation or a stripe pattern appears when such photos or pictures printed with fine dots are scanned Descreen is the function for reducing this moire effect OFF Moire will not be reduced ON Reduces moire It is recommended th...

Page 127: ...is recommended that you normally select this setting High Select this when the photo is very grainy This can affect the gradation and sharpness of the image Important Correction may not be applied properly if the scan area is too small Gutter Shadow Correction Use this function to correct shadows that appear between pages when scanning open booklets When you set the Gutter Shadow Correction settin...

Page 128: ...e scan If the binding part is not even the shadow will not be corrected properly How to place the document depends on your model and the document to be scanned Note Cover the document with black cloth if white spots streaks or colored patterns appear in scan results due to ambient light entering between the document and the Platen If the shadow is not corrected properly adjust the cropping frame s...

Page 129: ...Color Balance Adjust the saturation vividness and color tone of the image Use this function to brighten colors that have faded with time or due to colorcast Colorcast is a phenomenon where a specific color affects the entire picture due to the weather or ambient strong colors Adjusting Saturation and Color Balance Brightness Contrast Adjust the brightness and contrast of the image If the image is ...

Page 130: ... white are divided By adjusting the threshold level you can sharpen text in a document or reduce show through in newspapers Setting Threshold Custom You can name and save a set of tone curve and threshold settings of the Color Adjustment Buttons Select Add Delete from the pull down menu when Color Mode is set to anything but Black and White the Add Delete Tone Curve Settings dialog box opens when ...

Page 131: ...Reset all adjustments saturation color balance brightness contrast histogram and tone curve ...

Page 132: ... which to save images temporarily and music file to play during or at the end of a scan Scanner Tab Preview Tab Allows you to select what to do with Preview when ScanGear is started how to display cropping frames after previewing images and the cropping size for thumbnails of scanned documents Preview Tab Scan Tab Allows you to select what to do with ScanGear after scanning image Scan Tab Color Se...

Page 133: ...e operation panel of the machine or when printing scanning from a computer etc Scanning or printing may take longer than usual when this function is used Do not use quiet mode Select this option when you wish to use the machine with volume of normal operating noise Always use quiet mode Select this option when you wish to reduce the operating noise of the machine Use quiet mode during specified ho...

Page 134: ...n click Browse and specify a sound file You can specify the following files MIDI file mid rmi midi Audio file wav aif aiff MP3 file mp3 Calibration Settings When you set Execute at Every Scan to ON the scanner will be calibrated every time before previewing and scanning to reproduce correct color tones in scanned images Note Even when Execute at Every Scan is set to OFF the scanner may be calibrat...

Page 135: ...tartup Note Select None if you do not want to save the preview image Cropping Frame on Previewed Images Select how to display cropping frames after previewing images Execute Auto Cropping on Previewed Images The cropping frame scan area will automatically be displayed in the document size after previewing Display the Last Frame on Previewed Images A cropping frame of the same size as the last used...

Page 136: ...he area displayed for the standard size Note When you change the Cropping Size for Thumbnail View setting the preview images will be refreshed and cropped to the new size As the preview images are refreshed the color adjustments and other settings applied to them are reset ...

Page 137: ...creen and select what to do when scanning is completed Note Even if Do not close ScanGear automatically or Display the dialog to select next action is set some applications may not support it ADF Duplex Paper Output Settings Auto Duplex ADF models only Specify how to output the paper when scanning both sides of multiple documents at one time from the ADF Auto Document Feeder Output by back front F...

Page 138: ... Output by page Outputs the scanned documents in the correct page order ...

Page 139: ...age with optimum correction for monitor Defaults Returns to the default Color Matching settings None Select this to disable color correction provided by ScanGear scanner driver Note Color Matching is available when ScanGear monitor color management compliant application such as Adobe Photoshop and printer are set up correctly Refer to the corresponding manual for the monitor printer and applicatio...

Page 140: ...rner at the arrow alignment mark of the platen Photos that have been cut to various shapes and items smaller than 1 2 inches 3 cm square cannot be cropped accurately when scanning Reflective disc labels may not be scanned as expected For Photos Postcards Business Cards or BD DVD CD For Magazines Newspapers or Documents Placing a Single Item Place the item face down on the platen with 0 4 inch 1 cm...

Page 141: ...egrees or less are corrected automatically Placing Documents ADF Auto Document Feeder Important Do not leave thick items on the platen when scanning from the ADF May result in paper jam Place and align documents of the same size when scanning two or more documents Refer to Originals You Can Load for your model from Home of the Online Manual for details on supported document sizes when scanning fro...

Page 142: ......

Page 143: ... drag the cropping frame in the Preview area to specify the area Note You can change the auto crop setting in the Preferences dialog box See Cropping Frame on Previewed Images in Preview Tab for details Cropping Frame Types 1 Thick cropping frame rotating or stationary Represents a selected cropping frame Appears only in whole image view You can select multiple cropping frames by clicking them whi...

Page 144: ...rotate a cropping frame 90 degrees by clicking Switch Aspect Ratio However Switch Aspect Ratio is not available when Output Size is Flexible Creating Multiple Cropping Frames In thumbnail view You can only create one cropping frame per image In whole image view Click and drag the mouse in a space outside the existing cropping frame to create a new cropping frame in the Preview area The new croppin...

Page 145: ...rame it retains the settings of the latest cropping frame Note Create up to 12 cropping frames Scanning takes longer than usual when multiple cropping frames are selected Deleting Cropping Frames In thumbnail view To delete a cropping frame click an area outside the cropping frame on an image In whole image view To delete a cropping frame select it and click Remove Cropping Frame on the Toolbar Al...

Page 146: ...necting to a network scanning takes longer than usual Make sure that you have adequate disk space available when scanning large images at high resolutions For example at least 300 MB of free space is required to scan an A4 document at 600 dpi in full color ScanGear and WIA driver cannot be used at the same time Do not enter the computer into sleep or hibernate state during scanning Applications wi...

Page 147: ...at high resolution your computer may not respond or the progress bar may remain at 0 depending on the application In that case cancel the action for example by clicking Cancel on the progress bar then increase the operating system s virtual memory or reduce the image size resolution and retry Alternatively scan the image via IJ Scan Utility first then save and import it into the application ...

Page 148: ...Useful Information on Scanning Adjusting Cropping Frames IJ Scan Utility Resolution Data Formats Color Matching ...

Page 149: ...djust cropping frames checkbox an active cropping frame is automatically specified around the image in the Preview area You can drag the cropping frame to specify the area When you perform a scan the image in the area specified with the cropping frame will be scanned Adjusting a Cropping Frame The cursor will change into Arrow when it is positioned over a cropping frame Click and drag the mouse to...

Page 150: ...ution Settings Set the resolution according to the use of the scanned image Item Type Use Color Mode Appropriate Resolution Color photo Copying Printing Color 300 dpi Creating a postcard Color 300 dpi Saving to a computer Color 300 dpi Using on a website or attaching to e mail Color 150 dpi Black and white photo Saving to a computer Grayscale 300 dpi Using on a website or attaching to e mail Grays...

Page 151: ...When you will be printing the scanned image by enlarging it scan by setting a higher resolution than the recommended one above ...

Page 152: ...ade every time they are saved and cannot be returned to their original state JPEG is not available for black and white images TIFF Standard File Extension tif A data format featuring a relatively high compatibility between various computers and applications TIFF is suitable for editing saved images Note Some TIFF files are incompatible IJ Scan Utility supports the following TIFF file formats Uncom...

Page 153: ...iver Output Profile Target sRGB OS Application Application Printer Driver Monitor Printer The image s color space is converted from the scanner s color space to sRGB by ScanGear When displaying on a monitor the image s color space is converted from sRGB to the monitor s color space based on the operating system s monitor settings and the application s working space settings When printing the image...

Page 154: ...Other Scanning Methods Scanning with WIA Driver Scanning Using the Control Panel Windows XP Only ...

Page 155: ...using Windows Fax and Scan 1 Place the item on the platen or ADF Placing Items When Scanning from a Computer 2 Select New on the File menu of Windows Fax and Scan then click Scan The scan setting screen appears 3 Specify the settings Scanner The currently set product name is displayed To change the scanner click Change and select the product you want to use Profile Select Photo Default or Document...

Page 156: ...100 Preview or scan images as separate files Select this checkbox to preview or scan multiple images as separate files 4 Click Preview to preview the image The preview image appears on the right 5 Click Scan When scanning is completed the scanned image appears in the application Scanning with WIA Driver 1 0 The following is an example of scanning using Paint 1 Place the item on the platen or ADF P...

Page 157: ...eft will decrease the contrast of the image thus softening the image Moving it to the right will increase the contrast of the image thus sharpening the image You can also enter a value 127 to 127 Resolution DPI Enter the resolution Specify a value between 50 dpi and 600 dpi Resolution Picture type Select the type of scan you want for your item Reset Click to restore the original settings 5 Click P...

Page 158: ... 4 Select Picture type according to the item to be scanned To scan from the platen select Flatbed for Paper source To scan from the ADF Auto Document Feeder select Document Feeder Note To scan with the values previously set in Custom settings select Custom Selecting Document Feeder for Paper source enables you to select Page size 5 Click Custom settings to set the preferences as required Brightnes...

Page 159: ...arpening the image You can also enter a value 127 to 127 Resolution DPI Enter the resolution Specify a value between 50 dpi and 600 dpi Resolution Picture type Select the type of scan you want for your item Reset Click to restore the original settings 6 Click Preview to preview the image The preview image appears on the right Drag to specify the scan area 7 Click Next and follow the instructions ...

Page 160: ...rner at the arrow alignment mark of the platen Photos that have been cut to various shapes and items smaller than 1 2 inches 3 cm square cannot be cropped accurately when scanning Reflective disc labels may not be scanned as expected For Photos Postcards Business Cards or BD DVD CD For Magazines Newspapers or Documents Placing a Single Item Place the item face down on the platen with 0 4 inch 1 cm...

Page 161: ...egrees or less are corrected automatically Placing Documents ADF Auto Document Feeder Important Do not leave thick items on the platen when scanning from the ADF May result in paper jam Place and align documents of the same size when scanning two or more documents Refer to Originals You Can Load for your model from Home of the Online Manual for details on supported document sizes when scanning fro...

Page 162: ......

Page 163: ... of the Machine Forwarding Scanned Data to the Computer Using the Operation Panel of the Machine Basic Setting Items on the Operation Panel of the Machine Selecting a Response to Commands from the Operation Panel Using IJ Scan Utility ...

Page 164: ...ttings of Canon IJ Scan Utility Settings Dialog Box 1 Make sure that the machine is turned on Confirming that the Power Is On 2 Press the SCAN button If you forward the scanned data to a computer for the first time the Scan menu screen is displayed Go to step 3 If you have forwarded the scanned data to a computer the Scan standby screen is displayed If you change the scan settings press the Menu b...

Page 165: ... to select the data format then press the OK button 5 Make sure that Scan resolution is selected then press the OK button 6 Use the button to select the scan resolution then press the OK button The Scan standby screen is displayed after all the settings have been specified 6 Load the original document on the platen glass or in the ADF Loading Originals 7 Press the Color button for color scanning o...

Page 166: ...lection screen may be displayed after pressing the Color or Black button for the first time In this case specify Canon IJ Scan Utility as the application software to use select Always use this program for this action then click OK From the next time Canon IJ Scan Utility is automatically started If you want to scan originals with advanced settings or if you want to edit or print the scanned images...

Page 167: ...n if the machine is turned off When you forward the scanned data to the computer you can specify the destination and file name using Canon IJ Scan Utility Settings Dialog Box If you scan originals from the computer you can scan with advanced settings For details on scanning from the computer Scanning Photos and Documents Scan size Select the size of the original Ex If you select Auto scan A Singl ...

Page 168: ... when performing Auto Scan from the operation panel are used as examples in the following descriptions 1 Start IJ Scan Utility Starting IJ Scan Utility 2 Click Settings The Settings dialog box appears 3 Select a scan mode on the Scanning from the Operation Panel tab Note See the section below for details Settings Save to PC Auto Dialog Box Settings Save to PC Photo Dialog Box Settings Save to PC D...

Page 169: ...4 Specify image corrections in Scan Options 5 Specify the file name and other settings in Save Settings 6 Select the application you want to start after scanning in Application Settings ...

Page 170: ...7 Click OK The responses will be executed according to the specified settings when you start scanning from the operation panel ...

Reviews: