background image

Canon

MultiPASS L90 Hardware User’s Guide

ENGLISH

A-2

Appendix A

The Menu System

The Menu System

The MultiPASS L90’s menu system allows you to customise the way your unit
works. The following pages outline the unit’s various menus and settings, and
shows how to use them.

The factory default settings in the following tables are shown by asterisks (*).

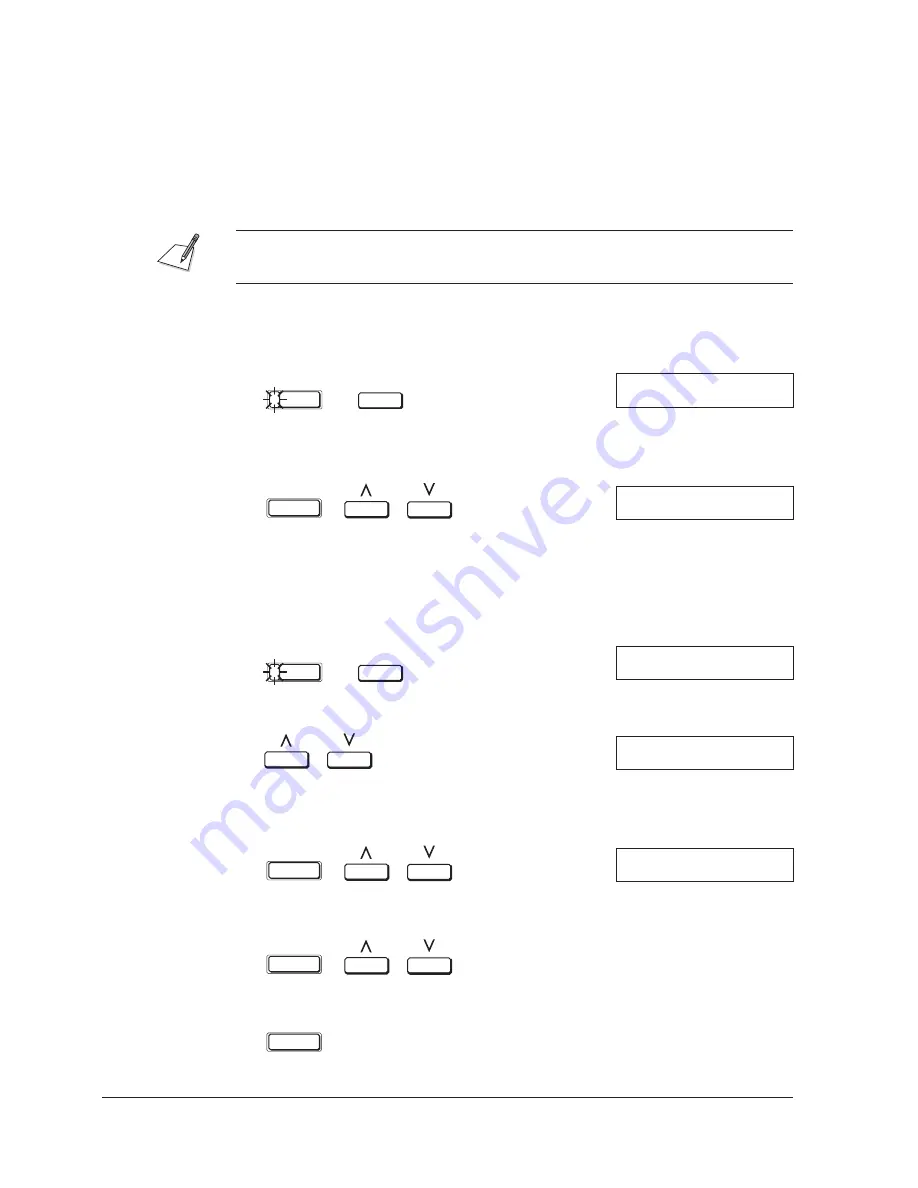
To Access SPEED DIAL SETUP:

1. Press FUNCTION and DATA REGISTRATION.

FUNCTION

DATA

REGISTRATION

DATA REGISTRATION

1.SPEED DIAL SETUP

2. Press SET, then use the search buttons to display the item you want to set or

change.

SET

SPEED DIAL SETUP

1.1-TOUCH SPD DIAL

J

For details on registering numbers, see page 3-12.

To Access USER SETTINGS:

1. Press FUNCTION and DATA REGISTRATION.

FUNCTION

DATA

REGISTRATION

DATA REGISTRATION

1.SPEED DIAL SETUP

2. Use the search buttons to display 2.USER SETTINGS.

DATA REGISTRATION

2.USER SETTINGS

3. Press SET, then use the search buttons to display the item you want to set or

change (see the following table).

SET

USER SETTINGS

1.DATE & TIME

4. Press SET, then use the search buttons to select menu items and sub-items.

SET

5. Press SET.

SET

Summary of Contents for MultiPASS L90

Page 1: ...fcv MultiPASS L90 User s Manual ...

Page 2: ...s faster call set up Trademarks Canon is a registered trademark of Canon Inc Copyright Copyright E 1997 by Canon Inc All rights reserved No part of this publication may be reproduced transmitted transcribed stored in a retrieval system or translated into any language or computer language in any form or by any means electronic mechanical magnetic optical chemical manual or otherwise without the pri...

Page 3: ...TZEN RADIAZIONE LASER INVISIBLE IN CASO DI APERTURA EVITARE L ESPOSIZIONE AL FASCIO RADIACION LASER INVISIBLE CUANDO SE ABRE EVITAR EXPONERSE AL RAYO AAVATTAESSA OLET ALTTIINA NÄKYMÄTTÖMÄLLE LASERSÄTEILYLLE ÄLÄ KATSO SÄTEESEEN OSYNLIG LASERSTRÅLNING NÄR DENNA DEL ÄR ÖPPNAD BETRAKTA EJ STRÅLEN USYNLIG LASER STRÅLING NÅR DENNE ER ÅBEN UNDGÅ BESTRÅLING USYNLIG LASERSTRÅLING NÅR DEKSEL ÅPNES UNNGÅ EKS...

Page 4: ... y 89 336 EEC según la enmienda a la Directiva 92 31 EEC ambas según la enmienda de la Directiva 93 68 EEC Esta marca CEE indica que este equipamento está de acordo com as Directivas 73 23 EEC e 89 336 EEC conforme amenda da directiva 92 31 EEC ambas amendas da directiva 93 68 EEC Auth h CE sh mansh dhlw nei thn sumvwnı a thŒ Suskeuh Œ me thn Odhgı a 73 23 EEC kai thn Odhgı a 89 336 EEC o pwŒ trop...

Page 5: ... Dimensions 2 3 Unpacking Your MultiPASS L90 2 4 Do You Have Everything 2 4 Removing Shipping Materials 2 6 Replaceable Parts 2 7 Assembling Your MultiPASS L90 2 8 Controls Components and Connections 2 9 From the Front 2 9 From the Back 2 10 The Handset Option 2 10 The Operation Panel 2 11 Making Connections 2 15 Connecting the Telephone Line 2 15 Connecting a Telephone or Optional Handset 2 15 Co...

Page 6: ...d Dialling 3 13 One Touch Speed Dialling 3 13 Storing Numbers for One Touch Speed Dialling 3 13 Changing a Number Name Stored under a One Touch Speed Dialling Button 3 16 Using One Touch Speed Dialling 3 18 Coded Speed Dialling 3 19 Storing Numbers for Coded Speed Dialling 3 19 Changing a Number Name Stored under a Coded Speed Dialling Code 3 21 Using Coded Speed Dialling 3 23 Group Dialling 3 24 ...

Page 7: ...ng Up Redialling 4 11 Maximising Image Quality 4 14 Resolution 4 14 Auto Halftone 4 14 Scanning Contrast 4 15 Chapter 5 Receiving Faxes 5 1 Different Ways to Receive a Fax 5 2 How to Set the Receiving Mode 5 3 Automatic Receiving Options 5 4 Setting Up Fax Telephone Auto Switch Receiving 5 5 What Happens When FAX TEL AUTO SW is Selected 5 6 Manual Receiving 5 10 Using the MultiPASS L90 with an Ans...

Page 8: ... a Stored Fax 6 15 Sending a Stored Fax to Another Destination 6 16 Receiving a PC Fax Document in Memory 6 18 If a Power Cut Occurs 6 19 During a Power Failure 6 19 Memory Backup Function 6 19 Making Copies 6 20 Polling To Receive Faxes 6 22 Polling a Fax Machine 6 22 Using Tone Dialling on a Pulse Line 6 23 Restricting Use of the MultiPASS L90 6 24 Chapter 7 Manual Feed of Paper Envelopes etc 7 ...

Page 9: ... the Inside of the MultiPASS L90 9 3 Cleaning the Scanner Components 9 4 Chapter 10 Frequently Asked Questions 10 1 Questions and Answers 10 2 Did Your Document or Recording Paper Misfeed or Jam 10 2 Document Feed Jams and Misfeeds 10 2 Recording Paper Jams 10 3 Can not Send Documents Correctly 10 9 Does the document not feed properly 10 9 Can not send a fax 10 9 Are the faxes you send spotted or ...

Page 10: ... Messages 10 18 Appendix A The Menu System A 1 The Menu System A 2 To Access SPEED DIAL SETUP A 2 To Access USER SETTINGS A 2 USER SETTINGS A 3 To Access REPORT SETTINGS A 4 REPORT SETTINGS A 5 To Access SEND TX SETUP A 6 SEND TX SETUP A 7 To Access RECEIVE RX SETUP A 8 RECEIVE RX SETUP A 8 To Access FAX PRINTER SETUP A 10 FAX PRINTER SETUP A 11 To Access SYSTEM SETTINGS A 12 SYSTEM SETTINGS A 13 ...

Page 11: ...ents that come with the unit and gives important safety instructions Features of the Canon MultiPASS L90 1 2 Plain Paper Fax Features 1 3 Copier Features 1 3 Telephone Features 1 4 Printer Features 1 4 PC Fax Features 1 4 Scanner Features 1 4 How to Use Your Documentation 1 5 Type Conventions 1 6 Customer Support 1 7 Important Safety Instructions 1 8 ...

Page 12: ...ephone option The MultiPASS L90 is equipped with a standard bi directional parallel port that enables it to transfer data to and from your computer This makes it possible for you to send scanned documents and received faxes from your MultiPASS L90 to your computer and to send data to be printed and or faxed from your computer to the MultiPASS L90 Your MultiPASS L90 includes the MultiPASSTM Desktop...

Page 13: ...eceive fax messages and normal phone calls on a single line J A transmission speed of approximately six seconds per page J A fax memory that can store approximately 42 received pages or 138 received pages with the optional 2 MB memory board installed J An Error Correction Mode ECM that reduces transmission errors J Sophisticated networking features such as memory broadcasting polling reception res...

Page 14: ...nter Features J 600 600 dpi with Resolution Enhancement laser beam printing for high resolution text and graphics PC Fax Features J Ability to set and download user settings including speed dial numbers directly from PC to MultiPASS L90 J Fax address book J Fax viewer J Fax distribution lists J Custom cover sheets J ECM receiving J Annotations and highlight supported Scanner Features J High precis...

Page 15: ...n one location and receiving documents in memory Keep it handy so you can refer to it when you have a problem or need particular information about the MultiPASS L90 J If you need help getting your MultiPASS L90 to operate properly see Chapter 10 Frequently Asked Questions For the unit s technical specifications see Appendix B J Use your MultiPASSTM Desktop Manager for Windows User s Guide to find ...

Page 16: ...our hardware or software or cause injury to yourself Notes provide advice or suggestions regarding the use of the MultiPASS L90 In addition this guide uses bold capital letters to show the names of buttons and switches on the unit such as SET FUNCTION or STOP Text that appears in the unit s display or the names of lamps are also shown using capital letters such as RECEPTION OK ...

Page 17: ...lem with your unit try first to solve it by referring to the information in Chapter 10 Frequently Asked Questions If you still can not solve the problem contact a Canon Authorised Service Facility If you think your MultiPASS L90 needs service only a Canon Authorised Service Facility will do warranty service You must have your sales receipt for warranty service ...

Page 18: ...hese openings Do not place the unit on a bed sofa rug or other similar soft surface or near a radiator or heat source Also do not place the unit in a cupboard on shelves or in a similar structure unless properly ventilated J Operate the unit only from the type of power source indicated on the unit s label If you are not sure of the type of power available consult your dealer or local power company...

Page 19: ...ey could touch dangerous voltage points or short out parts possibly resulting in fire or electric shock J After you unplug the unit wait at least five seconds before you turn it back on J Never unplug the unit during printing This can cause the printing unit to jam J Always unplug the unit during thunderstorms J Always unplug the unit before moving or cleaning it J Before you transport your unit r...

Page 20: ...e smoke or unusual noises or odors coming from it J If it does not operate normally when you have followed the operating instructions Adjust only those controls that are covered by the operating instructions in this manual Improper adjustment of other controls may result in damage and may require extensive work by a qualified technician to restore the product to normal operation J If it has been d...

Page 21: ...aterials 2 6 Replaceable Parts 2 7 Assembling Your MultiPASS L90 2 8 Controls Components and Connections 2 9 From the Front 2 9 From the Back 2 10 The Handset Option 2 10 The Operation Panel 2 11 Making Connections 2 15 Connecting the Telephone Line 2 15 Connecting a Telephone or Optional Handset 2 15 Connecting an Extension Phone or Answering Machine 2 16 Connecting the Parallel Cable 2 17 Poweri...

Page 22: ...ve to place the unit near a window install heavy curtains or blinds J Place the unit near a standard 220 240 V AC power outlet and a telephone line jack J Do not plug the unit into a circuit that is also used by appliances such as air conditioners electric typewriters or copiers Such appliances generate electrical noise that can interfere with faxing documents J Make sure the MultiPASS L90 is near...

Page 23: ... and to allow paper to flow freely into and out of the unit It requires this much space Top view 423 mm 445 mm 91 mm 383 mm 81 5 mm Side view 185 mm 269 mm 260 mm 435 2 mm Bottom view 315 mm 282 5 mm 265 mm If you need assistance installing your MultiPASS L90 contact your local Canon authorised service representative ...

Page 24: ...om the box You should have someone help by holding the box while you lift the unit and its protective packaging out of the carton Telephone Line Power Cord FX3 Toner Cartridge Manual Feed Tray User s Guide Desktop Manager for WindowsH Software User s Guide and Floppy Disks One Touch Faceplate 2 Sub Trays same size Document Support for ADF and Output Tray Document Supports for Scanned Documents Mai...

Page 25: ...Support for Scanned Documents FX3 Toner Cartridge One Touch Faceplate MultiPASS L90 User s Guide this book Power Cord Telephone Line Desktop Manager for WindowsH Software User s Guide Printer Driver Floppy Disk Desktop Manager for WindowsH Software Floppy Disks If anything is missing notify your Canon dealer immediately J In addition to the items shipped with your MultiPASS L90 you will need to pu...

Page 26: ...L90 be sure to remove all shipping materials as described below 1 Remove the shipping tapes from the printer cover and rear cover 2 The LCD is covered with a protective clear plastic sheet Please peel off this protective sheet 3 Remove the soft styrofoam sheet from inside the operation panel ...

Page 27: ...l feed tray from the protective bag 5 Remove the shipping tapes and cardboard protector from inside the paper cassette Replaceable Parts The only component of the MultiPASS L90 that should need regular service or replacement is the FX3 toner cartridge ...

Page 28: ...the output tray and document support for ADF rest back One touch Faceplate Fit the tabs on the one touch faceplate into the slots on the unit Manual Feed Tray Hold the tray with both hands and insert one tab first into the slot then the other tab into the other slot Make sure the tray rests back Telephone Line Connect the telephone line to the input jack marked Qp 2 15 Document Support for Scanned...

Page 29: ...sages and Menu Selections Input Jacks Telephone Line Jack Extension Phone Jack Handset Jack Bi directional Parallel Port Speaker Inner Cover Paper Delivery Slot Face up Delivery Slot Paper Cassette Output Tray Document Support for ADF Paper Guides Adjust to the Width of the Document Automatic Document Feeder ADF Holds Document pages to be scanned Operation Panel Use the Operation Panel Buttons to ...

Page 30: ...of the Unit to remove recording Paper Jams Power Connector Rear Cover Open to remove Paper when a recording Paper Jam occurs The Handset Option Ringer Volume Switch Adjusts the Volume of the Ringer There are three Settings High Low and Off Use a pen or other pointed object to adjust the Switch ...

Page 31: ... there is a paper jam when the unit is out of paper or toner when there is no cartridge installed when the loaded paper size is incorrect or when the printer cover or front cover is open b MEMORY lamp Flashes when data is being transmitted between your computer and the MultiPASS L90 Lights when there are documents in memory J When the MEMORY lamp is lit do not unplug the unit Doing so will erase a...

Page 32: ... buttons to enter phone numbers when dialling These buttons also enter text numbers and symbols when registering names and numbers j REDIAL button Press to dial the previous number dialled with the numeric buttons k CODED DIAL button Press this button and then press a 2 digit number code under which you have previously registered a facsimile or telephone number for coded speed dialling l HOOK butt...

Page 33: ...ons perform special operations when the FUNCTION lamp is on J DATA REGISTRATION button 01 Press to start data registration for facsimile numbers names and other important settings for sending receiving and printing J DELAYED TRANSMISSION button 02 Press to start registering a time for delayed sending J POLLING button 03 Use for polling receiving J MEMORY REFERENCE button 04 Use to delete or resend...

Page 34: ...J TONE button 13 Press to use tone dialling even if your unit is set for pulse dialling Press also to enter a in your facsimile number J Cursor buttons k j 14 and 16 Use to move the cursor during data registration J SPACE button 15 Press to enter a space between numbers or letters when you register facsimile numbers and names J CLEAR button 18 Press during data registration to clear a number or na...

Page 35: ...line to your telephone jack Connecting a Telephone or Optional Handset 1 If you wish to connect a telephone or optional handset to the unit connect the end of the cord to the jack marked See Appendix C for instructions on how to install the optional handset If the connector does not fit the jack or does not seat properly contact your local Canon authorised service representative or telephone compa...

Page 36: ...rked J You only need to use the extension answering machine jack the middle one when you are using a single phone line for both voice and fax communications The extension telephone does not ring for incoming calls J If the connector does not fit the jack or does not seat properly contact your local Canon authorised service representative or telephone company to have the correct connector installed...

Page 37: ...Make sure the computer is turned off and the MultiPASS L90 unplugged 2 Connect the parallel cable to your MultiPASS L90 J Align the cable connector with the interface port so that the shapes match J Gently press the cable connector into the port J Secure the cable connector by snapping the two wire clips on either sides of the port into the cable connector 3 Connect the other end of the parallel c...

Page 38: ...cord J Do not plug the unit into a power outlet shared with an appliance that generates electrical noise such as an air conditioner computer electric typewriter or copier J Make sure nothing is laying on the power cord and that the cord is located where it can not be walked on or tripped over J Do not overload the electrical outlet Make sure that the total amperage used by all products plugged int...

Page 39: ...the following message appears in the LCD display PLEASE WAIT The unit is warmed up and ready for use when the date appears in the LCD display 22 07 97 TUE 12 34 When connecting the unit for the first time the date display alternates with the following message 22 07 97 TUE 12 34 INSTALL CARTRIDGE P P See The Toner Cartridge on the following pages for details on installing the toner cartridge If fac...

Page 40: ...e may harm these items J Never touch the drum protective shutter When holding the cartridge avoid touching the drum protective shutter with your hands J Do not store the cartridge in direct sunlight J Avoid locations subject to high temperature high humidity or rapid changes in temperature Store the cartridge between 0 C and 35 C J Hold the cartridge as shown so that your hand is not touching the ...

Page 41: ...idge follow the instructions on page 10 13 to evenly distribute the toner If after doing this the message remains displayed or the print quality is low replace the cartridge as described below Canon makes numerous cartridges The FX3 toner cartridge has been designed specially for the MultiPASS L90 and is the only one Canon recommends that you use 1 Remove any documents or printed pages from the un...

Page 42: ...om side to side five or six times J This evenly distributes the toner inside 7 Place the cartridge on a flat clean surface and steady it with one hand Then remove the seal by gently pulling on the plastic tab with your other hand J Use a firm even pull to remove the plastic seal To avoid breaking the seal do not jerk on it unevenly Side View Top View Pull in this direction Pull in this direction ...

Page 43: ...the cartridge are aligned with the arrow marks P O on the unit J Align the arrow marks on the cartridge A with the arrow marks on the inside of the unit N 9 Gently slide the cartridge down and back and push firmly until it clicks into position J Make sure the cartridge is set all the way into the unit Otherwise it won t operate properly ...

Page 44: ...again J If you see REPLACE CARTRIDGE in the display the cartridge may not be installed properly even if the printer cover closes completely Try installing the cartridge again J After you have replaced the cartridge make a copy of a document to check if the unit is printing properly See page 6 20 Making Copies for details on making a copy J If you are setting up for the first time go on to the next...

Page 45: ...e paper so the top and bottom edges and sides are straight and even before placing it in the paper cassette J To keep the paper from curling do not open paper packs until you are ready to use the paper Store unused paper from opened packs in a cool dry location in the original packaging J The paper cassette supplied with your unit holds up to 250 sheets of standard weight paper or a stack of 2 75 ...

Page 46: ...he paper cassette being careful not to drop it as you pull it out J Filling the paper cassette without removing it completely from the unit may cause the paper to misfeed Be sure to remove the paper cassette completely before loading paper 2 Before loading the paper fan it and then stack it so that the leading edge and sides of the paper are even ...

Page 47: ... J Make sure the paper stack is not higher than the limit marks NNN on the sides of the cassette and is under the tabs on the paper selector J Check all corners and edges of the paper stack to be sure they are flat and even J The cassette can hold about 250 sheets of standard paper ...

Page 48: ...isplayed try inserting the paper cassette again J If you pull out the paper cassette with paper remaining in the cassette be sure to check the following before reinserting the cassette I Make sure no paper is out of the cassette I Make sure there is no paper inside the unit J If you wish to use letter or legal size paper please contact a Canon Authorised Service Facility J If the paper cassette ja...

Page 49: ...ering Your Fax Number and Name 3 10 Setting the Telephone Line Type 3 12 Speed Dialling 3 13 One Touch Speed Dialling 3 13 Storing Numbers for One Touch Speed Dialling 3 13 Changing a Number Name Stored under a One Touch Speed Dialling Button 3 16 Using One Touch Speed Dialling 3 18 Coded Speed Dialling 3 19 Storing Numbers for Coded Speed Dialling 3 19 Changing a Number Name Stored under a Coded ...

Page 50: ...ous system parameters relating to the software and the hardware including the Transmit Terminal Identification TTI information and speed dial numbers Once the settings are entered and saved they are downloaded to the MultiPASS L90 unit and will remain in effect until the next change is downloaded This method is covered in the MultiPASS Desktop Manager for Windows User s Guide It should be noted th...

Page 51: ...in J If you make a mistake while making an entry you can press CLEAR and repeat the entry or press STOP and start again Entering Numbers Letters and Symbols Each numeric button has a number and a group of uppercase and lowercase letters assigned to it Use the chart below to determine which number to press for each character Button Uppercase Lowercase 1 2 3 4 5 6 7 8 9 0 ABCÅÄÁÀA ÂÆÇ DEFÐËÉÈÊ GHIÏÍ...

Page 52: ...the symbol you want appears Press any other button or j to enter the symbol and move the cursor Here is the general method of entering letters 1 Make sure the unit is in uppercase and lowercase letter mode press if not 2 Press the button that contains the letter you want J If you want to enter a space press SPACE Special Function button 3 Press the button repeatedly as needed until the letter you ...

Page 53: ...n A appears in the upper right corner then press 2 for the first A 2 ABC UNIT NAME A A 2 Press the right cursor j Special Function button to enter the A and move the cursor one space to the right UNIT NAME A A 3 Press 2 for the second A 2 ABC UNIT NAME A AA Editing Your Entry You can also correct characters you ve already entered as follows 1 Use the cursor buttons k j to move the cursor to the ch...

Page 54: ...6 17 18 19 20 PAUSE TONE D T Using the Menu System The MultiPASS L90 includes a menu system that you use to select fax telephone and printer operations and to enter user information The system includes these seven items J SPEED DIAL SETUP Lets you register numbers for one touch speed dialling coded speed dialling and group dialling J USER SETTINGS Lets you enter the information that prints on the ...

Page 55: ...he Menu System You ll use the Special Function buttons to display and select items from the menu system as follows 1 FUNCTION DATA REGISTRATION DATA REGISTRATION 1 SPEED DIAL SETUP 2 Use the search buttons to change the menu display J Press i to display the next item in the menu The list will wrap from the last item in the list back to the first J Press h to display the previous item in the menu T...

Page 56: ...p of the faxed document in small type By identifying the documents you send the receiving party can recognize your fax messages at a glance Here is a sample document with the identifying information The date and time you sent the document Your Fax Telephone number Your name or company name The name of the party who is receiving the document The page number The top line also includes the name of th...

Page 57: ...R SETTINGS 1 DATE TIME 2 Press SET and use the numeric buttons to enter the correct date and time Use the 24 hour system for the time 5 20 p m would be 17 20 for example SET 1 4 7 2 5 8 0 3 6 9 ABC DEF GHI JKL MNO PQRS TUV WXYZ Ex 2 2 0 7 9 7 1 7 2 0 DATE TIME 22 07 97 17 20 3 Press SET to save the date and time then press STOP to return to standby mode SET 22 07 97 TUE 17 20 ...

Page 58: ... buttons to display 2 UNIT TELEPHONE USER SETTINGS 2 UNIT TELEPHONE 3 Press SET and enter your fax number up to 20 digits using the numeric buttons SET 1 4 7 2 5 8 0 3 6 9 ABC DEF GHI JKL MNO PQRS TUV WXYZ Ex 5 0 3 SPACE 5 5 5 SPACE 1 2 1 2 UNIT TELEPHONE TEL 503 555 1212 You can use the TONE button to enter a plus sign before the fax number 4 Press SET to save the fax number then press SET again ...

Page 59: ...r your name or your company name up to 24 characters using the numeric buttons Qp 3 3 1 4 7 2 5 8 0 3 6 9 ABC DEF GHI JKL MNO PQRS TUV WXYZ Ex CANON INC UNIT NAME A CANON INC 6 Press SET to save the name then press STOP to return to standby mode SET 22 07 97 TUE 17 20 ...

Page 60: ...consult your local telephone company 1 FUNCTION DATA REGISTRATION SET USER SETTINGS 1 DATE TIME 2 Use the search buttons to display 10 TEL LINE TYPE USER SETTINGS 10 TEL LINE TYPE 3 Press SET then use the search buttons to select rotary pulse or touch tone SET TEL LINE TYPE ROTARY PULSE TEL LINE TYPE TOUCH TONE 4 Press SET to save your selection then press STOP to return to standby mode SET 22 07 ...

Page 61: ...e page 4 6 for Manual Sending via the Handset or HOOK button One Touch Speed Dialling Storing Numbers for One Touch Speed Dialling 1 FUNCTION DATA REGISTRATION DATA REGISTRATION 1 SPEED DIAL SETUP 2 Press SET twice SET SET 1 TOUCH SPD DIAL 01 3 Use the search buttons to select a one touch speed dialling button between 01 and 20 1 TOUCH SPD DIAL 07 J You can also do this by pressing FUNCTION then t...

Page 62: ... and are ignored during dialling They are used to enhance clarity on lists and reports J If you want to clear a number or a mistaken entry press CLEAR J To enter a pause in the number press PAUSE one or more times 5 Press SET twice then use the numeric buttons to store the name that goes with the number See page 3 3 for details on entering letters SET SET 1 4 7 2 5 8 0 3 6 9 ABC DEF GHI JKL MNO PQ...

Page 63: ...more numbers and names for one touch speed dialling press DATA REGISTRATION DATA REGISTRATION 8 When you are finished registering numbers and names press STOP to return to standby mode 22 07 97 TUE 12 34 You may want to print a list of the numbers and names you store under the one touch speed dial buttons and post the list near the unit See Printing a List of Registered Telephone Numbers on page 8...

Page 64: ...nt to change or delete between 01 and 20 1 TOUCH SPD DIAL 02 20 5458545 J You can also do this by pressing FUNCTION then the one touch speed dialling button then FUNCTION again J If the button you select is registered for group dialling GROUP DIAL appears 3 Press SET twice SET SET TELEPHONE NUMBER TEL 20 5458545 J The registered number is displayed To delete a number 4 Press CLEAR then SET CLEAR S...

Page 65: ...5 Press SET twice to display the registered name To change the name use the numeric buttons to enter the new name over the previous name See page 3 3 for details on entering letters SET SET 1 4 7 2 5 8 0 3 6 9 ABC DEF GHI JKL MNO PQRS TUV WXYZ NAME A Canon Europa J If you want to keep the same name do not enter a new name and go to step 7 6 Press SET SET 1 TOUCH SPD DIAL 03 81 773 3173 J To change...

Page 66: ... the coded speed dial numbers first then to the one touch speed dial numbers J After you press a one touch speed dialling button the unit will start scanning in five seconds even if you don t press START COPY ten seconds if you press more than one one touch speed dialling button So if you want to send to multiple destinations be sure to press the second one touch speed dialling button within five ...

Page 67: ... in the display CODED SPD DIAL 07 J If a number is already stored at the code you select that number appears J If the code you select is registered for group dialling GROUP DIAL appears 5 Press SET twice then use the numeric buttons to enter the fax number you want to store SET SET 1 4 7 2 5 8 0 3 6 9 ABC DEF GHI JKL MNO PQRS TUV WXYZ TELEPHONE NUMBER TEL J Press SPACE to enter spaces between numb...

Page 68: ...adjust the transmission setting press SET and follow the instruction on page 3 28 SET OPTIONAL SETTING OFF or To continue registering more numbers and names for coded speed dialling press DATA REGISTRATION DATA REGISTRATION CODED SPD DIAL 08 9 When you are finished registering numbers and names press STOP to return to standby mode 22 07 97 TUE 12 34 You may want to print a list of the numbers and ...

Page 69: ...hen press SET SET CODED SPD DIAL 00 3 Use the search buttons to select the two digit code 00 99 you want to change CODED SPD DIAL 30 1 432 2060 J If the code you select is registered for group dialling GROUP DIAL appears 4 Press SET twice SET SET TELEPHONE NUMBER TEL 1 432 2060 J The registered number is displayed To delete a number 5 Press CLEAR then SET CLEAR SET CODED SPD DIAL 2 NAME J When you...

Page 70: ... step 6 6 Press SET twice to display the registered name To change the name use the numeric buttons to enter the new name over the previous name See page 3 3 for details on entering letters SET SET 1 4 7 2 5 8 0 3 6 9 ABC DEF GHI JKL MNO PQRS TUV WXYZ NAME A Canon OPTICS J If you want to keep the same name do not enter a new name and go to step 8 7 Press SET SET CODED SPD DIAL 31 J To change addit...

Page 71: ...an enter multiple coded speed dial codes and also include one touch speed dial buttons 01 20 The fax will automatically be sent in numerical order to the coded speed dial numbers first then to the one touch speed dial numbers J Once you enter a two digit code the unit will start scanning in five seconds even if you don t press START COPY ten seconds if you enter multiple codes So if you want to se...

Page 72: ...REGISTRATION 1 SPEED DIAL SETUP 2 Press SET then use the search buttons to display 3 GROUP DIAL SET SPEED DIAL SETUP 3 GROUP DIAL 3 Press SET SET 4 To store a group under a one touch speed dialling button Use the search buttons to select an unused one touch speed dial button code 01 to 20 If a group or number is already stored in the button you select 1 TOUCH SPD DIAL or GROUP DIAL is displayed GR...

Page 73: ... the desired one touch speed dial button s and press FUNCTION again the FUNCTION lamp goes on Ex FUNCTION 06 FUNCTION J If you want to enter a number that is already stored in a coded speed dialling code press CODED DIAL then enter the two digit code for the number Press CODED DIAL between each entry Ex CODEDDIAL 0 7 J You can add new numbers to a group already registered for group dial J If you w...

Page 74: ... 5 8 0 3 6 9 ABC DEF GHI JKL MNO PQRS TUV WXYZ Ex CANON INC NAME A CANON INC 8 Press SET SET J To enter additional groups repeat the above procedure starting with step 4 If a one touch speed dialling number or coded speed dialling code is changed it will also be changed if registered for group dialling 9 When you are finished entering groups press STOP to return to standby mode 22 07 97 TUE 12 34 ...

Page 75: ...ed for one touch or coded speed dialling J Once you select a group the unit will start scanning in five seconds even if you don t press START COPY ten seconds if you enter multiple codes So if you want to send to multiple destinations be sure to press the second group dialling coded dialling or one touch speed dialling button within five seconds after pressing the first and press any subsequent bu...

Page 76: ...lling 1 Use the search buttons to display ON OPTIONAL SETTING ON 2 Press SET SET OPTIONAL SETTING 1 SET TIME Setting the Transmission Time Use this procedure to set the transmission time for a one touch speed dialling button or a coded speed dialling code Make sure the OPTIONAL SETTING is on see above before following the procedure below 1 Use the search buttons to display 1 SET TIME OPTIONAL SETT...

Page 77: ...Ex 0 2 1 5 SET TIME 2 02 15 J Use the 24 hour system to set the time 4 Press SET SET SET TIME 3 5 To continue registering other features for the same number press DATA REGISTRATION DATA REGISTRATION OPTIONAL SETTING 2 TX TYPE J You do not need to press DATA REGISTRATION if the last time setting you set was 5 or If you are finished press STOP to return to standby mode 22 07 97 TUE 17 20 ...

Page 78: ...ure you can send documents with a registered subaddress or password based on the ITU T standard so that documents transmitted without the corresponding subaddress or password will not be received To send a document with the PASSWORD SUBADDRESS feature it is necessary that the subaddress or the password of the document you wish to send is identical to the subaddress or password of the other fax to ...

Page 79: ...numbers an asterisk a sharp or spaces up to 20 digits J If you wish not to register a subaddress press SET J If you make a mistake and want to enter again press CLEAR 4 Press SET twice then use the numeric buttons to enter a TX password SET SET 1 4 7 2 5 8 0 3 6 9 ABC DEF GHI JKL MNO PQRS TUV WXYZ Ex 9 8 7 6 5 4 3 PASSWORD 987 654 3 J You can enter numbers an asterisk a sharp or spaces up to 20 di...

Page 80: ...IONAL SETTING is on Qp 3 28 before following the procedure below 1 Use the search buttons to display 3 LONG DISTANCE OPTIONAL SETTING 3 LONG DISTANCE 2 Press SET then use the search buttons to change the setting SET LONG DISTANCE DOMESTIC Select long distance 1 then try to send your document LONG DISTANCE LONG DISTANCE 1 If the setting 1 does not solve the problem try setting 2 or 3 LONG DISTANCE ...

Page 81: ...EED 2 Press SET then use the search buttons to change the speed setting SET TX SPEED 14400bps J If it takes a long time for your document transmissions to begin this may mean that the telephone lines in your area are in poor condition If you experience this problem change the transmission speed from 14400 bps to 9600 bps or 4800 bps TX SPEED 9600bps TX SPEED 4800bps 3 Press SET SET 4 To continue r...

Page 82: ...3 34 Chapter 3 Registering Information in the MultiPASS L90 ...

Page 83: ...reparing to Send a Fax 4 4 Preparing the Document 4 4 Loading the Document 4 4 Two Ways to Send a Fax 4 6 Memory Sending 4 6 Manual Sending via the Handset or HOOK button 4 7 Adding Pages During Transmission 4 8 Cancelling a Transmission 4 8 Messages Displayed During Sending 4 9 Messages During Memory Sending 4 9 Redialling 4 10 Manual Redial 4 10 Auto Redial in Memory Sending 4 10 Cancelling Auto...

Page 84: ... 7 240 g m2 Multipage document 50 90 g m2 Width Paper 146 5 259 mm Scanning 208 mm Length 103 5 366 mm Thickness One page document 0 06 0 3 mm Multipage document 0 07 0 13 mm To prevent paper jams in the automatic document feeder ADF be sure not to use any of the following with the unit Wrinkled or creased paper Carbon or carbon back paper Curled paper Coated paper Torn paper Onion skin or very th...

Page 85: ... Area Make sure your document s text and graphics do not extend all the way to the edge of the page The white area in the illustration below shows the area the MultiPASS L90 can scan on an A4 size page Max 4 mm Max 3 mm Max 3 mm Max 4 mm ...

Page 86: ...Make sure all pages are the same size and type Loading the Document The MultiPASS L90 can hold up to 30 A4 size letter size or 20 legal size pages at a time If your document is longer than this you can add more pages to the automatic document feeder ADF while the fax is being sent see Adding Pages During Transmission later in this chapter 1 Slide the paper guides to fit the width of the document ...

Page 87: ...automatic document feeder ADF until it stops J If you are experiencing difficulty feeding multipage documents remove the stack and tap it on a flat surface to even the edges Then insert it into the automatic document feeder ADF until it stops You are now ready to send the fax as described on the following pages ...

Page 88: ...re often busy it automatically redials or to send to more than one fax number 1 Load the document into the automatic document feeder ADF until it stops J Load as described on pages 4 4 and 4 5 2 Use the numeric buttons to dial the fax number you re sending to 1 4 7 2 5 8 0 3 6 9 ABC DEF GHI JKL MNO PQRS TUV WXYZ J You can also use one touch or coded speed dialling to enter the number 3 Check the d...

Page 89: ...eeder ADF until it stops J Load as described on pages 4 4 and 4 5 2 Press HOOK to activate the speaker J You will hear the dial tone and the IN USE lamp lights up 3 Use the numeric buttons to dial the fax number you re sending to 1 4 7 2 5 8 0 3 6 9 ABC DEF GHI JKL MNO PQRS TUV WXYZ J You can also use one touch or coded speed dialling to enter the number J If you make a mistake press STOP and star...

Page 90: ...If you re using memory sending the message shown below appears Go to step 2 CANCEL DURING TX RX YES NO J If you re using manual sending the transmission is cancelled immediately 2 Press to cancel the transmission or press to complete the transmission or If you press the STOP button while the unit is waiting to redial the display will be deleted but the transmission will not be cancelled Follow the...

Page 91: ...t Transaction No TRANSMIT 0040 SCANNING DOC P 001 Page No During transmission the following are displayed alternately J Condition CALLING TRANSMIT etc J Dialled number J Other party s name J Transmission mode G3 J ECM TX in ECM J TX RX no J Page no When the document has been transmitted the following are displayed for about ten seconds before the unit returns to standby mode J Transmission result ...

Page 92: ...UTO REDIAL 22 07 97 TUE 12 34 TX RX NO 0040 P P These messages are displayed once the unit has redialled the number and is calling Telephone No 22 07 97 TUE 12 34 CALLING 22 07 97 TUE 12 34 5035551212 P P Auto redialling occurs even if the unit s memory becomes full when the document is being scanned In this case the following messages are displayed Transaction No MEMORY FULL PLEASE WAIT AUTO REDI...

Page 93: ...he first page of the document and the error page You can change these settings by following the procedure below Setting Up Redialling You can set up the following for automatic redialling J The number of times the unit attempts redialling J The time interval between redialling attempts J How the unit handles redialling when a transmission error occurs Follow the procedure below to adjust these set...

Page 94: ...se the numeric buttons to enter the time interval during rediallings 02 to 99 minutes SET SET 1 4 7 2 5 8 0 3 6 9 ABC DEF GHI JKL MNO PQRS TUV WXYZ REDIAL INTERVAL 02MIN 7 Press SET twice then use the search buttons to select whether or not the unit redials when a transmission error occurs SET SET Select ON to redial when a transmission error occurs TX ERROR RESEND ON Select OFF to cancel redialli...

Page 95: ...error occurs SET Resends the first page of the document and the page where the error occurred RESEND TX FROM ERROR 1ST PG Resends only the page where the error occurred RESEND TX FROM ERROR PAGE Resends all the document pages RESEND TX FROM ALL PAGES 9 Press SET to save your selection then STOP to return to standby SET 22 07 97 TUE 17 20 ...

Page 96: ...ndard and is a good setting for documents with small text To use it press the FINE STANDARD button until the FINE lamp lights When making copies the unit automatically adjusts to FINE Auto Halftone This setting tells the MultiPASS L90 whether the document includes halftone images or is composed only of black text on a white background When Auto Halftone is ON the unit automatically adjusts to accu...

Page 97: ...ET to save your selection then press STOP to return to standby mode SET 22 07 97 TUE 17 20 When making copies the unit automatically adjusts to Auto Halftone ON Scanning Contrast The MultiPASS L90 can send documents using any of three contrast settings Dark Standard and Light STANDARD is the default and is fine for most documents If the print on your document is very light use DARKER if the print ...

Page 98: ... SCANNING CONTRAST STANDARD 4 Use the search buttons to display the scanning contrast you want J You can cancel and return to standby mode by pressing STOP any time before pressing SET in step 5 5 Press SET to save your selection then press STOP to return to standby mode SET 22 07 97 TUE 17 20 ...

Page 99: ... 4 Setting Up Fax Telephone Auto Switch Receiving 5 5 What Happens When FAX TEL AUTO SW is Selected 5 6 Manual Receiving 5 10 Using the MultiPASS L90 with an Answering Machine 5 11 Adjusting the MultiPASS L90 for Different Types of Answering Machines 5 11 Using an Answering Machine 5 12 Recording the Outgoing Message 5 12 Receiving Documents in Memory 5 13 Printing a Fax from Memory 5 14 Messages ...

Page 100: ...d to have the optional handset installed or an extension telephone connected Use manual receiving when you want to answer every call yourself In this mode the unit rings for every incoming call whether from a fax machine or a telephone You can also use extension telephones with this mode J Answering machine receiving Use this mode if you have a combined fax phone line with an answering machine and...

Page 101: ...utomatic receiving To adjust the automatic receiving options turn to Automatic Receiving Options below J If the MANUAL lamp is on the unit is set for manual receiving For more information on manual receiving see Manual Receiving below J If the ANS HOOK UP lamp is on the unit is set for answering machine receiving See Using the MultiPASS L90 with an Answering Machine below for more information Answ...

Page 102: ...ck up the handset to answer the call You can choose one of these automatic receiving options as follows 1 FUNCTION DATA REGISTRATION DATA REGISTRATION 1 SPEED DIAL SETUP 2 Use the search buttons to display 5 RECEIVE RX SETUP DATA REGISTRATION 5 RECEIVE RX SETUP 3 Press SET then use the search buttons to display 2 RX MODE SET RECEIVE RX SETUP 2 RX MODE 4 Press SET then use the search buttons to dis...

Page 103: ... of time it is going to ring is determined by the F T RING TIME setting above If you do not answer the call one of two things can happen 1 If you set the F T SWITCH ACTION to RECEIVE the unit will switch to fax receive mode automatically at that point and start to receive the document If no document comes in it disconnects the call after approximately 35 seconds The factory programmed default is R...

Page 104: ...tiPASS L90 starts ringing Pick up the handset to talk If you don t pick up the handset within 22 seconds F T SW ACTION Choose between Receive factory default setting and Disconnect DISCONNECT The MultiPASS L90 disconnects the call RECEIVE Factory default setting Not all fax machines are capable of sending a FAX TONE For those cases if you set the F T SW ACTION to RECEIVE the MultiPASS L90 switches...

Page 105: ...X MODE AUTO FAX RX 5 Press SET then use the search buttons to display 1 F T RING TIME this is how many seconds the unit rings while waiting for someone to pick up the handset SET FAX TEL AUTO SW 1 F T RING TIME 6 Press SET then use the numeric buttons to enter a time from 10 to 45 seconds SET 1 4 7 2 5 8 0 3 6 9 ABC DEF GHI JKL MNO PQRS TUV WXYZ Ex 0 2 2 F T RING TIME 022SEC 7 Press SET then use t...

Page 106: ...AGE J This allows you to send an electronic voice message to the other party s fax when you receive a call You are connected Please hold 10 Press SET then use the search buttons to display ON SET OUTGOING MESSAGE ON 11 Press SET then use the search buttons to select the first language of the message The default language is English SET OGM 1 GERMAN J With a choice of 12 languages you can select one...

Page 107: ...xes 12 Press SET If you want to select a second language for the message use the search buttons to select it The default setting is OFF SET OGM 2 OFF 13 Press SET then press STOP to return to standby mode SET 22 07 97 TUE 17 20 ...

Page 108: ...iving ID J While the fax is coming in the display shows a transaction number a unique number used to identify the fax and the sender s name See Messages Displayed While Receiving a Fax later in this section and Display Messages and Meanings in Chapter 10 J See Appendix A The Menu System for instructions on how to change the remote receiving ID or turn it off Qp A 9 3 Replace the handset in its cra...

Page 109: ...o Manual receive MANUAL lamp on or Automatic receive both the ANS HOOK UP and MANUAL lamps off using the ANS HOOK UP MANUAL button Adjusting the MultiPASS L90 for Different Types of Answering Machines Some answering machines listen for a pause and disconnect the line after a certain period of silence When used with an answering machine your unit also listens for a pause to determine if a fax is be...

Page 110: ... that provide voice mail on the telephone line you are connecting to the MultiPASS L90 If you do subscribe to an Answering Service we suggest that you dedicate a different telephone line to be used for fax communication only and connect that telephone line to the unit Recording the Outgoing Message When recording a message on the answering machine J Try to keep your message to less than 15 seconds...

Page 111: ... jam occurs J the message OUTPUT TRAY FULL is displayed J there is a sheet of paper or envelope in the manual feed tray The fax displays the following messages telling you which of the above has occurred RECEIVED IN MEMORY 22 07 97 TUE 12 34 SUPPLY REC PAPER RECEIVED IN MEMORY P P O O Error message Error messages REPLACE CARTRIDGE Qp 2 20 SUPPLY REC PAPER Qp 2 25 INSTALL CARTRIDGE Qp 2 20 CHECK PA...

Page 112: ...axes will be lost After you turn on the fax as soon as power is restored the unit will automatically print out a Memory Clear Report listing the documents that were deleted from memory at the time of the power failure The unit s memory can store up to 42 A4 size pages If the memory fills up before a fax is completely received the remaining pages of the fax will be lost and must be resent With the ...

Page 113: ...e following are displayed alternately J Condition RECEIVING J Other party s telephone no may not be displayed J Other party s name may not be displayed J Receiving mode G3 J ECM RX in ECM J TX RX no J Page no When the document has been received the following are displayed for about ten seconds before the unit returns to standby mode J Reception result RECEPTION OK or an error message J TX RX no Th...

Page 114: ...5 16 Chapter 5 Receiving Faxes How to Cancel an Incoming Fax To cancel an incoming fax 1 Press STOP CANCEL DURING TX RX YES NO 2 Press to cancel or to resume receiving the fax or ...

Page 115: ... Document that Encountered an Error Signal 6 13 Printing a List of the Documents in Memory 6 14 Printing a Stored Fax 6 15 Sending a Stored Fax to Another Destination 6 16 Receiving a PC Fax Document in Memory 6 18 If a Power Cut Occurs 6 19 During a Power Failure 6 19 Memory Backup Function 6 19 Making Copies 6 20 Polling To Receive Faxes 6 22 Polling a Fax Machine 6 22 Using Tone Dialling on a P...

Page 116: ...6 2 Chapter 6 Special Features ...

Page 117: ...ng CODED DIAL and entering coded speed dialling codes Be sure to press CODED DIAL between each code J Using the numeric buttons to enter one destination only Be sure to press SET after entering the number You can also enter groups registered under speed dialling buttons 3 If you want to review the numbers you entered press FUNCTION and use the search buttons FUNCTION J You can clear a displayed nu...

Page 118: ...L is displayed on the LCD Should this happen you may need to I open the operation panel to remove the page being scanned Pulling the document without opening the operation panel may cause it to tear or become soiled I with the operation panel open remove the document by pulling it upward I gently push the operation panel shut until it clicks I press STOP Then try dividing the document into several...

Page 119: ... DELAYED TX SET TIME 14 30 3 Use the numeric buttons to enter the time at which you want to send the fax Enter the time in 24 hour form 10 00 p m would be 22 00 for example 1 4 7 2 5 8 0 3 6 9 ABC DEF GHI JKL MNO PQRS TUV WXYZ Ex 2 2 0 0 DELAYED TX SET TIME 22 00 4 Press SET SET TEL 5 Enter the destination s you want to send the fax to You can do this by J Pressing one touch speed dialling buttons...

Page 120: ...6 6 Chapter 6 Special Features 6 Press SET SET If MEMORY FULL is displayed while the document is being scanned the fax can not be sent at a delayed time Qp 6 3 ...

Page 121: ... coded speed dialling Qp 3 19 J When you have to make calls to an extension you may have to press the R button before you dial the extension number Before you can use the R button you have to register it as explained below Registering the Access Type and the Outside Line Number When the MultiPASS L90 is connected to a PBX or other telephone switching system you can register the type of access and ...

Page 122: ...he switching system SET PBX PREFIX PBX HOOKING PBX EARTH CONNECTION 6 Press SET SET If you selected PREFIX in step 5 7 Enter the outside line number up to 19 digits using the numeric buttons 1 4 7 2 5 8 0 3 6 9 ABC DEF GHI JKL MNO PQRS TUV WXYZ Ex 1 2 3 4 5 6 PREFIX 123456 8 Press PAUSE PAUSE PREFIX 123456P 9 Press SET then press STOP to return to standby mode SET 22 07 97 TUE 17 20 ...

Page 123: ...6 9 Chapter 6 Special Features If you selected EARTH CONNECTION or HOOKING in step 5 7 Press SET then press STOP to return to standby mode SET 22 07 97 TUE 17 20 ...

Page 124: ...number for dialling use the numeric buttons to enter the number 1 4 7 2 5 8 0 3 6 9 ABC DEF GHI JKL MNO PQRS TUV WXYZ TELEPHONE NUMBER TEL 03 2 To enter a pause within a number make sure the FUNCTION lamp is on then press PAUSE PAUSE TELEPHONE NUMBER TEL 03p37579448P J To enter a pause at the end of a number press PAUSE and press SET J A pause entered within a number p is two seconds long J If nec...

Page 125: ...rst part of the number until dial tone detection is required 1 4 7 2 5 8 0 3 6 9 ABC DEF GHI JKL MNO PQRS TUV WXYZ TELEPHONE NUMBER TEL 348 2 When a dial tone detection is required make sure the FUNCTION lamp is on then press the D T button D T TELEPHONE NUMBER TEL 348 J Where the dial tone is inserted you will see a small dot During dialling this is where the unit waits for the dial tone 3 Enter ...

Page 126: ...Y REFERENCE FUNCTION MEMORY REFERENCE MEMORY REFERENCE 1 DELETE DOCUMENT 2 Press SET then use the search buttons to select the TX RX number of the fax you want to delete SET DELETE DOCUMENT TX RX NO 0002 Use the cursor buttons k j to display the SET TIME and the other party s number for the TX RX number displayed For more information print the Doc Memory List as described in Printing a List of the...

Page 127: ...M RETRANSMIT 3 Press SET then use the search buttons to select the TX RX number of the fax you want to resend SET MEM RETRANSMIT RX TX NO 0002 Use the cursor buttons k j to display the SET TIME and the other party s number for the TX RX number displayed For more information print the Doc Memory List as described in Printing a List of the Documents in Memory Qp 6 14 4 Press SET SET J This function ...

Page 128: ...N then MEMORY REFERENCE FUNCTION MEMORY REFERENCE MEMORY REFERENCE 1 DELETE DOCUMENT 2 Use the search buttons to select 3 DOC MEMORY LIST then press SET to print the list SET MEMORY REFERENCE 3 DOC MEMORY LIST PRINTING REPORT 17 02 97 SAT 00 56 FAX 31 20 545 8264 CANON EUROPA 001 DOC MEMORY LIST TX RX NO MODE CONNECTION TEL ID PGS SET TIME ST TIME 0001 DELAYED TX 6566 2 16 02 01 03 01 03 0003 DELA...

Page 129: ...the TX RX number of the fax you want to print SET PRINT DOCUMENT TX RX NO 0002 Use the cursor buttons k j to display the SET TIME and the other party s number for the TX RX number displayed For more information print the Doc Memory List as described in Printing a List of the Documents in Memory Qp 6 14 4 Press SET then press to print the first page of the fax or to print the entire fax SET or PRIN...

Page 130: ...T then use the search buttons to select the TX RX number of the fax you want to resend SET MEMORY TX TX RX NO 0002 Use the cursor buttons k j to display the SET TIME and the other party s number for the TX RX number displayed For more information print the Doc Memory List as described in Printing a List of the Documents in Memory Qp 6 14 4 Press SET then enter the destination s you want to send th...

Page 131: ... time is erased from memory after it is sent using the procedure above J A fax that was received in memory due to no paper or toner in your fax machine will not be erased from memory after it is sent using the procedure above It will only be erased after the fax is printed which will automatically happen when you replace the toner or add paper to the unit ...

Page 132: ...e you must not unplug the MultiPASS L90 If the MultiPASS L90 loses power the document will be erased from memory When received faxes are in memory you will see this message 22 07 97 TUE 17 20 RECEIVED IN FILE To upload the document simply turn on your computer The document will be uploaded automatically to your computer If you want to print the document on the MultiPASS L90 follow these steps 1 Pr...

Page 133: ...cuments will be lost in this case the unit automatically prints a list of the lost documents when power is restored During a Power Failure While power is off you can only use the unit to receive telephone calls You can not make calls nor send or receive faxes With some extension telephones however you may be able to make calls Memory Backup Function To make the best use of the unit s memory backup...

Page 134: ...N COPY 90 OF COPIES 01 J Use the search buttons i h to select 100 90 80 or 70 4 If you want to make more than one copy use the numeric buttons to enter the number of copies you want up to 99 1 4 7 2 5 8 0 3 6 9 ABC DEF GHI JKL MNO PQRS TUV WXYZ Ex 2 COPY 90 OF COPIES 02 J To make a single copy leave OF COPIES set to 01 J The resolution is always set to FINE When you make a reduced copy of an origi...

Page 135: ...very in Chapter 7 for more details J If MEMORY FULL is displayed while making multiple copies of a document change the OF COPIES setting to 01 and make single copies instead as many times as required J When making copies the AUTO HALFTONE setting is always set to ON J You can also copy onto different types of media using manual feeding See Manually Feeding Paper Envelopes etc on page 7 11 for deta...

Page 136: ... Press FUNCTION then POLLING FUNCTION POLLING POLLING RX 1 SELECT LOCATIONS 2 Press SET SET TEL 3 Enter the destination s to poll You can do this by J Pressing one touch speed dialling buttons with the FUNCTION lamp off J Pressing CODED DIAL and entering coded speed dialling codes Be sure to press CODED DIAL between each code J Using the numeric buttons to enter one destination only Be sure to pre...

Page 137: ...s FUNCTION then press TONE to switch to tone dialling FUNCTION TONE J When TONE is pressed T is displayed on the LCD J Numbers entered after pressing TONE will be dialled using tone dialling 3 When you re done press HOOK or hang up the handset When registering one touch speed dialling and coded speed dialling numbers if you enter TONE after the number you will switch to tone dialling after the pho...

Page 138: ...N DATA REGISTRATION DATA REGISTRATION 1 SPEED DIAL SETUP 2 Use the search buttons to display 7 SYSTEM SETTINGS DATA REGISTRATION 7 SYSTEM SETTINGS 3 Press SET then use the search buttons to display 1 UN LOCK PHONE SET SYSTEM SETTINGS 1 UN LOCK PHONE 4 Press SET SET J If a password has already been registered enter it now then press SET UN LOCK PHONE PASSWORD 5 Press SET SET J If a password is alre...

Page 139: ...press SET SET 7 Press SET Use the search buttons to set LOCK PHONE on or off SET J The default setting is OFF Anyone can send documents or dial normally LOCK PHONE OFF J When set to ON no one can make calls or send documents Does not restrict incoming calls faxes LOCK PHONE ON 8 Press SET to save the setting then press STOP to return to standby mode SET 22 07 97 TUE 17 20 ...

Page 140: ...6 26 Chapter 6 Special Features ...

Page 141: ...s on how to select paper delivery and how to feed paper manually Selecting the Media Type 7 2 Selecting Paper and Other Media 7 3 Plain Paper 7 3 Plain White Paper 7 3 Coloured Paper 7 3 Heavy Thick Paper 7 3 Envelopes 7 5 Transparencies 7 7 Labels 7 7 Selecting Paper Delivery 7 8 Paper Delivery Selector 7 10 Manually Feeding Paper Envelopes etc 7 11 ...

Page 142: ...cies and paper of several thicknesses To maximise print output refer to the table below before purchasing any print media Input Source Media Size Weight Paper cassette Paper A4 210 mm 297 mm 60 90 g m2 Manual feed tray Paper A4 210 mm 297 mm Legal 8 1 2 14 Letter 8 1 2 11 Executive 7 1 4 10 1 2 A5 148 mm 210 mm 60 105 g m2 Envelopes COM 10 4 1 8 9 1 2 DL 4 3 8 6 75 90 g m2 Transparencies A4 LTR La...

Page 143: ...tions or paper that is highly textured extremely smooth or shiny J Damp wrinkled curled or torn paper can cause paper misfeed paper jams and excessive wear of the unit J The paper must be delivered in sealed packed protected from humidity and physical damage Coloured Paper You can used coloured paper with the MultiPASS L90 provided it meets the following requirements J The paper must meet the requ...

Page 144: ...emperatures Paper is briefly exposed to a temperature of 200 C inside the unit J Paper that is rough extremely smooth or glossy J Specially treated paper such as carbon paper adhesive paper or paper with a vinyl surface J Paper that is wavy curled creased or moist J Damaged or wrinkled paper or paper of irregular shape J Paper with cutouts or perforations J Stapled clipped paper or paper tied with...

Page 145: ... be within the range listed on page 7 2 J Edges must be square and crisply folded J Use envelopes that have diagonal joints and gummed flaps Never use the following types of envelopes J Envelopes that are damaged curled wrinkled or of irregular shape The flaps should be crisply folded and flat J Envelopes with fasteners snaps or windows made of artificial materials such as metal or plastic Metal a...

Page 146: ...orly manufactured envelopes including bulging envelopes or envelopes that are not square and straight J Envelopes with treated surfaces that might discolour melt or emit fumes when exposed to temperatures of up to 200 C J Envelopes with gummed edges J Envelopes with self stick adhesives ...

Page 147: ...ate labels can cause serious damage to the MultiPASS L90 Be sure to follow these guidelines when choosing label sheets J To print labels use only the manual feed tray J The print face of the label sheets must be of ordinary matte finish similar to copy paper J The paper backing must be able to withstand temperatures of up to 200 C J The paper backing must not be made of easily removable coated pap...

Page 148: ...ery Face Down Delivery Factory default setting Face down delivery is used in most situations The printed pages come out through the face down delivery slot and the pages are stacked in their correct order The face down delivery slot can hold up to about 60 sheets of standard paper When the face down delivery slot becomes full OUTPUT TRAY FULL is displayed on the LCD and any faxes received after th...

Page 149: ...the unit without bending and thus prevents curling of envelopes transparencies and other media Refer to Manually Feeding Paper Envelopes etc on page 7 11 for further details J Printed pages come out through the face up delivery slot in reverse order Since there is no limit in the number of pages that can be delivered when the document support for scanned documents is removed this setting is conven...

Page 150: ...delivery selector during printing J When the paper delivery selector is set to face up delivery FACE UP PRINT OUT is displayed on the LCD alternately with the date and time J If you select face up delivery and expect to receive print a large number of pages be sure to remove the document support for scanned documents and to place the unit on the edge of a table This will allow the printed pages to...

Page 151: ...of media you can feed through the manual feed tray J Always use face up delivery when manually feeding thick heavy paper envelopes labels and transparencies Face up delivery allows the paper to travel straight through the MultiPASS L90 without bending and thus prevents curling J The face up delivery slot can not hold several sheets so be sure to remove each sheet as it is delivered onto the face u...

Page 152: ... the LCD alternately with the date and time 2 Adjust the guides on the manual feed tray to the size of the sheet of paper or envelope Inserting a sheet into the manual feed tray while the unit is printing a fax report etc will cause the unit to jam Make sure that the unit is not printing before inserting a sheet of paper or envelope J Paper and envelopes are placed on the manual feed tray facing u...

Page 153: ... small segment of the sheet into the unit 4 Set your computer to print or the MultiPASS L90 to copy J Refer to the MultiPASS Desktop Manager for Windows User s Guide for details on setting your computer to print When printing directly from your computer do not press the START COPY button but start printing from your computer Refer to the MultiPASS Desktop Manager for Windows User s Guide for more ...

Page 154: ... NO PAPER IN MAN TRAY is displayed on the LCD while the MultiPASS L90 waits for you to insert the next sheet or envelope J If you do not insert the next sheet or envelope within 30 seconds copying or printing is cancelled and SUPPLY REC PAPER is displayed on the LCD If this occurs press STOP and start again J If you wish to cancel printing press STOP J Be sure to feed envelopes widthwise After man...

Page 155: ...ory Clear Report 8 7 Printing Information Registered in the MultiPASS L90 8 8 Printing a List of User s Data 8 8 Printing a List of Registered Telephone Numbers 8 9 One Touch Speed Dial List 1 8 9 Coded Speed Dial List 1 8 9 Group Dial List 8 10 Printing a Detailed List of One Touch Speed Dialling Numbers 8 11 One Touch Speed Dial List 2 8 11 Printing a Detailed List of Coded Speed Dialling Number...

Page 156: ...01 57 8261 CENV 0059 TRANSMIT ECM 1 OK 00 23 17 02 01 58 8261 CENV 0060 TRANSMIT ECM 1 OK 00 24 17 02 01 59 8261 CENV 0061 TRANSMIT ECM 1 OK 00 26 17 02 02 00 8261 CENV 0062 TRANSMIT ECM 1 OK 00 24 17 02 02 01 8281 CENV PATRICIA 0063 TRANSMIT ECM 1 OK 00 24 17 02 02 02 8261 CENV 0064 TRANSMIT ECM 1 OK 00 26 17 02 02 03 8260 CENV BMTS 0065 TRANSMIT ECM 1 OK 00 26 17 02 02 04 8261 CENV 0066 TRANSMIT...

Page 157: ...ECM 1 OK 00 26 17 02 02 03 8260 CENV BMTS 0065 TRANSMIT ECM 1 OK 00 26 17 02 02 04 8261 CENV 0066 TRANSMIT ECM 1 OK 00 25 17 02 02 05 8261 CENV 0068 TRANSMIT ECM 1 OK 00 22 17 02 02 06 8261 CENV 0069 TRANSMIT ECM 1 OK 00 25 17 02 02 07 8281 CENV PATRICIA 0070 TRANSMIT ECM 1 OK 00 25 Send and receive transactions listed separately ACTIVITY MANAGEMENT REPORT RX ST TIME CONNECTION TEL ID RX NAME NO M...

Page 158: ...te that the usage time does not reflect the total usage time used to transmit all pages of the document when retry occurs By printing an ACTIVITY MANAGEMENT REPORT and matching the transaction number of the TX REPORT with a transaction number in the ACTIVITY MANAGEMENT REPORT you can find out exactly how many attempts were made to send the document how many pages were sent in each attempt as well ...

Page 159: ...ment 20 02 97 TUE 19 27 FAX 31 20 545 8264 CANON EUROPA 001 TX REPORT TRANSMISSION OK TX RX NO 0092 CONNECTION TEL 8261 SUBADDRESS CONNECTION ID CENV ST TIME 20 02 19 27 USAGE T 00 31 PGS 1 RESULT OK J You can print part of the first page of the fax being sent on the activity report Qp A 5 ...

Page 160: ...every time you receive a fax Qp A 5 20 02 97 TUE 16 14 FAX 31 20 545 8264 CANON EUROPA 001 RX REPORT RECEPTION OK TX RX NO 5014 CONNECTION TEL 31 20 545 8208 SUBADDRESS CONNECTION ID CENV SMD ST TIME 20 02 16 13 USAGE T 00 35 PGS 1 RESULT OK J You can also set the unit to print an activity report only when an error occurs during receiving Qp A 5 ...

Page 161: ...9 27 FAX 31 20 545 8264 CANON EUROPA 001 MEMORY CLEAR REPORT TX RX NO MODE CONNECTION TEL ID PGS SET TIME ST TIME 0033 MEMORY RX 31 20 545 8264 1 16 02 19 05 0034 MEMORY RX 31 20 545 8264 1 16 02 19 06 0032 MEMORY RX 31 20 545 8264 1 16 02 19 03 0035 MEMORY RX 31 20 545 8264 1 16 02 19 08 0036 MEMORY RX 31 20 545 8264 1 16 02 19 09 0037 MEMORY RX 31 20 545 8264 1 16 02 19 10 0038 MEMORY RX 31 20 5...

Page 162: ...CANON EUROPA 001 USER S DATA LIST EC 01 03 02 USER SETTINGS UNIT TELEPHONE 31 20 545 8264 UNIT NAME CANON EUROPA TX TERMINAL ID ON TTI POSITION OUTSIDE IMAGE TELEPHONE MARK FAX AUTO HALFTONE OFF SCANNING CONTRAST STANDARD OFFHOOK ALARM ON VOLUME CONTROL CALLING VOLUME VOL MID KEYPAD VOLUME VOL MID ALARM VOLUME VOL MID RX CALL LEVEL STANDARD TEL LINE TYPE TOUCH TONE R KEY SETTING PBX PBX EARTH CONN...

Page 163: ...4 CANON EUROPA 001 1 TOUCH SPD DIAL LIST 1 NO CONNECTION TEL CONNECTION ID TX TYPE 01 8261 CANON TEST REGULAR TX 23 00 02 05458261 CENV REGULAR TX 00 00 03 05458281 CENV PATRICIA REGULAR TX 04 05458260 CENV BMTS REGULAR TX 05 05458208 CENV SMD REGULAR TX 01 00 Sending method Preset sending time Coded Speed Dial List 1 20 02 97 TUE 19 55 FAX 31 20 545 8264 CANON EUROPA 001 CODED SPEED DIAL LIST 1 N...

Page 164: ...1 8261 CANON TEST 03 05458281 CENV PATRICIA 05 05458208 CENV SMD 07 CANON HQ 04 05458260 CENV BMTS 05 05458208 CENV SMD 08 GROUP A 03 05458281 CENV PATRICIA 04 05458260 CENV BMTS 09 GROUP SIX 01 8261 CANON TEST 02 05458261 CENV 03 05458281 CENV PATRICIA 10 01 8261 CANON TEST 02 05458261 CENV 03 05458281 CENV PATRICIA 05 05458208 CENV SMD ...

Page 165: ...r 01 use the search buttons to select a button registered for one touch speed dialling 2 Press SET then press REPORT to print the list SET REPORT PRINTING REPORT One Touch Speed Dial List 2 20 02 97 TUE 20 28 FAX 31 20 545 8264 CANON EUROPA 001 1 TOUCH SPD DIAL LIST 2 01 CONNECTION TEL 8261 CONNECTION ID CANON TEST TX SPEED 14400bps 0 TX TYPE REGULAR TX 02 CONNECTION TEL 05458261 CONNECTION ID CEN...

Page 166: ...0 use the search buttons to select a code registered for coded speed dialling 2 Press SET then press REPORT to print the list SET REPORT PRINTING REPORT Coded Speed Dial List 2 20 02 97 TUE 20 29 FAX 31 20 545 8264 CANON EUROPA 001 CODED SPEED DIAL LIST 2 00 CONNECTION TEL 00441256841300 CONNECTION ID CANON AUDIO TX SPEED 14400bps 0 TX TYPE REGULAR TX 01 CONNECTION TEL 6128052011 CONNECTION ID CAN...

Page 167: ... is designed to operate with a minimum of regular maintenance as described in this chapter Maintaining the MultiPASS L90 9 2 Cleaning the MultiPASS L90 9 2 Cleaning the Outer Casing 9 2 Cleaning the Inside of the MultiPASS L90 9 3 Cleaning the Scanner Components 9 4 ...

Page 168: ...r similar materials for cleaning they can stick to the components or generate static charges Cleaning the Outer Casing Clean the unit s outer casing as follows When you unplug the unit be sure to plug it in again as soon as possible without power it will retain any data in image memory for about an hour After this the data will be lost 1 Unplug the unit 2 Lightly wipe the unit s outer casing with ...

Page 169: ...it will retain any data in image memory for about an hour After this the data will be lost 1 Unplug the unit 2 Open the printer cover 3 Remove the toner cartridge J Store the cartridge in its protective bag to avoid exposure to light 4 Use a clean soft dry lint free cloth to remove any toner or paper debris from the shaded area Black Roller Do not touch the black roller at the back as this may aff...

Page 170: ...about an hour After this the data will be lost 1 Unplug the unit 2 Open the operation panel The operation panel does not open all the way Be careful not to force it open 3 Use a soft dry clean cloth to clean the scanning glass and rollers shaded areas J If the document scanning glass and rollers are dirty the documents you send or print will be dirty too J Clean with a soft cloth that will not scr...

Page 171: ...n panel also affect the quality of documents you copy and send 5 Use a soft dry clean cloth to wipe up paper dust around the rollers 6 When you are finished close the operation panel by pressing it down from the centre as shown Be sure to close the operation panel until it locks into place Otherwise the unit will not function properly 7 Plug the unit back in ...

Page 172: ...9 6 Chapter 9 Maintenance ...

Page 173: ...recording paper jam frequently 10 10 Does the unit not switch automatically between phone and fax transmissions 10 10 Will the unit not receive faxes automatically 10 10 Will the unit not receive faxes manually Optional handset or extension phone connected to the unit 10 11 Will the unit not receive using ECM 10 11 Do errors frequently occur during receiving 10 11 Can not Print Correctly 10 12 Not...

Page 174: ...y using the procedures below You do not need to unplug the unit while clearing paper jams Document Feed Jams and Misfeeds Use this procedure if the document being fed into the unit jams or misfeeds In this case CHECK DOCUMENT is displayed 1 Lift and open the operation panel J Pulling the document without opening the operation panel may cause it to tear or become soiled 2 With the operation panel o...

Page 175: ...ollowing areas in the order described below Be sure to remove any documents or printed pages from the unit before removing the paper jam J Paper Cassette Area 1 Remove the paper cassette J Be careful not to drop the cassette as you pull it out 2 If there is any jammed paper inside the unit gently pull it out of the unit being careful not to tear it ...

Page 176: ...te jams when you try inserting it in the unit remove it from the unit and open the printer cover Then close it and try reinserting the paper cassette J If the paper jam occurred while receiving a document the remainder of the document is received in memory Once the paper jam is cleared the document in memory will automatically be printed J If the error message remains displayed there may be more j...

Page 177: ...e the front cover release latch to open the front cover Please note that the operation panel which can also be opened sits on top of the front cover Do not open the operation panel for this procedure Instead keep the operation panel and front cover together as you open the front cover Do not open the front cover without pushing the release latch as this may cause damage to your fax Be sure to use ...

Page 178: ...he jammed paper is visible gently pull it out being careful not to tear it The toner is not yet fixed to the paper in this area take care not to dirty yourself or the inside of the printer area 6 Lower the plastic cover and gently remove any jammed paper from the unit by pulling it forward Plastic Cover ...

Page 179: ...ently Asked Questions 7 If necessary gently pull the paper upwards to remove it from the unit 8 Open the rear cover 9 Gently pull out any jammed paper from the rear area being careful not to tear it 10 Close the rear cover ...

Page 180: ...10 8 Chapter 10 Frequently Asked Questions 11 Replace the toner cartridge 12 Close the printer cover and front cover J If the paper jam has been cleared completely the unit will work normally ...

Page 181: ...TYPE and page 3 12 for details on setting J If you used a one touch or coded speed dialling button check its contents to make sure they are correct J If using memory sending make sure no documents are waiting to be sent ahead of your document or that your document was not deleted from memory J The unit may have overheated and shut itself down If you suspect this turn it off and let it cool for sev...

Page 182: ...ister this speed in the transmission settings so that future documents are also sent at this speed Qp 3 33 Can not Receive Documents Correctly Does the recording paper jam frequently J Make sure the recording paper and the paper cassette are properly set as described on page 2 25 Does the unit not switch automatically between phone and fax transmissions J Make sure the ANS HOOK UP and MANUAL lamps...

Page 183: ...Y after hanging up the handset When receiving a fax manually you must hang up the handset after pressing START COPY J Check the display for an error message Qp 10 15 J Print an activity report and check for an error code Qp 8 2 Will the unit not receive using ECM J Make sure the unit is set for ECM receiving Qp A 8 J Make sure the sender s fax machine supports ECM If it doesn t the fax is sent in ...

Page 184: ...e fax lines Try using ECM receiving though if the lines are very busy or in poor condition you may have to ask the sender to try again See page A 8 for details on setting ECM Also remember that the sending fax machine usually determines the quality of the fax To see if your unit is the cause of the problem use it to make a copy if the copy is clear the sending fax machine may be the problem if the...

Page 185: ...nevenly distributed If this happens follow these steps 1 Open the printer cover and take out the toner cartridge 2 Gently rock the cartridge from side to side five or six times to evenly distribute the toner inside 3 Put the cartridge back into the unit 4 Close the printer cover If the problem persists the cartridge needs to be replaced See page 2 20 The Toner Cartridge for details on replacing th...

Page 186: ...if needed J Make sure the handset is on its cradle J When making multiple copies and MEMORY FULL is displayed There is not enough memory for the whole document Divide your document into several parts and copy each part separately If this message appears when your document is only one page long we recommend you increase the unit s memory with the optional 2MB memory board Can not poll other units J...

Page 187: ...fax machine ask them to set the polling ID of their fax to 255 Qp 6 22 CHECK DOCUMENT 001 A page may be jammed in the automatic document feeder ADF Remove the jammed page and try again Qp 10 2 011 Polling error The document has not been fed into the automatic document feeder ADF correctly on the sender s fax machine Ask the sender to remove the document and reinsert it properly in the fax machine ...

Page 188: ...Install the cartridge making sure it is all the way in See page 2 20 for replacing the toner cartridge MEMORY FULL 037 The unit s memory is full because it has received too many documents or a very detailed document Print out any documents that are stored in memory Then start the operation again If the memory contains any faxes you don t need delete them You can not receive a fax in memory if the ...

Page 189: ...y PLEASE WAIT The unit is warming up Wait until you see the standby mode message then begin REC PAPER JAM The unit has a paper jam Clear the paper jam Qp 10 3 RECEIVED IN MEMORY The unit received a fax in memory because the paper or toner ran out Change the cartridge or add recording paper then print the fax from memory REPLACE CARTRIDGE The toner cartridge is out of toner Replace the toner cartri...

Page 190: ...the message CHECK PRINTER press STOP and contact a CANON authorised service facility for servicing Message Error Meaning Solutions CHECK PRINTER 322 Fixing heater temperature abnormality Contact a Canon authorised service facility 323 Laser scanner section BD signal output function abnormality Contact a Canon authorised service facility 324 Printer section scanner motor rotation rate abnormality C...

Page 191: ...nit operates The Menu System A 2 To Access SPEED DIAL SETUP A 2 To Access USER SETTINGS A 2 USER SETTINGS A 3 To Access REPORT SETTINGS A 4 REPORT SETTINGS A 5 To Access SEND TX SETUP A 6 SEND TX SETUP A 7 To Access RECEIVE RX SETUP A 8 RECEIVE RX SETUP A 8 To Access FAX PRINTER SETUP A 10 FAX PRINTER SETUP A 11 To Access SYSTEM SETTINGS A 12 SYSTEM SETTINGS A 13 ...

Page 192: ... 2 Press SET then use the search buttons to display the item you want to set or change SET SPEED DIAL SETUP 1 1 TOUCH SPD DIAL J For details on registering numbers see page 3 12 To Access USER SETTINGS 1 Press FUNCTION and DATA REGISTRATION FUNCTION DATA REGISTRATION DATA REGISTRATION 1 SPEED DIAL SETUP 2 Use the search buttons to display 2 USER SETTINGS DATA REGISTRATION 2 USER SETTINGS 3 Press S...

Page 193: ...f the faxes you send DARKER STANDARD LIGHTER Choose the setting for the type of document you send most often 7 OFFHOOK ALARM Turn the handset off hook alarm on or off ON OFF You may want to turn this off if you work in a quiet office 8 VOLUME CONTROL Set the audio level of the calling signal keypad alarm and line monitor Adjust the volume to suit your office environment 1 CALLING VOLUME Set the vo...

Page 194: ... SPEED DIAL SETUP 2 Use the search buttons to display 3 REPORT SETTINGS DATA REGISTRATION 3 REPORT SETTINGS 3 Press SET then use the search buttons to display the item you want to set or change see the following table SET REPORT SETTINGS 1 TX REPORT 4 Press SET then use the search buttons to select menu items and sub items SET 5 Press SET SET ...

Page 195: ...and reference 2 RX REPORT Set whether the unit automatically prints an activity report when it receives a fax PRINT ERROR ONLY OUTPUT YES OUTPUT NO OUTPUT YES Prints a report every time the fax receives a fax OUTPUT NO Prints no reports when receiving PRINT ERROR ONLY Prints a report only when an error occurs when receiving 3 ACTIVITY REPORT Set how and when the fax automatically prints activity m...

Page 196: ...N 1 SPEED DIAL SETUP 2 Use the search buttons to display 4 SEND TX SETUP DATA REGISTRATION 4 SEND TX SETUP 3 Press SET then use the search buttons to display the item you want to set or change see the following table SET SEND TX SETUP 1 ECM TX 4 Press SET then use the search buttons to select menu items and sub items SET 5 Press SET SET ...

Page 197: ...SEND TX FROM Set which pages to resend if TX ERROR RESEND is on ERROR 1ST PG ERROR PAGE ALL PAGES ERROR 1ST PG Resends the first page and the page the error occurred on ERROR PAGE Resends only the page the error occurred on ALL PAGES Resends all the document pages 4 ERASE FAILED TX Set whether the fax in memory is erased if an error occurs during sending ON OFF ON The fax is automatically erased a...

Page 198: ... ECM RX Turn Error Correction Mode ECM receiving on or off ON OFF ON Receiving is done in error correction mode OFF Receiving is done without error corrrection 2 RX MODE Set how the fax handles incoming calls AUTO FAX RX FAX TEL AUTO SW AUTO FAX RX Treats all calls as faxes FAX TEL AUTO SW Switches between fax phone receiving automatically If you select FAX TEL AUTO SW you can also set items 1 to ...

Page 199: ...de when the caller does not talk 01 99 SEC 06 Set a time from 01 to 99 seconds 5 MAN AUTO SWITCH Set whether the unit switches from manual receive mode to document receive mode after ringing for a set time ON OFF ON The unit switches to document receive mode after ringing for a set time OFF In manual receive mode the unit does not switch to document receive mode RING TIME Set how long the unit rin...

Page 200: ... DIAL SETUP 2 Use the search buttons to display 6 FAX PRINTER SETUP DATA REGISTRATION 6 FAX PRINTER SETUP 3 Press SET then use the search buttons to display the item you want to set or change see the following table SET FAX PRINTER SETUP 1 SELECT PAPER SIZE 4 Press SET then use the search buttons to select menu items and sub items SET 5 Press SET SET ...

Page 201: ...ge may be printed on two pages 3 TONER SAVING Set whether the toner saving function is on or off If set to on the unit will consume up to 50 less toner OFF ON ON Decreases the amount of toner used during printing Note With this setting print quality may deteriorate even before the toner cartridge runs out OFF Prints normally 4 TONER SUPPLY LOW Determine if printing continues when the toner level d...

Page 202: ...PEED DIAL SETUP 2 Use the search buttons to display 7 SYSTEM SETTINGS DATA REGISTRATION 7 SYSTEM SETTINGS 3 Press SET then use the search buttons to display the item you want to set or change see the following table SET SYSTEM SETTINGS 1 UN LOCK PHONE 4 Press SET then use the search buttons to select menu items and sub items SET 5 Press SET SET ...

Page 203: ...d a document ON A party can dial your unit and send a document only if their number is registered on your fax speed dialling 3 DATE FORMAT Set the format used for dates displayed on the fax and printed on faxes you send DD MM YY YY MM DD MM DD YY YY Year MM Month DD Day 4 DISPLAY LANGUAGE Set the language for the message displayed in the LCD during operation of the unit ENGLISH FRENCH SPANISH GERM...

Page 204: ...A 14 Appendix A The Menu System ...

Page 205: ...B 1 Appendix B Specifications Appendix B Specifications The specifications for the MultiPASS L90 are listed in this section MultiPASS L90 Specifications B 2 ...

Page 206: ...e sensor Recording method Laser beam printing Applicable lines Subscriber s telephone circuit PSTN Auto dial functions One Touch Speed Dialling Registration for 20 numbers Coded Speed Dialling Registration for 100 numbers Power source 200 240 V 50 60 Hz Power consumption Standby approx 7 W Operation approx 450 W 20 of document black copy Operating environment Temperature 10 32 5 C Humidity 20 80 R...

Page 207: ...endix C Options This section describes the optional items available for use with the MultiPASS L90 Handset C 2 Package Contents C 2 Attaching the Handset to the MultiPASS L90 C 2 Memory Board C 5 Installing the Memory Board C 6 ...

Page 208: ...your Canon dealer immediately Handset Screw with plugs Handset cradle Screws not used for the MultiPASS L90 The two screws with a plastic white head are not for use with the MultiPASS L90 You only need the two screws with plugs provided Attaching the Handset to the MultiPASS L90 To attach the handset to the MultiPASS L90 follow these steps 1 Use a screwdriver to remove the two covers on the left s...

Page 209: ...e plugs with the handset cradle in the holes on the unit If you have difficulty inserting the plugs turn the unit so that the left side is facing you and the right side is placed against a wall This will allow you to insert the plugs without the unit moving 4 Insert the screws into the plugs and push them in with your finger ...

Page 210: ... may break J Make sure the screws are inserted all the way into the plugs 5 Connect the handset cord to the input jack marked on the left side of the unit When carrying the unit do not lift it by the handset cradle as it may break If you need to remove the handset cradle after it is installed use a small phillips screwdriver to unscrew the two screws ...

Page 211: ...ments you may wish to increase the unit s memory The optional 2 MB memory board is available for the MultiPASS L90 I Before touching the memory board remove any static electricity from your hands by touching a grounded metal object Static electricity can damage the memory board I Hold the edges of the memory board Do not touch the delicate electronic circuitry with your fingers ...

Page 212: ...the documents in memory J Remove any documents or printed pages from the unit before installing the memory board J If documents remain stored in memory when the memory board is installed the unit will print out the Memory Clear report when the unit is next plugged in 1 Unplug the MultiPASS L90 2 Remove the document support for scanned documents from the unit 3 Use the front cover release latch to ...

Page 213: ...for this procedure Instead keep the operation panel and front cover together as you open the front cover Do not open the front cover without pushing the release latch as it may cause damage to your unit Be sure to push the front cover release latch to open the front cover 4 Remove the two screws on the inner cover using a long phillips screwdriver ...

Page 214: ...C 8 Appendix C Options 5 Close the front cover 6 Lift the inner cover slightly and remove it from the unit by sliding it forward 7 Open the front cover again ...

Page 215: ...ectricity can damage the memory board I Hold the edges of the memory board Do not touch the delicate electronic circuitry with your fingers I When removing connecting the memory board be careful not to touch the components around the connector on the unit 9 Hold the edges of the 2 MB memory board and connect it to the same connector you removed the 0 5 MB memory board from Connector Top View of th...

Page 216: ...e slots on the unit 11 Replace the screws 12 Close the front cover 13 Replace the document support for scanned documents into the unit 14 Plug in the MultiPASS L90 and make sure it is working properly Qp 2 18 15 Print the User s Data List as described on page 8 8 and check the memory amount The TOTAL FAX MEMORY item should say 2 156 MByte ...

Page 217: ...ntering a two digit code J Group dialling Allows you to dial a group of numbers stored under a one touch speed dialling button or a coded speed dialling code Automatic image reduction The unit can print the date time company name and a fax number at the top of the faxes it receives To prevent this information from crowding the faxed image off the page and onto the next thus possibly lengthening th...

Page 218: ...ssing the CODED DIAL button and entering a two digit code The unit can store up to 100 fax numbers for coded speed dialling D dB A Stands for decibel level a decibel being a unit of measurement for the intensity of the sound coming from the unit adjusted for background noise Delayed transmission The unit can scan in a document for sending to one or more numbers at a later preset time Document The ...

Page 219: ...ings and you can answer the call using the handset This feature allows the unit to use a single line for both fax and phone calls and also enables you to use these variations J Voice answering When the MultiPASS L90 receives a call it responds with a built in voice message You are connected Please hold J Ring back tone When using FAX TEL switching it takes the unit a few seconds to switch to the p...

Page 220: ...scanned fax to as many as 121 locations at once using a combination of one touch speed dialling coded speed dialling or regular dialling Memory list Shows the faxes stored in the unit s memory along with the following information for each J Transaction number J How the fax was stored J Name and number the fax was sent to for one touch speed dialling or coded speed dialling J Number of pages J Date...

Page 221: ...t is being scanned your MultiPASS L90 will begin to call the other party and transmit the information even as the remaining pages are being scanned The unit scans the document quickly so you can get it back in a few moments and return to work R Regular dialling Dialling a number by using the numeric buttons Remote receiving ID The number you can dial from an extension phone to start receiving a fa...

Page 222: ...unit and used to identify that fax TTI Transmit Terminal Identification See Sender ID TWAIN Both a protocol and an application programming interface API that allows you to input image data directly from any source for example desktop and handheld scanners video capture boards digital cameras and other imaging equipment without requiring users to switch out of the application It provides compatibil...

Page 223: ...tridge handling storing 2 20 characters clearing 3 5 entering 3 3 3 4 cleaning unit 9 2 CLEAR button 2 14 3 5 clearing entry 3 5 coded changing numbers 3 21 CODED DIAL button 2 12 coded speed dial list printing 8 9 coded speed dialling changing numbers 3 21 long distance settings 3 32 printing fax numbers 8 12 sending with passwords 3 30 sending with subaddresses 3 30 settings 3 28 storing numbers...

Page 224: ...nnecting 2 16 extension telephone connecting 2 16 F face down delivery 7 8 face up delivery 7 9 faceplate 2 8 fax numbers printing coded speed dialling 8 12 one touch speed dialling 8 11 storing your own 3 10 FAX PRINTER SETUP menu system 3 7 fax telephone auto switch receiving setting up 5 5 faxes memory receiving into 5 13 printing from memory 5 14 receiving answering machine 5 11 answering serv...

Page 225: ...e touch speed dialling 3 32 M maintenance 9 2 cleaning 9 2 toner cartridge 10 13 making copies 6 20 manual feeding 7 11 receiving 5 10 sending cancelling 4 8 maximising image quality 4 14 memory 1 3 backup battery recharging 6 19 backup function 6 19 capacity pages received 5 14 with optional board 5 14 during power cut 5 14 6 19 print list 6 14 printing faxes from 5 14 receiving faxes into 5 13 s...

Page 226: ...r mode 3 4 numeric buttons 2 12 O on off switch 2 19 one touch changing numbers 3 16 one touch speed dial list printing 8 9 one touch speed dialling changing name 3 16 changing number 3 16 long distance settings 3 32 printing numbers 8 11 sending with passwords 3 30 sending with subaddresses 3 30 settings 3 28 storing numbers example 3 13 transmission speed 3 33 transmission time 3 28 transmission...

Page 227: ...a 8 8 private branch exchange PBX sending through 6 7 pulse line 6 23 R RECEIVE RX SETUP menu system 3 7 receiving answering machine 5 2 auto switch 5 4 automatic 5 2 options 5 4 by polling 6 22 cancelling the fax 5 16 manual 5 10 receiving faxes fax telephone auto switching setting up 5 5 into memory 5 13 manually problems with 10 11 messages during 5 15 with an answering machine 5 11 setting up ...

Page 228: ...nu system 3 6 setup automatic receiving 5 4 connections 2 15 power 2 18 shipping materials 2 6 SPACE button 2 14 special function buttons 3 6 example 3 7 SPEED DIAL SETUP menu system 3 6 3 7 speed dialling 3 13 buttons 3 6 coded changing numbers 3 21 printing fax numbers 8 12 storing numbers 3 19 using 3 23 one touch changing numbers 3 16 printing numbers 8 11 storing numbers 3 13 using 3 18 stand...

Page 229: ...ent misfeeds 10 2 recording paper 10 3 polling 10 14 printing problems 10 12 10 13 receiving faxes errors during 10 11 problems with 10 10 sending faxes errors during 10 10 problems with ECM 10 10 telephone 10 14 toner cartridge 10 14 TTI Transmit Terminal Identification 3 8 type conventions 1 6 U unit as a copier 6 20 assembly 2 8 automatic receiving 5 4 back 2 10 cleaning 9 2 fax telephone auto ...

Page 230: ...I 8 Index ...

Reviews: