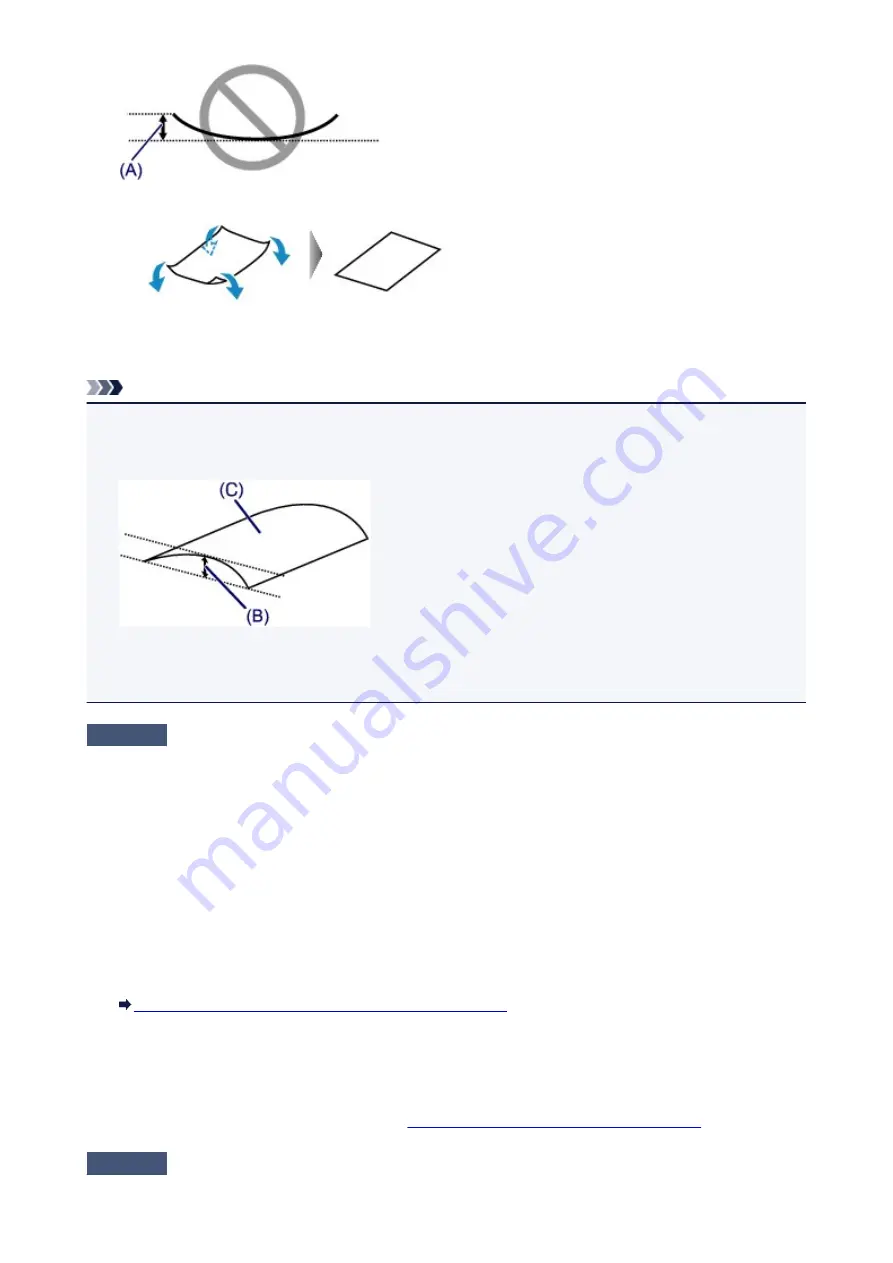
1. Roll up the paper in the opposite direction to the paper curl as shown below.
2. Check that the paper is now flat.
We recommend printing curl-corrected paper one sheet at a time.
Note
• Depending on the media type, the paper may be smudged or may not be fed properly even if it is not
curled inward. In such cases, follow the procedure described below to curl the paper outward within 0.1
inch / 3 mm (B) in height before printing. This may improve the print result.
(C) Printing side
We recommend printing paper that has been curled outward one sheet at a time.
Check4
Adjust the setting to prevent paper abrasion.
Adjusting the setting to prevent paper abrasion will widen the clearance between the print head and the loaded
paper. If you notice abrasion even with the media type set correctly to match the loaded paper, set the machine
to prevent paper abrasion by using the operation panel or the computer.
Print speed may be reduced if you apply the setting to prevent paper abrasion setting.
* Readjust the setting not to prevent paper abrasion once printing is complete. If not, this setting remains
enabled for all subsequent print jobs.
•
To set by using the operation panel
Press the
HOME
button, select
Setup
,
Device settings
, and
Print settings
in this order, and then set
Prevent paper abrasion
to
ON
.
Changing the Machine Settings Using the Operation Panel
•
To set by using your computer
Open the printer driver setup window, and in
Custom Settings
in the
Maintenance
sheet, select the
Prevent paper abrasion
check box, and then click
OK
.
To open the printer driver setup window, see
How to Open the Printer Driver Setup Window
.
Check5
If the intensity is set high, reduce the intensity setting and try printing again.
814
Summary of Contents for MG6600 Series
Page 91: ...91 ...
Page 125: ...Safety Guide Safety Precautions Regulatory and Safety Information 125 ...
Page 132: ...Main Components Front View Rear View Inside View Operation Panel 132 ...
Page 149: ...Loading Paper Originals Loading Paper Loading Originals Inserting the Memory Card 149 ...
Page 183: ...Replacing an Ink Tank Replacing an Ink Tank Checking the Ink Status 183 ...
Page 232: ...Note The effects of the quiet mode may be less depending on the print quality settings 232 ...
Page 248: ...Language selection Changes the language for the messages and menus on the touch screen 248 ...
Page 263: ...Information about Network Connection Useful Information about Network Connection 263 ...
Page 310: ...5 Delete Deletes the selected IP address from the list 310 ...
Page 341: ...Checking the Ink Status with the Ink Lamps 341 ...
Page 375: ...Note Selecting Scaled changes the printable area of the document 375 ...
Page 386: ...Related Topic Changing the Printer Operation Mode 386 ...
Page 410: ...Note During Grayscale Printing inks other than black ink may be used as well 410 ...
Page 415: ...Adjusting Brightness Adjusting Intensity Adjusting Contrast 415 ...
Page 510: ...Using the Slide Show Function Printing Photo While Viewing the Slide Show 510 ...
Page 553: ...Scanning Scanning from a Computer Scanning from the Operation Panel of the Machine 553 ...
Page 636: ...Related Topic Scanning Items Larger than the Platen Image Stitch 636 ...
Page 657: ...657 ...
Page 680: ...Related Topic Scanning in Basic Mode 680 ...
Page 733: ...When scanning is completed the scanned image appears in the application 733 ...
Page 801: ...Problems with Printing Quality Print Results Not Satisfactory Ink Is Not Ejected 801 ...
Page 888: ...1401 Cause The print head may be damaged Action Contact the service center 888 ...
Page 889: ...1403 Cause The print head may be damaged Action Contact the service center 889 ...
Page 890: ...1405 Cause The print head may be damaged Action Contact the service center 890 ...
Page 897: ...1660 Cause The ink tank is not installed Action Install the ink tank 897 ...
Page 925: ...5B00 Cause Printer error has occurred Action Contact the service center 925 ...
Page 926: ...5B01 Cause Printer error has occurred Action Contact the service center 926 ...
Page 927: ...5B12 Cause Printer error has occurred Action Contact the service center 927 ...
Page 928: ...5B13 Cause Printer error has occurred Action Contact the service center 928 ...
Page 929: ...5B14 Cause Printer error has occurred Action Contact the service center 929 ...
Page 930: ...5B15 Cause Printer error has occurred Action Contact the service center 930 ...


