background image


C8000 Battery Testing System User Manual 

212 


Cadex BatteryLab


Menu Item 

Description 

Start Capture 

Starts a load capture. 

Load Capture 

Set the in-circuit zero offset  
(Current Only):  

Perform zero offset

 – Set the zero offset 

to the current level being measured.  

Reset Zero offset

 – Reset the zero offset 

to the default value, determined when 
the LCU was connected to the C8000. 

Reset Capture 
Unit 

Resets the LCU to its StartUp state. 

Note:

 This functional will perform a 

Zero offset function for both the 
current and voltage inputs. 

 
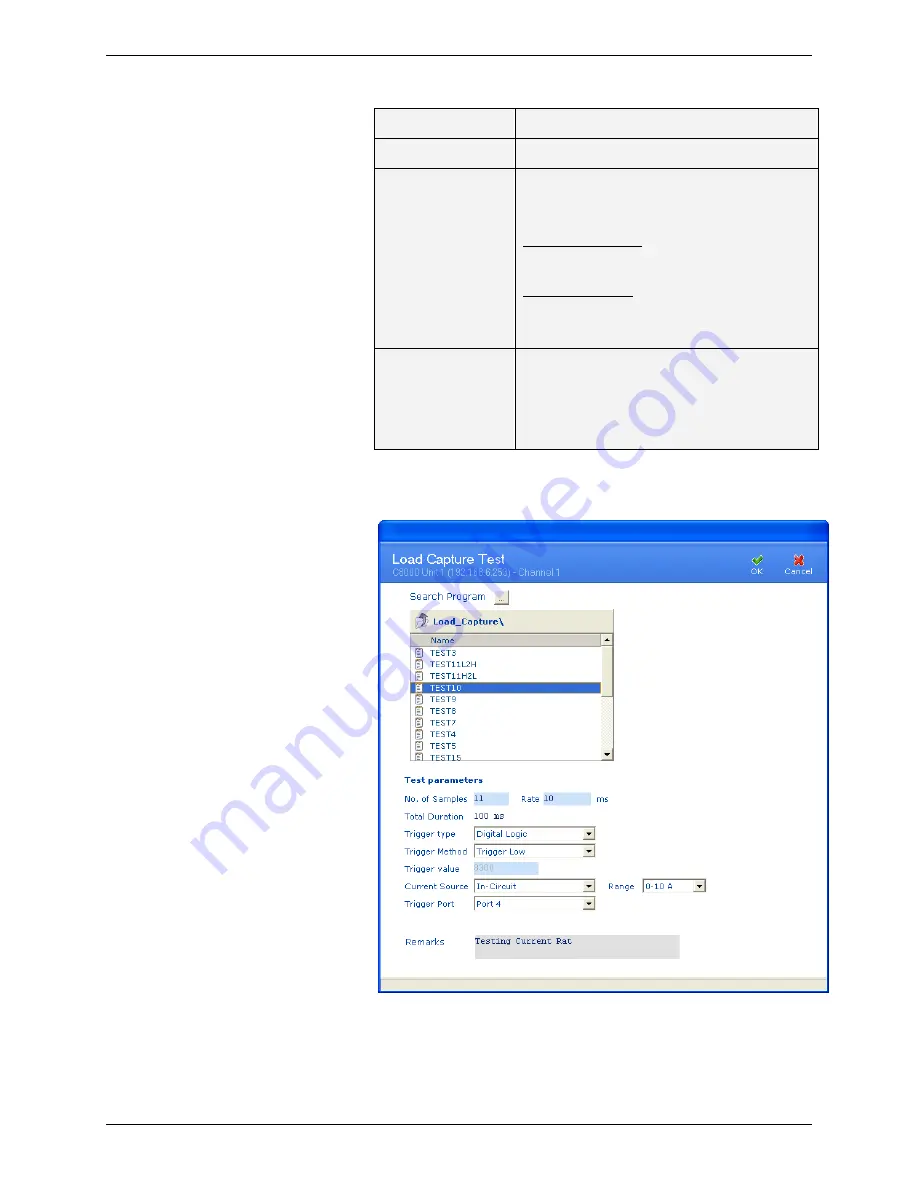
3.


The 

Load Capture Test

 window appears. 


Summary of Contents for C8000

Page 1: ...Battery Testing System User Manual V2 x Cadex Electronics Inc 22000 Fraserwood Way Richmond British Columbia Canada V6W 1J6 Phone 1 604 231 7777 FAX 1 604 231 7755 Web www cadex com E mail info cadex...

Page 2: ...obligation to notify any person of such changes Please contact Cadex Electronics Inc service cadex com for suggestions or corrections Disclaimer While every effort is made to ensure that the informati...

Page 3: ...xplosion Hazard 4 1 1 7 Charge and Discharge Lithium ion Li ion Batteries 5 1 1 8 Shock Hazard 6 1 2 Warranty and Service 7 1 2 1 Warranty Service 7 1 2 2 Non Warranty Repairs 8 1 3 Back Up and Restor...

Page 4: ...put 17 2 1 5 2 Ethernet Port 17 2 1 5 3 Serial Ports and USB Port 17 2 1 5 4 Cooling Fans 18 2 2 Cadex C8000 Adapter Unit 18 2 2 1 Cadex C8000 Adapter Unit 18 2 2 2 Connect the C8000 Adapter Unit to t...

Page 5: ...Test Results 45 2 7 2 1 View Test Results 45 2 7 2 2 Print Test Results 46 2 7 2 3 Delete a Test Result 46 2 7 2 4 Delete All Test Results 47 2 7 3 Battery Profiles 48 2 7 3 1 View and Edit a Battery...

Page 6: ...t Windows Explorer and My Computer to Display File Extensions 75 3 1 3 Create a Database for BatteryLab 75 3 1 4 Back Up the Data Files on the PC 76 3 1 5 Install and Uninstall BatteryLab 76 3 1 5 1 I...

Page 7: ...Configure C8000 Functions 94 3 1 15 C8000 Settings 94 3 1 16 Alert Window 96 3 1 17 Exit BatteryLab 97 3 2 Configure BatteryLab 98 3 2 1 Results Panel 98 3 2 2 Event Logging 101 3 2 3 Report Template...

Page 8: ...a 121 3 6 3 12 Cycle Graph 122 3 6 3 13 Print Results 123 3 6 3 14 Print a Battery Test Graph 123 3 6 3 15 Export Test Record Results to a File 123 3 6 3 16 Export Graph Data To a File 124 3 6 3 17 Ex...

Page 9: ...Sort the C Codes 164 3 10 Programs 164 3 10 1 Factory Default Programs 165 3 10 2 A Custom Program Example 171 3 10 3 A Custom Program with Thermal Chamber Example 175 3 10 4 Add a Program 183 3 10 4...

Page 10: ...24 3 12 2 Add a Waveform 228 3 12 2 1 Add a Step to a Waveform 230 3 12 2 2 Remove a Step from a Waveform 230 3 12 2 3 Copy a Step to Another Step in a Waveform 230 3 12 2 4 Move the Order of Steps in...

Page 11: ...Troubleshooting 263 3 15 1 1 Communication Issues 263 3 15 1 2 Frozen Keyboard and LCD Display 263 3 15 1 3 Check IP Addresses 263 3 15 1 4 DAO Error 263 3 15 1 5 Corrupt Database 264 3 15 1 6 Folder...

Page 12: ......

Page 13: ...equipment is used in a manner not specified by this documentation the protection provided by this equipment may be impaired Please read this document and equipment labeling before using the equipment...

Page 14: ...re used to warn of potential hazards Warning or Danger Information that if ignored can result in serious injury or death Caution Information that if ignored can result in damage to the C8000 Battery T...

Page 15: ...dance with the instructions in this manual it may cause interference with radio communications The equipment has been tested and found to comply with the limits for a Class A digital device pursuant t...

Page 16: ...0 C 122 F during testing Stop service if the battery s internal temperature exceeds 50 C Allow cold batteries to warm up and hot batteries to cool before charging The temperatures cited here are the b...

Page 17: ...only available to authorized battery manufacturers Today imports are becoming readily available and often fall into the hands of the inexperienced While most brand name cells are equipped with an inte...

Page 18: ...ir end use equipment Use the tester only as specified in the documentation Other uses may impair the protection provided by the unit Use only a grounded AC outlet to power the tester Before attempting...

Page 19: ...without the appropriate model number serial number or safety markings Products used for rental purposes 1 2 1 Warranty Service Before sending the unit for service contact Cadex Technical Support If y...

Page 20: ...thorization to precede with repairs 1 3 Back Up and Restore Calibration Data It is possible to manually back up the calibration data for each C8000 using the System Update window This calibration data...

Page 21: ...t IP address Then run BatteryLab and configure BatteryLab to allow connection from the new C8000 Choose Connect to allow BatteryLab to automatically backup the calibration data for the new C8000 This...

Page 22: ...Cadex C8000 Battery Tester User Manual This manual provides instructions to configure the C8000 and to test batteries Up to four batteries can be tested at any time using one of several testing progra...

Page 23: ...up copy provided by Cadex Electronics For more information see 1 3 Back Up and Restore Calibration Data 2 1 2 What is in the Box The C8000 box contains 1 C8000 Battery Testing System Part 11 308 0000...

Page 24: ...C8000 has air vents to allow cooling airflow Do not cover block or obstruct the air vents 2 1 3 Optional C8000 Accessories 2 1 3 1 C8000 Adapter Unit Desktop converter unit that provides cross platfo...

Page 25: ...real time Capture a power tool load signature or any other electronic device by drilling through a steel beam Then apply a repeatable load signature to any battery to determine performance characteris...

Page 26: ...xecuting a test and also displays test status and results Use the keypad and arrow buttons to enter information into the fields on the screen 2 1 4 2 Channel Key Buttons There are four channel key but...

Page 27: ...the LCD Display Use the and arrow keys to move from one field to another Press the Edit key to activate the selected remark field for edits Use the and keys to scroll through the alphabet Press ENTER...

Page 28: ...ion about the SnapLock Adapter see 2 1 3 3 SnapLockTM Universal Battery Adapter 4 wire versions only If the plastic button on a circuit breaker pops out the breaker has tripped Determine and correct t...

Page 29: ...the host computer The Ethernet Port on the back panel has two LEDs to indicate communication between the C8000 and a computer Use this port with the TCP IP Settings menu For more information see 3 1...

Page 30: ...enabled 2 1 5 4 Cooling Fans The thermostatically controlled fans operate automatically to keep the inside of the C8000 at optimum temperature Keep all case vents and fan openings clear to ensure free...

Page 31: ...ning the ring on the battery connector clockwise until the lock is engaged See 2 3 2 Connect the Power Port Cable to the C8000 for instructions on how to connect the Power Port Cable 3 Push the DB25 f...

Page 32: ...hieve better accuracy the C8000 utilizes a four wire design where the two main wires provide a path for charge and discharge currents while the other two paths measure the voltage as close to the batt...

Page 33: ...re 1 Power port cable connector end view Figure 2 Dual power port cable connector end view iii Push the battery connector plug into the desired battery channel outlet on the C8000 then rotate the lock...

Page 34: ...e cable should be connected for normal operation The cable has six leads as follows Two drive lines with heavy gauge wire to supply the charge and discharge current Two sense lines to measure the volt...

Page 35: ...RigidArm series when using the C8000 Adapter Unit and SM Bus batteries Custom programs can be configured to control and respond to states of the configurable lines The connector provides the following...

Page 36: ...er Note Once theC8000 Adapter Unit is connected the input output ports become reserved The following diagrams show the pin and electrical specifications of interfaces for the Auxiliary Input Output Co...

Page 37: ...Reserved Yellow black 13 Reserved Pink black 14 Ground Green 15 Temperature T Blue 16 Pressure P Purple 17 Differential Analog Input 1 Positive Red white 18 Differential Analog Input 1 Negative Red b...

Page 38: ...s front panel 4 Ports each including Battery Positive Battery Negative Sense Positive Sense Negative Thermistor Input Thermistor Ground Auxillary Ports I O front panel 4 x DB25 Type each including 4 D...

Page 39: ...320W total Dual Power Port cable may be to increase the maximum Power Rate to 160W per channel pair External Load may be used to increase Discharge Rate up to 2400W Maximum Charge Discharge Current 3...

Page 40: ...ronmental RoHS WEEE 2 4 2 Auxillary Port Absolute Maximum Ratings When using the Auxiliary Input Output Connector the voltage settings for the pins must not exceed the absolute maximum ratings otherwi...

Page 41: ...ting ratings must be set according to the following settings Voltage Setting Operating Rating Voltage at Digital I O 1 4 0 to 5V A Pull up is required open collector Voltage at SMBC SMBD or SMBDIO 0 t...

Page 42: ...and 2 11 2 User Information 3 If required use LCD Settings to adjust the contrast of the LCD display See 2 11 3 LCD Settings for more information 2 6 User Maintenance for the C8000 2 6 1 User Mainten...

Page 43: ...the main AC input fuse may need to be replaced Replace fuses only with fuses of the same type and rating Fuse 5x20mm T8A 250V Cadex part number 52 546 0800 Caution Before replacing the fuse unplug th...

Page 44: ...disk Retrieve test results stored on the C8000 to the BatteryLab database To download the test results to BatteryLab select Retrieve Results from the File menu on the Test Results window For more info...

Page 45: ...to open the C8000 while it is plugged into an electrical outlet or any peripheral device Severe electrical shock to the service person and or damage to the C8000 could result 2 Use a Phillips screwdri...

Page 46: ...ng toward the fan until the clip slips in place 1 Replace the cover making sure that no interior wires or cables are caught or pinched between the cover and the C8000 case 2 Replace the seven cover sc...

Page 47: ...t feature only 3 No Graphing or Detail information for Test Results Summary of information only 4 No Load Capture capabilities When you power on the C8000 without any batteries connected the Main scre...

Page 48: ...ng BatteryLab 1 Connect the battery 2 Select a battery ID or C Code from the StartUp screen Note If the StartUp screen is minimized the channel status indicates Startup Press the Channel button to max...

Page 49: ...any given program Test Results Indicates the file name to which the current program s results will be saved to during operation On completion of a program indicates the file to which the results have...

Page 50: ...M Ohms The resistance of the battery measured in milliohms Displays the latest resistance measurement otherwise N A when resistance measurement is not selected Elapsed The time since starting the prog...

Page 51: ...unning it can be temporarily suspended Later the program can be resumed 1 From the Channel screen click Suspend The program is immediately interrupted 2 Press Resume to restart the program 2 7 1 3 Abo...

Page 52: ...40 2 Battery Tester 2 Press OK The Aborted screen appears 2 7 1 4 View Auxiliary Port Information While a program is active the current program configuration can be viewed 1 From the Channel screen pr...

Page 53: ...ecific Program Step A program may contain one or more action steps The JUMP command allows the ability to move immediately from the current action step to any of the other action steps within the acti...

Page 54: ...formation Before using any SM Bus battery functions ensure the SM Bus lines from the I O port are connected to the battery Note The temperature reading for SM Bus batteries will still use the Cadex th...

Page 55: ...000 will ignore this flag and continue the current step D Retries indicates a value between 1 and 10 This option is available for Over Temperature Alarm bit only The setting will indicate to the unit...

Page 56: ...ogram field press ENTER The Select Program screen appears 3 Select the program to run and press ENTER Note When scrolling through the list of programs all factory programs are indented All custom prog...

Page 57: ...followed by the sequential number if the test was started using a battery ID or Cx where x is the channel number followed by the sequential number The date shown is the date the test result file was c...

Page 58: ...Dchg Cycles The number of discharge cycles performed during the test Duration The time it took to complete the test Status Codes Displays the last five status codes regardless if test completed or fa...

Page 59: ...esult to delete 3 Press DELETE The Confirm Action screen appears 4 Press OK to delete the test result 2 7 2 4 Delete All Test Results To delete all test results 1 From the Main screen select Test Resu...

Page 60: ...ery Tester 2 Press DELETE ALL The Confirm Action screen appears 3 Press OK to delete all test results 2 7 3 Battery Profiles To add edit and delete battery profiles in the C8000 From the Main menu sel...

Page 61: ...file in the Battery Profiles screen and press ENTER The Battery Profiles screen appears Edit the information for the battery profile as required and press OK to save the changes When adding or editing...

Page 62: ...s ENTER For a description of the fields see 2 8 1 2 View and Edit a C Code Edit the details of the battery c code as required and press OK to save the changes Press CANCEL to discard any changes just...

Page 63: ...diting a c code see 2 8 1 2 View and Edit a C Code Press BACK to return to the Page 1 screen 2 7 3 2 Delete a Battery Profile To delete a battery profile From the Main screen select Batteries and pres...

Page 64: ...mport or export c codes to and from the C8000 Note The Import and Export functions apply only to SnapLock RigidArm Adapters when using the C8000 Adapter Unit From the Main screen select C Codes and pr...

Page 65: ...r the cells and rating and press ENTER Press Next and the battery c code information appears Make any required changes and press OK to save the changes See section 2 8 1 2 View and Edit a C Code for d...

Page 66: ...ter the number of cells Number of cells supported by Battery chemistry NiCD and NiMH up to 30 cells in series 36 Volts nominal SLA batteries up to 18 cells in series 36 Volts nominal Li ion batteries...

Page 67: ...the total rating field Unit m Ohms The minimal resistance impedance value is required to determine a Pass Fail condition Unit m ohm Range 1 1000 Trickle Rate The current rate of charge discharge when...

Page 68: ...before terminating Unit C minutes Dchrg Timeout The maximum length of time that a Discharge current can be applied before terminating Unit C minutes Max Chrg Curr The maximum allowable Charge current...

Page 69: ...rt C Codes screen appears showing which c codes 1 10 were extracted from the SnapLock RigidArm Adapter Next select the c codes to import To select a c code for import select the c code by its correspo...

Page 70: ...ted from the C8000 The numbered 1 through 10 fields list all c codes contained within the SnapLock RigidArm Adapter In the C Code field press Enter to retrieve a list of c codes currently on the C8000...

Page 71: ...n select Programs The Custom Programs screen appears 2 9 1 View a Custom Program View the details of a custom program 1 From the Main screen select Programs The Custom Programs screen appears 2 Select...

Page 72: ...wing the information about the custom program press CANCEL to return to the Custom Programs screen 2 9 2 Delete a Custom Program Custom programs can be deleted only if the security setting is set to D...

Page 73: ...OK 2 10 Waveforms To view information about a waveform or delete one or more waveforms From the Main screen select Waveforms The Custom Waveforms screen appears The Custom Waveforms screen lists all...

Page 74: ...cted waveform Note if a version number is not entered when the waveform is created V0 00 is displayed When finished viewing the waveform s information press CANCEL to return to the Custom Waveforms sc...

Page 75: ...The System Options screen shows 10 menu items Set Clock User Information LCD Contrast Serial Ports TCP IP Settings Maintenance Options Security System Information and Factory Defaults 2 11 1 Set the C...

Page 76: ...To enter user information 1 From the Main screen select System and press ENTER The System Options screen appears 2 Select User Information and press ENTER The User Information screen appears 3 To acti...

Page 77: ...contrast of the C8000 s LCD screen 1 From the Main screen select System and press ENTER The System Options screen appears 2 Select LCD Contrast and press ENTER The Set LCD Contrast screen appears 3 Us...

Page 78: ...eld 4 Press OK 5 Restart the C8000 after modifications 2 11 5 Specify the TCP IP Address on the C8000 Note that the TCP IP addresses must be static IP addresses For more information see 3 1 10 Selecti...

Page 79: ...s been removed from the DCHP server assignment list 2 11 6 Maintenance Test results for each battery test are saved on the C8000 and are automatically deleted after the specified number of days 1 From...

Page 80: ...me Hours field to any other value 1 From the Main screen select System and press ENTER The System Options screen appears 2 From the System Options screen select Options and press ENTER The System Opti...

Page 81: ...ed and the password is entered to disable the security the security will automatically enable after a reboot or after 10 minutes of no activity To deactivate the security permanently disable the secur...

Page 82: ...IC versions the RDD free space and whether security is enabled or disabled The units MAC and serial number are also shown Each C8000 contains three microprocessors one Coldfire processor and two Digit...

Page 83: ...e The last time the C8000 was turned on The security password enables or disables the C8000 s security feature The default password is 0000 and security features are disabled by default If a security...

Page 84: ...ults erases all saved data customized programs waveforms and c codes This data should be backed up before proceeding to restore factory defaults 1 From the Main screen select System and press ENTER Th...

Page 85: ...tor Supported DC Electronic Loads BK Precision 8510 BK Precision 8514 BK Precision 8518 BK Precision 8520 BK Precision DC Electronic Load Limits The programming of the DC Load will take between 10 90...

Page 86: ...ate of 60 seconds Programs can be defined to acquire data at a rate of 1 second Only status code changes are acquired immediately Customizable reports can be generated from historical results retrieve...

Page 87: ...o Display File Extensions A file extension describes a file type A filename and its extension are separated by a period for example Setup exe The extension exe indicates an executable program file To...

Page 88: ...agnetic tape It is possible to reinstall software but the data files on your computer including test records and calibration data for your C8000s can be restored only if a backup copy exists Scheduled...

Page 89: ...omatically preserved during the upgrade 3 1 5 1 Install BatteryLab 1 Insert the installation CD into the CD drive 2 Browse your CD drive in Windows Explorer and double click Setup exe If BatteryLab is...

Page 90: ...tteryLab is installed in the C Program Files Batlab folder by default To install BatteryLab in a different location click Browse The Select Destination Directory window appears Select the location and...

Page 91: ...ault To install BatteryLab s database in a different location click Browse The Select Destination Directory window appears Select the location and click OK Click Yes to overwrite the existing copy of...

Page 92: ...install BatteryLab 1 In Control Panel click Add Remove Programs 2 Select Cadex BatteryLab and click Remove 3 You can select either Automatic or Custom If you select Custom select All followed by Next...

Page 93: ...1 Software Version To see what version of BatteryLab is installed on the computer select About from the Help menu The build number and the location of the database files appears in the About window 3...

Page 94: ...matically enable security in BatteryLab and connected analyzers To enable and disable security see 2 11 8 Security To select a password select Password Setting from the Database menu You must specify...

Page 95: ...and the network mask Launch BatteryLab on the host PC to enter the IP address for every C8000 that the host PC will communicate with See 3 1 10 3 Add IP Addresses for C8000s on the PC for information...

Page 96: ...8 5 TCP IP Settings Use the Cadex C8000 standalone or connected to a TCP IP network and use with Cadex BatteryLab PC software In the standalone option information is specified manually into the C8000...

Page 97: ...Lab to communication with the C8000 a rule will be required to be configured and granted or allowed communications to the network On the initial execution of the BatteryLab application the majority of...

Page 98: ...omputer or device uniquely on a TCP IP network Each of the four numbers can range from 0 to 255 If a Network administrator is unavailable follow the instructions below on a computer to determine a uni...

Page 99: ...notated by using four numbers from 0 through 255 separated by periods Subnet Mask This number identifies the network segment on which the PC is located A subnet mask is a 32 bit number that is notated...

Page 100: ...ld the computer receive a reply when the C8000 has not been programmed with an IP Address select another IP Address If there is no device on the local network currently using this address the ping req...

Page 101: ...select the Auto Connect on BatteryLab Startup check box 5 To automatically execute BatteryLab on logon select the Automatically run BatteryLab when I log on to Windows check box In case of a power los...

Page 102: ...the BatteryLab icon on the desktop If there is no BatteryLab icon on the desktop from the Start menu select Programs BatteryLab BatteryLab The main window for BatteryLab appears 3 1 11 1 The Menu Bar...

Page 103: ...eal time statuses for the selected C8000 channel Set Clock Sets the computer s clock for one or all C8000s Set Options Sets the system options for the selected C8000 or all C8000s External Device Info...

Page 104: ...s the Load Capture programs database Waveforms Displays the Waveforms Database window Sequencer Displays the Sequencer window Security Setting Enables or Disables the C8000 and BATTERYLAB Security Set...

Page 105: ...le system security in BatteryLab and on all connected analyzers Connected analyzer windows will display a padlock indicating security is enabled on the analyzer Note If system security is enabled atte...

Page 106: ...tc 1 Select Password Setting from the Database menu The Password window appears 2 Enter your password and click OK The Password Updated window appears Note Password verification is required if a passw...

Page 107: ...commended For more information see 2 11 Specify System Options 5 In the Resume Hours field enter a value 0 24 where 0 off The C8000 will resume a test if this option is set after a power interruption...

Page 108: ...where x Channel 1 4 yy c code location in the adapter 01 10 For example a c code imported from Channel 3 with a C Code in memory location 1 would be C7301 9 In the RDD Free Space Alert field enter 0...

Page 109: ...ssue To view information about the next warning error condition click Next To view information about the previous warning error condition click Prev Click Close to close the Alert window Note Closing...

Page 110: ...nt step Step Description A user defined description of the current step Status The current status of the C8000 channel or program Pgm Name The executing program s name Result The test result of the cu...

Page 111: ...s an input DigitalIn4 Status of Digital 4 when configured as an input AnalogIn1 Voltage level of Analog Input 1 AnalogIn2 Voltage level of Analog Input 2 AnalogIn3 Voltage level of Analog Input 3 Anal...

Page 112: ...2 Click Results Panel The Results Panel window appears 3 To add a field to the Results window select the field in the Available Fields column and click Add 4 To remove a field from the Results window...

Page 113: ...ime status events in C8000s To select the location of the log file and Enable 1 From the Tools menu select BatteryLab Configuration The BatteryLab Configuration window appears Click Event Logging The...

Page 114: ...be customized with a logo and report headers 1 From the Tools menu select BatteryLab Configuration The BatteryLab Configuration window appears Click Report Template Options The Report Template Option...

Page 115: ...ay for a variable in the plot select the variable in the Plot Variables column and click Up or Down 5 To display the separate Y axis for the selected variables select the Separate y axis check box 6 S...

Page 116: ...ery channel Program Step shows all the steps within the program being currently run Selecting a step will display all the parameters of the step within the Action Parameters sub window The parameters...

Page 117: ...imited to a maximum of 10000 points Zoom Out undo all zoom commands Separate y axis Separates all graphs into individual scales Default checked Auto Scale Automatically scales each graph on the y axis...

Page 118: ...yLab To view the current C Code for this channel click C Code To view waveforms for this channel click Custom Waveform The Waveforms real time information appears To view the playback of a waveform cl...

Page 119: ...User Manual 3 Cadex BatteryLab 107 To view smart battery real time information click Smart Battery To view the schedule of programs for this channel click Schedule The Schedule window displays the pro...

Page 120: ...tle Header from C8000 to the Unit indicated on the analyzer window Wait for the C8000 to connect to BatteryLab before starting to test a battery If the C8000 and software do not connect within 15 to 6...

Page 121: ...or c code o The type of program selected will filter the available C codes Example SM BUS program will only filter all non SM BUS C codes from the available list o To automatically create a SM BUS C c...

Page 122: ...atus message To modify the information that appears in the Result Panel select Result Panel in the BatteryLab Configuration window 3 4 1 1 Background Color of Tests Running The background color displa...

Page 123: ...d choose Suspend 3 4 2 3 Resume a Suspended Test In the C8000 window right click on the channel and choose Resume 3 4 2 4 Simulate a Battery Removal In the C8000 window right click on the channel and...

Page 124: ...running Note If results for tests NOT started via BatteryLab are retrieved long after Test Results on the C8000 are automatically deleted then there is a chance that the wrong Test Result record will...

Page 125: ...ll running If a test is started on a C8000 and BatteryLab is not running the Test Results will be saved on the C8000 When BatteryLab is run the next time use the Retrieve Results File menu option on t...

Page 126: ...ow appears 2 From the File menu select Import Test Results The Open window appears 3 Select the file that contains the test results to import and click Open 3 6 2 Print a Search List To print the sear...

Page 127: ...ry test information by selecting a record in the Test Result list and clicking View Record 1 From the C8000 menu click Results The Test Results window appears with 100 of the latest results listed Cli...

Page 128: ...3 6 3 1 Edit a Test Result Record To edit the remarks for a test result 1 From the C8000 menu click Results The Test Results window appears 2 In the Test Results window search for the test result by a...

Page 129: ...ecord is no longer needed delete it from the database 1 From the C8000 menu click Results The Test Results window appears 2 In the Test Results window search for the test result by battery ID or C Cod...

Page 130: ...st Record window click Print Record 3 6 3 4 View Details To the Details 1 In the Test Record window click Details 2 The Details window displays a list of all the recorded data 3 6 3 5 View Program Ste...

Page 131: ...am Steps window displays each program step and the step s parameters 3 6 3 6 View a Battery Test Graph To view a graph of the battery test click Graph in the Test Record window 3 6 3 7 View C Code Inf...

Page 132: ...BatteryLab 3 6 3 8 Custom Waveform To view custom waveform information click Custom Waveform in the Test Record window Note If no Custom Waveform was used in the program this option will be grayed ou...

Page 133: ...ayback Waveform was used in the program this option will be grayed out 3 6 3 10 Load Capture Waveform To view a load capture waveform in the Test Record window click Load Capture Waveform Note If no P...

Page 134: ...anual 122 3 Cadex BatteryLab In the Test Record window click Termination Data Click the Data Point tab to view data point information Click the Graph tab to view termination data in graph form 3 6 3 1...

Page 135: ...Test Record window click Print Results 3 6 3 14 Print a Battery Test Graph To print a hardcopy of the battery test graph 1 In the Test Record window click Print Graph 2 The Printing window appears 3 C...

Page 136: ...3 Cadex BatteryLab 2 Click the File name field and type a new name for the file if necessary 3 Click Save 3 6 3 16 Export Graph Data To a File To export graph data 1 In the Test Record window click E...

Page 137: ...to display required test result fields and to specify optional report headers and a report bitmap After setting the default Report Template test results will appear as described by the Report Templat...

Page 138: ...C8000 Battery Testing System User Manual 126 3 Cadex BatteryLab 2 Click Add The Password window appears 3 Enter your password and click OK The Template Fields window appears...

Page 139: ...his report template To quickly select all fields for inclusion in the report template click Select All to exclude all fields from the report template click Clear All 6 To move the position of a field...

Page 140: ...that will be created from this report template To quickly select all fields for inclusion in the report template click Select All to exclude all fields from the report template click Clear All 5 To mo...

Page 141: ...ck mark in the Default check box to set the template as the default report template 3 Click OK 3 7 2 4 Delete a Report Template A protected report can be deleted after protection is removed The defaul...

Page 142: ...rs Click Yes The report template is deleted 4 Click OK 3 7 2 5 Copy a Report Template It is possible to create a report template based on an existing template record Making a copy of an existing templ...

Page 143: ...ting System User Manual 3 Cadex BatteryLab 131 2 Select the template to copy 3 Click Copy The Copy Report Template window appears 4 Type a name for the new report template 5 Click OK The Template Fiel...

Page 144: ...in the report template click the field name and then click Move Up or Move Down This sets the order that the fields will appear in reports using this template 6 Click OK The new report template appear...

Page 145: ...printing reports 1 From the Tools menu select Report Template The Report Templates window appears 2 Click Printer Setup The Print Setup window appears 3 Select the properties paper size and source and...

Page 146: ...de may be changed at any time The C Code Database window describes a specific battery type and the settings required to process that battery type 3 8 1 Add a Battery ID 1 From the Database menu click...

Page 147: ...y ID and click OK 5 Type any remarks in the Comment 1 and Comment 2 fields 6 Click OK The new battery ID appears in the Battery ID Database window 3 8 2 Edit a Battery ID To edit a battery ID 1 From t...

Page 148: ...D Definition window appears 5 Edit the information as required 6 Click OK 3 8 3 Delete a Battery ID To delete a battery ID 1 From the Database menu click Battery ID The Battery ID Database window appe...

Page 149: ...from BatteryLab option the Confirm window appears Click Yes to delete the battery ID If you select the Delete from Connected C8000 the Delete Battery ID window appears The top half of this window lis...

Page 150: ...eryLab 3 8 4 Copy a Battery ID Copy a battery ID to create a battery ID 1 From the Database menu click Battery ID The Battery ID Database window appears 2 Select the battery ID to copy 3 Click Copy If...

Page 151: ...password and click OK The Battery ID Definition window appears 5 Click OK The new battery ID appears in the Battery ID Database window 3 8 5 Import a Battery ID To import a battery ID from a file 1 Fr...

Page 152: ...Battery Testing System User Manual 140 3 Cadex BatteryLab 2 Click Import If database security is enabled the Password window appears 3 Enter your password and click OK The Import a Battery ID window a...

Page 153: ...1 4 Click Browse The Open window appears 5 Select the file that contains the battery ID information to import 6 Click Open If the c code specified in the to be imported file already exists this error...

Page 154: ...stem User Manual 142 3 Cadex BatteryLab 7 An Information window appears with the number of files imported To import a battery ID from the C8000 1 From the Database menu click Battery ID The Battery ID...

Page 155: ...rity is enabled the Password window appears 3 Enter your password and click OK The Import Battery ID window appears 4 Click From the C8000 5 Select the C8000 that contains the battery ID information t...

Page 156: ...Battery ID Database window appears 2 Select the battery ID to export Hold the CTRL key down to select multiple records 3 Click Export Click Browse The Save As window appears 4 Type a name for the expo...

Page 157: ...r Manual 3 Cadex BatteryLab 145 To export a battery ID to the C8000 1 From the Database menu click Battery ID The Battery ID Database window appears 2 Select the battery ID to export Hold the CTRL key...

Page 158: ...C8000 Battery Testing System User Manual 146 3 Cadex BatteryLab 3 Click Export The Export Battery ID window appears 4 Click To the C8000 A list of connected C8000s appears 5 Click Export...

Page 159: ...ry IDs The BatteryLab database may contain many battery IDs To sort the battery IDs in ascending order click the Battery ID or C Code column in the Battery ID Database window Click the column a second...

Page 160: ...current and use the maximum discharge current of the external load Bypass only occurs if the Discharge Playback action is used in a program and is currently active 7 Click OK The new c code appears i...

Page 161: ...ery configuration Consult the battery specifications before proceeding with the connection for a full description on the Auxillary I O port cable To automatically add a SM BUS c code in BatteryLab 1 S...

Page 162: ...e requested Charge Voltage If the requested current is ZERO 0 then the system will default to the a 1 0C rate This register is only downloaded if the Chemistry type is equivalent to a CC CV charging a...

Page 163: ...e Alarm 3 Overcharge Alarm 4 Fully Discharged Alarm 5 Terminate Discharge Any of the above options can be set to one the following conditions a Finished will terminate the program successfully on flag...

Page 164: ...t a C Code To edit a c code 1 From the Database menu click C Code The C Code Database window appears 2 Select the c code to edit 3 Click Edit If database security is enabled the Password window appear...

Page 165: ...anual 3 Cadex BatteryLab 153 5 Edit the information as required 6 Click OK 3 9 4 Delete a C Code To delete a c code from BatteryLab 1 From the Database menu click C Code The C Code Database window app...

Page 166: ...Options window appears 5 If you select Delete from BatteryLab option the Confirm window appears Click Yes to delete the c code 6 If you select the Delete from Connected C8000 the Delete C Code window...

Page 167: ...3 Cadex BatteryLab 155 3 9 5 Copy a C Code To create a c code based on an existing C Code 1 From the Database menu click C Code The C Code Database window appears 2 Select the c code to copy 3 Click C...

Page 168: ...ryLab 4 Edit the chemistry settings for the c code as required 5 Type a name for the new c code in the C Code Name field 6 Click OK 3 9 6 Import a C Code To import a c code from a file 1 From the Data...

Page 169: ...ort and click Open The Information window appears showing the number of c codes imported If the c code already exists click Cancel to terminate the import process altogether or OK to overwrite the exi...

Page 170: ...g System User Manual 158 3 Cadex BatteryLab 1 From the Database menu click C Code The C Code Database window appears 2 Click Import The Import C Code window appears 3 Click From the C8000 The Import C...

Page 171: ...tem User Manual 3 Cadex BatteryLab 159 4 5 Select the C8000 that contains the c code to import and click Import or click Import from SnapLock Adapter to see a list of stations the SnapLock RigidArm Ad...

Page 172: ...apLock RigidArm Adapter Next select the c code s to download Click Import to transfer the c code s file s 3 9 7 Export a C Code To export c codes to a file 1 From the Database menu click C Code The C...

Page 173: ...4 Click Browse The Save As window appears 5 Type a name for the file in the File name field 6 Click Save All selected c codes are saved to the file An Information window appears with the number of C...

Page 174: ...BatteryLab 7 Click OK To export c codes to the C8000 1 From the Database menu click C Code The C Code Database window appears 2 Select the c code s to export 3 Select the C8000 to export the c codes...

Page 175: ...tem User Manual 3 Cadex BatteryLab 163 4 Click To the C8000 The Import Export window appears 5 Click Export All selected c codes are exported to the same file An Information window appears with the nu...

Page 176: ...y c codes To sort the c codes in ascending order click the C Code column in the C Code Database window Click the column a second time to sort the c codes in descending order 3 10 Programs The Program...

Page 177: ...onstant current Nighttime Similar to the program above except connect an external light sensor to one of the auxiliary inputs 1 Charge lower current if analog input daytime value proceed to step 2 2 C...

Page 178: ...or stored batteries for use A new or stored battery may require several charge discharge cycles to form the cells to achieve peak performance Sequence The program cycles discharges and charges the ba...

Page 179: ...ly charge the battery using the Charge program before running the Discharge only program Sequence The battery is discharged until its voltage reaches the END OF DISCHARGE setting in the C Code and the...

Page 180: ...EST SETPOINT If the result is above this threshold the program fails the battery Duration 30 to 60 seconds for all chemistries Runtime Function Often referred to as a 5 5 90 test the RunTime program s...

Page 181: ...ply the Boost program again Duration 3 minutes user may repeat if unsuccessful Warning Failure to follow these precautions may result in serious damage to the Cadex unit and or the battery The Boost p...

Page 182: ...ery is partially discharged the capacity may be lower than the target capacity This may give a Fail Code 115 or 116 The battery is not necessarily poor Duration Approximately 1 hour for a NiCD battery...

Page 183: ...rged battery operating over a 10 day period The battery charges for 3 hours at low current simulating early morning sun The battery charges for 6 hours at a higher current simulating mid day sun The b...

Page 184: ...C8000 Battery Testing System User Manual 172 3 Cadex BatteryLab Step 1 charge at lower current for 3 hours...

Page 185: ...C8000 Battery Testing System User Manual 3 Cadex BatteryLab 173 Step 2 charge at higher current for 6 hours Step 3 charge at lower current for 3 hours...

Page 186: ...174 3 Cadex BatteryLab Step 4 discharge at constant current for 12 hours At the end of Step 4 there is a Loop Counter test If the loop counter is 5 or more the test finishes otherwise the test increme...

Page 187: ...t for 30 minutes simulating the sun being covered blocked and no charge applied The environmental temperature is then increased to 35 C over a 6 hour period while the battery charges at higher current...

Page 188: ...C8000 Battery Testing System User Manual 176 3 Cadex BatteryLab Step 1 Environment is configured to starting temperature Step 2 Battery is saturated in the early morning environment...

Page 189: ...8000 Battery Testing System User Manual 3 Cadex BatteryLab 177 Step 3 Environmental Temperature is increased over a 3 hour period Step 4 charge at lower current for 3 hours during the temperature rise...

Page 190: ...C8000 Battery Testing System User Manual 178 3 Cadex BatteryLab Step 5 Battery is Rested for 30 minutes Step 6 Environmental temperature is increased...

Page 191: ...C8000 Battery Testing System User Manual 3 Cadex BatteryLab 179 Step 7 charge at high current for 6 hours during the temperature rise Step 8 Battery is Rested for 30 minutes...

Page 192: ...C8000 Battery Testing System User Manual 180 3 Cadex BatteryLab Step 9 Environmental temperature is decreased Step 10 charge at low current for 3 hours during the temperature decrease...

Page 193: ...C8000 Battery Testing System User Manual 3 Cadex BatteryLab 181 Step 11 Battery is Rested for 30 minutes Step 12 Environmental temperature is decreased over a 6 hour period...

Page 194: ...discharge for 6 hours during the temperature fall At the end of Step 13 there is a Loop Counter test If the loop counter is equivalent 9 the test finishes otherwise the test increments the loop counte...

Page 195: ...stem User Manual 3 Cadex BatteryLab 183 3 10 4 Add a Program To add a custom program to BatteryLab click Programs in the Database menu The Program Database window appears Next click Add T he Add Custo...

Page 196: ...here is No Test the program will automatically go to the next step on a successful completion of the action step When this program executes the steps are performed in the order listed To change the or...

Page 197: ...tion point CTP in the C code All Chemistries Recharges the battery if the voltage level drops below the standby voltage of the c code Available for Step zero 0 only Discharge Type Allows the selection...

Page 198: ...ult shall use the charge current value in the C code to set the rate of charge Recondition None Performs a discharge at the trickle discharge rate as per C code until the end of recondition voltage is...

Page 199: ...d until the user prompts to continue the service by selecting RESUME Discharge Playback Dchg Device Selection of the Device to perform a discharge Uses a playback waveform to perform a discharge on th...

Page 200: ...on step the program has the ability to run a test during the action step and take appropriate action based on the result of the test The table below lists the Test Type available for each action step...

Page 201: ...en at the being of the step against the Temperature value in the program Comparison is conducted every 10s from the start of the program step Impedance Requires resistance value stated in m ohms m ohm...

Page 202: ...mparator Function Less than Less then or equal to Equal to Greater than or equal to Greater than Not Equal to The selected Test Type with the selected comparator can be viewed in equation format in th...

Page 203: ...e and If the current step is the last step in the program this action will return to step zero 0 Inc D goto next step None Increments the secondary counter D by one and If the current step is the last...

Page 204: ...and enter information in to the fields The fields functionalities are defined as shown in the following table Program Parameter Table Field Default State Description of the Program Parameter Program N...

Page 205: ...Analog input or output port of the C8000 Check mark the Analog ports to enable The Analog output ports have a 0 5 volt range and the output value is controlled in the Action Parameter Tab Analog Inpu...

Page 206: ...er s name to identify it as a folder a text document icon adjacent to the program s name can identify programs Only one level of folders is permitted 1 From the Database menu click Programs The Progra...

Page 207: ...10 6 Edit a Program BatteryLab allows edits to custom programs created by the user System and SM Bus programs cannot be edited or copied to create a program 1 From the Database menu click Programs Th...

Page 208: ...rogram BatteryLab allows deletion of a custom program provided there are no running tests using this program Historical data related to this program is retained for display and reporting operations No...

Page 209: ...b 197 2 Select the program to delete Click Delete If database security is enabled the Password window appears 3 Enter your password and click OK The Delete Options window appears Select the Delete Fro...

Page 210: ...tabase menu click Programs The Program Database window appears 2 Select the program to delete Click Delete If database security is enabled the Password window appears 3 Enter your password and click O...

Page 211: ...System User Manual 3 Cadex BatteryLab 199 4 Select the custom program to delete and click Delete 5 The Confirm window appears 6 Click Yes 3 10 8 Copy a Program It is possible to create a program base...

Page 212: ...tteryLab 1 From the Database menu click Programs The Program Database window appears 2 Select the program to copy 3 Click Copy If database security is enabled the Password window appears 4 Enter your...

Page 213: ...ox if the program is to be an active program 7 Type any notes in the Comment 1 and Comment 2 fields as required 8 Select a waveform for the program Click Browse The Waveforms window appears Select the...

Page 214: ...n Folders Programs can be organized or grouped into folders To move a program to a folder 1 From the Database menu click Programs The Program Database window appears 2 Select the program identified by...

Page 215: ...uble click the name of the folder to move the program to The target folder appears 5 Click OK The program is moved to the target folder 3 10 10 Import a Program To import a program from a file 1 From...

Page 216: ...0 Battery Testing System User Manual 204 3 Cadex BatteryLab 2 Click Import If database security is enabled the Password window appears 3 Enter your password and click OK The Import Program window appe...

Page 217: ...grams The Information window appears with the number of programs imported If the program already exists click Cancel to terminate the import process altogether or OK to overwrite the existing program...

Page 218: ...ppears 3 Click From the C8000 Select a C8000 first from the list C800s are listed by their IP addresses Select the program to import and click Import The Import Program window shows the programs 4 Sel...

Page 219: ...al 3 Cadex BatteryLab 207 3 10 11 Export a Program To export a program to a file 1 From the Database menu click Programs The Program Database window appears 2 Select the program to export 3 Click Expo...

Page 220: ...for the export file in the File Name field 5 Click Save Note that multiple programs can be exported to a single file The Information window appears with the number of programs exported to the file 6...

Page 221: ...sting System User Manual 3 Cadex BatteryLab 209 2 Select the program to export 3 Click Export The Export a Program window appears 4 Click To the C8000 The Export Program window updates with a list of...

Page 222: ...ograms To find a specific program click the Search By Program field to move the cursor to that field Next type the first one or two characters of the program to find As BatteryLab locates the partial...

Page 223: ...the LCU on Channel 1 only The Test Battery caption now changes to Start Capture when the active selected channel is connected to the LCU The channel s status now reads LCU STARTUP 2 Click Start Captu...

Page 224: ...Perform zero offset Set the zero offset to the current level being measured Reset Zero offset Reset the zero offset to the default value determined when the LCU was connected to the C8000 Reset Captur...

Page 225: ...igger condition is met When capturing the status reads LCU CAPTURING and FINISH will appear on completion A window appears indicating the status and the Test ID that has been attached to the captured...

Page 226: ...oltage level is required to start the capture requires Trigger Method and Range definition Range Defines the input voltage range of the analog port selectable ranges 0 5v 0 10v 0 15v Trigger Method De...

Page 227: ...the Trigger Type parameter s Digital option that allows the selection of the digital input for triggering Remarks Notes about the capture program 3 11 1 Load Capture Programs Database The Load Capture...

Page 228: ...ds in the Load Capture Program Editor window to describe the load capture program 4 Type a name for the load capture program in the Program Name field 5 Click OK The new load capture program appears i...

Page 229: ...ser Manual 3 Cadex BatteryLab 217 2 Select the load capture program to edit 3 Click Edit If database security is enabled the Password window appears 4 Enter your password and click OK The Load Capture...

Page 230: ...Lab 5 Edit the information as required 6 Click OK 3 11 4 Delete a Load Capture Program To delete a load capture program from BatteryLab 1 From the Database menu click Load Capture The Program Database...

Page 231: ...sword window appears 4 Enter your password and click OK The Confirm window appears Click Yes to delete the load capture program 3 11 5 Copy a Load Capture Program To create a load capture program base...

Page 232: ...tteryLab 2 Select the load capture program to copy 3 Click Copy The Load Capture Program Editor window appears 4 Edit the settings for the load capture program as required 5 Type a name for the new lo...

Page 233: ...dex BatteryLab 221 3 11 6 Import a Load Capture Program To import a load capture program from a file 1 From the Database menu click Load Capture The Program Database window appears 2 Click Import The...

Page 234: ...ms imported If the load capture program already exists click Cancel to terminate the import process altogether or OK to overwrite the existing load capture program Alternatively specify a different na...

Page 235: ...port The Export a Load Capture Program window appears 4 Click Browse The Save As window appears 5 Type a name for the file in the File name field 6 Click Save All selected load capture programs are sa...

Page 236: ...apture Programs The BatteryLab database may contain many load capture programs To sort the load capture programs in ascending order click the Name column in the Program Database window Click the colum...

Page 237: ...C8000 Battery Testing System User Manual 3 Cadex BatteryLab 225 the battery for 550 us and a 200 mA load for 4 ms First select the device compatibility and the maximum steps Step 5 550 us load 2A...

Page 238: ...BatteryLab Step 6 4 ms load 200 mA Once a GSM waveform is created it can be used in a custom program The following program will charge the battery discharge the battery using a GSM waveform and then...

Page 239: ...C8000 Battery Testing System User Manual 3 Cadex BatteryLab 227 Step 8 discharge using the GSM waveform Step 9 Charge the battery back up...

Page 240: ...tteryLab 1 From the Database menu click Waveforms The Waveform Database window appears 2 Select the Custom Load Capture or Playback folder and click Add The Add New Waveform window appears Explanation...

Page 241: ...200W 8520 120V 240A 2400W Note If there is a charge step in a waveform and a BK device has been selected a five second 0 current step is required between the charge and discharge currents All charge s...

Page 242: ...p is required when transitioning between charge discharge and vice versa The last waveform step must respect this rule when it is compared with the first waveform step 1 Click Add in the Waveform Edit...

Page 243: ...es of waveforms are categorized as custom waveforms Waveform 1 Maximum 50 steps with charge discharge steps of any duration Minimum 500s Maximum 12hrs Waveform 2 Maximum 500 steps with charge discharg...

Page 244: ...System User Manual 232 3 Cadex BatteryLab 7 Select the waveform identified by a text document icon to move to a folder 8 Click Move To The Target Folder window appears 9 If necessary create a folder b...

Page 245: ...s 11 Click OK The waveform is moved to the target folder Note Waveforms cannot be moved from one group to another The Load Capture Waveforms can be converted from a Load Capture waveform to a Playback...

Page 246: ...User Manual 234 3 Cadex BatteryLab 2 Select the waveform to edit 3 Click Edit The Waveform Editor window appears 4 Edit the information for the waveform as required 5 Click OK 3 12 5 Delete a Waveform...

Page 247: ...Options window appears To delete the waveform from BatteryLab select the Delete From BatteryLab check box To delete the waveform from the connected C8000 select the Delete From Connected C8000 check b...

Page 248: ...2 Select the waveform to copy 3 Click Copy The Waveform Editor window appears 4 Type a name for the new waveform in the Waveform Name field 5 Type any notes in the Comment 1 and Comment 2 fields as re...

Page 249: ...237 7 Click OK The new waveform appears in the Waveform Database window 3 12 7 Import a Waveform To import a waveform from a file 1 From the Database menu click Waveforms The Waveform Database window...

Page 250: ...pears with the number of waveforms imported If the waveform already exists click Cancel to terminate the import process altogether or OK to overwrite the existing waveform Alternatively specify a diff...

Page 251: ...The Import a Waveform window appears 3 Click From the C8000 The window updates with a list of connected C8000s and available waveforms for the selected C8000 4 Select the waveform to import 5 Click Im...

Page 252: ...Cadex BatteryLab 3 12 8 Export a Waveform To export a waveform to a file 1 From the Database menu click Waveforms The Waveform Database window appears 2 Select the waveform to export 3 Click Export Th...

Page 253: ...241 4 Select the folder to export the waveforms to and click Export 5 Click Browse The Save As window appears 6 Type a name for the export file in the File Name field 7 Click Save The Information wind...

Page 254: ...tery Testing System User Manual 242 3 Cadex BatteryLab 8 Click OK To export a waveform to the C8000 1 From the Database menu click Waveforms The Waveform Database window appears 2 Select the waveform...

Page 255: ...nual 3 Cadex BatteryLab 243 3 Click Export The Export a Waveform window appears 4 Click To the C8000 The window updates with a list of connected C8000s 5 Click Export The Information window appears wi...

Page 256: ...ht the corresponding waveform s name in the Waveform Database window 3 12 10 Sort the Waveforms The BatteryLab database may contain many waveforms To sort the waveforms in ascending order click the Na...

Page 257: ...ce 1 From the Database menu click Sequencer The Sequence Database window appears 2 Click Add The Add Program Sequence window appears 3 Select the program to add the program sequence to Next select the...

Page 258: ...and select a battery ID 6 Type any remarks in the Notes field 7 Click OK The new program sequence appears in the Sequence Database window 3 13 2 Edit a Program Sequence To edit a program sequence 1 Fr...

Page 259: ...tem User Manual 3 Cadex BatteryLab 247 3 Click Edit If database security is enabled the Password window appears 4 Enter your password and click OK The Modify Program Sequence window appears 5 Edit the...

Page 260: ...e a program sequence 1 From the Database menu click Sequencer The Sequence Database window appears 2 Select the program sequence to delete 3 Click Delete If database security is enabled the Password w...

Page 261: ...4 Copy a Program Sequence Copy a program sequence to create a program sequence 1 From the Database menu click Sequencer The Sequence Database window appears 2 Select the program sequence to copy 3 Cl...

Page 262: ...l 250 3 Cadex BatteryLab 4 Enter your password and click OK The Copy Program Sequence window appears 5 In the Sequence Name field type a name for the new sequence 6 Click OK The new program sequence a...

Page 263: ...rogram Sequence To import a program sequence from a file 1 From the Database menu click Sequencer The Sequence Database window appears 2 Click Import If database security is enabled the Password windo...

Page 264: ...yLab 4 Click Browse The Open window appears 5 Select the file that contains the program sequence to import 6 Click Open If the c code specified in the to be imported file already exists this error win...

Page 265: ...r Manual 3 Cadex BatteryLab 253 7 An Information window appears with the number of program sequences imported To import a program sequence from the C8000 1 From the Database menu click Sequencer The S...

Page 266: ...Battery Testing System User Manual 254 3 Cadex BatteryLab 2 Click Import If database security is enabled the Password window appears 3 Enter your password and click OK The Import a Sequence window ap...

Page 267: ...ct the C8000 that contains the program sequence to import 6 Click Import and click OK 3 13 6 Export a Program Sequence Note Only one sequence program may be exported at a time To export a program sequ...

Page 268: ...00 Battery Testing System User Manual 256 3 Cadex BatteryLab 2 Select the program sequence to export Hold the CTRL key down to select multiple records 3 Click Export The Export a Sequence window appea...

Page 269: ...As window appears 5 Type a name for the export file in the File name field 6 Click Save 7 An Information window appears with the number of program sequences exported To export a program sequence to t...

Page 270: ...00 Battery Testing System User Manual 258 3 Cadex BatteryLab 2 Select the program sequence to export Hold the CTRL key down to select multiple records 3 Click Export The Export a Schedule window appea...

Page 271: ...the cursor to that field Next type the first one or two characters of the program sequence s name to find As BatteryLab locates the partial name it will highlight the corresponding sequence in the Se...

Page 272: ...ys each connected C8000 with its associated firmware version s IP address and status The System Update file location The Browse button will accept only valid C8000 System Update c8u files to enable th...

Page 273: ...ind the folder containing the new firmware file on your hard drive The firmware files have a c8u extension you can obtain these from Cadex Electronics Inc 5 Select the new firmware file 6 Click Update...

Page 274: ...alibration Data To update the calibration data on the C8000s 1 From the Tools menu click System Update The System Update window appears 2 Click Calibration Data 3 To back up the calibration data click...

Page 275: ...thernet port on the back of the C8000 3 Your network administrator can also ping see Ping the Network to Check for Available IP Address the C8000 to make sure it is communicating properly with the net...

Page 276: ...to report a DAO error If a centralized server manages folder permissions on your network then you have one of two options to resolve Folder Access Permission issues 1 Uninstall BatteryLab from the def...

Page 277: ...the Security tab 8 Choose users in the group or user names list 9 Select the Full Control Allow check box 10 Click Advanced 11 Clear the Inherit from parent check box and choose Copy 12 Click OK to cl...

Page 278: ...stry Battery Chemistry All N A N A N A N A 0x22 Any change to this field to affect all other fields Number of Cells Cells All 1 NiMH 30 N A N A No Maximum Value is Chemistry dependent Any change to th...

Page 279: ...two Maximum voltages The selection depends on the Nominal voltage selected by the user SLA 2 800 cells 48 048 Li 4 500 cells LiPh 4 200 cells Primary 1 2v nominal 1 800 cells Primary 3v nominal 4 500...

Page 280: ...arge rate All Rating 100ah 0 055 Maximum Discharge A 0 01 2C 0x14 Rating 100ah 0 200 Low temperature Low temperature limit All 30 80 C Maximum Temperature 0 10 No Zero value is valid High temperature...

Page 281: ...T Delta T C per minute All 1 10 C Min N A No Charge timeout Maximum duration of a charge before Failure All 0 300 C Minute No Zero value is valid and indicates Parameter is OFF Discharge timeout Maxim...

Page 282: ...o Discharge Rate during a Recondition Action for NiXX Rating 100ah 0 200 End of recondition NiMH NiCD Minimal Voltage End of discharge V 0 40 0 80 V cell No Reverse load weight NiMH NiCD 0 20 5 12 No...

Page 283: ...ue is valid and indicates Parameter is OFF Standby voltage SLA Li LiPh End of discharge Minimal Voltage V SLA 2 15 2 45V cell No Li 3 90 4 35V cell LiPh 3 20 3 65V cell Maximum charge voltage The char...

Page 284: ...arm 5 Terminate Discharge Any of the above options can be set to one the following conditions 1 Finished will terminate the program successfully on flag 2 Fail will terminate the program with a failur...

Page 285: ...OXIMATELY EQUAL TO THE RATE OF SELF CHARGE FOR NiXX LEAD ACID BATTERIES OR AT A RATE PROGRAMMED IN THE C CODE FOR ALL BATTERY TYPES IF IN A LOW VOLTAGE CONDITION 4 RECONDITIONING FOR NiXX BATTERIES ON...

Page 286: ...EN DISCONNECTED FROM THE BATTERY TERMINALS 18 RESERVED RESERVED 19 RESTING NO CURRENT IS ACTIVELY BEING APPLIED TO THE BATTERY THROUGH THE BATTERY PORTS 20 INSERTED A BATTERY IS CONNECTED TO THE CHANN...

Page 287: ...HIGHER THAN THE MAX SAFE OPERATING VOLTAGE AS DEFINED IN THE C CODE 121 REVERSED BATTERY REVERSED 122 SHORTED THE BATTERY VOLTAGE IS EITHER EXTREMELY LOW OR THE TERMINALS HAVE BEEN SHORTED 123 L V TIM...

Page 288: ...58 RESERVED RESERVED 159 RESERVED RESERVED 160 FUSE DRIVER NO CURRENT OUTPUT HAS BEEN DETECTED FOR 1 MINUTE 161 NO_PARALLEL THE STEP PARALLEL DISCHARGE IS BEING ATTEMPTED TO BE RUN AND NO DUAL PORT CA...

Page 289: ...LOAD CAPTURE UNIT IS CAPTURING DATA 220 LOOP CNT TEST LOOP COUNTER TEST 221 VOLTAGE TEST VOLTAGE TEST 222 CURRENT TEST CURRENT TEST 223 TEMP TEST TEMPERATURE TEST 224 DELTA T TEST DELTA TEMPERATURE T...

Page 290: ...n the C code BATTERY REMOVED 17 Battery was removed when the program completed This message appears briefly when the battery is removed If message persists press ESC SUSPEND 26 User suspended the test...

Page 291: ...temperature has exceeded its maximum setting after service has ended and battery was on trickle charge The trickle charge stops Lower the room temperature Verify that the C Code is correct for the ba...

Page 292: ...tester Service will resume in a few minutes after the board has cooled down If it reoccurs continuously move the tester to a cooler room TARGET CAPACITY NOT MET after service 116 Final capacity of the...

Page 293: ...edia such as a writable CD writable DVD or magnetic tape files containing data that was current at the time of backup The latest backup data can be restored to a hard disk in the event that files on t...

Page 294: ...ected in series or parallel with one another in the battery Check Box A square box displayed in a program dialog box that can contain white space indicating deselected or a check mark indicating selec...

Page 295: ...user interface window in which a user can enter or select parameters for use by a computer program Dual Port Cable Used to parallel discharge EPSU Emergency power supply unit Field A text box or pull...

Page 296: ...s that precede the first significant digit 1 through 9 in a number LAN Local area network LCD Liquid Crystal Display A type of display panel often used on the front panel of electronic devices such as...

Page 297: ...mpere for one hour Abbreviation mAh mOhm Milliohm a measure of resistance or impedance one thousandth of an ohm RMA Return Material Authorization A number or form that must be obtained from Cadex to r...

Page 298: ...lled current Reconditioning applies only to NiCD and NiMH batteries Reconditioning helps break down large crystals which develop as a result of memory to more desirable small sizes Reconditioning ofte...

Page 299: ...tance and self discharge SoC State of Charge SoH State of Health SLA Sealed lead acid battery chemistry Target Capacity The capacity level as a percentage of the manufacturer stated battery capacity t...

Page 300: ...ty fails a UPS converts DC battery power to AC providing AC power for a period of time sufficient for you to shut down the computer USB Universal Serial Bus A serial bus standard to interface devices...

Reviews: