97
VENUS - GIOIA
EN
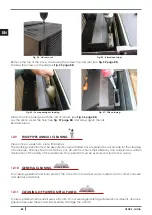
Fig. 59 - Shutter with the fuse to remove
Proceed as follows (see
Fig. 60 page 98
):
• Release the cap. Unhook right and left side panels and extract it from its housing.
• After these operations you can have access at the following components: geared motor (3), ignition
plug (5), ambient fan (8), fume fan (7), ambient probe (10), fume probe (9), thermostat (6), electronic
board (1), pressostat (4).
• For cleaning or replacemente of the auger it is necessary to unscrew the three bolt of the geared motor
(3) and to extract it, unscrew the two screws lying under the geared motor of the auger, remove the
hand rejector inside the hopper and then unscrew the inner bolt of the auger. To assembly proceed at
the contrary.
Summary of Contents for GIOIA
Page 2: ......
Page 49: ...49 VENUS GIOIA IT 14 3 RICAMBI Fig 60 Ricambi ...
Page 52: ...52 VENUS GIOIA IT 14 4 DICHIARAZIONE DI CONFORMITÀ Fig 61 Dichiarazione di Conformità ...
Page 98: ...98 VENUS GIOIA EN 14 3 SPARE PARTS Fig 60 Spare parts ...
Page 101: ...101 VENUS GIOIA EN 14 5 DECLARATION OF CONFORMITY Fig 61 Declaration of Conformity ...
Page 148: ...148 VENUS GIOIA FR 14 3 PIÈCES DÉTACHÉES Fig 60 Pièces détachées ...
Page 151: ...151 VENUS GIOIA FR 14 5 DÉCLARATION DE CONFORMITÉ Fig 61 Déclaration de Conformité ...
Page 197: ...197 VENUS GIOIA ES 14 3 REPUESTOS Fig 60 Repuestos ...
Page 200: ...200 VENUS GIOIA ES 14 5 DECLARACIÓN DE CONFORMEDAD Fig 61 Declaración de conformedad ...
Page 247: ...247 VENUS GIOIA NL 14 3 RESERVEONDERDELEN Fig 60 Reserveinderdelen ...
Page 250: ...250 VENUS GIOIA NL 14 5 CONFORMITEITSVERKLARING Fig 61 Conformiteitsverklaring ...
Page 297: ...297 VENUS GIOIA PT 14 3 PEÇAS SOBRESSALENTES Fig 60 Peças sobressalentes ...
Page 300: ...300 VENUS GIOIA PT 14 5 DECLARAÇÃO DE CONFORMIDADE Fig 61 Declaração de conformidade ...
Page 348: ...348 VENUS GIOIA EL 14 3 ΕΞΑΡΤΗΜΑΤΑ Fig 60 Εξαρτήματα ...
Page 351: ...351 VENUS GIOIA EL 14 5 ΔΗΛΩΣΗ ΣΥΜΜΟΡΦΩΣΗΣ Fig 61 Δηλωση Συμμορφωσησ ...


