background image


6-9 

Precautions to keep good printing quality/use printer over the long term

(4) 

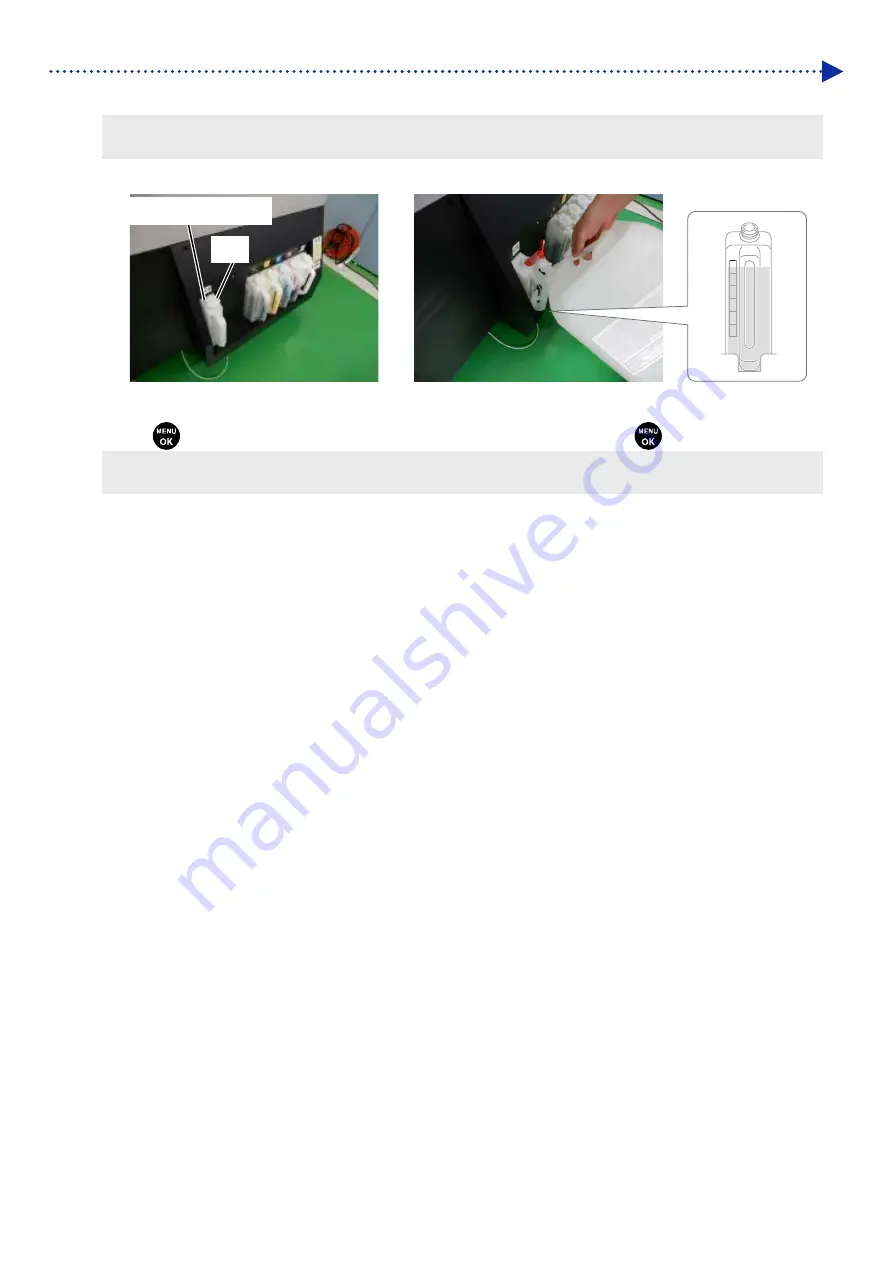
Open the cleaning solution tank lid and fill the tank with the cleaning solution up to above graduation mark 6. 

<IMPORTANT> 


Take care not to exceed graduation mark 6. 


(5) 

Press 

  on the operation panel. Close the cleaning solution tank lid and press 

  again. 

<IMPORTANT> 


After filling the cleaning solution, be sure to close the cleaning solution tank lid. 


X1072

6
5
4
3
2
1

Cleaning solution tank 

Lid 

Summary of Contents for GTX600NB

Page 1: ... PRINTER Instruction Manual Please be sure to read this manual before using this product Keep this manual in a safe place for future use This printer should only be used by operators who are appropriately trained in its safe operation ...

Page 2: ...ttery 1 by pulling out the holder in the direction of the arrow 3 Pickup the Lithium Battery 1 to the direction of the arrow 1 1 Note based on California law USA on the use and handling of Perchlorate This product contains a CR Coin Lithium Battery which contains Perchlorate Material special handling may apply See http www dtsc ca gov hazardouswaste perchlorate ...

Page 3: ...jury CAUTION The instructions which follow this term indicate situations where failure to follow the instructions may result in minor or moderate injury IMPORTANT The instructions which follow this term indicate situations where failure to follow the instructions may result in damage to property NOTE The instructions which follow this term indicate precautions and restrictions for use Symbols This...

Page 4: ...electric shocks Installation Do not set up the printer in a dusty environment If dust collects inside the printer it may cause fire or electric shocks or problems with correct operation Be sure to connect the ground If the ground connection is not secure you run a high risk of receiving a serious electric shock and problems with correct operation may also occur Do not bend the cords excessively or...

Page 5: ...ating fan Otherwise it will be caught up which results in injuries Turn off the power when you approach the fan CAUTION Environmental requirements Use the printer in a place which is adequately ventilated A slight odor is generated when the printed articles are being fixed by heat Installation The printer machine weighs 730 kg 1609 lb Transporting and setting up of the printer should be held in th...

Page 6: ...over You may get injured if you pinch your fingers When you mount or replace the head be careful not to get your hands or fingers caught Otherwise you may be injured Do not drink liquids such as the ink maintenance solution cleaning solution pretreatment or waste They may cause diarrhea or vomiting When handling liquids such as the ink maintenance solution cleaning solution pretreatment and waste ...

Page 7: ...Sources of strong electrical noise may cause problems with correct operation Any fluctuations in the power supply voltage should be within 10 of the rated voltage for the printer Voltage fluctuations which are greater than this may cause problems with correct operation The power supply capacity should be greater than the requirements for the printer s power consumption Insufficient power supply ca...

Page 8: ...els X1006 6 6 6 3 5 4 2 2 1 6 6 7 6 6 6 Pretreatment 5 kg 11 lb Pretreatment 20 kg 44 lb Ink bottle 18 L Waste ink tank Cleaning solution bottle 9 L Cleaning solution bottle 18 L Ink bottle 9 L Waste water tank Pretreatment 200 kg 440 lb ...

Page 9: ...ONS This printer has the following warning labels displayed on it Follow the precautions given on each warning label for your work When the label is peeled off or illegible contact the place of purchase 1 5 6 2 3 4 7 PS ...

Page 10: ...he power 3 6 3 3 3 When there is no prospect of electric power recovery for a while due to power outage 3 7 3 4 Connection between Printer and PC for Windows 3 10 3 4 1 Installing printer driver onto your PC 3 11 3 4 2 Connecting the printer to your PC via a LAN cable Adding a printer to PC 3 12 3 5 Connection between Printer and PC for Macintosh 3 19 3 5 1 Installing printer driver onto your PC 3...

Page 11: ...olor balance 4 37 4 4 12 Specify the print direction 4 38 4 5 Driver settings for print data using color ink and black ink only 4 39 4 5 1 Setting up the printer driver 4 39 4 5 2 Select the platen size 4 41 4 5 3 Select the ink type 4 42 4 5 4 Specify whether or not to perform Multiple Pass Printing 4 43 4 5 5 Set up the color ink 4 44 4 5 6 Set up the image quality 4 46 4 5 7 Set up the color ba...

Page 12: ...adjustment 5 16 5 5 Placing print medium in position 5 17 5 6 Sending Loading Print Data 5 20 5 6 1 Sending print data from ARX6 file preview 5 20 5 6 2 Sending print data from applications 5 24 5 6 3 Loading print data ARX6 file from USB flash memory 5 27 5 7 Executing a printing job 5 29 5 7 1 Executing a print job once for a single print medium 5 29 5 7 2 Executing a print job several times for...

Page 13: ...ck pattern checking on the print heads 6 44 6 2 Cleaning 6 46 6 2 1 Cleaning the nozzle guard and suction cap 6 46 6 2 2 Cleaning and replacing maintenance parts 6 56 6 2 3 Cleaning the surrounding area of nozzle surface 6 57 6 2 4 Disposal of waste ink and waste water 6 60 6 3 When Not Using for a Long Period of Time 6 62 6 3 1 When Not Using for a Long Period of Time within 2 weeks 6 62 6 3 2 Wh...

Page 14: ...ork setting 7 17 7 23 Check circulation schedule 7 18 7 24 Check humidification schedule 7 18 7 25 Language setting 7 19 7 26 Display of version 7 20 7 26 1 Updating of firmware 7 21 8 Troubleshooting 8 1 8 1 Troubleshooting instructions 8 2 8 2 Solutions to print quality problems 8 7 8 2 1 Recovery action to be taken for such a nozzle that is unable to eject ink jet droplets 8 13 8 3 Acquisition ...

Page 15: ...n too low sensor is activated 5 4 2 Platen height adjustment P 5 16 Never power off the printer or open the cover while the printer is in operation Otherwise the printer may break down or a print job may end up in failure Until the ink is firmly fixed do not touch the printed part If a T shirt is soiled with such ink that has not been firmly fixed on its surface such ink stain cannot be removed ev...

Page 16: ... moistened with a small amount of mild detergent for home use or alcohol If a printed material is rubbed with vinyl chloride based white or light colored synthetic leather color transfer may occur Also when a color printed surface is rubbed strongly against a printed surface with only white ink color transfer may occur in the same fashion About maintenance If you put your hands inside the cover du...

Page 17: ...of operating systems described in the main context of this manual are abbreviated Product names used in this manual are in general trademarks or registered trademarks of their respective developer or manufacture However in this manual the marks or TM marks are not used Brother logo is registered trademark of Brother Industries Ltd Apple Macintosh Mac OS iOS OS X macOS Safari iPad iPhone iPod and i...

Page 18: ...se 2 1 The Company grants you a non exclusive right to use this software 2 2 You cannot conduct any of the following acts 1 Modifications of all or part of this software 2 Reverse engineering disassembly or decompilation 3 Loaning or leasing this software 4 Keep this software available for download in public 3 No warranty The Company provides this software without any warranty either expressed or ...

Page 19: ...k cover installation screw M4 2 14 Key to main body door 1 6 4 Main tank cover S installation screw M3 1 15 Clean stick R Clean stick T 10 10 5 Hole cap black 4 6 Print switch unit 2 16 Cleaning cup 1 7 Print switch cover installation screw 8 17 Gloves 2 8 Print switch unit installation screw 8 18 Cam fixing pin 2 9 Carriage foam 1 19 Wiper blade 4 10 Humidifier pipe R 1 20 Flushing foam 2 11 Wast...

Page 20: ...to dilute the pretreatment and supply to the humidifier NOTE Avoid using such water as tap water in which impurities are contained Heat press It must deliver the performance through which the print range of the size of a platen to be used can be covered and 180 C 356 F can be kept for 35 seconds or more At a fixing stage of the pretreatment be sure to use the heat press but not an oven to smoothen...

Page 21: ...rm a printing test on it beforehand Some textiles may leave noticeable imprints of the pretreatment after it is fixated In that case wash them away with water Perform a printing test beforehand Then the following phenomena may occur The textiles may be discolored by the pretreatment and cannot be restored to the original color even if they are washed A deep colored polyester blended yarn fabric di...

Page 22: ...1 8 Before Using Your Printer for the First Time 1 4 Name and function of each component 1 4 1 Front part 5 4 6 10 13 3 7 9 1 2 8 11 12 11 12 ...

Page 23: ... and feeds the entire T shirt into the printer 8 Platen fixing handle Use this handle to secure the platen in place Tighten or loosen it when attaching removing the platen Keep it tightened when printing 9 Mist fan filter It absorbs ink mist which is generated inside the printer on its surface 10 Operation panel Operate the printer using this panel 11 Print button There is no print data when this ...

Page 24: ...me Function 1 Right side cover Open this cover when cleaning the internal area of the printer 2 Ink tank White W magenta M cyan C yellow Y and black K from the right hand side 3 Cleaning solution tank It is the tank that reserves the cleaning solution used for maintenance 1 2 3 ...

Page 25: ... Waste ink tank This tank collects waste ink 5 Drainage tube This tube is used to drain water 6 Waste water tank This tank collects drain water 7 Model plate On this plate a product serial number is inscribed 8 Power cord insertion port Insert the power cord into this port 9 Power switch Use this button to turn the power on off to the printer To turn off the power execute Prepare Power OFF on the ...

Page 26: ...print heads on a regular basis Example Auto Cleaning Function 5 Caps color white The caps protect the color and white head surfaces and suck ink when cleaning the heads 6 Wiper unit It wipes away ink from the head surface Wiper cleaning tank Under the wiper unit This tank keeps cleaning solution and soaks and cleans the wiper 7 Flushing foam To keep good printing quality the foam absorbs the ink j...

Page 27: ...de screen is being displayed use this button to display a warning when any warning message appears 6 IC stick insertion slot This slot accommodates the IC stick that contains the color information for use when refilling the ink 7 MENU OK button If this button is pressed when the printer is placed in the standby state the menu screen will appear While the menu screen or the error screen is being di...

Page 28: ... are completed While the menu screen is being displayed the screen will exit and return to the standby mode screen 11 Platen button It is used to move the platen toward the rear or front of the printer Use this button to ascertain whether the platen is set to a proper height after the platen s height is adjusted 12 Shortcut button Performs the action assigned to the shortcut function 13 Power LED ...

Page 29: ...is displayed 3 Remaining ink volume indication area In this area the current remaining ink volume of each tank is displayed In the left to right order the remaining ink volume in the black K yellow Y cyan C magenta M and white W ink cartridges are shown here The remaining ink volume is running low Make ink available for use in the next printing session 1 Ink has been depleted 4 Waste ink tank repl...

Page 30: ...tion is indicated here 10 Text string display area on basic display screen In this area the print job name or file name auto cleaning receiving state standby state etc are shown 11 Progress bar display area It displays a state of progress during the process of printing IMPORTANT 1 If you perform printing that requires a large volume of ink when the remaining ink level is low the ink may be deplete...

Page 31: ...ow will be displayed if it is less than 65 RH 5 Auto Cleaning Head cleaning is automatically performed every time a predetermined number of sheets are printed in order to provide stable printing quality At the next print will be displayed on the right side if auto cleaning is activated before or after printing The conditions for performing auto cleaning will change as appropriate depending on chan...

Page 32: ...irst Time No Indications Function 8 White ink circulation time The time of the next white ink circulation is displayed The time set by the maintenance tool is displayed The reinforced circulation of white ink will be performed if is displayed ...

Page 33: ...humidifier will not operate if the ambient humidity is high and the humidity inside the unit is sufficiently high 1 5 1 About the water used Use pure water IMPORTANT If non pure water such as tap water is used white powdery impurities will adhere to the inside of the unit causing damage to the printer and heads 1 5 2 Water supply Select the water supply to the printer from the following two method...

Page 34: ...per flow path Be sure to mount a cable cover with sufficient strength to the tube Water will not be supplied and may leak to the floor if the tube is broken or cut off Lay the tube so that the bending radius is 2 0 in 5 cm or more If the bending radius is small the tube may break If the tube is broken during laying do not use the broken part Do not use the optional humidifier water supply tube to ...

Page 35: ...item which is one level lower in the menu layer Pressing causes the currently displayed menu to be acknowledged Return to previous menu in upper menu layer Pressing causes the current menu to change to another menu item which is one level higher in the menu layer Exit If you press when a menu in the uppermost menu layer remains displayed the menu will exit and the system will return to a standby s...

Page 36: ...es In the event that no ink jet droplets are ejected this menu item enables you to perform cleaning of all the nozzles of the white heads All Print Heads In the event that no ink jet droplets are ejected this menu item enables you to perform cleaning of the nozzles of all the print heads Powerful Cleaning All Colors In the event that the poor ejection of ink jet droplets is not improved by means o...

Page 37: ... loaded into the system with this menu item Receiving History By selecting this menu item you can display any print data received in the order in which they are sorted from the newest to the oldest ones and you can select any one of them Maintenance Maintenance Part Clean Replace Use when performing printer maintenance White Ink Circulation White Ink Tank Agitation Humidification Humidifier Water ...

Page 38: ...circulation Auto Cleaning Auto Cleaning Setting Auto Cleaning Start Timing Auto Multiple Pass Setting Flushing Interval Setting Flushing Volume Setting Auto Job Delete Network filtering IP Address Set Shortcut button setting Total Print Use when needed Temperature Humidity Info Confirm network setting IP Address Subnet Mask Default Gateway Host name MAC address Check circulation schedule Check hum...

Page 39: ...ter machine weighs 730 kg 1609 lb Transporting and setting up of the printer should be held in the proper way Otherwise the printer may topple over and cause injury Unplug the printer and contact the dealer where you purchased the printer or a trained technician if the printer topples over If you continue to use it it may result in fire or electric shocks or poor printing quality Do not set up the...

Page 40: ... 1609 lb Do not use any extension cable Keep a minimum workspace of 31 5 in 80 cm in front and on the left and right sides of the printer Also keep 15 7 in 40 cm or wider clearance at the back of the printer Keep 17 7 in 45 cm or wider space free above the unit as well If this space is not secured you will have to move peripherals or the printer when making a repair When installing the printer pla...

Page 41: ...ional item Turning on the power 3 2 1 Level adjustment Prepare a level gage and a 1 4 in 35 mm wrench 1 On the operation panel press and move the platen toward the front of the printer 2 Place a level gage on the top surface of the platen 3 Adjust the level by rotating the lower nuts that secure the legs 4 points so that the main unit is set horizontally level while checking the level gage IMPORTA...

Page 42: ...3 4 Installation and preparation 4 Tighten the upper nuts on the lefts 4 points upwards after adjusting the level IMPORTANT Check the level again with a level gage after fixing everything ...

Page 43: ...st about 31 5 in 80 cm of space required for the platen is secured IMPORTANT Turn on the power before you refill the ink 1 Connect the power cord to the power cord insertion port 2 Insert the power plug into an electric outlet 3 Make sure that the printer s earth terminal is properly grounded 4 Turn on the printer power switch with each door and cover closed IMPORTANT Never power off the printer w...

Page 44: ...r OFF and press If the printer is operating wait for it to finish 2 Cleaning will start at the end of the print job Follow the instructions on the panel and turn off the power IMPORTANT No cleaning will be performed at the end of the print job to keep the print heads in good condition if you turn the power off or disconnect the AC power cable before the operation of Prepare Power OFF is completed ...

Page 45: ...rinter is operating and no prospect of recovery for a while IMPORTANT Be sure to turn off the power switch before starting work TIPS Perform the work specified below when no print heads are capped e g when a power failure occurs during printing The specified work is not required if the print heads are capped 1 Unlock the upper left hand side cover and top cover and open them 2 Remove two screws to...

Page 46: ...ul not to let the carriage come in contact with the protrusion on the cap Return the parts to the storage position 4 Insert the two pins stored on the lower right side of the maintenance unit into the holes marked A and B respectively 5 Turn the lever clockwise until it comes in contact with the pin inserted in A IMPORTANT If any print head rises unlock and reinstall the print head Lever Pin Protr...

Page 47: ...ad capping will be performed correctly in this state IMPORTANT Make sure that the lever will not come in contact with the nozzle surfaces of the print heads when turning the lever A print head may rise if you press the protruding part of the cap strongly against the nozzle surface of a print head Do not forcibly turn the lever in that case and start over the work from the beginning 8 Pull out the ...

Page 48: ...ext step while checking each procedural step 1 2 3 4 X1062 Installing the printer driver 3 4 1 Installing printer driver onto your PC P 3 11 Printer static IP Address Set 7 18 Static IP address setting P 7 14 Add a Printer to PC 3 4 2 Connecting the printer to your PC via a LAN cable Adding a printer to PC P 3 12 Adjusting Printer 3 6 1 Initial settings after head replacement P 3 24 3 6 3 Firing a...

Page 49: ...er to the PC yet TIPS You must log into your PC with administrator privileges 1 Activate the PC 2 Complete all of the current sessions 3 Double click on the setup exe to execute the installer 4 Then the installation procedures will begin Follow the on screen instructions to complete the installation 5 When the dialog box shown below appears click Install 6 After the installation is completed react...

Page 50: ... the printer Then add the printer to your PC according to the procedure specified below 1 Connect your PC with the printer by means of the LAN cable to make a network connection and power on the printer TIPS For this connection of the LAN cable secure it in place by means of the cable clamp as required 2 Select Settings Devices Devices and Printers 3 Click the Add a printer 4 Select The printer th...

Page 51: ...llation and preparation 5 Select Add a local printer or network printer with manual settings then click Next 6 Select the Create a new port then select Standard TCP IP Port for Type of port and finally click Next ...

Page 52: ...ic acquisition you must check the IP address of the printer in advance You can confirm the IP address by selecting Confirm network setting IPAddress from the menu 7 22 Confirm network setting P 7 17 If you are using a DNS server you can use a host name and domain name instead of the IP address Enter the host name of your choice 7 22 Confirm network setting P 7 17 As for the domain name check with ...

Page 53: ...ation 10 In the Protocol select the LPR enter BINARY_P1 in Queue Name of the LPR Settings and click OK When the current screen goes back to the previous screen click Next 11 After the window shown below appears click the Have Disk ...

Page 54: ...n the installer according to the PC s OS 64 bit version After the file path appears click OK 13 Make sure that a list of printer drivers is shown for the selected folder After that click Next 14 After the window shown below appears select the Replace the current driver and click Next ...

Page 55: ...tion and preparation 15 Enter Printer name and click Next 16 Then the specified printer will be added to the system following which the window shown below appears select the Do not share this printer and click Next ...

Page 56: ...ration 17 Click Finish This exits the setting for the PC TIPS If the PC cannot recognize the Printer a correct static IP address might not be assigned Consult your administrator 18 Then adjust the printer using GTX 6 Maintenance ...

Page 57: ... with on your PC install the printer driver for file output Brother GTX 6 FileOutput At this stage do not connect the printer to your PC yet TIPS You must log into your PC with administrator privileges 1 Activate the PC 2 Complete all of the current sessions 3 Double click on BrotherGTX 6_ver pkg to execute the installer 4 Then the installation procedures will begin Follow the on screen instructio...

Page 58: ...add the printer to your PC according to the procedure specified below 1 Connect your PC with the printer by means of the LAN cable to make a network connection and power on the printer TIPS For this connection of the LAN cable secure it in place by means of the cable clamp as required 2 Open System Preferences from the Apple menu and click Printers Scanners 3 Click the button at the bottom left 4 ...

Page 59: ...ter the IP address of the printer for Address Select Line Printer Daemon LPD from Protocol Enter BINARY_P1 for Queue Enter the printer name for Name Select and click Select Software under Use 6 Select Brother GTX 6 and click OK 7 Click Add ...

Page 60: ... Installation and preparation 8 The screen returns to the Printers Scanners screen and the GTX 6 printer LAN is added If necessary select the GTX 6 printer under Default Printer This exits the LAN settings ...

Page 61: ...ite only or color only printing Black paper or transparent sheet such as OHP sheet White paper 3 6 4 2 same color heads position adjustment P 3 27 Platen rolling adjustment Make adjustments if the horizontal stripes banding in the picture are noticeable after printing White paper 3 6 5 Platen rolling adjustment P 3 28 White Color Alignment Make adjustments if the white and color images are out of ...

Page 62: ...a LAN cable 2 On the PC from All Programs in the Start menu select the GTX 6 Maintenance from Brother GTX 6 Tools 3 After the window shown below appears select Initial settings after head replacement and click Next 4 Perform the required operation by following the on screen instructions in the dialog box After the adjustment is completed the currently displayed screen will go back to the window me...

Page 63: ...ng timing before you do so 1 Make several sheets of A4 size or letter size white paper available for use 2 Make sure that the printer and PC are connected via a LAN cable 3 On the PC select GTX 6 Maintenance under Brother GTX 6 Tools from All Programs in the Start menu 4 When the window shown below is displayed select Color adjustments between the two color heads and click Next 5 Follow the instru...

Page 64: ...ngs after print head replacement before you do so 1 Make several sheets of A4 size or letter size paper black paper or transparent sheet such as OHP sheet and white paper available for use 2 Make sure that the printer and PC are connected via a LAN cable 3 On the PC from All Programs in the Start menu select the GTX 6 Maintenance from Brother GTX 6 Tools 4 After the window shown below appears sele...

Page 65: ...ng before you do so 1 Make several sheets of A4 size or letter size paper black paper sheets or transparent sheets such as OHP sheets along with white paper sheets available for use 2 Make sure that the printer and PC are connected via a LAN cable 3 On the PC select GTX 6 Maintenance under Brother GTX 6 Tools from All Programs in the Start menu 4 When the window shown below is displayed select 2 s...

Page 66: ...ng timing before you do so 1 Make several sheets of A4 size or letter size white paper available for use 2 Make sure that the printer and PC are connected via a LAN cable 3 On the PC select GTX 6 Maintenance under Brother GTX 6 Tools from All Programs in the Start menu 4 When the window shown below is displayed select Platen rolling adjustment and click Next 5 Follow the instructions in the dialog...

Page 67: ...eplacement and adjust the firing timing before you do so 1 Prepare a sheet of black paper or a pretreated black or dark color T shirt 2 Make sure that the printer and PC are connected via a LAN cable 3 On the PC from All Programs in the Start menu select the GTX 6 Maintenance from Brother GTX 6 Tools 4 After the window shown below appears select the White Color Alignment and click Next 5 Perform t...

Page 68: ...yed on the nozzle check pattern 1 Make sure that the printer and PC are connected via a LAN cable 2 On the PC from All Programs in the Start menu select the GTX 6 Maintenance from Brother GTX 6 Tools 3 After the window shown below appears select Setting of the time displayed on the nozzle check pattern and click Next ...

Page 69: ...quired operation by following the on screen instructions in the dialog box CAUTION Confirm that the date and time of your PC are set correctly and continue 5 After the setting is completed the currently displayed screen will go back to the Main screen ...

Page 70: ...t set white ink circulation will be performed automatically every four hours 1 Make sure that the printer and PC are connected via a LAN cable 2 On the PC from All Programs in the Start menu select the GTX 6 Maintenance from Brother GTX 6 Tools 3 After the window shown below appears select Set the scheduled time for white ink circulation and click Next ...

Page 71: ...3 33 Installation and preparation 4 After the next window appears select Set the scheduled time for white ink circulation Then click Next ...

Page 72: ...that the date and time of your PC are set correctly and continue Enter at least six start time settings Set the white ink circulation interval to be between one hour and six hours Input a time range of 0 00 to 23 59 TIPS You can check on the main unit the scheduled time you set 7 23 Check circulation schedule P 7 18 ...

Page 73: ... the operation schedule of the humidifier 1 Make sure that the printer and PC are connected via a LAN cable 2 On the PC from All Programs in the Start menu select the GTX 6 Maintenance from Brother GTX 6 Tools 3 After the window shown below appears select Humidification Schedule Settings and click Next ...

Page 74: ...3 36 Installation and preparation 4 After the window shown below appears click the Set the scheduled time for humidification Then click Next ...

Page 75: ...er the start time and end time if you check the day of the week Humidification will not start or end in time on days that are not checked Humidification will start at the start time Specify one hour before printing Insufficient humidification can affect print quality Waste liquid increases to prevent the printer from malfunctioning TIPS You can check on the main unit the scheduled time you set ...

Page 76: ...3 38 Installation and preparation 6 Select the elapsed time to finish humidification and click Next ...

Page 77: ...3 39 Installation and preparation 3 7 Moving the printer When moving the printer elsewhere please contact your dealer ...

Page 78: ...the procedures for using other applications Using Brother products Applications to use Reference GTX Graphics Lab Graphics Lab Instruction Manual When using other applications Applications to use Reference CorelDRAW 2020 2021 4 3 1 When using CorelDRAW P 4 4 Adobe Photoshop CC 4 3 2 When using Adobe Photoshop P 4 11 Adobe Illustrator CC 4 3 3 When using Adobe Illustrator P 4 16 TIPS Make proper se...

Page 79: ...ting no ink For an image that you want to print pure white color with white ink make sure that the white areas are set to RGB 254 TIPS The treatment of RGB 255 varies depending on the applications Configure the settings appropriately About ARX6 file Use the Brother GTX 6 FileOutput printer driver for file output in order to save your print data in the ARX6 format When your print data is saved in t...

Page 80: ...owing error may or may not appear Try again with the GTX 6 FileViewer running TIPS The procedure for outputting a file from Brother GTX 6 FileOutput is the same as that for a Windows PC Sending print data Follow the procedure below to send print data to the printer if the print data has been saved using the Brother GTX 6 FileOutput printer TIPS The procedure for sending print data is the same as t...

Page 81: ...seful Tools Convert data to bitmap image data Replace RGB 255 in bitmap image data with RGB 254 TIPS For this printer it is recommendable to use CorelDRAW 2020 2021 The display screen is described assuming CorelDRAW 2019 Color management settings 1 In the menu bar select Tools Color Management 2 Establish the settings in Color management settings as follows RGB Profile sRGB IEC61966 2 1 Primary co...

Page 82: ...TX 6 FileOutput click on Apply and close the Print dialog box TIPS If Printer is set to Brother GTX 6 the print data at the time of printing will be sent to the printer If Printer is set to Brother GTX 6 FileOutput the print data at the time of printing will be saved as an ARX6 file 3 In the menu bar select Layout Page Layout ...

Page 83: ... in 420 mm Page orientation Portrait TIPS Set the width and height to the size of platen to be used The above size is the standard 14X16 platen size In the case of print data using white ink 4 4 2 Select the platen size P 4 24 In the case of print data using color ink and black ink only 4 5 2 Select the platen size P 4 41 ...

Page 84: ...ectly sending data to the printer from an application 5 6 2 Sending print data from applications P 5 24 1 In the menu bar select File Print 2 Open the Color tab and make the following settings Place a checkmark in the Document color checkbox Color conversions Brother GTX 6 or Brother GTX 6 FileOutput Color Profile sRGB IEC61966 2 1 Rendering intent Relative colorimetric 3 On General tab select Pri...

Page 85: ...ARX6 file to your PC Use the color palette in Useful Tools 1 Save the color pallet files for CorelDRAW GT_Colors xml and GT_Tshirts xml on your PC following the instructions on screen 2 In the menu bar select Window Color Palettes Open Palette 3 Select the files having such filename as GT_Colors xml and GT_Tshirts xml respectively TIPS Do not use any color from the color sample palette such as HKS...

Page 86: ...IPS When the white ink is used for performing the printing unmark the Anti aliasing checkbox TIPS Even when the platen size to be used has been selected from the printer driver the current setting in Page Layout may change to Settings from printer In the Page Layout be sure to change the width and the height according to the size of the platen ...

Page 87: ... to be printed select an area for RGB 255 and replace it with RGB 254 To make such replacement use the method mentioned below 1 In the menu bar select Effects Adjust Replace Colors 2 From the Original pull down menu set RGB 255 in Replace Colors 3 In the same manner set New color to RGB 254 4 Check the Single Color check box and click on the OK button TIPS For the vector data change the fill color...

Page 88: ...ver In the case of print data using white ink 4 4 10 Set up the image quality P 4 36 In the case of print data using color ink and black ink only 4 5 6 Set up the image quality P 4 46 For this printer it is recommended to use Photoshop CC The display screen is described in Photoshop CC Color setting 1 In the menu bar select Edit Color Settings 2 Establish the settings of Color Settings as follows ...

Page 89: ...eOutput For details of directly sending data to the printer from an application 5 6 2 Sending print data from applications P 5 24 1 In the menu bar select File Print If the PC s default printer is either Brother GTX 6 or Brother GTX 6 FileOutput the layout is set to the platen size 2 Make the settings as follows Color Handling Printer Manages Colors Rendering Intent Relative Colorimetric 3 From Pr...

Page 90: ... the dialog box shown below will be displayed on the screen After that click Save TIPS There may be cases where this saving process takes several minutes 6 Specify the Save In and File name first and then click Save to save the ARX6 file to your PC ...

Page 91: ...ns on screen 2 In the menu bar select Window Swatches 3 Click on to open the submenu 4 From Read Swatches select Swatch Exchange ASE for the type of file and then select the file name GT_Colors_T ase TIPS Do not use any color from the color sample palette such as HKS and Pantone Otherwise an on screen color may differ from the resulting print color RGB 254 ...

Page 92: ...justment Layer Selective Color and create a new layer 2 Set the opacity to 20 and click OK 3 From the Selective Color make the following settings Colors Whites Black 1 Mark the Absolute option TIPS The method to replace RGB 255 with RGB 254 as shown above can be used only when the Color mode is set to 8 bit of RGB Color For Photoshop the action file SolidWhite atn is made available in Useful Tools...

Page 93: ... 6 FileOutput Use the Brother GTX 6 FileOutput printer driver to output a file then display and check the print preview For an image created in CMYK color mode load the image into Photoshop select Image Mode in the menu bar and change the color to the RGB color sRGB In order to edit an image load the image into Photoshop edit it in the form of bitmap data or edit it by means of image quality impro...

Page 94: ...ioned below and click OK Settings Custom Working Spaces RGB sRGB IEC61966 2 1 Color Management Policies RGB Convert to Working Space CMYK Convert to Working Space Profile Mismatches Mark the Ask When Opening and Ask When Pasting checkboxes Missing profiles Mark the Ask When Opening checkbox Conversion Options Engine Adobe ACE Intent Relative Colorimetric ...

Page 95: ...rientation Portrait Color Mode RGB TIPS Set the width and height to the size of platen to be used The above size is the standard 14 16 platen size In the case of print data using white ink 4 4 2 Select the platen size P 4 24 In the case of print data using color ink and black ink only 4 5 2 Select the platen size P 4 41 ...

Page 96: ...e As such save your image data for an editing purpose in advance For file output there are some cases where neither file output destination nor extension cannot be specified by the Print to file command Be sure to use the printer driver Brother GTX 6 FileOutput For details of directly sending data to the printer from an application 5 6 2 Sending print data from applications P 5 24 1 In the menu ba...

Page 97: ... 4 22 In the case of print data using color ink and black ink only 4 5 1 Setting up the printer driver P 4 39 CAUTION For Adobe Illustrator set the platen size for the paper size in the Print dialog box in the application The size or placement of the image may not be set correctly if you make settings in the Print Settings dialog 5 When you press Print the dialog box shown below will be displayed ...

Page 98: ... the submenu 4 Select Other Library 5 On the Open screen select the file having such filename as GT_Colors_T ase TIPS Unlike the Photoshop or CorelDRAW this Swatch needs to be selected each time a file is opened However you can fix the Swatch library in the following method to display the screen automatically whenever you start the application if you are using Illustrator CC Click on the top right...

Page 99: ...s not eject the ink For such an image that you wish to print out in pure white color with white ink make such a setting as RGB 254 For the color replacement method refer to a relevant page 4 3 Using other applications P 4 4 or help menu of each application software 1 By following the printing procedures of each application software open the print setup dialog box of the printer driver ...

Page 100: ...ou have made in the Select Ink option or the like setup items that appear on the screen vary The rollover help is displayed in the square portion at the bottom of dialog box Place the mouse pointer over it to browse the help feature For the detailed description of setup items refer to each chapter mentioned below 3 After your settings are completed click OK TIPS You can refer to each value you hav...

Page 101: ... to the paper size Setup item Platen to be used Size 24 24 24 24 platen 24 2 in x 24 2 in 615 mm x 615 mm 18 22 18 22 platen 18 2 in x 22 2 in 463 mm x 565 mm 16X18 16X18 platen 16 5 in x 18 5 in 420 mm x 470 mm 14X16 14X16 platen 14 6 in x 16 5 in 370 mm x 420 mm 10X12 10X12 platen 10 6 in x 12 6 in 270 mm x 320 mm 7X8 7X8 platen 7 3 in x 9 1 in 185 mm x 230 mm ...

Page 102: ...or image to be printed out on the mask layer of white ink White Ink Only This option enables the white ink only to be used for printing out a monochrome image Color Ink Only This option enables a color image to be printed out on a white background or lighter and pale color background Black Ink Only This option enables the black ink only to be used for printing out monochrome image ...

Page 103: ...t the mode If you set Mode to Eco Mode the white ink volume serving as the background is automatically adjusted to reduce the overall ink consumption TIPS The luminance on the finished print may be slightly reduced depending on the color ...

Page 104: ...pi 1200dpi Prints at 1200 dpi 1200 dpi 1200dpi 1200dpi HQ Prints at 1200 dpi 1200 dpi High Quality Mode Valid for white color ink and white ink only 1200dpi 900dpi Prints at 1200 dpi 900 dpi 1200dpi 600dpi Prints at 1200 dpi 600 dpi TIPS Depending on the settings of Resolution Print Time will change Actual ink consumption depends on the actual colors used in the original image As such use this num...

Page 105: ...ite Ink Only in the Select Ink the setup items for White Ink Settings will appear Adjust the white ink volume separately in the Highlight visible white ink volume and in the Mask white ink volume to cover the background color Also set the white ink time in the 2 Layer White and White Color Pause ...

Page 106: ...nting the Print Time and Whiteness will change accordingly Print Time will be set to 1 if the setup value of Highlight is 5 and 2 Layer White White Color Pause and Color Multiple Pass Printing are turned OFF With this X1 serving as a reference value how many times relates to how long the print time will take when printing Actual ink consumption depends on the actual colors used in the original ima...

Page 107: ...Select Ink settings this setting menu will be enabled White Color Pause Set 0 60 seconds for the time from the start of printing the previous white ink layer to the start of printing the color ink layer If you set a time shorter than the time it takes to print the previous white ink layer the additional waiting time will be set to 0 seconds TIPS Only if you have selected Color White Ink in the Sel...

Page 108: ...ve selected Color White Ink in the Select Ink the setup items of Use background black color for black T shirts only will appear In the event that you wish to print a black T shirt making use of the T shirt s background black color mark the Use background black color for black T shirts only checkbox ...

Page 109: ...k Ink Only in the Select Ink In cases where small and horizontal stripes are noticeable in the print result mark the Color Multiple Pass Printing checkbox TIPS Even if the Color Multiple Pass Printing checkbox is marked the amount of ink to be consumed will remain unchanged It takes longer to complete the print when the Color Multiple Pass Printing checkbox is marked For a typical print time refer...

Page 110: ...hite Ink Only in the Select Ink this setting menu will be enabled When you click on the Advanced in the Printing Preferences dialog box the setup items of White Ink Settings appear In the White Ink Settings you can make settings for Transparent Color Tolerance Minimum Whiteness and Choke Width ...

Page 111: ...n menu for color selection becomes active 2 In the pull down menu select a color which serves as a background color of T shirt or click on the Custom to specify a RGB value TIPS This custom color you have specified is valid only for one color which is specified immediately before This color cannot be saved in the list Tolerance Specify the gradation range RGB values to smoothly connect the zone be...

Page 112: ...e more likely that blurring occurs White Ink Choke Width This enables you to select the white ink choke width in such ten levels as 1 to 10 When you increase this value the choke width increases By decreasing the print range of white ink the white ink will be prevented from extending off from under the color inks TIPS Check the original image if white lines and or dots are seen around the image th...

Page 113: ...larity of an image without using any functions of application software Setup item Description Saturation The more vivid the color is the higher its value Brightness The brighter the color is the higher its value Contrast Contrast makes the image lighter for lighter colors and darker for darker colors if its value increases TIPS If a value of Contrast is increased there may be some cases in which f...

Page 114: ...n ink volume If you increase its value the color becomes light bluish overall If you decrease its value the color becomes reddish overall Magenta Adjust the magenta ink volume If you increase its value the color becomes reddish purple overall If you decrease its value the color becomes greenish overall Yellow Adjust the yellow ink volume If you increase its value the color becomes yellowish overal...

Page 115: ... Printing Preferences dialog box you can make the settings for Uni Directional Printing TIPS What you have specified on the printer s operation panel are prioritized and this option becomes active only when the print direction specified on the printer side is set to Auto Print time will be doubled ...

Page 116: ...r and does not eject the ink For such an image that you wish to print out in pure white color with white ink make such a setting as RGB 254 For the color replacement method refer to a relevant page 4 3 Using other applications P 4 4 or help menu of each application software 1 By following the printing procedures of each application software open the print setup dialog box of the printer driver ...

Page 117: ...ou have made in the Select Ink option or the like setup items that appear on the screen vary The rollover help is displayed in the square portion at the bottom of dialog box Place the mouse pointer over it to browse the help feature For the detailed description of setup items refer to each chapter mentioned below 3 After your settings are completed click OK TIPS You can refer to each value you hav...

Page 118: ... to the paper size Setup item Platen to be used Size 24 24 24 24 platen 24 2 in x 24 2 in 615 mm x 615 mm 18 22 18 22 platen 18 2 in x 22 2 in 463 mm x 565 mm 16X18 16X18 platen 16 5 in x 18 5 in 420 mm x 470 mm 14X16 14X16 platen 14 6 in x 16 5 in 370 mm x 420 mm 10X12 10X12 platen 10 6 in x 12 6 in 270 mm x 320 mm 7X8 7X8 platen 7 3 in x 9 1 in 185 mm x 230 mm ...

Page 119: ...or image to be printed out on the mask layer of white ink White Ink Only This option enables the white ink only to be used for printing out a monochrome image Color Ink Only This option enables a color image to be printed out on a white background or lighter and pale color background Black Ink Only This option enables the black ink only to be used for printing out monochrome image ...

Page 120: ...k Ink Only in the Select Ink In cases where small and horizontal stripes are noticeable in the print result mark the Color Multiple Pass Printing checkbox TIPS Even if the Color Multiple Pass Printing checkbox is marked the amount of ink to be consumed will remain unchanged It takes longer to complete the print when the Color Multiple Pass Printing checkbox is marked For a typical print time refer...

Page 121: ...his value corresponds to 100 cotton fabrics as well as for blended yarn fabrics hemp 50 polyester 50 or cotton 50 polyester 50 9 to 7 These values correspond to a thinner T shirt thick towel and cotton products woven with twill fabrics 6 to 4 These values correspond to thin and plain fabrics as well as for blended yarn fabrics that consist of cotton polyester and polyurethane 3 to 1 These values c...

Page 122: ...e processes wait time between the 1st and 2nd print cycle 2 Separate processes longer wait time than the case with setting 1 between the 1st and 2nd print cycle 3 Separate processes longer wait time than the case with setting 2 between the 1st and 2nd print cycle TIPS For the options 1 to 3 the platen will reciprocate two times The higher the setpoint is the longer the print time will be ...

Page 123: ...ty of an image without using any functions of application software Setup item Description Saturation The more vivid the color is the higher its value Brightness The brighter the color is the higher its value Contrast Contrast makes the image lighter for lighter colors and darker for darker colors if its value increases TIPS If a value of Contrast is increased there may be some cases in which fine ...

Page 124: ... ink volume If you increase its value the color becomes light bluish overall If you decrease its value the color becomes reddish overall Magenta Adjust the magenta ink volume If you increase its value the color becomes reddish purple overall If you decrease its value the color becomes greenish overall Yellow Adjust the yellow ink volume If you increase its value the color becomes yellowish overall...

Page 125: ... Printing Preferences dialog box you can make the settings for Uni Directional Printing TIPS What you have specified on the printer s operation panel are prioritized and this option becomes active only when the print direction specified on the printer side is set to Auto Print time will be doubled ...

Page 126: ...ach application software TIPS When using the printer driver by default use one of them as a color sample to check color reproduction and create edit the image data Because CorelDRAW cannot contain identical color in the same palette the color palette is divided into two files 4 6 2 Replace RGB 255 with RGB 254 for Photoshop only For Photoshop use this to change RGB 255 to RGB 254 1 From the Useful...

Page 127: ... following files are provided as color samples GT_Blues pdf GT_Greens pdf GT_Oranges pdf GT_Reds pdf GT_ColorChart pdf 2 Configure the printer driver and create print data TIPS For details of the printer driver s setting procedures In the case of print data using white ink 4 4 1 Setting up the printer driver P 4 22 In the case of print data using color ink and black ink only 4 5 1 Setting up the p...

Page 128: ...ile for example Grid14 16 arx6 that has a grid size suitable to the platen size 2 Send the print data of grid pattern to the printer 3 Without putting a T shirt in place print the grid pattern directly onto the platen sheet TIPS After the printing is completed press down the printed surface lightly with a dry cloth or a sheet of paper to dry the ink Platen sheet Platen Grid ...

Page 129: ...der and decide on an appropriate ink volume setting value before creating print data There are four types of ink volume printing data Select the ink volume print data to match the Double Printing setting for the printer driver 1 Select the desired file from Ink Volume SinglePrint arx6 Ink Volume DoublePrint1 arx6 Ink Volume DoublePrint2 arx6 and Ink Volume DoublePrint3 arx6 from the Useful Tools t...

Page 130: ...ghlight setting value before creating print data 1 From the Useful Tools click Highlight Mask Check at MW1 zip or Highlight Mask Check at MW2 zip to download data TIPS The file you should select differs depending on whether Minimum Whiteness is set to 1 or 2 Check the number at the end of the file name before downloading the file 2 Unzip the file and the following print data will be displayed High...

Page 131: ...ck the print result to make sure the color adjustment has been set correctly 4 6 8 Check the ejection timing Check whether or not the ejection timing is correct 1 From the Useful Tools click FIRING CHK COLOR A arx6 or FIRING CHK COLOR B arx6 or FIRING CHK WHITE A arx6 or FIRING CHK WHITE B arx6 to download data 2 Send the data to the printer and perform printing 3 Check the print result to make su...

Page 132: ... Send the data to the printer and perform printing 3 Check the print result to make sure the position adjustment has been set correctly 4 6 10 Platen feed adjustment Check whether or not the platen feed adjustment is appropriate 1 From the Useful Tools click FEEDING PATTERN 1 arx6 to download data 2 Send the data to the printer and perform printing 3 Check the print result to make sure the platen ...

Page 133: ...hite side with the print position on the color side 1 From the Useful Tools click ALIGN CHK arx6 to download data 2 Send the data to the printer and perform printing 3 Check the print result to make sure the print position on the white side has been aligned with the print position on the color side correctly ...

Page 134: ... Ensure there is adequate space left in front of the printer and avoid placing any objects Otherwise your hand may get caught between the platen and an object which may result in injury Do not handle the platen while printing If your hand gets caught between the platen or the T shirt tray and the covers it may be injured Do not put your hands inside the covers while the printer s power is turned o...

Page 135: ...IMPORTANT Do not move the platen by hand Otherwise the printer may be mechanically and electrically damaged Ensure there is adequate space left in front of the printer and avoid placing any objects The platen may be hit and damaged ...

Page 136: ...for print medium To fixate the white ink onto a T shirt apply the pretreatment to it beforehand If you are not using white ink you do not need to pretreat print medium 5 3 Pretreating process for print medium P 5 5 Replace the currently used platen with another one that suits the print medium After the platen replacement is completed adjust the platen s height 5 4 Platen adjustment P 5 14 Put a pr...

Page 137: ...out a nozzle check pattern 6 1 17 Print out the nozzle check pattern checking on the print heads P 6 44 TIPS There is no need to agitate the white ink tank manually However it is necessary to check the ejection from the head periodically 5 2 2 Confirmation of Water Supply Tank Before starting the work check that the water supply tank has water in it Perform test print Color White and check head fi...

Page 138: ...need available in advance Items to be prepared Pretreatment Pretreatment Weighing instrument Spray Heat press Peel off sheet Silicone foam of open cell structure Adhesive roller Pretreatment It is the white liquid that is needed for pretreating process for printing with white ink If a print medium is not coated with this agent no color development of white ink takes place and the whiteness becomes...

Page 139: ... so that neither inks nor pretreatment can be attached to the press surface of the heat press As a peel off sheet use a silicone coated paper or a fluororesin sheet There is a tendency to bring the print result to an almost matte finish if a silicone coated paper is used at the ink fixation stage There is a tendency to bring the print result to an almost bright finish if a fluororesin sheet is use...

Page 140: ...hin the ratio range of x3 Pretreatment Pure water 1 2 Volume ratio Dilution method TIPS The figure below is based on the pretreatment 20 kg 44 lb When using the pretreatment 5 kg 11 lb remove the cap and pour the agent into the container and dilute it with pure water referring to step 4 and the subsequent steps Dilution ratio is the same 1 Unpack the pretreatment container from the shipping carton...

Page 141: ...ute the pretreatment three times pretreatment with pure water at the ratio of 1 2 by volume Close the lid of the container for dilution and stir the content well to make the concentration uniform 5 To provide safekeeping for the pretreatment close the faucet place the pretreatment with the faucet part facing upward and store the entire carton in a safe place X0081 X0082 Pretreatment Faucet Pretrea...

Page 142: ...tment perform the work at a place as far as possible from the printer Otherwise it may cause failure of print heads Reference guide for amount of coating of pretreatment Determine a coating area and amount of coating according to a platen size When your coating area differs from what are shown in the table below calculate the amount of coating based on the area ratio IMPORTANT Depending on the typ...

Page 143: ...Fill the pretreatment applicator with the diluted pretreatment TIPS Please use a pretreatment applicator preferably of an electrically operated type that can emit fine spray 2 Set the T shirt on the pretreatment applicator and apply the pretreatment evenly onto the print surface X1039 Pretreatment applicator Smooth out the wrinkles T shirt ...

Page 144: ... goggles designed to shield against liquid splash during the work operation For information on handling of the pretreatment see the Material Safety Data Sheet issued by us http sds brother co jp sdsapp index html IMPORTANT If you are using an electric spray to apply the pretreatment perform the work at a place as far as possible from the printer Otherwise it may cause failure of print heads TIPS N...

Page 145: ...s on top of each other Avoid leaving the pretreatment as it is in any highly humid areas If the agent is left unchecked for a long time use the heat press to apply pressure to a T shirt immediately before the printing in order to dry it well Guidelines on fixation conditions of pretreatment The undermentioned fixation temperature time serve as guidelines only and optimum conditions vary with your ...

Page 146: ...evaporate water content of the pretreatment by the heat of heat press Keep your working space clean so that the surface to be coated with the agent will not get wet A peel off sheet should be used if needed depending on the heat press you use 2 Remove the T shirt from the heat press so that the steamy heat will escape from it X0096 X0097 Water droplets Heat press Peel off sheet T shirt Heat press ...

Page 147: ...12 platen is used ascertain that a proper Platen size has been selected in the printer driver s setting menu For print data using white ink 4 4 2 Select the platen size P 4 24 For print data using color ink and black ink only 4 5 2 Select the platen size P 4 41 5 4 1 Replacing the currently used platen with another one 1 On the operation panel press and move the platen toward the front of the prin...

Page 148: ...y from above 5 Tighten the platen fixing handle TIPS Place the platen fixing handle sideways so that the platen fixing handle will not come in contact when setting the platen or T shirt If the platen fixing handle is in portrait orientation pull the platen fixing handle sideways and turn it in landscape orientation Platen Platen Platen fixing handle Platen ...

Page 149: ...ot to put your hands in the clearance of the cover of the lifting up down mechanism Doing so may cause injury Otherwise the operator may get injured TIPS There are custom positions that can be set to any height You can set the height from the menu by selecting Printer Setting Platen Setting Height User Setting 7 9 1 User settings for height P 7 7 Platen Height Adjustment Head Cleaning Test Print I...

Page 150: ...um before using it As a rough indication adjust the height so that it is lowered by one step from the limit height detected by the obstacle sensor and check that the platen is not detected by the sensor In the event that the platen s height is lowered excessively ink mist will be scattered inside the printer which may result in staining of the printing surface blurring of the printed image and mal...

Page 151: ...rt tend to be raised easily during the printing operation if not flattened properly and detected by the obstacle sensor Touching on the fixated pretreated surface should be avoided during the work Do not pull the T shirt with the pretreatment applied Instead flatten it in such a way that it will fit onto the platen surface well When the surface of the T shirt does not remain flattened properly the...

Page 152: ...so that it is lowered by one step from the limit height detected by the obstacle sensor and check that the platen is not detected by the sensor If the platen s height is too high a print medium will strike against the print head during the printing process which in turn results in ink stains or malfunction 7 On the operation panel press and move the platen toward the front of the printer TIPS Repe...

Page 153: ...open the ARX6 file You can also load ARXP and ARX4 files 2 The file s printing conditions and preview window will be displayed TIPS If you have selected Color White Ink or White Ink Only in the Select Ink operation the preview window will be displayed against a Black background or a Transparent color background which has been specified in the Advanced settings If you have selected Color Ink Only i...

Page 154: ...5 21 Basic printing procedures When Color Ink Only is selected Details ...

Page 155: ...ou can change the background color of the preview window and preview the print image Select Change Define Custom Colors and enter RGB value TIPS When the White Data checkbox is marked the preview window for white ink only will be displayed Example Preview window for printing an image on a brown R 128 G 64 B 64 T shirt ...

Page 156: ... shown as Total the preview window of the final print result is displayed When the White Data checkbox is marked the preview window for white ink only will be displayed 5 Check the printing conditions and preview window and click on Send to Printer Then the ARX6 file is sent to the printer TIPS Make sure that the PC and printer are connected via a LAN cable In the event that two or more GTX 6 prin...

Page 157: ...ter is set to Brother GTX 6 the print data will be sent to the printer If the specified Printer is set to Brother GTX 6 FileOutput the print data will be saved as an ARX6 file 4 On Preferences set up the printer driver and send the print data by clicking OK in the Print dialog box TIPS How to set the printer driver For print data using white ink 4 4 1 Setting up the printer driver P 4 22 For print...

Page 158: ... the print data will be sent to the printer If Printer is set to Brother GTX 6 FileOutput the print data will be saved as an ARX6 file 4 In the Print Settings set up the printer driver and send the print data by clicking Print TIPS How to set the printer driver For print data using white ink 4 4 1 Setting up the printer driver P 4 22 For print data using color ink and black ink only 4 5 1 Setting ...

Page 159: ...int data will be sent to the printer If Printer is set to Brother GTX 6 FileOutput the print data will be saved as an ARX6 file 4 In the Advanced set up the printer driver and send the print data by clicking Print TIPS How to set the printer driver For print data using white ink 4 4 1 Setting up the printer driver P 4 22 For print data using color ink and black ink only 4 5 1 Setting up the printe...

Page 160: ... can be loaded from the USB flash memory is only the data in ARX6 ARXP or ARX4 format 2 From the menu select Print Data Load and press TIPS The information on file is shown on the liquid crystal panel 3 Select a filename to be printed out and press TIPS Selecting will display the file stored in Folders in the USB flash memory are shown down to the 3rd layer Folders created in the 4th layer or belo...

Page 161: ...orrupted TIPS Depending on data size it may take several minutes before the loading process is completed If any files of USB flash memory cannot be read out 8 1 Troubleshooting instructions P 8 2 If a folder contains more than one print data item use the buttons to switch the preview window The print data loading will be completed when the print button stops blinking and remains lit while the elec...

Page 162: ... will hear a sound each time you press the print buttons and after a certain period lapses When the printing is completed the platen moves to the forward most position and the sound of pong is heard TIPS If the print buttons are pressed when the platen has not moved toward the front no print job will be started Pressing causes the printing to be canceled The printer may shift to low temperature op...

Page 163: ... started Pressing causes the printing to be canceled The number of print media of which printing is completed is shown on the liquid crystal panel The printer may shift to low temperature operation mode when the room temperature is less than 18 C 64 4 F and white ink is used During low temperature mode it may take a longer time for print operation and maintenance before starting the print Change t...

Page 164: ...ach time you press the print buttons and after a certain period lapses When the printing is completed the platen moves to the forward most position and the sound of pong is heard TIPS If the print buttons are pressed when the platen has not moved toward the front no print job will be started Pressing causes the printing to be canceled The printer may shift to low temperature operation mode when th...

Page 165: ... a print job During the white ink circulation While the white ink is being circulated inside the printer at specified intervals or at a scheduled time for circulation 5 8 2 When a scheduled print begins A scheduled print begins when each of the following conditions is true When you schedule printing When the print begins The printer is receiving print data When the printer has completely received ...

Page 166: ...Because the printed surface is still wet with ink avoid touching it If any ink is attached to your hands wash your hands with soap and water Those inks that are attached to fabrics cannot be cleaned up please handle the inks with utmost care TIPS The printed ink is not fixated at this point therefore handle the T shirt with care to avoid the printed surface touching with other objects X1044 T shir...

Page 167: ...ent remains on the T shirt on which the ink was fixated after applying pretreatment For this reason it is advisable to wash such T shirts with water before wearing them Guidelines on fixation conditions of ink The undermentioned fixation temperature time serve as guidelines only and optimum conditions vary with your heat press or oven Be sure to perform the fixation after checking on the temperatu...

Page 168: ... peel off sheet or to an almost bright finish if a fluororesin sheet is used as the same at the ink fixation stage Selectively use either of them according to your desired finish Ink fixation by means of conveyor type oven 2 Fixate inks onto a T shirt by means of the conveyor type oven TIPS For the guidelines on fixation conditions of ink 5 10 Fixation of ink P 5 34 For the conveyor type oven iden...

Page 169: ...nse the eyes with water Keep the liquids out of the reach of children Be sure to wear protective goggles and gloves when handling the grease so that it does not get into your eyes or onto your skin It can cause inflammation Do not drink or eat the grease It may cause diarrhea or vomiting Keep the liquids out of the reach of children When replacing parts and installing optional accessories be sure ...

Page 170: ...glasses during the work operation Take care not to lose the IC stick that comes standard with the ink bottle Once you have refilled ink you cannot print until you insert the IC stick 1 From the menu select Ink refill and press 2 From Black Yellow Cyan and Magenta select the color with no ink and press 3 Insert the IC stick of the same color as the refilled ink and press TIPS An error appears if yo...

Page 171: ...Open the ink tank lid and refill ink up to above graduation mark 4 IMPORTANT Take care not to exceed the graduation mark in 6 6 Press on the operation panel Close the ink tank lid and press again IMPORTANT Be sure to close the ink tank lid once you have refilled the ink 7 Remove the IC stick following the instructions on screen and press NOTE Store the IC stick by attaching it to the handle of the...

Page 172: ...the ink bottle when agitating the ink because doing so causes foreign matter inclusion possibly resulting in printer failure CAUTION Be sure to wear a pair of plastic gloves and protective glasses during the work operation Take care not to lose the IC stick that comes standard with the ink bottle Once you have refilled ink you cannot print until you insert the IC stick Agitating white ink with an ...

Page 173: ...ting and darken the surrounding area to make the sediments more visible Agitated state With sediments Without sediments TIPS The shadows of bubbles may be confusing with sediments after the white ink agitation so leave the bottle until bubbles disappear before checking for sediments To distinguish between bubbles and sediments lightly shake the ink bottle The shadows of bubbles move but the shadow...

Page 174: ...term How to refill white ink 1 From the menu select Ink refill and press 2 Select White and press 3 Insert the white IC stick and press TIPS An error appears if you insert an IC stick of a different color from the depleted ink Ink refill White Error IC stick insertion slot ...

Page 175: ...Open the ink tank lid and refill ink up to above graduation mark 6 IMPORTANT Take care not to exceed the graduation mark in 6 6 Press on the operation panel Close the ink tank lid and press again IMPORTANT Be sure to close the ink tank lid once you have refilled the ink 7 Remove the IC stick following the instructions on screen and press NOTE Store the IC stick by attaching it to the handle of the...

Page 176: ...evel in the cleaning solution tank and refill the tank with the solution if its amount is insufficient 1 From the menu select Refill Ink and press 2 Select Cleaning solution and press 3 Open the cleaning solution bottle and attach the supplied faucet IMPORTANT Protect the ink on the faucet in use with a plastic bag to prevent the ink from drying out Do not use a non standard funnel Use the provide...

Page 177: ...k with the cleaning solution up to above graduation mark 6 IMPORTANT Take care not to exceed graduation mark 6 5 Press on the operation panel Close the cleaning solution tank lid and press again IMPORTANT After filling the cleaning solution be sure to close the cleaning solution tank lid X1072 6 5 4 3 2 1 Cleaning solution tank Lid ...

Page 178: ...rect tank volume sensor and press 7 Press Enter the scale for the ink level and press TIPS Check and correct the color scale displayed on the panel If the level is between the scales make a correction based on the lower value CAUTION If you enter an incorrect value the remaining level may not be correctly recognized and the printer may be damaged Tank correction timing WARNING Correct tank volume ...

Page 179: ...screen replace each maintenance part TIPS For the way to perform replacement refer to the respective maintenance parts section 6 1 6 Replacing the wiper P 6 12 6 1 7 Replacing the cap chip and cap foam P 6 14 6 1 8 Replacing the flushing foam P 6 17 6 1 9 Replacing the carriage foam P 6 20 Replace wiper Replace cap foam Replace flushing foam Replace carriage foam WARNING ...

Page 180: ...ce 1 Have the supplied gloves and wiper ready 2 From the menu select Maintenance Maintenance Part Clean Replace Maintenance Unit Part Replace and press IMPORTANT If any other error or message is displayed on the operation panel or warning message window follow the message to solve the problem then perform the cleaning Please complete the task within 15 minutes in order to prevent the print heads f...

Page 181: ...rs of the four locations at the same time Make sure that each wiper is installed in the correct direction Push the wiper in and make sure that the left and right protrusions are firmly fitted 6 Close the upper left hand side cover and top cover NOTE Dispose of any waste resulting from the replacement in accordance with applicable laws and ordinances Do not reuse the replaced wipers TIPS Then the h...

Page 182: ...f parts inside the printer are stained perform cleaning 6 2 2 Cleaning and replacing maintenance parts P 6 56 1 Prepare the gloves cap chip and cap foam 2 From the menu select Maintenance Maintenance Part Clean Replace Maintenance Unit Part Replace and press IMPORTANT If any other error or message is displayed on the operation panel or warning message window follow the message to solve the problem...

Page 183: ...4 Remove the cap chip and cap foam from the maintenance unit CAUTION Do not use sharp objects such as tweezers and be sure to remove the cap chip and cap foam by hand 5 Wipe the gloves with a waste cloth 6 Set a new cap chip and cap foam X0436 Cap chip Cap foam Waste cloth Gloves ...

Page 184: ...o reverse the orientation of the cap foam The cap chip has two sides Be careful not to turn it upside down Be careful not to turn the cap chip upside down when the cap chip and cap foam are assembled 7 Close the upper left hand side cover and top cover NOTE Dispose of any waste resulting from the replacement in accordance with applicable laws and ordinances Back Surface Cap chip Cap foam hole Cap ...

Page 185: ...er are stained perform cleaning 6 2 2 Cleaning and replacing maintenance parts P 6 56 1 Prepare the gloves and flushing foam consumable supplies 2 From the menu select Maintenance Maintenance Part Clean Replace Maintenance Unit Part Replace and press IMPORTANT If any other error or message is displayed on the operation panel or warning message window follow the message to solve the problem then pe...

Page 186: ...shing foam from the maintenance unit IMPORTANT Ink droplets will drop off from the hole in flushing foam After removal apply a waste cloth to the bottom face NOTE For a proper work operation be sure to wear the printer provided gloves 5 Wipe the gloves with a waste cloth X0436 Waste cloth Gloves ...

Page 187: ...oard end portions of the maintenance unit If it sticks out of the end portions it may interfere with any nozzles and may result in non ejection of ink jet droplets 7 Close the upper left hand side cover and top cover NOTE Dispose of any waste resulting from the replacement in accordance with applicable laws and ordinances TIPS The head cleaning will be performed to prevent ink from drying up On th...

Page 188: ... or message is displayed on the operation panel or warning message window follow the message to solve the problem then replace the carriage foam Please complete the task within 15 minutes in order to prevent the print heads from drying up There is a risk of damaging the nozzle surface of the head Be careful not to damage the nozzle surface of the head 4 Unlock and open the right hand side cover 5 ...

Page 189: ...new clean stick R when you start cleaning Never touch the tip end of clean stick R with your hand If any sebaceous matter is attached to the nozzle surface it may malfunction the printer Do not use other fluids water etc because they may damage the print heads Do not return the cleaning solution which has been put in the cleaning cup to the cleaning solution bottle Do not shed cleaning solution in...

Page 190: ... is recommended to make it easier to see when cleaning It is not easy to see the rearward side of the nozzle guard It is recommended to clean it while checking the cleaning condition with a mirror Nozzle guard side cleaning After nozzle guard side cleaning Head frontward side Head rearward side X1014 Nozzle guard Frontward side Rearward side ...

Page 191: ...ns to keep good printing quality use printer over the long term Head frontward and rearward cleaning 10 Remove ink clots if any protruding from the nozzle surface on the underside of the carriage X1049 Nozzle surface ...

Page 192: ...g ink clots do not use hard objects like iron tweezers The nozzle may be damaged resulting in non ejection if the objects touch the nozzle or other parts Use gloves and remove ink clots by pinching them with a clean stick or your fingers 11 Clean the top of the steel plate next to the flushing foam Cleaning location ...

Page 193: ...n of the arrow to prevent the peeled ink waste from entering the flushing foam and the wiper cleaning solution tank TIPS If it is difficult to remove the ink built up clean it with the cleaning solution for GTX 6 GCX 6W09L GCX 6W18L When doing so do not apply the cleaning solution directly to the top surface of the steel plate but rather use a waste cloth soaked with the cleaning solution Pre clea...

Page 194: ...term 12 Place the tip of the new carriage foam on the sliding surface of the foam guide 13 Move the foam along the sliding surface of the guide in the direction of the arrow and move the carriage foam until it touches the two foam pads Sliding surface of foam guide Foam pad ...

Page 195: ...t the carriage foam does not ride on the four foam pads IMPORTANT Be careful not to let the carriage foam come into contact with the nozzle surface of the head 15 Make sure that the nozzle surface is below the bottom surface of the foam 16 Close and lock the right hand side cover 17 From the menu select Exit and press Foam pad Nozzle surface Foam bottom ...

Page 196: ...gloves and a new mist fan filter 2 From the menu select Maintenance Maintenance Part Clean Replace Clean nozzle guard and cap and press 3 Select Replace mist fan filter and press IMPORTANT If any other error or message is displayed on the operation panel or warning message window follow the message to solve the problem then perform the cleaning TIPS Pressing causes the platen to start moving Do no...

Page 197: ...h in and close the mist fan door CAUTION Insert the mist fan filter completely on the side with the grip facing upward 7 Replace the other one in the same way 8 Press by following the on screen instructions to finish the work NOTE Dispose of any waste resulting from the replacement in accordance with applicable laws and ordinances Mist fan filter Mist fan filter ...

Page 198: ...platen TIPS When it is hard to peel the platen sheet off warm it using a hair dryer or the like and peel it off 3 Wipe the surface of the platen with a clean cloth moistened with a mild detergent which is diluted with water then wipe the platen clean with a dry and soft clean cloth 4 Mount the platen in the main unit of the printer 5 4 1 Replacing the currently used platen with another one P 5 14 ...

Page 199: ...ole platen sheet onto the entire platen TIPS Straighten the platen sheet and stick it properly while pressing it with hands outward from the center to avoid making wrinkles 8 As required print a grid pattern onto the new platen sheet 4 6 4 Print a grid pattern on the platen sheet P 4 51 TIPS After the printing is completed press down the printed surface lightly with a dry cloth or a sheet of paper...

Page 200: ... print head with the white side print head Check the case color red for the color side white for the white side and replace the case Both color print head and white print head have side A and side B Be sure to set them correctly Ink needs to be re installed after replacing the print head If the ink level is low refill ink 1 From the menu select Maintenance Head Replacement Corresponding print head...

Page 201: ...NT Care is needed in preventing any ink from being spilled from each tube If the ink is dripping wipe off the dripping ink NOTE For a proper work operation be sure to wear the printer provided gloves 7 Remove the latch on the carriage board cover and open the cover 8 Remove the head board of the corresponding print head CAUTION Be sure not to touch other boards 9 Remove the hook and clamp and disc...

Page 202: ...urface at the bottom of the head Otherwise it may cause poor printing TIPS Sometimes you may find it hard to remove the print head when you try to open the lock of a part If it is hard use both hands to remove it 12 Mount the new print head onto the carriage and push in the lock bar of the print head to lock the print head IMPORTANT Be careful not to pinch the flat cable between the metal plate of...

Page 203: ...able for head A does not overlap with that for head B Extend the flat cable on the print head side toward the carriage board so that the flat cable will not bend Fold the flat cable on the print head side 15 Close the carriage board cover IMPORTANT Make sure that the latch is securely closed Ensure that the flat cables do not extend past the edge of the cover CAUTION Ensure that the flat cable for...

Page 204: ...following the on screen instructions TIPS After the procedures are completed the current screen will go back to the standby mode screen Replace other print heads in the same way 20 Print the nozzle check patterns 6 1 17 Print out the nozzle check pattern checking on the print heads P 6 44 21 Perform the initial settings after head replacement configuration 3 6 1 Initial settings after head replace...

Page 205: ...t close smoothly Tilt adjustments 1 Turn the adjustment screw on the front side clockwise or counterclockwise to make adjustments if a cover is tilted Turn the adjustment screw clockwise to lower the cover and counterclockwise to raise the cover Upper right side cover Upper left side cover Lower left side cover Adjustment screw Hinge ...

Page 206: ...er interferes with the adjacent cover Turn the adjustment screw clockwise to reduce the clearance and counterclockwise to increase the clearance Up Down adjustments 1 Turn the adjustment screw in the center clockwise or counterclockwise to make up and down adjustments Turn the adjustment screw clockwise to raise the cover and counterclockwise to lower the cover Hinge Adjustment screw Adjustment sc...

Page 207: ... Precautions to keep good printing quality use printer over the long term Back Forth adjustments 1 Turn the adjustment screw On the inside clockwise to make back and forth adjustments Adjustment screw Hinge ...

Page 208: ... menu screen into view 2 Press select Maintenance Tube air bleed and press 3 Select the item you want to bleed air from and press 4 Select the color you want to bleed air from and press TIPS Select the number for the white head 6 1 12 Replacement of print head P 6 32 5 Follow the message displayed on screen press on the operation panel Air bleeding in the tube is executed Tube air bleed White head...

Page 209: ...on a printed material head cleaning sometimes provides a solution Selecting a type of head cleaning from the menu to perform the head cleaning 1 While the printer is in standby mode press on the operation panel to bring the menu screen into view 2 From the menu select Head Cleaning and press 3 By pressing select one of the options Normal Cleaning Powerful Cleaning or Super Cleaning and press TIPS ...

Page 210: ... jet droplets determine the color for which the head cleaning should be performed 6 1 17 Print out the nozzle check pattern checking on the print heads P 6 44 5 Then the head cleaning will be performed for the specified print heads TIPS The cleaning operation cannot be canceled halfway After the procedures are completed the current screen will go back to the standby mode screen Normal Cleaning All...

Page 211: ...he power because if you do so the printer may fail because necessary maintenance operations are not performed TIPS Completing the white ink circulation varies depending on the ambient temperature Usually it takes about 8 9 minutes and up to 15 minutes White ink is circulated automatically every four hours and white ink three times as much as normal is circulated every 24 hours If you are activatin...

Page 212: ... the nozzle check pattern P 3 30 1 Put the platen 14 16 in place and position its level at A 5 4 1 Replacing the currently used platen with another one P 5 14 and 5 4 2 Platen height adjustment P 5 16 2 As illustrated below put the A4 size or letter size white paper on the platen in alignment with the right hand corner of the platen at its front edge When the paper is loosely fitted fix its edge w...

Page 213: ...the white side printed result are light since white ink is fired from more than one nozzle on the same place the quality is not affected TIPS The following items are printed at the bottom of the nozzle check pattern Serial number Temperature Firmware version Humidity Print date day month year Number of prints Time The name of the corresponding head head A or B is printed next to each nozzle check ...

Page 214: ... printer available for use 2 From the menu select Maintenance Maintenance Part Clean Replace Clean nozzle guard and cap and press 3 Select in response to the instructions on the screen IMPORTANT If any other error or message is displayed on the operation panel or warning message window follow the message to solve the problem then perform the cleaning TIPS Pressing causes the platen to start moving...

Page 215: ...e description mentioned below 6 After the cleaning is completed close all the covers NOTE Dispose of any waste resulting from the cleaning in accordance with applicable laws and ordinances TIPS Then the head cleaning will be performed to prevent any ink from drying up Because the cleaning cup will be reused rinse it in clean cleaning solution and store it in a safe place X1013 On the white side On...

Page 216: ...nse the cleaning cup and prepare a new clean stick R and the cleaning solution Cleaning suction cap Perform cleaning of the suction cap part on the white side Cleaning suction cap Use clean stick T P 6 52 Perform cleaning of the color side Nozzle guard Cleaning Perform cleaning of the nozzle guard part on the color side Cleaning the nozzle guard Use clean stick R P 6 49 After cleaning the nozzle g...

Page 217: ... end of clean stick R with your hand If any sebaceous matter is attached to the wiper it may result in a printer malfunction Do not use other fluids water etc because they may damage the print heads Do not return the cleaning solution which has been put in the cleaning cup to the cleaning solution bottle Do not shed cleaning solution in the maintenance unit NOTE For a proper work operation be sure...

Page 218: ...tick R Do not rub the nozzle strongly Cleaning conditions Pre cleaning state Post cleaning state IMPORTANT Be sure to use the clean stick R separately for white ink and color ink X1018 X1046 Clean this part Cleaning location Between the nozzle surface and nozzle guard Cleaning location Between the nozzle surface and nozzle guard Nozzle surface Nozzle guard Nozzle guard rearward Nozzle guard frontw...

Page 219: ... surface on the underside of the carriage Ink clot example CAUTION When removing ink clots do not use hard objects like iron tweezers The nozzle may be damaged resulting in non ejection if the objects touch the nozzle or other parts Use gloves and remove ink clots by pinching them with a clean stick or your fingers Nozzle surface ...

Page 220: ...k T Do not use tweezers or other sharp objects Using sharp objects could damage the suction cap and deteriorate its air tightness possibly resulting in failure to eject ink jet droplets Be sure not to pinch the rubber seal If it is damaged its sealing property will be degraded which in turn may lead to non ejection of ink jet droplets from the print heads 2 Replace clean stick T with clean stick R...

Page 221: ...6 53 Precautions to keep good printing quality use printer over the long term Cleaning conditions Pre cleaning state Post cleaning state ...

Page 222: ... cloth to clean the area CAUTION When cleaning the backside of the carriage with a waste cloth make sure that the waste cloth will not touch the nozzle surface The nozzle may be damaged resulting in non ejection if the objects touch the nozzle or other parts TIPS Clean the white side in the same way Cleaning location Wipe off the adhered mist ink with a waste cloth Absorb ink droplets with the cle...

Page 223: ...6 55 Precautions to keep good printing quality use printer over the long term Cleaning ink droplets Pre cleaning state Post cleaning state Mist state ink Pre cleaning state Post cleaning state ...

Page 224: ...cloth IMPORTANT Please complete the task within 15 minutes in order to prevent the print heads from drying up Be sure to use a clean waste cloth Using a cloth with pretreatment may lead to non ejection Do not touch other parts such as springs and caps when wiping part a as shown in the photo If you touch the spring in particular it may come off Do not rub the parts strongly Doing so may cause the ...

Page 225: ...le it may result in the printer malfunction 2 From the menu select Maintenance Maintenance Part Clean Replace Clean nozzle guard and cap and press IMPORTANT If any other error or message is displayed on the operation panel or warning message window follow the message to solve the problem then perform the cleaning Please complete the task within 15 minutes in order to prevent the print heads from d...

Page 226: ...r head and the white head Use a new clean stick R when you start cleaning Do not use other fluids water etc because they may damage the print heads Do not return the cleaning solution which has been put in the cleaning cup to the cleaning solution bottle Do not shed cleaning solution in the maintenance unit NOTE For a proper work operation be sure to wear the printer provided gloves X1000 Do not d...

Page 227: ... may scrape the water repellent film 7 Close the right side cover and press in response to the instructions on the screen NOTE Dispose of any waste resulting from the cleaning in accordance with applicable laws and ordinances TIPS Then the head cleaning will be performed to prevent any ink from drying up Because the cleaning cup will be reused rinse it in clean cleaning solution and store it in a ...

Page 228: ...d up with water When the waste ink tank accumulates and an error occurs treat the water in the waste water tank at the same time TIPS Warning messages will be displayed for the respective tanks when the waste ink and the water in the waste water tank are about half full However these messages are not due to a malfunction of the detector 1 From the menu select Maintenance Empty replace waste ink ta...

Page 229: ...se of the waste ink properly as water based waste fluid in accordance with applicable laws and ordinances 4 Check the direction of the tank holes and install each tank as shown on the label Insert each tube into the tanks after installation IMPORTANT Be sure to push the tanks into the end Install the tanks so that the hole of each tank is directly below the tube The tanks may not be detected if th...

Page 230: ...e ink and the waste water in the tanks 6 2 4 Disposal of waste ink and waste water P 6 60 2 Check the amount of cleaning solution in the cleaning solution tank and refill the tank when its amount is below the proper level 6 1 3 Refilling the cleaning solution P 6 8 3 As required print out a nozzle check pattern 6 1 17 Print out the nozzle check pattern checking on the print heads P 6 44 6 3 2 When...

Page 231: ...ority to file name display Priority to job name display Platen Setting Height settings by user Obstcl sensr settng during print Platen too low sensor Low Temperature Mode Enable Normal Disable Low Humidity Mode Printing at Low Humidity No Printing at Low Humidity Select Everyday Post circulation Auto Cleaning Before Next Printing Soon after if within 30 min Soon after if within 1 hr Soon after if ...

Page 232: ...leaning Auto cleaning Print Data Load White Ink Circulation Platen Height Adjustment Total Print Temperature Humidity Info Confirm network setting IP Address Subnet Mask Default Gateway Host name MAC address Check circulation schedule Check humidification schedule Language English Español Français Deutsch Italiano Türkçe Русский 한국어 中文 日本語 Prepare Power OFF Version Firm Version Data Info Serial No...

Page 233: ...ction gives priority to the printer s setting over the setting of the printer driver The setting content will be kept intact until it is changed for the next printing job 7 2 Screen back light adjustment 1 From the menu select Printer Setting Back Light and press 2 Select your desired brightness of Liquid crystal panel and press TIPS During this menu selection process the screen is displayed with ...

Page 234: ...lection process the currently selected set value is displayed 7 4 Setting the menu timeout period 1 From the menu select Printer Setting Menu TimeOut Setting and press 2 Select the time before the display screen returns to the standby mode screen and press TIPS During this menu selection process the currently selected set value is displayed Menu TimeOut Setting 1 min 3 min 5 min OK Auto Screen Era...

Page 235: ...ght step scale from 0 to 7 and press TIPS You can adjust the volume while checking it 7 6 Setup of temperature indication 1 From the menu select Printer Setting Temperature and press 2 Select your desired unit of ambient temperature to be shown on the liquid crystal panel and press Temperature Fahrenheit Centigrade OK Speaker Volume Set to OK to Confirm ...

Page 236: ...e display setting Make file name display settings of print data The display name you set is reflected in the selection screen of standby mode or receiving history or the USB flash memory loading screen 1 From the menu select Printer Setting File name display setting and press 2 Select the display method and press TIPS The job name is set automatically by the image editing application File name dis...

Page 237: ...nsor is intended to detect wrinkles of the print media or foreign object on it to prevent the print head from contacting wrinkles or foreign matter or minimize the time during which the contact continues If the print head comes into contact with wrinkles or foreign object a failure to eject ink jet droplets or a mechanical failure may occur If the obstacle sensor detects a foreign object the print...

Page 238: ...e printer with automatic switching to low temperature operation mode for ensuring print quality when Temp Low is displayed on the liquid crystal panel It is set to Enable Normal by default If the low temperature operation mode is enabled the printer will automatically be switched to the low temperature operation Although it can assure print quality it may take longer time for printing If the low t...

Page 239: ...ng and the amount of waste liquid will increase if you print in a low humidity environment You cannot print in a low humidity environment if you select No Printing at Low Humidity The following confirmation screen will be displayed once a day at the first timing when you try to print in a low humidity environment if you select Select Everyday Low Humidity Mode Printing at Low Humidity No Printing ...

Page 240: ...o protect the printer and provide stable printing quality If the printing quality deteriorates in continuous printing decrease the number of printed sheets for Auto Cleaning The default value is 72 1 From the menu select Printer Setting Auto Cleaning Setting and press 2 Press to set up the number of sheets to be printed in the range between 1 and 72 and press TIPS The printing quality tends to det...

Page 241: ...rm this if the white printing quality deteriorates while printing 1 From the menu select Printer Setting Auto Multiple Pass Setting and press 2 Select the amount of white ink used for multiple pass printing and press TIPS The printing quality tends to deteriorate while printing if the temperature is low Although automatic multiple pass printing can assure print quality it may take a longer time fo...

Page 242: ...increases the time required for printing 7 15 Flushing Volume Setting Perform this if the printing quality deteriorates at the startup of the printing operation 1 From the menu select Printer Setting Flushing Volume Setting and press 2 Select your desired volume of ink to be ejected from the print heads during the flushing operation before the printing operation starts and press TIPS The printing ...

Page 243: ... 7 17 Network filtering settings This function will enhance LAN security Enable or disable this function when using the printer Setting this function to Enable will allow only specific PC access It is set to Disable by default 1 From the menu select Network filtering setting and press 2 Select either Enable or Disable and press Network filtering Enable Disable OK Auto Job Delete OFF ON OK ...

Page 244: ...reen after the settings are automatically acquired 3 To make manual settings press to move to and select your desired position 4 To make manual settings press to specify your desired numeric value 5 When the button is pressed the selected value is accepted and the display screen goes to the IP Address Subnet Mask and Default Gateway in sequence TIPS The display screen shown here has been taken as ...

Page 245: ... data to load If you select White Ink Circulation the white ink circulation begins 7 20 Display of total printed sheets On this display screen the total number of printed sheets is shown 1 From the menu select Total Print and press 1 Then the total number of printed sheets is displayed TIPS Only the number of printed sheets of which printing has succeeded is counted in which the canceled number of...

Page 246: ...nu select Temperature Humidity Info and press 2 Then the ambient temperature and humidity are displayed TIPS Make the setting of temperature indication unit in the Temperature window The display screen shown here has been taken as an example Temperature Humidity Info Press OK to Return Outer side Right side Left side 24 C 75 F 42 22 C 72 F ...

Page 247: ... Host name and MAC address and press 3 Display IPAddress Subnet Mask Default Gateway Host name or MAC address TIPS The display screen shown here has been taken as an example IP Address Press OK to Return 192 168 000 001 Subnet Mask Press OK to Return 255 255 255 000 Default Gateway Press OK to Return 000 000 000 000 Host name Press OK to Return GTX6 XXXXXX MAC Address Press OK to Return 00 1B A9 F...

Page 248: ...ill not be displayed 7 24 Check humidification schedule 1 From the menu select Check humidification schedule and press 2 The day of the week start time and end time for humidification will be displayed TIPS If the scheduled time of humidification is not set with the maintenance tool the humidification schedule will not be displayed Check humidification schedule Sun 09 00 18 00 Mon 09 00 18 00 Tue ...

Page 249: ...hown on the liquid crystal panel 1 From the menu select Language and press 2 Select your desired language in the Language window and finalize your setting by pressing 3 Follow the on screen message and turn off the power and on again Language English Español Français Deutsch Italiano OK ...

Page 250: ...tion will appear TIPS Pressing the button causes the currently displayed window to go back to the Version window The display screen shown here has been taken as an example Firm Version Main 0 42 9601 ACT 0 33 0000 LCD 0 33 0000 Head 0 31 0000 0 31 0000 Data Info Message 0 19 0000 Font 1 00 0000 Test Print 0 00 0007 Serial No Serial No ABCDEFG1 Hardware ID 1 0 Head information W_A No 6CM1234 V Rati...

Page 251: ...it the website of Brother Industries Ltd 1 Download the firmware s updated data from the website of Brother Industries Ltd 2 On the PC from All Programs in the Start menu select the GTX 6 Firmware Update from Brother GTX 6 Tools 3 Specify the firmware s updated data bwf 4 Connect the PC to the printer via a LAN cable and update your firmware by performing the on screen procedures ...

Page 252: ...g liquids such as the ink maintenance solution cleaning solution pretreatment and waste ink use protective glasses and gloves to avoid causing your eyes and skin to contact the liquids It may cause inflammation In case of contact with eyes do not rub but immediately rinse the eyes with water Keep the liquids out of the reach of children Be sure to wear protective goggles and gloves when handling t...

Page 253: ...the print button Probable Cause Remedy Reference Are you pressing the print buttons properly Press and hold two print buttons at the same time Check if the print is scheduled the button is flashing fast The print begins as soon as the printer becomes available Wait for a while Is any error message displayed Eliminate the cause of the error and perform printing once more 9 Error message P 9 1 Does ...

Page 254: ...rs immediately after activating the printer Probable Cause Remedy Reference Is any error message displayed Check the content of the error and restart the printer If the error is still not eliminated please contact your dealer or Brother 9 Error message P 9 1 No print data can be loaded from USB flash memory Probable Cause Remedy Reference Is the applicable file ARP or AR3 file This printer cannot ...

Page 255: ...der For help please contact your dealer Water supply error Probable Cause Remedy Reference Is a humidifier water supply error displayed If a water supply error occurs the humidifier will stop working Perform Humidification start from the menu Start humidification from the menu after confirming the following two points If the problem persists contact your dealer Make sure the water tank is filled w...

Page 256: ...ollowing two points If the problem persists contact your dealer Make sure that the amount of water in the tank and the installation height of the tank are appropriate Check if there are any problems with the piping from the water supply section pure water equipment and tank such as disconnected tubing or forgetting to open the main faucet If you supply water from a tank make sure it is a new tube ...

Page 257: ...over 2 Loosen the two bolts on the carriage belt holder IMPORTANT Loosen the two bolts until there is a gap between each bolt s face and the part 3 Tighten the two bolts on the carriage belt holder to 3 5 N m 4 Close and lock the right side cover Contact your dealer if you have any questions Keyhole ...

Page 258: ...ce Is there any nozzle that does not eject ink jet droplets Perform Head Cleaning from the menu If no improvement is attained follow the referenced instructions 8 2 1 Recovery action to be taken for such a nozzle that is unable to eject ink jet droplets P 8 13 Do you print ink dots on a highly water absorbing print medium Set the print head s print direction to Always Uni Directional Also combine ...

Page 259: ...te ink P 4 28 Ink sticks to such an area where no print data exists ink stain horizontal stripe etc Probable Cause Remedy Reference Is the area around the print heads soiled with waste ink spilled from the head cap Clean the head section and suction cap 6 2 1 Cleaning the nozzle guard and suction cap P 6 46 Is any lint attached to the nozzle surface Clean the nozzle guard 6 2 1 Cleaning the nozzle...

Page 260: ...ference Is the ambient atmosphere at a high temperature and very dry which in turn tends to cause the nozzle surface to dry up Perform the flushing more frequently In addition increase the flushing volume 7 14 Flushing Interval Setting P 7 12 7 15 Flushing Volume Setting P 7 12 White ink is not printed out evenly Probable Cause Remedy Reference Has the pretreatment been applied unevenly Apply the ...

Page 261: ...u If no improvement is attained follow the referenced instructions 8 2 1 Recovery action to be taken for such a nozzle that is unable to eject ink jet droplets P 8 13 Is the white ink circulated insufficiently From the menu select Maintenance White Ink Circulation to circulate the white ink properly Is the Low Temperature Mode set to Disable Change the setting to Enable Normal 7 10 Print Operation...

Page 262: ...d with Color White Ink Probable Cause Remedy Reference White Color Alignment misaligned Misalignment of white and color inks can occur when the media thickness or the platen height is changed Adjust the platen height first for the actual media to be printed and align the white and color inks positions 3 6 6 White color alignment P 3 29 Is the media easy to stretch when wet Print misalignment may o...

Page 263: ... of printer P 3 2 Takes longer print time than before Probable Cause Remedy Reference Is the ambient temperature under 18 C 64 4 F Adjust the room temperature to 18 C 64 4 F or more If it is difficult to adjust the room temperature set the operational configuration under low temperature to Disable 7 10 Print Operation Settings Under Low Temperature P 7 8 Is your printing under a low humidity envir...

Page 264: ...he wiper cleaning solution contaminated The wiper may not be sufficiently cleaned and the nozzle surface may not be wiped cleanly if the wiper cleaning solution is dirty Replacement of wiper cleaning solution From the menu select Maintenance Operate wiper cleaning tank Change cleaning solution Is there any indication of scar or deformation on the wiper If the wiper has any scar or deformation the ...

Page 265: ...ts Proceed to Step 2 Step 2 Perform the head cleaning 1 Perform a normal cleaning 6 1 15 Head cleaning P 6 41 2 Print out a nozzle check pattern 2nd time 3 Check the result of the printed nozzle check pattern 2nd time and carry out the following procedures Existence or nonexistence of a nozzle that does not eject any ink jet droplets Recovery action Such a nozzle does not exist that does not eject...

Page 266: ...zzle does not exist that does not eject any ink jet droplets Exit Such a nozzle exists that does not eject any ink jet droplets Proceed to Step 4 Step 4 Clean the nozzle surface 1 Clean the nozzle surface of the print heads 2 Make the clean stick R cleaning cup gloves and cleaning solution which come standard with the printer available for use IMPORTANT Use a new clean stick R when you start clean...

Page 267: ... a new clean stick R when you start cleaning Do not use other fluids water etc because they may damage the print heads Do not return the cleaning solution which has been put in the cleaning cup to the cleaning solution bottle Do not shed cleaning solution in the maintenance unit NOTE For a proper work operation be sure to wear the printer provided gloves X1000 Do not drain waste ink Cleaning cup C...

Page 268: ...e check pattern 10 Check a result of the resultant nozzle check patterns and carry out the following procedures Existence or nonexistence of a nozzle that does not eject any ink jet droplets Recovery action Such a nozzle does not exist that does not eject any ink jet droplets Exit Such a nozzle exists that does not eject any ink jet droplets Proceed to Step 5 IMPORTANT Even if the nozzles on the w...

Page 269: ...18 Troubleshooting Step 5 Head Replacement 1 Replace the print head with a new one 6 1 12 Replacement of print head P 6 32 2 If the non ejection state persists after replacing the head contact your dealer ...

Page 270: ... slot of the printer 2 Press on the operation panel located on the left side of printer to go to the menu 3 Press select Maintenance Log copy to USB and press 4 Then the print button stops blinking and the log file writing operation will be completed when you hear the sound of pong IMPORTANT Never remove the USB flash memory from the printer when the print button is blinking Otherwise the USB flas...

Page 271: ...PC from All Programs in the Start menu select the GTX 6 Maintenance from Brother GTX 6 Tools 2 After the window shown below appears select the Log Data Retrieval and click Next 3 Perform the required operation by following the on screen instructions in the dialog box ...

Page 272: ...ion is established between the main board and white head board A when the power is turned on Check and see if any source produces a loud noise near the printer If the problem persists even after reactivating the printer please contact your dealer 0014 Machine Error No communication is established between the main board and white head board B when the power is turned on Check and see if any source ...

Page 273: ...or A communication error has occurred between the main board and color head board B while the printer is in operation Check and see if any source produces a loud noise near the printer If the problem persists even after reactivating the printer please contact your dealer 0113 Machine Error A communication error has occurred between the main board and white head board A while the printer is in oper...

Page 274: ...the printer please contact your dealer 0142 Machine Error A communication error has occurred between the main board and platen servomotor while the printer is in operation Check and see if any source produces a loud noise near the printer If the problem persists even after reactivating the printer please contact your dealer 0143 Machine Error A communication error has occurred between the main boa...

Page 275: ...ease Adjust RTC The built in clock has not been set up Note the error code and error message and notify your dealer 1090 Clean nozzle guard and cap The cap needs to be cleaned Select the Clean nozzle guard and cap menu item to perform cleaning 1091 Clean nozzle guard and cap The cap needs to be cleaned Select the Clean nozzle guard and cap menu item to perform cleaning 1210 Exhaust Fan Stop The mi...

Page 276: ...Replacing Head menu item to install the ink for white head A 1804 None after head change Because white head B has been replaced the Install Ink after Replacing Head function needs to be put into execution Select the Install Ink after Replacing Head menu item to install the ink for white head B 1901 Perform Initial Ink Installation Initial ink installation has not been performed yet Select the Init...

Page 277: ...re 2051 Temp High The ambient temperature rises above the operation assurance range for the best print result Lower your room temperature 2055 Humidity too Low The humidity is lower than the operation assurance range for the best print result Turn on the humidification function and wait for a while 2056 Humidity too High The humidity is higher than the operation assurance range for the best print ...

Page 278: ...ete Enable function remains active no receiving history menu is available Press the OK button to clear the error When you use the receiving history disable the Print Data Auto Delete option 2230 Detected refilling of ink tank Black ink was refilled to the main tank in an incorrect way Refill the ink following the on screen instructions To refill the ink be sure to select the Ink refill menu item 2...

Page 279: ...se the left door 2347 Upper door open The upper door is open Close the upper door 2350 Right mist fan door open The mist fan door on the right side is open Close the mist fan door on the right side 2351 Left mist fan door open The mist fan door on the left side is open Close the mist fan door on the left side 3000 PC Communication Error Data reception from the PC has been suspended Make sure that ...

Page 280: ...cation between your PC and the printer once again If the problem is still not remedied restart your PC and the printer If the problem persists please contact your dealer 3013 PC Data Error A communication error between the PC and printer Make sure that your PC is connected to the printer and start communication between your PC and the printer once again If the problem is still not remedied restart...

Page 281: ...by means of GTX 6 File Viewer Make sure that your PC is connected to the printer and start communication between your PC and the printer once again Restart your PC and the printer If the problem persists please contact your dealer 3411 PC Data Error Abnormal data has been received from the PC Check on the ARX6 file by means of GTX 6 File Viewer Make sure that your PC is connected to the printer an...

Page 282: ...y to operate it once again 4106 Illegal Format The file in the USB flash memory is not accessible Check on the content of USB flash memory Insert a USB flash memory into the slot again and perform the required operation once more If the problem is still not remedied restart the printer and try to operate it once again 4108 USB flash drive Access Error The file in the USB flash memory is not readab...

Page 283: ...or Network related settings have been failed Press the OK button to clear the error Use the maintenance tool to set up a correct static IP address and subnet mask value once again 4502 Machine Error Network related settings have been failed Press the OK button to clear the error Contact your network setup manager and network administrator If the problem persists please contact your dealer 4503 Mac...

Page 284: ...cted when the color 1 wiper was operated Check and see if any source produces a loud noise near the printer If the problem persists even after reactivating the printer please contact your dealer 5201 Machine Error An error has been detected when the color 2 wiper was operated Check and see if any source produces a loud noise near the printer If the problem persists even after reactivating the prin...

Page 285: ... IC stick is inserted correctly If the problem persists even after reactivating the printer please contact your dealer 5602 Machine Error An error has been detected during IC stick control Check that the IC stick is inserted correctly If the problem persists even after reactivating the printer please contact your dealer 6004 Machine Error An error in the platen obstacle sensor has been detected Ch...

Page 286: ...been detected in the Cancel button at the startup Make sure that no buttons on the operation panel are pressed If the problem persists please contact your dealer 6034 Machine Error An error has been detected in the Left arrow button at the startup Make sure that no buttons on the operation panel are pressed If the problem persists please contact your dealer 6035 Machine Error An error has been det...

Page 287: ...date the firmware again Check if the firmware update file is for the model of your printer If the problem persists please contact your dealer 6070 Machine Error An error has been detected in the connector connection of the platen stop button on the right side Check and see if any source produces a loud noise near the printer If the problem persists even after reactivating the printer please contac...

Page 288: ...ing the printer please contact your dealer 6231 Machine Error An error has been detected in the voltage of color head A Ascertain whether or not the cable for the heads is disconnected If the problem persists even after reactivating the printer please contact your dealer 6232 Machine Error An error has been detected in the voltage of color head B Ascertain whether or not the cable for the heads is...

Page 289: ...ed in the fan of white head B Check and see if any source produces a loud noise near the printer If the problem persists even after reactivating the printer please contact your dealer 7000 Machine Error The software detected an internal error Check and see if any source produces a loud noise near the printer If the problem persists even after reactivating the printer please contact your dealer 701...

Page 290: ... in the sensor of white 2 sub tank Check and see if any source produces a loud noise near the printer If the problem persists even after reactivating the printer please contact your dealer 8060 Machine Error Failed to fill the black sub tank with ink Check and see if any source produces a loud noise near the printer If the problem persists even after reactivating the printer please contact your de...

Page 291: ...ase contact your dealer 8072 Machine Error Failed to discharge ink from the cyan sub tank Check and see if any source produces a loud noise near the printer If the problem persists even after reactivating the printer please contact your dealer 8073 Machine Error Failed to discharge ink from the magenta sub tank Check and see if any source produces a loud noise near the printer If the problem persi...

Page 292: ...your dealer 8100 Machine Error Failed to fill the black head with ink Check and see if any source produces a loud noise near the printer If the problem persists even after reactivating the printer please contact your dealer 8101 Machine Error Failed to fill the yellow head with ink 8102 Machine Error Failed to fill the cyan head with ink 8103 Machine Error Failed to fill the magenta head with ink ...

Page 293: ... humidifier drain tank is full Empty the humidifier drain tank 8212 Humidifier drain tank full The humidifier drain tank will be full soon 8220 Humidification error An error has been detected in the humidification fan Check and see if any source produces a loud noise near the printer If the problem persists even after reactivating the printer please contact your dealer 8221 Machine Error An error ...

Page 294: ... platen Installation conditions Environment Power Single phase 200 V 240 V 50 60 Hz Power consumptions When active 5 A max Temper ature and humidity environ ment Recomm ended print environ ment Temperature 18 to 30 C 64 4 to 86 F Humidity 35 to 85 no condensation X0394 30 20 40 35 50 60 70 80 85 40 35 30 25 20 18 15 10 37 29 Working Environ ment Temperature 10 to 35 C 50 to 95 F Humidity 20 to 85 ...

Page 295: ...Sur Min operating environment CPU with 2 GHz or above RAM with 4 GB or above Display resolution SXGA 1280 x 1024 or higher Output Printer driver GTX Graphics Lab Application software for high level image editing Adobe Photoshop CC Adobe Illustrator CC CorelDRAW 2020 2021 Windows ...

Page 296: ...ge temperature 0 to 40 C 32 to 104 F Cautions for storage Store them in a place where they are not exposed to direct sunlight Keep them out of the reach of children Store them away from fire heat and oxidized substance Content 5 kg 11 lb External dimensions in transport condition 4 piece set 18 0 in width x 12 6 in depth x 12 5 in height 456 mm width x 320 mm depth x 318 mm height 10 3 3 Cleaning ...

Page 297: ...re heat and oxidized substance Cap the container tightly and keep it in a cool dark place with good ventilation Content 200 kg 440 lb 20 kg 44 lb 5 kg 11 lb External dimensions in transport condition 200 kg 440 lb 2 piece set 46 5 in width x 23 6 in depth x 40 6 in height 1180 mm width x 600 mm depth x 1030 mm height 20 kg 44 lb 1 piece set 10 4 in width x 10 4 in depth x 15 9 in height 265 mm wid...

Page 298: ... sheet 14 16 SC4577 18 L GCX 6W18L Platen size L SC4872 Cleaning solution for GTX 6 9 L GCX 6E09L 16 5 in 420 mm 16 5 in 420 mm 18 L GCX 6E18L Platen sheet 16 18 SC3060 Pretreatment 5 kg 11 lb GCX 4PS05 Platen size XL SC4873 20 kg 44 lb GCX 4PS20 18 2 in 463 mm 22 2 in 565 mm 200 kg 440 lb GCX 4PS2H Platen sheet 18 22 SC3541 Maintenance solution 5 kg 11 lb GC 50S5K Platen size XXL SC4874 Maintenan...

Page 299: ...in tank filter cleaning solution SB7680 Main tank filter white SC1643 Return filter white SC1695 Circulation filter white SB7680 Head filter color SB7093 Head filter white SC1695 Cleaning cup SB6925 Waste ink tank SC4946 Waste water tank SC4946 Humidifier fan filter SC5138 Encoder strip SC2555 Encoder sensor board SC3262 CR origin sensor LG2239 ...

Page 300: ... 18 L Cleaning solution for GTX 6 9 L Cleaning solution for GTX 6 18 L Pretreatment 5 kg 11 lb Pretreatment 20 kg 44 lb Pretreatment 200 kg 440 lb Water tank supply ASSY White head Color head Main tank filter white Maintenance solution 5 kg 11 lb Carriage foam Clean stick R Clean stick T Cap foam Cap chip Flushing foam ...

Page 301: ...t which supports RSS Reader XPS emulation for Direct Print feature or PDF creation module libstrophe json c This software is used in the product which supports Google Cloud Print Open SSH This software is used in the product which supports Secure Scan FTP Open NFC linux_libnfc nci This software is used in the product which supports NFC USB Host Driver in FreeBSD This software is used in the produc...

Page 302: ...IAL EXEMPLARY OR CONSEQUENTIAL DAMAGES INCLUDING BUT NOT LIMITED TO PROCUREMENT OF SUBSTITUTE GOODS OR SERVICES LOSS OF USE DATA OR PROFITS OR BUSINESS INTERRUPTION HOWEVER CAUSED AND ON ANY THEORY OF LIABILITY WHETHER IN CONTRACT STRICT LIABILITY OR TORT INCLUDING NEGLIGENCE OR OTHERWISE ARISING IN ANYWAY OUT OF THE USE OF THIS SOFTWARE EVEN IF ADVISED OF THE POSSIBILITY OF SUCH DAMAGE Permission...

Page 303: ...on to use copy modify and distribute this software for any purpose and without fee is hereby granted provided that the above copyright notices appear in all copies and that both the copyright notice and this permission notice appear in supporting documentation This software is provided as is without express or implied warranty ...

Page 304: ...ftware from the United States of America may require a specific license from the United States Government It is the responsibility of any person or organization contemplating export to obtain such a license before exporting WITHIN THAT CONSTRAINT permission to use copy modify and distribute this software and its documentation for any purpose and without fee is hereby granted provided that the abov...

Page 305: ... PROFITS WHETHER IN AN ACTION OF CONTRACT NEGLIGENCE OR OTHER TORTUOUS ACTION ARISING OUT OF OR IN CONNECTION WITH THE USE OR PERFORMANCE OF THIS SOFTWARE Copyright c 2006 Red Hat Inc Portions copyright c 2006 Massachusetts Institute of Technology All Rights Reserved Redistribution and use in source and binary forms with or without modification are permitted provided that the following conditions ...

Page 306: ...ing or publicity pertaining to the use of distribution of this software without specific written prior authorization If the above copyright notice or any other identification of the University of Michigan is included in any copy of any portion of this software then the disclaimer below must also be included THIS SOFTWARE IS PROVIDED AS IS WITHOUT REPRESENTATION FROM THE UNIVERSITY OF MICHIGAN AS T...

Page 307: ... without prior written permission For permission or any other legal details please contact Office of Technology Transfer Carnegie Mellon University 5000 Forbes Avenue Pittsburgh PA 15213 3890 412 268 4387 fax 412 268 7395 tech transfer andrew cmu edu 4 Redistributions of any form whatsoever must retain the following acknowledgment This product includes software developed by Computing Services at C...

Page 308: ... written permission of the OpenSSL Project 6 Redistributions of any form whatsoever must retain the following acknowledgment This product includes software developed by the OpenSSL Project for use in the OpenSSL Toolkit http www openssl org THIS SOFTWARE IS PROVIDED BY THE OpenSSL PROJECT AS IS AND ANY EXPRESSED OR IMPLIED WARRANTIES INCLUDING BUT NOT LIMITED TO THE IMPLIED WARRANTIES OF MERCHANTA...

Page 309: ...ing materials mentioning features or use of this software must display the following acknowledgement This product includes cryptographic software written by Eric Young eay cryptsoft com The word cryptographic can be left out if the rouines from the library being used are not cryptographic related 4 If you include any Windows specific code or a derivative thereof from the apps directory application...

Page 310: ...d and that due credit is given to the University of Michigan at Ann Arbor The name of the University may not be used to endorse or promote products derived from this software without specific prior written permission This software is provided as is without express or implied warranty Portions Copyright c 1999 2000 Novell Inc All Rights Reserved THIS WORK IS SUBJECT TO U S AND INTERNATIONAL COPYRIG...

Page 311: ...OR OTHERWISE ARISING IN ANY WAY OUT OF THE USE OF THIS SOFTWARE EVEN IF ADVISED OF THE POSSIBILITY OF SUCH DAMAGE The names of the authors and copyright holders must not be used in advertising or otherwise to promote the sale use or other dealing in this Software without specific written prior permission Title to copyright in this Software shall at all times remain with copyright holders OpenLDAP ...

Page 312: ...OR TORT INCLUDING NEGLIGENCE OR OTHERWISE ARISING IN ANY WAY OUT OF THE USE OF THIS SOFTWARE EVEN IF ADVISED OF THE POSSIBILITY OF SUCH DAMAGE RFC 2251 Full Copyright Statement Copyright c The Internet Society 1997 All Rights Reserved This document and translations of it may be copied and furnished to others and derivative works that comment on or otherwise explain it or assist in its implementati...

Page 313: ...ware and to permit persons to whom the Software is furnished to do so subject to the following conditions The above copyright notice and this permission notice shall be included in all copies or substantial portions of the Software THE SOFTWARE IS PROVIDED AS IS WITHOUT WARRANTY OF ANY KIND EXPRESS OR IMPLIED INCLUDING BUT NOT LIMITED TO THE WARRANTIES OF MERCHANTABILITY FITNESS FOR A PARTICULAR P...

Page 314: ...any advertising or publicity relating to the software without the specific prior written permission of Sam Leffler and Silicon Graphics THE SOFTWARE IS PROVIDED AS IS AND WITHOUT WARRANTY OF ANY KIND EXPRESS IMPLIED OR OTHERWISE INCLUDING WITHOUT LIMITATION ANY WARRANTY OF MERCHANTABILITY OR FITNESS FOR A PARTICULAR PURPOSE IN NO EVENT SHALL SAM LEFFLER OR SILICON GRAPHICS BE LIABLE FOR ANY SPECIA...

Page 315: ...10 22 Specifications l libjpeg this software is based in part on the work of the Independent JPEG Group ...

Page 316: ...to the same disclaimer and license as libpng 1 0 6 with the following individuals added to the list of Contributing Authors Simon Pierre Cadieux Eric S Raymond Gilles Vollant and with the following additions to the disclaimer There is no warranty against interference with your enjoyment of the library or against infringement There is no warranty that our efforts or the library will fulfill any of ...

Page 317: ...ect incidental special exemplary or consequential damages which may result from the use of the PNG Reference Library even if advised of the possibility of such damage Permission is hereby granted to use copy modify and distribute this source code or portions hereof for any purpose without fee subject to the following restrictions 1 The origin of this source code must not be misrepresented 2 Altere...

Page 318: ...at of course is supplied in the files pngbar png and pngbar jpg 88x31 and pngnow png 98x31 Libpng is OSI Certified Open Source Software OSI Certified Open Source is a certification mark of the Open Source Initiative Glenn Randers Pehrson glennrp at users sourceforge net April 25 2013 ...

Page 319: ...furnished to do so subject to the following conditions The above copyright notice and this permission notice shall be included in all copies or substantial portions of the Software THE SOFTWARE IS PROVIDED AS IS WITHOUT WARRANTY OF ANY KIND EXPRESS OR IMPLIED INCLUDING BUT NOT LIMITED TO THE WARRANTIES OF MERCHANTABILITY FITNESS FOR A PARTICULAR PURPOSE AND NONINFRINGEMENT IN NO EVENT SHALL THE AU...

Page 320: ...s furnished to do so subject to the following conditions The above copyright notice and this permission notice shall be included in all copies or substantial portions of the Software THE SOFTWARE IS PROVIDED AS IS WITHOUT WARRANTY OF ANY KIND EXPRESS OR IMPLIED INCLUDING BUT NOT LIMITED TO THE WARRANTIES OF MERCHANTABILITY FITNESS FOR A PARTICULAR PURPOSE AND NONINFRINGEMENT IN NO EVENT SHALL THE ...

Page 321: ...ose the GNU license being the most restrictive see below for details However none of that term is relevant at this point in time All of these restrictively licenced software components which he talks about have been removed from OpenSSH i e RSA is no longer included found in the OpenSSL library IDEA is no longer included its use is deprecated DES is now external in the OpenSSL library GMP is no lo...

Page 322: ...ISING OUT OF THE USE OR INABILITY TO USE THE PROGRAM INCLUDING BUT NOT LIMITED TO LOSS OF DATA OR DATA BEING RENDERED INACCURATE OR LOSSES SUSTAINED BY YOU OR THIRD PARTIES OR A FAILURE OF THE PROGRAM TO OPERATE WITH ANY OTHER PROGRAMS EVEN IF SUCH HOLDER OR OTHER PARTY HAS BEEN ADVISED OF THE POSSIBILITY OF SUCH DAMAGES 4 The Rijndael implementation by Vincent Rijmen Antoon Bosselaers and Paulo B...

Page 323: ...als provided with the distribution 3 Neither the name of the University nor the names of its contributors may be used to endorse or promote products derived from this software without specific prior written permission THIS SOFTWARE IS PROVIDED BY THE REGENTS AND CONTRIBUTORS AS IS AND ANY EXPRESS OR IMPLIED WARRANTIES INCLUDING BUT NOT LIMITED TO THE IMPLIED WARRANTIES OF MERCHANTABILITY AND FITNE...

Page 324: ...tribution THIS SOFTWARE IS PROVIDED BY THE AUTHOR AS IS AND ANY EXPRESS OR IMPLIED WARRANTIES INCLUDING BUT NOT LIMITED TO THE IMPLIED WARRANTIES OF MERCHANTABILITY AND FITNESS FOR A PARTICULAR PURPOSE ARE DISCLAIMED IN NO EVENT SHALL THE AUTHOR BE LIABLE FOR ANY DIRECT INDIRECT INCIDENTAL SPECIAL EXEMPLARY OR CONSEQUENTIAL DAMAGES INCLUDING BUT NOT LIMITED TO PROCUREMENT OF SUBSTITUTE GOODS OR SE...

Page 325: ...th the License You may obtain a copy of the License at http www apache org licenses LICENSE 2 0 Unless required by applicable law or agreed to in writing software distributed under the License is distributed on an AS IS BASIS WITHOUT WARRANTIES OR CONDITIONS OF ANY KIND either express or implied See the License for the specific language governing permissions and limitations under the License ...

Page 326: ...except in compliance with the License You may obtain a copy of the License at http www apache org licenses LICENSE 2 0 Unless required by applicable law or agreed to in writing software distributed under the License is distributed on an AS IS BASIS WITHOUT WARRANTIES OR CONDITIONS OF ANY KIND either express or implied See the License for the specific language governing permissions and limitations ...

Page 327: ...bject to the following conditions The above copyright notice and this permission notice shall be included in all copies or substantial portions of the Software THE SOFTWARE IS PROVIDED AS IS WITHOUT WARRANTY OF ANY KIND EXPRESS OR IMPLIED INCLUDING BUT NOT LIMITED TO THE WARRANTIES OF MERCHANTABILITY FITNESS FOR A PARTICULAR PURPOSE AND NONINFRINGEMENT IN NO EVENT SHALL THE AUTHORS OR COPYRIGHT HO...

Page 328: ...ials provided with the distribution THIS SOFTWARE IS PROVIDED BY THE AUTHOR AND CONTRIBUTORS AS IS AND ANY EXPRESS OR IMPLIED WARRANTIES INCLUDING BUT NOT LIMITED TO THE IMPLIED WARRANTIES OF MERCHANTABILITY AND FITNESS FOR A PARTICULAR PURPOSE ARE DISCLAIMED IN NO EVENT SHALL THE AUTHOR OR CONTRIBUTORS BE LIABLE FOR ANY DIRECT INDIRECT INCIDENTAL SPECIAL EXEMPLARY OR CONSEQUENTIAL DAMAGES INCLUDI...

Page 329: ...ce with the License You may obtain a copy of the License at http www apache org licenses LICENSE 2 0 Unless required by applicable law or agreed to in writing software distributed under the License is distributed on an AS IS BASIS WITHOUT WARRANTIES OR CONDITIONS OF ANY KIND either express or implied See the License for the specific language governing permissions and limitations under the License ...

Page 330: ...in the above copyright notice this list of conditions and the following disclaimer 2 Redistributions in binary form must reproduce the above copyright notice this list of conditions and the following disclaimer in the documentation and or other materials provided with the distribution 3 Neither the name s of the above listed copyright holder s nor the names of its contributors may be used to endor...

Page 331: ...10 38 Specifications T Kernel This Product uses the Source Code of T Kernel under T License 2 0 granted by the T Engine Forum www tengine org ...

Page 332: ...htly from the actual product purchased as a result of product improvements https www brother com 1 5 Kitajizoyama Noda cho Kariya 448 0803 Japan 2021 2022 Brother Industries Ltd All Rights Reserved This is the original instructions GT60NB I2011626F EN 2022 03 F 1 ...

Reviews: