background image


6


D After ironing


Unplug the iron and press the steam on/off 
button (3) so that it catches in its lower 
position (steam off). 

To prolong the life of the iron, empty the 
water tank. 

Store the cool iron in a dry place always 
standing on its heel rest.


E Maintenance and cleaning


To clean the sole plate, use steel wool.  
Then wipe the sole plate clean with a cloth. 
Never use a scouring pad, vinegar nor 
other chemicals. To clean the soft material 
of handle and power shot and spray 
buttons, use soapy water.


F Cleaning the anticalc valve


Your iron is provided with an anticalc valve 
which is located at the lower end of the 
steam on/off button (3). The anticalc valve 
has to be decalcified regularly (e.g. when-
ever steam development is insufficient).

Before removing and cleaning the anticalc 
valve, unplug the iron and empty the water 
tank. 

Press the steam button so that it is lifted. 
Carefully pull out the steam button. 
Do not touch the anticalc valve at its lower 
end.

Immerse the anticalc valve in vinegar (not 
vinegar essence) or lemon juice until the 
lime becomes soft.
Using a non-metallic brush, remove re-
maining residues and make sure that parti-
cularly the openings at the bottom and 
on the lower sides are clean. Rinse under 
running water. 

Then re-insert the steam button and push 
it down as far as it will go. 

Press it to check the steam on/off function.

Note: The iron must never be used without 
the steam button. 


G Decalcifying/anticalc system


When scale particles come out of the 
steam vents or when the steam function 
does not work well even after having 
cleaned the anti-calc valve, you should 
proceed as follows to clean the steam 
chamber. For this, proceed as follows 
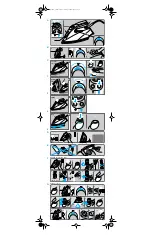
(G 1-13):

Press the steam button (3) so that it 
catches in its lower position.

Fill the tank, connect the iron to the mains, 
select the «•••» temperature setting and 
wait until the temperature pilot light goes 
off. 

Unplug the iron and hold it over a sink. 
Press the steam button so that it is lifted. 
Then carefully pull up the steam button 
and turn it so that it rests in this position.

Caution: When the steam button is pulled 
up, hot water and steam will come out 
from the sole plate. 

Wait for the sole plate to cool down, then 
clean it as described above.

Re-insert the steam on/off button and 
push it down as far as it will go. Press it so 
that it catches in its lower position.

Refill the tank with water, heat up the iron 
and press the power shot button 4 times 
to rinse the iron before ironing. 

Important: Only pull out the steam button 
when you want to activate the anticalc 
system. Never pull out the steam button 
when ironing.


H Trouble-shooting guide


Problem

Remedy


––––––––––––––––––––––––––––––––––––––
Drops 

Turn the steam regulator 

coming out 

anti-clockwise to reduce 

of the steam

the steam or press the 

vents

steam button to turn the 
steam off. 
Take longer intervals 
when pressing the power 
shot button.
Select a higher tempera-
ture setting.

No steam

Press the steam button 

at all

so that it is lifted.

Less steam

Clean the anticalc valve 

develops or no

(see F).

steam at all

Calcium 

Decalcify the steam 

particles 

chamber (see G).

coming through
the steam vents
–––––––––––––––––––––––––––––––––––––– 

Subject to change without notice.

This product conforms to the 
EMC-Requirements as laid down 
by the Council Directive 89/336/EEC 
and to the Low Voltage Regulation 
(73/23 EEC).

For further information about garment care 
and maintenance, please also see our 
web site: www.braun.com


Guarantee 


We grant a 1 year guarantee on the product 
commencing on the date of purchase.

Within the guarantee period we will elimi-
nate, free of charge, any defects in the 
appliance resulting from faults in material 
or workmanship either by repairing, or 
exchanging parts or exchanging the whole 
appliance as we may choose.

Not covered by this guarantee: damage 
arising from improper use or storage 
(operation with incorrect current/voltage, 
plugging it into an unsuitable power point, 
breakage, use of commercial decalcifyers, 
wet storage on the ironing surface), normal 
wear and defects which have a negligible 
effect on the value or operation of the 
appliance.

The guarantee becomes void if repairs are 
undertaken by unauthorized persons and if 
original Braun parts are not used.

The guarantee only comes into force if  
the date of purchase is confirmed by the 
dealer’s stamp and signature on the 
guarantee card and registration card.

This guarantee extends to every country 
where this appliance is supplied by Braun 
or its appointed distributor and where no 
import restrictions hinder or prevent service 
being given under guarantee.

Service under the guarantee does not 
affect the expiry date of the guarantee. 
The guarantee on parts or entire appliances 
which are exchanged ends when the guar-
antee on this appliance expires.

In the event of a claim under this guaran-
tee, hand in the complete appliance with 
the valid guarantee card to your dealer, or 
send both to the nearest Braun Customer 
Service Centre. All other claims including 
for damages resulting from this guarantee 
are excluded unless our liability is legally 
mandatory.

Those claims arising out of the sales 
contract with the vendor are not affected by 
this guarantee.


For UK only:


This guarantee in no way affects your 
rights under statutory law.


SI 6530_MN_4694450  Seite 6  Freitag, 10. März 2000  3:56 15

Summary of Contents for Freestyle saphir Series

Page 1: ... diesem Produkt Rufen Sie an in Deutschland und Österreich zum Nulltarif 00 800 27 28 64 63 00 800 BRAUNINFOLINE 08 44 88 40 10 Servicio al consumidor para España 901 116184 Serviço ao Consummidor para Portugal 0808200033 Servizio consumatori 02 66781 o 02 6678623 Heeft u vragen over dit produkt Bel Braun Consumenten infolijn 070 4 13 16 58 Vous avez des questions sur ce produit Appelez Braun Belg...

Page 2: ... press 6 press press m ax min j e t vinegar or lemon juice 7 9 1 5 6 2 3 8 4 1 3 2 4 5 7 8 10 11 12 13 4x 9 100 C p r e s s 6 p r e s s p r e s s p r e s s p r e s s m ax min j e t m ax min j e t m ax min j e t p r e s s p r e s s p r e s s p r e s s max max m ax min j e t max m i n jet p r e s s press SI 6530_MN_4694450 Seite 3 Freitag 10 März 2000 3 56 15 ...

Page 3: ...ann in Abständen von nicht weniger als 5 Sekunden gedrückt werden Power shot kann auch beim Bügeln ohne Dampf eingesetzt werden Dabei muß der Temperaturregler allerdings im Bereich von bis max eingestellt sein Die Power shot Funktion kann auch zum Bedampfen hängender Textilien eingesetzt werden 3 Sprühfunktion Sprühknopf 4 drücken 4 Trockenbügeln Dampfknopf nach unten drücken um den Dampf auszusch...

Page 4: ...ns completely Keep the use instructions during the entire life of the iron Make sure your voltage corresponds to the voltage printed on the iron Connect the iron to alternating current only Always unplug the iron before filling with water and make sure the steam button is in its lower position steam off Always pull the plug not the cord The cord should never come in contact with hot objects or wit...

Page 5: ...activate the anticalc system Never pull out the steam button when ironing H Trouble shooting guide Problem Remedy Drops Turn the steam regulator coming out anti clockwise to reduce of the steam the steam or press the vents steam button to turn the steam off Take longer intervals when pressing the power shot button Select a higher tempera ture setting No steam Press the steam button at all so that ...

Page 6: ... pré repasse les tissus par humidification ce qui permet un repassage plus facile Faites attention de la vapeur est diffusé latéralement 2 Fonction pressing Avant utilisation pressez le bouton de la fonction pressing 5 3 à 4 fois de manière à l activer Appuyez le bouton de la fonction pressing par intervalle d au moins 5 secondes La fonction pressing peut être activée durant le repassage à sec san...

Page 7: ...lique en tout état de cause la garantie légale qui oblige le vendeur professionnel à garantir l acheteur contre toutes les conséquences des défauts ou vices cachés de la chose vendue ou du service rendu dans les conditions des articles 1641 et suivants du Code civil Nuestros productos están desarrollados para alcanzar los más altos estándares de calidad funcionalidad y diseño Esperamos que disfrut...

Page 8: ...jo hasta donde pueda Presiónelo de forma que se sitúe en la posición inferior presionado Llene el depósito de agua deje que la plancha se caliente y presione el botón de super vapor a presión 4 veces para preparar la plancha para el planchado Importante Sólo tire del botón de vapor cuando quiera activar el sistema anti cal No tire nunca del botón cuando esté planchando H Problemas y soluciones Pro...

Page 9: ... inferiores a 5 segundos O super vapor a pressão pode activar se para o engomar a seco Contudo o selector de temperatura deverá estar dentro da escala compreendido entre e max A função de super vapor a pressão pode ser usada também para engomar peças de roupa na vertical 3 Função de spray Pressione o botão de spray 4 4 Engomar a seco Desligue o modo de vapor pressionando o botão de vapor 3 de form...

Page 10: ...ro Conservate le istruzioni per tutto il periodo di utilizzo del ferro Assicuratevi che la tensione del Vostro impianto elettrico corrisponda a quella riportata sul ferro Collegate il ferro esclusivamente ad una presa di corrente alternata Staccate sempre la spina dalla presa prima di procedere al rifornimento di acqua e assicurarsi che il tasto vapore è nella posizione bassa vapore spento Staccat...

Page 11: ...r verificarne il funzionamento Riempite il serbatoio e premete il pulsante colpo di vapore per 4 volte per pulire il ferro prima di iniziare a stirare Importante Estraete il tasto vapore quando si vuole attivare il sistema anticalcare Non estrarlo quando si sta stirando H Guida ad eventuali guasti Problema Rimedio Gocce d acqua Ruotate il regolatore escono dai fori di vapore in senso della piastra...

Page 12: ...t tussenpozen van minimaal 5 seconden De stoomstoot kan worden gebruikt bij droog strijken maar de temperatuur regelaar moet in het gebied tussen en max worden gezet De stoomstoot functie kan ook worden gebruikt in verticale positie voor het stomen van hangende kleding 3 Spray functie Druk de spray knop 4 in 4 Droog strijken Zet de stoom doseerknop 3 uit door deze in te drukken in de lagere positi...

Page 13: ...vender strygejernet Behold instruktionsbogen i hele strygejernets levetid Det skal sikres at voltspændingen i Deres elstik svarer til voltspændingen som er trykt på strygejernet Forbind kun strygejernet til vekselstrøm Fjern altid stikket fra kontakten før De fylder vand på strygejernet og vær sikker på at dampknappen er i sin lave position damp fra Træk altid i stikket ikke i ledningen Ledningen ...

Page 14: ... Forsigtighed Når dampknappen er oppe vil der komme damp og varmet vand ud af strygesålen Vent indtil strygesålen er kølet af og rens den derefter som beskrevet ovenfor Sæt damp til fra knappen tilbage og tryk den ned så langt som den kan Tryk den ned så den forbliver i laveste stilling Fyld atter tanken op med vand opvarm strygejernet og tryk på dampskuds knappen 4 gange for at rense strygejernet...

Page 15: ...ir aktivert Knappen for ekstra kraftig dampstøt trykkes ned i intervaller på minst 5 sekunder Det ekstra kraftige dampstøtet kan aktiveres ved tørrstryking men temperatur velgeren må være innenfor området og max Funksjonen for ekstra kraftige dampstøt kan også brukes i vertikal stilling for damping av klær som henger 3 Dynkefunksjon Trykk ned knappen for dynkespray 4 4 Tørrstryking Slå av dampfunk...

Page 16: ...med den spänning som anges på strykjärnet Anslut endast strykjärnet till växelström Dra ur kontakten ur vägguttaget innan du fyller på vatten och försäkra dig om att ångknappen är inställd i det lägsta läget ånga av Dra alltid i kontakten inte i sladden Sladden får aldrig komma i kontakt med heta föremål eller med stryksulan Doppa aldrig strykjärnet i vatten eller i andra vätskor Placera alltid st...

Page 17: ...dfat Tryck på ångknappen så att den lyfts upp Dra sedan försiktigt upp ångknappen och vrid den så att den stannar i detta läge Viktigt när ångknappen är i detta läge kommer hett vatten och ånga att komma ut ur stryksulan Vänta tills dess att stryksulan svalnat och rengör den som beskrivs ovan Sätt tillbaka ångknappen och tryck ner den så långt det går Tryck fast den i lägsta läge Fyll åter vattent...

Page 18: ...ertaa aktivoidaksesi sen Painallusten välissä tulisi olla vähintään 5 sekuntia Tehohöyry voidaan aktivoida kuivasilityksessäkin Tällöin lämpötilan valitsimen tulee olla merkkien ja max välillä Tehohöyryä voidaan käyttää myös pystyasennossa roikkuvien vaatteiden höyryttämiseen 3 Vesisuihke Paina vesisuihkepainiketta 4 4 Kuivasilitys Paina höyrypainike 3 alas niin että se jää ala asentoon D Silityks...

Page 19: ...του ατµο ε ναι π ντα στο χαµηλ θ ση steam off Να τραβ τε π ντα την πρ ζα και χι το καλ διο Το καλ διο δεν πρ πει ποτ να ρθει σε επαφ µε ζεστ αντικε µενα µε την πλ κα σιδερ µατος Μη βυθ ζετε ποτ το σ δερο σε νερ λλο υγρ 2ταν κ νετε µια πα ση στο σιδ ρωµα να τοποθετε τε το σ δερο ρθιο στη β ση του Να το βγ ζετε απ τη πρ ζα ταν βγα νετε απ το δωµ τιο ακ µη και για µικρ χρονικ δι στηµα Μην τραβ τε ποτ...

Page 20: ...µ στε το δοχε ο συνδ στε το σ δερο µε το δ κτυο ηλεκτρικο ρε µατος επιλ χτε τη θερµοκρασ α και περιµ νετε µ χρι η φωτειν νδειξη θερµοκρασ ας σβ σει Αποσυνδ στε το σ δερο απ το δ κτυο ηλεκτρικο ρε µατος και κρατε στε το π νω απ το νεροχ τη Πι στε το κουµπ ατµο 3 τσι στε να ανασηκωθε Μετ ανασηκ στε προσεκτικ το κουµπ ατµο και γυρ στε το τσι στε να εφαρµ σει στη θ ση αυτ Προσοχ Οταν το κουµπ λειτουργ...

Page 21: ... Sol BP 1941 L 1019 Luxembourg 4 00 50 51 Malaysia Braun Malaysia c o Gillette 11 A Persian Selangor P O B 7013 409991 Shah Alam Selangor Darul Ehsan 35 59 21 16 Malta D I N K Ltd Kind s Mosta Road Lija Bzn 09 24 71 18 Maroc Gillette Morocco S A Braun Division Espace Porte d Anfa No 17 Rue Bab El Mansour Bat B BP 2554 Casablanca 212 2 95 09 75 Martinique Decius Absalon 23 Rue du Vieux Chemin P O B...

Reviews: