background image

Boxfish ROV Owner’s Manual


p53                    

V1.3 All rights reserved. Information and specifications may change at any time without notice.


11


Battery management 

In the water there are a lot of variables that will affect the length of time you will 
get out of a full battery charge; we will list some of these below. 


Monitoring battery usage 

Use the Battery data on the telemetry screen to see how much battery is 
remaining. The trend line will give you clues as to what functions are draining 
the battery faster than others.  

Note that it takes practice to become accustomed to how the ROV functions 
affect how much time you get out of a full battery charge. 


Variables that affect battery usage 

Variables that you as ROV Pilot and tether operator can control are: 


Speed of thrusters using the thrust control thumb wheel 


How far you push the joysticks in each direction 


LED illumination lights 


Tether cable drag – there is excess tether cable in the water causing drag 
weight 


Tether cable tension – there is too much tension on the tether cable causing 
the ROV to work against it. 

Some external variables affecting battery life are: 


Current 


Swell 


Depth / visibility (and therefore use of lights). 


Limits 

Aim to be back at the surface with 14.7V remaining in the batteries.  

Note that the ROV will automatically shut down its thrusters between 14.3 and 
14.1V, and it will power off completely at 13.7V to preserve its batteries.  

Avoid discharging the ROV batteries completely as it is dangerous and will 
reduce the life of the battery. 

Summary of Contents for ROV

Page 1: ...Boxfish ROV Owner s Manual V1 3 All rights reserved Information and specifications may change at any time without notice p0...

Page 2: ...Boxfish ROV Owner s Manual p1 V1 3 All rights reserved Information and specifications may change at any time without notice...

Page 3: ...ol Station 14 Tether reel 17 Accessories provided 18 Optional accessories for the Boxfish ROV system 23 6 Putting together the Boxfish ROV system 24 Charge the ROV battery 24 Overview of ROV system 24...

Page 4: ...le launch site 41 9 Launch 42 Overview 42 Assembling the Boxfish ROV system for dive 42 Pre dive checks 42 Put ROV in the water 42 Make ROV balanced and neutrally buoyant 43 Check depth reading 44 Beg...

Page 5: ...7 14 After dive procedures 58 Disconnect ROV components and cables 58 Clean ROV system 58 Leave ROV components to dry 58 Charge ROV battery 58 15 ROV battery charging and discharging 59 Battery chargi...

Page 6: ...ndix IV O ring types and spares 95 How often to replace o rings 95 Care and maintenance of o rings 95 Table of o ring types 95 22 Appendix V Troubleshooting 96 Thruster test does not work 96 Feeds com...

Page 7: ...s and technical specifications If you need further support please contact us at info boxfish nz For general enquiries or to purchase accessories or updates please email info boxfish nz or visit https...

Page 8: ...long hair and loose clothing or anything that may become entangled well clear of the thrusters when operating The ROV should not be operated close to any object which may get caught in the thrusters D...

Page 9: ...attery to the safe storage voltage of 15 4V See Chapter 15 ROV battery charging and discharging Charging ONLY charge using the Boxfish supplied charging equipment and charging process and always refer...

Page 10: ...me without notice DO NOT use the ROV below its depth rating check the rating specified in your order or contact us if you are unsure DO NOT operate in currents where control is impeded DO NOT operate...

Page 11: ...rt by getting you familiar with the ROV components and take you right through to using it in the water Tips and tricks to get the best out of your ROV Maintenance instructions Appendices with more det...

Page 12: ...ibed in this manual at any time and without prior notice Boxfish Research will not be held liable for any damages resulting from the use of this product While every effort has been made to ensure that...

Page 13: ...case will be supplied only if ordered 2 Tether reel case Includes tether reel tether cable and winder handle 3 Control Station case accessories box Contains the Control Station in its own case Also in...

Page 14: ...mation of objects 5 Frame tubes balancing chambers Carbon fibre shock absorbing buoyancy tubes with balancing chambers at each end 6 Thrusters Eight 3D vectored thrusters 7 Tether port To connect fibr...

Page 15: ...al unit that is used to Receive and display video and telemetry data from the ROV Pilot the ROV Record video via Ninja V recording accessory Plug in optional accessories or computers Update software a...

Page 16: ...e of the ROV 2 Power in port Provides power to the Control Station 3 Fibre communication port Used to send receive telemetry control signals and video between the Control Station and the ROV Must be c...

Page 17: ...mera focus mode 18 Altitude Hold switch can be used if optional altimeter accessory is present 19 Multi functional buttons will be specified in the manual when if used 21 Level button Used level the R...

Page 18: ...e tether cable used to attach the tether to the ROV Should always be covered with cap when not connected to ROV 3 Tether penetrator protective cap Cover for tether penetrator end of tether cable Shoul...

Page 19: ...e you can use a DC outlet such as boat or car 1 Control Station AC power adapter Universal single phase 100 250V AC 50 60 Hz AC adaptor for powering the Control Station from an AC supply 2 Control Sta...

Page 20: ...ep these on at all times when cable not in use Battery charger and cables The below items are used to charge the ROV battery 1 Battery charger Universal 100 250V AC 50 60 Hz AC charger used to charge...

Page 21: ...The Ninja V attaches to the Control Station and allows you to record the 4K camera video from the ROV Later you can download the footage to a computer for editing 1 Vacuum pump Manual hand operated va...

Page 22: ...DMI cables one spare and 1 x power cable 4 Ninja Caddy External case to hold the Ninja SSD mini for connecting to standard SATA ports 5 Ninja 500GB SSD Mini Solid state disk for storing recordings fro...

Page 23: ...her reel and fibre optic cables 1 Fibre optic cleaning pen 2 Pack containing 10 x single use fibre optic connector cleaning sticks Spares and tools We supply the following with your ROV They are locat...

Page 24: ...ll find it useful No 2 Phillips Screwdriver You will only need this when replacing a thruster or propeller Optional accessories for the Boxfish ROV system You can extend the capability of your ROV wit...

Page 25: ...how soon you ll use your ROV you can charge to either 15 4V or 16 8V now See Chapter 15 ROV battery charging and discharging for safety information and instructions Overview of ROV system The diagram...

Page 26: ...ng the plastic collar to make sure it can t be pulled out accidentally Power cable plugged in and secured with plastic collar Assemble tether reel Find a place near the Control Station to set up your...

Page 27: ...Attach and screw in the fibre patch cable to the port Store the caps safely Fibre patch connection point on tether reel covered by red cap Fibre patch cable connected to tether reel Connect fibre patc...

Page 28: ...f the ROV Next practice the below steps so you can perform them quickly and confidently in the field On the tether port at point 7 on the rear of the ROV unscrew the collar and pull out the plug It is...

Page 29: ...ibre cable caps and fibre port caps inside the tether penetrator protective cap Plug and screw in the fibre port plug into the tether penetrator protective cap and keep this safe during your dive Atta...

Page 30: ...r recording and viewing during a dive For detailed instructions on using the Ninja V including starting stopping recording video see the Ninja V user manual at https www atomos com product support Rec...

Page 31: ...s the ballast rings inside Before shipping your ROV we test that it is balanced with any supplied accessories attached for your intended use in either salt water or fresh water but it is also a good i...

Page 32: ...k is OK Amber 8 blinking Control system is OK Lights 4 5 and 6 may also light up if you have accessories or external sensors installed on your ROV See Appendix III ROV for information on the other sta...

Page 33: ...agnetic key Useful to confirm ROV and Control Station are communicating TSUS indicates whether the thrusters are suspended SUS or working ARMD Until you put the ROV in the water and begin the ROV enab...

Page 34: ...ROV so it is not lost A pressure valve which can remove the vacuum in the chamber simply by pulling it out Note that when the ROV arrives for the first time there will be no vacuum in the vessel safe...

Page 35: ...fall Holding the vacuum hose in place while pressurising the ROV you reach the target pressure of 875mbar all of the status LEDs will flash off and then back on and the ROV will quietly beep Diagram o...

Page 36: ...he configuration tighten the ballast chamber caps to maintain position of the lights Check lights are working To test the lights are working turn on the lighting switch 12 on the Control Station Note...

Page 37: ...g lasers If the optional scaling lasers are fitted to your ROV turn the LASERS On Off switch at point 20 on the Control Station to ON Hold a piece of paper in front of the ROV to see them Turn the swi...

Page 38: ...so an o ring contained inside the black collar on the tether penetrator To lubricate the o ring inside the collar unscrew the collar and take off the tether penetrator protective cap Squeeze a tiny am...

Page 39: ...end domes dropping and damaging the tether penetrator stepping on tether cable leaving fibre optic cable ends or ports without caps water ingress to ROV or Control Station Packing up your Boxfish ROV...

Page 40: ...able to wind it on neatly Disconnect fibre patch cable Get the fibre cable caps and port caps ready Disconnect the fibre patch cable from the tether reel and replace the clear cap on the end of the ca...

Page 41: ...lan and objectives Your team who will pilot the ROV and who will manage the tether cable How will you communicate effectively Weather conditions Sea water conditions Underwater hazards Communication w...

Page 42: ...ROV pilot to be able to see the ROV before it enters the water good communication with team members is more important Tether reel placement the tether reel operator and Control Station operator need t...

Page 43: ...ystem is in good working order the ROV is safe to enter the water and the recommended amount of ballast has been added Turn on Sensor Power switch If your ROV has any external accessories or sensors i...

Page 44: ...ater This will direct you where to add or remove weights Add or remove weights to achieve neutral buoyancy To achieve neutral buoyancy while the ROV is in the water Hold onto the ROV and move it aroun...

Page 45: ...re all switches on the Control Panel are OFF except the Sensor Power switch if you have external accessories installed Press the Enable green button on the Control Panel This will enable the water sen...

Page 46: ...ter to prevent thrusters from breaching as this may damage the thrusters monitor the Pressure reading on the telemetry screen to ensure ROV is watertight monitor the Battery reading on the telemetry s...

Page 47: ...Attitude shows what you are attempting to achieve while piloting the ROV target Roll Pitch and Yaw 3 Heading according to the ROV s internal compass 17 Wide angle front camera This is the best option...

Page 48: ...data will be prevented from appearing on the telemetry screen The rest of the telemetry screen fields are explained in Appendix II Telemetry Screen More Information Navigation directions Boxfish ROV...

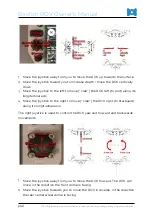
Page 49: ...the left joystick to increase depth will move the ROV closer to the centre of the earth and moving it forward or sideways will move it horizontally along the earth s surface If the ROV is pitched dow...

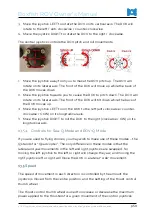
Page 50: ...ck to the left to move crab the ROV left to port along its longitudinal axis Move the joystick to the right to move crab the ROV right to starboard along its longitudinal axis The right joystick is us...

Page 51: ...oystick LEFT to roll the ROV to the left anti clockwise counter clockwise CCW on its longitudinal axis Move the joystick RIGHT to roll the ROV to the right clockwise CW on its longitudinal axis Contro...

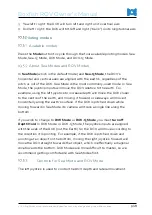
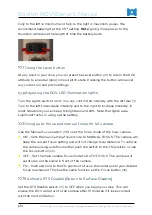
Page 52: ...st situations you can keep the lights around 20 Note that lights are a significant factor in using up the battery Using auto focus and manual focus for 4K camera Use the Manual Focus switch 18 to set...

Page 53: ...meter More about Sea Mode and ROV Mode Sea Mode is the default mode and easiest to master When piloting the ROV in Sea Mode or Sea Q Mode you will tend to set the pitch first if required and then pilo...

Page 54: ...that affect battery usage Variables that you as ROV Pilot and tether operator can control are Speed of thrusters using the thrust control thumb wheel How far you push the joysticks in each direction...

Page 55: ...rmation and specifications may change at any time without notice p54 Battery storage Keeping the ROV batteries at an appropriate voltage during storage is essential for optimising your Boxfish ROV bat...

Page 56: ...ificant distance they should work with the tether operator to unwind enough tether to allow free movement Similarly for coming back toward the surface the ROV pilot should communicate to the tether op...

Page 57: ...e the cable on deck until you can take the time to wind it onto the reel properly This will avoid birdsnest making a mess of the tether on the reel You can also rinse it easily to get rid of salt debr...

Page 58: ...ere is no fixed reference it s often easiest to return the ROV to the launch point by turning the ROV around and following the tether ensuring the tether operator is keeping light tension on the tethe...

Page 59: ...out any debris and salt from the pressure sensor at the rear of the ROV 14 Use fresh water at a minimum and if you can use warm soapy water Hose down tether cable and tether reel with fresh water as...

Page 60: ...g the ROV battery the battery charge ports on the ROV should be the last thing you connect and the first thing you disconnect 7 Do not bridge the battery charge ports on the ROV with a conductive obje...

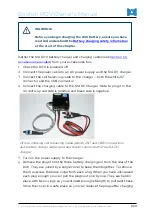
Page 61: ...Picture showing cell balancing cable white JST and USB connections and battery charge cables red and black connected to the 12A DC charger Turn on the power supply to the charger Remove the plugs fro...

Page 62: ...marked with a red label b Negative is marked with a black label c The cell balancing cable is marked with a blue label Note that this pin is keyed so you will need to line up the arrows on the chargin...

Page 63: ...h 2 above like a mouse wheel to scroll through the menus on the charger Press the dial wheel to select and item and push the wheel to the left to go back i Press button once to navigate to Main Menu C...

Page 64: ...ischarged to 15 4V before storing in a cool dry stable place Procedure for preparing ROV batteries for storage Follow steps 1 8 from Section 15 2 Battery charging procedure except you don t need to co...

Page 65: ...to time Contact us at Boxfish if you need assistance https www iata org en programs cargo dgr lithium batteries ROV and accessories should be clean and dry and be packed with original protective inser...

Page 66: ...t notice iii Check Cells Voltage and Task are correct then select Start iv Click Yes the cell balancing cable is not necessary here Wait until the charger has brought the battery modules to its approp...

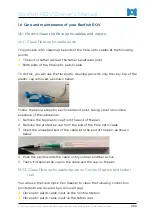
Page 67: ...removed as shown below Follow the below steps for each cable end point taking care to minimise exposure of the cable ends Remove the top plastic cap from the end of the pen Remove the protective cap...

Page 68: ...Insert the pen into the input as shown below Push the top of the pen down until you hear feel a click Replace the cap on the input on the Control Station Clean fibre optic port on ROV You will use the...

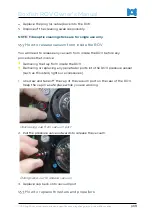
Page 69: ...any vacuum from inside the ROV before any procedures that involve Removing the tray from inside the ROV Removing or replacing any penetrator ports into the ROV pressure vessel such as thrusters lights...

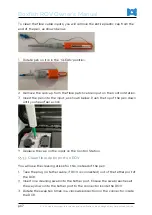
Page 70: ...plug for the thruster to be removed Thruster ports are at the rear of the ROV and are labelled T 1 to T 8 Using your fingers unscrew the penetrator cap anti clockwise for the thruster cable and gentl...

Page 71: ...efully remove the entire thruster including cable and plug Thruster as it looks when removed from the ROV How to replace a thruster propeller Note You will need a 2mm Allen Key and a No 2 Phillips Scr...

Page 72: ...ting plate on the outside of its cowl shroud Remove the mounting plate as follows a Unscrew the 4 x hex head screws from the mounting plate b Remove the mounting plate Note orientation of the mounting...

Page 73: ...r onto motor hub taking care to align the holes in the propeller with the threaded holes on the motor hub b Secure the propeller to the motor using 2 x hex head screws Do not over tighten or you may d...

Page 74: ...a Move thruster into position with threaded holes on the mounting plate aligned to the holes on the thruster mounting point on the ROV b Ensure thruster cable is not trapped and is in the correct orie...

Page 75: ...port b Gently push the plug into place c Using your fingers screw on the cap until it is firmly finger tight Before cap is screwed back on Cap should be finger tight Perform a thruster test to confirm...

Page 76: ...he Allen Key loosen the 4 x 6mm hex head bolts until there is approximately 10mm of clearance between the bolt head and the ROV tray Make sure the bolts still have some threads gripping the main body...

Page 77: ...will be stopped by the bolts which are still in place Tray has been removed to the point of o ring showing Fully remove tray a Completely unscrew the 4 x 6mm bolts so they are no longer engaging the t...

Page 78: ...below are in good condition before putting tray back into ROV e Replace o ring seals if you find damage or fit is not good O rings must be fit well and in good condition to ensure the ROV is watertig...

Page 79: ...with the holes in the ROV body and push the ROV forward until you feel resistance from the o ring seals Screw in bolts a Use your fingers to tighten bolts into the threaded holes on the ROV body Alter...

Page 80: ...sconnect battery a Use your hands to grip the removal handles on both sides of the battery assembly b Gently rotate both removal handles up and out at the same time As you do this the battery will sta...

Page 81: ...battery assembly is clean and dry and there is nothing in the battery contacts c Check the ROV tray battery compartment is clean and dry and there is nothing in the battery contacts Rotate removal ha...

Page 82: ...gers on the handles engage the rails on the ROV tray As you rotate both handles down the fingers on the battery assembly will pull the battery assembly into position DO NOT use excessive force to lowe...

Page 83: ...ol Station Do not touch any controls on the Control Station until the update is complete After a while the Control Station will beep 3 times quickly About 30 seconds later it will beep again The F W V...

Page 84: ...lied for example Sonar 2 Power in port Provides power to the Control Station via Boxfish AC Adapter 15 Volts 13 4 Amps OR Directly from a DC supply capable of supplying 10 Amps with the Boxfish DC Pow...

Page 85: ...s for a given movement of the control joysticks Fully to the left is minimum and fully to the right is maximum power It is recommended to keep the wheel at the 1 3rd setting unless more power is requi...

Page 86: ...move the ROV in the direction required and stay on course When switched on STAB will appear on the telemetry screen 2 OFF With the switch off the ROV movement is based on control inputs but the ROV wi...

Page 87: ...Currently no function 17 Altitude Hold switch This switch can be used only if an altimeter is present on the ROV Please see our separate Altimeter Accessory Guide for instructions on using Altitude Ho...

Page 88: ...11 Currently no function 12 Disable Water Sensor Do not use unless directed by Boxfish Press and hold this button for six seconds disables the water sensor This will allow the thrusters to be enabled...

Page 89: ...ruster test See Chapter 7 6 Test Thrusters 26 Focus button Press and hold this button to focus the camera on a certain object until desired focus is achieved Has the same function as pushing and holdi...

Page 90: ...Main Camera Normally connected to the Ninja Recorder to allow capture of main camera video 34 Air ventilation intakes Air intakes for cooling the Control Station DO NOT block the vent or the Control S...

Page 91: ...ile it restarts the telemetry screen will go blank but video will still appear on the 17 4K monitor and you can pilot the ROV using the controls as usual Pilot and Sonar buttons Use only if a Sonar ac...

Page 92: ...chieve 9 Displays current ROV temperature in degrees Celsius and a trend line to give an indication of the temperature over time 10 Steering Currently in development 11 Humidity Displays the current R...

Page 93: ...s If within dome lasers are spaced 138mm apart If external lasers are 50mm apart 5 Frame tubes with balancing chambers inside Carbon fibre shock absorbing tubes with internal patented ballasting syste...

Page 94: ...r submerge the ROV without the battery terminal port covers in place 14 Depth sensor Port containing ROV Depth sensor used to detect depth DO NOT cover or block depth sensor port or ROV may indicate i...

Page 95: ...1 2 and 3 will be ON and 8 will be flashing LEDs 4 5 and 6 may be on depending on which accessories you have installed and or if the Sensor Power switch is set to the ON position on the control stati...

Page 96: ...placement o ring through your clean fingers to lubricate it before insertion Don t use too much silicone grease it does not form part of the seal Only use o rings supplied by Boxfish If in doubt pleas...

Page 97: ...ss the Video button 28 on the Control Station once to restart the camera Note that the camera may keep shutting off once it has overheated How to calibrate ROV compass NOTE Your ROV should come with i...

Page 98: ...UPTIME will start counting again when the compass calibration has been completed Status LED lights are blinking when powering up ROV If the Status LED lights are blinking when you ve powered on your...

Page 99: ...corporate information from Boxfish Owner s Manual Volume 1 and write task based instructions for ROV operations Initial release 1 0 21 1 2021 Amend links for printed version Minor edits and formatting...

Page 100: ...Boxfish ROV Owner s Manual p99 V1 3 All rights reserved Information and specifications may change at any time without notice...

Reviews: