


R5900120 /01
CX-50 Gen2
36
Select
External Access Point
from the drop down menu and select the preferred authentication mode and
fill out the details.
Click
Save Changes
. For more information, see
3.
Pair the Buttons again with the Base Unit.
4.
Optionally the Base Unit’s WiFi can be set to Access Point or can be set to Off. For more info, see
settings, Wireless Client”, page 84
Setup via XMS
1.
Log in to XMS and go to the
Base Units
tab.
2.
In the device list select the Unit(s) for deploying network integration mode.
3.
Open the
Configure
dropdown list and choose
Network integration
.
4.
Select one of the authentication modes for network integration mode and fill out the details.
5.
Re-pair the ClickShare Buttons with the updated Base Unit(s) to apply the new configuration
For more detailed information on how to use XMS, consult the XMS user guide.
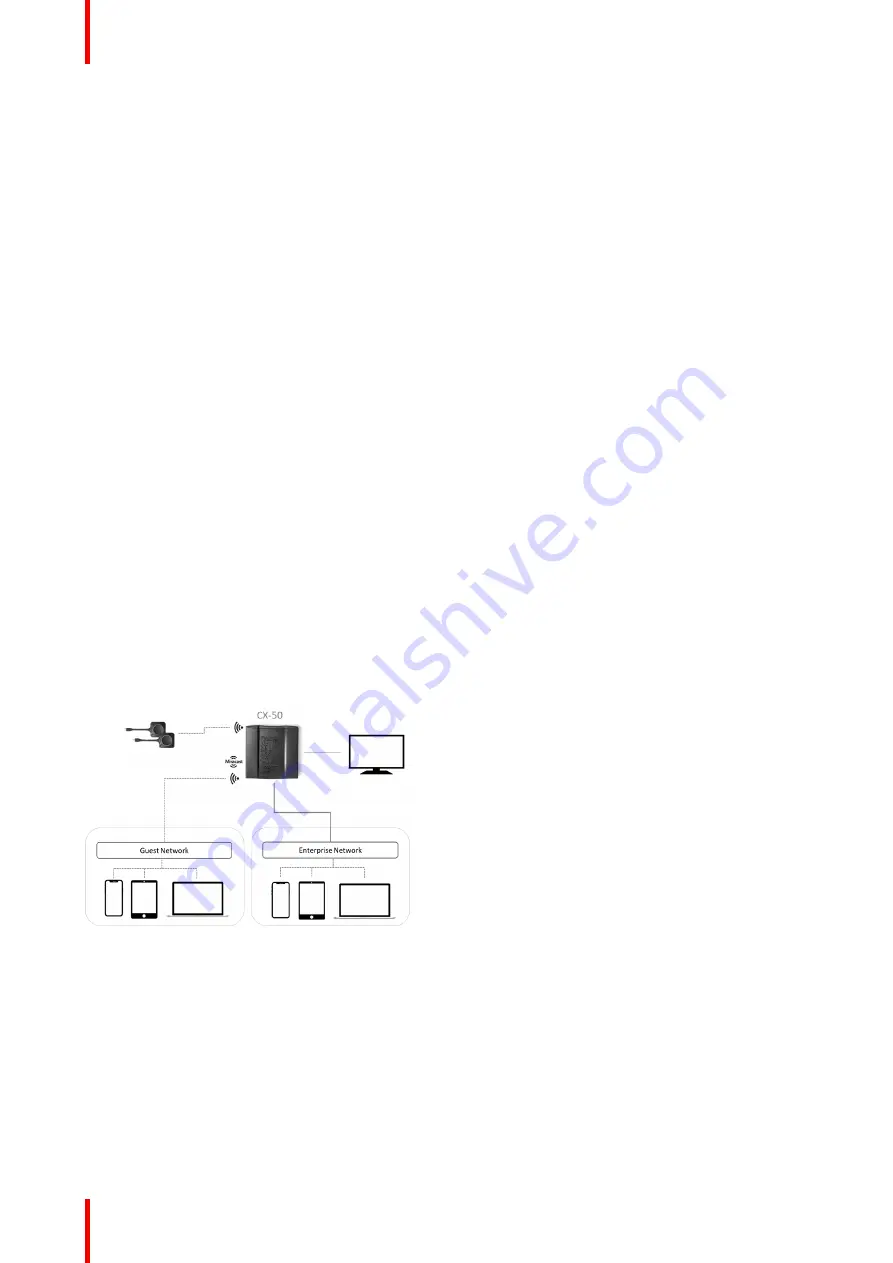
4.9 Dual network connected setup
Overview
This installation offers a seamless experience for employees and guests and is the recommended setup for
any organization with an advanced network configuration, for meeting rooms which will be frequently used by
guests, visitors and externals or when the ClickShare Apps and native BYOD protocols, such as AirPlay,
Google Cast and Miracast, will be frequently used in the organization.
In this setup, ClickShare Buttons connect directly to the Base Units access point with the CX-50.
Users can share to the Base Unit with the ClickShare Desktop App, the ClickShare Mobile App, AirPlay,
Miracast and Google Cast via either network to which the Base Unit is connected. Miracast MS-MICE will only
be available through the LAN connection, all other devices will connect to the Base Unit directly over Wi-Fi
direct.
Image 4–5
How to setup via the Configurator
1.
Connect the Base Unit and browse to the
ClickShare Configurator
and log in.
2.
Select
Button
in the
System
menu and click
Edit settings
.
Select
External Access Point
from the drop down menu and select the preferred authentication mode and
fill out the details.
Click
Save Changes
. For more information, see
.
3.
Pair the Buttons again with the Base Unit.
Summary of Contents for CX-50 Gen2
Page 1: ...ENABLING BRIGHT OUTCOMES Installation manual CX 50 Gen2...
Page 2: ......
Page 10: ......
Page 14: ...R5900120 01 CX 50 Gen2 14...
Page 15: ...15 R5900120 01 CX 50 Gen2 Introduction 1...
Page 28: ...R5900120 01 CX 50 Gen2 28 Getting started...
Page 58: ...R5900120 01 CX 50 Gen2 58 CX 50 Gen2 Installation...
Page 119: ...119 R5900120 01 CX 50 Gen2 Firmware updates 7...
Page 121: ...121 R5900120 01 CX 50 Gen2 Troubleshooting 8...
Page 143: ......


