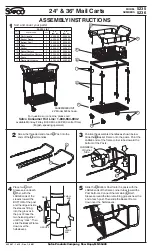
21
PARTS REQUIRED:
3" (7,6 cm)
Secure lower edge of wall panels to floor frame with 2" nails spaced 6" apart.
Angle nail to hit floor frame
(Fig. A)
.
3
Your right side wall is now installed.
FINISH
Secure wall bottom plates to floor with 3" nails
(Fig. A)
.
3" (7,6 cm)
x8
x2
2" (5,1 cm)
x18
RIGHT WALL INSTALLATION
Center right side wall on the 96" (243,8 cm) floor dimension.
Ensure the 1" (2,5 cm) wall panel overlap is to the bottom.
Install
OO
as a temporary brace.
Secure
OO
with (2) 3" screws.
BEGIN
1
Nail 2" nails first.
2" (5,1 cm)
Nails
3" (7,6 cm)
Nails
Fig. A
OO
x1
69" (175,3 cm) Door Stiffener
TEMPORARY SUPPORT
Flush
OO
1"
(2,5 cm)
3"
(7,6 cm)
Screws
3" Nails
DOOR