CONFIRMING THE PATTERN POSITION
127
B
asic
E
m
br
oi
der
y
4
c
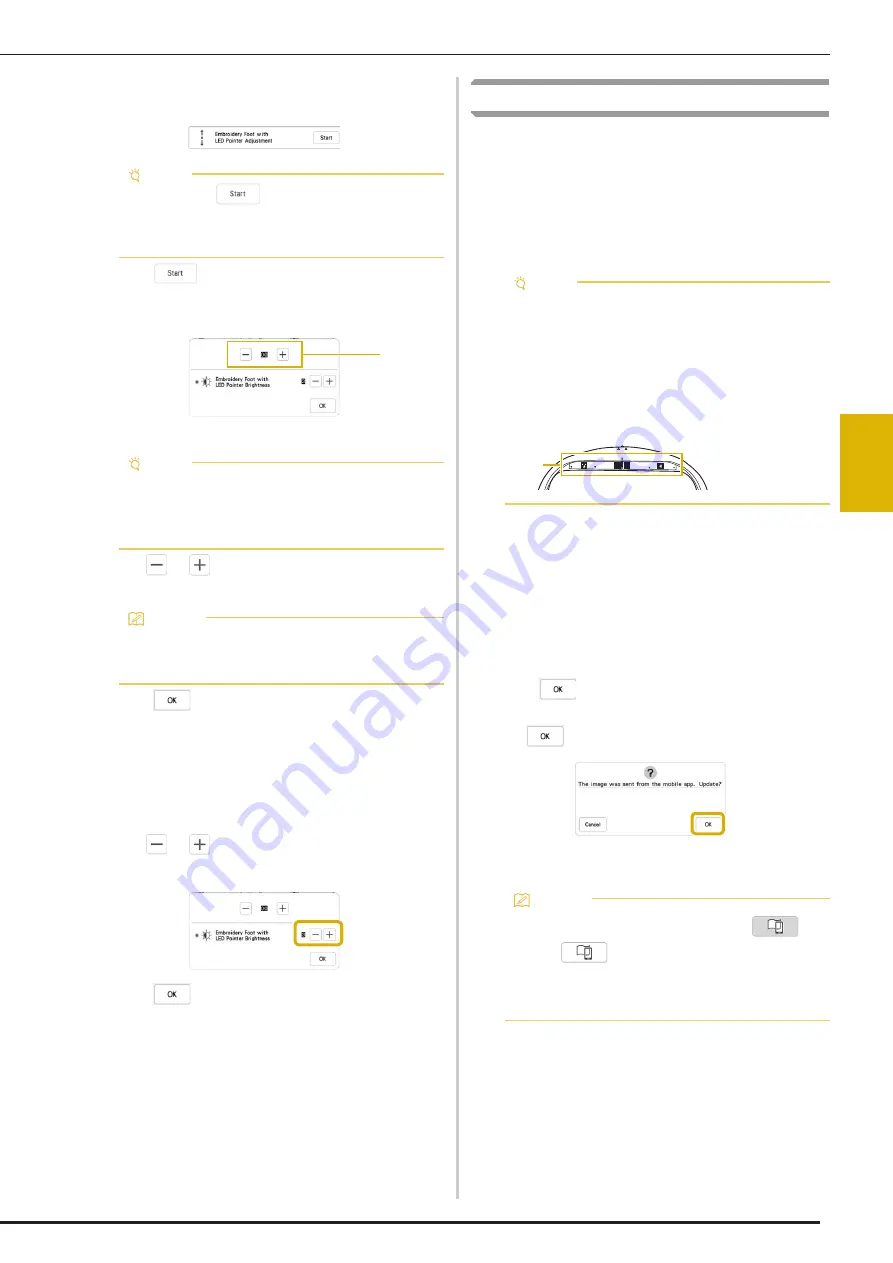
Display [Embroidery Foot with LED Pointer
Adjustment] in the embroidery setting screen.
d
Press .
The Embroidery Foot “W+” with LED Pointer
Adjustment screen appears.
1
LED pointer adjustment
e
Use
or
to adjust the LED pointer so that it
indicates the actual needle drop point.
f
Press
to return to the original screen.
■
Adjusting the Brightness of the LED Pointer
a
Follow the steps from
a
to
c
of “Adjusting the LED
Pointer” on page 126 to display the embroidery foot
with LED pointer adjustment screen.
b
Use
or
to adjust the brightness of the LED
pointer.
c
Press
to return to the original screen.
Displaying a Background Image
Using a special application downloaded to a
smartphone or tablet, you can transfer a photo of the
hooped fabric to be embroidered to the machine to be
used as a background image.
The embroidery frame is displayed in the application.
You can see how the pattern will be arranged on the
actual fabric.
■
Displaying the Background Image on the
Screen of the Machine
a
Select the pattern. (page 104)
b
Photograph the fabric in the frame with the easy mode
of the application, and then transfer it to the machine.
For a detailed procedure, refer to the application.
c
Press .
*
Attach the frame used in the image before pressing
.
The transferred background image appears on the
screen of the machine.
Note
• As a default,
appears gray. After the
embroidery foot “W+” with LED pointer is attached
to the machine, the key becomes available and
settings can be specified.
Note
• The specified setting is saved in the machine’s
memory. This is useful for positioning during
continuous embroidering.
• For normal use, return the setting to [00].
Memo
• In order to more accurately check the needle drop
point, turn the handwheel toward you
(counterclockwise) to lower the needle.
1
Note
• The wireless network settings must first be
specified on the machine. Refer to “WIRELESS
NETWORK CONNECTION FUNCTIONS” on
page 33.
• Only embroidery frames with factory-coded
stickers can be used with the application (IQ
Intuition).
Memo
• To hide the background image, press
.
Press
to display the background image
again.
• The transferred background image includes the
embroidery frame display.
1
Factory-
coded
stickers
1
Summary of Contents for BLTA
Page 1: ......
Page 2: ......
Page 12: ...CONTENTS 10...
Page 56: ...CHANGING THE PRESSER FOOT 54...
Page 57: ...Chapter 2 Sewing Basics...
Page 73: ...Chapter 3 Various Stitches...
Page 102: ...USING THE MEMORY FUNCTION 100...
Page 103: ...Chapter 4 Basic Embroidery...
Page 137: ...Chapter 5 Advanced Embroidery...
Page 152: ...EMBROIDERY APPLICATIONS 150...
Page 153: ...Chapter 6 IQ Designer...
Page 172: ...STIPPLING 170...
Page 173: ...Chapter 7 Appendix...
Page 189: ...ERROR MESSAGES 187 Appendix 7...
Page 201: ......
Page 202: ......
Page 203: ......
Page 204: ...XH3853 001 English 882 W71...


