background image

Chapter 1 - Getting Started

1-12

®

1
2
3
4
5
6
7
8
9

10
11
12
13
14

A

B

C

D

EA9-USER-M Hardware User Manual, 1st Ed. Rev. K

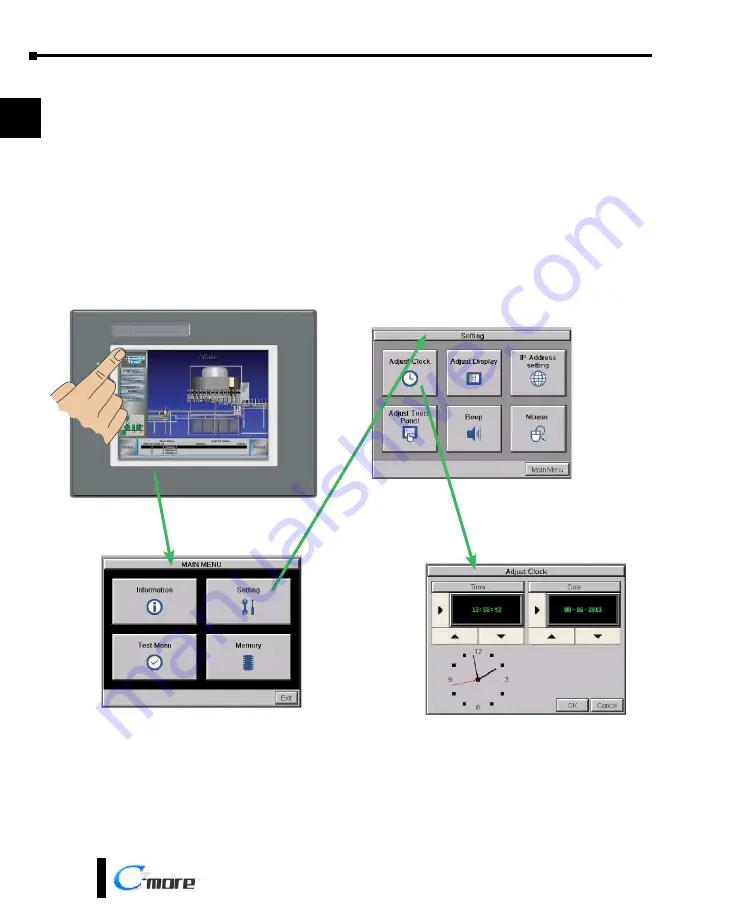
Step 7 – Access the Touch Panel Setup Screens

•  Access the Main Menu of the touch panel System Setup Screens by pressing the extreme upper left 

corner of the panel display area for three (3) seconds as shown below.

•  Adjust the time and date for the panel by pressing the Setting button on the Main Menu, then press 

the Adjust Clock button on the Setting screen.

•  Use the right pointing arrows for the time or date display to select the unit to change. Use the up 

and down arrows to increment or decrement the value for the selected unit.

•  Press OK when done to accept the changes to the time and date in the touch panel or press Cancel 

to exit the Adjust Clock setup screen without making any changes.

•  Press the Main Menu button on the Setting screen and then the Exit button on the Main Menu 

screen to return to the application screen.


Summary of Contents for C-more EA9-T10CL

Page 1: ...echnicians on staff at our full service in house repair center WE BUY USED EQUIPMENT Sell your excess underutilized and id We also offer credit for buy backs and www artisantg com WeBuyEquipme REMOTE...

Page 2: ...Hardware User Manual EA9 USER M...

Page 3: ......

Page 4: ...in hazardous environments requiring fail safe performance such as in the operation of nuclear facilities aircraft navigation or communication systems air traffic control direct life support machines...

Page 5: ...te de vida o sistemas de armamentos en las cuales la falla del producto puede resultar directamente en muerte heridas personales o da os f sicos o ambientales severos Actividades de Alto Riesgo Automa...

Page 6: ...n cessitant une s curit absolue par exemple l exploitation d installations nucl aires les syst mes de navigation a rienne ou de communication le contr le de la circulation a rienne les quipements de...

Page 7: ......

Page 8: ...sions 1st Ed Rev B 01 15 Revised PLC communication and drivers minor revisions 1st Ed Rev C 03 16 Added Recovery Tool and No System Found to Troubleshooting minor revisions 1st Ed Rev D 12 16 Added EA...

Page 9: ......

Page 10: ...with Available Communication Ports 1 7 Step 4 Install the Programming Software and Develop a Project 1 8 Step 5 Connect Touch Panel to Computer 1 9 Step 6 Provide Power to the Touch Panel 1 10 Step 7...

Page 11: ...18 Dimensions Inches mm 2 18 Ports and Memory Expansion 2 19 EA9 T12CL 2 20 Dimensions Inches mm 2 20 Ports and Memory Expansion 2 21 EA9 T15CL R EA9 T15CL 2 22 Dimensions Inches mm 2 22 Ports and Me...

Page 12: ...g Safety Guidelines 4 2 Introduction 4 3 EA9 T6CL R EA9 T6CL EA9 T7CL R and EA9 T7CL Cutout Dimensions 4 4 EA9 T8CL and EA9 T10WCL Cutout Dimensions 4 5 EA9 T12CL Cutout Dimensions 4 7 EA9 T15CL R and...

Page 13: ...mationDirect PLCs RS 422A RS 485A 6 10 DirectLOGIC Universal Isolated Network Adapter p n FA ISOCON 6 16 DirectLOGIC Universal Converter p n F2 UNICON 6 17 RS 422A RS 485A Multi Drop Wiring Diagram Ex...

Page 14: ...o Communications between Panel and PC Personal Computer via USB 8 10 USB Driver Troubleshooting 8 12 No Communications between Panel and PC Personal Computer via Ethernet 8 14 No Communications betwee...

Page 15: ...Explanation A 6 AutomationDirect CLICK A 6 AutomationDirect DirectLOGIC Modbus Koyo A 6 Modicon Modbus RTU A 6 Entivity Modbus RTU A 6 DirectLOGIC ECOM Protocol PLC Error Codes A 6 Productivity Error...

Page 16: ...r Code Table A 39 Omron Panel Error Code P495 Explanation A 42 Omron CS CJ FINS Ethernet Protocol PLC Error Code Table A 43 Siemens Panel Error Code P499 Explanation A 44 Siemens PPI Protocol PLC Erro...

Page 17: ......

Page 18: ...Steps 1 5 Step 1 Unpack and Inspect 1 5 Step 2 Install Optional Hardware Accessories 1 6 Step 3 Become Familiar with Available Communication Ports 1 7 Step 4 Install the Programming Software and Deve...

Page 19: ...nels our user manuals will provide all the information you need to get and keep your system up and running Supplemental Manuals If you are familiar with industrial control type devices you may be able...

Page 20: ...inning of the text When you see the exclamation mark icon in the left hand margin the paragraph to its immediate right will be a warning This information could prevent injury loss of property or even...

Page 21: ...io output port stereo requires amplifier and speaker s full feature units only User configurable LED on the front of the panel Built in project simulation test on PC while developing Ethernet 10 100Ba...

Page 22: ...ck Start Guide b Unpack any accessories that have been ordered such as AC DC Power Adapter programming cable communications cable etc c Inspect all equipment for completeness If anything is missing or...

Page 23: ...C D EA9 USER M Hardware User Manual 1st Ed Rev K Step 2 Install Optional Hardware Accessories EA ECOM Expansion Module C more Touch Panel EA SD CARD SD Card USB FLASH USB Pen Drive EA AC AC DC Power...

Page 24: ...100M 10M Off SD Card Slot 1 SD Card Slot 2 HDMI Port Video Out Note Device is not available on Base Feature touch panel EA9 T6CL R 8 1 15 9 Port 1 PLC Serial Communications RS 232C RS 485 Pin Signal...

Page 25: ...d CD into the PC s CD drive and navigate to the CD drive location on the PC Double click on EA_Setup exe and follow the instructions If you need assistance during the software installation call the Au...

Page 26: ...ramming port on the C more touch panel or connect the C more touch panel and PC together either directly or via an Ethernet switch and CAT5 Ethernet cables full feature panels only USB CBL ABxx USB Ca...

Page 27: ...s such as solenoids or relays the transients caused by these loads can affect the operation of the panel or damage panel components NOTE The AC DC Power Adapter EA AC is for C more touch panels only T...

Page 28: ...een Orange Red Off Green Red Blinking Red Blinking Orange Blinking Green Front View User Defined Refer to online help file for further details Orange CPU Status LED Green Orange Red Off Power Off Norm...

Page 29: ...essing the Setting button on the Main Menu then press the Adjust Clock button on the Setting screen Use the right pointing arrows for the time or date display to select the unit to change Use the up a...

Page 30: ...260 D2 262 K Sequence Direct NET Modbus Koyo addressing D2 240 D2 250 1 D2 260 Using DCM Direct NET Modbus Koyo addressing H2 ECOM H2 ECOM100 Direct LOGIC Ethernet DL305 D3 330 330P Requires the use o...

Page 31: ...ix 1100 1400 and SLC 5 05 via native Ethernet port MicroLogix 1000 1100 1200 1400 1500 SLC 5 03 04 05 all via ENI adapter Micro 800 Series Modbus RTU Modbus TCP Micro 800 Series Tag Based DF1 Full Dup...

Page 32: ...ctLOGIC DL405 PLC 15 pin D sub port DL405 RS 232C EA 4CBL 1 DirectLOGIC PLC 25 pin D sub port DL405 D3 350 DL305 DCU and all DCM s RS 232C EA 4CBL 2 Allen Bradley MicroLogix 1000 1100 1200 1400 1500 R...

Page 33: ...full feature panels only For further information on setting up communications between a C more panel and a PLC see the C more programming help file topic CM129 Creating a New Project EA 2CBL 1 DL 06...

Page 34: ...ch Models 2 9 12 inch and 15 inch Models 2 10 EA9 T6CL R EA9 T6CL 2 11 Dimensions Inches mm 2 11 Ports and Memory Expansion 2 12 EA9 T7CL R EA9 T7CL 2 13 Dimensions Inches mm 2 13 Ports and Memory Exp...

Page 35: ...Ports and Memory Expansion 2 23 Mounting Clearances 2 25 EA9 T15CL R EA9 T15CL Derating 2 26 Communications Ports 2 27 Handling External Memory Devices 2 30 Writing to External Memory Devices 2 30 Me...

Page 36: ...This page intentionally left blank...

Page 37: ...TFT LCD widescreen 800 x 480 pixel WVGA LED backlight supports 3 serial 1 Ethernet and 2 USB ports 1 memory card slot and 1 audio line out 26 MB 1 slot Yes Yes No EA9 T8CL C more EA9 series touch scr...

Page 38: ...g specification tables are separated into these groups Specifications common to all models 6 7 Reduced and Full Feature Models EA9 T6CL R EA9 T6CL EA9 T7CL R and EA9 T7CL 8 10 Full Feature Models EA9...

Page 39: ...1 min FG to Power supply Insulation Resistance 10M ohm 500V DC FG to Power supply Vibration IEC60068 2 6 Test Fc Shock IEC60068 2 27 Test Ea Emission EN55011 Class A Radiated RF emission Enclosure NE...

Page 40: ...Day Year Yes monthly deviation 60 sec at 25 C Serial Port 1 15 pin D sub female RS2342C RS 422 485 Serial Port 2 N A 3 wire terminal block RS 485 Serial Port 3 N A RJ 12 modular jack RS 232C USB Port...

Page 41: ...th Day Year Yes monthly deviation 60 sec at 25 C Serial Port 1 15 pin D sub female RS2342C RS 422 485 Serial Port 2 N A 3 wire terminal block RS 485 Serial Port 3 N A RJ 12 modular jack RS 232C USB Po...

Page 42: ...f Screens Up to 999 screens limited by project memory Realtime Clock Realtime Clock Built into panel backed up for 30 days at 25 C Calendar Month Day Year Yes monthly deviation 60 sec Reference Serial...

Page 43: ...nce Serial PLC Interface Port 1 15 pin D sub female RS2342C RS 422 485 Serial PLC Interface Port 2 3 wire terminal block RS 485 N A 3 wire terminal block RS 485 Serial PLC Interface Port 3 RJ 12 modul...

Page 44: ...clips and screws to secure the touch panel to the cabinet or enclosure surface A template for marking the cutout dimensions on the mounting surface is provided in the box Enclosure Mounting Thickness...

Page 45: ...Chapter 2 Specifications 2 12 1 2 3 4 5 6 7 8 9 10 11 12 13 14 A B C D EA9 USER M Hardware User Manual 1st Ed Rev K Ports and Memory Expansion EA9 T6CL R EA9 T6CL...

Page 46: ...clips and screws to secure the touch panel to the cabinet or enclosure surface A template for marking the cutout dimensions on the mounting surface is provided in the box Enclosure Mounting Thickness...

Page 47: ...Chapter 2 Specifications 2 14 1 2 3 4 5 6 7 8 9 10 11 12 13 14 A B C D EA9 USER M Hardware User Manual 1st Ed Rev K Ports and Memory Expansion EA9 T7CL R EA9 T7CL...

Page 48: ...and screws to secure the touch panel to the cabinet or enclosure surface A template for marking the cutout dimensions on the mounting surface is provided in the box Enclosure Mounting Thickness Ranges...

Page 49: ...Chapter 2 Specifications 2 16 1 2 3 4 5 6 7 8 9 10 11 12 13 14 A B C D EA9 USER M Hardware User Manual 1st Ed Rev K Ports and Memory Expansion EA9 T8CL...

Page 50: ...and screws to secure the touch panel to the cabinet or enclosure surface A template for marking the cutout dimensions on the mounting surface is provided in the box Enclosure Mounting Thickness Range...

Page 51: ...s and screws to secure the touch panel to the cabinet or enclosure surface A template for marking the cutout dimensions on the mounting surface is provided in the box Enclosure Mounting Thickness Rang...

Page 52: ...Chapter 2 Specifications 2 19 1 2 3 4 5 6 7 8 9 10 11 12 13 14 A B C D EA9 USER M Hardware User Manual 1st Ed Rev K Ports and Memory Expansion EA9 T10CL EA9 T10WCL...

Page 53: ...and screws to secure the touch panel to the cabinet or enclosure surface A template for marking the cutout dimensions on the mounting surface is provided in the box Enclosure Mounting Thickness Range...

Page 54: ...Chapter 2 Specifications 2 21 1 2 3 4 5 6 7 8 9 10 11 12 13 14 A B C D EA9 USER M Hardware User Manual 1st Ed Rev K Ports and Memory Expansion EA9 T12CL...

Page 55: ...unting clips and screws to secure the touch panel to the cabinet or enclosure surface A template is provided for marking the cutout dimensions on the mounting surface Enclosure Mounting Thickness Rang...

Page 56: ...Chapter 2 Specifications 2 23 1 2 3 4 5 6 7 8 9 10 11 12 13 14 A B C D EA9 USER M Hardware User Manual 1st Ed Rev K Ports and Memory Expansion EA9 T15CL R...

Page 57: ...Chapter 2 Specifications 2 24 1 2 3 4 5 6 7 8 9 10 11 12 13 14 A B C D EA9 USER M Hardware User Manual 1st Ed Rev K EA9 T15CL...

Page 58: ...drawing shows the mounting clearances for the C more touch panel There should be a minimum of 4 inches of space between all sides of the panel and the nearest object or obstruction and at least 1 72 i...

Page 59: ...e temperature shall be derated as shown below Other panels may be mounted at any angle without derating consideration 0 15 90 Angle 15 to 90 Temp 0 to 50 C Angle 0 to 15 Temp 0 to 45 C Angle 0 to 15 T...

Page 60: ...C RS 485 Pin Signal 1 Frame GND TXD 232C RXD 232C Do Not Connect 2 3 4 5 Logic GND Pin Signal Pin Signal 6 LE for DH485 CTS 232C RTS 232C RXD 422 485 7 8 9 10 RXD 422 485 11 TXD 422 485 TXD 422 485 Te...

Page 61: ...s to the panel such as USB pen drives ADC p n USB FLASH USB keyboards USB barcode scanners USB card scanners C more can log data to the USB pen drive as well as restore projects to the panel from the...

Page 62: ...L and EA9 T15CL include an HDMI Type A port to provide video output to a projector or monitor Model Supported Resolution EA9 T12CL SVGA 800 x 600 pixel EA9 T15CL XGA 1024 x 768 pixel Output Video Data...

Page 63: ...iod for each object Additionally logging data is initially stored in the buffer in the panel MRAM and data is written to the external memory device when 2kB of data is cached when 20 records have been...

Page 64: ...dyToUse SYS USB ReadyToUse Be sure to backup the memory device at regular intervals If you suspect the memory device is bad you may want to use a PC to re format the device or use a known good memory...

Page 65: ...e plus three digit number To maximize storage capabilities on external memory devices use screen names that have unique characters in the first four digits and object names that are unique in the firs...

Page 66: ...AC DC Power Adapter 3 3 AC DC Power Adapter Dimensions 3 5 AC DC Power Adapter Installation 3 6 EA ECOM Ethernet Communication Module 3 7 D SUB 15 pin to Terminal Block Adapters 3 8 Non glare Screen C...

Page 67: ...h C more EA9 T10CL and C more Micro EA3 T10CL HMIs EA 10W COV2 Screen protector non glare 10in Package of 3 For use with C more EA9 T10WCL widescreen HMI EA 12 COV2 Screen protector non glare 12in Pac...

Page 68: ...a power loss signal to the touch panel that causes the touch panel to stop writing data to SD memory devices providing a controlled shutdown for increased data logging reliability Part No EA AC AC DC...

Page 69: ...otection 140 C 284 F with autorecovery Short Circuit Protection 85 VAC 2 6 A 100 VAC 2 8 A 264 VAC 3 9 A Static Electricity Discharge Resistance Compliant with IEC61000 4 2 Contact 4 kV Air 8 kV Agenc...

Page 70: ...el BOTTOM VIEW FRONT VIEW SIDE VIEW REAR VIEW AC Power Connector DC Power Connector 1 421 0 02 36 1 0 5 Units inches mm Panel Depth with AC DC Power Adapter Installed Units inches mm A Part Number A E...

Page 71: ...ding Preparation Place the touch panel face down on a lint free soft surface to prevent scratching the display screen if not already installed in a control cabinet Remove the DC power connector if it...

Page 72: ...mum surrounding air temperature rating 50 C Storage Temperature 20 to 60 C 4 to 140 F Humidity 5 95 RH non condensing Environmental Air For use in pollution degree 2 environment Vibration IEC60068 2 6...

Page 73: ...7CL EA COMCON 3 is UL Recognized EA COMCON 3A is NOT UL Recognized or Listed It is used with EA9 T8CL EA9 T10CL EA9 T12CL EA9 T15CL R and EA9 T15CL EA COMCON 3 EA COMCON 3A Country of Origin EA COMCON...

Page 74: ...external light sources pk of 3 Part No EA 6 COV2 EA 7 COV2 EA 8 COV2 EA 10 COV2 EA 10W COV2 EA 12 COV2 EA 15 COV2 EA xx COV2 A B C D Non glare Screen Covers Dimensions inches mm Part Number A B C D EA...

Page 75: ...tep 1 Start in one corner and peel the screen cover from the backing Step 2 Step 3 Align the screen cover over the touch panel s white frame then start on one side and gently lay the cover over the en...

Page 76: ...LC Flash memory utilized by EA SD CARD has the advantage of being the most accurate flash memory type when reading and writing data SLC flash has the longest lifespan of flash types and can operate in...

Page 77: ......

Page 78: ...and EA9 T7CL Cutout Dimensions 4 4 EA9 T8CL and EA9 T10WCL Cutout Dimensions 4 5 EA9 T12CL Cutout Dimensions 4 7 EA9 T15CL R and EA9 T15CL Cutout Dimensions 4 8 Mounting Clearances 4 9 EA9 T15CL R EA9...

Page 79: ...nts for your particular application Make sure you follow all national state and local government requirements for the proper installation and use of your equipment Plan for Safety The best way to prov...

Page 80: ...torque rating to assure the gasket is sealing correctly and finally connecting the appropriate power source to the touch panel NOTE Each C more touch panel is provided with a cutout template to make...

Page 81: ...sert into a series of slots around the rear perimeter of the touch panel Each clip has a tab that will mate to a slot The screw of each mounting clip needs to be tightened to the torque rating shown i...

Page 82: ...ing clips will insert into a series of slots around the rear perimeter of the touch panel Each clip has a tab that will mate to a slot The screw of each mounting clip needs to be tightened to the torq...

Page 83: ...f slots around the rear perimeter of the touch panel Each clip has a tab that will mate to a slot The screw of each mounting clip needs to be tightened to the torque rating shown in the table below so...

Page 84: ...of slots around the rear perimeter of the touch panel Each clip has a tab that will mate to a slot The screw of each mounting clip needs to be tightened to the torque rating shown in the table below s...

Page 85: ...series of slots around the rear perimeter of the touch panel Each clip has a tab that will mate to a slot The screw of each mounting clip needs to be tightened to the torque rating shown in the table...

Page 86: ...ing drawing shows the mounting clearances for the C more touch panel There should be a minimum of 4 inches of space between all sides of the panel and the nearest object or obstruction and at least 1...

Page 87: ...rd the temperature shall be derated as shown below Other panels may be mounted at any angle without derating consideration 0 15 90 Angle 15 to 90 Temp 0 to 50 C Angle 0 to 15 Temp 0 to 45 C Angle 0 to...

Page 88: ...r your particular application nor do we assume any responsibility for your product design installation or operation If you have any questions concerning the installation or operation of this equipment...

Page 89: ...inductive loads such as solenoids or relays the transients caused by these loads can affect the operation of the panel or damage panel components NOTE The AC DC Power Adapter EA AC is for C more touch...

Page 90: ...reen Red Blinking Red Blinking Orange Blinking Green Front View User Defined Refer to online help file for further details Orange CPU Status LED Green Orange Red Off Power Off Normal CPU Run State Gre...

Page 91: ......

Page 92: ...ssing the System Setup Screens no project loaded 5 3 Accessing the System Setup Screens with project loaded 5 4 System Setup Screens Enable Password in Software 5 6 System Setup Screens Flowchart 5 12...

Page 93: ...etails are available in this area as well as an error log to help in trouble shooting the system Setting This is the area for 1 making adjustments to the internal clock 2 adjusting the brightness of t...

Page 94: ...no project loaded To access the Main Menu of the touch panel System Setup Screens prior to downloading a project press the extreme upper left corner of the panel display area for 3 seconds as shown be...

Page 95: ...cations with the PLC is active while the Warning is displayed The dialog box will close if no action is taken for 60 seconds The dialog box will not display if the touch panel does not have a project...

Page 96: ...ns Password Protecting System Screen Access NOTE If the password system tag SYS SYSTEMSCREENPW is enabled the Enter Security Code keypad shown below will open The procedure to enable the SYS SYSTEMSCR...

Page 97: ...em Setup Screens Enable Password in Software Under the C more Programming Software s Navigation window select the Function tab then double click on Alarm Action to display the Event Manager Database s...

Page 98: ...Manual 1st Ed Rev K System Setup Screens Enable Password cont d The Event Add dialog box will be displayed as shown 3 Click on the Tag Name pull down menu and select the internal System Bit On SYS BI...

Page 99: ...d cont d Use the Event Name text box to document the event as System Screen PW for record keeping This is optional In the Action box click once on the displayed 01 Alarm under the Sequence List so tha...

Page 100: ...User Manual 1st Ed Rev K System Setup Screens Enable Password cont d In the Action box click on the Add Action button This will bring up the Add Action dialog box as shown below Add Action 7 Click on...

Page 101: ...are User Manual 1st Ed Rev K System Setup Screens Enable Password cont d A 01 Tag action item will then be added to the Sequence List 01 Tag 9 Click on the Tag Name pull down list down arrow in the Ac...

Page 102: ...umeric value into the Value box such as 777 This value becomes the Password code to access the System Setup Screen s Main Menu Password Value 777 11 Click the Apply button in the Event Add dialog box...

Page 103: ...l Memory Ethernet Error Main Menu Information Setting Adjust Clock Adjust Display Adjust Touch Panel Touch Screen Calibration Beep Test Touch Panel Test Display Test User LED Test Beep Sound Backup Re...

Page 104: ...nu structure Touch Screen Calibration While the Main Menu system setup screen is being displayed the extreme upper left corner of the touch panel can be pressed for 3 seconds to access the Touch Scree...

Page 105: ...me is configured in the programming software and saved with a project The default panel name is the model number plus the lower three bytes of the panel MAC address ie EA9 T8CL 0022C4 3 Version The ve...

Page 106: ...in the panel they will be included in this list SD1 SD2 12 and 15 inch panels only and USB 2 Resource Monitor this troubleshooting tool displays CPU and panel internal memory usage When enabled the Re...

Page 107: ...ernet Link Online Ethernet Settings MAC Address 00 D0 7C XX XX XX Address Type DHCP Static IP Address Subnet Mask Default Gateway DNS 1 Automatically 2 Use Designated Address Note N A not available on...

Page 108: ...Write 6 PLC Address The assigned address of the PLC that caused the error 7 Access Bytes The number of access bytes 8 Error Message The error message is the same as the message displayed in the upper...

Page 109: ...eep and turn on and off the mouse cursor Item No Function Description Comments 1 Adjust Clock Press to go to the Adjust Clock screen 2 Adjust Display Press to go to the Adjust Display screen 3 IP Addr...

Page 110: ...lue by 1 with each press 4 OK Press to accept the changes 5 Cancel Press to return to the Setting Menu screen without accepting the changes NOTE The function buttons used to adjust the clock settings...

Page 111: ...No Function Description Comments 1 Setting Use the Up and Down arrows to change the brightness 2 Color Sample Displays a sample of how colors will appear with the new setting 3 Contrast Sample Displa...

Page 112: ...ration points NOTE The panel will display the Adjust Touch Panel window on power up until the calibration procedure is completed 2 1 3a 3b 3c 3e 3d Item No Function Description Comment 1 Start Calibra...

Page 113: ...e the touch panel s internal beep function Item No Function Description Comments 1 Enable Beep Check to enable the internal beep 2 OK Press to accept the changes 3 Cancel Press to return to the Settin...

Page 114: ...tup screen function is used to enable disable the arrow mouse cursor on the panel screen It may be valuable to display the mouse cursor for example when an external USB keyboard is connected to the pa...

Page 115: ...et cable is not connected to the touch panel from an active Ethernet device then the IP Address will show as 0 0 0 0 3 IP Address Subnet Mask Default Gateway Select the field that needs to be assigned...

Page 116: ...ser supplied amplified stereo speaker s Item No Function Description Comments 1 Test Touch Panel Press to go to the Test Touch Panel screen 2 Test Display Press to go to the Test Display screen 3 Test...

Page 117: ...reen pixels should turn black in that area If the screen pixels do not turn black when touched then the touch screen is defective or needs to be calibrated See Setting Adjust Touch Screen Item No Func...

Page 118: ...r wiping across the screen in the direction indicated by the arrows then repeats Color 1st Time 2nd Time 3rd Time 4th Time RED GREEN BLUE 3 Item No Function Description Comments 1 Touch the Test Displ...

Page 119: ...Each tab shows diagrams to assist the user in building the loop back connector 2 PLC Enquiry Test This function allows the ability to select any PLC that that may be connected to the touch panel via a...

Page 120: ...tarted 2 Receive Counts The number of bytes which are received after the test is started 3 Error Counts The number of bytes which have not been received after the test is started 4 RTS CTS Test Pass F...

Page 121: ...anel through the selected serial comm port connection and checks to see if the communications are working correctly NOTE The communications protocol for the PLC being selected must be configured the s...

Page 122: ...ion to whether an Ethernet link has been established for the touch panel s Ethernet comm port or not Displays panel s IP address and shows whether it is static or assigned by a DHCP server 2 PLC Enqui...

Page 123: ...orking correctly NOTE The communications protocol for the PLC being selected must be configured the same as the C more touch panel The touch panel s PLC serial communications are configured using the...

Page 124: ...he Beep Test button is pressed and released the Beeper will sound for 500 msec The Speaker Test function requires that a speaker s with an amplifier can be stereo be connected to the Audio Line Out st...

Page 125: ...USB pen drive SD Card Slot1 All panels SD card SD Card Slot2 12 inch 15 inch SD Card A folder on the memory device named EA_Memory Copy must exist containing a file named StartupStorage eas9 The proje...

Page 126: ...rd plugged into an SD card slot do not remove the memory card from the slot Damage to the SD memory card and possibly the touch panel may result WARNING After a firmware update the project files which...

Page 127: ...device is not available it will be grayed out The Next button is grayed out until a device is selected The Cancel button can be pressed at any time to return to the Memory Menu screen This is an exam...

Page 128: ...d out if there is no card in SD Slot 1 or the card in SD slot 1 has the project currently running on the panel stored on it The project will exist on SD1 if the SD card was installed in SD1 when the p...

Page 129: ...stem firmware and run time files Included in backup file name StartupStorage eas9 Log data consists of the Alarm Log Message Log and Trend Data Logging files Select the data file s to be backed up by...

Page 130: ...s are organized on the memory device when doing a Backup and also the file naming convention that is used when viewed in Windows Explorer on a PC Folders EA_MemoryCopy Log Recipe X Removable Disk F Al...

Page 131: ...sing the Prev button This message is displayed during the Backup copying process Press the Cancel button to abort the backup The following text is shown in the copying progress message box Copy to USB...

Page 132: ...Device Device will show either SD1 SD2 or USB This warning message will be displayed if the backup Memory device fails or is removed during the backup Press the OK button to clear the warning message...

Page 133: ...on is grayed out until a device is selected The Cancel button can be pressed at any time to return to the Memory Menu screen This is an example of a USB memory device selected to be the source for res...

Page 134: ...n SD card inserted into SD1 Slot then the SD1 button s Total and Free memory will be displayed NOTE The following definitions are for the various file types that can be restored Project data consists...

Page 135: ...OTE The following definitions are for the various file types that can be restored Project data consists of the actual developed project data that is created in the C more programming software and incl...

Page 136: ...n The problem could be caused by a corrupted data file See Chapter 8 Troubleshooting for additional help This message is displayed during the Restore process Press the Cancel button to abort the backu...

Page 137: ...size must be less than 10 MByte for 6 10 panels and less than 40 MByte for 12 15 panels This warning message will be displayed if the restore Memory device fails or is removed during the backup Press...

Page 138: ...such as a USB pen drive or an SD card Select the memory device to clear If the device is not available it will be grayed out The Next button is grayed out until a device is selected The selected devic...

Page 139: ...selected in Clear Memory Step 1 Notice the ability to select either the Project file Log files Recipe files or the System files NOTE Firmware files cannot be cleared from internal memory This is an ex...

Page 140: ...echnicians on staff at our full service in house repair center WE BUY USED EQUIPMENT Sell your excess underutilized and id We also offer credit for buy backs and www artisantg com WeBuyEquipme REMOTE...

Reviews: