background image

UPS User Manual

28

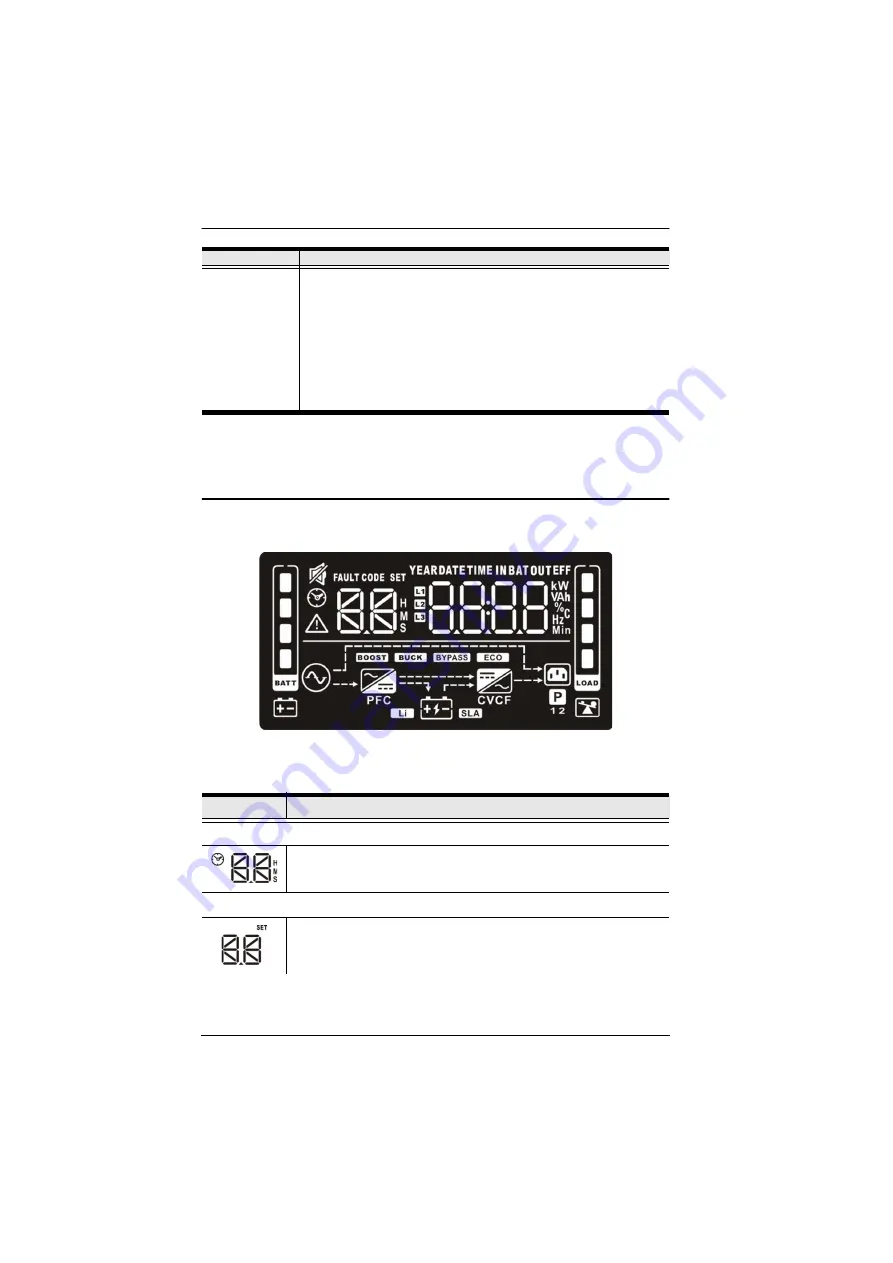
LCD Panel

The LCD Panel is shown below:

The function is described below:

on / mute button

+

select button

Switch to bypass mode: When the main power is normal, press 
ON/Mute and Select buttons simultaneously for 3 seconds. Then 
UPS will enter to bypass mode. This action will be ineffective when 
the input voltage is out of acceptable range.


Exit setting mode or return to the upper menu: When working in 
setting mode, press ON/Mute and Select buttons simultaneously 
for 0.2 seconds to return to the upper menu. If it’s already in top 
menu, press these two buttons at the same time to exit the setting 
mode.

Display

Function

Backup time Information

Indicates the estimated backup time.

H: hours, M: minute, S: second.

Configuration and fault information

Indicates the configuration items, and the configuration items are listed 
in details in 

UPS Setting

 on page 33.

Button

Function

Summary of Contents for OL1000LV

Page 1: ...OL1000LV OL1500LV OL2000LV OL3000LV Professional Online UPS UL Listed User Manual...

Page 2: ...f this equipment in a residential area is likely to cause harmful interference in which case the user will be required to correct the interference at his own expense The device complies with Part 15 o...

Page 3: ...Support For telephone support call this number User Notice All information documentation and specifications contained in this manual are subject to change without prior notification by the manufactur...

Page 4: ...turer of this system is not responsible for any radio and or TV interference caused by unauthorized modifications to this device It is the responsibility of the user to correct such interference The m...

Page 5: ...atteries in total BC36V9AH 2000VA 4B 4 x 9AH 4 pcs batteries in total BC48V9AH 2000VA 6B 6 x 7AH 6 pcs batteries in total BC72V7AH 3000VA 6B 6 x 9AH 6 pcs batteries in total BC72V9AH Rated Description...

Page 6: ...at all components are in working order If you encounter any problem please contact your dealer The UPS package consists of 1 Online UPS 1 rack mount kit 1 rail slide kit 1 RS 232 cable 1 USB Type A to...

Page 7: ...Introduction Overview 1 Features 3 Operation Principle 4 Components 5 Front View All Models 5 Rear View 6 2 Hardware Setup Mounting 9 Rack Mount 9 Vertical Tower Desktop Mount 13 Mounting UPS with Ba...

Page 8: ...s Reference Code 44 Warning Indicator 45 Appendix Safety Instructions 47 Transportation 47 Preparation 47 Installation 47 Operation 48 Maintenance service and faults 49 Technical Support 51 Internatio...

Page 9: ...rdware Setup provides step by step instructions to setting up your unit and explains the connections in detail Chapter 3 General Operations explains the general operations of the unit Chapter 4 LCD Bu...

Page 10: ...f keys need to be chorded they appear together in the same bracket with a plus sign between them Ctrl Alt 1 Numbered lists represent procedures with sequential steps Bullet lists provide information b...

Page 11: ...gs or a momentary surge can ruin your equipment and destroy irreplaceable data Desktop computers don t have batteries built in like laptops do If you were working on a desktop computer and encountered...

Page 12: ...llows users to access vital UPS battery conditions load levels and runtime information as well as provide graceful unattended shut down of network computers and virtual machines connected to a battery...

Page 13: ...All potential UPS maintenance including complete power module exchange can be performed without powering down connected equipment As long as utility power is on you may leave the UPS and connected equ...

Page 14: ...e The operation principle of the UPS is shown in the diagram below The UPS is composed of a mains input EMI RFI filters a rectifier PFC inverter a battery charger a DC to DC converter a battery packag...

Page 15: ...ront View All Models No Component Description 1 LCD display 2 on mute button Click this to turn on the LCD 3 select button Click this to jump to the next selection 4 off enter button Click this to tur...

Page 16: ...These outlets can be programmed to provide backup power and surge protection 2 backup and surge protected outlets For critical load connection These outlets provide backup power and surge protection...

Page 17: ...UPS it will provide advanced communication and monitoring options 8 emergency power off function connector EPO Enables an emergency UPS power off from a remote location 9 external battery connection p...

Page 18: ...UPS User Manual 8 This Page Intentionally Left Blank...

Page 19: ...ing 1 Make sure the rail slide kit includes all the components The components include 2 slide rails 1 for each side indicated by L and R in the diagram below 6 M6 nuts 4 fixing studs and 8 M6 screws a...

Page 20: ...the supporting columns pull the two ends of the rail slider apart While at it fit the fixing studs into the columns holes on the same level This step serves to hold the slider rail in place for the la...

Page 21: ...to the support columns as show below 6 Attach the mounting kit onto the UPS by screwing M4 screws into the mounting kit screw holes and the UPS as shown 7 Fit the UPS onto the rack rails and stabilize...

Page 22: ...UPS User Manual 12...

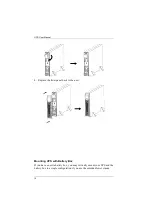
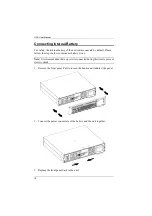
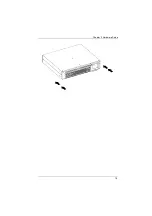
Page 23: ...nt the unit onto the tower stand set a set includes 2 tower stands from the package content Place the unit onto the tower stands 2 Remove the front panel Pull to loosen the hooks and withdraw the pane...

Page 24: ...Replace the front panel back to the unit Mounting UPS with Battery Box If you have an extra battery box you may vertically mount your UPS and the battery box in a single configuration if you use the e...

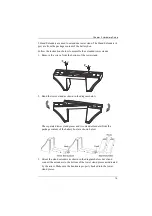
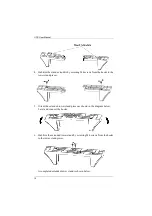
Page 25: ...screws from the bottom of the tower stand 2 Bend the tower stand as shown in the diagram below The separated tower stand pieces and two stand extenders from the package content of the battery box are...

Page 26: ...e hooks to the tower stand pieces 5 Orient the extended tower stand pieces as shown in the diagram below Level and connect the hooks 6 Stabilize the extended tower stand by screwing M4 screws from the...

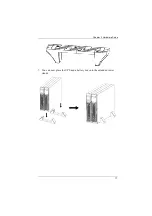
Page 27: ...Chapter 2 Hardware Setup 17 7 You can now place the UPS and a battery box onto the extended tower stands...

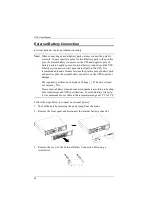
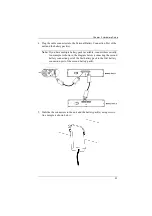
Page 28: ...ollow the steps below to reconnect battery wires Note It is recommended that no power is connected during this time to prevent electric shock 1 Remove the front panel Pull to loosen the hooks and with...

Page 29: ...Chapter 2 Hardware Setup 19...

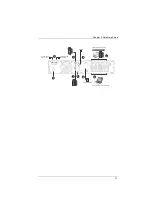
Page 30: ...er to External Battery Connection on page 22 5 Optional Connect a modem phone fax source using a corresponding cable into the surge protected IN outlet Connect an equipment you wish to have surge prot...

Page 31: ...Chapter 2 Hardware Setup 21 2 7 4 8 3 6 5 9 modem phone fax source non critical powered devices critical powered devices external battery SNMP 1 modem phone fax source...

Page 32: ...etween the positive pole of battery pack and positive pole of external battery connector on the UPS to prevent damage The required specification of breaker Voltage 1 25 battery voltage set current 50A...

Page 33: ...ou have multiple battery packs available connect them serially An example is shown in the diagram below connecting the second battery connection port of the first battery pack to the first battery con...

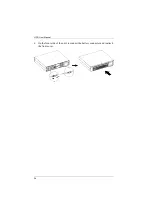
Page 34: ...UPS User Manual 24 6 On the front side of the unit reconnect the battery connector and reattach the front cover...

Page 35: ...remove two screws on EPO port and metal plate will be removed Note The EPO function logic can be set up via LCD setting Please refer to EPO Logic Setting on page 38 for details Install Software For o...

Page 36: ...UPS User Manual 26 This Page Intentionally Left Blank...

Page 37: ...enter UPS self testing while in AC mode ECO mode or converter mode off enter button Turn off the UPS Press and hold this button at least 2 seconds to turn off the UPS UPS will be in standby mode under...

Page 38: ...table range Exit setting mode or return to the upper menu When working in setting mode press ON Mute and Select buttons simultaneously for 0 2 seconds to return to the upper menu If it s already in to...

Page 39: ...ient temperature output voltage output frequency load current and load percent k kilo W watt V voltage A ampere percent centigrade degree Hz frequency Load Information Indicates the load level by 0 24...

Page 40: ...erter mode Indicates the output is working Battery information Indicates the battery level by 0 24 25 49 50 74 and 75 100 Indicates low battery Mode Alarm Pattern battery mode Beep once every 5 second...

Page 41: ...h Letter Display Definition ENA Enable DIS Disable ESC Escape HLS High loss LLS Low loss AO Active open AC Active close EAT Estimated autonomy time RAT Running autonomy Time SD Shutdown OK OK ON ON BL...

Page 42: ...nual 32 OC Overcharge SF Site wiring fault EP EPO TP Temperature CH Charger BF Battery fault BV Bypass out range FU Bypass frequency unstable BR Battery replace EE EEPROM error English Letter Display...

Page 43: ...d in parameter 1 Parameter 1 Interface Display Parameter 2 Description Output Voltage Setting Display 01 Parameter 2 Output voltage 100 100vac output voltage 110 110vac output voltage 115 115vac outpu...

Page 44: ...wing two options ENA Enable ECO mode DIS Disable ECO mode Default ECO Voltage Range Setting Display 05 Display HS Parameter 2 Acceptable high voltage point and low voltage point for ECO mode Press the...

Page 45: ...voltage point and acceptable low voltage point for Bypass mode Press the Up or Down key to adjust the values HLS Bypass high voltage point For 100 110 115 120 127 VAC models 120 140 setting the high v...

Page 46: ...r 50Hz output frequency models 45 49Hz setting the frequency low loss point from 45Hz to 49HZ Default 47 0Hz For 60Hz output frequency models 55 59Hz setting the frequency low loss point from 55Hz to...

Page 47: ...city if external battery pack is connected Maximum Charger Current Setting Display 13 Parameter 2 Charger maximum current For low voltage model with 24 36 48VDC 1 2 4 6 8 Set maximum charger current t...

Page 48: ...ge from 2 20 V cell to 2 33V cell Default 2 28V cell EPO Logic Setting Display 16 Parameter 2 EPO function control logic AO Active Open Default When selected it will activate EPO function with Pin 1 a...

Page 49: ...Display HS Parameter 2 Acceptable high voltage point and acceptable low voltage point for input voltage range Press the Up or Down key to adjust the values HLS Input high voltage point For 100 110 115...

Page 50: ...4V18AH 81 10 5 BP24V18AH 99 10 6 BP24V18AH 117 12 7 BP24V18AH 135 12 8 BP24V18AH 153 12 9 BP24V18AH 171 12 10 BP24V18AH 189 12 1000VA 3B 7 2 1 BP36V18AH 25 4 2 BP36V18AH 43 6 3 BP36V18AH 61 8 4 BP36V1...

Page 51: ...153 12 9 BP36V18AH 171 12 10 BP36V18AH 189 12 2000VA 4B 9 2 1 BP48V18AH 27 4 2 BP48V18AH 45 6 3 BP48V18AH 63 8 4 BP48V18AH 81 10 5 BP48V18AH 99 10 6 BP48V18AH 117 12 7 BP48V18AH 135 12 8 BP48V18AH 153...

Page 52: ...2V18AH 151 12 9 BP72V18AH 169 12 10 BP72V18AH 187 12 3000VA 6B 9 2 1 BP72V18AH 27 4 2 BP72V18AH 45 6 3 BP72V18AH 63 8 4 BP72V18AH 81 10 5 BP72V18AH 99 10 6 BP72V18AH 117 12 7 BP72V18AH 135 12 8 BP72V1...

Page 53: ...nverter Mode When the input frequency is within 40 Hz to 70 Hz the UPS can be set at a constant output frequency of 50 Hz or 60 Hz The UPS will also charge the battery Battery Mode When the input volt...

Page 54: ...t Code Icon Bus start fail 01 x Battery voltage too high 27 x Bus over 02 x Battery voltage too low 28 x Bus under 03 x Charger output short 2A x Inverter soft start fail 11 x Over temperature 41 x In...

Page 55: ...seconds Over Charge Beeps every 2 seconds Site wiring fault Beeps every 2 seconds EPO enable Beeps every 2 seconds Over temperature Beeps every 2 seconds Charger failure Beeps every 2 seconds Battery...

Page 56: ...S User Manual 46 NOTE Site Wiring Fault function can be enabled disabled via software Please check the software manual for the details EEPROM error Beeps every 2 seconds Warning Icon Flashing Code Ala...

Page 57: ...he UPS system e g laser printers to the UPS output sockets Place cables in such a way that no one can step on or trip over them Do not connect domestic appliances such as hair dryers to UPS output soc...

Page 58: ...tem and of all connected loads The UPS system features its own internal current source batteries The UPS output sockets or output terminals block may be electrically live even if the UPS system is not...

Page 59: ...inals and the ground Before touching please verify that no voltage is present Caution Do not dispose of batteries in a fire The batteries may explode Caution Do not open or mutilate batteries Released...

Page 60: ...with the limits for a Class A digital device pursuant to part 15 of the FCC Rules These limits are designed to provide reasonable protection against harmful interference when the equipment is operate...

Page 61: ...Product model number serial number and date of purchase Your computer configuration including operating system revision level expansion cards and software Any error messages displayed at the time the...

Page 62: ...Voltage Range 80 150 V AC 5 100 load 55 150 V AC 5 50 load Derate capacity to 80 when the output voltage is adjusted to 100 V AC Input Frequency Range 40 Hz 70 Hz Rated input current 9 3 A 13 2 A 17...

Page 63: ...Transfer Time Inverter to Bypass 4 ms ECO Battery Runtime at Half Load min Half load 10 1 Half load 10 3 Half load 10 0 Half load 10 1 Runtime at Full Load min Full load 2 95 Full load 2 96 Full load...

Page 64: ...Rack Size 2U Form Factor Rack Tower Dimensions WxHxD mm3 438 x 88 x 410 438 x 88 x 510 438 x 88 x 630 Weight kg 11 6 14 1 15 5 19 5 27 5 Environmental Temperature Operating Storage 0 40 C non condensi...

Page 65: ...activated Set the circuit in closed position to disable EPO function The icons of and and the warning code flash on LCD display Alarm is sounding every 2 seconds Line and neutral conductors of UPS in...

Page 66: ...PS shut down automatically because of overload at the UPS output Remove excess loads from UPS output and restart it Fault code is shown as 14 on LCD display and alarm is continuously sounding The UPS...

Page 67: ...the charger output Check if battery wiring of connected external pack is in short circuit status Fault code is shown as 45 on LCD display At the same time alarm is continuously sounding The charger do...

Page 68: ...he option to 1 repair said product with new or repaired components or 2 replace the entire product with an identical product or with a similar product which fulfills the same function as the defective...

Reviews: