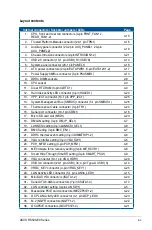


ASUS RS500-E9 Series
4-17
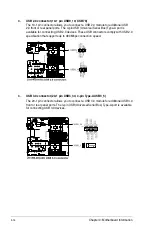
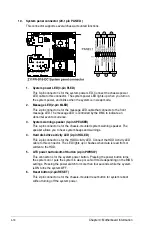
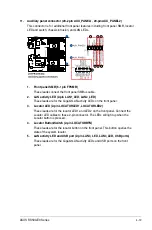
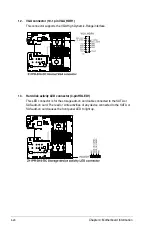
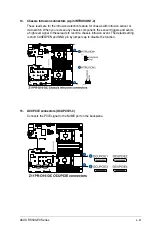
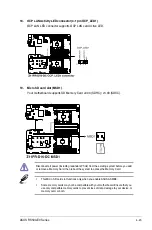
9.
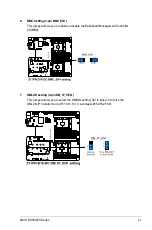
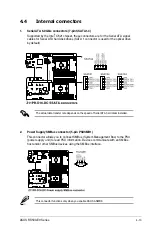
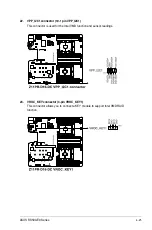
ATX power connectors (24-pin EATXPWR1, 8-pin EATX12V1-2)
These connectors are for the ATX power supply plugs. The power supply plugs are
designed to fit these connectors in only one orientation. Find the proper orientation and
push down firmly until the connectors completely fit.
•
DO NOT forget to connect the 24-pin and the 8-pin power plugs; otherwise, the system
will not boot up.
•
Use of a power supply unit (PSU) with a higher power output is recommended when
configuring a system with more power-consuming devices. The system may become
unstable or may not boot up if the power is inadequate.
•
This motherboard supports ATX2.0 PSU or later version.
•
Ensure that your PSU can provide at least the minimum power required by your
system.
Summary of Contents for RS500-E9 Series
Page 1: ...1U Rackmount Server User Guide RS500 E9 Series RS500 E9 PS4 RS500 E9 RS4 RS500 E9 RS4 U ...
Page 10: ...x ...
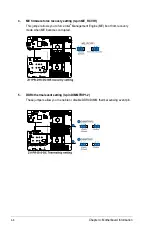
Page 25: ...2 5 ASUS RS500 E9 Series 6 Reinstall the air ducts CPU1 CPU socket 1 CPU2 CPU socket 2 ...
Page 51: ...3 5 ASUS RS500 E9 Series 3 2 Rail kit dimensions 589mm 43 6mm 900mm 43 6mm ...
Page 52: ...Chapter 3 Installation Options 3 6 ...
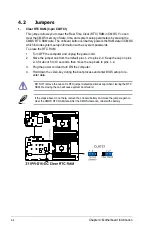
Page 54: ...Chapter 4 Motherboard Information 4 2 4 1 Motherboard layout ...
Page 148: ...6 22 Chapter 6 RAID Configuration ...
Page 155: ...7 7 ASUS RS500 E9 Series 5 Follow the onscreen instructions to complete the installation ...
Page 156: ...7 8 Chapter 7 Driver Installation ...
Page 157: ...Appendix Appendix ...
Page 158: ...Z11PR D16 DC block diagram ...