


2-21
ASUS RS500-E9 Series
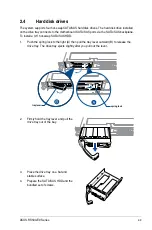
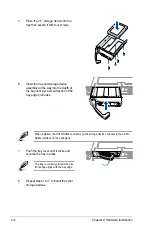
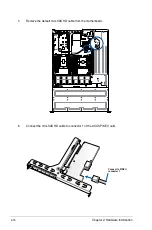
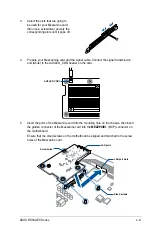
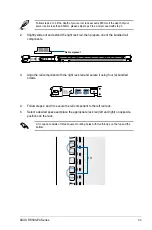
3.
Select the slots that are going to
be used for your Mezzanine card,
then use a screwdriver and pry the
corresponding slots until it pops off.
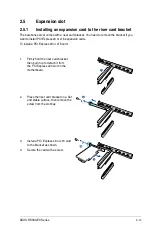
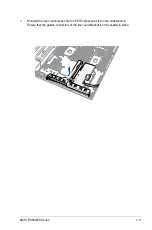
4.
Prepare your Mezzannine card and the signal cable. Connect the signal transmission
end (white) to the AUXLED_CON header on the card.
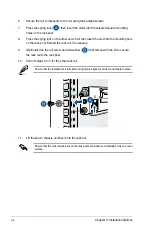
AUXLED_CON1
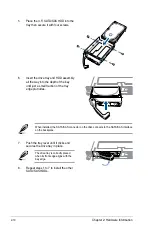
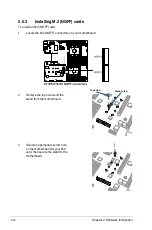
Stand screws
LAN ports
LAN port slots
Screw holes
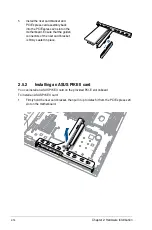
5.
Insert the ports of the Mezzanine card into the mounting hole on the chassis, then insert
the golden connector of the Mezzanine card into the
MEZZPCIE1
(OCP) connector on
the motherboard.
Ensure that the stand screws on the motherboard is aligned and matched to the screw
holes of the Mezzanine card.
Summary of Contents for RS500-E9 Series
Page 1: ...1U Rackmount Server User Guide RS500 E9 Series RS500 E9 PS4 RS500 E9 RS4 RS500 E9 RS4 U ...
Page 10: ...x ...
Page 25: ...2 5 ASUS RS500 E9 Series 6 Reinstall the air ducts CPU1 CPU socket 1 CPU2 CPU socket 2 ...
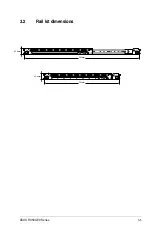
Page 51: ...3 5 ASUS RS500 E9 Series 3 2 Rail kit dimensions 589mm 43 6mm 900mm 43 6mm ...
Page 52: ...Chapter 3 Installation Options 3 6 ...
Page 54: ...Chapter 4 Motherboard Information 4 2 4 1 Motherboard layout ...
Page 148: ...6 22 Chapter 6 RAID Configuration ...
Page 155: ...7 7 ASUS RS500 E9 Series 5 Follow the onscreen instructions to complete the installation ...
Page 156: ...7 8 Chapter 7 Driver Installation ...
Page 157: ...Appendix Appendix ...
Page 158: ...Z11PR D16 DC block diagram ...