12
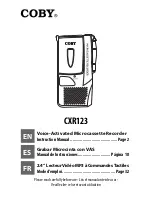
Video Source
Selector Button
Record Button
Step 6: Power on AnyHD Recorder
Turn on the Power Switch on the rear panel of AnyHD Recorder. Wait for about
10 seconds.
A red Power Indicator LED will illuminate on the
front panel of the AnyHD Recorder. One of the
Source LED indicators (HDMI, YPbPr or CVBS)
will illuminate and should match the type of input
source you have attached. If it doesn’t match,
press the Video Source Selector button on the front
panel until the appropriate Source LED indicator
illuminates.
If your Video Player is transmitting a video stream, you should begin to see it on
your HDTV.
Step 7: Recording to USB Storage Device
Press the “REC” button on the front panel to begin
recording to the USB Storage Device. The red “REC”
LED should illuminate.
The TV screen should display “Recording
Started”.
Step 8: Stop Recording
Press the “REC” button on the front panel again to stop recording.
The TV screen should display “Recording Stopped”.
A folder designated by date and a sequence number will be created on the USB
storage device on the root:\\VSTOR directory of the device. For example, the
folder name, “V5C8000”, represents a folder that was recorded on Dec 16, 2015;
the three last digits “000” represent a sequence number. If you record a second
video on the same day, the sequence number for a new folder name will be
incremented (e.g. V5C8001).
At least two files will be created in each folder, a DAT.TS (audio and video
content) and a Meta.APV (playlist). Since the maximum file size is limited to
about 4 GB, video recordings that extend past that file limit will be broken up into
consecutive 4 GB files.
Remark 1: The naming rule of the folder name is V( Year(1 digit) +
Month(1digit) + Day(1 digit) + Numbers(3digits)
Month: 1..9 A represents 10; B represents 11; C represents 12
Remark 2: The folder name cannot be changed but it is ok to add any words
after 8_character folder name for readable.