background image

54

-EN


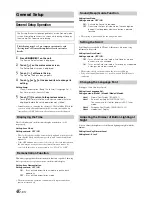
About Time Correction

The distance between the listener and the speakers in a car vary widely 
due to the complex speaker placement. This difference in the distances 
from the speakers to the listener creates a shift in the sounds image and 
frequency characteristics. This is caused by the time delay between the 
sound reaching the listener’s right versus the left ear.
To correct this, this unit is able to delay the audio signal to the speakers 
closest to the listener. This effectively creates a perception of increased 
distance for those speakers. The listener can be placed at an equal 
distance between the left and right speakers for optimum staging.
The adjustment will be made for each speaker in 3.4cm steps.

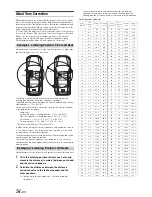
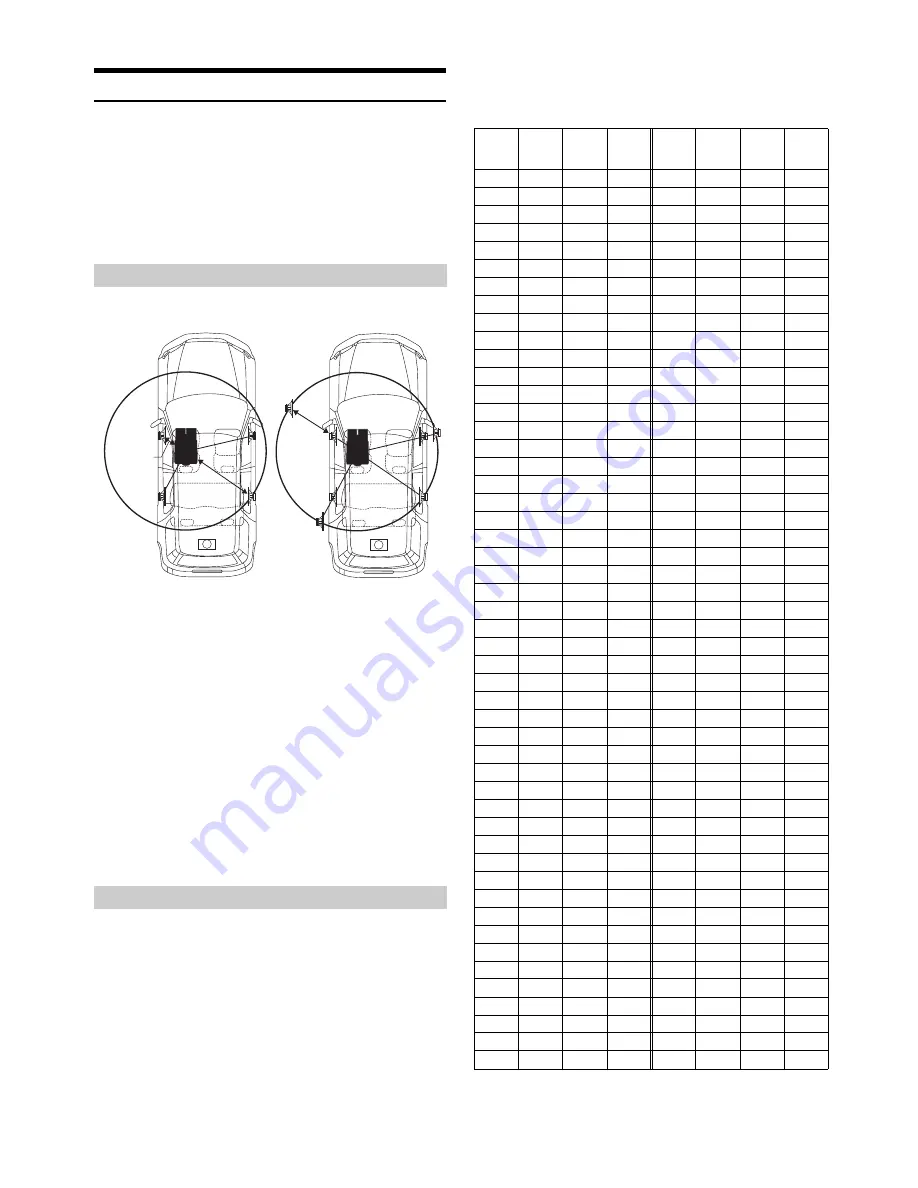
Adjust the time correction level of the front left speaker to a high value 
and the rear right to zero or a low value.

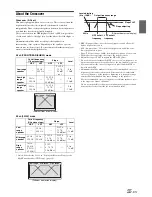
The sound is not balanced because the distance between the 
listening position and the various speakers is different.
The difference in distance between the front left speaker and the rear 
right speaker is 1.75 m (68-7/8").
Here we calculate the time correction value for the front left speaker 
in the diagram on the above.

Conditions:
Farthest Speaker – listening position : 2.25 m (88-9/16")
Front left speaker – listening position : 0.5 m (19-11/16")
Calculation: L = 2.25 m – 0.5 m = 1.75 m (68-7/8")
Time correction = 1.75 ÷ 343

*

1

 × 1,000 = 5.1 (ms)

*

1

Speed of sound: 343 m/s (765 mph) at 20°C

In other words, giving the front left speaker a time correction value of 
5.1 ms makes it seem as if its distance from the listener is the same 
as the distance to the farthest speaker.

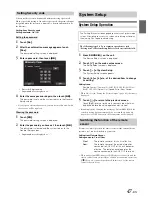
Time correction eliminates the differences in the time required for the 
sound to reach the listening position.
The time of the front left speaker is corrected by 5.1 ms so that its 
sound reaches the listening position at the same time as the sound of 
other speakers.

Adjust the time correction level of each speaker to almost the same level.

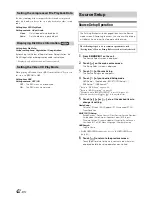
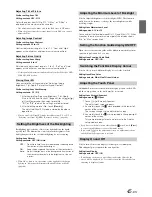
1

Sit in the listening position (driver’s seat, etc.) and 
measure the distance (in meters) between your head 
and the various speakers.

2

Calculate the difference between the distance 
correction value to the farthest speaker and the 
other speakers.

L = (distance to farthest speaker) – (distance to other 

speakers)

These values are the time correction values for the different 
speakers. Setting these values to make each sound reach the 
listening position at the same time as the sound of other speakers.

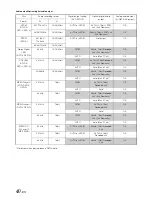
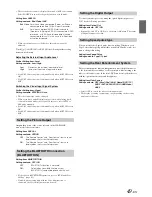
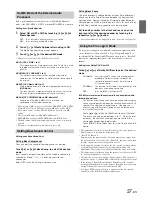
Time Correction Value List

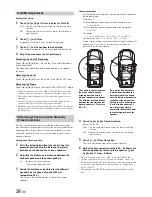
Example 1. Listening Position: Front Left Seat

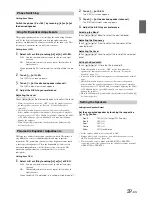
Example 2. Listening Position: All Seats

5.1ms

2.25m

0.5m

Delay 

Number

Time 

Difference 

(ms)

Distance

(cm)

Distance

(inch)

Delay 

Number

Time 

Difference 

(ms)

Distance

(cm)

Distance

(inch)

1

0.0

0.0

0.0

51

5.0

170.0

67.0

2

0.1

3.4

1.3

52

5.1

173.4

68.3

3

0.2

6.8

2.7

53

5.2

176.8

69.7

4

0.3

10.2

4.0

54

5.3

180.2

71.0

5

0.4

13.6

5.4

55

5.4

183.6

72.4

6

0.5

17.0

6.7

56

5.5

187.0

73.7

7

0.6

20.4

8.0

57

5.6

190.4

75.0

8

0.7

23.8

9.4

58

5.7

193.8

76.4

9

0.8

27.2

10.7

59

5.8

197.2

77.7

10

0.9

30.6

12.1

60

5.9

200.6

79.1

11

1.0

34.0

13.4

61

6.0

204.0

80.4

12

1.1

37.4

14.7

62

6.1

207.4

81.7

13

1.2

40.8

16.1

63

6.2

210.8

83.1

14

1.3

44.2

17.4

64

6.3

214.2

84.4

15

1.4

47.6

18.8

65

6.4

217.6

85.8

16

1.5

51.0

20.1

66

6.5

221.0

87.1

17

1.6

54.4

21.4

67

6.6

224.4

88.4

18

1.7

57.8

22.8

68

6.7

227.8

89.8

19

1.8

61.2

24.1

69

6.8

231.2

91.1

20

1.9

64.6

25.5

70

6.9

234.6

92.5

21

2.0

68.0

26.8

71

7.0

238.0

93.8

22

2.1

71.4

28.1

72

7.1

241.4

95.1

23

2.2

74.8

29.5

73

7.2

244.8

96.5

24

2.3

78.2

30.8

74

7.3

248.2

97.8

25

2.4

81.6

32.2

75

7.4

251.6

99.2

26

2.5

85.0

33.5

76

7.5

255.0

100.5

27

2.6

88.4

34.8

77

7.6

258.4

101.8

28

2.7

91.8

36.2

78

7.7

261.8

103.2

29

2.8

95.2

37.5

79

7.8

265.2

104.5

30

2.9

98.6

38.9

80

7.9

268.6

105.9

31

3.0

102.0

40.2

81

8.0

272.0

107.2

32

3.1

105.4

41.5

82

8.1

275.4

108.5

33

3.2

108.8

42.9

83

8.2

278.8

109.9

34

3.3

112.2

44.2

84

8.3

282.2

111.2

35

3.4

115.6

45.6

85

8.4

285.6

112.6

36

3.5

119.0

46.9

86

8.5

289.0

113.9

37

3.6

122.4

48.2

87

8.6

292.4

115.2

38

3.7

125.8

49.6

88

8.7

295.8

116.6

39

3.8

129.2

50.9

89

8.8

299.2

117.9

40

3.9

132.6

52.3

90

8.9

302.6

119.3

41

4.0

136.0

53.6

91

9.0

306.0

120.6

42

4.1

139.4

54.9

92

9.1

309.4

121.9

43

4.2

142.8

56.3

93

9.2

312.8

123.3

44

4.3

146.2

57.6

94

9.3

316.2

124.6

45

4.4

149.6

59.0

95

9.4

319.6

126.0

46

4.5

153.0

60.3

96

9.5

323.0

127.3

47

4.6

156.4

61.6

97

9.6

326.4

128.6

48

4.7

159.8

63.0

98

9.7

329.8

130.0

49

4.8

163.2

64.3

99

9.8

333.2

131.3

50

4.9

166.6

65.7

100

9.9

336.6

132.7

Summary of Contents for INA-W910R

Page 1: ...1 800 ALPINE 1 1 800 257 4631 1 888 NAV HELP 1 888 628 4357 ALPINE ELECTRONICS OF CANADA INC 777 Supertest Road Toronto Ontario M3J 2M9 Canada Phone 1 800 ALPINE 1 1 800 257 4631 1 888 NAV HELP 1 888 628 4357 ALPINE ELECTRONICS OF AUSTRALIA PTY LTD 161 165 Princes Highway Hallam Victoria 3803 Australia Phone 03 8787 1200 ALPINE ELECTRONICS GmbH Wilhelm Wagenfeld Str 1 3 80807 München Germany Phone...

Page 2: ......

Page 3: ...RDS Operation Turning AF Alternative Frequencies On or Off 21 Receiving Traffic Information 22 PTY Programme Type Tuning 22 Receiving Traffic Information While Playing CD or Radio 22 Priority News 22 Displaying Radio Text 22 CD MP3 WMA AAC Playback 23 Repeat Play 23 M I X Random Play 24 Selecting Folders concerning MP3 WMA AAC 24 About MP3 WMA AAC 24 DVD Video CD Playing a Disc 26 To display the D...

Page 4: ...formation 42 Setting the Video CD Play Mode 42 Source Setup Source Setup Operation 42 Radio Setup 43 USB Search 43 Display Setup Display Setup Operation 44 Visual EQ Setting Operation 44 Setting the Brightness of the Backlighting 45 Adjusting the Minimum Level of Backlight 45 Setting the Function Guide display ON OFF 45 Switching the Font Back Display Colour 45 Adjusting the Touch Panel 45 Display...

Page 5: ...he DVD Level 61 Linear PCM Setting 61 Storing Settings in the Memory 61 Calling up the Preset Memory 61 BT Hands Free Calling Setup Before Using 61 About BLUETOOTH 61 Before Using Hands Free Function 61 How to connect to a BLUETOOTH compatible device Pairing 61 BLUETOOTH Setup 62 BLUETOOTH Setup Operation 62 Hands Free Phone Control 64 About the Hands Free Phone 64 Answering a Call 64 Hanging up t...

Page 6: ...lect the desired Folder Folder up down 75 Creating the playlist from the Artist Album information of the current song Tag search mode only 75 About MP3 WMA AAC File of USB Memory 76 iPod iPhone Optional Connecting an iPod iPhone 76 Setting the iPod Control 77 Playback 77 Searching for a desired Song 77 Searching by artist name 77 Direct Search Function 78 Alphabet Skip Function 78 Selecting Playli...

Page 7: ... the navigation system may display the vehicle s location erroneously Use your own driving judgment in this situation taking into account current driving conditions Please be aware that in this situation the navigation system should correct the vehicle s position automatically however there may be times where you may have to correct the position yourself If this is the case stop in a safe and lega...

Page 8: ...st destroy all copies of the SOFTWARE and all of its component parts INTELLECTUAL PROPERTY RIGHTS All title and intellectual property rights in and to the SOFTWARE including but not limited to any images photographs animations video audio music text and applets incorporated into the SOFTWARE the accompanying printed materials and any copies of the SOFTWARE are owned by MS Microsoft Corporation the...

Page 9: ...uest If the Database does not perform in accordance with this limited warranty NAVTEQ will use reasonable efforts to repair or replace your non conforming copy of the Database If these efforts do not lead to performance of the Database in accordance with the warranties set out herein you will have the option to either receive a reasonable refund of the price you paid for the Database or to rescind...

Page 10: ...eanings of these pictorial displays in order to use this manual and the system properly INSTALL THE PRODUCT CORRECTLY SO THAT THE DRIVER CANNOT WATCH TV VIDEO UNLESS THE VEHICLE IS STOPPED AND THE EMERGENCY BRAKE IS APPLIED It is dangerous for the driver to watch TV Video while driving a vehicle Installing this product incorrectly enables the driver to watch TV Video while driving This may cause a...

Page 11: ...ealer if you are not sure Failure to do so may result in fire etc KEEP SMALL OBJECTS SUCH AS BOLTS OR SCREWS OUT OF THE REACH OF CHILDREN Swallowing them may result in serious injury If swallowed consult a physician immediately USE THE CORRECT AMPERE RATING WHEN REPLACING FUSES Failure to do so may result in fire or electric shock DO NOT BLOCK VENTS OR RADIATOR PANELS Doing so may cause heat to bu...

Page 12: ...allpoint pen Playing a disc while driving on a very bumpy road may result in skips but this will not scratch the disc or damage the player Irregular Shaped Discs Be sure to use round shaped discs only for this unit and never use any special shaped discs Use of special shaped discs may cause damage to the mechanism New Discs To prevent the CD from jamming Disc Error is displayed if discs with irreg...

Page 13: ...t be parked and the parking brake must be engaged for the procedure described in the Owner s Manual to be valid The warning Can t operate while driving will be displayed if any attempts are made to perform these operations while driving The INA W910R draws minimal current even when its power switch is turned off If the switched power ignition lead of the INA W910R is connected directly to the posi...

Page 14: ...tempt playback again Tips for making your own CDs The INA W910R plays DVD Video DVD Audio Video CD Audio CD DivX and has a built in MP3 WMA AAC decoder The following information is designed to help you create your own music CDs either Audio CD or MP3 WMA AAC encoded CD R RW files What is the difference between an Audio and MP3 WMA AAC CD An Audio CD is the same format as the commercial CDs you buy...

Page 15: ...t supported Depending on the connected USB memory device the unit may not function or some functions may not be performed The audio file format that can be played back on the unit is MP3 WMA AAC Artist song name etc can be displayed however characters may not be correctly displayed On Handling USB Memory This unit can control a memory storage device that supports the USB Mass Storage Class MSC pro...

Page 16: ... incorporates copyright protection technology that is protected by U S patents and other intellectual property rights Use of this copyright protection technology must be authorized by Macrovision and is intended for home and other limited viewing uses only unless otherwise authorized by Macrovision Reverse engineering or disassembly is prohibited Manufactured under license from Dolby Laboratories ...

Page 17: ... screen is audio source screen Radio CD iPod etc Press again to turn it off For more information refer to the Owner s Manual of navigation system stored in the supplied CD ROM Press this button for at least 2 seconds to turn the T INFO mode ON or OFF MAP button Recall the navigation map screen For more information refer to the Owner s Manual of navigation system stored in the supplied CD ROM NAVI ...

Page 18: ...memory card can be played back by the player built in this unit To insert and take out the SD memory card follow the instructions below You can update the software and map of navigation system by using an optional SD memory card 1 After opening the movable monitor open the cover of SD memory card slot Insert the SD memory card 2 Insert your SD memory card until it clicks Remove the SD memory card ...

Page 19: ...list first Then touch the desired source key Display example for FM Radio main screen Displays the source name such as radio band etc that is selected Changes to the Bass 1 Treble 1 and Subwoofer 2 Level adjustment screen directly If the optional IMPRINT audio processor is connected the Bass and Treble Level can be adjusted only when MultEQ is set to Curve 1 or Curve 2 page 50 If an optional exter...

Page 20: ... mode selection list PTY SEARCH 2 button Search for a station by PTY Programme Type Tuning refer to PTY Programme Type Tuning page 22 1 The button displays the current tuning mode 2The button displays only when the tuning mode of PTY is selected Listening to the Radio 1 Press SOURCE on the unit The Source Select screen is displayed 2 Touch Radio The radio mode is activated and the display changes ...

Page 21: ...gh P SET 6 that has a station stored to it The preset station is received Display example for RDS main screen Displays the Radio text When a Radio station that transmits text messages Turning AF Alternative Frequencies On or Off The RDS Radio Data System is a radio information system using the 57 kHz subcarrier of regular FM broadcast The RDS allows you to receive a variety of information such as ...

Page 22: ...selecting the programme type to start searching for a station of the selected programme type If no station is found NO PTY will be displayed Receiving Traffic Information While Playing CD or Radio The example explained here is how to receive the traffic information broadcast during CD playback 1 In the CD mode press and hold AUDIO TA for at least 2 seconds to turn on the Traffic information mode T...

Page 23: ...s a built in MP3 WMA AAC unit You can play CD ROMs DVD ROMs CD Rs CD RWs DVD Rs DVD RWs DVD Rs and DVD RWs containing MP3 WMA AAC files on this unit Use the format compliant with this unit For further information about playing or storing MP3 WMA AAC files refer to pages 24 and 25 before using the unit WMA format files that are protected by DRM Digital Rights Management AAC format files that have b...

Page 24: ...efer to the user s manual for that software MP3 WMA AAC files that can be played back by this device have the following file extensions MP3 mp3 WMA wma ver 7 1 8 9 9 1 and 9 2 are supported AAC m4a WMA is not supported for the following files Windows Media Audio Professional Windows Media Audio 9 Voice or Windows Media Audio 9 Pro Lossless There are many different versions of the AAC format Confir...

Page 25: ...them to the disc Therefore the playback order may not be what s expected Verify the writing order in the software s documentation The playback order of the folders and files is as follows The following numbers may differ from actually displayed numbers Terminology Bit rate This is the sound compression rate specified for encoding The higher the bit rate the higher the sound quality but also the la...

Page 26: ...o discs can be used Video CD discs can be used CD R CD RW DVD R DVD RW DVD R DVD RW discs that are recorded in the DivX mode can be used WARNING It is dangerous for the driver to watch the TV DVD Video while driving the vehicle The driver may be distracted from looking ahead and an accident could occur Install the INA W910R correctly so that the driver cannot watch TV DVD Video unless the vehicle ...

Page 27: ... mixed into 2ch prohibited section of a DVD Audio disc is played In this case only the Lch Rch recorded on the disc is output as sound The sound of Centre speaker L surround speaker R surround speaker and Subwoofer is not output While Index Reading is displayed by DivX the fast forwarding fast reversing and repeat functions etc cannot be used On DVDs and Video CDs with playback control PBC menu sc...

Page 28: ...ears on page 27 1 Touch P1 2 on the DVD mode main screen The function guide changes The display differs depending on the disc mode 2 Touch MENU CONT The menu operation mode screen appears For further operation see If a menu screen appears on page 27 To play back a DVD Audio disc set VCAP in Setting the DVD Audio Playback Mode page 41 Stopping Playback Pre Stop Press the stop button during playback...

Page 29: ... resume playback No sound is played during the still frame mode The image or sound may stop temporarily when playback starts from the pause mode This is not a malfunction Forward reverse frame by frame Playback 1 In the pause mode touch or The picture advances or reverses by one frame each time the button is touched 2 Touch to return to normal mode No sound is output during forward reverse frame b...

Page 30: ...uched and held for at least 2 seconds Searching by Title Group Folder Number Use this function to easily find positions on the DVD using the DVD s title Group or Folder number 1 Touch P1 2 while playback is stopped The function guide appears The display differs depending on the disc mode 2 Touch 10KEY The numeric keypad input mode screen appears 3 Enter a desired title Group or Folder by touching ...

Page 31: ...ngle switches To play back a DVD Audio disc set VCAP in Setting the DVD Audio Playback Mode page 41 Scroll to Move the Page Forward or Backward Page is a still image stored on a DVD Audio disc 1 Touch P1 3 twice while playing a DVD Audio disc in VCAP mode Playing back a DVD Audio disc when VCAP is set in Setting the DVD Audio Playback Mode page 41 2 Touch PAGE or The display switches Touch and hol...

Page 32: ...About DivX DivX is a codec software programme to compress moving images while maintaining image quality using a highly advanced compression ratio and operating speed Official DivX Certified product Plays all versions of DivX video including DivX 5 with standard playback of DivX media files DivX DivX Certified and associated logos are trademarks of DivX Inc and are used under license DivX Certified...

Page 33: ...ront and rear speakers Setting range F15 to R15 If an IMPRINT audio processor PXA H100 is connected to this unit and you have set the 2 2ch 3WAY 4 2ch FRONT REAR SUBW switch of the IMPRINT audio processor PXA H100 to 2 2ch 3WAY you cannot adjust the FADER mode For details refer to the Owner s Manual of PXA H100 Adjusting the Balance Touch L or R to adjust the sound volume of the left and right spe...

Page 34: ...r of Treble Freq to select the desired Treble centre frequency Setting range 10 kHz 12 5 kHz 16 kHz 17 5 kHz The operation can be performed only when the P EG is selected in Setting EQ mode on page 35 When P EQ is set in Setting EQ mode page 35 the frequency value may change correspondingly with the value set in Band 5 Subwoofer On and Off Touch or of Subwoofer to set to ON or OFF Adjusting the Su...

Page 35: ...ked this item is displayed Before performing the following procedures refer to About Time Correction page 54 1 Touch of Time Correction The Time Correction screen appears 2 Adjust the distance 0 0 to 336 6 cm of a desired speaker by touching the respective or button L distance to farthest speaker distance to other speakers Refer to Time Correction Value List on page 54 3 Repeat step 2 to set anoth...

Page 36: ... the level of selected band Adjustable level 6 to 6 dB 3 To adjust another band repeat step 2 and then adjust all bands When Graphic EQ is adjusted the adjustment for Parametric EQ becomes ineffective Adjusting Highpass Filter When Defeat is set to OFF touch the title bar of H P F to adjust screen Touch or of Front H P F to adjust the front speaker Setting range OFF 60 Hz 80 Hz 100 Hz Touch or of ...

Page 37: ... a desired folder and then touch appears only when a file is present in the selected folder The file list screen is displayed 2 Touch of a desired file name The selected file will be played back Switching Display Modes While your vehicle is parked touch WIDE on the visual source screen Each touch changes the display modes as follows In Mode 1 Wide the monitor displays a normal picture wider to fit...

Page 38: ...while the system is writing data automatically do not turn the ignition key engine key to OFF Otherwise the settings may not be changed The audio language subtitle language and menu language can be set according to your preferences Once set this becomes the default language This function is convenient when you always want to listen in English The language setting is not effective on some discs If ...

Page 39: ...r whom you deem them inappropriate 1 Touch Input The numeric keypad screen is displayed 2 Touch the numeric keypad to input a 4 digit password The initial number is 1111 Input number are displayed as 3 Touch Enter to memorize the number The Parental screen appears Set the rating level of PARENTAL 4 Touch of Parental to turn on 5 Touch or of Parental Level to select the rating level 1 to 8 Select O...

Page 40: ... 2ch 2ch Downmix OK AUTO Auto Max 7 1ch OK DTS ES CD DA DVD V DVD A 44 1kHz 16 20 24bit LPCM 44 1kHz 16bit Decoded 2ch 2ch Downmix OK AUTO Auto Max 6 1ch OK 48 96kHz 16 20 24bit LPCM 48kHz 16bit Decoded 2ch 2ch Downmix OK AUTO Auto Max 6 1ch OK MPEG1Layer II VCD DVD V DVD A 44 1kHz 16bit LPCM 44 1kHz 16bit Decoded 2ch OK AUTO Auto OK 48kHz 16bit LPCM 48kHz 16bit Decoded 2ch 2ch Downmix OK AUTO Aut...

Page 41: ...ion on the jacket etc of the disc for the code number Setting item Bonus Code Setting content Code 1 Touch Code The 10 key input screen is displayed 2 Input the 4 digit code number given on the jacket of the disc etc 3 Touch Enter to memorize the number If the code number of the bonus group differs from the code number you set in this section the 10 key input screen automatically appears in the di...

Page 42: ... to ON page 49 4 You can directly touch or to change this item 5 Touch or etc of the desired item to change its setting Radio Setup FM Level PI Seek RDS Regional PTY Language PTY31 Tuner Condition BLUETOOTH Setup Paired Devices Device Search Clear Device Service Provider Visible Mode Auto Answer Speaker Select MIC Input Firmware Version Firmware Update Hung Up Echo Cancel Navi Voice IN Call BT Men...

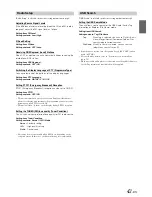
Page 43: ...nit will show Alarm in the display during PTY31 reception Setting the TUNER FM tone quality Tuner Condition This unit can set your preferred tone quality for FM radio source Setting item Tuner Condition Setting contents Normal HiFi Stable Noise may be more noticeable when HiFi is set depending on the reception status In this case the Normal setting is recommended USB Search is selected on the sour...

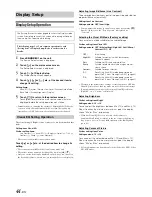
Page 44: ...u can select a mode suitable for the subject image Further setting item Visual EQ Setting contents OFF Initial setting Night M Soft Sharp Contrast P 1 P 2 To return to the default video settings set this function to OFF Any Visual EQ selection or changes made are reset their initial settings If any adjustments are made to the existing Visual EQ selections Night M etc Custom is displayed Adjusting ...

Page 45: ...he screen brightness while travelling at night Setting item Dimmer Low Level Setting content 15 to 15 You can adjust the level between Min 15 and Max 15 When it reaches the minimum or maximum point the display shows Min or Max respectively When on is set the function guide will be hidden automatically after no operation is performed for 5 seconds Setting item Function Guide Fade Setting contents O...

Page 46: ...contents OFF ON This setting is unavailable for the navigation mode Scroll display is available if CD text folder name file name or tag information is entered Setting item Auto Scroll Setting contents OFF ON The display scrolls on the unit when the screen is filled up Song artist and album name etc scrolls when an iPod iPhone is connected Four types of font can be selected Setting item Language Se...

Page 47: ...X1 IN AUX2 IN AUX Out BLUETOOTH IN Optical Out Speed Pulse Rear Source When ON is set in Setting the Picture Output page 49 the item is displayed 5 Touch to return to the previous screen Touch Exit to return to the main source screen that was displayed before the setup operation was started Immediately after changing the settings of System Mode While the system is writing data automatically do not...

Page 48: ...also be connected to this unit 3 If both front camera HCE C200F and rear camera HCE C200R are connected please set Camera IN to RCA and Camera Select to Rear Turning View Change Function ON OFF Depending on the connected camera the view angle of camera may be changed When a camera with View Change Function is connected set this item to ON Setting item View Change Func Displayed only when Camera IN...

Page 49: ...tents OFF ON Afterwards set ACC to OFF once then turn it ON again The setting of Digital Output is decided You can set the vehicle speed pulse division setting When you set to Type 2 the vehicle speed pulse divider is enabled Usually you do not need to change this setting Setting item Speed Pulse Setting contents Type1 Type2 The rear entertainment function independently routes different sources to...

Page 50: ...ngs to create your own preference when the MultEQ mode is set to OFF Manual Mode 1 Check whether the Defeat mode is off 2 Press SOURCE on the unit The Source Select screen is displayed 3 Touch on the source selection screen The Setup Select screen is displayed 4 Touch of Audio Setup The Audio Setup screen appears 5 Touch of A Processor The A Processor list screen appears 6 Touch or etc of the desi...

Page 51: ...4 Adjust the crossover to your preference Selecting the Cut Off Frequency Touch or of Freq then select the cut off frequency crossover point The adjustable bandwidth differs depending on the speaker channel 4 2ch FRONT REAR SUBW System Setting contents Low SUB W 20 Hz 200 Hz Mid REAR 20 Hz 200 Hz High FRONT 20 Hz 200 Hz Adjusting the Slope Touch or of Slope then adjust the HPF or LPF slope Adjusta...

Page 52: ...ou can change the unit cm or inch of time correction Touch or of T Corr Parameter to select cm or Inch Setting item T Corr Parameter Setting contents cm Inch You can modify the equalizer settings to create a response curve more appealing to your personal taste Setting item G EQ 1 Select L R by touching of G EQ When Parametric EQ is adjusted this setting will be turned OFF 2 Touch of G EQ after sel...

Page 53: ...he speaker care should be taken when setting the response slope of the high range speaker to FLAT in 2 2ch 3WAY mode see Adjusting the Crossover Settings X Over on page 51 as speaker damage may result Setting item TW Setup Touch or of TW Setup to select Factory s or User s Only if the 2 2ch 3WAY switch is toggled between 4 2ch FRONT REAR SUBW and 2 2ch 3WAY on the IMPRINT audio processor PXA H100 ...

Page 54: ... farthest speaker and the other speakers L distance to farthest speaker distance to other speakers These values are the time correction values for the different speakers Setting these values to make each sound reach the listening position at the same time as the sound of other speakers Time Correction Value List Example 1 Listening Position Front Left Seat Example 2 Listening Position All Seats 5 ...

Page 55: ...e damage to the speaker due to the low frequency content You cannot adjust the crossover frequency higher than the HPF or lower than the LPF Adjustment should be made according to the recommended crossover frequency of the connected speakers Determine the recommended crossover frequency of the speakers Adjusting to a frequency range outside that recommended may cause damage to the speakers For the...

Page 56: ...etc of the desired item to change its setting Setting items Media Xpander Bass Sound Cont Dolby PLII Rear Fill X Over Time Correction Phase G EQ P EQ Speaker Select Multi Ch Setup Speaker Setup DVD Level PCM Mode 7 Touch to return to the previous screen Touching Exit will change to the main source screen ExternalAudioProcessor Operation Optional The Parking Brake must be engaged to access the Audi...

Page 57: ...Dolby Digital and DTS signals there is also a Rear Fill function for outputting the signals of the front channel to the rear channel Setting item Dolby PLII Rear Fill Touch or of Dolby PLII Rear to select the desired mode If PLII Music is selected the centre width can be adjusted with following operations This function offers the optimum vocal position by adjusting the centre channel position betw...

Page 58: ... Calculating the time correction value for the front left speaker on the diagram below In other words setting the time correction value for the front left speaker to 5 1 ms sets a virtual distance matching the distance to the farthest speaker 4 Touch or of Time Correction Select L R or L R 5 Touch of Time Correction The Time Correction adjustment screen appears 6 Adjust the time correction value 0...

Page 59: ...will be turned off 2 Touch of P EQ The P EQ list screen appears 3 Touch of the desired speaker channel The P EQ adjustment screen appears 4 Adjust the P EQ to your preference Selecting the Band Touch or of Band to select the desired band Adjusting the Frequency Touch or of Freq to adjust the frequency of the selected band Adjusting the Level Touch or of Level to adjust the level of the selected ba...

Page 60: ...justments of the different speakers When levels are equal a strong sense of presence can be heard from the different speakers at the listening position Avoid stopping pausing switching the disc cueing fast forwarding or switching the audio channel of this unit while making this adjustment The setting is cancelled if the decode mode is switched 1 Touch On of Output Level Test tone output is repeate...

Page 61: ...en BLUETOOTH compatible devices BLUETOOTH transmission is available in the unlicensed 2 4 GHz spectrum if the distance between devices is within 10 meters For details refer to the BLUETOOTH Home page http www bluetooth com Depending on the BLUETOOTH version a BLUETOOTH compatible device may not be able to communicate with this unit Proper function of this unit with all BLUETOOTH compatible devices...

Page 62: ...ered Setting item Paired Devices Touch a BLUETOOTH compatible device to use change connection from the Paired Device list If the connection is successfully changed Connected NO Device name is displayed for 2 seconds and then the display returns to the Setup screen If you input the wrong passcode or communications fail Failed is displayed If you want to connect another BLUETOOTH compatible device a...

Page 63: ...audio processor PXA H100 or External Audio processor PXA H701 etc is connected the default setting All will be set and cannot be adjusted Adjusting the volume for the microphone input You can emphasise or weaken the microphone input volume level Setting item MIC Input Touch or to select the desired volume level 0 7 The setting cannot be adjusted during a phone call Adjust the setting before placin...

Page 64: ...ned in the Owner s Manual are based upon the latest available information and are believed to be accurate at the time of printing Alpine reserves the right to change or modify any information or specifications without notice or obligation Answering a Call Incoming calls are announced by the received call ring tone and a displayed message Caller name PHONE No Touch The call starts Indicator Signal ...

Page 65: ...creen Touch Exit to return to the main source screen that was displayed before the setup operation was started If you place a call directly from the paired mobile phone the phone number is not displayed you cannot redial from the unit in this case Previously dialed telephone numbers are stored in dialed numbers history You can redial a number by searching from dialed numbers history Setting item D...

Page 66: ... The Voice Dial function performance depends on the recognition range of the mobile phone and mounting location of the microphone Note when the microphone is mounted Voice dial operation depends on the function of the mobile phone For details refer to the Owner s Manual of the mobile phone You can place a call by inputting the telephone number directly by the numeric keypad screen on the unit 1 To...

Page 67: ...the calling person and the person on hold Preset a number in the Phone Book Shortcut dial Numbers that you dial frequently can be as signed to preset for quick recall You can assign up to five frequently called phone numbers to number presets 1 Touch of the person s name you want to preset from the Phone Book list The Phone Book number screen is displayed Display example for Phone Book number list...

Page 68: ...ront camera Rear camera Operation 1 Press SOURCE on the unit The Source Select screen is displayed 2 Touch CAMERA The Camera mode is activated and view video is displayed 3 Touch any area of the screen to display the view change function keys 3 4 Touch Back Panorama Corner or Top to choose the view angle 5 Touch Guide On or Guide Off to set whether the rear camera guide line 4 is displayed Touch t...

Page 69: ...ake sure view change function is set to ON page 48 1 Touch any area of the screen to display the view change function keys 2 Touch Back for three times The volume adjustment screen appears 3 Touch Back again The sensitivity adjustment screen appears 4 Touch Panorama to switch a desired detection sensitivity level Touching the button toggles the volume level 5 Touch to return to normal mode Adjusti...

Page 70: ... not displayed on the main menu set AUX1 IN to ON or AUX2 IN to AUX by following Setting the AUX Mode page 48 The setting of switching NTSC PAL which you have set in this section can be used in same way in Switching the Visual Input Signal System on page 49 The display mode changes by touching WIDE For operation refer to Switching Display Modes on page 37 SD Memory Video WARNING It is dangerous fo...

Page 71: ...e INA W910R If you connect a changer compatible with MP3 you can play CD ROMs CD Rs and CD RWs containing MP3 files on the INA W910R Using the KCA 410C Versatile Link Terminal multiple changers can be controlled by the INA W910R See the Multi Changer Selection section for selecting the CD Changers explained on page 72 1 Press SOURCE on the unit The Source Select screen is displayed 2 Touch CD CHG ...

Page 72: ...owing conditions Otherwise the number of songs that can be stored may be less than 1 000 Conditions general estimate values Playlists 20 32 characters 64 bytes Genres 10 32 characters 64 bytes Composers 30 32 characters 64 bytes Artists 30 32 characters 64 bytes Albums 100 32 characters 64 bytes Titles 1 000 32 characters 64 bytes Folders 100 32 characters 64 bytes Files 1 000 32 characters 64 byt...

Page 73: ...nd hold Advancing to the beginning of the next track file Touch Fast forward Touch and hold Depending on the connected portable audio player fast forwarding fast reversing may not be available 4 To pause playback touch Touching again will resume playback WMA format files that are protected by DRM Digital Rights Management AAC format files that have been purchased from iTunes Music Store that are n...

Page 74: ...rformed Another search mode can be used for the same operation although the hierarchy differs 1 Touch The search mode is activated and the search list screen appears Touching for at least 2 seconds will return to last search mode 2 Touch of Artists The Artists search screen is displayed 3 Select the desired artist To play back the artist directly 1 Touch next to the artist s name All songs of the ...

Page 75: ...For example if you listen to a song from a selected album the album can be changed Touch or to select the desired Playlist Artist Album Genre Composer This item is invalid when a portable audio player is connected If search selection mode is not activated a Song search is not possible If an album is selected from an artist search the album can be searched During shuffle M I X playback this operati...

Page 76: ...an iPhone to this unit it can be used as an iPod To watch the video screen of the file from iPod iPhone iPhone iPod touch iPod classic iPod 5th generation iPod nano 3rd generation iPod nano 4th generation and iPod nano 5th generation using the USB connection and the Parking Brake must be engaged set AUX2 IN to iPod Video in Setting the AUX Mode page 48 For automatic transmission vehicles place the...

Page 77: ... or song name created in iTunes has too many characters songs may not be played back when connected to this unit Therefore a maximum of 250 characters is recommended The maximum number of characters for the head unit is 128 128 byte Some characters may not be correctly displayed No Support is displayed when text information is not compatible with the this unit If an iPhone or a video compatible iP...

Page 78: ...tion by touching the direct search bar for quick search For details refer to Direct Search Function page 78 If Alphabet Skip Function is activated in the search mode a search can be made quickly by Alphabet skip function to find the desired artist or song etc For details refer to Alphabet Skip Function on page 78 When search is made during M I X play the M I X play mode will be cancelled In search...

Page 79: ...ngs in the iPod are played back in random sequence Any one song does not play back again until all songs have been played back Shuffle Albums The songs on each album are played back in proper order Upon completing of all the songs on the album the next album is selected randomly This continues until all albums have been played Shuffle Songs Song shuffle randomly plays back songs within a selected ...

Page 80: ...o go back to the beginning of the current file Press and hold to fast reverse DVD Video Video CD DivX Move to the desired position on the disc During playback press and hold for more than 1 second to reverse the disc at double speed Hold for more than 5 seconds to reverse the disc at 8 times the normal speed Hold for more than 10 seconds to reverse the disc at 21 times the normal speed DVD Video W...

Page 81: ...rocessor is connected Press the button to display the audio processor setting screen When an external audio processor is non connected Press the button to display the audio mode screen Radio mode Selects in ascending order stations programmed into the radio s presets MP3 WMA AAC DivX mode Folder Select UP Button to selects the folder Changer mode DISC Select UP Button selects a disc in ascending o...

Page 82: ...ed in up to eight languages The desired language can be selected from the unit Subtitles function page 32 Movies can include subtitles in up to 32 languages The desired subtitle language can be selected from the unit Multi angle function page 31 When the DVD contains a movie shot from multiple angles the desired angle can be selected from the unit Multi story function With this function a single m...

Page 83: ...dio decoder Analogue audio outputs are available Dolby Pro Logic II Dolby Pro Logic II plays 2 channel sources in 5 channels over the entire frequency range This is done with an advance high sound quality matrix surround decoder which draws out the spatial properties of the original recording without adding any sounds to or changing the sound of the source The separately sold digital audio process...

Page 84: ...979 6983 6984 6985 7065 7073 7074 7079 7082 7089 7165 7168 7176 7178 7185 7265 7273 7282 7285 7289 7365 Abbreviation IE IK IN IS IT IW JP JI JW KA KK KL KM KN KO KS KU KY LA LN LO LT LV MG MI MK ML MN MO MR MS MT MY NA NE NL NO OC OM OR PA PL PS PT QU RM Code 7369 7375 7378 7383 7384 7387 7465 7473 7487 7565 7575 7576 7577 7578 7579 7583 7585 7589 7665 7678 7679 7684 7686 7771 7773 7775 7776 7778 ...

Page 85: ... IS IT JM JO JP KE KG KH 6877 6879 6890 6967 6969 6971 6972 6982 6983 6984 7073 7074 7075 7077 7079 7082 7165 7166 7168 7169 7170 7172 7173 7176 7177 7178 7180 7181 7182 7183 7184 7185 7187 7189 7275 7277 7278 7282 7284 7285 7368 7369 7376 7378 7379 7381 7382 7383 7384 7477 7479 7480 7569 7571 7572 Dominica Dominican Republic Algeria Ecuador Estonia Egypt Western Sahara Eritrea Spain Ethiopia Finl...

Page 86: ... 8371 8372 8373 8374 8375 8376 8377 8378 8379 8382 8384 8386 8389 8390 8467 8468 8470 8471 8472 8474 8475 8477 8478 8479 8480 8482 8484 8486 8487 8490 8565 8571 8577 8583 8589 8590 8665 8667 8669 8671 8673 8678 8685 8770 8783 8969 8984 8985 9065 9077 9087 PE PF PG PH PK PL PM PN PR PT PW PY QA RE RO RU RW SA SB SC SD SE SG SH SI SJ SK SL SM SN SO SR ST SV SY SZ TC TD TF TG TH TJ TK TM TN TO TP TR ...

Page 87: ...on Allow enough time for the condensation to evaporate about 1 hour Ambient Temperature Make sure the temperature inside the vehicle is between 0 C and 45 C 32 F and 113 F Radio Unable to receive stations No antenna or open connection in the antenna cable Make sure the antenna is properly connected replace the antenna or cable if necessary Unable to tune stations in the seek mode You are in a weak...

Page 88: ...e wire and set the parking brake For details refer to the monitor s instructions Playback does not start Disc is loaded upside down Check the disc and load it with the labelled side facing upward Disc is dirty Clean the disc A disc not able to play back with this unit is loaded Check if the disc is able to be played back Parental lock is set Cancel the parental lock or change the rating level Pict...

Page 89: ...supported by the unit is used Use a sampling rate bit rate that is supported by the unit Indication for DVD Video CD No disc is inserted Insert a disc Although a disc is inserted No Disc is displayed and the unit does not start to play or eject the disc Remove the disc by following these steps Press for at least 3 seconds Button operation on the unit or remote control is not possible For some disc...

Page 90: ...er No magazine is loaded into the CD Changer Insert a magazine No indicated disc Choose another disc Indication for USB Memory Portable audio player Database error or decoder error You can solve the problem by reconnecting the USB Memory Portable audio player Communication error or boot error etc You can solve the problem by reconnecting the USB memory Portable audio player or changing source The ...

Page 91: ... Frequency response may differ depending on the encoder software bit rate Screen Size 7 0 LCD Type Transparent type TN LCD Operation System TFT active matrix Number of Picture Elements 1 152 000 pcs 800 3 480 Effective Number of Picture Elements 99 99 or more Illumination System LED Tuning Range 87 5 108 0 MHz Mono Usable Sensitivity 8 1 dBf 0 7 µV 75 ohms 50 dB Quieting Sensitivity 12 dBf 1 1 µV ...

Page 92: ...000 Hz 1 dB Wow Flutter WRMS Below measurable limits Total Harmonic Distortion 0 008 at 1 kHz Dynamic Range 95 dB at 1 kHz Channel Separation 85 dB at 1 kHz Signal system NTSC PAL Horizontal resolution 500 lines or greater Video output level 1Vp p 75 ohms Video S N ratio DVD 60 dB Audio S N ratio 105 dB Wave length DVD 666 nm CD 785 nm Laser power CLASS II Power Requirement 14 4 V DC 11 16 V allow...

Page 93: ...S AND INSTALL THEM SECURELY Be sure to use only the specified accessory parts Use of other than designated parts may damage this unit internally or may not securely install the unit in place This may cause parts to become loose resulting in hazards or product failure ARRANGE THE WIRING SO IT IS NOT CRIMPED OR PINCHED BY A SHARP METAL EDGE Route the cables and wiring away from moving parts like the...

Page 94: ...affix the supplied seal refer to How to use a Seal page 95 Slide the unit into the mounting sleeve and secure it If B or C is used make sure that there is a enough space depthwise before installing the unit If the unit is forcibly pushed into the mounting sleeve damage may occur 1 If the installed mounting sleeve is loose in the dashboard the pressure plates may be bent slightly to remedy the prob...

Page 95: ...ng a screw already attached to the car s chassis Attach the Original Mounting Bracket to each side of the INA W910R using the screws supplied with INA W910R 4 Screw Bolt Stud This unit Chassis Ground Lead Metal Mounting Strap Hex Nut M5 2 1 When your vehicle has the Bracket mount the long hex bolt onto the rear panel of the INA W910R and put the Rubber Cap on the hex bolt If your vehicle does not ...

Page 96: ...er leads as possible Connect the ground lead securely to a bare metal spot remove any paint dirt or grease if necessary of the car chassis If you add an optional noise suppressor connect it as far away from the unit as possible Your Alpine dealer carries various noise suppressors contact them for further information Your Alpine dealer knows best about noise prevention measures so consult your deal...

Page 97: ...f HCE C300R 2 Press SOURCE on the unit The SOURCE selection screen is displayed 3 Touch CAMERA The Camera mode is activated and the Top menu is displayed 4 Touch any area of the screen to display the view change function keys Make sure view change function is set to ON page 48 Display example for Top menu screen 5 Touch Back Corner Back according to the instructions on the screen The Setup Mode sc...

Page 98: ...iolet AUDIO INTERRUPT IN REMOTE TURN ON PARKING BRAKE ACC GND POWER ANT BATTERY Grey Black White To remote input lead To remote output lead To plus side of the back lamp signal lead of the car Not used To guide control input terminal To steering remote control interface box Microphone Included GPS Antenna To Video Output terminal To Audio Output terminals R L To Video Input terminal To Audio Input...

Page 99: ...ed please make sure to connect it to this unit via Direct CAMERA Input Connector iPod AUDIO VIDEO Input Connector Input the iPhone video compatible iPod audio video signal or AUX video audio signal Set AUX2 IN to iPod Video in Setting the AUX Mode page 48 when an iPhone or a video compatible iPod is connected Set AUX2 IN to AUX in Setting the AUX Mode page 48 when normal AUX video audio is input G...

Page 100: ... post of the vehicle s battery Fuse Holder 10A ISO Power Supply Connector ISO Connector Speaker Output Left Rear Speaker Output Lead Green Left Rear Speaker Output Lead Green Black Left Front Speaker Output Lead White Left Front Speaker Output Lead White Black Right Front Speaker Output Lead Grey Black Right Front Speaker Output Lead Grey Right Rear Speaker Output Lead Violet Black Right Rear Spea...

Page 101: ... compatible product is connected it is necessary to set the mode of this unit Refer to Setting the Digital Output page 49 Please observe the following when using Fiber optic Cable Do not coil the Fiber optic Cable smaller than a 30 mm radius Do not place anything on top of the Fiber optic Cable Be careful not to bend the Fiber optic Cable at a sharp angle Fiber optic cable Ai NET cable Fiber optic...

Page 102: ...ng signals from the remote control To Ai NET Connector Grey RCA Extension Cable Included with DVD video player Video Input Connector AUX INPUT Yellow Connect the video output lead of a DVD video player or DVD changer to this terminal AUX I O Camera Input Connector To Ai NET Connector Black Ai NET Cable Included with IMPRINT Audio Processor PXA H100 Fiber optic Cable sold separately Guide Connector...

Page 103: ... to the remote control input lead This lead outputs the controlling signals from the remote control Remote Control Input Lead White Brown Reverse Lead Orange White Use only when a back up camera is connected Connect to the plus side of the car s reverse lamp This lamp illuminates when the transmission is shifted into reverse R With this lead properly wired the video picture automatically switches ...

Page 104: ... video compatible iPod audio video signal or AUX video audio signal Set AUX2 IN to AUX in Setting the AUX Mode page 48 when normal AUX video audio is input When you use this connector as normal video audio input connector AUX 2 Input an optional AV RCA interface cable should be used For details refer to Camera extension cable Included with direct rearview camera Direct CAMERA Input Connector Use w...

Page 105: ......

Reviews: