Alan MAP600 User Manual Download Page 42

MAP 600 – User’s Manual 

Page 42 

15. Troubleshooting 

In case of problems, this table might help to resolve them. If not, contact your supplier or service centre and describe in 
detail the problem found. 
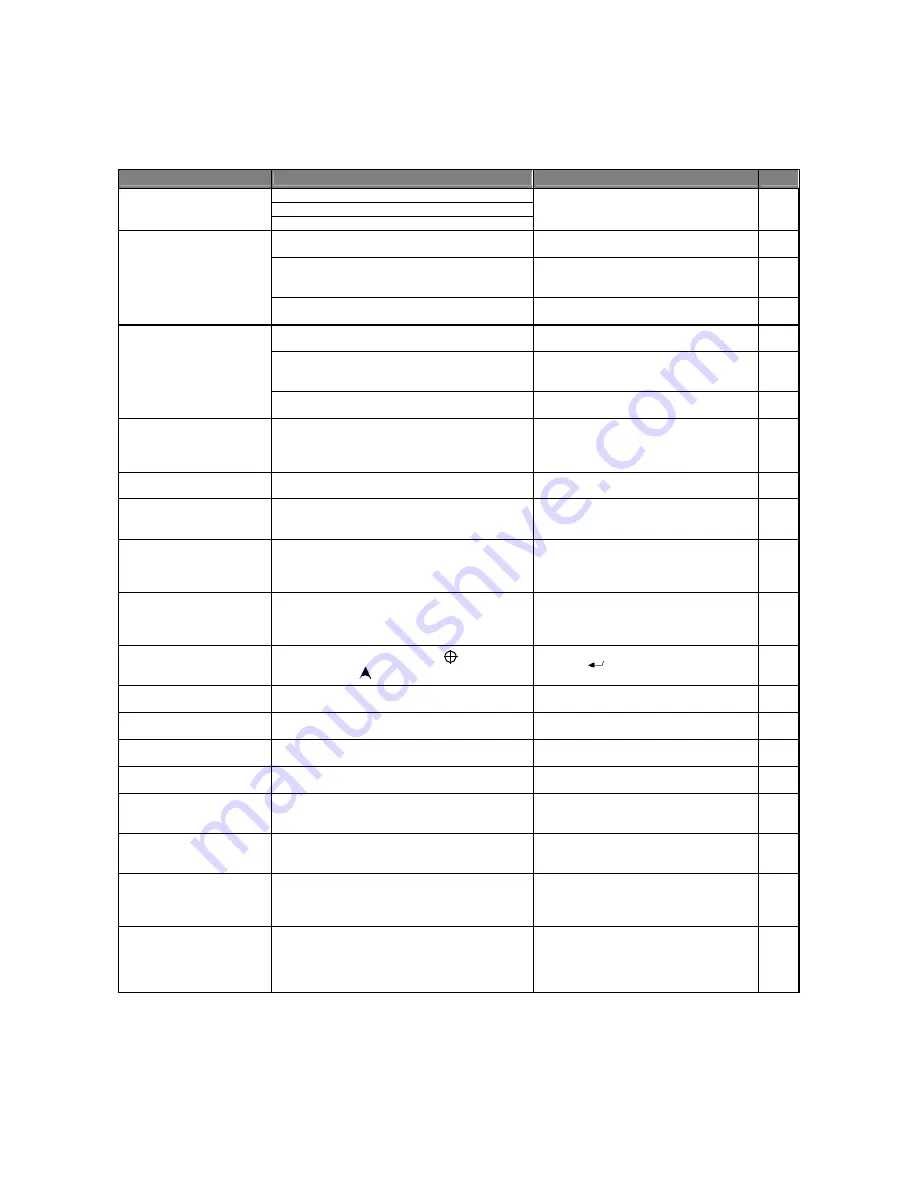
OQNAKDL  

ONRRHAKD B@T RD 

RNKT SHNM 

QDE- 

Batteries are not inserted correctly 
Batteries are low 

MAP 600 does not turn on 

Battery contacts are dirty 

Ensure you have inserted the batteries 
correctly, that the batteries are charged, 
and, if necessary, clean the contacts 

4.2.b  

This can be expected if the GPS energy saver is 
not enabled 

Try to insert the energy saver 

8.2.b 

Rechargeable batteries are not suitable, are 
charged incorrectly, and/or are experiencing a 
“memory effect” 

Ensure the batteries are the correct type, 
that they are properly charged, and/or 
eliminate the memory effect 

4.2.a 

Batteries do not last very 
long 

You are using the display backlighting too 
frequently 

Backlighting increases consumption. 
Reduce its use to a minimum 

7.3 

There is insufficient open space overhead  

Move to a more open area. Try to monitor 
the signals using the Satellite page  

9.1 

MAP 600 is connected too close to interference 
devices (televisions, computers, transceivers, air 
conditioners, etc) 

Move MAP 600 further away from 
interference devices 

GPS does not start the 
operating mode 

Logical malfunction 

Remove the batteries for a few minutes and 
try to insert them again 

4.2.b 

GPS takes a long time to 
start the operating mode 

You have traveled more than 500Km with the 
device turned off and/or with insufficient open 
space overhead for reception 

Ensure you have enough open space 
overhead, then turn off the device and turn 
it back on again. You can also try to 
initialize it. 

5.2 

GPS does not update its 
position on the display 

You are in Simulation mode 

Put the device in navigation mode 

8.2.b 

The displayed time is 
incorrect 

You have chosen an incorrect time difference (time 
zone difference from Greenwich) for your current 
position 

Select the correct time zone difference 

8.7 

Measurements displayed 
on the GPS are incorrect or 
incomprehensible 

An incorrect unit of measure for your requirements 
has been selected (e.g., nautical units rather than 
land units) and/or the reference system on your 
map is different from the selected one 

Select the correct unit of measurement 
depending on your current needs and/or 
select the correct reference system 

8.3.a 


GPS has acquired 3 or 
more satellites, but is not 
displaying your position 

The acquired satellites are all located in one 
quadrant of the sky (the 

DOP

 value (Dilution of 

Position) on the 

Satellite 

page is too high) 

When this happens, MAP 600 will not 
display your position because the margin of 
error is too high. Move to another area to 
acquire satellites from other quadrants 

On the Map page, your 
position is no longer 
displayed 

You have selected the 

View Map


 mode rather 

than 

Navigation


 mode 

Press the 

 button 

Step 4 

of 9.2 

You are unable to delete 
waypoints 

The waypoints you are trying to delete have been 
inserted in a route 

Remove the waypoints you are deleting 
from the route 

11.6 
11.7 

You are unable to program 
waypoint coordinates 

You have selected a map reference with a different 
standard from WGS-1984 

You can only program waypoint coordinates 
using WGS-1984. Select it 

8.5 

You are unable to navigate 
along a route 

Programming a route is not enough; you also have 
to active it before using the route for navigation 

Activate the route for navigation 

11.2 

The Change Next WP 
command is disabled 

To navigate using a route and select a next 
waypoint, you must first program a route 

Program the waypoints and the route 

10 
11 

Map details are not 
displayed as they should 
be 

It is possible to show all details or only those which 
you wish to show (using the correct commands) 

Please refer to the paragraphs noted to the 
right of this box, and follow the instructions 
according to your needs 

Step 3 

of 9.2 


The data being read does 
not match with the data on 
a paper map 

It is possible that the reference system or the 
design standard of the map are not the same as 
are being used in your MAP 600 

Please refer to the paragraphs notes to the 
right of this box 

8.4 
8.5  

An error message appears 
during the recording of the 
tracking and every time 
you turn on the device 

You have reached the maximum capacity of the 
tracking 

Save or delete the tracking 

13.2 

A PC or other device is not 
able to receive data from 
your MAP 600 

The market offers many navigation systems which 
use different transmission speeds and data output, 
as well as various software which is protected by a 
special code which restricts the use only to specific 
GPS receivers 

Enquire as to the compatibility of data 
formats 

8.2.c 

Summary of Contents for MAP600

Page 1: ......

Page 2: ...t 12 7 Main pages 12 7 1 Selecting the main pages 13 7 2 Rotating the main pages 13 7 3 Display backlight 14 7 4 Adjusting the display contrast 14 8 Navigating the Command Menus 15 8 1 System Setting...

Page 3: ...nserting a waypoint between two existing waypoints 35 11 6 Removing a waypoint from a route 35 11 7 Removing all the waypoints from a route and creating a new route 36 12 Navigator AutoRoute 37 12 1 a...

Page 4: ...ing pay attention to your driving When the sockets are not in use cover them with the rubber cover to protect them Observe all precautions regarding use of the batteries as described further in Chapt...

Page 5: ...l information correction obtained by the use of the WAAS and EGNOS technology Fully waterproof Alan MAP 600 is suitable for the most extreme conditions such as outdoors or over a motorcycle use Please...

Page 6: ...ages exit to select the main pages screens and going backwards through the command menus without creating or changing settings 6 direction Joystick to use different functions such as scrolling through...

Page 7: ...nsufficient visibility of the sky e g inside a vehicle 15 Beeper Acoustic signaling that indicates the approaching to a turn by a beep please refer to par 8 2 e Do not connect the battery charger when...

Page 8: ...ve the lever of the battery well cover to the centre and pull it out diagram 1 b Remove the battery well cover c Install 2 fully charged AA batteries paying attention to the polarities as shown on the...

Page 9: ...ning battery charge a full icon indicates the higher battery charge an empty icon indicates a low battery charge To switch to the Satellite page please refer to par 7 1 2 Similar to fuel indicators on...

Page 10: ...car For a better GPS signal acquisition we suggest to use it in conjunction with an external antenna 3 Data Cable It is possible to connect MAP600 to a PC through two different cables a Serial Cable R...

Page 11: ...ion survey as described in par 5 2 c This procedure consists of three steps that have to be executed with the following order Positioning and first start up Initialization Establishing of position 5 2...

Page 12: ...ditional Routes consist of at least two or more waypoints that specify a route to a destination You can specify up to 50 routes each of them with up to 150 waypoints This function drives you from the...

Page 13: ...her information about the details of each page please refer to Chapt 9 7 2 Rotating the main pages You can rotate the display visualization by 90 degrees in order to take advantage of using the longer...

Page 14: ...display contrast can be adjusted in two ways as explained below MODE 1 From the Satellite page a Move the Joystick left or right respectively to reduce or increase the contrast During this operation...

Page 15: ...and quickly access to the functions geographical reference settings routes etc more frequently used Please refer to par 8 1 and 8 8 for details about using the System Setting and Main Menu menus 2 You...

Page 16: ...interface e g transceiver mapping instrument etc is able to process the data The available settings are Off interface excluded MAP 600 works normally without sending data to the interface On interfac...

Page 17: ...nglo Saxon countries 8 3 b Language This setting specifies the default language English Dutch Italian German French Spanish 8 3 c DMS Format This setting specifies the DMS display format of degrees mi...

Page 18: ...to avoid highways if possible Auto Zoom In With this setting MAP600 enables a 50m zoom when a distance of 200mfrom a turn is reached in order to allow you to better understand the route to drive throu...

Page 19: ...to choose which map file load Please refer to Chapt 5 2 for more information about the use LCD Level By selecting this option it is possible to adjust the display contrast Please refer to Chapt 5 2 f...

Page 20: ...ss the button twice or press the button once then highlight Main Menu with the Joystick and press the button The display will show b With the Joystick highlight Files in CF and press the button A page...

Page 21: ...lites at least three dark bars must appear as described in the above description 5 Battery icon indicates the remaining battery power For further details please refer to par 4 3 a 6 Backlight icon ind...

Page 22: ...own but as soon as you move the Joystick it will appear close to your current position View map mode the display shows an area as you wish not related to your position The cursor is always visible to...

Page 23: ...two pages will appear Fast and Wildcard From the Fast page it is possible to select the desired Road from a list of all the available roads in the city chosen while from the Wildcard page you can ente...

Page 24: ...in Autoroute mode i e Start Point End Point etc a Append This function allows to MAKE a Start Point a Middle Point or an end point by selecting one of this options From GPS Current user position Sear...

Page 25: ...p is automatically oriented towards the direction wherein you are moving Map rotates with 45 steps in order to maintain this orientation In this mode the icon on the upper left corner of the display s...

Page 26: ...The symbol shows the new position 9 2 h Navigator Menu diagram 6 In order to access to all navigator functions as well as the settings described in par 9 2 e you can enter this convenient menu by pres...

Page 27: ...ng the button you can access to the following options that can be highlighted with the Joystick and selected by pressing the button Trip Reset It allows to reset the trip start timer Please refer to p...

Page 28: ...ing to the settings menu For further details please refer to par 8 1 Main Menu It allows accessing to the main menu For further details please refer to par 8 8 To select a desired option use the comma...

Page 29: ...or press once highlight Main Menu with the Joystick and press the button diagram 1 1 2 Using the Joystick highlight Waypoints and press the button A list of previously programmed waypoints if existin...

Page 30: ...llow the step 4 described in par 10 1 a this time selecting the Edit command 10 3 Deleting one or more waypoints If you wish to delete a previously programmed waypoint 1 Follow steps 1 through 3 as de...

Page 31: ...same characters in the same position on the list The character _ underscore in any position automatically accepts any character Example you have 5 waypoints with these names W001 W002 PORT HOME LIGHT...

Page 32: ...cu late a straight virtual route b Navigator AutoRoute Differently from the traditional routes this function allows to calculate the route following the roadmap It is possible to enter a number of int...

Page 33: ...the first waypoint to add press the button you will see 1 to the right of the waypoint that is the first reference used as starting point 11 Add other waypoints by repeating the step 10 You will note...

Page 34: ...route 2 If you wish to turn off the navigation of all routes follow again the above procedure selecti ng Cancel Navi at step 3 11 3 Adding a waypoint to a route To add waypoints to a route 1 Follow st...

Page 35: ...the button above and below the waypoint two dotted lines will appear 6 Press the button The display will show the available options 7 Using the Joystick select Insert WP Diagram 5 to insert a new way...

Page 36: ...you wish to remove all the waypoints then press the button 3 Move the Joystick up or down to enter the waypoint list 4 Press the button select Delete All and then press the button 5 Press the button...

Page 37: ...At this point the page as shown in Diagram 1 will appear 1 2 Select GOTO MAP600 will start to calculate a AutoRoute from the point you are that becomes the start point to the selected point that becom...

Page 38: ...he three options below a The GPS will start to calculate an AutoRoute to this point b The display will show the selected point c It cancels the search and the GPS will return to the Menu Moreover in t...

Page 39: ...hown under Tracking Off excluded Fill recording of points until the memory space is filled up to 2500 positions Wrap continuous recording of points when the memory is full new points will substitute t...

Page 40: ...ected track i e the number of saved points the date and the area of interest to modify the track name and add a comment 13 3 Edit Info Once a track is saved you can edit it and display all the related...

Page 41: ...4 A completely blank screen will appear Attention MAP600 might seem turned off but it is not 5 Press the menu button to access to a menu 3 6 Select Factory Reset then press the Enter button Diagram 3...

Page 42: ...lect the correct unit of measurement depending on your current needs and or select the correct reference system 8 3 a GPS has acquired 3 or more satellites but is not displaying your position The acqu...

Page 43: ...time is multiplied by the speed of light the result is the satellite range distance from satellite to receiver The navigation information provided by each satellite consists of orbital and clock data...

Page 44: ...0 seconds on average Already warm 15 seconds on average Speed of satellite acquisition every 0 1 second Speed of data update every second Precision Position 5 25 meters Speed within 0 1m second Time 1...

Page 45: ...ual Every effort has been made to ensure that the information in this document is complete accurate and up to date The manufacturer assumes no responsibility for their real correspondence with the pro...

Page 46: ...Navigating the command menus 15 Navigation mode 16 NMEA data output 16 On Off 11 Reset Trip Timer 27 Rotating of main pages 13 Route See Routes Routes activating 34 adding a waypoint 35 creating 33 in...

Reviews: