S220/S221/S230/S231/Z200
6-5
Attachments
6
1
2
3
4
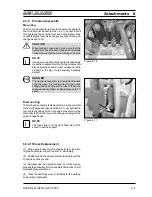
Figure 6-10
Figure 6-12
Figure 6-11
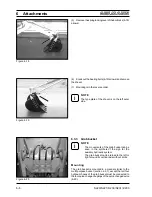
(4) Pick up the bucket using the quick-change device and,
by simultaneously tilting the quick-change device, raise the
bucket until the quick-change device is next to it (6-10).
(5) Release the release button for the quick-change
device (4-7/1).
NOTE
-
When the release button for the quick-change
device is pressed, the claws release as long
as the button is pressed.
-
The bucket claws engage again when the
button is released.
(6) Check that the device is mounted and locked correctly
on both sides.
DANGER
The bucket is mounted and locked correctly
when the bucket is located next to the quick-
change device and the piston rods of the quick-
change device cylinder can be plainly seen (6-11/
arrow).
(7) Shut down the engine and turn the ignition key to „I“.
(8) Remove the pressure from the hydraulic lines. For this
purpose, press both pushbuttons for the auxiliary hy-
draulics (4-9/3) alternatingly several times.
(9) Unscrew the protective caps (6-12/1) of the hoses of
the multi-purpose bucket.
(10) Unscrew the protective caps (6-12/2) of the quick-
change couplings on the bucket arm and connect the
hoses of the multi-purpose bucket (6-12/3) to those in the
bucket arm.
CAUTION
-
When making connections, make sure that
the hydraulic connections are clean and
completely connected and that the colour
codings coincide.
-
Connections that are not used (6-12/4) must
be protected by caps.
Dismounting
(1) Place the multi-purpose bucket firmly on the ground.
(2) Shut down the engine and turn the ignition key to „I“.
(3) Remove the pressure from the hydraulic lines. For this
purpose, press both pushbuttons for the auxiliary hy-
draulics (4-9/3) alternately several times.
(4) Further dismounting is in the reverse order.
NOTE
The type plate is on the rear of the bucket, on the
right-hand side beneath the cross arm.
i
i
Summary of Contents for AS 210
Page 7: ...Safety Regulations ...
Page 19: ...Signs ...
Page 22: ...ProtectionAgainstTheft ...
Page 25: ...Description ...
Page 33: ...Operation ...
Page 44: ...Attachments ...
Page 53: ...Rescue Towing Lashing Lifting by Crane ...
Page 60: ...Maintenance ...
Page 78: ...Faults Causes and Remedies ...
Page 81: ...Diagrams ...
Page 98: ...Technical Data Loader ...
Page 102: ...Technical Data Attachments ...
Page 115: ...AdditionalOptions Modifications Notes on Inspection for Loaders ...


