To remove and replace the switch actuator assembly
1
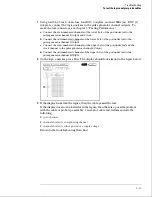
Using previous procedures, remove the following assemblies:
•
Handle
•
Rear Feet
•
Cover
•
Disk Drive
•
Power Supply
•
Main Circuit board
2
Make sure the power switch is in the off position.
3
Disconnect the switch actuator from the line filter.
a
Slide the clamp off of the outer casing far enough to release the switch actuator
assembly.
C A U T I O N
If the wire in the switch actuator is bent, the complete assembly must be replaced. Refer to
chapter 5, "Replaceable Parts" for the part number.
b
Without bending the wire, gently pry the nipple out of the switch plunger.
c
Slide the cable out of the switch assembly.
4
Remove the switch actuator assembly from the front of the cabinet.
To remove, depress the retaining ears on both sides of the assembly next to the front panel
and push the assembly out the front.
5
Install the new switch actuator assembly. Make sure that the line filter switch is in
the off position.
a
Route the cable through the front panel, then snap the pushbutton into the front panel.
b
Snap the nipple into the switch plunger.
c
Position the free end of the outer casing into the switch mounting chassis. The edge
of the outer casing should be all the way against the inner edge of the switch mounting
chassis.
d
Close the clamp by pushing it into the switch assembly until the clamp is seated.
6
Verify the push-on, push-off action of the assembly.
Replacing Assemblies
To remove and replace the switch actuator assembly
6–8
Summary of Contents for 1664A
Page 3: ...The Agilent Technologies 1664A Logic Analyzer iii...
Page 8: ...Contents viii...
Page 22: ...2 6...
Page 91: ...Troubleshooting Flowchart 1 Troubleshooting To use the flowcharts 5 3...
Page 92: ...Troubleshooting Flowchart 2 Troubleshooting To use the flowcharts 5 4...
Page 93: ...Troubleshooting Flowchart 3 Troubleshooting To use the flowcharts 5 5...
Page 94: ...Troubleshooting Flowchart 4 Troubleshooting To use the flowcharts 5 6...
Page 95: ...Troubleshooting Flowchart 5 Troubleshooting To use the flowcharts 5 7...
Page 96: ...Troubleshooting Flowchart 6 Troubleshooting To use the flowcharts 5 8...
Page 97: ...Troubleshooting Flowchart 7 Troubleshooting To use the flowcharts 5 9...
Page 98: ...Troubleshooting Flowchart 8 Troubleshooting To use the flowcharts 5 10...
Page 99: ...Troubleshooting Flowchart 9 Troubleshooting To use the flowcharts 5 11...
Page 100: ...Troubleshooting Flowchart 10 Troubleshooting To use the flowcharts 5 12...
Page 101: ...Troubleshooting Flowchart 11 Troubleshooting To use the flowcharts 5 13...
Page 102: ...Troubleshooting Flowchart 12 Troubleshooting To use the flowcharts 5 14...
Page 124: ...Exploded View of the 1664A Replacing Assemblies 6 4...
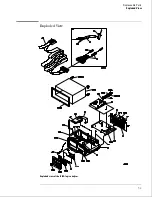
Page 137: ...Exploded View Exploded view of the 1664A logic analyzer Replaceable Parts Exploded View 7 3...
Page 160: ...8 18...
Page 162: ......

