FLASH CS3
User Guide
246
Property pop-up menu
Enabled only when the Use One Setting for All Properties check box is not selected. When
enabled, a separate curve is maintained for each of the five properties appearing in the menu. Selecting a property
in the menu displays the curve for that property. The properties are:
•
Position
Specifies custom ease settings for the position of an animated object on the Stage.
•
Rotation
Specifies custom ease settings for the rotation of an animated object. For example, you can fine-tune
how quickly or slowly an animated character turns around to face the user on the Stage.
•
Scale
Specifies custom ease settings for the scale of an animated object. For example, you can more easily
customize the scale of an object so it appears to be moving away from the viewer, then coming closer, and then
moving away again.
•
Color
Specifies custom ease settings for color transitions applied to an animated object.
•
Filters
Specifies custom ease settings for filters applied to an animated object. For example, you can control the
ease setting of a drop shadow that simulates a change in the direction of a light source.
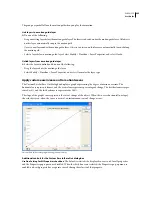
Play and Stop buttons
Let you preview an animation on the Stage using all the current velocity curves defined in the
Custom Ease In/Ease Out dialog box.
Reset button
Lets you reset the velocity curve to the default, linear state.
Position of the selected control point
In the lower-right corner of the dialog box, a numeric value displays the
keyframe and position of the selected control point. If no control point is selected, no value appears.
To add a control point to the line, click the diagonal line once. To achieve a precise degree of control over the motion
of an object, drag the positions of the control points.
Using frame indicators (represented by square handles), click where you want an object to slow down or speed up.
Clicking the square handle of a control point selects that control point, and displays the tangent points on either side
of it. Hollow circles represent tangent points. Drag the control point or its tangent points with the mouse or use the
keyboard’s arrow keys to position them.
By default, the control points snap to a grid. You can turn off snapping by pressing the X key while dragging the
control point.
Clicking an area of the curve away from any control points adds a new control point to the curve at that point,
without changing the shape of the curve. Clicking away from the curve and control points deselects the currently
selected control point.
Use the Custom Ease In/Ease Out dialog box
1
Select a layer in the Timeline that has a motion tween applied to it.
2
Click the Edit button next to the Ease slider in the frame Property inspector.
3
(Optional) To display the curve for a property, deselect Use One Setting For All Properties, and select a property
in the menu.
4
To add a control point, Control-click (Windows) or Command-click (Macintosh) the diagonal line.
5
To increase the speed of the object, drag the control point up; to slow down the speed of the object, drag it
downwards.
6
To further adjust the ease curve, and fine tune the ease value of the tween, drag the vertex handles.
7
To view the animation on the Stage, click the play button in the lower-left corner.
8
Adjust the controls until you achieve the desired effect.


