Assembly
Assembly Instructions
20
1HSB435410-2 enrev1
4.9.3 Assembling the pull-rod between poles A1 and B1
•
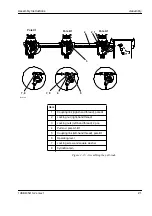
Screw on the locking nuts (2 and 3) to the end of the threads on the pull-rods
(4). This is especially important for locking nut (3).
N.B. Double nuts (3).
•
Fit two spring washers on the right-hand end of the pull rod and screw on the
coupling link (1) two turns on the pull-rod (4).
•
Dismantle the locking screw with the square washer (7), pin (8) and the
coupling link (5) from the operating lever (6) on pole B and screw the coupling
link two turns onto the pull-rod (4). Insert the coupling link between the forks
of the operating lever (6). Turn the operating rod using the nut (3) so that the
rod is screwed into the coupling links on both poles B1 and A1, whereby the
distance between the coupling links decreases.
•
When the distance has decreased so that the alignment check holes, D=25, in
the lever (6 ) and coupling link (5) align with each other, fit the pin (8) and
locking screw with square washer (7). Tighten the locking screw (7) with a
tightening torque of 22.5 Nm.
•
After the cylindrical pin has been assembled and secured with the locking
screw and washer, continue to turn the pull-rods in the same direction. The
torque will increase as the operating lever (6) pulls towards the Close position
(to the right) and opening spring on the B1 pole contract.
TIGHTENING TORQUE
22.5 Nm
Summary of Contents for SF6 LTB 245E1 BLG 1002A
Page 1: ...Product Manual 1HSB435416 2 en Rev 1 LTB 245E1 BLG 1002A 3 pole operation ...
Page 92: ...ABB Switchgear SF6 Circuit Breaker Circuit breakers HPL and LTB 1HSB445409 1 en0 Lubricants ...
Page 198: ......
Page 199: ......
Page 209: ......
Page 210: ......


