2-2
C
HAPTER
2: C
ABLE
M
ODEM
H
ARDWARE
I
NSTALLATION
5
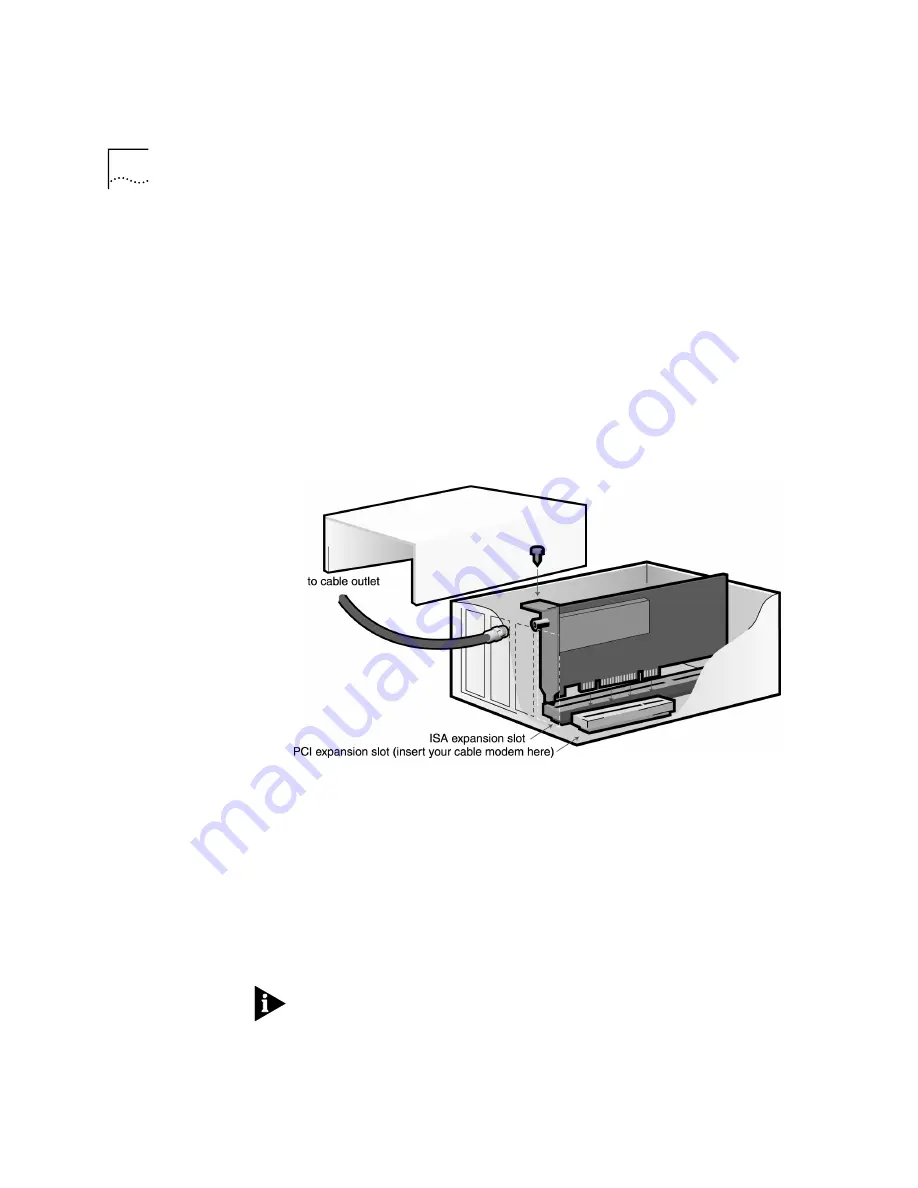
Holding the modem at each corner, with the gold edge facing the slot,
push the modem down until it snaps into the expansion slot. The
following diagram shows horizontally aligned expansion slots. Some
computers have vertically aligned slots. These instructions apply to both
styles. You will need to apply some pressure to seat the modem properly.
Sometimes a gentle back-and-forth motion helps fit the modem all the
way into the slot. If you feel resistance, the modem may not be properly
lined up with the slot. Do not force it into the slot. Remove the modem
and try again.
6
Once the modem is in the slot, fasten the modem firmly into place using
the screw that you removed in step 4. If you had to snap out your
expansion slot cover, you will need to obtain a standard slot screw.
7
Replace the computer cover. Fasten it with the screws removed in step 3.
8
Connect your cable line to the cable modem’s coaxial cable connector. Be
careful not to bend the center wire inside the end of the connector.
9
You need a separate analog modem in order to use this cable modem.
Make sure your analog modem is properly installed and that it is
connected to an analog phone jack. The analog modem can be internal
or external. See the analog modem’s documentation for assistance.
10
Plug the power cords, cables, and peripherals back into the computer and
turn on the computer.
NOTE: Your computer’s three-pronged power cable should be plugged
into a properly grounded three-pronged outlet.
Summary of Contents for 8R-002700-00
Page 12: ...1 6 CHAPTER 1 BEFORE YOU BEGIN ...
Page 30: ...3 16 CHAPTER 3 CABLE MODEM SOFTWARE INSTALLATION ...
Page 34: ...4 4 CHAPTER 4 MAKING YOUR FIRST CONNECTION ...
Page 40: ...5 6 CHAPTER 5 CABLE MODEM CONNECTION CENTER FEATURES ...
Page 44: ...6 4 CHAPTER 6 UNINSTALLING THE CABLE MODEM ...
Page 65: ...SNMP Agent A 5 You are finished installing the networking components ...
Page 66: ...A 6 APPENDIX A INSTALLING NETWORKING COMPONENTS ...


