


Chapter 9 Interfaces
USG20(W)-VPN Series User’s Guide
173
Enable Rapid
Commit
Select this to shorten the DHCPv6 message exchange process from four to two steps.
This function helps reduce heavy network traffic load.
Note: Make sure you also enable this option in the DHCPv6 clients to make rapid commit
work.
Request Address Select this to get an IPv6 IP address for this interface from the DHCP server. Clear this
to not get any IP address information through DHCPv6.
DHCPv6 Request
Options
Use this section to configure DHCPv6 request settings that determine what additional
information to get from the DHCPv6 server.
Add
Click this to create an entry in this table. See
for more
information.
Remove
Select an entry and click this to delete it from this table.
Object
Reference
Select an entry and click
Object Reference
to open a screen that shows which
settings use the entry. See
for an example.
#
This field is a sequential value, and it is not associated with any entry.
Name
This field displays the name of the DHCPv6 request object.
Type
This field displays the type of the object.
Value
This field displays the IPv6 prefix that the USG will advertise to its clients.
Interface
Parameters
Egress
Bandwidth
Enter the maximum amount of traffic, in kilobits per second, the USG can send through
the interface to the network. Allowed values are 0 - 1048576.
Ingress
Bandwidth
This is reserved for future use.
Enter the maximum amount of traffic, in kilobits per second, the USG can receive from
the network through the interface. Allowed values are 0 - 1048576.
MTU
Maximum Transmission Unit. Type the maximum size of each data packet, in bytes,
that can move through this interface. If a larger packet arrives, the USG divides it into
smaller fragments. Allowed values are 576 - 1492. Usually, this value is 1492.
Connectivity Check
The interface can regularly check the connection to the gateway you specified to make
sure it is still available. You specify how often the interface checks the connection, how
long to wait for a response before the attempt is a failure, and how many consecutive
failures are required before the USG stops routing to the gateway. The USG resumes
routing to the gateway the first time the gateway passes the connectivity check.
Enable
Connectivity
Check
Select this to turn on the connection check.
Check Method
Select the method that the gateway allows.
Select
icmp
to have the USG regularly ping the gateway you specify to make sure it is
still available.
Select
tcp
to have the USG regularly perform a TCP handshake with the gateway you
specify to make sure it is still available.
Check Period
Enter the number of seconds between connection check attempts.
Check Timeout
Enter the number of seconds to wait for a response before the attempt is a failure.
Check Fail
Tolerance
Enter the number of consecutive failures before the USG stops routing through the
gateway.
Check Default
Gateway
Select this to use the default gateway for the connectivity check.
Check this
address
Select this to specify a domain name or IP address for the connectivity check. Enter
that domain name or IP address in the field next to it.
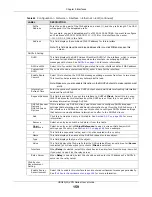
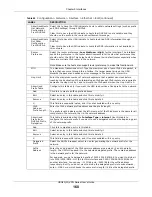
Table 69
Configuration > Network > Interface > PPP > Add (continued)
LABEL
DESCRIPTION
Содержание ZyWall USG20-VPN
Страница 17: ...17 PART I User s Guide ...
Страница 18: ...18 ...
Страница 99: ...99 PART II Technical Reference ...
Страница 100: ...100 ...
Страница 151: ...Chapter 9 Interfaces USG20 W VPN Series User s Guide 151 Configuration Network Interface Ethernet Edit External Type ...
Страница 152: ...Chapter 9 Interfaces USG20 W VPN Series User s Guide 152 Configuration Network Interface Ethernet Edit External Type ...
Страница 154: ...Chapter 9 Interfaces USG20 W VPN Series User s Guide 154 Configuration Network Interface Ethernet Edit Internal Type ...
Страница 155: ...Chapter 9 Interfaces USG20 W VPN Series User s Guide 155 Figure 121 Configuration Network Interface Ethernet Edit OPT ...
Страница 156: ...Chapter 9 Interfaces USG20 W VPN Series User s Guide 156 Configuration Network Interface Ethernet Edit OPT ...
Страница 170: ...Chapter 9 Interfaces USG20 W VPN Series User s Guide 170 Figure 127 Configuration Network Interface PPP Add ...
Страница 178: ...Chapter 9 Interfaces USG20 W VPN Series User s Guide 178 Figure 129 Configuration Network Interface Cellular Add Edit ...
Страница 194: ...Chapter 9 Interfaces USG20 W VPN Series User s Guide 194 Figure 139 Configuration Network Interface VLAN Add Edit ...
Страница 206: ...Chapter 9 Interfaces USG20 W VPN Series User s Guide 206 Figure 141 Configuration Network Interface Bridge Add Edit ...
Страница 282: ...Chapter 15 UPnP USG20 W VPN Series User s Guide 282 Figure 190 Network Connections My Network Places Properties Example ...
Страница 340: ...Chapter 21 IPSec VPN USG20 W VPN Series User s Guide 340 Figure 226 Configuration VPN IPSec VPN VPN Connection Edit IKE ...
Страница 348: ...Chapter 21 IPSec VPN USG20 W VPN Series User s Guide 348 Figure 228 Configuration VPN IPSec VPN VPN Gateway Add Edit ...
Страница 378: ...Chapter 22 SSL VPN USG20 W VPN Series User s Guide 378 Create a Web Application SSL Application Object ...
Страница 591: ...Chapter 31 Log and Report USG20 W VPN Series User s Guide 591 Figure 418 Configuration Log Report Email Daily Report ...
Страница 659: ...Appendix B Legal Information USG20 W VPN Series User s Guide 659 Environmental Product Declaration ...


