background image

 Chapter 7 Wireless

WX Series User’s Guide

99

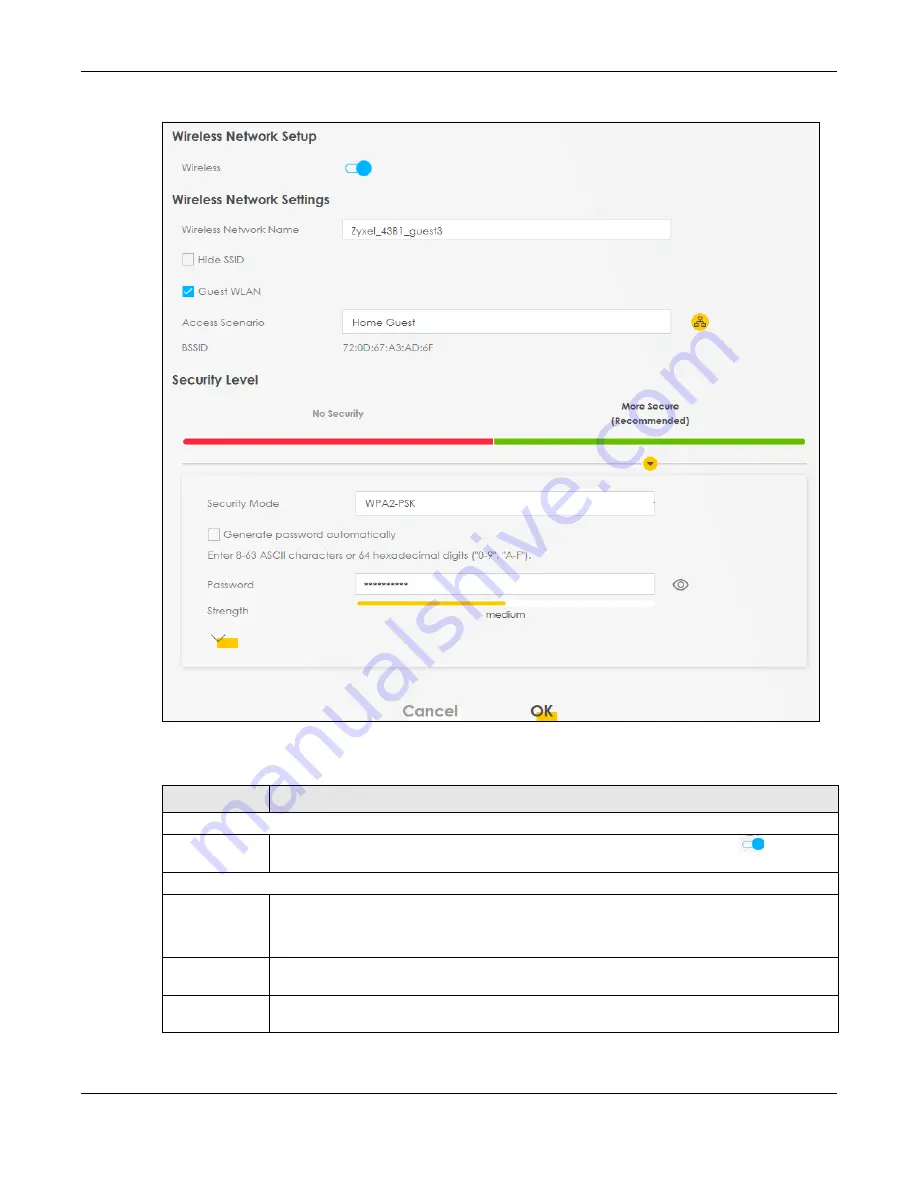
Figure 47   

Network Setting > Wireless > Guest/More AP > Edit

The following table describes the fields in this screen.

Table 23   Network Setting > Wireless > Guest/More AP > Edit

LABEL

DESCRIPTION

Wireless Network Setup

Wireless

Click this switch to enable


or disable WiFi in this field. When the switch turns blue 

, the 

function is enabled; otherwise, it is not.

Wireless Network Settings

Wireless 
Network Name

The SSID (Service Set IDentity) identifies the service set with which a wireless device is associated. 
Wireless devices associating to the access point (AP) must have the same SSID.

Enter a descriptive name (up to 32 English keyboard characters) for WiFi.

Hide SSID

Select this check box to hide the SSID in the outgoing beacon frame so a station cannot obtain 
the SSID through scanning using a site survey tool.

Guest WLAN

Select this to create Guest WiFis for home and external clients. Select the WiFi type in the 

Access 

Scenario

 field.

Содержание WX3100-TO

Страница 1: ...ails User s Guide WX3401 B0 WX3100 T0 Dual Band Wireless Extender Copyright 2020 Zyxel Communications Corporation LAN IP Address http 192 168 1 2 Login admin Password See the device label Version 5 17 5 50 Ed 1 11 2020 ...

Страница 2: ...om what you see due to differences in your product firmware or your computer operating system Every effort has been made to ensure that the information in this manual is accurate Related Documentation Quick Start Guide The Quick Start Guide shows how to connect the WX Device More Information Go to support zyxel com to find other information on the WX Device ...

Страница 3: ...the WX Device in this guide Product labels screen names field labels and field choices are all in bold font A right angle bracket within a screen name denotes a mouse click For example Network Setting Wireless MAC Authentication means you first click Network Setting in the navigation panel then the Wireless sub menu and finally the MAC Authentication tab to get to that screen Icons Used in Figures...

Страница 4: ...ical Reference 37 App Tutorials 38 Web Tutorials 71 Connection Status 83 Wireless 92 Home Networking 124 Log 127 Multicast Status 130 WLAN Station Status 132 System 134 User Account 135 Remote Management 138 Time Settings 140 Firmware Upgrade 143 Backup Restore 146 Diagnostic 150 Troubleshooting and Appendices 152 Troubleshooting 153 ...

Страница 5: ...etwork Controller 14 1 3 Dual Band WiFi 16 1 4 Daisy Chain 16 1 5 MU MIMO Technology 18 1 5 1 2X2 2 MU MIMO 18 1 5 2 4X4 4 MU MIMO 18 1 6 2 4 5 GHz MU MIMO 19 1 7 Multicast for WX3401 B0 only 19 Chapter 2 Hardware 21 2 1 Front Panel and LEDs 21 2 2 Rear Panel 22 2 3 LEDs Lights 23 2 4 Wall Mounting 25 2 4 1 The WX3401 B0 Wall Mounting 25 2 4 2 The WX3100 T0 Wall Mounting 26 2 5 WPS Button 28 2 5 1...

Страница 6: ... Managing the Controller 50 4 4 2 Viewing the Controller Information 51 4 4 3 Adding Devices to Your Mesh Network 54 4 4 4 Adding Devices to Your Mesh Network 60 4 5 Devices Screen 62 4 5 1 Viewing Device Information 63 4 6 WiFi Settings Screen 64 4 6 1 Editing WiFi Settings 66 4 7 Guest WiFi Settings Screen 67 4 7 1 Editing Guest WiFi Settings 68 4 8 Account Screen 70 Chapter 5 Web Tutorials 71 5...

Страница 7: ...y 96 7 2 2 More Secure Recommended 96 7 3 Guest More AP 98 7 3 1 Edit Guest More AP Settings 98 7 4 MAC Authentication 100 7 4 1 Add Edit MAC Addresses 102 7 5 WPS Settings 102 7 6 WMM Settings 104 7 7 Others Settings 105 7 8 Channel Status Settings 107 7 9 Operating Modes Settings 108 7 10 AP List Screen 110 7 11 Technical Reference 111 7 11 1 Wireless Network Overview 111 7 11 2 Additional Wirel...

Страница 8: ... 1 Multicast Status Overview 130 10 2 IGMP Status 130 10 3 MLD Status 130 Chapter 11 WLAN Station Status 132 11 1 WLAN Station Status Overview 132 Chapter 12 System 134 12 1 System Overview 134 12 2 System Settings 134 Chapter 13 User Account 135 13 1 User Account Overview 135 13 2 User Account Settings 135 13 2 1 User Account Add Edit 136 Chapter 14 Remote Management 138 14 1 Remote Management Ov...

Страница 9: ...hat You Can Do in this Chapter 150 18 2 What You Need to Know 150 18 3 Ping TraceRoute 151 Part III Troubleshooting and Appendices 152 Chapter 19 Troubleshooting 153 19 1 Power and Hardware Problems 153 19 2 Device Access Problems 154 19 3 Internet Problems 155 19 4 WiFi Problems 156 19 5 Resetting the WX Device to Its Factory Defaults 156 19 6 MPro Mesh App Problems 157 19 7 Daisy Chain Problems ...

Страница 10: ...10 PART I User s Guide ...

Страница 11: ...WX Device is a dual band wireless extender that can extend WiFi coverage from a router modem with Internet access The WX Device supports MPro Mesh that lets a controller manage your WiFi network The following table describes the features of the WX Device by model Table 1 WX Device Comparison Table WX3401 B0 WX3100 T0 2 4 G WLAN Y Y 5 G WLAN Y Y MU MIMO 2 4 GHz 2 2 5 GHz 4 4 2 4 GHz 2 2 5 GHz 2 2 A...

Страница 12: ... 1 Device Operation Mode Example Repeater Mode Set your WX Device to Access Point AP mode if you already have a router in your network and you want to bridge a wired network LAN and another LAN or wireless LAN WLAN in the same subnet If the WX Device has a wired uplink connection it is in AP mode In the following figure the WX Device A is in Access Point AP mode and is bridging a wired network and...

Страница 13: ...er modem then the router modem is the controller If the router modem is not an MPro Mesh router modem then the WX Device is the controller 1 2 1 AP Steering and Band Steering Zyxel MPro Mesh supports AP steering and Band steering AP steering allows WiFi clients to roam seamlessly between Mesh supported devices in your Mesh network by using the same SSID and WiFi password Also AP steering helps mon...

Страница 14: ...ates WiFi activity in a network A controller also manages the SSIDs and passwords on all APs in a network auto configuration For example if you change the SSID on the controller the SSID of each AP in the network will also change Note For AP steering and band steering to work the controller and all the APs in the network need to have the same SSID and password Therefore we recommend using the cont...

Страница 15: ... router controller in a Mesh network with the WX Device Note If your router does not support Zyxel MPro Mesh your WX Device will automatically become the AP controller Table 2 Icons used in Mesh Application ICON DESCRIPTION C Router Controller the DX5301 B0 in Scenario 1 see Section 4 3 1 on page 38 or AP controller the first WX Device in Scenario 2 see Section 4 3 2 on page 43 AP Access Point RP ...

Страница 16: ...ic like high definition video music and gaming Figure 6 Dual Band Application 1 4 Daisy Chain You can add more WX Device to your network to form a daisy chain Daisy chain refers to the connection from the first WX Device to up to three other WX Devices to extend the WiFi connection from the router to the client The WX Device uplink connection determines the mode Access Point AP or Repeater RP If t...

Страница 17: ...MPro Mesh Scenario 4 is only for routers that support Zyxel MPro Mesh Note We do not recommend connecting more than three WX Devices in your daisy chain network If you already have two WX Devices in RP mode we do not recommend adding another WX Device as a repeater Note If one of the WX Devices has a WiFi uplink connection we do not recommend linking the other WX Devices in your daisy chain networ...

Страница 18: ... WiFi clients 1 5 1 2X2 2 MU MIMO 2X2 2 MU MIMO WiFi means an AP allows two transceivers and two receivers to communicate concurrently with multiple WiFi clients dividing up the bandwidth evenly In 2X2 2 the first and second number n X n show the number of transmit and receive antennas respectively The third number n means the number of data spatial streams indicating the number of independent dat...

Страница 19: ... as the receiver An uplink connection means transmitting data from a WiFi client to an AP An Uplink connection means the AP is the receiver and the WiFi client the transmitter 1 7 Multicast for WX3401 B0 only Traditionally IP packets are transmitted in one of either two ways Unicast 1 sender to 1 recipient or Broadcast 1 sender to everybody on the network Multicast delivers IP packets to a group o...

Страница 20: ...upports source filtering reporting or ignoring traffic from specific source address to a particular host on the network A class D IP address is used to identify host groups and can be in the range 224 0 0 0 to 239 255 255 255 The address 224 0 0 0 is not assigned to any group and is used by IP multicast computers The address 224 0 0 1 is used for query messages and is assigned to the permanent gro...

Страница 21: ... to the Quick Start Guides to see how to make the hardware connections 2 1 Front Panel and LEDs Use the LEDs to determine if the WX Device is behaving normally or if there are problems on your network See Table 5 on page 23 and Table 6 on page 24 for more information on the LEDs Figure 15 The WX3401 B0 s Front Panel ...

Страница 22: ...Chapter 2 Hardware WX Series User s Guide 22 Figure 16 The WX3100 T0 s Front Panel 2 2 Rear Panel Figure 17 The WX3401 B0 s Rear Panel ...

Страница 23: ...wer button to start the device RESET Press the button to return the WX Device to the factory defaults Table 5 LED Table for the WX Device 1 LED COLOR STATUS DESCRIPTION POWER Green On Power is on or the MPro Mesh configuration process is done Blinking The WX Device is starting up or under the MPro Mesh configuration process Red On The WX Device detects a system error Blinking The WX Device is upgr...

Страница 24: ...Mesh configuration process Red On The WX Device 2 detects a system error Blinking The WX Device 2 is upgrading firmware Link with a WiFi connection Green On The WiFi connection to the WX Device 1 is good Amber On The signal is too strong We suggest moving the WX Device 2 away from the WX Device 1 Red On The signal is too weak Move the WX Device 2 closer to the WX Device 1 Link with a wired connect...

Страница 25: ...he WX3401 Screw Specifications 1 Select a position free of obstructions on a wall strong enough to hold the weight of the device 2 Mark two holes on the wall at the appropriate distance apart for the screws Be careful to avoid damaging pipes or cables located inside the wall when drilling holes for the screws Table 7 The WX3401 Wall Mounting Information Distance between holes 89 00 mm M4 Screws Tw...

Страница 26: ...out 0 5 cm If not using screw anchors use a screwdriver to insert the screws into the wall Do not insert the screws all the way in leave a gap of about 0 5 cm 4 Make sure the screws are fastened well enough to hold the weight of the WX Device with the connection cables 5 Align the holes on the back of the WX Device with the screws on the wall Hang the WX Device on the screws Figure 21 The WX3401 W...

Страница 27: ...X3100 T0 as shown Figure 23 Attach the bracket 2 Drill a hole in the wall Insert the screw anchor and screw into the hole 3 Place the WX3100 T0 so the wall mount hole lines up with the screw Slide the WX3100 T0 down gently to fix it into place Table 8 The WX3100 Wall Mounting Information M4 Screws One Screw anchors optional One ...

Страница 28: ... you have you can either press a button recommended on the device itself or in its web configurator When WPS is activated on a device it has two minutes to find another device that also has WPS activated Then the two devices connect and set up a secure network by themselves The WPS button is located at the front panel of the WX Device 2 5 1 Using the WPS Button 1 Make sure the power LED is on not ...

Страница 29: ... twice within 8 seconds 2 Press the WPS button once on the downlink WX Device within 2 minutes of each other Note You must activate WPS in the WX Device and in another wireless device within two minutes of each other Note With WPS WiFi clients can only connect to the 5 GHz or 2 4 GHz WiFi network using the first 5 GHz or 2 4 GHz SSID on the WX Device in AP or repeater mode 2 6 RESET Button If you ...

Страница 30: ...n your WX Device is in the AP mode 1 Connect your computer to the LAN port of the WX Device using an Ethernet cable 2 Connect your computer to a LAN port of the router Log into the router s Web Configurator to check the IP address the router assigned to your WX Device 3 Open a web browser such as Internet Explorer and type http DHCP assigned IP as the web address in your web browser 4 Log into the...

Страница 31: ...ge the WX Device type the default username admin and the randomly assigned default password see the device label on the login screen and click Login If you have changed the password enter your password and click Login Figure 25 Login Screen Note The default allowable times that you can enter the Password is 3 If you entered the wrong password for the fourth time by default the Web Configurator wil...

Страница 32: ...X Series User s Guide 32 Figure 26 Change Password Screen 8 The Connection Status page appears Use this screen to configure basic Internet access and wireless settings see Section 6 1 on page 83 for details Figure 27 Connection Status ...

Страница 33: ...reen Layout As illustrated above the main screen is divided into these parts A Navigation Panel B Layout Icon C Main Window 3 3 1 Navigation Panel Click the menu icon to display the navigation panel that contains configuration menus and icons quick links Click X to close the navigation panel C A B ...

Страница 34: ...el to open screens to configure WX Device features The following tables describe each menu item Table 9 Configuration Menus Summary LINK TAB FUNCTION Connection Status Use this screen to configure basic Internet access and wireless settings This screen also shows the network status of the WX Device and computers devices connected to it Network Setting ...

Страница 35: ...his screen to view the status of events that occurred to the WX Device You can export or e mail the logs Multicast Status IGMP Status Use this screen to view the status of all IGMP settings on the WX Device MLD Status Use this screen to view the status of all MLD settings on the WX Device WLAN Station Status WLAN Station Status Use this screen to view the wireless stations that are currently assoc...

Страница 36: ...rovide the following functions Table 10 Web Configurator Icons ICON DESCRIPTION Theme Click this icon to select a color that you prefer and apply it to the Web Configurator Restart Click this icon to reboot the WX Device without turning the power off Language Select the language you prefer Logout Click this icon to log out of the Web Configurator ...

Страница 37: ...37 PART II Technical Reference ...

Страница 38: ...ew your app version or logout see Section 4 8 on page 70 4 3 Network Setup There are several ways to set up your WX Device You can set it up with a Zyxel MPro Mesh Router using a wired or WiFi connection Alternatively you can set it up with a non MPro Mesh Router with a wired connection This section shows you how to connect to a Zyxel MPro Mesh router wirelessly and how to connect to a non MPro Me...

Страница 39: ...abel of the Zyxel MPro Mesh Router Find this SSID on your mobile device Enter the key to connect to your router Note The Zyxel MPro Mesh Router is the wireless controller so you must connect to it to use the MPro Mesh app to manage WiFi settings 3 Connect the MPro Mesh App to the Zyxel MPro Mesh Router Open the app enter the username and password on the back label of your Zyxel MPro Mesh Router to...

Страница 40: ...0 degrees 5 Place the WX Device where you want to extend the coverage of your WiFi network l 6 Plug in the power cable and switch on the WX Device Wait until the POWER LED turns steady green This may take up to 2 5 minutes l 7 Open the MPro Mesh App On the Home screen tap on the icon to add a WX Device ...

Страница 41: ...the instructions to start pairing the WX Device with a Zyxel MPro Mesh Router with the WX3401 B0 and the DX5301 B0 as an example Once the pairing starts a 2 minute countdown timer will begin 9 Within 2 minutes press the WPS button once on the WX Device until WiFi LED starts blinking slowly ...

Страница 42: ...he result on the app screen 11 Click Done to finish the pairing process The Mpro Mesh Router the controller will undergo an auto configuration after a Mesh network is established See Section 1 2 on page 13 for more information Check the status of your MPro Mesh network on the Home screen 12 The POWER LED shows if the WX Device is ready to join the WiFi network The LINK LED shows the WiFi link qual...

Страница 43: ...elow to set up the WX Device 1 with a non MPro Mesh Router Connect the WX Device 1 to the Non MPro Mesh Router 1 Use an Ethernet cable to connect the WX Device 1to your non MPro Mesh Router 2 Rotate the stand on the bottom of the WX Device 1 90 degrees Table 12 LED Table for WX Device 1 LED COLOR STATUS DESCRIPTION POWER Green On Power is on or the MPro Mesh configuration process is done Blinking ...

Страница 44: ...power cable and switch on the WX Device 1 Wait until the POWER LED turns steady green This may take up to 2 5 minutes 4 On your mobile device go to the WiFi settings Long press your existing WiFi connection Tap Forget network to remove your existing WiFi connection ...

Страница 45: ...mobile device Enter the key to connect to your WX Device 1 Note In this scenario WX Device 1 is the wireless controller so you must connect to it to use the MPro Mesh app to manage the WiFi network 6 Download the MPro Mesh App from Google Play or Apple Store 7 Connect the MPro Mesh App to the WX Device 1 Open the app enter the username and password on the side label of the WX Device 1 when prompte...

Страница 46: ...he stand on the bottom of the WX Device 2 90 degrees Rotate the stand 2 Place the WX Device 2 where you want to extend the coverage of your network Place the second WX Device 3 Plug in the power cable and switch on the WX Device 2 Wait until the POWER LED turns steady green This may take up to 2 5 minutes ...

Страница 47: ...X Device 2 is steady green open the MPro Mesh App On the Home screen tap on the icon to add the WX Device 2 Tap Add Mesh on the Home screen 5 Select the Use WiFi scenario Follow the instructions to start pairing the WX Device 2 with the WX Device 1 Once the pairing starts a 2 minute countdown timer will begin ...

Страница 48: ...minutes press the WPS button once on the WX Device 2 for less than 3 seconds Press the WPS button on the second WX Device 7 The POWER and Link LED on the WX Device 2 turns steady green if the pairing process is successful You can also check the result on the app screen ...

Страница 49: ...an connect your WiFi clients to your wireless Mesh network To do this note the SSID and WiFi key printed on the side label of the WX Device 1 using this SSID Table 13 LED Table for WX Device 2 LED COLOR STATUS DESCRIPTION POWER Green On Power is on or the MPro Mesh configuration process is done Blinking The WX Device 2 is starting up or under the MPro Mesh configuration process Red On The WX Devic...

Страница 50: ...8 you must connect your smartphone to the Zyxel MPro Mesh Router to manage the Mesh network through the app This is because the Zyxel MPro Mesh Router is the wireless controller If you are using a wired connection with a non MPro Mesh Router see Section 4 3 2 on page 43 you must connect your smartphone to the WX Device 1 to manage the Mesh network through the app This is because the WX Device 1 is...

Страница 51: ...s Guide 51 Home 4 4 2 Viewing the Controller Information Use this screen to view basic information of your controller the Zyxel MPro Mesh Router or WX Device 1 Tap on the icon next to the model name WX3401 00016 to open the following screen ...

Страница 52: ...Chapter 4 App Tutorials WX Series User s Guide 52 Gateway Detail Tap on the icon to change the model name shown on the app ...

Страница 53: ...Chapter 4 App Tutorials WX Series User s Guide 53 Change model name Tap the icon to save the changes made Tap on Reboot at the bottom left corner to restart your device ...

Страница 54: ...54 Reboot 4 4 3 Adding Devices to Your Mesh Network Use this screen to add extenders to your network to form a daisy chain for more information on daisy chain see Section 1 4 on page 16 On the Home screen tap on the icon to open the following screen ...

Страница 55: ...de 55 Select the Connection Method To add a WX Device to your network wirelessly 1 Tap on the icon under Use WiFi 2 The following screen appears Follow the instruction to set your device to the Repeater mode Then click Next to go to the next step ...

Страница 56: ... up your devices Note Your device may not have a mode switch The method for setting modes for your device may vary depending on the device you use For WX Device its mode depends on its uplink connection see Section 1 1 on page 11 for more information 3 The following screen appears Follow the instruction and click Start Pairing to connect your devices through the WPS button ...

Страница 57: ...Chapter 4 App Tutorials WX Series User s Guide 57 4 The following screen appears Wait for the WX Device to connect to the MPro Mesh Router through the WPS method ...

Страница 58: ...er s Guide 58 Press the WPS button 5 The following screen appears if the connection fails Tap on Need help to see possible reasons for the connection failure or tap on Try Again to try connecting your devices through WPS button once more ...

Страница 59: ...ter 4 App Tutorials WX Series User s Guide 59 Unsuccessful connection 6 The following screen appears if the WX Device is connected to the MPro Mesh Router successfully Tap Done to go back to the home screen ...

Страница 60: ...Series User s Guide 60 Successful connection 4 4 4 Adding Devices to Your Mesh Network Use this screen to add extenders or APs to your network to form a daisy chain On the Home screen tap on the icon to open the following screen ...

Страница 61: ...s Guide 61 To add a WX Device to your network with an Ethernet cable 1 Tap on the icon under Use Ethernet Cable 2 The following screen shows Follow the instruction to set your device to the AP mode Then click Done to go back to the Home page ...

Страница 62: ...de 62 4 5 Devices Screen Use this screen to view clients that are connected to the WX Device and their link quality You can tap on the search icon to search for a certain client Tap on Devices in the navigation panel to open the following screen ...

Страница 63: ...WX Series User s Guide 63 Devices 4 5 1 Viewing Device Information Use this screen to view basic information of the client connected to the WX Device and block Internet access to it Tap on the icon to open the following screen ...

Страница 64: ... the icon to change the name of your device shown on the app 4 6 WiFi Settings Screen Use this screen to configure settings for your WiFi network For more information on Guest WiFi see Section 4 7 on page 67 Tap on WiFi in the navigation panel to open the following screen ...

Страница 65: ...Chapter 4 App Tutorials WX Series User s Guide 65 WiFi Settings Tap on the icon to show the QR code for connecting a WiFi client to the WX Device ...

Страница 66: ... Tutorials WX Series User s Guide 66 QR Code for WiFi Connection 4 6 1 Editing WiFi Settings Use this screen to edit the SSID WiFi name and password for your WiFi network Tap on the icon to open the following screen ...

Страница 67: ...p on Save to save your changes or tap on Cancel to go back to the previous screen 4 7 Guest WiFi Settings Screen Use this screen to configure Guest WiFi settings Slide the Guest WiFi switch to the right to enable Guest WiFi Tap on the icon and the following screen appears ...

Страница 68: ...s Guide 68 4 7 1 Editing Guest WiFi Settings Use this screen to edit the SSID WiFi Guest name and password for your WiFi network Tap on the icon to open the following screen Note If you disable Guest WiFi you must reconnect to the controller ...

Страница 69: ...Chapter 4 App Tutorials WX Series User s Guide 69 Tap on Save to save your changes or tap on Cancel to go back to the previous screen ...

Страница 70: ...Chapter 4 App Tutorials WX Series User s Guide 70 4 8 Account Screen Use this screen to logout or view the app version and privacy policy ...

Страница 71: ...the Internet through the AP Thomas has to configure the WiFi network settings on the WX Device Then he can set up a WiFi network using WPS Section 5 2 2 on page 73 or manual configuration Section 5 2 3 on page 74 5 2 1 Setting Up a WiFi Network This example uses the following parameters to set up a WiFi network 1 Click Network Setting Wireless to open the General screen Select More Secure as the s...

Страница 72: ...Chapter 5 Web Tutorials WX Series User s Guide 72 2 Go to the Wireless Others screen and select 802 11b g n ax Mixed in the 802 11 Mode field Click Apply ...

Страница 73: ...twork simply by pressing a button This is the easier method PIN Configuration create a secure WiFi network simply by entering a WiFi client s PIN Personal Identification Number in the WX Device s interface This is the more secure method since one device can authenticate the other Note When using WPS in the Web Configurator and depending on your Band selection 2 4 GHz or 5 GHz the secure connection...

Страница 74: ...elessNetwork pre shared key to establish a WiFi Internet connection Note The WX Device supports IEEE 802 11ac ax WiFi clients Make sure that your notebook or computer s wireless adapter supports one of these standards 5 2 4 Setting Up WiFi Network Groups Company A wants to create different WiFi network groups for different types of users as shown in the following figure Each group has its own SSID...

Страница 75: ...d password Company A will use the following parameters to set up the WiFi network groups 1 Click Network Setting Wireless to open the General screen Use this screen to set up the company s general WiFi network group Configure the screen using the provided parameters and click OK COMPANY VIP GUEST SSID Company VIP Guest Security Level More Secure More Secure More Secure Security Mode WPA2 PSK WPA2 ...

Страница 76: ...Series User s Guide 76 2 Click Network Setting Wireless Guest More AP to open the following screen Click the Modify icon to configure the second WiFi network group 3 Configure the screen using the provided parameters and click OK ...

Страница 77: ...2 4GHz Main SSID is enabled then the 2 4GHz Guest SSID can be enabled But when the 2 4GHz Main SSID is disabled then the 2 4GHz Guest SSID is automatically disabled cannot be enabled by the user 4 In the Guest More AP screen click the Modify icon to configure the third WiFi network group Configure the screen using the provided parameters and click OK ...

Страница 78: ...s are active and ready for WiFi access 5 2 5 Connecting to the Zyxel Device s WiFi Network Windows 10 This section shows how to set the IP address of a computer using Windows 10 to be in the same subnet as a WX Device 1 In Windows 10 open the Control Panel 2 Click Network and Internet this field may be missing in your version Network and Sharing Center ...

Страница 79: ...er 5 Web Tutorials WX Series User s Guide 79 3 Click Change adapter settings 4 Right click the Ethernet icon and then select Properties 5 Click Internet Protocol Version 4 TCP IPv4 and then click Properties ...

Страница 80: ...IP address and enter an IP address from 192 168 1 3 to 192 168 1 254 The Subnet mask will be entered automatically 7 Click OK when you are done and close all windows 5 3 Device Maintenance 5 3 1 Upgrading the Firmware Upload the firmware to the WX Device for feature enhancements ...

Страница 81: ...d Click Upload 4 This process may take up to two minutes to finish After two minutes log in again and check your new firmware version in the Status screen 5 3 2 Backing up the Device Configuration Back up a configuration file in case you want to return to your previous settings 1 Go to the Maintenance Backup Restore screen 2 Click Backup in the Backup Configuration section and a configuration file...

Страница 82: ... WX Device to restore that previous configuration 1 Go to the Maintenance Backup Restore screen 2 Click Browse in Restore Configuration section and select the configuration file that you want to upload Click Upload 3 The WX Device will restart automatically after the configuration file is successfully uploaded Wait for one minute before logging into the WX Device again ...

Страница 83: ...After you log into the Web Configurator the Connection Status screen appears You can configure basic Internet access and wireless settings in this screen It also shows the network status of the WX Device and computers devices connected to it Figure 30 Connection Status ...

Страница 84: ...2 Connectivity Use this screen to view the network connection status of the WX Device and its clients Figure 31 Connectivity Click the Arrow icon to open the following screen Use this screen to view IP addresses and MAC addresses of the wireless and wired devices connected to the WX Device Place your mouse within the device block and an Edit icon will appear Click the Edit icon to change the icon ...

Страница 85: ...ge the icon and name of a connected device by clicking the device s Edit icon Select an icon and or enter a name in the Device Name field for a connected device Click Save to save your changes Figure 33 Connectivity Edit 6 1 3 System Info Use this screen to view the basic system information of the WX Device Figure 34 System Info ...

Страница 86: ...vice System Uptime This field displays how long the WX Device has been running since it last started up The WX Device starts up when you plug it in when you restart it Maintenance Reboot or when you reset it Interface Status Virtual ports are shown here You can see whether the ports are in use and their transmission rate LAN Information These fields display information about the LAN ports IP Addre...

Страница 87: ... When the switch goes to the right the function is enabled Otherwise it is not Select Keep 2 4G and 5G the same to use the same SSID for 2 4 GHz and 5 GHz bands MAC Address This shows the wireless adapter MAC Media Access Control address of the wireless interface Status This displays whether WiFi is activated SSID This is the descriptive name used to identify the WX Device in a wireless LAN Channe...

Страница 88: ...t WiFi Name The SSID Service Set IDentity identifies the service set with which a wireless device is associated Wireless devices associating to the access point AP must have the same SSID Enter a descriptive name up to 32 English keyboard characters for WiFi WiFi Password If you selected Random Password this field displays a pre shared key generated by the WX Device If you did not select Random Pa...

Страница 89: ...figure the 2 4G and 5G SSIDs and or passwords for your guest wireless networks Figure 39 Guest WiFi Settings Configuration To assign different SSIDs to the 2 4G and 5G guest wireless networks clear the Keep 2 4G and 5G the same check box in the WiFi Settings screen and the Guest WiFi Settings screen will change Figure 40 Guest WiFi Settings Different SSIDs ...

Страница 90: ...ust have the same SSID Enter a descriptive name up to 32 English keyboard characters for WiFi WiFi Password If you selected Random Password this field displays a pre shared key generated by the WX Device If you did not select Random Password you can manually type a pre shared key from 8 to 64 case sensitive keyboard characters Click the Eye icon to show or hide the password of your wireless networ...

Страница 91: ...ss you want to assign to your WX Device in dotted decimal notation for example 192 168 1 2 factory default Subnet Mask Type the subnet mask of your network in dotted decimal notation for example 255 255 255 0 factory default Your WX Device automatically computes the subnet mask based on the IP address you enter so do not change this field unless you are instructed to do so Save Click Save to save ...

Страница 92: ... wireless advanced features such as the DTIM interval Section 7 7 on page 105 Use the Channel Status screen to scan WiFi channel noises and view the results Section 7 8 on page 107 Use the Operating Modes screen to manually enter the SSID and security settings of the AP to which you want the WX Device to connect Section 7 9 on page 108 Use the AP List screen to scan the wireless networks in the WX...

Страница 93: ...de These are basic elements for starting a wireless service It s recommended that you select More Secure to enable WPA2 PSK data encryption Note If you are configuring the WX Device from a computer connected to WiFi and you change the WX Device s SSID channel or security settings you will lose your wireless connection when you press Apply to confirm You must then change the wireless settings of yo...

Страница 94: ...nd This shows the wireless band which this radio profile is using 2 4GHz is the frequency used by IEEE 802 11b g n ax wireless clients while 5GHz is used by IEEE 802 11a n ac ax wireless clients Note The Operating Modes and AP List screen are only available if you select the 5GHz Band Wireless Click this switch to enable or disable WiFi in this field When the switch turns blue the function is enab...

Страница 95: ...nnel and set the Bandwidth field to 40MHz or 20 40MHz Set whether the control channel set in the Channel field should be in the Lower or Upper range of channel bands Wireless Network Settings Wireless Network Name The SSID Service Set IDentity identifies the service set with which a wireless device is associated Wireless devices associating to the access point AP must have the same SSID Enter a de...

Страница 96: ...er WEP Using a Pre Shared Key PSK both the WX Device and the connecting client share a common password in order to validate the connection This type of encryption while robust is not as strong as WPA WPA2 or even WPA2 PSK The WPA2 PSK security mode is a newer more robust version of the WPA encryption standard It offers slightly better security although the use of PSK makes it less robust than it c...

Страница 97: ...sword automatically Select this option to have the WX Device automatically generate a password The password field will not be configurable when you select this option Password Select Generate password automatically or enter a Password The password has two uses 1 Manual Manually enter the same password on the WX Device and the client Enter 8 63 ASCII characters or exactly 64 hexadecimal 0 9 a f cha...

Страница 98: ...ing Wireless Guest More AP screen Table 22 Network Setting Wireless Guest More AP LABEL DESCRIPTION This is the index number of the entry Status This field indicates whether this SSID is active A yellow bulb signifies that this SSID is active while a gray bulb signifies that this SSID is not active SSID An SSID profile is the set of parameters relating to one of the WX Device s BSSs The SSID Servi...

Страница 99: ...is not Wireless Network Settings Wireless Network Name The SSID Service Set IDentity identifies the service set with which a wireless device is associated Wireless devices associating to the access point AP must have the same SSID Enter a descriptive name up to 32 English keyboard characters for WiFi Hide SSID Select this check box to hide the SSID in the outgoing beacon frame so a station cannot ...

Страница 100: ... allow any client to associate this network without any data encryption or authentication See Section 7 2 1 on page 96 for more details about this field Security Mode Select the security mode the WX Device uses Select WPA2 PSK WPA3 SAE or WPA3 SAE WPA2 PSK to add security on this wireless network The wireless clients which want to associate to this network must have same wireless security settings...

Страница 101: ...ccess the WX Device Select Allow to permit access to the WX Device MAC addresses not listed will be denied access to the WX Device MAC Address List Add New MAC Address This field is available when you select Deny or Allow in the MAC Restrict Mode field Click this if you want to add a new MAC address entry to the MAC filter list below This is the index number of the entry MAC Address This is the MA...

Страница 102: ...it 7 5 WPS Settings WiFi Protected Setup WPS allows you to quickly set up a wireless network with strong security without having to configure security settings manually To set up a WPS connection between two devices both devices must support WPS It is recommended to use the Push Button Configuration PBC method if your wireless client supports it See Section 7 11 8 3 on page 119 for more informatio...

Страница 103: ...ation PBC Click this switch to make it turn blue Click Apply to activate WPS method 1 on the WX Device WPS Click this button to add another WPS enabled wireless device within wireless range of the WX Device to your wireless network This button may either be a physical button on the outside of device or a menu button similar to the WPS button on this screen Note You must press the other wireless de...

Страница 104: ...wo minutes to have it present its PIN to the WX Device Method 3 Use this section to set up a WPS wireless network by entering the PIN of the WX Device into the client Click this switch and make it turn blue Click Apply to activate WPS method 3 on the WX Device Release Configuration The default WPS status is configured Click this button to remove all configured wireless and wireless security settin...

Страница 105: ...r of packets it sends WMM QoS WiFi MultiMedia Quality of Service gives high priority to voice and video which makes them run more smoothly If the 802 11 Mode in Network Setting Wireless Others is set to include 802 11n or 802 11ac WMM cannot be disabled WMM Automatic Power Save Delivery APSD Select this option to extend the battery life of your mobile devices especially useful for small devices th...

Страница 106: ...evice sends a beacon it includes with it a beacon interval This specifies the time period before the device sends the beacon again The interval tells receiving devices on the network how long they can wait in low power mode before waking up to handle the beacon This value can be set from 50 ms to 1000 ms A high value helps save current consumption of the access point DTIM Interval Delivery Traffic...

Страница 107: ...compliant WiFi devices to associate with the WX Device Select 802 11ac Only to allow only IEEE 802 11ac compliant WiFi devices to associate with the WX Device Select 802 11a n Mixed to allow either IEEE 802 11a or IEEE 802 11n compliant WiFi devices to associate with the WX Device The transmission rate of your WX Device might be reduced Select 802 11n ac Mixed to allow either IEEE 802 11n or IEEE ...

Страница 108: ... Status 7 9 Operating Modes Settings Use this screen to manually enter the SSID and security settings of the AP to which you want the WX Device to connect This screen allows you to set a profile so that the WX Device will automatically try to connect to the AP specified in the profile each time the WX Device in Repeater mode is turned on Click Network Setting Wireless Operating Modes The screen ap...

Страница 109: ...Device If the WX Device is connected to the AP using a cable the WX Device will be in the AP mode If the WX Device is connected to the AP wirelessly the WX Device will be in the repeater mode Wireless Setup Wireless Network Name Enter the name of the wireless network SSID to which the WX Device is connecting Security Mode Select the security mode the AP uses from the drop down list box Password En...

Страница 110: ...ate the WPS method Click WPS button Click this to connect the WX Device to the AP using the WPS method Apply Click Apply to save your changes Cancel Click Cancel to begin configuring this screen afresh Table 28 Network Setting Wireless Operating Modes LABEL DESCRIPTION Table 29 Network Setting Wireless AP List LABEL DESCRIPTION Connection Status This shows whether the WX Device is already connecte...

Страница 111: ...which there is no access point Wireless clients connect to one another in order to exchange information The following figure provides an example of a wireless network SSID This shows the network name of the AP the WX Device can detect MAC Address This shows the MAC address of the AP Channel This shows the channel the AP uses RSSI dbm This shows the strength of the AP s radio signal measured in dbm...

Страница 112: ...levision channels each wireless network uses a specific channel or frequency to send and receive information Every device in the same wireless network must use security compatible with the AP Security stops unauthorized devices from using the wireless network It can also protect the information that is sent in the wireless network Radio Channels In the radio spectrum there are certain frequency ba...

Страница 113: ...g of apparently random numbers and letters but it is not very secure if you use a short key which is very easy to guess for example a three letter word from the dictionary Because of the damage that can be done by a malicious attacker it s not just people who have sensitive information on their network who should use security Everybody who uses any wireless network should ensure that effective sec...

Страница 114: ...as to have the correct information SSID channel and security If a device is not allowed to use the wireless network it does not matter if it has the correct information This type of security does not protect the information that is sent in the wireless network Furthermore there are ways for unauthorized wireless devices to get the MAC address of an authorized device Then they can use that MAC addr...

Страница 115: ...erference occur when other radio waves interrupt the data signal Interference may come from other radio transmissions such as military or air traffic control communications or from machines that are coincidental emitters such as electric motors or microwaves Problems with absorption occur when physical objects such as thick walls are between the two radios muffling the signal 7 11 5 BSS A Basic Se...

Страница 116: ...e same AP 7 11 6 1 Notes on Multiple BSSs A maximum of eight BSSs are allowed on one AP simultaneously You must use different keys for different BSSs If two wireless devices have different BSSIDs they are in different BSSs but have the same keys they may hear each other s communications but not communicate with each other MBSSID should not replace but rather be used in conjunction with 802 1x secu...

Страница 117: ...te the other in each of the two devices When WPS is activated on a device it has two minutes to find another device that also has WPS activated Then the two devices connect and set up a secure network by themselves 7 11 8 1 Push Button Configuration WPS Push Button Configuration PBC is initiated by pressing a button on each WPS enabled device and allowing them to connect automatically You do not n...

Страница 118: ...ter referred to here as the AP and a client device using the PIN method 1 Ensure WPS is enabled on both devices 2 Access the WPS section of the AP s configuration interface See the device s User s Guide for how to do this 3 Look for the client s WPS PIN it will be displayed either on the device or in the WPS section of the client s configuration interface see the device s User s Guide for how to f...

Страница 119: ...ves network and security settings The registrar creates a secure EAP Extensible Authentication Protocol tunnel and sends the network name SSID and the WPA PSK or WPA2 PSK pre shared key to the enrollee Whether WPA PSK or WPA2 PSK is used depends on the standards supported by the devices If the registrar is already part of a network it sends the existing information If not it generates the SSID and...

Страница 120: ...orts both functions If the registrar is unconfigured the security settings it transmits to the enrollee are randomly generated Once a WPS enabled device has connected to another device using WPS it becomes configured A configured wireless client can still act as enrollee or registrar in subsequent WPS connections but a configured access point can no longer act as enrollee It will be the registrar ...

Страница 121: ... in order to use the network In this case AP1 must be the registrar since it is configured it already has security information for the network AP1 supplies the existing security information to Client 2 Figure 61 WPS Example Network Step 2 In step 3 you add another access point AP2 to your network AP2 is out of range of AP1 so you cannot use AP1 for the WPS handshake with the new access point Howev...

Страница 122: ...rollee devices Whether the network uses WPA PSK or WPA2 PSK depends on the device You can check the configuration interface of the registrar device to discover the key the network is using if the device supports this feature Then you can enter the key into the non WPS device and join the network as normal the non WPS device must also support WPA PSK or WPA2 PSK When you use the PBC method there is...

Страница 123: ...not involved in the WPS handshake a rogue device must still associate with the access point to gain access to the network Check the MAC addresses of your wireless clients usually printed on a label on the bottom of the device If there is an unknown MAC address you can remove it or reset the AP ...

Страница 124: ...AN IP address subnet mask and DHCP settings of your WX Device Section 8 2 on page 125 8 1 2 What You Need To Know 8 1 2 1 About LAN IP Address IP addresses identify individual devices on a network Every networking device including computers servers routers printers and so on needs an IP address to communicate across the network These networking devices are also known as hosts Subnet Mask Subnet ma...

Страница 125: ...gs Figure 64 Network Setting Home Networking Home Networking The following table describes the fields in this screen Table 31 Network Setting Home Networking LAN Setup LABEL DESCRIPTION LAN IP Setup Select DHCP to deploy the WX Device as a DHCP client in the network When you enable this the WX Device gets its IP address from the network s DHCP server for example your ISP or router Users connected ...

Страница 126: ...t Stateful to obtain an IPv6 address using IPv6 stateful autoconfiguration Select Stateless to obtain an IPv6 address using IPv6 stateless autoconfiguration Select Static to configure a fixed IPv6 address for the WX Device WAN IPv6 Address Enter an IPv6 IP address that your ISP gave you for the WAN interface IPv6 Gateway Enter the IP address of the next hop gateway The gateway is a router or switc...

Страница 127: ...The syslog protocol allows devices to send event notification messages across an IP network to syslog servers that collect the event messages A syslog enabled device can generate a syslog message and send it to a syslog server Syslog is defined in RFC 3164 The RFC defines the packet format content and system log related information of syslog messages Each syslog message has a facility and severity...

Страница 128: ...LABEL DESCRIPTION Level Select a severity level from the drop down list box This filters search results according to the severity level you have selected When you select a severity the WX Device searches through all logs of that severity or higher Category Select the type of logs to display Clear Log Click this to delete all the logs Refresh Click this to renew the log screen Export Log Click this...

Страница 129: ... in the syslog server Refer to the documentation of your syslog program for more details Level This field displays the severity level of the log Category This field displays the type of the log Messages This field states the reason for the log Table 33 System Monitor Log System Log continued LABEL DESCRIPTION ...

Страница 130: ...els in this screen 10 3 MLD Status Use this screen to look at the current list of IPv6 multicast groups the WX Device manages through MLD Multicast Listener Discovery MLD allows an IPv6 switch or router to discover the presence of MLD hosts who wish to receive multicast packets and the IP addresses of multicast groups the hosts want to join on its network MLDv1 is equivalent to IGMPv2 and MLDv2 is...

Страница 131: ...D Status The following table describes the labels in this screen Table 35 System Monitor Multicast Status MLD Status LABEL DESCRIPTION Refresh Click this button to update the status on this screen Interface This field displays the name of the WX Device s interface that belongs to an MLD multicast group Multicast Group This field displays the address of the MLD multicast group to which the interfac...

Страница 132: ...s Figure 68 System Monitor WLAN Station Status The following table describes the labels in this screen Table 36 System Monitor WLAN Station Status LABEL DESCRIPTION This is the index number of an associated wireless station MAC Address This field displays the MAC address of an associated wireless station Rate Mbps This field displays the transmission rate of WiFi traffic between an associated wire...

Страница 133: ...er which represents the strength of the WiFi signal between an associated wireless station and the WX Device The WX Device uses the RSSI and SNR values to determine the strength of the WiFi signal 5 means the WX Device is receiving an excellent WiFi signal 4 means the WX Device is receiving a very good WiFi signal 3 means the WX Device is receiving a weak WiFi signal 2 means the WX Device is recei...

Страница 134: ...a network may work with just the host name without the use of the domain name 12 2 System Settings Click Maintenance System to open the following screen Assign a unique name to the WX Device so it can be easily recognized on your network You can use up to 30 characters including spaces Figure 69 Maintenance System The following table describes the labels in this screen Table 37 Maintenance System ...

Страница 135: ... User Account The following table describes the labels in this screen Table 38 Maintenance User Account LABEL DESCRIPTION Add New Account Click this button to add a new user account This is the index number of the user account Active This field indicates whether the user account is active or not Clear the check box to disable the user account Select the check box to enable it User Name This field ...

Страница 136: ...tor or User privileges Modify Click the Edit icon to configure the entry Click the Delete icon to remove the entry Cancel Click Cancel to restore the default or previously saved settings Apply Click Apply to save your changes Table 38 Maintenance User Account continued LABEL DESCRIPTION Table 39 Maintenance User Account Add Edit LABEL DESCRIPTION Active Select Enable or Disable to activate or deac...

Страница 137: ...before attempting to log in again after a number if consecutive wrong passwords have been entered as defined in Retry Times Group Specify whether this user will have Administrator or User privileges Administrator and User privileges are mostly the same but the following menu items will only display when you log in as an Administrator Network Setting Security Settings Maintenance System Cancel Clic...

Страница 138: ...ous approaches to access the WX Device remotely from a LAN connection Section 14 2 on page 138 Note The WX Device is managed using the Web Configurator 14 2 MGMT Services Use this screen to configure through which interface s each service can access the WX Device You can also specify service port numbers computers must use to connect to the WX Device Click Maintenance Remote Management Remote Mana...

Страница 139: ...way HTTPS is the secured version of HTTP it makes sure that your data cannot be read during transmission TELNET provides a way to control your WX Device remotely SSH prevents leakage of data during remote management Additionally it can encrypt all transmitted data PING is a diagnostic tool that can check if your WX Device is connected to the Internet Cancel Click Cancel to restore the default or p...

Страница 140: ...me For effective scheduling and logging the WX Device s system time must be accurate Use this screen to configure the WX Device s time based on your local time zone You can enter a time server address select the time zone where the WX Device is physically located and configure Daylight Savings settings if needed Click Maintenance Time to open the following screen ...

Страница 141: ...time server Current Date This field displays the date of your WX Device Each time you reload this page the WX Device synchronizes the date with the time server Time and Date Setup First Fifth Time Server Address Select an NTP time server from the drop down list box Otherwise select Other and enter the IP address or URL up to 29 extended ASCII characters in length of your time server Select None if...

Страница 142: ...or UTC So in the European Union you would set the day to Last Sunday and the month to March The time you select in the o clock field depends on your time zone In Germany for instance you would select 2 in the Hour field because Germany s time zone is one hour ahead of GMT or UTC GMT 1 End Rule Configure the day and time when Daylight Saving Time ends if you enabled Daylight Saving You can select a...

Страница 143: ...ecific model Refer to the label on the bottom of your WX Device 16 2 Firmware Upgrade Settings Click Maintenance Firmware Upgrade to open the following screen Download the latest firmware file from the Zyxel website and upload it to your WX Device using this screen The upload process uses HTTP Hypertext Transfer Protocol and may take up to two minutes After a successful upload the WX Device will r...

Страница 144: ... 76 Error Message Table 42 Maintenance Firmware Upgrade LABEL DESCRIPTION Upgrade Firmware Restore Default Settings After Firmware Upgrade Select the check box to have the WX Device automatically reset itself after the new firmware is uploaded Current Firmware Version This is the present Firmware version and the date created File Path Type the location of the file you want to upload in this field ...

Страница 145: ...Series User s Guide 145 Note that the WX Device automatically restarts during the upload causing a temporary network disconnect In some operating systems you may see the following icon on your desktop Network Temporarily Disconnected ...

Страница 146: ...ce configurations You can also reset your device settings back to the factory default 17 2 Backup Restore Settings Click Maintenance Backup Restore Information related to factory default settings and backup configuration are shown in this screen You can also use this to restore previous device configurations Figure 77 Maintenance Backup Restore ...

Страница 147: ...guration has been restored successfully the login screen appears Login again to restart the WX Device The WX Device automatically restarts in this time causing a temporary network disconnect In some operating systems you may see the following icon on your desktop Figure 78 Network Temporarily Disconnected If you uploaded the default configuration file you may need to change the IP address of your ...

Страница 148: ... 81 Reset In Process Message You can also press the RESET button on the rear panel to reset the factory defaults of your WX Device Refer to Section 2 6 on page 29 for more information on the RESET button 17 3 Reboot System Reboot allows you to reboot the WX Device remotely without turning the power off You may need to do this if the WX Device hangs for example Click Maintenance Reboot Click Reboot...

Страница 149: ...Chapter 17 Backup Restore WX Series User s Guide 149 Figure 82 Maintenance Reboot ...

Страница 150: ...ing an IP address or trace the route packets take to a host Section 18 3 on page 151 18 2 What You Need to Know The following terms and concepts may help as you read through this chapter How CFM Works A Maintenance Association MA defines a VLAN and associated Maintenance End Point MEP ports on the device under a Maintenance Domain MD level An MEP port has the ability to send Connectivity Check Mes...

Страница 151: ...ic The following table describes the fields in this screen Table 44 Maintenance Diagnostic LABEL DESCRIPTION Address Type the IP address of a computer that you want to perform ping traceroute or nslookup in order to test a connection Ping Click this to ping the IPv4 address that you entered Ping 6 Click this to ping the IPv6 address that you entered Trace Route Click this to display the route path...

Страница 152: ...152 PART III Troubleshooting and Appendices Appendices contain general information Some information may not apply to your WX Device ...

Страница 153: ... None of the LEDs turn on 1 Make sure the WX Device is turned on 2 Make sure you are using the power adapter included with the WX Device 3 Make sure the power adapter is connected to the WX Device and plugged in to an appropriate power source Make sure the power source is turned on 4 Turn the WX Device off and on 5 If the problem continues contact the vendor One of the LEDs does not behave as expe...

Страница 154: ...reen 1 Make sure you are using the correct IP address The default IP address is 192 168 1 2 See Chapter 3 on page 30 for more details If you changed the IP address See Section 8 2 on page 125 use the new IP address If you changed the IP address and have forgotten it see the troubleshooting suggestions for I don t know the IP address of the WX Device Make sure your computer has an IP address in the...

Страница 155: ... 19 5 on page 156 19 3 Internet Problems I cannot access the Internet 1 Check the hardware connections and follow the instructions at Section 4 3 on page 38 depending on if you choose to use a wired or a wireless connection Make sure the LEDs are behaving as expected See the Quick Start Guide and Table 12 on page 43 2 Make sure you entered your ISP account information correctly in the Network Sett...

Страница 156: ...Try closing some programs that use the Internet especially peer to peer applications If the WiFi client is sending or receiving a lot of information it may have too many programs open that use the Internet I cannot access the WX Device using WiFi Make sure the WX Device is working in AP or Repeater mode and the wireless LAN is enabled on the WX Device Make sure the wireless adapter on the WiFi cli...

Страница 157: ... MPro Mesh App Problems I cannot use the MPro Mesh app to manage my WiFi network Make sure you connect your mobile device to the controller The Zyxel MPro Mesh Router in Scenario 1 or the WX Device 1 in Scenario 2 in order to manage the WiFi network Make sure you use the controller s The Zyxel MPro Mesh Router in Scenario 1 or the WX Device 1 in Scenario 2 SSID and key when logging in with the app...

Страница 158: ...Mesh Router follow the steps in Scenario1 to add WX Devices to your network see Section 4 3 1 on page 38 for more information With a non MPro Mesh Router follow the steps in Scenario 2 to add WX Devices to your network see Section 4 3 2 on page 43 for more information ...

Страница 159: ...n Please have the following information ready when you contact an office Required Information Product model and serial number Warranty Information Date that you received your device Brief description of the problem and the steps you took to solve it Corporate Headquarters Worldwide Taiwan Zyxel Communications Corporation http www zyxel com Asia China Zyxel Communications Shanghai Corp Zyxel Commun...

Страница 160: ...ippines Zyxel Philippines http www zyxel com ph Singapore Zyxel Singapore Pte Ltd http www zyxel com sg Taiwan Zyxel Communications Corporation https www zyxel com tw zh Thailand Zyxel Thailand Co Ltd https www zyxel com th th Vietnam Zyxel Communications Corporation Vietnam Office https www zyxel com vn vi Europe Belarus Zyxel BY https www zyxel by Belgium Zyxel Communications B V https www zyxel...

Страница 161: ...ark Zyxel Communications A S https www zyxel com dk da Estonia Zyxel Estonia https www zyxel com ee et Finland Zyxel Communications https www zyxel com fi fi France Zyxel France https www zyxel fr Germany Zyxel Deutschland GmbH https www zyxel com de de Hungary Zyxel Hungary SEE https www zyxel com hu hu Italy Zyxel Communications Italy https www zyxel com it it Latvia Zyxel Latvia https www zyxel...

Страница 162: ...nd Zyxel Communications Poland https www zyxel com pl pl Romania Zyxel Romania https www zyxel com ro ro Russia Zyxel Russia https www zyxel com ru ru Slovakia Zyxel Communications Czech s r o organizacna zlozka https www zyxel com sk sk Spain Zyxel Communications ES Ltd https www zyxel com es es Sweden Zyxel Communications https www zyxel com se sv Switzerland Studerus AG https www zyxel ch de ht...

Страница 163: ...rica Argentina Zyxel Communications Corporation https www zyxel com co es Brazil Zyxel Communications Brasil Ltda https www zyxel com br pt Colombia Zyxel Communications Corporation https www zyxel com co es Ecuador Zyxel Communications Corporation https www zyxel com co es South America Zyxel Communications Corporation https www zyxel com co es Middle East Israel Zyxel Communications Corporation ...

Страница 164: ...ications Corporation https www zyxel com me en North America USA Zyxel Communications Inc North America Headquarters https www zyxel com us en Oceania Australia Zyxel Communications Corporation https www zyxel com au en Africa South Africa Nology Pty Ltd https www zyxel com za en ...

Страница 165: ...a2f 0015 2001 db8 1a2f 0 0 15 or 2001 db8 0 0 1a2f 15 Prefix and Prefix Length Similar to an IPv4 subnet mask IPv6 uses an address prefix to represent the network address An IPv6 prefix length specifies how many most significant bits start from the left in the address compose the network address The prefix length is written as x where x is a number For example 2001 db8 1a2b 15 1a2f 0 32 means that...

Страница 166: ...f ff00 8 The following table describes some of the predefined multicast addresses The following table describes the multicast addresses which are reserved and can not be assigned to a multicast group Table 46 Predefined Multicast Address MULTICAST ADDRESS DESCRIPTION FF01 0 0 0 0 0 0 1 All hosts on a local node FF01 0 0 0 0 0 0 2 All routers on a local node FF02 0 0 0 0 0 0 1 All hosts on a local ...

Страница 167: ...iation IA is a collection of addresses assigned to a DHCP client through which the server and client can manage a set of related IP addresses Each IA must be associated with exactly one interface The DHCP client uses the IA assigned to an interface to obtain configuration from a DHCP server for that interface Each IA consists of a unique IAID and associated IP information The IA type is the type o...

Страница 168: ...he received IPv6 prefix for example 2001 db2 48 to generate its LAN IP address Through sending Router Advertisements RAs regularly by multicast the WX Device passes the IPv6 prefix information to its LAN hosts The hosts then can use the prefix to generate their IPv6 addresses ICMPv6 Internet Control Message Protocol for IPv6 ICMPv6 or ICMP for IPv6 is defined in RFC 4443 ICMPv6 has a preceding Nex...

Страница 169: ...s the next hop Otherwise the WX Device determines the next hop from the default router list or routing table Once the next hop IP address is known the WX Device looks into the neighbor cache to get the link layer address and sends the packet when the neighbor is reachable If the WX Device cannot find an entry in the neighbor cache or the state for the neighbor is not reachable it starts the addres...

Страница 170: ...Pv6 for IP address assignment you have to additionally install a DHCPv6 client software on your Windows XP Note If you use static IP addresses or Router Advertisement for IPv6 address assignment in your network ignore this section This example uses Dibbler as the DHCPv6 client To enable DHCPv6 client on your computer 1 Install Dibbler and select the DHCPv6 client option on your computer 2 After th...

Страница 171: ...Example Enabling IPv6 on Windows 7 Windows 7 supports IPv6 by default DHCPv6 is also enabled when you enable IPv6 on a Windows 7 computer To enable IPv6 in Windows 7 1 Select Control Panel Network and Sharing Center Local Area Connection 2 Select the Internet Protocol Version 6 TCP IPv6 checkbox to enable it 3 Click OK to save the change ...

Страница 172: ...dynamic IPv6 address This example shows a global address 2001 b021 2d 1000 obtained from a DHCP server C ipconfig Windows IP Configuration Ethernet adapter Local Area Connection Connection specific DNS Suffix IPv6 Address 2001 b021 2d 1000 Link local IPv6 Address fe80 25d8 dcab c80a 5189 11 IPv4 Address 172 16 100 61 Subnet Mask 255 255 255 0 Default Gateway fe80 213 49ff feaa 7125 11 172 16 100 2...

Страница 173: ...e of IP protocol used by the service If this is TCP UDP then the service uses the same port number with TCP and UDP If this is USER DEFINED the Port s is the IP protocol number not the port number Port s This value depends on the Protocol If the Protocol is TCP UDP or TCP UDP this is the IP port number If the Protocol is USER this is the IP protocol number Description This is a brief explanation o...

Страница 174: ...s including large files that may not be possible by e mail H 323 TCP 1720 NetMeeting uses this protocol HTTP TCP 80 Hyper Text Transfer Protocol a client server protocol for the world wide web HTTPS TCP 443 HTTPS is a secured http session often used in e commerce ICMP User Defined 1 Internet Control Message Protocol is often used for diagnostic purposes ICQ UDP 4000 This is a popular Internet chat...

Страница 175: ...EXEC TCP 514 Remote Execution Daemon RLOGIN TCP 513 Remote Login ROADRUNNER TCP UDP 1026 This is an ISP that provides services mainly for cable modems RTELNET TCP 107 Remote Telnet RTSP TCP UDP 554 The Real Time Streaming media control Protocol RTSP is a remote control for multimedia on the Internet SFTP TCP 115 The Simple File Transfer Protocol is an old way of transferring files between computer...

Страница 176: ...n and terminal emulation protocol common on the Internet and in UNIX environments It operates over TCP IP networks Its primary function is to allow users to log into remote host systems VDOLIVE TCP UDP 7000 user defined A videoconferencing solution The UDP port number is specified in the application Table 48 Examples of Services continued NAME PROTOCOL PORT S DESCRIPTION ...

Страница 177: ...id the user s authority to operate the device This product has been tested and complies with the specifications for a Class B digital device pursuant to Part 15 of the FCC Rules These limits are designed to provide reasonable protection against harmful interference in a residential installation This device generates uses and can radiate radio frequency energy and if not installed and used accordin...

Страница 178: ...tention particulière aux choses suivantes Les dispositifs fonctionnant dans la bande de 5 150 à 5 250 MHz sont réservés uniquement pour une utilisation à l intérieur afin de réduire les risques de brouillage préjudiciable aux systèmes de satellites mobiles utilisant les mêmes canaux Pour les dispositifs munis d antennes amovibles le gain maximal d antenne permis pour les dispositifs utilisant la b...

Страница 179: ... autres dispositions pertinentes de la directive 2014 53 UE Hrvatski Croatian Zyxel ovime izjavljuje da je radijska oprema tipa u skladu s Direktivom 2014 53 UE Íslenska Icelandic Hér með lýsir Zyxel því yfir að þessi búnaður er í samræmi við grunnkröfur og önnur viðeigandi ákvæði tilskipunar 2014 53 UE Italiano Italian Con la presente Zyxel dichiara che questo attrezzatura è conforme ai requisiti...

Страница 180: ...where anyone can walk on the power adaptor or cord Please use the provided or designated connection cables power cables adaptors Connect it to the right supply voltage for example 110V AC in North America or 230V AC in Europe If the power adaptor or cord is damaged it might cause electrocution Remove it from the device and the power source repairing the power adapter or cord is prohibited Contact ...

Страница 181: ...sumption 0 5W Wireless setting please refer to the chapter about wireless settings for more detail European Union Disposal and Recycling Information The symbol below means that according to local regulations your product and or its battery shall be disposed of separately from domestic waste If this product is end of life take it to a recycling station designated by local authorities At the time of...

Страница 182: ...沙土 食物或其他不合適的材料 雷雨天氣時 不要安裝 使用或維修此設備 有遭受電擊的風險 切勿重摔或撞擊設備 並勿使用不正確的電源變壓器 若接上不正確的電源變壓器會有爆炸的風險 請勿隨意更換產品內的電池 如果更換不正確之電池型式 會有爆炸的風險 請依製造商說明書處理使用過之電池 請將廢電池丟棄在適當的電器或電子設備回收處 請勿將設備解體 請勿阻礙設備的散熱孔 空氣對流不足將會造成設備損害 請插在正確的電壓供給插座 如 北美 台灣電壓 110V AC 歐洲是 230V AC 假若電源變壓器或電源變壓器的纜線損壞 請從插座拔除 若您還繼續插電使用 會有觸電死亡的風險 請勿試圖修理電源變壓器或電源變壓器的纜線 若有毀損 請直接聯絡您購買的店家 購買一個新的電源變壓器 請勿將此設備安裝於室外 此設備僅適合放置於室內 請勿隨一般垃圾丟棄 請參閱產品背貼上的設備額定功率 請參考產品型錄或是彩盒上的作業溫...

Страница 183: ...rchaser This warranty is in lieu of all other warranties express or implied including any implied warranty of merchantability or fitness for a particular use or purpose Zyxel shall in no event be held liable for indirect or consequential damages of any kind to the purchaser To obtain the services of this warranty contact your vendor You may also refer to the warranty policy for the region in which...

Страница 184: ... 150 MIP 150 channel WiFi 112 configuration backup 147 reset 148 restoring 147 connection status screen 32 overview 83 Connectivity Check Messages see CCMs contact information customer support 159 copyright 177 CTS threshold 113 customer support 159 D daisy chain 12 16 data fragment threshold 113 disclaimer 177 E encryption 115 Extended Service Set IDentification 95 99 F filters MAC address 100 11...

Страница 185: ...bnet mask 124 125 LAN setup 90 Language icon 36 layout icon 91 LBR 150 limitations WiFi 115 WPS 122 link trace 150 Link Trace Message see LTM Link Trace Response see LTR login 31 password 31 Logout icon 36 logs 127 130 Loop Back Response see LBR loopback 150 LTM 150 LTR 150 M MA 150 MAC address 101 filter 100 114 MAC authentication 100 Maintenance Association see MA Maintenance Domain see MD Maint...

Страница 186: ...ersion 86 LAN 86 91 WiFi 86 subnet mask 124 syslog protocol 127 severity levels 127 system firmware 143 version 86 password 31 status 83 LAN 86 91 WiFi 86 time 140 system information 85 T Theme icon 36 thresholds data fragment 113 RTS CTS 113 time 140 TWT Target Wakeup Time 93 U upgrading firmware 143 W warranty 183 note 183 web browser version recommended 30 Web Configurator layout 33 login 31 ov...

Страница 187: ... 117 WiFi overview 92 WiFi setting configuration 88 WiFi6 introduction 93 wireless basics 92 wireless channel 156 wireless LAN 156 wireless network secure setup 71 wireless security troubleshooting 156 wireless tutorial 73 WPS 28 117 119 example 120 limitations 122 PIN 118 example 119 push button 117 WPS button 28 WPS methods tutorial 73 ...

Отзывы: