Stamp and signature
Date of sale
1. The seller provides product warranty of 24 months from the date of sale to the consumer.
2. Upon sale, the seller is obligated to complete a warranty certificate, including a date and stamp.
It is prohibited to confirm this warranty certificate after the sale of the product.
3. In case of a claim it is necessary for the consumer to present the original of the confirmed warranty
certificate, original document about the purchase of the product (receipt) and make a report about the
claim (description under which circumstances the defect occurred or a brief description of the defect
stating consumer’s requirements).
4. Only clean product is accepted into the claim process.
5. The warranty period is extended by the time when the consumer exercised his/her entitlement
to a warranty repair until the time when he/she was obligated to collect the product after the repair.
6. The warranty entitlement expires if the consumer or any other person fails to follows assembly,
maintenance, cleaning and use instructions in compliance with the instruction manual that forms part
of these warranty terms and conditions. The consumer is prohibited to make any changes to the product.
7. Warranty does not apply to mechanical defects caused by incorrect use of the product, in particular
scratches, bending, breakoff of structure or plastic parts, cracked or broken joints, fading of colours of fabric
covers due to washing under inadequate instructions, or loss of colours due to exposing the product to
direct sunlight or humidity. It is also impossible to raise a claim for the scrapping or tearing of the cover
fabric and standard wear and tear of product parts. Warranty does not apply in cases when the product
is damaged by external chemical effects, and in case of loss or theft of product parts. These faults will be
repaired and charged to the consumer, including transport costs.
8. The product was ‘demonstrated’ to the buyer or ‘assembled by the seller’ in front of the buyer (delete as
applicable) and the buyer was familiarised with the instruction manual.
9. Providing warranty does not affect the rights of the buyer associated with the purchase
under special legal regulations.
WARRANTY CERTIFICATE
BKB1014
SMART CLOSE AUTO CLOSE METAL GATE
35
Содержание BKB1014
Страница 2: ...CZ 3 SK 14 EN 25 DE 36 HU 47 PL 58 SLO 69 IT 80 2...
Страница 6: ...F F G 6...
Страница 7: ...7...
Страница 8: ...1 E 8 Prove te p edb nou mont z brany a zvolte a ozna te ty i body k vyvrt n otvor...
Страница 10: ...5 4 3 1 5mm 10 Zkontrolujte e spodn mezeraje5mm Zkontrolujte e mezera umo uje hladk zamyk n a odemyk n...
Страница 17: ...F F G 17...
Страница 18: ...18...
Страница 19: ...1 E 19 Vykonajte predbe n mont z brany a zvo te a ozna te tyri body na vyv tanie otvorov...
Страница 20: ...2 20 Vyv tajte v 4 vyzna en ch bodoch otvory a vlo te do nich pr chytky B a pou ite A a D na upevnenie s asti C...
Страница 21: ...5 4 3 1 5mm 21 Skontrolujte espodn medzeraje5mm Skontrolujte e medzera umo uje hladk zamykanie a odomykanie...
Страница 28: ...F F G 28...
Страница 29: ...29...
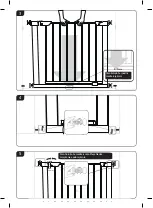
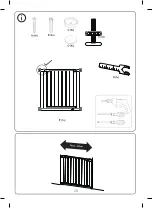
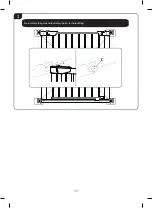
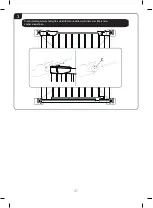
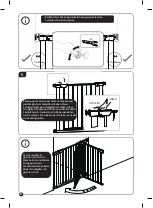
Страница 30: ...1 E 30 Pre assemble the gate and locate four points for hole drilling...
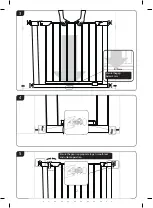
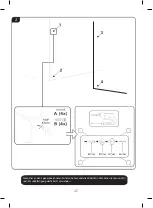
Страница 31: ...2 31 Drill hole for the 4 marked positions then put wall plugs B and use A and D to fix component C...
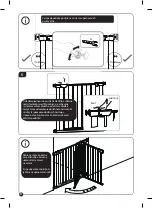
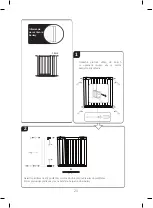
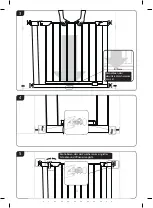
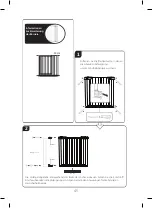
Страница 32: ...5 4 3 1 5mm 32 Ensurethegap below5mm Ensure the gap is appropriate to get smooth lock and unlock operation...
Страница 39: ...F F G 39...
Страница 40: ...40...
Страница 41: ...1 E 41 DieVormontage des Schutzgitters durchf hren und die vier Punkte zum Bohren der L cher anzeichnen...
Страница 50: ...F F G 50...
Страница 51: ...51...
Страница 52: ...1 E 52 R gz tse tmeneti jelleggel a biztons gi korl tot s jel lje be a kif rni k v nt n gy pontot...
Страница 61: ...F F G 61...
Страница 62: ...62...
Страница 63: ...1 E 63 Wykonaj wst pny monta barierki wybierz i zaznacz cztery punkty do wywiercenia otwor w...
Страница 64: ...2 64 Wykonaj wiercenia otwor w w 4 zaznaczonych punktach w do nich ko ki B i u yj A i D do zamocowania cz ci C...
Страница 65: ...5 4 3 1 5mm 65 Sprawd czydolna szczelinawynosi5mm Sprawd czy szczelina umo liwia p ynne zamykanie i otwieranie...
Страница 72: ...F F G 72...
Страница 73: ...73...
Страница 74: ...1 E 74 Najprej na rahlo pritrdite ograjico izberite in ozna ite tiri to ke in izvrtajte luknje...
Страница 76: ...5 4 3 1 5mm 76 Preverite espodnja pranjameri5mm Preverite e pranja omogo a nemoteno odklepanje in zaklepanje...
Страница 83: ...F F G 83...
Страница 84: ...84...
Страница 91: ...91...

