EN
IMPORTANT! READ AND FOLLOW
THESE INSTRUCTIONS CAREFULLY
AND KEEP FOR FUTURE REFERENCE
INTRODUCTION
Please read the instructions thoroughly to ensure proper installation.
Please immediately inspect your safety gate upon receipt. If you see any damage, or additional parts are
required for this gate, do not assemble gate and please go to back page of the instruction booklet for website
or Consumer Relations Representative information. We recommend that you carry out the installation away
from young children as some of the smaller components may present a choking hazard when loose.
IMPORTANT INFORMATION
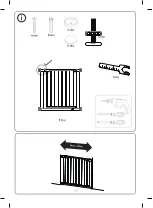
There is a gap between your gate frame and handle. This is not a defect. The gap on your gate will close once
it is properly mounted. Please check the gate on a regular basis to ensure gate and parts are all in proper
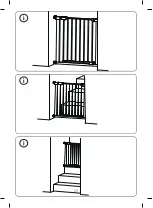
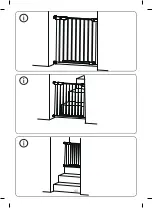
working order. If the gate is used at the top of stairs, it should not be positioned below the top level.
When using at top of stairs, gate must open away from stairs. If the gate is used at the bottom of the stairs,
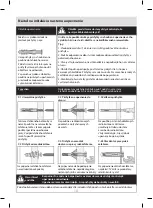
please place towards the front of the lowest stair. Ensure the gate is attached between two clean and solid
surfaces. Ensure appropriate fixings are used for drywall, wood, brick, etc. If wall plugs are provided with
the gate and do not secure to the wall satisfactorily, consult with a hardwarestore for your proper wall plug
application. If additional parts are required for this gate, please go to back page of the instruction booklet for
website or Consumer Relations Representative information. Do not use this gate at the top or bottom of stairs
without using all four wall cups. For maximum safety, use 4 wall cups with sticky pads and screws provided
when installing the gate in all locations. In some openings only 2 top wall cups can be fitted.
DISCLAIMER
Any safety gate which has been subjected to misuse, abuse, abnormal use, excessive wear and tear, improper
assembly, negligence, environmental exposure, alteration or accident, or has had its serial number altered
or removed invalidates any and all claims against the manufacturer. Any damage to property during
installation of your safety gate is the sole responsibility of the end user.
WARNING!
• Never use with a child able to climb over or dislodge
the gate or enclosure.
• Stop using gate if any parts are missing or become
damaged.
• Incorrect installation can be dangerous.
USER’S MANUAL
25
Содержание BKB1014
Страница 2: ...CZ 3 SK 14 EN 25 DE 36 HU 47 PL 58 SLO 69 IT 80 2...
Страница 6: ...F F G 6...
Страница 7: ...7...
Страница 8: ...1 E 8 Prove te p edb nou mont z brany a zvolte a ozna te ty i body k vyvrt n otvor...
Страница 10: ...5 4 3 1 5mm 10 Zkontrolujte e spodn mezeraje5mm Zkontrolujte e mezera umo uje hladk zamyk n a odemyk n...
Страница 17: ...F F G 17...
Страница 18: ...18...
Страница 19: ...1 E 19 Vykonajte predbe n mont z brany a zvo te a ozna te tyri body na vyv tanie otvorov...
Страница 20: ...2 20 Vyv tajte v 4 vyzna en ch bodoch otvory a vlo te do nich pr chytky B a pou ite A a D na upevnenie s asti C...
Страница 21: ...5 4 3 1 5mm 21 Skontrolujte espodn medzeraje5mm Skontrolujte e medzera umo uje hladk zamykanie a odomykanie...
Страница 28: ...F F G 28...
Страница 29: ...29...
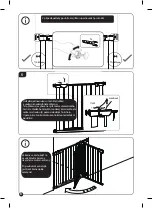
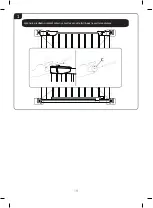
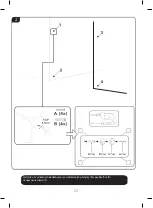
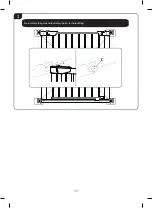
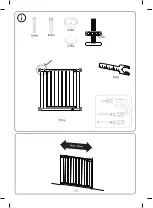
Страница 30: ...1 E 30 Pre assemble the gate and locate four points for hole drilling...
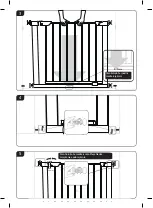
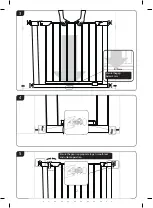
Страница 31: ...2 31 Drill hole for the 4 marked positions then put wall plugs B and use A and D to fix component C...
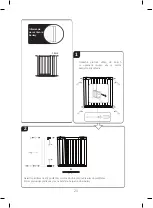
Страница 32: ...5 4 3 1 5mm 32 Ensurethegap below5mm Ensure the gap is appropriate to get smooth lock and unlock operation...
Страница 39: ...F F G 39...
Страница 40: ...40...
Страница 41: ...1 E 41 DieVormontage des Schutzgitters durchf hren und die vier Punkte zum Bohren der L cher anzeichnen...
Страница 50: ...F F G 50...
Страница 51: ...51...
Страница 52: ...1 E 52 R gz tse tmeneti jelleggel a biztons gi korl tot s jel lje be a kif rni k v nt n gy pontot...
Страница 61: ...F F G 61...
Страница 62: ...62...
Страница 63: ...1 E 63 Wykonaj wst pny monta barierki wybierz i zaznacz cztery punkty do wywiercenia otwor w...
Страница 64: ...2 64 Wykonaj wiercenia otwor w w 4 zaznaczonych punktach w do nich ko ki B i u yj A i D do zamocowania cz ci C...
Страница 65: ...5 4 3 1 5mm 65 Sprawd czydolna szczelinawynosi5mm Sprawd czy szczelina umo liwia p ynne zamykanie i otwieranie...
Страница 72: ...F F G 72...
Страница 73: ...73...
Страница 74: ...1 E 74 Najprej na rahlo pritrdite ograjico izberite in ozna ite tiri to ke in izvrtajte luknje...
Страница 76: ...5 4 3 1 5mm 76 Preverite espodnja pranjameri5mm Preverite e pranja omogo a nemoteno odklepanje in zaklepanje...
Страница 83: ...F F G 83...
Страница 84: ...84...
Страница 91: ...91...

