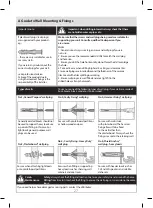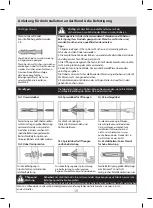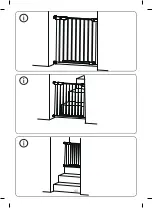
A Guide to Wall Mounting & Fixings
Important note:
Important: when drilling into walls always check that there
are no hidden wires or pipes etc.
If plastic wall plugs (rawl plugs)
are supplied with your product,
e.g.:
- these are only suitable for use in
masonry walls.
If you are in any doubt about the
correct wall plugs for your wall,
seek professional advice.
Failure of the product due to
using the incorrect fixings is the
responsibility of the installer.
Make sure that the screws and wall plugs being used are suitable for
supporting your unit. Consult a qualified tradesperson If you
are unsure.
Hints:
1: General rule: always use a larger screw and wall plug if you are
not sure.
2: Ensure you use the recommended drill bit to match the wall plug
and hole size.
3: Ensure you drill the hole horizontally; do not force the drill or enlarge
the hole.
4: Take extra care when drilling high walls, callings and ceramic tiles.
Ensure wall plugs are inserted beyond the thickness of the ceramic
tiles to avoid the tiles splitting or cracking.
5: Ensure wall plugs are well fitted and are a tight fit in the
drilled hole.vyvŕtaných otvoroch.
Types of walls
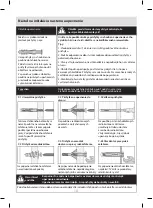
You can use one of the following types of wall plug if your walls are made of
brick, breeze block, concrete, stone or wood.
No.1 „General Purpose“ wall plug
Generally aerated blocks should not
be used to support heavy loads, use
a specialist fitting in this case. For
light loads, general purpose wall
plugs can be used.
For use with plasterboard partitions
or hollow wooden doors.
No.3 „Cavity Fixing“ wall plug
No.2 „Plasterboard“ wall plug
No.4 „Cavity Fixing - Heavy Duty‘‘
wall plug
No.6 „Shield Anchor“
wall plug - heavy loads
No.5 „Hammer Fixing“ wall plug
For use with walls stuck
with plasterboard. The hammer
fixing allows it to be fixed
to the wall rather than
the plasterboard. Always check the
fixing is secure to the retaining wall.
For use when attaching light loads
onto plasterboard partitions.
For use when fitting or supporting
heavy loads such as shelving, wall
cabinets and coat racks .
For use with heavier loads such as
TV and HiFi speakers and satellite
dishes etc.
Care &
Maintenance
Safety:
always check the fitting and location to ensure your safety in and arround the home.
Fitting:
from time to time check the fitting to ensure the wall plugs or screws do not become
loose
If you need help or have damaged or missing parts, contact the distributor.
27
Содержание BKB1014
Страница 2: ...CZ 3 SK 14 EN 25 DE 36 HU 47 PL 58 SLO 69 IT 80 2...
Страница 6: ...F F G 6...
Страница 7: ...7...
Страница 8: ...1 E 8 Prove te p edb nou mont z brany a zvolte a ozna te ty i body k vyvrt n otvor...
Страница 10: ...5 4 3 1 5mm 10 Zkontrolujte e spodn mezeraje5mm Zkontrolujte e mezera umo uje hladk zamyk n a odemyk n...
Страница 17: ...F F G 17...
Страница 18: ...18...
Страница 19: ...1 E 19 Vykonajte predbe n mont z brany a zvo te a ozna te tyri body na vyv tanie otvorov...
Страница 20: ...2 20 Vyv tajte v 4 vyzna en ch bodoch otvory a vlo te do nich pr chytky B a pou ite A a D na upevnenie s asti C...
Страница 21: ...5 4 3 1 5mm 21 Skontrolujte espodn medzeraje5mm Skontrolujte e medzera umo uje hladk zamykanie a odomykanie...
Страница 28: ...F F G 28...
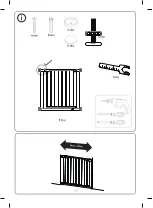
Страница 29: ...29...
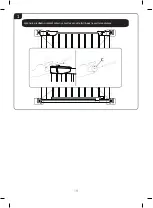
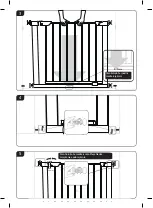
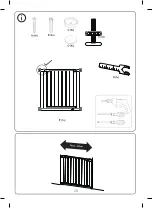
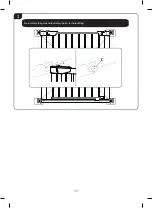
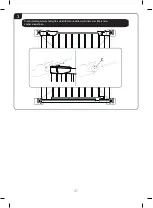
Страница 30: ...1 E 30 Pre assemble the gate and locate four points for hole drilling...
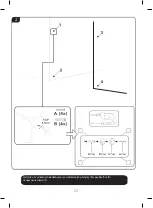
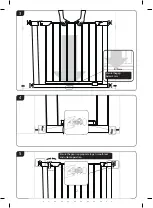
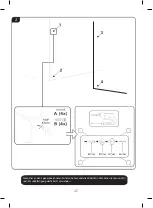
Страница 31: ...2 31 Drill hole for the 4 marked positions then put wall plugs B and use A and D to fix component C...
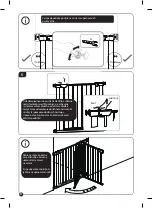
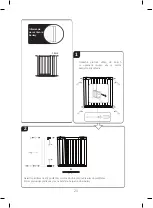
Страница 32: ...5 4 3 1 5mm 32 Ensurethegap below5mm Ensure the gap is appropriate to get smooth lock and unlock operation...
Страница 39: ...F F G 39...
Страница 40: ...40...
Страница 41: ...1 E 41 DieVormontage des Schutzgitters durchf hren und die vier Punkte zum Bohren der L cher anzeichnen...
Страница 50: ...F F G 50...
Страница 51: ...51...
Страница 52: ...1 E 52 R gz tse tmeneti jelleggel a biztons gi korl tot s jel lje be a kif rni k v nt n gy pontot...
Страница 61: ...F F G 61...
Страница 62: ...62...
Страница 63: ...1 E 63 Wykonaj wst pny monta barierki wybierz i zaznacz cztery punkty do wywiercenia otwor w...
Страница 64: ...2 64 Wykonaj wiercenia otwor w w 4 zaznaczonych punktach w do nich ko ki B i u yj A i D do zamocowania cz ci C...
Страница 65: ...5 4 3 1 5mm 65 Sprawd czydolna szczelinawynosi5mm Sprawd czy szczelina umo liwia p ynne zamykanie i otwieranie...
Страница 72: ...F F G 72...
Страница 73: ...73...
Страница 74: ...1 E 74 Najprej na rahlo pritrdite ograjico izberite in ozna ite tiri to ke in izvrtajte luknje...
Страница 76: ...5 4 3 1 5mm 76 Preverite espodnja pranjameri5mm Preverite e pranja omogo a nemoteno odklepanje in zaklepanje...
Страница 83: ...F F G 83...
Страница 84: ...84...
Страница 91: ...91...


