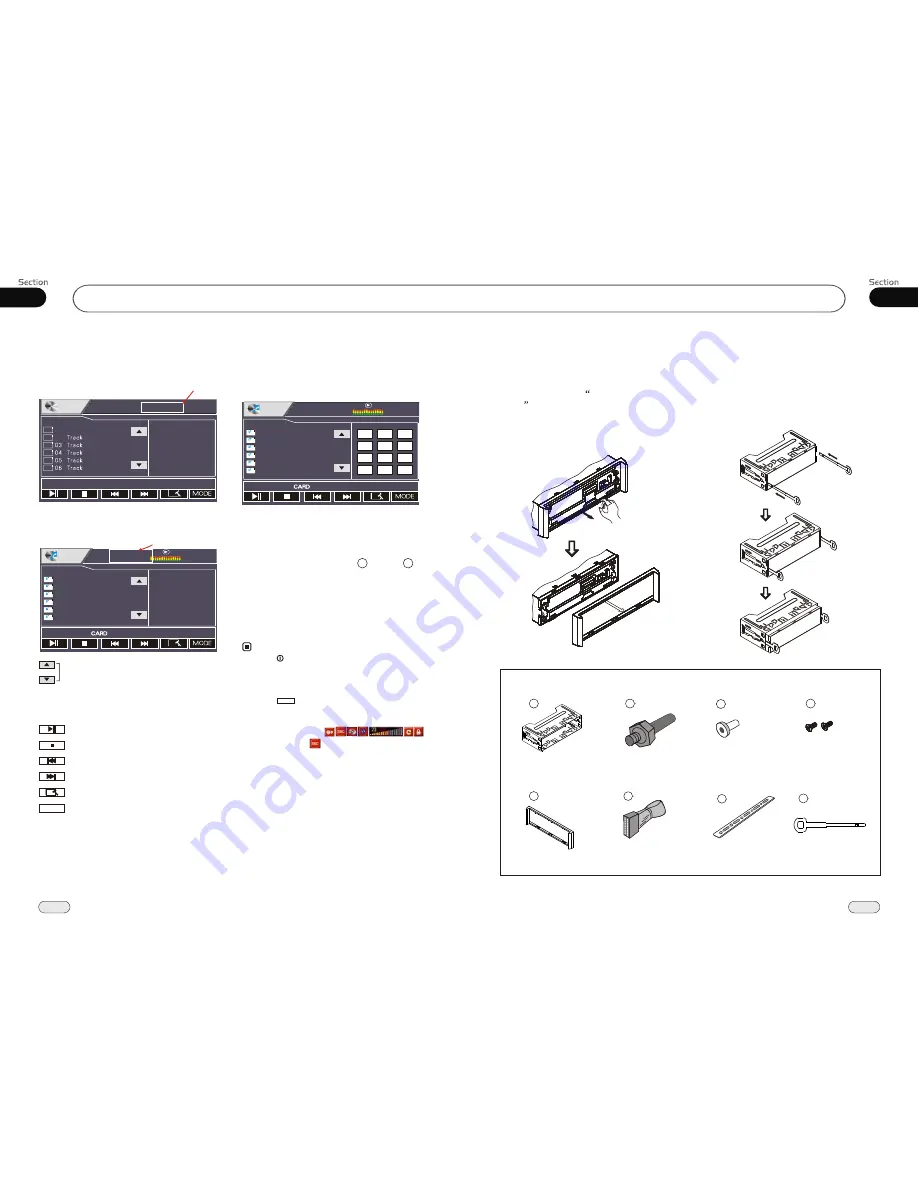
XOVision X450NAV Скачать руководство пользователя страница 15

02

15

34

Installation

06

CD/MP3/SD/USB

Detach the Unit


2

3

4

6


M4x3 &M5x5

7

Main Parts List

Mounting Sleeve x1

Rear Mounting Bolt x1 Harness Rubber x1

4 Screws Each

Outer Trim Frame x 1

Connecting Wire x1

Steel Bar x 1

8

Key x 2

1.Take out the Outer Trim Frame after

detaching the front panel.

Detach the front panel before disassembl-

ing the unit. F

efer to

the Front 

Panel

 .

or more details regarding 

this section, r

Detach 

2.Insert the keys supplied to the unit at

both sides of the unit (shown as illustrat-

ed) until they click. Pulling the keys 

makes it possible to remove the unit from 

the dashboard.

During CD playback, touching the screen 

shows the following menu:

CD/MP3/SD/USB Setup

Track region

During MP3/SD/USB playback, touching

the screen shows the following menu:

Track region

Scan the tracks

CARD

CARD

The 

CARD

 appearing is in the SD Card

mode, the 

USB

 appearing is in the USB

mode.

Play/pause
Stop 
Previous track
Next track
DVD setup menu

MODE

Mode selector

CD/MP3/SD/USB Play

Insert a CD/MP3 disc into the slot, the unit 

will play automatically.

Take away the rubber plug      USB or      SD

card, then insert USB or SD card which 

will be played automatically.

If there have be loaded a disc/USB/SD card, 

press SOURCE to switch to play, or back 

to play source to select menu, press DVD

to play.


Note:

*

12

6

Press     /MOD on the main unit to switch to 

DVD mode. When SD card and USB were

inserted into, press this key again and again to 

switch among SD card, USB and disc.  


*

Press           in the monitor to turn to mode switch. 


MODE

Track Region: 

Press this region and the screen 

shows the following menu:

number keys appears, touch the 

number to select tracks. 

Touch the " 

X

 " to exit this menu.

01:18

C D

0 1   T r a c k

0 2   

C D
C D
C D
C D
C D
C D

Track  03/16

00:00

001/105

00:00

M P 3

MP3

MP3

MP3

MP3

MP3

MP3

D e m o

a m o u r
Au to m a tic

B e  n a tu r a l_ s _ e

C a n  yo u ce le b r

c lo n _ b in g  b in g

00:00

001/105

00:00

M P 3

MP3

MP3

MP3

MP3

MP3

MP3

D e m o

a m o u r
Au to m a tic

B e  n a tu r a l_ s _ e

C a n  yo u ce le b r

c lo n _ b in g  b in g

1

2

3

4

5

6

7

8

9

--

0

X

*

1

5

When a disc, an SD card or a USB device is 

loading, pressing the 

upper left corner of the

screen reveals  the                                                      , 

and then press       button to select the corresp-

onding media icon to play.    

*

At present, our products can only support up

to 16G of SD or USB.


Содержание X450NAV

Страница 1: ...al inmost states There is a safety feature on this device which enables viewing videos only when Parked All other features may still be used while driving such as audio and Navigation but must be done...

Страница 2: ...Picture Size 26 On Screen Display 26 Setting the Playback Time 26 Changing Audio Language 27 Changing the Subtitle Language 27 Changing the Viewing Angle 27 Selecting Channel 27 Program Playing 28 Pla...

Страница 3: ...Phone 42 Simple Troubleshooting Guide 45 AUX Touch Screen Menu 39 00 3 Contents Slow Motion Play On Screen Display Program Playing Eject an SD Card Eject a USB 36 36 36 36 36 AUX 8 7 Tuner Listening t...

Страница 4: ...o each other or to the vehicle body Make sure all the connections are comp letely correct before turning on your unit When replacing the fuse s the replace ment must be of the same amperage as shown o...

Страница 5: ...ts edge to keep the disc clean and do not touch the surface Do not attempt to modify the unit modifying the unit may cause an accident Stop the vehicle before carrying out any operation that could int...

Страница 6: ...s this button to go back to the select menu Current playing information Current file directory list box Selecting Tracks Fast Pressing in the monitor to perform the same function Note DuringIPODplayba...

Страница 7: ...ay press to pause play Stop play press to stop play and press the PLAYto play the current track again 21 Note 17 18 30 Pressing on the unit or performs the same function 8 This function is only valid...

Страница 8: ...nit or performs the same function To dial the number of the unit in the car only Pressing on the main unit or in the monitor also performs the same function PAIR 5 Pressing and on the unit or and perf...

Страница 9: ...llow the pairing instructions for the first time use after that the unit will connect automatically Note To provide the best sound with minimal distorted sound the cellphone or network brings Full dup...

Страница 10: ...r answer a phone During IPOD mode press it to go back to the previous mode During bluetooth mode press to hang up or refuse a phone During IPOD mode press it to back to the root catalog 08 BACK ROOT P...

Страница 11: ...ore than 2 seconds while listening to a station on another number the station will be stored in that number button 1 2 3 Pressing in the monitor performs the same function Note 5 Scanning Memorizing S...

Страница 12: ...n unit or in the monitor performs the same function During radio status repeatedly press BAND button to select bands in lowing order the fol Band Selector 3 For Two Bands 13 1 FM2 MW2 MW FM3 FM1 FM4 O...

Страница 13: ...ode press PROG the TFT displays the program menu Press NUMBER BUTTONS to select the track Number and then press to move the cursor to START press ENTER to start program playing move the cursor to EXIT...

Страница 14: ...Number Buttons 0 9 to select a track to play automatically 23 Pressing track region and the screen shows the number keys touch the number to select tracks Note Note Pressing button on the main unit or...

Страница 15: ...tically Take away the rubber plug USB or SD card then insert USB or SD card which will be played automatically If there have be loaded a disc USB SD card press SOURCE to switch to play or back to play...

Страница 16: ...e Audio Subtitles DVDMenu Parental ChangePSW Default Auto Eng Eng Eng PreferencePage TVType Audio Subtitles DVDMenu Parental ChangePSW Default Auto Eng Eng Eng Change PSW Example showing how to set pa...

Страница 17: ...y and briefly desired Briefly pressing button on the unit also performs the same function main 14 After selecting the desired mode you adjust the current level by pressing can VOL buttons Note 7 14 Pr...

Страница 18: ...ommon SD Card insert a common SD card into SD slot and the programs in the card will be played 6 Eject a Disc Press button to eject or insert a disc Note Pressing on the main unit also performs the sa...

Страница 19: ...ET to go back to the default value on the screen Note Adjusting other options perform the same operation Pressing VOL VOL on the remote or press EN EN button on the main unit also performs the same fu...

Страница 20: ...ress and or press the long strip to adjust the angle then press SAVE to save the setup press RESET to go back to the default value on the screen Note Do not use force to adjust the angle of display Ge...

Страница 21: ...PBC Menu During VCD status first press TITLE PBC playback starts and the menu of the entire disc appears on the monitor and then you can select your favorite track by using Number Buttons When a trac...

Страница 22: ...multi audio recordings The number in the mark on a DVD s package indicates the number of recorded languages audio systems 2 Note 6 Changing the subtitle language Multi subtitle With DVDs featuring mu...

Страница 23: ...e playing time when the TFT dis play disc time track time repeat time disp Press to select the options press ENTER to set the status Then press NUMBER BUTTONS or to set the current status track 2 23 S...

Страница 24: ...pause During stop mode press this button to resume playback mode Pause Playback 17 Note Pressing in the monitor or on the main unit performs the same function Stop the playback During DVD VCD playbac...

Отзывы: