XOVision X450NAV Скачать руководство пользователя страница 12

37

Installation

02

12

07

Tuner

The brown wire is connected with brake signal; for safety, the programs can be seen on the monitor 

after braking the car, but the menu and RCA output are free of it.

If you do not want to use this function, connect it with the negative pole.

Do not connect the pink wire to the battery,otherwise it will use up the power of battery. 

Note:

*

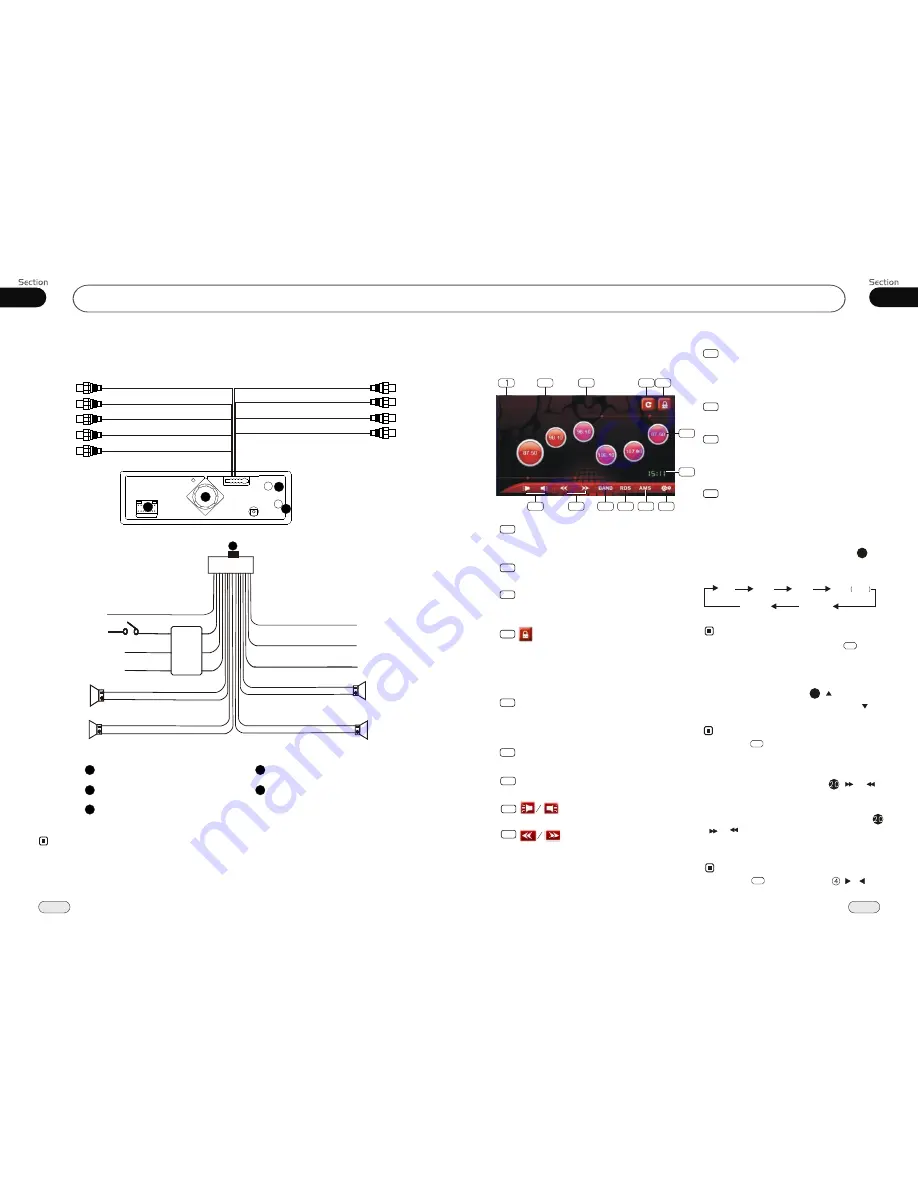
Listening to the radio

Band Indicator

Shows which band the radio is tuned 

to.

1

Preset Number Indicator

Shows what preset has been selected.

2

Shows which frequency the tuner is

tuned.

Frequency  Indicator

3

6

TIME SHOW

To show the current time.

5

The 6 stations of the current band.

Briefly press to select station, hold and

press to save the current station to one

of the 6 stations.

Press this button to lock or unlock

the touch screen

During unlock status, glide up and down

or left and right on the blank space of

screen to switch to the previous or next 

mode.

4

7

BACK

Press it to go back to the select menu.

8

Press it to adjust the volume.

9

Press this button to search the frequency

manually. Press and hold it to search

the station automatically.

10

AMS

Press it to scan the current station each

5 seconds, press and hold it to search

and store the stations automatically.

11

12

13

SETUP MENU

Press it to enter the main setup menu.

RDS MENU

Press this button to enter the RDS setup

menu.(Without RDS function, the icon is 

in gray.)

BAND

Press this button to select bands.

Note:

*   Pressing BND on the main unit or        in the 

     monitor performs the same function.

During radio status, repeatedly press

BAND button to select bands in 

lowing order:


the 

fol

Band Selector

3

(For Two Bands)

13

1

FM2

MW2

MW

FM3

FM1

FM4

OIRT

Selecting the Stored Station

During radio status, press           button to 

select the stored station upward, press     to

select 

downward.

the stored station 

27

Note:

*

Pressing        in the monitor also performs the

same function.

5

2

3

4

7

5

6

9

10

12

13

8

11

:

FM 1

:

FM 1

:

CH 3

:

CH 3

98.00MHz

98.00MHz

Wiring Connection

 Video Out 1  

Rear RCA 
Front RCA

Reverse Video 

Input 

(Light grey line with 

  yellow head)
(Light Grey line with 

  red & white head)
(Dark Grey line with 

  red & white head)

(Brown line with 

  yellow head)

 Video Out 2  

(Light grey line with 

  yellow head)

Subwoofer  

(Brown line with 

 brown head)

1

Reverse Gear

Orange
Red


Yellow
Black 

Ignition Key

B

Ground

Rear L 

Speaker

Front L

Speaker

Green/Black 
Green 
White/Black   
White  

Brown

Pink(optional) 

Violet/Black  

Blue  

Violet   
Grey/Black  
Grey  

Parking Brake

Lamp In
Antenna

Power +

Rear R 

Speaker

Front R

Speaker

4

1

2

5

Output Plug(Male) 

3

Output Socket(Female)

FILTER

&FUSE

BOX

Fan Window

 AUX Audio input  

(Black line with red 

& white head)

 AUX Video input  

(Black line with 

yellow head)

Ipod Wire Conection 

(White)(+5V)

3

4

2

5

GPS Antenna Receptacle
Radio Antenna Receptacle

Manual/Automatic Tuning

Manual Tuning:

 Briefly press     

(     

button on the remote control to select the

different band.

or     

Automatic Tuning:

  ressing and 


)

 button

the radio will 

stations 

 or 

 respectively 

and plays when it finds a station.

P

holding     

( or     

 on 

automatically 

search 

downward

upward

Pressing        in the monitor or            /  

on the main unit also performs the same 

function.

Note:

*

9

Содержание X450NAV

Страница 1: ...al inmost states There is a safety feature on this device which enables viewing videos only when Parked All other features may still be used while driving such as audio and Navigation but must be done...

Страница 2: ...Picture Size 26 On Screen Display 26 Setting the Playback Time 26 Changing Audio Language 27 Changing the Subtitle Language 27 Changing the Viewing Angle 27 Selecting Channel 27 Program Playing 28 Pla...

Страница 3: ...Phone 42 Simple Troubleshooting Guide 45 AUX Touch Screen Menu 39 00 3 Contents Slow Motion Play On Screen Display Program Playing Eject an SD Card Eject a USB 36 36 36 36 36 AUX 8 7 Tuner Listening t...

Страница 4: ...o each other or to the vehicle body Make sure all the connections are comp letely correct before turning on your unit When replacing the fuse s the replace ment must be of the same amperage as shown o...

Страница 5: ...ts edge to keep the disc clean and do not touch the surface Do not attempt to modify the unit modifying the unit may cause an accident Stop the vehicle before carrying out any operation that could int...

Страница 6: ...s this button to go back to the select menu Current playing information Current file directory list box Selecting Tracks Fast Pressing in the monitor to perform the same function Note DuringIPODplayba...

Страница 7: ...ay press to pause play Stop play press to stop play and press the PLAYto play the current track again 21 Note 17 18 30 Pressing on the unit or performs the same function 8 This function is only valid...

Страница 8: ...nit or performs the same function To dial the number of the unit in the car only Pressing on the main unit or in the monitor also performs the same function PAIR 5 Pressing and on the unit or and perf...

Страница 9: ...llow the pairing instructions for the first time use after that the unit will connect automatically Note To provide the best sound with minimal distorted sound the cellphone or network brings Full dup...

Страница 10: ...r answer a phone During IPOD mode press it to go back to the previous mode During bluetooth mode press to hang up or refuse a phone During IPOD mode press it to back to the root catalog 08 BACK ROOT P...

Страница 11: ...ore than 2 seconds while listening to a station on another number the station will be stored in that number button 1 2 3 Pressing in the monitor performs the same function Note 5 Scanning Memorizing S...

Страница 12: ...n unit or in the monitor performs the same function During radio status repeatedly press BAND button to select bands in lowing order the fol Band Selector 3 For Two Bands 13 1 FM2 MW2 MW FM3 FM1 FM4 O...

Страница 13: ...ode press PROG the TFT displays the program menu Press NUMBER BUTTONS to select the track Number and then press to move the cursor to START press ENTER to start program playing move the cursor to EXIT...

Страница 14: ...Number Buttons 0 9 to select a track to play automatically 23 Pressing track region and the screen shows the number keys touch the number to select tracks Note Note Pressing button on the main unit or...

Страница 15: ...tically Take away the rubber plug USB or SD card then insert USB or SD card which will be played automatically If there have be loaded a disc USB SD card press SOURCE to switch to play or back to play...

Страница 16: ...e Audio Subtitles DVDMenu Parental ChangePSW Default Auto Eng Eng Eng PreferencePage TVType Audio Subtitles DVDMenu Parental ChangePSW Default Auto Eng Eng Eng Change PSW Example showing how to set pa...

Страница 17: ...y and briefly desired Briefly pressing button on the unit also performs the same function main 14 After selecting the desired mode you adjust the current level by pressing can VOL buttons Note 7 14 Pr...

Страница 18: ...ommon SD Card insert a common SD card into SD slot and the programs in the card will be played 6 Eject a Disc Press button to eject or insert a disc Note Pressing on the main unit also performs the sa...

Страница 19: ...ET to go back to the default value on the screen Note Adjusting other options perform the same operation Pressing VOL VOL on the remote or press EN EN button on the main unit also performs the same fu...

Страница 20: ...ress and or press the long strip to adjust the angle then press SAVE to save the setup press RESET to go back to the default value on the screen Note Do not use force to adjust the angle of display Ge...

Страница 21: ...PBC Menu During VCD status first press TITLE PBC playback starts and the menu of the entire disc appears on the monitor and then you can select your favorite track by using Number Buttons When a trac...

Страница 22: ...multi audio recordings The number in the mark on a DVD s package indicates the number of recorded languages audio systems 2 Note 6 Changing the subtitle language Multi subtitle With DVDs featuring mu...

Страница 23: ...e playing time when the TFT dis play disc time track time repeat time disp Press to select the options press ENTER to set the status Then press NUMBER BUTTONS or to set the current status track 2 23 S...

Страница 24: ...pause During stop mode press this button to resume playback mode Pause Playback 17 Note Pressing in the monitor or on the main unit performs the same function Stop the playback During DVD VCD playbac...

Отзывы: