XOVision X450NAV Скачать руководство пользователя страница 10

39

Before You Start

10

01

1

SOURCE/PWR 

4

AMS/MENU

3

BAND/TITLE

5

LOC/SUB -T

6

ST/AUDIO (mono or stereo/language or

channel selector)

8

OSD

Slow Forward/Reward)

7

ANGLE

13

PROG(Program playing)

12

Mute

P/N( system adjusting)

9

ZOOM (zoom in or zoom out) 

2

GOTO (playing time/track)

RPT(Repeat Playing)

15

RDM (Playing Tracks at Random)

16

VOL+/VOL-/SEL

14

Press it to show the current information.

30

25

LOUD (loudness)

SETUP

19

(F.R/F.F)

20

CLEAR

22

0~9 (Number) Buttons

23

(Eject Button)

24

18

(Stop Playing)

17

(Pause/Play)

EQ (equalizer) Button

26

21

(Previous/Next Track)

ENTER   

27

(Left/Right/Up/Down


ENTER)

28

BT (bluetooth mode) Button

29

PAIR/VIDEO

During bluetooth mode, press it to pair.

30

31

During bluetooth mode, press to dial, re-dial 

or answer a phone.

During IPOD mode, press it to go back to the

previous mode.

During bluetooth mode, press to hang up or 

refuse a phone.

During IPOD mode, press it to back to the 

root catalog.

08

       /BACK

       /ROOT

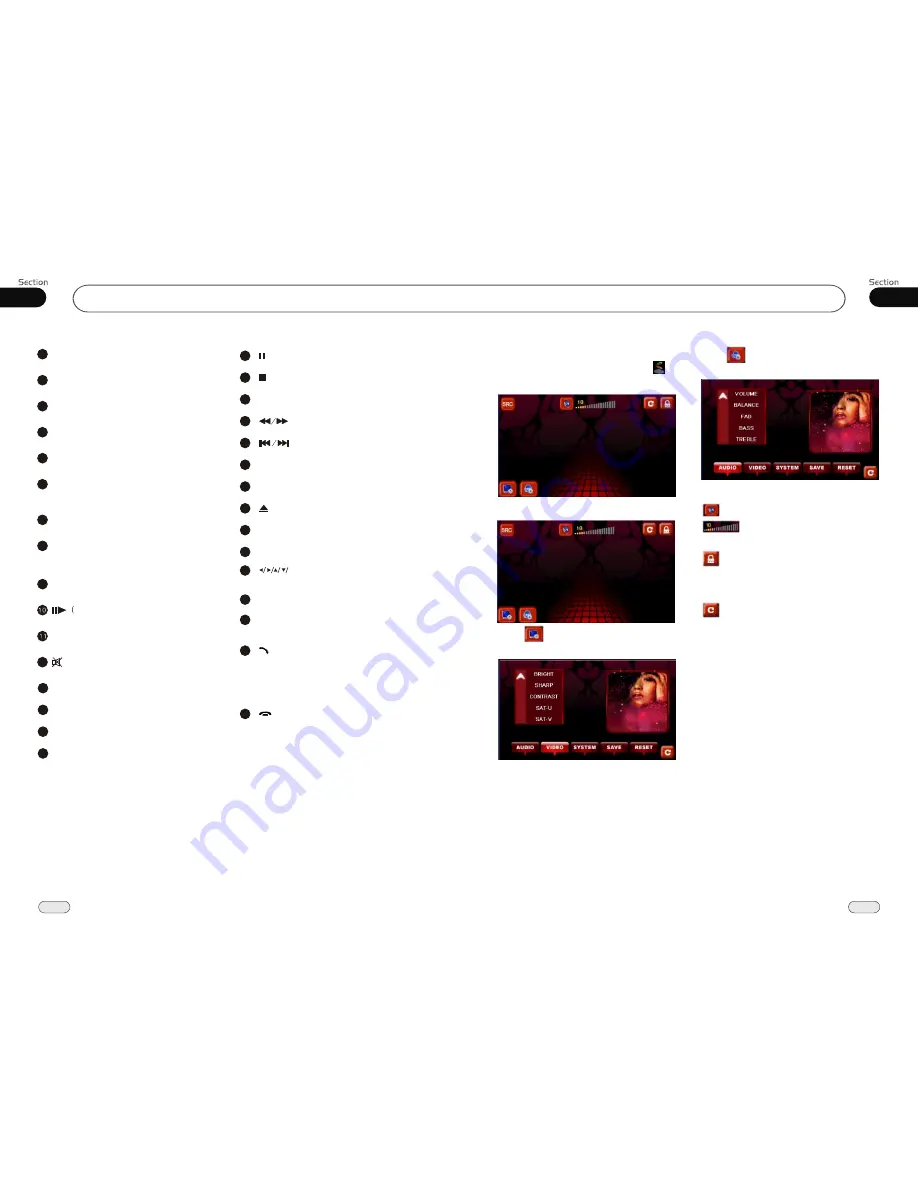
Press SRC to turn to AUX 1 or press     

icon in the select menu to appear as follows:    

AUX Touch Screen Menu

To adjust AUDIO please refer to pages 19.

Press SRC in the monitor to turn to AUX 2:

Press         icon in the monitor of AUX 1 or

AUX 2 to enter the menu as follows:

To adjust VIDEO please refer to pages 20.

Press         icon in the monitor of AUX 1 or

AUX 2 to show menu as follows:

Press this button to mute.
             You can adjust the volume by 

gliding this strip horizontally.
Press this button to lock or unlock

the touch screen

During unlock status, glide up and down or left

and right on the blank space of screen to switch 

to the previous or next mode.

Press this button to go back to the select menu.

AUX

AU X1

AU X1

AU X1

AU X1

Содержание X450NAV

Страница 1: ...al inmost states There is a safety feature on this device which enables viewing videos only when Parked All other features may still be used while driving such as audio and Navigation but must be done...

Страница 2: ...Picture Size 26 On Screen Display 26 Setting the Playback Time 26 Changing Audio Language 27 Changing the Subtitle Language 27 Changing the Viewing Angle 27 Selecting Channel 27 Program Playing 28 Pla...

Страница 3: ...Phone 42 Simple Troubleshooting Guide 45 AUX Touch Screen Menu 39 00 3 Contents Slow Motion Play On Screen Display Program Playing Eject an SD Card Eject a USB 36 36 36 36 36 AUX 8 7 Tuner Listening t...

Страница 4: ...o each other or to the vehicle body Make sure all the connections are comp letely correct before turning on your unit When replacing the fuse s the replace ment must be of the same amperage as shown o...

Страница 5: ...ts edge to keep the disc clean and do not touch the surface Do not attempt to modify the unit modifying the unit may cause an accident Stop the vehicle before carrying out any operation that could int...

Страница 6: ...s this button to go back to the select menu Current playing information Current file directory list box Selecting Tracks Fast Pressing in the monitor to perform the same function Note DuringIPODplayba...

Страница 7: ...ay press to pause play Stop play press to stop play and press the PLAYto play the current track again 21 Note 17 18 30 Pressing on the unit or performs the same function 8 This function is only valid...

Страница 8: ...nit or performs the same function To dial the number of the unit in the car only Pressing on the main unit or in the monitor also performs the same function PAIR 5 Pressing and on the unit or and perf...

Страница 9: ...llow the pairing instructions for the first time use after that the unit will connect automatically Note To provide the best sound with minimal distorted sound the cellphone or network brings Full dup...

Страница 10: ...r answer a phone During IPOD mode press it to go back to the previous mode During bluetooth mode press to hang up or refuse a phone During IPOD mode press it to back to the root catalog 08 BACK ROOT P...

Страница 11: ...ore than 2 seconds while listening to a station on another number the station will be stored in that number button 1 2 3 Pressing in the monitor performs the same function Note 5 Scanning Memorizing S...

Страница 12: ...n unit or in the monitor performs the same function During radio status repeatedly press BAND button to select bands in lowing order the fol Band Selector 3 For Two Bands 13 1 FM2 MW2 MW FM3 FM1 FM4 O...

Страница 13: ...ode press PROG the TFT displays the program menu Press NUMBER BUTTONS to select the track Number and then press to move the cursor to START press ENTER to start program playing move the cursor to EXIT...

Страница 14: ...Number Buttons 0 9 to select a track to play automatically 23 Pressing track region and the screen shows the number keys touch the number to select tracks Note Note Pressing button on the main unit or...

Страница 15: ...tically Take away the rubber plug USB or SD card then insert USB or SD card which will be played automatically If there have be loaded a disc USB SD card press SOURCE to switch to play or back to play...

Страница 16: ...e Audio Subtitles DVDMenu Parental ChangePSW Default Auto Eng Eng Eng PreferencePage TVType Audio Subtitles DVDMenu Parental ChangePSW Default Auto Eng Eng Eng Change PSW Example showing how to set pa...

Страница 17: ...y and briefly desired Briefly pressing button on the unit also performs the same function main 14 After selecting the desired mode you adjust the current level by pressing can VOL buttons Note 7 14 Pr...

Страница 18: ...ommon SD Card insert a common SD card into SD slot and the programs in the card will be played 6 Eject a Disc Press button to eject or insert a disc Note Pressing on the main unit also performs the sa...

Страница 19: ...ET to go back to the default value on the screen Note Adjusting other options perform the same operation Pressing VOL VOL on the remote or press EN EN button on the main unit also performs the same fu...

Страница 20: ...ress and or press the long strip to adjust the angle then press SAVE to save the setup press RESET to go back to the default value on the screen Note Do not use force to adjust the angle of display Ge...

Страница 21: ...PBC Menu During VCD status first press TITLE PBC playback starts and the menu of the entire disc appears on the monitor and then you can select your favorite track by using Number Buttons When a trac...

Страница 22: ...multi audio recordings The number in the mark on a DVD s package indicates the number of recorded languages audio systems 2 Note 6 Changing the subtitle language Multi subtitle With DVDs featuring mu...

Страница 23: ...e playing time when the TFT dis play disc time track time repeat time disp Press to select the options press ENTER to set the status Then press NUMBER BUTTONS or to set the current status track 2 23 S...

Страница 24: ...pause During stop mode press this button to resume playback mode Pause Playback 17 Note Pressing in the monitor or on the main unit performs the same function Stop the playback During DVD VCD playbac...

Отзывы: