background image

Customizing  Your  Phone


35 


BroadSoft Phonebook 

Local Directory 

The built-in phone directory stores the names and phone numbers of your contacts. You 
can store up to 300 contacts in your phone's local directory. You can add, edit, delete 
or search for a contact in the local directory. You can also dial a contact from the local 
directory. 

Adding Contacts 

You can add contacts to your local directory in the following ways: 


Manually 


From call history 


From remote phonebook 

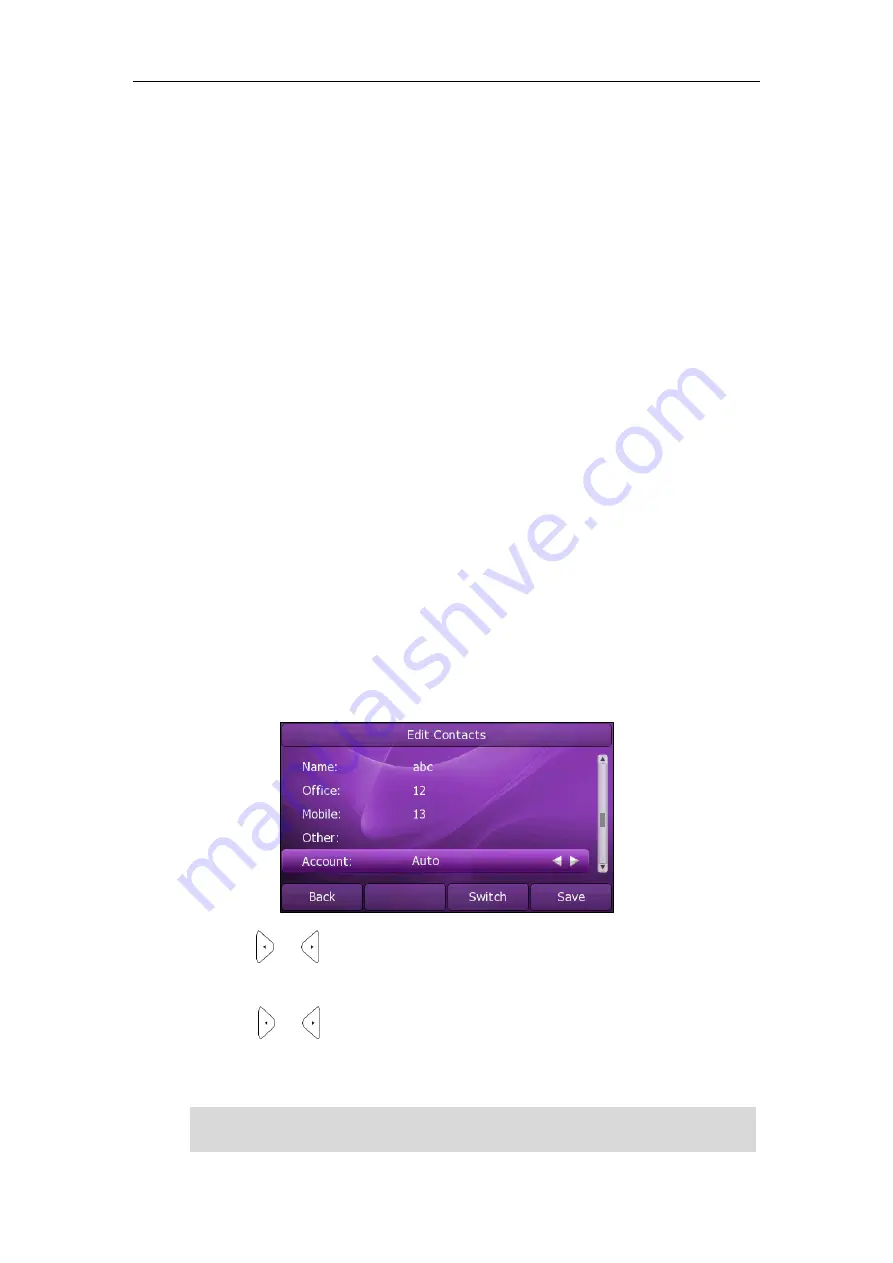
Adding Contacts Manually 

To add a contact to the local directory manually: 

1.


Press 

Directory

->

Local Directory

2.


Select the desired contact group (For example, select 

Contacts

). 

3.


Press the 

Add

 soft key. 

4.


Enter the 

Name

 and the 

Office

Mobile

 or 

Other

 numbers. 


5.


Press          or          , or the 

Switch

 soft key to select the desired account from the 

Account

 field. If 

Auto 

is selected, the phone will use the first available account 

when placing calls to the contact from the local directory. 

6.


Press          or          , or the 

Switch

 soft key to select the desired ring tone from the 

Ring


field.   

7.


Press the 

Save

 soft key to accept the change or the 

Back 

soft key to cancel. 

Note


If the contact has existed in the directory, the LCD screen will prompt “ContactName 
exists in contactlist!”.


Содержание XP0150G

Страница 1: ...Xorcom XP0150G Gigabit Color IP Phone User Guide ...

Страница 2: ...h your system administrator that your network is prepared for configuring your IP phone As well be sure to read the Packing List and Regulatory Notices sections in this guide before you set up and use the Xorcom XP0150G IP phone If this is your first time using the Xorcom XP0150G IP phone we recommend that you first refer to the Quick Installation Guide and Quick Reference Guide In This Guide This...

Страница 3: ...ot installed and used in accordance with the instructions may cause harmful interference to radio communications However there is no guarantee that interference will not occur in a particular installation If this equipment does cause harmful interference to radio or television reception which can be determined by turning the equipment off and on the user is encouraged to try to correct the interfe...

Страница 4: ...ne User Interface 6 Web User Interface 6 Documentation 9 Getting Started 11 Packing List 11 Phone Installation 13 Phone Initialization 15 Phone Status 16 Basic Network Settings 17 Registration 18 Idle Screen 18 Customizing Your Phone 21 General Settings 21 Wallpaper 21 Screensaver 22 Theme 23 Backlight 24 Contrast 24 Language 25 Time and Date 26 Administrator Password 28 Key as Send 29 Keypad Lock...

Страница 5: ...ncy Number 64 Live Dialpad 64 Hotline 65 Basic Call Features 67 Placing Calls 67 Answering Calls 69 Ending Calls 70 Redialing Numbers 71 Auto Answer 71 Auto Redial 72 Call Completion 73 Call Return 75 Call Mute 75 Call Hold Resume 76 Do Not Disturb DND 77 Call Forward 78 Call Transfer 80 Call Waiting 81 Conference 82 Local Conference 82 Network Conference 83 Call Park 84 Call Pickup 85 Anonymous C...

Страница 6: ...rcom Calls 100 Incoming Intercom Calls 101 Automatic Call Distribution ACD 102 Messages 104 Short Message Service SMS 104 Voice Mail 106 Message Waiting Indicator MWI 108 Troubleshooting 111 Regulatory Notices 115 Service Agreements 115 Limitations of Liability 115 Safety Instructions 115 Appendix A Time Zones 117 Index 119 ...

Страница 7: ...ent Instructions Icon Instructions LED Instructions User Interfaces Documentation If you require additional information or assistance with your new phone contact your system administrator Hardware Component Instructions The main hardware components of the Xorcom XP0150G IP phone are the LCD screen and the keypad XP0150G ...

Страница 8: ... Key Enters the main menu of phone CANCEL Key Cancels actions or rejects an incoming call MESSAGE Key Indicates and accesses voice messages HEADSET Key Toggles and indicates the headset mode TRANSFER Key Transfers a call to another party HOLD Key Places a call on hold or resumes a held call REDIAL Key Redials a previously dialed number MUTE Key Toggles and indicates the Mute feature on or off Spea...

Страница 9: ...ble Registered successfully Registered fail Registering Hands free speakerphone mode Handset mode Headset mode Multi lingual lowercase letters input mode Multi lingual uppercase letters input mode Alphanumeric input mode Numeric input mode Voice Mail Text Message Auto Answer Do Not Disturb Call Forward Call Hold Call Mute Ringer volume is 0 ...

Страница 10: ... Calls Dialed Calls Missed Calls Recording box is full A call cannot be recorded Recording starts successfully Recording cannot be started Recording cannot be stopped Open VPN Conference The default contact photo The current page of the line keys The non current page of the line keys 1 2 3 ...

Страница 11: ...nactive Line key LED configured as BLF key LED Status Description Solid red The monitored user is busy Fast flashing red The monitored user receives an incoming call Off The monitored user is idle The monitored user does not exist Line key LED configured as shared line key LED Status Description Solid red The shared line is seized Some party receives the ringback The shared line is in conversation...

Страница 12: ...pressing the Menu soft key to access the phone user interface The Advanced Settings options are administrator level features only the default password is admin case sensitive For more information on customizing your phone using the available options from the phone user interface refer to Customizing Your Phone on page 21 Web User Interface In addition to the phone user interface you can also custo...

Страница 13: ...ference Anonymous Call Anonymous Call Rejection DND Basic Phone Settings Language Time Date Administrator Password Ring Tones Contrast Backlight Wallpaper Screensaver Theme Call Waiting Keypad Lock Phone Volume Call History Management BroadSoft Call Log Contact Management Local Directory Blacklist Remote Phonebook BroadSoft Phonebook Dial Plan DSS Keys Key as Send Hotline Live Dialpad Emergency ...

Страница 14: ...king ACD Messages SIP Account User Options Register Status Activation Label Display Name Register Name User Name Password SIP Server Server Option Registrar Port Outbound Status Outbound Proxy Backup Outbound Proxy NAT Traversal STUN Status STUN Server Note The table above lists most of the feature options Please refer to the relevant sections for more information ...

Страница 15: ...e found Format Language Quick Installation Guide Basic set up of the phone In the package PDF English Quick Reference Guide Basic call features and phone customizations In the package PDF English User Guide Phone Web user interface settings Basic call features and advanced phone features CD attached in the package PDF English ...

Страница 16: ...User Guide Xorcom XP0150G IP Phone 10 ...

Страница 17: ... The topics include Packing List Phone Installation Phone Initialization Phone Status Basic Network Settings Registration Idle Screen If you require additional information or assistance with your new phone contact your system administrator Packing List The following components are included in your Xorcom XP0150G IP phone package Xorcom XP0150G IP phone Phone Stand XP0150G ...

Страница 18: ...P Phone 12 Power Adapter Handset Handset Cord Ethernet Cable Quick Installation Guide Quick Reference Guide Check the list before installation If you find anything missing contact your system administrator Power Adapter Optional ...

Страница 19: ...roceed to Phone Initialization on page 15 This section introduces how to install the phone with the components in the packing list Attach the Stand Connect the Handset and optional Headset Connect the Network and Power 1 Attach the Stand a Deskmount Method b Wallmount Method ...

Страница 20: ...our system administrator will advise you which one to use AC power Power over Ethernet PoE AC Power To connect the AC power 1 Connect the DC plug on the power adapter to the DC5V port on the phone and connect the other end of the power adapter into an electrical power outlet A headset is not provided in the packing list Contact your system administrator for more information ...

Страница 21: ...n the Internet port on the phone and an available port on the in line power switch hub Note Phone Initialization After your phone has been powered up the system boots up and performs the following steps If in line power is provided you don t need to connect the AC adapter Make sure the Ethernet cable and switch hub is PoE compliant The phone can also share the network with other network device suc...

Страница 22: ...web user interface Available information of phone status includes Network status including WAN port and LAN port information Phone status including device model firmware version and MAC address Account status indicating the register status of sip accounts To view the phone status via phone user interface 1 Press or press Menu Status 2 Press or to scroll through the list and view the specific infor...

Страница 23: ...NS in the corresponding fields 3 Press the Save soft key to accept the change or the Back soft key to cancel If you are using an xDSL modem you can connect your phone to the Internet via PPPoE mode You can set a WAN port to be a PPPoE port The PPPoE port will perform a PPP negotiation to obtain the IP address Contact your system administrator for the PPPoE username and password To configure PPPoE ...

Страница 24: ...Management on page 59 Idle Screen If the phone has successfully started up the idle LCD screen is shown as below Idle Screen description No Description 1 This area shows the phone s time date 2 This area shows the phone feature status For more information you can refer to Icon Instructions on page 3 3 This area shows the six line key labels You can also custom the line key as other function For mo...

Страница 25: ...ault soft key labels are History Directory DND and Menu 6 This area shows the current account User can use or to choose the available account 7 This area shows the backgrounds picture You can also change it For more information you can refer to Wallpaper on page 21 ...

Страница 26: ...User Guide Xorcom XP0150G IP Phone 20 ...

Страница 27: ...dio Settings Contact Management Call History Management BroadSoft Call Log System Customizations If you require additional information or assistance with your new phone contact your system administrator General Settings Wallpaper You can customize the wallpaper of the Xorcom XP0150G IP phone You can change the wallpaper image via phone user interface or web user interface You can also upload custo...

Страница 28: ...u can configure the time out for screensaver and preview screensaver pictures To configure the screensaver via phone user interface 1 Press Menu Display Screensaver 2 Press or or the Switch soft key to select the desired time in the Time out field After the time you specified in the Time out field your phone will display the screensaver 3 Press to scroll to the Preview Screensaver Pictures field p...

Страница 29: ...r the phone via phone user interface and web user interface To change the theme via phone user interface 1 Press Menu Display Theme 2 Press or to select the desired theme 3 Press the Save soft key to accept the change or the Back soft key to cancel The following table lists the four themes supported by the T68G IP phone Theme 1 Theme 2 Theme 3 Theme 4 ...

Страница 30: ...klight 2 Press or or the Switch soft key to select the desired level from the Active Level field 3 Press or or the Switch soft key to select the desired level from the Inactive Level field 4 Press or or the Switch soft key to select the desired time from the Backlight Time field 5 Press the Save soft key to accept the change or the Back soft key to cancel You can also configure the backlight via w...

Страница 31: ...er for the web user interface if the language of your internet browser is not supported by the phone the web user interface will use English by default You can change the language for the phone user interface and the web user interface respectively from each other Note To change the language for the phone user interface 1 Press Menu Setting Basic Settings Language 2 Press or to select the desired ...

Страница 32: ...tor for more information You can configure the phone to obtain the time and date from the SNTP server automatically or configure the time and date manually To configure the SNTP settings via phone user interface 1 Press Menu Setting Basic Settings Time Date SNTP Settings 2 Press or or the Switch soft key to select the time zone that applies to your area from the Time Zone field The default time zo...

Страница 33: ...interface 1 Press Menu Setting Basic Settings Time Date Format 2 Press or or the Switch soft key to select the desired time format 12 Hour or 24 Hour from the Clock field 3 Press or or the Switch soft key to select the desired date format from the Date Format field 4 Press the Save soft key to accept the change or the Back soft key to cancel There are 7 available date formats for example the date ...

Страница 34: ...strator Password You can change the administrator password to protect your phone from unauthorized use Only the users owning the administrator password have the permission to change the advanced settings To change the administrator password via phone user interface 1 Press Menu Setting Advanced Settings password admin Set Password 2 Enter the old password in the Current PWD field 3 Enter the new p...

Страница 35: ...ot using it This feature helps you to protect your phone from unauthorized use This feature allows you to perform the following Menu Key The Menu soft key and Menu key are locked You cannot access the menu of the phone until unlocked A new voice mail can be accessed by pressing the Connect soft key or the MESSAGE key but the voice mail code cannot be configured Function Keys The function keys are ...

Страница 36: ...tting or the Back soft key to cancel Note To activate the keypad lock via phone user interface 1 Press Menu Setting Advanced Settings password admin Phone Setting Lock 2 Press or or the Switch soft key to select the desired type from the Keypad Lock field 3 Press the Save soft key to accept the change 4 Long press to lock the keypad immediately when the phone is idle The emergency number setting i...

Страница 37: ...f long pressing To configure the timeout for auto lock via web user interface 1 Click on Phone Features 2 Click the sign on the left of the Phone Lock to expand the feature list 3 Enter the desired time in the Auto Lock Time out 0 3600s filed The default value is 10 seconds 4 Click Confirm to accept the change Note When the time out is 0 seconds that is you can long press to lock the keypad only Y...

Страница 38: ...via phone user interface 1 Press Menu Setting Advanced Settings password admin Phone Setting Lock 2 Press or or the Switch soft key to select Disabled from the Keypad Lock field 3 Press the Save soft key to accept the change You can also activate or deactivate the keypad lock via web user interface at the path Phone Features Phone Lock Note The default PIN for unlock is 123 you can also unlock the...

Страница 39: ...st the ringer volume when the phone is in the idle screen 2 When the phone is during the call press to adjust the volume of audio device handset speakerphone or headset Note Ring Tones Ring tones are used to indicate incoming calls You can select different ring tones to distinguish the accounts or to distinguish your phone from your neighbor s To select a ring tone for the phone via phone user int...

Страница 40: ...path Phone Preference Refer to the above instruction 4 Click Confirm to accept the change You can also upload custom ring tones for your phone contact your system administrator for more information Note Contact Management This section provides the operating instructions for managing contacts The topics include Local Directory Blacklist Remote Phonebook The ring tone for an incoming call on the pho...

Страница 41: ...ntact to the local directory manually 1 Press Directory Local Directory 2 Select the desired contact group For example select Contacts 3 Press the Add soft key 4 Enter the Name and the Office Mobile or Other numbers 5 Press or or the Switch soft key to select the desired account from the Account field If Auto is selected the phone will use the first available account when placing calls to the cont...

Страница 42: ...mote phonebook 1 Press Directory Remote Phone Book 2 Press or to highlight the desired entry 3 Press the Option soft key and then select Move to Contacts from the prompt list 4 Press the Save soft key to save the contact in the local directory If the contact has already existed in the local directory the LCD screen will prompt Overwrite the original contact Press the OK soft key to overwrite the o...

Страница 43: ...on soft key and then select Delete from the prompt list 4 Press the OK soft key to confirm the deleting or the Cancel soft key to cancel You can also manage the contacts via web user interface at the path Contacts Contacts Contacts Please refer to the instruction above for the parameters detail Uploading Contact Photos To upload a new custom photo for the contact via web interface 1 Click on Conta...

Страница 44: ...the contact the phone idle screen will show the contact photo The phone only supports uploading the png jpg or bmp format files The maximum resolution of the upload picture is 96 96 pixels You can only delete the custom photos If multiple contacts want to use the same custom photo you need to upload the contact photo again ...

Страница 45: ... the Dial soft key to dial out the number Searching for Contacts To search for a contact in the local directory 1 Press Directory Local Directory 2 Press the Search soft key 3 Enter a few continuous characters of the contact name or continuous numbers of the contact phone number using the keypad 4 Press the OK soft key The contacts whose name or phone number matches the characters entered will app...

Страница 46: ... Import to complete importing the contact list To export a contact list via web user interface 1 Click on Contacts Contacts 2 Click Export XML or Export CSV 3 Click Save to save the contact list to your local system Blacklist The built in phone directory stores the names and phone numbers of the blacklist You can store up to 30 contacts in your phone s blacklist directory You can add edit delete o...

Страница 47: ...strator for the access URL of the corporate directory To configure an access URL for remote phonebook via web user interface 1 Click on Contacts Remote Phone Book 2 Enter the access URL in the Phone Book URL field 3 Enter the name in the Name field 4 Click Confirm to accept the change To access your corporate directory via phone user interface 1 Press Directory Remote Phone Book 2 Select the desir...

Страница 48: ...hone Book 4 Enter the refresh period of corporate directory in the Load Remote Phone Book Interval 120 2592000s field The default value is 3600 seconds 5 Click Confirm to accept the change BroadSoft Phonebook You can access the BroadSoft directory through your phone You can add local contacts from the BroadSoft directory You can also dial a contact from the BroadSoft directory You can configure yo...

Страница 49: ...the change To access the Broadsoft directory via phone user interface 1 Press Directory BroadSoft 2 Select the desired directory item and then press the Enter soft key The phone connects to load the BroadSoft directory and then displays the desired BroadSoft contact list on the LCD screen 3 Press the Back soft key to back to the previous interface To place a call from the Broadsoft directory 1 Pre...

Страница 50: ... to accept the change or the Back soft key to cancel To check the call history 1 Press the History soft key The LCD screen displays All Calls list 2 Press or to switch between All Calls Dialed Calls Received Calls Missed Calls and Forwarded Calls 3 Press or to select the desired entry 4 Press the Option soft key and then select Detail from the prompt list The detailed information of the entry appe...

Страница 51: ...s Dialed Calls Received Calls Missed Calls and Forwarded Calls 3 Press the Option soft key and then select Delete All from the prompt list 4 Press the OK soft key The LCD screen prompts Are you sure to delete all records 5 Press the OK soft key to confirm the deleting or the Cancel soft key to cancel BroadSoft Call Log You can access the call log of the BroadSoft user through the IP phone The call...

Страница 52: ...ng fields 4 Press the Save soft key to accept the change or the Back soft key to cancel To configure the BroadSoft call log via web user interface 1 Click on Contacts Call Log 2 Select the desired call log item from the pull down list of Calllog Item 3 Enter the parameters display name server address port username and password in the corresponding fields 4 Click Confirm to accept the change To acc...

Страница 53: ...og menu and then press the Enter soft key to load the BroadSoft call log 3 Select the desired contact in the BroadSoft call log list 4 Press the Detail soft key The detailed information of the entry appears on the LCD screen To dial a call from the BroadSoft call log list 1 Press Menu History Network Call Log 2 Select the desired call log menu and then press the Enter soft key to load the BroadSof...

Страница 54: ...ne key feature which will appear on the LCD screen Line keys allow you to use quick access features such as call return and voice mail The line keys LED will indicate the monitoring status when the keys are assigned specific features such as BLF and Shared Line The default key type of line key 1 6 is Line The default key type of line key 7 15 is N A which indicates that this line key provides no f...

Страница 55: ...reen display When you assign functionality to line key located in line key 7 15 the label of the line key is displayed on the second or third page of the line keys Each page can display 5 line key labels at most The lowest line key is used to switch pages of the line keys The following figure shows an example of the LCD screen display The following table lists the default page icon status Icons De...

Страница 56: ...s an incoming call on the non current page Solid The line is in conversation on the non current page To configure the page icon status via web user interface 1 Click on DSS Key Line Key 2 Select Enabled in the Page Tip field 3 Click Confirm to accept the change The line key features are explained in the following subchapters in detail Line Speed Dial Voice Mail Direct Pickup Group Pickup DTMF Pref...

Страница 57: ...t using the first registered account When you select Lock in the Value field the line keys located in the same position of the other page will be automatically assigned Line feature with Lock filled in the Value field You can use this key feature on every page This feature is only applicable to line key 1 5 When you select Float in the Value field the phone will automatically switch to the page wh...

Страница 58: ...owed by the specific phone number Usage Press the DSS key on your phone when the specific phone number receives an incoming call The call is answered on your phone Group Pickup You can use this key feature to answer incoming calls in a group that is associated with their own group Dependencies Type Key Event Key Type Group Pickup Account ID the account this feature will be applied to Label key lab...

Страница 59: ...name you want to access Label key label displays on the LCD screen Usage Press the DSS key to access the contact group specified in the Local Group field XML Phone Book You can use this key feature to access the remote group in your corporate directory quickly You should configure the remote phonebook in advance For more information refer to Remote Phonebook on page 41 Dependencies Type Key Event ...

Страница 60: ...oft group in the BroadSoft phonebook quickly You should configure the BroadSoft phonebook in advance For more information refer to BroadSoft Phonebook on page 42 Dependencies Type Key Event Key Type BroadSoft Dir BroadSoft Name the BroadSoft group name you want to access if the BroadSoft phonebook is configured Label key label displays on the LCD screen Usage Press the DSS key to access the BroadS...

Страница 61: ...field When the transfer mode on DSS key is Attended Transfer press the DSS key to dial out the number specified in the Value field and then you can complete the attended or semi attended transfer When the transfer mode on DSS key is New Call press the DSS key the number specified in the Value field displays on the LCD screen and then you can complete the blind attended or semi attended transfer No...

Страница 62: ...u can select an entry to redial Dependencies Type Key Event Key Type Redial Label key label displays on the LCD screen Usage 1 Press the DSS key when the phone is idle to access the dialed calls list 2 Select an entry and press the DSS key again to redial the call SMS You can use this key feature to quick access the text message feature For more information refer to Short Message Service SMS on pa...

Страница 63: ...ent Key Type Public Hold Label key label displays on the LCD screen Usage 1 Press the DSS key when there is an active call on the shared line The active call is placed on public hold 2 Press the DSS key again to retrieve the public held call Note Private Hold You can use this key feature to place an active call on private hold or retrieve a private held call The private hold feature is often used ...

Страница 64: ... specific URL quickly Dependencies Type URL Label key label displays on the LCD screen URL the URL you want to access Usage Press the DSS key to access the URL specified in the URL field Keypad Lock You can use this key feature to immediately lock the keypad of your phone instead of long pressing For more information refer to Keypad Lock on page 29 Dependencies Type Key Event Key Type Keypad Lock ...

Страница 65: ... the desired account and then press the Enter soft key 3 Select Enable from the Activation field 4 Enter the desired values in Label Display Name Register Name User Name Password and SIP Server fields respectively Contact your system administrator for more information 5 Press the Save soft key to accept the change or the Back soft key to cancel 6 Repeat steps 2 to 5 until you have registered all a...

Страница 66: ...ple line keys associated with an account This enhances call visualization and simplifies call handling If this is the case the LCD screen could resemble the following figure Incoming calls to this line will be distributed evenly among the available line keys Similarly outgoing calls will be distributed Your phone can be configured to have a combination of lines with a single line key and lines wit...

Страница 67: ...ation Number 9 5 7 Replace 5 2 When you enter 96123 to dial out on your phone the number will be replaced as 5123 and then dialed out 2 means the characters in the second parenthesis that is 123 Note Replace Rule You can configure one or more replace rules to remove the specified string and replace it with another string You can configure a pattern with wildcards expression syntax refer to the tab...

Страница 68: ...w string the number will be dialed out automatically For example a dial now rule is configured as 2xx then entering any three digit string begins with 2 will be dialed out automatically on the phone To add a dial now rule via web user interface 1 Click on Phone Dial Plan Dial now 2 Enter the desired value e g 1234 in the Dial now Rule field 3 Enter the desired line ID in the Account field or leave...

Страница 69: ...s Code 011 Minimum Length 4 Maximum Length 11 then when you dial out the number 56789 the phone will add the area code and dial out the number 01156789 To configure the area code and lengths via web user interface 1 Click on Phone Dial Plan Area Code 2 Enter the desired values in the Code Minimum Length 1 15 and Maximum Length 1 15 fields 3 Enter the desired line ID in the Account field or leave i...

Страница 70: ...the emergency services number in the Emergency field For multiple numbers enter a between each emergency number The default emergency numbers are 112 911 and 110 4 Click Confirm to accept the change Live Dialpad You can enable the live dialpad feature on the Xorcom XP0150G IP phone which enables the IP phone to automatically dial out the phone number without pressing any other key You can also con...

Страница 71: ...al out the hotline number automatically after the specified delay time To configure the hotline number via phone user interface 1 Press Menu Features Hotline 2 Enter the desired number in the Hotline field 3 Enter the delay time seconds in the Hotline Time out field 4 Press the Save soft key to accept the change or the Back soft key to cancel You can also configure hotline via web user interface a...

Страница 72: ...User Guide Xorcom XP0150G IP Phone 66 ...

Страница 73: ...0G IP phone The topics include Placing Calls Answering Calls Ending Calls Redialing Numbers Auto Answer Auto Redial Call Completion Call Return Call Mute Call Hold Resume Do Not Disturb DND Call Forward Call Transfer Call Waiting Conference Call Park Call Pickup Anonymous Call Anonymous Call Rejection If you require additional information or assistance with your new phone contact your system admin...

Страница 74: ...the handset 1 Pick up the handset 2 Enter the desired number using the keypad 3 Press or the Send soft key By default the key is set to be a send key You can set the key as send key or set neither of them to be send keys For more information refer to the Key as Send on page 29 Note To place a call using the hands free speakerphone mode Do one of the following With the handset on hook press or the ...

Страница 75: ...number using the keypad Press or the Send soft key Press or the Hold soft key to place the original call on hold Press the New Call soft key Enter the desired number using the keypad Press or the Send soft key You can press or to switch between the calls and then press the Resume soft key to retrieve the desired call Answering Calls When you are not in another call you can answer a call in three w...

Страница 76: ...l using the headset Do one of the following Press With the headset mode activated press the Answer soft key With the headset mode activated press the line key the line key LED flashes green Answering When in Another Call If you have an active call and an incoming call arrives on the phone do one of the following Press the Answer soft key The incoming call is answered and the original call is place...

Страница 77: ...nd soft key Auto Answer You can enable the auto answer feature for a line You can use the auto answer feature to allow the phone to automatically answer an incoming call on the line To configure auto answer via phone user interface 1 Press Menu Setting Advanced Settings password admin Accounts 2 Select the desired account and then press the Enter soft key 3 Press or or the Switch soft key to selec...

Страница 78: ...ts To configure auto redial via phone user interface 1 Press Menu Features Auto Redial 2 Press or or the Switch soft key to select Enable from the Auto Redial field 3 Enter the desired time in the Auto Redial Interval field the default time interval is 10s 4 Enter the desired times in the Auto redial times field the default times are 10 5 Press the Save soft key to accept the change or the Back so...

Страница 79: ...LCD screen of the phone 2 Wait for a period of time or press the OK soft key to redial the phone number The phone will retry as many times as you configured until the called party is idle Call Completion You can use the call completion feature to notify the caller of a failed call when the callee becomes available to receive a call To configure call completion via phone user interface 1 Press Menu...

Страница 80: ...also configure call completion via web user interface at the path Phone Features General Information To use call completion When the called party is busy the following prompt will appear on the LCD screen of the phone 1 Press the OK soft key the phone returns to the idle screen and call completion is activated 2 When the called party becomes idle the following prompt appears on the LCD screen of t...

Страница 81: ...h soft key to select Call Return from the Key Type field 5 Press the Save soft key to accept the change or the Back soft key to cancel You can also configure a call return key via web user interface at the path DSS Key Call Mute You can mute the microphone of the active audio device during an active call and then the other party cannot hear you To mute a call 1 Press during an active call The MUTE...

Страница 82: ...in progress on your phone other calls can be received and made while placing the original call on hold When placing a call on hold your IP PBX might play a melody or message to the other party while waiting To place a call on hold 1 Press or the Hold soft key during a call The phone LCD screen shows the call is on hold and the line key LED flashes green Note To resume a held call 1 Press or the Re...

Страница 83: ... the DND soft key when the phone is idle The icon on the idle screen indicates that the Do Not Disturb mode is enabled Incoming calls will be rejected automatically and n New Missed Call s n indicates the number of the missed calls will prompt on the LCD screen Note To specify the DND authorized numbers via web user interface 1 Click on Phone Features 2 Click the sign on the left of the Do Not Dis...

Страница 84: ...ls are immediately forwarded if the phone is busy No Answer Forward Incoming calls are forwarded if not answered after a period of time 3 Depending on your selection a If you select Always Forward 1 Press or or the Switch soft key to select Enable from the Always field 2 Enter the destination number you want to forward all incoming calls to in the Forward to field 3 Optional Enter the always forwa...

Страница 85: ...ter the no answer forward on code or off code respectively in the On Code or Off Code field 4 Press the Save soft key to accept the change or the Back soft key to cancel The icon on the idle screen indicates the call forward is enabled You can also configure forward feature via web user interface at the path Phone Features Forward Note You can also enter the SIP URL or IP address in the Forward to...

Страница 86: ...n incoming call to another party 1 When the phone is ringing press the Forward soft key 2 Enter the number you want to forward the incoming call to 3 Press or the Send soft key The LCD screen prompts a call forward message Call Transfer You can transfer a call to another party in one of the three ways Blind Transfer Transfer a call directly to another party without consulting Semi Attended Transfe...

Страница 87: ...l press or the Transfer soft key to complete the transfer If you are using a handset the transfer can be completed by hanging up the handset You can cancel the transfer before the call connects by pressing the Cancel soft key Call Waiting You can enable or disable the call waiting feature on the phone If the call waiting feature is enabled you can receive another call when there is an active call ...

Страница 88: ...nce between an active call and a call on hold on the same or another line by pressing the Conf soft key The network conference feature allows you to add and remove specific conference parties Note Local Conference The Xorcom XP0150G IP phone supports up to 3 parties including yourself in a conference call This is called Local Conference and is the default method of conference To set up a local con...

Страница 89: ...can press or the Hold soft key to place the conference on hold You can press the Split soft key to split the conference call into two individual calls To drop the conference call press the Cancel soft key Network Conference You can use network conference feature on the Xorcom XP0150G IP phone to conduct a conference with multiple participants This feature allows you to perform the following Join t...

Страница 90: ...your system administrator for more information Call Park You can use call park feature to place a call on hold and then retrieve the call from another phone in the system for example a phone in another office or conference room You can park an active call by pressing the call park key on the phone If the call is parked successfully the response is either a voice prompt confirming that the call was...

Страница 91: ...arked call The system establishes call between phone C and B Note Call Pickup You can use call pickup feature to answer someone else s incoming call on the phone The Xorcom XP0150G IP phone supports the direct call pickup and group call pickup features Direct call pickup is used for picking up a call that is ringing at a specific phone number Group call pickup is used for picking up a call that is...

Страница 92: ...ct Call Pickup 4 Enter the direct call pickup code in the Direct Call Pickup Code field 5 Click Confirm to accept the change Note To configure the direct call pickup code on a per account basis via web user interface 1 Click on Account 2 Select the desired account from the pull down list of Account 3 Click on Advanced under the Account tab 4 Enter the direct call pickup code in the Direct Call Pic...

Страница 93: ...ickup key via phone user interface or web user interface You can pick up the call by pressing the direct pickup key directly Group Call Pickup To enable the group call pickup via web user interface 1 Click on Phone Features 2 Click the sign on the left of the Call Pickup to expand the feature list 3 Select Enabled from the pull down list of Group Call Pickup 4 Enter the group call pickup code in t...

Страница 94: ...ckup soft key appears on the LCD screen 2 Press the GPickup soft key on your phone when a phone in the group receives an incoming call The call is answered on your phone You can also configure a DSS key as group pickup key via phone user interface or web user interface You can pick up the call by pressing the group pickup key directly Note The directed call pickup code and group call pickup code a...

Страница 95: ...Line ID field 3 Press or or the Switch soft key to select Enable from the Anonymous Call field 4 Optional Enter the anonymous call on code in the Call On Code field 5 Optional Enter the anonymous call off code in the Call Off Code field 6 Press the Save soft key to accept the change or the Back soft key to cancel You can also configure anonymous call via web user interface at the path Account Basi...

Страница 96: ...ia phone user interface 1 Press Menu Features Anonymous Call 2 Press or or the Switch soft key to select the desired line from the Line ID field 3 Press or to scroll to the Rejection field 4 Press or or the Switch soft key to select Enable from the Rejection field 5 Optional Enter the anonymous call rejection on code in the Reject On Code field 6 Optional Enter the anonymous call rejection off cod...

Страница 97: ...e to make a call the BLF key LED illuminates solid red on your phone to indicate that the friend s phone is in use and busy For more BLF key LED indications refer to LED Instructions on page 5 You can press a BLF key to dial out the monitored phone number when it is idle You can receive a visual alert and an audio alert when the monitored phone is ringing You can also pick up a call directly by pr...

Страница 98: ...r 1007 is during an active call When the monitored phone is ringing you can enable audio alert for BLF pickup feature to allow the monitoring phone to play a warning tone you can also enable visual alert for BLF pickup feature to allow the LCD screen of the monitoring phone to display the caller ID To enable the visual and audio alert feature via web user interface 1 Click on Phone Features 2 Clic...

Страница 99: ...s 2 Click the sign on the left of the Transfer Settings to expand the feature list 3 Select the desired transfer mode from the pull down list of Transfer Mode via DSS key Depending on your selection If you select Blind Transfer press the BLF key to complete the blind transfer to the monitored phone number If you select Attended Transfer press the BLF key to dial out the monitored phone number and ...

Страница 100: ... phone number When the monitored user receives an incoming call press the BLF List key to pick up the call directly When there is a conversation on the monitored user press the BLF List key to barge in and set up a conference call To configure the BLF List settings via web user interface 1 Click on Account 2 Select the desired account from the Account field 3 Click on Advanced 4 Enter the BLF List...

Страница 101: ...An incoming call to that number will cause all phones to ring simultaneously The incoming call can be answered on one of the phones but not all of them This feature is very useful in the boss and secretary scenario For example the secretary can share the boss extension number on her phone When there is an incoming call to the extension number of the boss both the phones of the boss and the secreta...

Страница 102: ...ath DSS Key To place a call on private hold 1 Press the private hold key when there is an active call on the shared line Note To barge in a shared line call 1 Press the shared line key on any other phone when there is an active call on the shared line For more shared line key LED instructions refer to LED Instructions on page 5 Call Recording You can record calls by pressing a record key on the Xo...

Страница 103: ...lect the desired DSS key 3 Press or or the Switch soft key to select URL Record from the Type field 4 Enter the URL e g http 10 1 2 224 phonerecording cgi in the URL Record filed 5 Press the Save soft key to accept the change or the Back soft key to cancel You can also configure the Record or URL Record keys via web user interface at the path DSS Key The Record URL Record keys control the recordin...

Страница 104: ...m For example you can dial an access code to listen to the recordings Note Hot Desking Hot Desking originates from the definition of being the temporary physical occupant of a work station or surface by a particular employee A primary motivation for Hot Desking is cost reduction This feature is regularly used in places where not all the employees are in the office at the same time or not in the of...

Страница 105: ...rom the Key Type field 5 Leave the Value field blank 6 Press the Save soft key to accept the change or the Back soft key to cancel You can also configure a hot desking key via web user interface at the path DSS Key To use hot desking 1 Press the hot desking key when the phone is idle The phone prompts the following warning 2 Press the OK soft key all currently configured accounts will be unregiste...

Страница 106: ...e extension will automatically answer the incoming intercom calls Note Outgoing Intercom Calls To configure an intercom key via phone user interface 1 Press Menu Features DSS Keys 2 Select the desired DSS key 3 Press or or the Switch soft key to select Intercom from the Type field 4 Select the desired line from the Account ID field 5 Enter the remote extension number in the Value field 6 Press the...

Страница 107: ...n incoming intercom call while there is already an active call on the phone the active call is placed on hold Intercom features you need to know Intercom features Description Accept Intercom Allows you to enable or disable the IP phone to automatically answer an incoming intercom call Intercom Mute Allows you to enable or disable the microphone on the IP phone for Intercom calls Warning Tone Allow...

Страница 108: ...ing Tone is enabled by default Allow Barge In You can enable or disable the phone to automatically answer an incoming intercom call while there is already an active call on the phone If Allow Barge In is enabled the phone automatically answers the intercom call and places the active call on hold If Allow Barge In is disabled the phone handles an incoming intercom call like a waiting call Allow Bar...

Страница 109: ...er ID the phone number used to log in the queue Password the password used to log in the queue 2 Press the Log In soft key to login Note After configuring an ACD key you can press the ACD key to log in the ACD system After logging in you are ready to receive calls from the ACD system You can press the ACD key to show your current phone status You can press the Available Unavailable soft key to cha...

Страница 110: ... messages can be indicated both acoustically and visually When receiving a new text message the phone LCD screen will prompt receiving new text messages with the number of waiting messages example 3 New Text Message and a flashing icon Note To read a text message 1 Press Menu Messages Text Message Inbox It is recommended you configure no more than one ACD key per phone At any time at most one ACD ...

Страница 111: ...n the To field 6 Press the Send soft key to send the message or the Back soft key to cancel You can also send a text message via web user interface at the path Phone SMS To reply a text message 1 Press Menu Messages Text Message Inbox 2 Select the desired message and press the Reply soft key 3 Compose the new text message You can press the abc soft key to change the input mode 4 Press the Send sof...

Страница 112: ...ce Mail You can leave voice mails for someone else on the Xorcom XP0150G IP phone You can also listen to the voice mails stored in a centralized location When receiving a new voice mail the phone will play a warning tone and the MESSAGE key LED will illuminate You can also delete all text messages by pressing the Delete soft key and then select Delete All You can refer to the above steps You can a...

Страница 113: ...Mail 2 Press the navigation keys to highlight the account which you want to set 3 Press the 123 soft key to select the proper input mode and then enter the voice mail access code e g 97 4 Press the Save soft key to accept the change or the Back soft key to cancel Note To listen to the voice mails 1 When the phone user interface prompts receiving new voice mails press or the Connect soft key to dia...

Страница 114: ...dicated in three ways a warning tone the MESSAGE key LED illuminates solid green and an indicator message including a voice mail icon appears on the LCD screen This is cleared only when you retrieve all voicemails or delete them For some particular servers the MWI service is unsolicited So the Xorcom XP0150G IP phone just need to handle the MWI messages sent from the server But for some servers th...

Страница 115: ...bscription Period Period of MWI subscription The IP phone re sends a MWI subscription before expiring To enable MWI subscription via web user interface 1 Click on Account Advanced 2 Select Enabled from the pull down list of Subscribe for MWI 3 Enter the period time in seconds in the MWI Subscription Period Scope 0 84600 seconds field 4 Click Confirm to accept the change ...

Страница 116: ...User Guide Xorcom XP0150G IP Phone 110 ...

Страница 117: ...into the Internet port on the phone and the Ethernet cable is not loose Ensure that the switch or hub in your network is operational Contact your system administrator for more information Why does the phone display No Service The phone LCD screen prompts No Service message when the SIP accounts do not register successfully Contact your system administrator for more information on account settings ...

Страница 118: ... my headset not working Check to ensure that the headset cord is fully connected to the headset jack on the phone Refer to Phone Installation on page 13 Check to ensure that the headset mode is activated Refer to Headset Use on page 48 Check to ensure that the headset volume is adjusted to an appropriate level Refer to Volume on page 33 How to change the user password You can change the user passw...

Страница 119: ...he following message 3 Press the OK soft key Note How to Export PCAP Trace We may need you to provide a PCAP Trace to help analyze your problem To export a PCAP Trace via web user interface 1 Click on Phone Upgrade 2 Click Start to begin recording signal traffic 3 Recreate the error to be documented in the trace 4 Click Stop to end recording 5 Click Export to open file download window and then sav...

Страница 120: ...ur phone configurations via web user interface 1 Click on Phone Configuration 2 Click Export to open file download window and then save the file to your local system To Import phone configurations via web user interface 1 Click on Phone Configuration 2 Click Browse to select a configuration file from your local system 3 Click Import to import the configuration file Note How to make the call using ...

Страница 121: ...ructions Read these safety instructions before use The following basic safety precautions should always be followed to reduce risk of fire electrical shock and other personal injury General Requirements Before you install and use the device read the safety instructions carefully and observe the situation during operation During the process of storage transportation and operation please always keep...

Страница 122: ...pill liquid of any kind on the product or use the equipment near water for example near a bathtub washbowl kitchen sink wet basement or near a swimming pool Do not tread on pull or over bend any cable in case of malfunction of the device During a thunderstorm stop using the device and disconnect it from the power supply Unplug the power plug and the Asymmetric Digital Subscriber Line ADSL twisted ...

Страница 123: ... 05 00 Cuba Havana 05 00 United States Eastern Time 04 30 Venezuela Caracas 04 00 Canada Halifax Saint John 04 00 Chile Santiago 04 00 Paraguay Asuncion 04 00 United Kingdom Bermuda Bermuda 04 00 United Kingdom Falkland Islands 04 00 Trinidad Tobago 03 30 Canada Newfoundland St Johns 03 00 Denmark Greenland Nuuk 03 00 Argentina Buenos Aires 03 00 Brazil no DST 03 00 Brazil DST 02 00 Brazil no DST ...

Страница 124: ...a Moscow 03 30 Iran Teheran 04 00 Armenia Yerevan 04 00 Azerbaijan Baku 04 00 Georgia Tbilisi 04 00 Kazakhstan Aqtau 04 00 Russia Samara 05 00 Kazakhstan Aqtobe 05 00 Kyrgyzstan Bishkek 05 00 Pakistan Islamabad 05 00 Russia Chelyabinsk 05 30 India Calcutta 06 00 Kazakhstan Astana Almaty 06 00 Russia Novosibirsk Omsk 07 00 Russia Krasnoyarsk 07 00 Thailand Bangkok 08 00 China Beijing 08 00 Singapor...

Страница 125: ... iii Conference 82 Contact Management 34 Contrast 24 Customizing Your Phone 21 D Declaration of Conformity iii Deleting Contacts 37 Dial now 62 Dial Plan 60 Do Not Disturb DND 77 Documentation 9 DSS Keys 48 E Editing Contacts 36 Emergency Number 64 Ending Calls 70 G General Settings 21 Getting Started 11 H Hardware Component Instructions 1 Headset Use 48 Headset Activation Deactivation 48 Hot Desk...

Страница 126: ...ew 1 R Redialing Numbers 71 Registration 18 Regulatory Notices 115 Remote Phonebook 41 Replace Rule 61 Ring Tones 33 S Safety Instructions 115 Screensaver 22 Searching for Contacts 39 Semi attended Transfer 80 Service Agreements 115 Shared Lines 95 Short Message Service SMS 104 System Customizations 48 T Theme 23 Time and Date 26 Time Zones 117 Troubleshooting 111 V Voice Mail 106 Volume 33 W Wall...

Отзывы: