


Disassembly
6-4
6.3 Information Related to Disassembly and Reassembly
Before diassembling the printer:
Caution
Do not use a power screwdriver for reassembling the printer. The plastic screw holes in the chassis can become
damaged or stripped. If holes are already damaged, use spare untapped holes. This printer uses 19 different
screw types, please refer page 6-5 for a list of all the screws used.
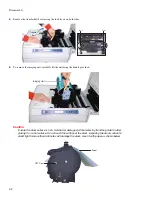
Note
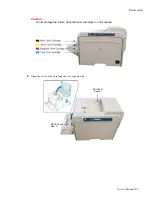
Before disassembling the printer, always remove the toner cartridges, imaging unit and transfer unit. Protect the
assemblies from light, fingerprints and scratching. To prevent toner spills when removing the front cover, first
remove the waste toner cartridge and cover the openings with the caps provided.
6.3.1 Service Part Assemblies Warnings and Cautions
Do not disassemble or adjust the components listed below, these are spared as complete assemblies.
Warning
High Voltage! Be sure to follow the steps outlined in Section 1.5.4 when servicing this assembly
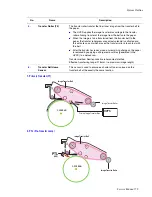
1) Laser Unit (LSU)
There are no serviceable parts inside the LSU. Alignment of the mirrors is critical. Opening the LSU will allow dust
into the laser and significantly reduce print quality.
Warning: It is very dangerous to operate or service a printer
with the LSU open or system interlocks disabled. Exposure to laser radiation can cause blindness
.
2) Transfer Belt (ITB)
Do not disassemble the ITB. The alignment of the home sensor is critical and is set up in the factory. Incorrect re-
assembly will cause print quality degradation.
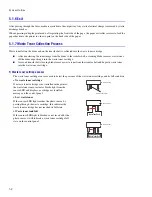
3) Imaging Unit (OPC drum)
If the imaging unit is exposed to direct sunlight for a long time the parameters and response of the electrostatic
surface are changed, causing image transfer and print quality issues.
Caution: There is no protective shutter on the
drum to prevent scratching Please use extra care to ensure the drum is protected from light and physical
contact when servicing the printer.
4) Toner Cartridges
Toner cartridges contain an extremely fine powder. Please keep toner cartridges away from children. The toner
powder contained in the toner cartridge can be harmful and if swallowed you should contact a doctor. Take care not to
spill toner - spillages should be cleaned with a Type II toner vacuum and cleaned up with cold water (hot water sets
the toner). Do not touch the developer roller surface as contamination will reduce print quality. Take care not to
damage the rollers surface when installing or removing a toner cartridge.
5) Developer (DEVE) Drive and Main Drive Assemblies
The alignment of the drive mechanism is critical and has been set by the factory. They are adjusted for the best
gearing alignment. If these motors are disassembled, misalignment will occur causing operational noise and image
problems: image alignment and toner distribution may be affected.
6) Boards
Do not adjust the variable resistors on the boards. They have been already adjusted in the factory.
Содержание Phaser 6100
Страница 1: ...Service Manual X XEROX P h a s e r C o l o r L a s e r P r i n t e r 6100 ...
Страница 2: ......
Страница 10: ...vi ...
Страница 22: ...Reference Information 2 6 ...
Страница 28: ...Specifications 3 6 ...
Страница 38: ...Summary of Product 4 10 RAM DIMM SPGPm Main Control FLASH MEMORY ENGINE CONTROL ...
Страница 44: ...Summary of Product 4 16 ...
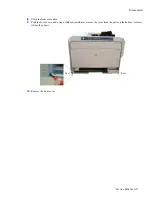
Страница 66: ...Disassembly 6 10 3 Remove the toner caps and fit them to the inlets as shown below Toner Cap ...
Страница 84: ...Disassembly 6 28 7 Remove 5 screws 3 6 machine gold and then remove the HVPS Screw Screw Screw Screw Screw ...
Страница 94: ...Disassembly 6 38 6 Disconnect 2 harnesses and remove the laser unit Harness Harness ...
Страница 130: ...Maintenance and Diagnostics 7 20 ...
Страница 188: ...Parts List 9 34 9 16 Base Frame Assembly 16 15 14 23 13 6 12 8 3 3 7 4 5 19 10 9 20 18 22 17 1 2 24 25 26 11 21 ...
Страница 190: ...Parts List 9 36 9 17 MPT Assembly 15 19 20 13 4 17 17 18 24 1 18 11 3 7 23 1 S5 6 2 S9 9 14 22 10 21 8 5 16 12 0 ...
Страница 196: ...Parts List 9 42 9 21 Transfer Belt Cam Assembly S18 9 0 8 S8 7 6 5 10 1 2 14 3 12 13 S8 11 4 ...
Страница 200: ...Parts List 9 46 ...


