


Troubleshooting
8-12
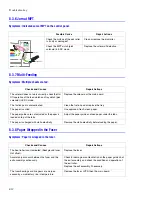
8.3.6 Jam at MPT
Symptoms: Indicated Jam at MPT on the control panel.
8.3.7 Multi-Feeding
Symptoms: Multiple sheets are fed.
8.3.8 Paper Wrapped in the Fuser
Symptoms: Paper is wrapped in the fuser.
Possible Cause
Repair Actions
Check the surface of the pick roller.
Is it dirty or damaged?
Clean or replace the pick roller.
Check the MPT clutch (pick
solenoid) in EDC mode.
Replace the solenoid if defective.
Checks and Causes
Repair Actions
The solenoid does not work correctly, check the On/
Off operation of the feed clutch and tray clutch (pick
solenoid) in EDC mode.
Replace the solenoid or the main board.
The friction pad is contaminated.
Clean the friction pad or replace the tray.
The paper is curled.
Use approved, fresh, clean paper.
The paper guides are not adjusted or the paper is
loaded on top of the tabs.
Adjust the paper guide and load paper under the tabs.
The paper is charged with static-electricity.
Remove the static-electricity before loading the paper.
Checks and Causes
Repair Actions
The heat roller is contaminated. (Background toner,
Hot offset).
Replace the fuser.
Accordion jams occur between the fuser and the
exit assembly continuously.
Check for damage or contamination on the paper guide rib of
the exit assembly, and check the condition and operation of
the exit roller.
Replace the exit assembly if necessary.
The fuser bearings or drive gears are warped
caused by a momentary rise in temperature.
Replace the fuser, LVPS, then the main board.
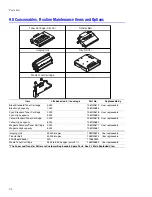
CASSETTE
SCF
SCF Path
MP Empty Sensor
Feed Sensor
Содержание Phaser 6100
Страница 1: ...Service Manual X XEROX P h a s e r C o l o r L a s e r P r i n t e r 6100 ...
Страница 2: ......
Страница 10: ...vi ...
Страница 22: ...Reference Information 2 6 ...
Страница 28: ...Specifications 3 6 ...
Страница 38: ...Summary of Product 4 10 RAM DIMM SPGPm Main Control FLASH MEMORY ENGINE CONTROL ...
Страница 44: ...Summary of Product 4 16 ...
Страница 66: ...Disassembly 6 10 3 Remove the toner caps and fit them to the inlets as shown below Toner Cap ...
Страница 84: ...Disassembly 6 28 7 Remove 5 screws 3 6 machine gold and then remove the HVPS Screw Screw Screw Screw Screw ...
Страница 94: ...Disassembly 6 38 6 Disconnect 2 harnesses and remove the laser unit Harness Harness ...
Страница 130: ...Maintenance and Diagnostics 7 20 ...
Страница 188: ...Parts List 9 34 9 16 Base Frame Assembly 16 15 14 23 13 6 12 8 3 3 7 4 5 19 10 9 20 18 22 17 1 2 24 25 26 11 21 ...
Страница 190: ...Parts List 9 36 9 17 MPT Assembly 15 19 20 13 4 17 17 18 24 1 18 11 3 7 23 1 S5 6 2 S9 9 14 22 10 21 8 5 16 12 0 ...
Страница 196: ...Parts List 9 42 9 21 Transfer Belt Cam Assembly S18 9 0 8 S8 7 6 5 10 1 2 14 3 12 13 S8 11 4 ...
Страница 200: ...Parts List 9 46 ...


