background image

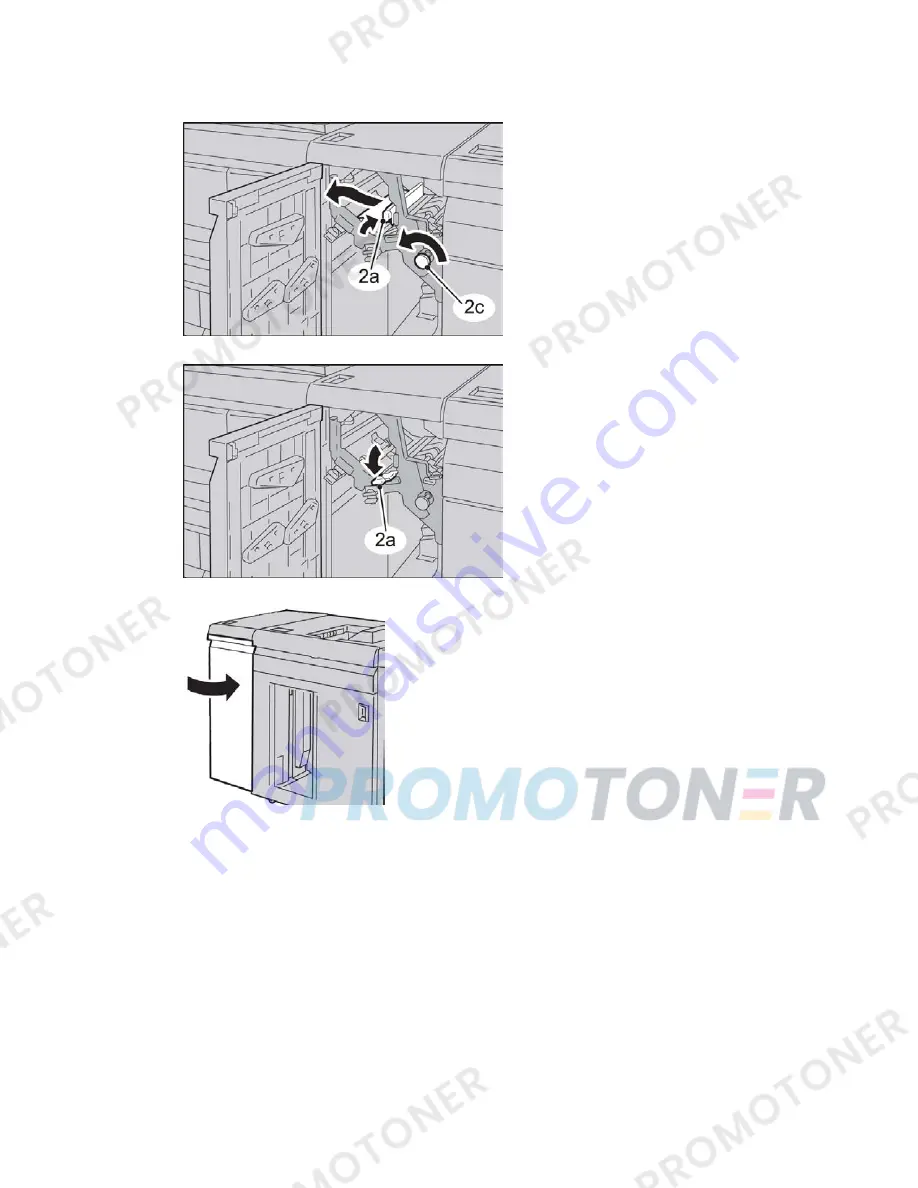
2. Move the lever  2a upward, turn the knob 2c counterclockwise, and remove the

jammed paper.

3. Return the lever 2a to the original position.

4. Close the front cover of the module.

5. Follow the instructions on the UI to clear other areas or to resume your print job.

14-7

Xerox

®

 D110/D125/D136 Printer

User Guide

Interface Module/Interface Cooling Module

Содержание D125

Страница 1: ...Xerox D110 D125 D136 Printer User Guide Version 3 0 September 2013 701P33220...

Страница 2: ...and other countries Elements of Apple s Technical User Documentation used by permission from Apple Computer Inc Adobe the Adobe logo Acrobat the Acrobat logo Acrobat Reader Distiller Adobe PDF logo A...

Страница 3: ...aker Finisher 1 11 SquareFold Trimmer Module 1 11 Standard Finisher Plus 1 12 Third Party Finishing Devices D110 D125 D136 configurations 1 12 2 Where to find help 2 1 Customer documentation CD DVD 2...

Страница 4: ...1 Printing with the PCL print drivers 6 1 Network tab printing 6 2 Network printing on tabs using the PS print drivers 6 2 Network printing on tabs using the PCL print drivers 6 3 7 Job Status 7 1 Job...

Страница 5: ...s in the Bypass Tray 5 10 3 Envelope jams in the Bypass tray 10 4 Paper jams in Trays 1 4 10 5 Paper jams in transport unit 4 10 6 Paper jams in duplex module 3 10 7 Paper jams inside the main unit 10...

Страница 6: ...HCF 1 or 2 Trays for 1 sided print jobs 13 6 Loading pre drilled stock into the OHCF 1 or 2 Trays for 2 sided print jobs 13 7 Skew adjustment levers 13 8 OHCF problem solving 13 9 Clearing OHCF jams 1...

Страница 7: ...ypes 16 4 Loading paper tabs in Tray 8 T1 Post Process Inserter 16 6 Maintenance 16 7 Standard Booklet Maker consumable supplies 16 7 Replace the standard staple cartridge 16 7 Replace the booklet sta...

Страница 8: ...Folder 16 50 17 SquareFold Trimmer Module 17 1 Overview 17 1 Identifying the components 17 2 Main components 17 2 Paper path 17 3 Control panel 17 4 Square Fold feature 17 4 Square fold options 17 5 A...

Страница 9: ...unch Waste Container 18 12 Problem solving 18 13 Paper jams in the Finisher Module 18 13 Paper jams in Tray 8 T1 Post Process Inserter 18 13 Paper jams inside the finisher left cover 18 14 Paper jams...

Страница 10: ...Optional C Z Folder 18 47 Finishing Transport specifications 18 47 User Guide viii Table of Contents...

Страница 11: ...Machine components 1 Optional High Capacity Feeder HCF Trays 6 and 7 This optional feeding device adds an additional 2 000 sheet capacity of letter size 8 5 x 11 in A4 media 1 1 Xerox D110 D125 D136...

Страница 12: ...rovides a wide range of finishing options including stapling and folding 5 Front cover Open this cover to clear paper jams and to replace the toner waste container 6 Left cover Open this cover to repl...

Страница 13: ...3 Press this button to display the main window which is called Services Home The Services Home window by default is where the UI displays the available service buttons such as Copy E Mail Network Sca...

Страница 14: ...it the Energy Saver mode Energy Saver button 14 This button lights when a user is logged in through the System Administration mode the Authentication mode or the Accounting mode Press this button to d...

Страница 15: ...ensure that the touch screen is blank and the Energy Saver button is not lit up 3 Open the front cover 4 Press the main power switch to the zero 0 position to switch the main power off The Main Power...

Страница 16: ...Common Service Settings Energy Saver Settings Exiting the Energy Saver Mode 1 Press Energy Saver or 2 Send a print job to the machine Print server overview One of the following print servers may be av...

Страница 17: ...sheets from 16 lb Bond to 80 lb Cover 52 gsm to 216 gsm Oversized High Capacity Feeder OHCF 1 or 2 trays Trays 6 7 The Oversized High Capacity Feeder OHCF is available in a 1 tray or 2 tray option The...

Страница 18: ...hed finishing device or devices Note The Interface Module is not available with the D95 Copier Printer configuration Interface Cooling Module D136 configuration The Interface Cooling Module is require...

Страница 19: ...dule or the Interface Cooling Module depends on your machine configuration it is also shown with the optional Booklet Maker Finisher and the optional C Z Folder Important The D110 D125 configurations...

Страница 20: ...s for output to a Stacker Tray Note The Interface Module is not available with the D95 Copier Printer configuration Standard Finisher This finisher provides a wide range of finishing folding options N...

Страница 21: ...6 configuration the Booklet Maker Finisher requires the Interface Cooling Module SquareFold Trimmer Module The SquareFold Trimmer Module is an optional finishing device that is used in conjunction wit...

Страница 22: ...e with the D95 Copier Printer configuration Third Party Finishing Devices D110 D125 D136 configurations Additional third party Document Finishing Architecture DFA devices are also available for your m...

Страница 23: ...hipped with the print server You or your System Administrator should print these documents after the installation is complete Help on the World Wide Web Xerox on the World Wide Web For system support...

Страница 24: ...be helpful to know your machine serial number before calling for support The machine serial number is shown on the Machine Information tab Machine Status Machine Information User Guide 2 2 Where to fi...

Страница 25: ...capacity of 1 600 sheets Media must be loaded into the trays in the long edge feed LEF direction Trays 3 and 4 Trays 3 and 4 are size adjustable Both trays accommodate media sizes starting at 5 5 x 7...

Страница 26: ...the tray until it comes to a stop If enabled by your System Administrator the Paper Tray settings screen may be displayed on the UI 7 If changes have been made to the paper tray select the Change Set...

Страница 27: ...dge of the material in the tray Do not load materials above the MAX line located on the rear Edge Guide 7 Gently push in the tray until it comes to a stop If enabled by your System Administrator the P...

Страница 28: ...nabled by your System Administrator the Paper Tray settings screen may be displayed on the UI 7 If changes have been made to the paper tray select the Change Settings button otherwise proceed to the n...

Страница 29: ...returned to the tray settings window 9 Select Confirm to close the window Loading transparencies in trays 1 4 1 Select the appropriate paper stock for your print job 2 Pull out the tray slowly until...

Страница 30: ...Refer to the specific chapter for information and instructions on loading media in the optional feeding devices Loading post process media in optional finishing devices Refer to the specific chapter...

Страница 31: ...de that prints data stored in text format It also includes index printing that prints a list of files retrieved in the mode Make sure to back up data on media Data stored on media may be lost or damag...

Страница 32: ...printed only from the directory located directly in the USB memory device A file or folder name can be recognized even if it exceeds 8 characters Do not connect multiple USB memory devices to the mac...

Страница 33: ...the USB memory device into the USB memory slot on the control panel 2 The USB Device detected screen appears Select one of the following Store to USB 3 One of the following will occur The USB Device D...

Страница 34: ...er Type Select the paper type to be used from the list Paper Supply Media Print Text Off Long Edge Flip Short Edge Flip 2 Sided Printing Off 2 Pages Up 4 Pages Up Pages per side Off On Bitmap Smoothin...

Страница 35: ...Select an access destination 4 Select Open from the pop up menu displayed Accessing Using Buttons Registered on the Services Home window You can register frequently used web applications on the Servi...

Страница 36: ...User Guide 5 2 Web Applications...

Страница 37: ...ant to print 3 Select File Print 4 Select the desired printer 5 Select Properties 6 Select the Paper Output tab 7 Select the appropriate Paper Tray Paper Size and Paper Type 8 Select the Advanced tab...

Страница 38: ...ork tab printing Network printing on tabs using the PS print drivers 1 Load the tab stock in Tray 3 Tray 4 or Tray 5 Bypass Refer to Loading Tab Paper in Trays in the Paper and Other Media chapter 2 F...

Страница 39: ...is being used for the tab stock then select Paper Settings for Auto Tray and choose Tab Stock for the paper type 9 If Tray 5 Bypass is being used for the tab stock then select Tray 5 Bypass Settings...

Страница 40: ...User Guide 6 4 Computer operations...

Страница 41: ...bs 3 From the View pull down menu select the desired jobs to be viewed You can select All Jobs Printer and Print from Folder Jobs Scan and Internet Fax Jobs Job Flow and File Transfer Jobs 4 From the...

Страница 42: ...ory Report or Print this Report if a report is desired Secure Print Jobs More tab This tab allows you to print confidential documents 1 Press the Job Status button 2 Select the Secure Print Jobs More...

Страница 43: ...ting the entire job set 1 Press the Job Status button 2 Select the Secure Print Jobs More tab 3 Select Sample Set The Sample Set screen is displayed 4 Select Refresh to display the latest updated info...

Страница 44: ...nt the job b Select Yes or No to continue printing the job Charge Print The Charge Print feature allows you to print or delete documents stored for each billing user ID 1 Press the Job Staus button on...

Страница 45: ...nformation Faults Supplies Billing information Tools Machine Information tab Machine Information provides general information about the copier printer and has buttons that allow the user to view detai...

Страница 46: ...engine the Controller ROM Read Only Memory and any optional feeding and finishing devices Print Reports The Print Reports button must be enabled by the system administrator before reports can be print...

Страница 47: ...Faults tab The Faults tab provides access to fault information and error messages Access to this tab is by pressing the Machine Status button on the control panel and selecting the Fault tab on the U...

Страница 48: ...ature displays the total number of prints copies made by the machine and also allows the user to view specific billing meter usage counter information The main Billing Information screen displays The...

Страница 49: ...ob Images Sent Counters This view provides information on the total amounts for internet fax images email images and network scanned images All Usage Counters This view provides a complete total of al...

Страница 50: ...created and saved stored programs Add Address Book Entry Select to add Address and Recipient Information To add select an available entry and enter the information To view an entry select the entry a...

Страница 51: ...ray Attributes screen is displayed 10 Select Close The main Tools screen is displayed 11 Press the Services button on the control panel to return to the main Copy screen 8 7 Xerox D110 D125 D136 Print...

Страница 52: ...User Guide 8 8 Machine Status...

Страница 53: ...cument cover and document glass at the same time These components consist of the document cover the document platen glass and the second side scanning lens assembly Cleaning the document cover and gla...

Страница 54: ...m the exterior with a soft cloth Cleaning the document cover and glass 1 Cleaning the document cover a Raise the document feeder b To remove dirt wipe the document cover with a soft cloth moistened wi...

Страница 55: ...the glass surface 3 Cleaning the second side scanning lens assembly a The second side scanning lens assembly is located along the left side of the document cover The assembly consists of the mirrored...

Страница 56: ...of the white plastic strip and the rollers with a soft cloth moistened with water and then wipe it dry with a soft cloth Caution Do not press heavily on the mirrored glass as this will result in damag...

Страница 57: ...e document feeder Cleaning the document feeder rollers 1 Gently lift the latch of the document feeder top cover until it is open completely in a fixed position 2 While turning the rollers gently clean...

Страница 58: ...inutes from the time the machine is powered off to allow the machine to cool down Fuser oil can cause irritation upon contact with the eye Make sure to wash your hands thoroughly with soap and water a...

Страница 59: ...he 2c handle to its original position 9 Clean the input baffles to the Transfer and Fuser 10 Wipe the Fuser input baffle 11 Wipe the Transfer input baffle 9 7 Xerox D110 D125 D136 Printer User Guide M...

Страница 60: ...the Supplies and entering selecting your specific machine information product family and model type Store supply items and Xerox parts in their original packages in a convenient location Note Always...

Страница 61: ...stops running Always recycle dispose the used CRU according to the disposal instructions supplied with the new CRU Note If image quality IQ issues are on the output refer to the problem solving chapte...

Страница 62: ...owly 1 while holding the bottom of the cartridge with one hand 2 5 Dispose the old toner cartridge as normal office waste or recycle the cartridge 6 Remove the new cartridge from the box and shake if...

Страница 63: ...e the cartridge is in the lock position and is installed into the appropriate toner location Caution Never use a vacuum cleaner when cleaning up spilled toner It can cause a small explosion as the ton...

Страница 64: ...machine stops after copying or printing approximately 18 000 sheets 1 Make sure that the machine has stopped copying printing then open the front cover on the machine 2 Open the toner waste container...

Страница 65: ...s provided with the new container Close the bag and dispose of the container according to your local regulations 6 Remove the new container from its packaging 7 Do not grip the container handle Grasp...

Страница 66: ...A message displays and the machine will not operate if the front cover is open even slightly User Guide 9 14 Maintenance...

Страница 67: ...be removed with the machine still powered on When the power is turned off all information stored to the machine s memory will be erased Do not touch components inside the machine This can cause print...

Страница 68: ...the optional HCF Trays 6 7 or optional OHCF Trays 6 7 being present If you have either an HCF or an OHCF open the front cover to optional Trays 6 7 to access this area 1 Open the lower left cover 2 Re...

Страница 69: ...paper are cleared before proceeding with any copy print jobs 1 Remove the jammed paper and any paper that is loaded from the Bypass tray Note If paper is torn check inside the machine and remove it 2...

Страница 70: ...that the envelopes are within specification Carefully read and adhere to the following guidelines when using envelopes in the Bypass Tray Always ensure that the Bypass tray guides are against the edg...

Страница 71: ...ull out the tray where the paper jam occurred Note To avoid tearing paper review where the paper jam occurred before pulling out a tray Torn paper remaining inside the machine can cause machine malfun...

Страница 72: ...cleared before proceeding with your copy print jobs 1 Make sure that the machine has stopped printing before opening the front cover 2 Pull out Tray 1 3 Pull out Transport Unit 4 Tray 2 will come out...

Страница 73: ...it comes to a stop 8 Close the front cover completely The machine will not operate if the front cover is open even slightly Paper jams in duplex module 3 Tip Always ensure that all paper jams includin...

Страница 74: ...check inside the machine and remove it 4 Move lever 3b to the right and then remove the jammed paper Note If paper is torn check inside the machine and remove it 5 Push the duplex module in gently un...

Страница 75: ...r copy print jobs Warning Never touch a labeled area found on the fuser unit or nearby indicating High Temperature and Caution Contact can lead to burns 1 Make sure that the machine has stopped printi...

Страница 76: ...the top of the transfer module or inside the fuser unit remove the paper by pulling it out toward the left If the paper cannot be removed lift up the lever 2c and then try removing it 5 Lift up the l...

Страница 77: ...mains inside and it is difficult to remove pull out the duplex module after returning the transfer module to the original position Then try again 8 Insert the transfer module completely and turn the g...

Страница 78: ...rocess the job 003 754 Cause An error occurred in the document scanner Remedy Reprocess the job 003 755 Cause An incompatible combination of features is specified in the document scan conditions Remed...

Страница 79: ...336 Cause An error occurred in the machine Remedy Power off power on the machine If the document scanner error is not corrected contact the Customer Support Center 016 415 016 416 Cause The SMB host...

Страница 80: ...m Administration Guide 016 702 Cause Mail specifying a non registered or invalid mailbox number was received Remedy Take one of the following actions Request the sender to register the mailbox with th...

Страница 81: ...resolution cancel 2 Sided printing or N up and retry printing 016 718 Cause PCL print data could not be processed as there was insufficient memory Remedy Increase the size of the print page buffer 01...

Страница 82: ...edy Specify the printable paper size for booklet creation 016 738 Cause The specified document and paper size are an unauthorized combination Remedy Specify the combination of the printable document a...

Страница 83: ...occurred on the SMTP server Remedy Contact the SMTP Server Administrator 016 766 Cause Could not send mail as the mail address was wrong Remedy Check the mail address and transmit again 016 767 Cause...

Страница 84: ...Remedy Either remove unnecessary data from the hard disk to increase free disk space or initialize the hard disk 016 786 Cause Failed to load a file from the Web browser Remedy Perform the following...

Страница 85: ...ze tray output tray or 2 sided printing that is incompatible with the specified paper quality has been specified Remedy Check the print data 024 746 Cause An illegal print parameter combination was se...

Страница 86: ...rating check the log When it is not operating check the network environments 027 725 Cause The job status is unclear during an application interface Remedy Check whether an application linked operates...

Страница 87: ...nd job If the problem persists call the Customer Support Centre for further help instructions 027 770 Cause Disk full error message on the controller Remedy Cancel job Delete unwanted files from the c...

Страница 88: ...078 282 Cause Charge Corotron cleaner failure Remedy Power cycle the machine If the error is not fixed by performing the relevant remedy contact the Customer Support Center 091 311 Cause Charge Corotr...

Страница 89: ...chine error is not fixed by performing the relevant remedy contact the Customer Support Center 124 345 124 346 124 347 124 348 124 349 Cause Communication error between the printer and the controller...

Страница 90: ...are displayed Cause and Remedy Fault Code Message Cause An error occurred Remedy Turn off the power wait until the Control Panel display goes dark and then turn on power again If the message persists...

Страница 91: ...connected from the machine or the rear of the rack Make sure that the power supply is 200 240 V volts 15 A amperes Make sure that power of capacity compatible with the specified maximum power consumpt...

Страница 92: ...to load paper of the correct size and instruct it to print again Is correct paper loaded on the tray Tray 5 Bypass printing failed Refer to the image quality troubleshooting section for more informati...

Страница 93: ...in as far as possible Is the paper tray set properly Replace with paper from a new ream Is the paper damp Either turn the paper so that the curl is facing down in the paper tray or replace with paper...

Страница 94: ...er clips or adhesive tape from the document before copying Are you trying to copy documents affixed with sticky labels paper clips or adhesive tape Properly set the document guides Are the document gu...

Страница 95: ...ing Are you making copies of glossy printing paper Clean the document glass Is the scanning glass on the feeder dirty The copy has black lines Adjust the copy density Is the copy density set to Dark T...

Страница 96: ...idge is depleted or damaged Black dots are printed Contact the Customer Support Center The drum cartridge is depleted or damaged Black lines are printed Clean the document feeder glass The scanning gl...

Страница 97: ...he loaded paper differed from the setting on the print driver The entire page is printed faint Fan the paper thoroughly and reset Two or more sheets may be feeding at once Replace with paper from a ne...

Страница 98: ...solved go to next Cause Action Glossy printing paper is being scanned Cause Glossy printing paper easily sticks to the document glass and shadows are sometimes scanned and reproduced as dirt Place a t...

Страница 99: ...ext Cause Action The document guides are in an incorrect position Cause Load the document correctly and align the document guides with the edges of the document Action If problem is not solved go to n...

Страница 100: ...solved go to next Cause Action The network cable is disconnected from the machine Cause Connect the network cable to the machine For information about network settings refer to the System Administrati...

Страница 101: ...work connection between the computer and machine is abnormal Cause Check with your system administrator Action If problem is not solved go to next Cause Action The port is not enabled Cause Enable the...

Страница 102: ...m the specified tray size Cause Yes Printing performed with a different paper size If No go to next symptom Change the paper size set in the tray or change print options to specify a tray that contain...

Страница 103: ...Cause Yes The settings specified for print options do not take effect If No go to next symptom Install the print driver for this model Action If problem is not solved go to next Cause Action The optio...

Страница 104: ...User Guide 10 38 Problem solving...

Страница 105: ...olution 600 600 dpi 47 2 47 2 dots mm Data processing resolution 2400 600 dpi 47 2 47 2 dots mm Resolution PCL6 PCL5 Adobe PostScript 3 Page Description Language ESC P VP 1000 HP GL HP7586B HP GL2 RTL...

Страница 106: ...rosoft Windows XP Microsoft Windows Server 2003 Microsoft Windows Vista PostScript Microsoft Windows 2000 Microsoft Windows XP Microsoft Windows Server 2003 Microsoft Windows Vista Mac OS 7 5 or later...

Страница 107: ...n A4 The two tray High Capacity Feeder HCF Trays 6 and 7 provides an extra 4 000 sheet capacity of either 8 5 x 11 in or A4 paper Each tray holds 2000 sheets from 16 lb Bond to 80 lb Cover 52 gsm to 2...

Страница 108: ...des c Adjust the guides to fit the new paper size and retighten the two screws 4 Open the ream of paper with the seam side facing up 5 Fan the sheets before loading them into the tray 6 Load and align...

Страница 109: ...ions c Select Save until you are returned to the tray settings window 9 Select Confirm to close the window Problem solving Paper jams in Trays 6 7 HCF Tip Always ensure that all paper jams including a...

Страница 110: ...cleared before proceeding with your copy print jobs This section describes how to remedy paper jams that occur at the following locations Paper jams in lower left cover Paper jams at lever 1a and kno...

Страница 111: ...any small ripped pieces of paper are cleared before proceeding with your copy print jobs 1 Open the front cover of the HCF 2 Open the lower left cover while gripping the release lever 12 5 Xerox D110...

Страница 112: ...mpletely Note The machine will not operate if the cover is open even slightly Paper jams at lever 1a and knob 1c Tip Always ensure that all paper jams including any small ripped pieces of paper are cl...

Страница 113: ...torn check inside the machine and remove it 3 Return lever 1a to the original position 4 Close the front cover of the HCF completely Note The machine will not operate if the cover is open even slightl...

Страница 114: ...cover of the HCF 2 Move lever 1b to the right and turn knob 1c to the right Remove the jammed paper Note If paper is torn check inside the machine and remove it 3 Return lever 1b to the original posit...

Страница 115: ...of the HCF 2 Move lever 1d upwards and turn knob 1c remove the jammed paper Note If paper is torn check inside the machine and remove it 3 Return lever 1d to the original position 4 Close the front c...

Страница 116: ...nction in Tray 6 7 Remedy Check the paper setting of paper trays 6 7 and power cycle the machine If the trays errors are not fixed by performing the relevant remedy contact the Customer Support Center...

Страница 117: ...ned Remedy Check the paper loaded in Tray 6 7 Power off and then power on the machine If the tray errors are not fixed by performing the relevant remedy contact the Customer Support Center 078 300 078...

Страница 118: ...User Guide 12 12 High Capacity Feeder HCF Trays 6 and 7 8 5 x 11 in A4...

Страница 119: ...OHCF is available in a 1 tray or 2 tray option The OHCF feeds a variety of stock sizes including standard and oversized stock up to 13 x 19 2 in 330 2 x 488 mm Each tray holds 2 000 sheets Note The 1...

Страница 120: ...mm SEF media Using the Postcard bracket Use the following procedure for installing and using the Postcard bracket when printing on smaller media 4 x 6 in 101 6 x 152 4 mm 1 Slowly open one of the pape...

Страница 121: ...ostcard stock and adjust the paper guides against the stock 8 Close the paper tray and confirm the new settings on the UI 9 Run your print job 10 Upon completion of your print job remove the postcard...

Страница 122: ...isplayed on the UI 9 If changes have been made to the paper tray select the Change Settings button otherwise proceed to the next step a Make the desired selections for Paper Type Paper Weight Paper Si...

Страница 123: ...r curl and alignment adjustment Note Refer to the System Administration Guide for detailed information on the paper curl and alignment adjustment options c Select Save until you are returned to the tr...

Страница 124: ...drilled stock into the OHCF 1 or 2 Trays for 1 sided print jobs 1 Select the appropriate paper stock for your print job 2 Pull out the tray slowly until it stops 3 Open the ream of paper with the seam...

Страница 125: ...register the paper against the right side of the tray as depicted below for LEF direction 6 Load and register the paper against the right side of the tray as depicted below for SEF direction 7 Adjust...

Страница 126: ...in in their default position The position of these levers should be changed only when there is a skew problem when running a specific print job and or specific media type Changing the skew adjustment...

Страница 127: ...d accurately without skew and the printed output is satisfactory your task is complete The paper is skewed and the printed output is unsatisfactory proceed to the next step 14 Pull out the tray slowly...

Страница 128: ...emove the jammed paper Note If paper is torn check inside the machine and remove it 3 Gently push in the tray until it comes to a stop OHCF paper jams at lever 1a and knob 1c 1 Open the front cover of...

Страница 129: ...lever 1a to the original position 4 Close the front cover of the OHCF Note If the front cover of the OHCF is not completely closed a message will appear and the machine will not operate OHCF paper jam...

Страница 130: ...3 Return the lever 1b to the original position 4 Close the front cover of the OHCF Note If the front cover of the OHCF is not completely closed a message will appear and the machine will not operate...

Страница 131: ...e it 3 If the paper cannot be removed turn the knob 1c clockwise and then remove the jammed paper Note If paper is torn check inside the machine and remove it 4 Return the lever 1d to the original pos...

Страница 132: ...ems persist contact the Customer Support Center Note Trays other than the OHCF trays may be used in the interim 078 100 Cause An OHCF tray has malfunctioned Remedy Perform the following Check the pape...

Страница 133: ...Support Center Note Trays other than the OHCF trays may be used in the interim 078 211 Cause An OHCF tray has malfunctioned Remedy Perform the following Check the paper setting of the paper trays and...

Страница 134: ...e OHCF trays may be used in the interim 078 263 Cause An OHCF tray has malfunctioned Remedy Perform the following 1 Check the paper loaded in the trays 2 Power Off On the machine 3 If problems persist...

Страница 135: ...malfunctioned Remedy Perform the following 1 Check the paper loaded in the trays 2 Power Off On the machine 3 If problems persist contact the Customer Support Center Note Trays other than the OHCF tra...

Страница 136: ...loaded in the trays 2 Power Off On the machine 3 If problems persist contact the Customer Support Center Note Trays other than the OHCF trays may be used in the interim 078 272 Cause An OHCF tray has...

Страница 137: ...Support Center Note Trays other than the OHCF trays may be used in the interim 078 276 Cause An OHCF tray has malfunctioned Remedy Perform the following 1 Check the paper loaded in the trays 2 Power...

Страница 138: ...e OHCF trays may be used in the interim 078 280 Cause An OHCF tray has malfunctioned Remedy Perform the following 1 Check the paper loaded in the trays 2 Power Off On the machine 3 If problems persist...

Страница 139: ...malfunctioned Remedy Perform the following 1 Check the paper loaded in the trays 2 Power Off On the machine 3 If problems persist contact the Customer Support Center Note Trays other than the OHCF tra...

Страница 140: ...he interim OHCF specifications Oversized High Capacity Feeder OHCF Trays A1 1 and A1 2 Specification Item SEF 8 5 x 11 in A4 8 5 x 13 in 8 5 x 14 in 10 x 14 in B4 11 x 17 in A3 12 x 18 in 12 6 x17 7 i...

Страница 141: ...e Cooling Module goes a step further in that it contains additional fans and associated duct work These fans and duct work aid in cooling the outgoing printed media The correct module for your machine...

Страница 142: ...ly finishing device is the Standard Finisher or Booklet Maker Finisher The SquareFold Trimmer Module is available only with the Booklet Maker Finisher D136 configuration For either Copier Printer or P...

Страница 143: ...curl up or down that is selected 5 Auto Curl indicator This indicates that the Auto Curl Mode is selected If you want to quickly and at the point of need adjust the paper curl on the printed output yo...

Страница 144: ...dule Preset decurler settings The module is designed with several automated presettings for controlling paper curl When using these settings the amount of curl correction is automatically set by the m...

Страница 145: ...jams including any small ripped pieces of paper are cleared before proceeding with your print jobs Note Remedies differ according to the paper jam location Follow the instructions displayed to remove...

Страница 146: ...on 4 Close the front cover of the module 5 Follow the instructions on the UI to clear other areas or to resume your print job Paper jams at lever 2a 1 Open the front cover of the module User Guide 14...

Страница 147: ...he jammed paper 3 Return the lever 2a to the original position 4 Close the front cover of the module 5 Follow the instructions on the UI to clear other areas or to resume your print job 14 7 Xerox D11...

Страница 148: ...pen the front cover of the module 2 Move the lever downward turn the knob 2c counterclockwise and remove the jammed paper 3 Return the lever 2b to the original position User Guide 14 8 Interface Modul...

Страница 149: ...dule front door 2 Carefully remove all sheets and paper scraps from the jam clearance areas 3 Close the front door Verify the paper used is within the approved paper specifications 048 101 Cause Paper...

Страница 150: ...door 048 310 Cause Interface Module Interface Cooling Module decurler sensor or belt problem Remedy Power off the machine print engine then power on If problem continues contact the Customer Support C...

Страница 151: ...power on If problem continues contact the Customer Support Center 048 319 Cause Interface Module Interface Cooling Module cooling fan failure Remedy Power off the machine print engine then power on If...

Страница 152: ...Off On the machine 048 324 Cause Interface Module Interface Cooling Module communication failure or connection failure Remedy Perform the following Check the connection between the Interface Module In...

Страница 153: ...e Module Interface Cooling Module and the connected finishing device or devices Fully clear any jams between the Interface Module Interface Cooling Module and the connection finishing device or device...

Страница 154: ...cations 048 903 Cause Paper jam A jam occurred during feeding A jam notification is displayed on the UI Remedy Perform the following 1 Open the Interface Module Interface Cooling Module front door 2 C...

Страница 155: ...a Stacker Tray 1 Interface Module Interface Cooling Module 2 High Capacity Stacker HCS Important The HCS requires the Interface Module or the Interface Cooling Module Module type depends on your prod...

Страница 156: ...ntifying the components The HCS consists of the following components 1 Control Panel Provides manual control of the various HCS functions 2 Top Tray Holds a maximum of 500 sheets Note Labels must be d...

Страница 157: ...oad indicator This indicator lights when the Stacker Tray has reached the down position and the front door can be opened 6 Exit jam This indicator blinks where there is a jam in the exit area E8 7 Sta...

Страница 158: ...lights 3 Position the securing bar on top of the stacked paper 4 Pull the Stacker Cart straight out of the HCS 5 Remove the securing bar 6 Remove the paper from the Stacker Tray 7 Push the empty Stack...

Страница 159: ...ide for specific information on paper curl settings and adjustment Jam clearance Tip Always ensure that all paper jams including any small ripped pieces of paper are cleared before proceeding with you...

Страница 160: ...structions on the screen to remove any paper in the area indicated 6 Follow the instructions displayed on the UI to resume printing HCS transport jams E4 E5 and E6 Perform the following steps to clear...

Страница 161: ...Push the stacker cart straight into the HCS 9 Close the front door 10 If the UI indicates there is a jam in the print engine follow the instructions on the screen to remove any paper in the area indic...

Страница 162: ...S Front Cover 6 If the UI indicates there is a jam in the print engine follow the instructions on the screen to remove any paper in the area indicated 7 Follow the instructions displayed on the UI to...

Страница 163: ...to the following hints and tips when using the HCS 1 Check the paper in the Stock Tray for curl a If no curl is present and if the output is acceptable meets customer satisfaction you are finished b...

Страница 164: ...aper scraps from jam clearance areas 049 101 Cause There is a top tray sensor fault in the HCS Remedy Perform the following Power Off On the machine If the problem still exists contact the Customer Su...

Страница 165: ...Cause HCS bypass exit sensor fault Remedy Perform the following Power Off On the machine If the problem still exists contact the Customer Support Center Carefully remove all sheets and paper scraps fr...

Страница 166: ...ollowing Power Off On the machine If the problem still exists contact the Customer Support Center Carefully remove all sheets and paper scraps from jam clearance areas 049 119 Cause Bypass path sensor...

Страница 167: ...ps from jam clearance areas Close the HCS front door 049 212 Cause Stacker up down failure Remedy Perform the following Power Off On the machine If the problem still exists contact the Customer Suppor...

Страница 168: ...8 Cause Stacker full sensor fault Remedy Perform the following Power Off On the machine If the problem still exists contact the Customer Support Center 049 219 Cause HCS front door fault Remedy Perfor...

Страница 169: ...or failure Remedy Perform the following Power Off On the machine If the problem still exists contact the Customer Support Center Carefully remove all sheets and paper scraps from jam clearance areas 0...

Страница 170: ...e problem still exists contact the Customer Support Center Carefully remove all sheets and paper scraps from jam clearance areas 049 236 Cause HCS sensor failure Remedy Perform the following Power Off...

Страница 171: ...jam clearance areas 049 241 Cause HCS sensor failure Remedy Perform the following Power Off On the machine If the problem still exists contact the Customer Support Center Carefully remove all sheets...

Страница 172: ...the following Power Off On the machine If the problem still exists contact the Customer Support Center Carefully remove all sheets and paper scraps from jam clearance areas 049 253 Cause HCS sensor fa...

Страница 173: ...contact the Customer Support Center Carefully remove all sheets and paper scraps from jam clearance areas 049 284 Cause HCS sensor failure Remedy Perform the following Power Off On the machine If the...

Страница 174: ...Cooling Module and the HCS 049 300 Cause HCS communication or software fault Remedy Perform the following Power Off On the machine If the problem still exists contact the Customer Support Center Check...

Страница 175: ...y Perform the following Power Off On the machine If the problem still exists contact the Customer Support Center Carefully remove all sheets and paper scraps from jam clearance areas 049 902 Cause The...

Страница 176: ...ully remove all sheets and paper scraps from jam clearance areas 049 908 Cause The HCS detects paper at the HCS top tray HCS bypass or at the HCS stacker tray However no paper is present HCS sensor fa...

Страница 177: ...e Stacker height limit or full detection fault Remedy Perform the following Power Off On the machine If the problem still exists contact the Customer Support Center 049 966 Cause Stacker height limit...

Страница 178: ...nter Open the HCS front door Remove any paper from the stacker cart Close the HCS front door 049 970 Cause Stacker limit or full sensor fault Remedy Perform the following Power Off On the machine If t...

Страница 179: ...per guidelines Stacker Tray will accept 55 350 gsm either coated or uncoated stock with the possibility of degraded stock quality and increased jam rate for stocks that are heavier than 300 gsm Transp...

Страница 180: ...User Guide 15 26 High Capacity Stacker HCS...

Страница 181: ...of finishing and folding options The following illustration shows the Booklet Maker Finisher Note The Interface Cooling Module is required with D136 configurations Note The Standard Finisher or Bookl...

Страница 182: ...iddle tray 4 Note Both the Top and Stacker Trays can be used for hole punched output optional This is available only with the Booklet Maker Finisher The Booklet tray receives saddle stitched booklets...

Страница 183: ...sertion into the printed output This tray is also known as the Interposer Tray 8 holds a maximum of 200 sheets when using 20 lb 75 gsm paper Paper can be loaded in the LEF or SEF direction Post proces...

Страница 184: ...t If your output is curled upward press this button to prevent upward curls Note When no indicator is lit the machine does not perform any curl correction to the printed output Folding feature If your...

Страница 185: ...own here with 3 hole punch As with a regular Z Fold it has two folds that are folded in the opposite directions The difference between a regular Z Fold and a Z Fold Half Sheet is that the Z Fold Half...

Страница 186: ...th the printed side facing up b If the media is tab stock load the tab side to be fed first in the direction of the arrow as shown in the above illustration 4 From the Tray Properties window enter the...

Страница 187: ...er Replaceable Units CRUs part numbers Store supply items and Xerox parts in their original packages in a convenient location Supply Unit Shipped with finisher Reorder Quantity Supply Item 4 staple ca...

Страница 188: ...nd remove the staple cartridge from the unit 5 Push a new staple cartridge into the unit 6 Reinstall the cartridge unit to its original position in the finisher 7 Close the right cover on the finisher...

Страница 189: ...be replaced a message appears on the UI 1 Make sure that the machine has stopped printing 2 Open the right cover on the finisher 3 While pressing the lever to the right pull out the booklet staple ca...

Страница 190: ...message will display and the machine will not operate if the right cover is open even slightly Replacing the Staple Waste Container on the finisher The machine displays a message indicating that the S...

Страница 191: ...aple waste container from the machine 5 Place the used staple waste container into a supplied plastic bag Note Do not return a disassembled used container to the Customer Support Center 6 Hold the new...

Страница 192: ...ven slightly Empty the Punch Waste Container The UI displays a message indicating when it is time to empty the Punch Waste Container Caution Only remove the Punch Waste Container while the system is p...

Страница 193: ...ight cover on the finisher Note A message will display and the machine will not operate if the right cover is open even slightly Finisher problem solving Tip Always ensure that all paper jams includin...

Страница 194: ...ove the jammed paper and all paper loaded in the tray Note If paper is torn check inside the machine and remove it 3 Fan the paper you removed making sure that all four corners are neatly aligned and...

Страница 195: ...and turn knob 1c left Remove the jammed paper Note If paper is torn check inside the machine and remove it 4 Return lever 1a to the original position 5 Close the finisher left cover completely Note T...

Страница 196: ...lever 1d upwards and remove the jammed paper Note If paper is torn check inside the machine and remove it 4 Move the lever 1d to the original position 5 Close the finisher left cover completely Note T...

Страница 197: ...right and remove the jammed paper Note If paper is torn check inside the machine and remove it 4 Move the lever 1b to the original position 5 Close the finisher left cover completely Note The machine...

Страница 198: ...and 3d remove the jammed paper Note If paper is torn check inside the machine and remove it 4 Return the levers 3b and 3d to their original positions 5 Close the right cover on the finisher Note A mes...

Страница 199: ...knob 3c remove the jammed paper Note If paper is torn check inside the machine and remove it 4 Return the lever 3e its original position 5 Close the right cover on the finisher Note A message will dis...

Страница 200: ...d turn the knob 3f and remove the jammed paper Note If paper is torn check inside the machine and remove it 4 Return the lever 3g to its original position 5 Close the right cover on the finisher Note...

Страница 201: ...nob 3a remove the jammed paper Note If paper is torn check inside the machine and remove it 4 Return the lever 4b to its original position 5 Close the right cover on the finisher Note A message will d...

Страница 202: ...and turn the knob 3a remove the jammed paper Note If paper is torn check inside the machine and remove it 4 Return the lever 2a to its original position 5 Close the right cover on the finisher Note A...

Страница 203: ...nob 2c remove the jammed paper Note If paper is torn check inside the machine and remove it 4 Return the lever 2b to its original position 5 Close the right cover on the finisher Note A message will d...

Страница 204: ...to the right and remove the jammed paper Note If paper is torn check inside the machine and remove it 4 If you cannot remove the paper return the lever 2e 2f to its original position Swing the lever...

Страница 205: ...and the machine will not operate if the right cover is open even slightly Paper jams at 2d and lever 2g 1 Make sure that the machine has stopped printing 2 Open the right cover on the finisher 3 Pull...

Страница 206: ...ray 2d 5 Close the right cover on the finisher Note A message will display and the machine will not operate if the right cover is open even slightly Paper jams at unit 4 and knob 4a 1 Make sure that t...

Страница 207: ...cover on the finisher Note A message will display and the machine will not operate if the right cover is open even slightly Paper jams at finisher top tray 1 Make sure that the machine has stopped pr...

Страница 208: ...tacker tray 1 Make sure that the machine has stopped printing 2 Remove jammed paper from the finisher stacker tray Note If paper is torn check inside the machine and remove it 3 Open and close the fin...

Страница 209: ...a and remove any jammed paper from the optional booklet maker tray Note If paper is torn check inside the machine and remove it 4 Close the right cover on the finisher Note A message will display and...

Страница 210: ...output is stapled as shown in the figure above contact our Customer Support Center Note Depending on the type of paper that is being stapled the stapled nails may be bent If the bent nails are stuck...

Страница 211: ...her 4 Check the inside of the finisher for any remaining staples and if necessary remove them 5 Open the staple cartridge unit as shown and remove the jammed staple Warning To avoid injury to your fin...

Страница 212: ...ight cover is open even slightly Staple jams in the booklet maker cartridge Note Always check inside the finisher for any individual staples or staple remnants 1 Make sure that the machine has stopped...

Страница 213: ...dge Warning To avoid injury to your fingers carefully remove the jammed staples from the cartridge 6 While holding the tabs of a new staple cartridge push it into the unit 7 Push the staple cartridge...

Страница 214: ...re if the standard staple cartridge is inserted incorrectly into the machine Note Always check inside the finisher for any individual staples or staple remnants 1 Make sure that the machine has stoppe...

Страница 215: ...e lever on the rear of the staple cartridge unit in the downward direction 6 While holding the lever down turn over the unit and remove the staple cartridge from the unit 7 Detach the outside staples...

Страница 216: ...isted in the table below or if an error persists after following the listed solution then contact your Xerox Customer Support Center If an error code is displayed all print data of the machine as well...

Страница 217: ...k for any obstructions in the paper path and clear them 012 213 Cause The finisher malfunctioned Remedy Perform the following Power off on the machine and if necessary resend restart your print job If...

Страница 218: ...er malfunctioned Remedy Perform the following Power off on the machine and if necessary resend restart your print job If the error persists contact the Customer Support Center Check for any obstructio...

Страница 219: ...chine and if necessary resend restart your print job If the error persists contact the Customer Support Center Check for any obstructions in the paper path and clear them 012 227 Cause The finisher ma...

Страница 220: ...he error persists contact the Customer Support Center Check for any obstructions in the paper path and clear them 012 236 Cause The finisher malfunctioned Remedy Perform the following Power off on the...

Страница 221: ...use The finisher malfunctioned Remedy Perform the following Power off on the machine and if necessary resend restart your print job If the error persists contact the Customer Support Center Check for...

Страница 222: ...off on the machine and if necessary resend restart your print job If the error persists contact the Customer Support Center Check for any obstructions in the paper path and clear them 012 251 Cause T...

Страница 223: ...sts contact the Customer Support Center Check for any obstructions in the paper path and clear them 012 260 Cause The finisher malfunctioned Remedy Perform the following Power off on the machine and i...

Страница 224: ...them 012 283 Cause The finisher malfunctioned Remedy Perform the following Power off on the machine and if necessary resend restart your print job If the error persists contact the Customer Support Ce...

Страница 225: ...aple cartridge is empty or stapling error occurred Remedy Perform the following Check the staple cartridge and reset correctly If necessary replace with a new cartridge Resume job 024 957 Cause Post P...

Страница 226: ...emove all paper from the booklet tray 024 984 Cause The booklet stapler low staple signal is on Remedy Remove all paper from the booklet tray 024 985 Cause The booklet stapler low staple signal is on...

Страница 227: ...and try to print again 124 706 Cause The settings for folding are canceled Remedy Confirm the folding settings and try to print again 124 709 Cause The number of pages exceeds the number of pages that...

Страница 228: ...00 sheets Optional C Z Folder tray Minimum 30 sheets When using A4 LEF B5 LEF 8 5 x 11 in LEF 8 x 10 in LEF 7 5 x 10 5 in LEF only When using paper of other sizes tray capacity is 1 500 sheets and 100...

Страница 229: ...50gsm uncoated 106 300gsm coated Paper Weights Booklet Capacity 64 80 gsm Uncoated 25 sheets 81 90 gsm Uncoated 20 sheets 91 105 gsm Uncoated 10 sheets 106 128 gsm Uncoated 10 sheets Coated 10 sheets...

Страница 230: ...16 24 lb 64 90 gsm Output tray Stacker middle tray Z Fold Half Sheet Paper size A4 8 5 x 11 in Number of sheets to be folded 1 sheet Capacity Minimum 30 sheets When using Xerox 20 lb 75 gsm paper Pap...

Страница 231: ...the finisher Flattens the booklet spine thereby reducing the booklet thickness and giving it the appearance of a perfect bound book Trims cuts away the face edge of the booklet resulting in a neat fin...

Страница 232: ...fold mechanism is found in this area 2 Top Right Cover Open this cover to remove paper jams The trimming mechanism is found in this area 3 Booklet Output Tray This tray receives square fold booklet o...

Страница 233: ...is flattened and the spine squared it is moved to the trimmer area a Based on the finished booklet size the booklet is moved until the trail edge reaches the trimmer cutter b The trail edge is trimme...

Страница 234: ...This indicator lights when the Trimmer Waste Container is pulled out or when it is full 2 Square Fold options This area of the control panel contains the following Note The Square Fold options are av...

Страница 235: ...print driver connected to the machine 1 Square Fold Book Pressing options on the machine UI the illustration shown is a representation only The actual images on the machine UI may vary depending on th...

Страница 236: ...a more rounded thicker appearance to the spine of the booklet 2 This booklet was square folded The booklet spine is flattened and squared giving it the appearance of a perfect bound book Accessing the...

Страница 237: ...r Booklet Creation or Folding 3 From the Booklet Creation screen perform the following a Select On b Select Fold Staple c From the Booklet Creation Fold Staple screen select either Fold Only or Fold S...

Страница 238: ...the trimmer setting Adjustments are made in 0 1 mm 0 0039 in increments 2 The trimmer setting is based on The number of sheets in the finished booklet The finished booklet width size such as 8 5 in 2...

Страница 239: ...5 5 x 8 5 in 149 x 210 mm 8 5 x 11 in A4 210 x 298 mm 3 10 125 20 lbs 75 gsm 5 5 x 8 5 in 149 x 210 mm 8 5 x 11 in A4 210 x 298 mm 4 12 135 80 lbs 120 gsm 5 5 x 8 5 in 149 x 210 mm 8 5 x 11 in A4 210...

Страница 240: ...computer open the desired job in its appropriate application for example Microsoft Word or Adobe Reader a Select File and Print b From the Print window select the desired machine with the SquareFold T...

Страница 241: ...fer to the illustration 1 This booklet has preprinted front and back covers with a full page image It was printed on 8 5 x 14 in B4 paper The front cover which was trimmed displays the entire image 2...

Страница 242: ...you achieve your desired output Problem solving Jam clearance Note The top covers cannot be opened during normal operation or when the machine is idle The covers can be opened only when an indicator i...

Страница 243: ...ompletely pushed in closed 8 Ensure that all covers on the SquareFold Trimmer Module are closed 9 If the SquareFold Trimmer Module Control Panel and or the machine s UI indicate there is a still a jam...

Страница 244: ...p 2 open the right cover of the finisher 4 Turn the knob 4a to the right and then remove the jammed paper 5 Close the left cover of the Trimmer unit 6 If you opened the right cover of the finisher in...

Страница 245: ...ocedure to clear jams when the E3 LED is lit on the SquareFold Trimmer Module control panel 1 Make sure that the machine is not in operation and press the button on the right cover of the Trimmer unit...

Страница 246: ...UI continues to reflect a fault jam go to the finisher Open the finisher Remove any jams Close the finisher cover s 2 Follow the instructions shown on the machine UI to resume printing 3 If fault per...

Страница 247: ...d Trimmer Module Remedy Perform the following 1 Open the Top Left and Right Covers of the SquareFold Trimmer Module 2 Carefully remove all sheets and paper scraps from jam clearance areas 3 Close the...

Страница 248: ...following 1 Open the Top Left and Right Covers of the SquareFold Trimmer Module 2 Carefully remove all sheets and paper scraps from jam clearance areas 3 Close the SquareFold Trimmer Module Top Left a...

Страница 249: ...Waste Container is full or has a fault Remedy Perform the following 1 Pull open the container and empty any trimmer scraps from it 2 Reinsert the container into the SquareFold Trimmer Module 3 Ensure...

Страница 250: ...machine 2 If fault persists call for service 013 227 Cause Jam or communication error with the SquareFold Trimmer Module Remedy Perform the following 1 Power off on the machine 2 If fault persists cal...

Страница 251: ...r off on the machine 2 If fault persists call for service 0013 234 Cause Jam or communication error with the SquareFold Trimmer Module Remedy Perform the following 1 Power off on the machine 2 If faul...

Страница 252: ...h the SquareFold Trimmer Module Remedy Perform the following 1 Power off on the machine 2 If fault persists call for service 013 241 Cause Jam or communication error with the SquareFold Trimmer Module...

Страница 253: ...s steps 7 If fault persists power off on the machine 8 If fault persists call for service 013 304 Cause A top cover is open Remedy Perform the following 1 Open the Top Left and Right Covers of the Squ...

Страница 254: ...paper scraps from jam clearance areas 3 Close the SquareFold Trimmer Module Top Left and Right Covers 4 Check the Trimmer Waste Container If full empty the container and reinsert it in the SquareFold...

Страница 255: ...einsert the container into the SquareFold Trimmer Module 3 Ensure that the container is fully pushed in and that the indicator light is not lit 4 If fault persists repeat the previous steps 5 If fault...

Страница 256: ...es both the Interface Cooling Module and the Booklet Maker Finisher Paper size 5 20 sheet booklet up to 80 imaged sides at 24 lb 90 gsm 5 25 sheet booklet up to 100 imaged sides at 200 lb 80 gsm Cut a...

Страница 257: ...the machine The Standard Finisher Plus supports a number of optional finishing devices ranging from light production print engines to futuristic devices that utilize other communication and physical i...

Страница 258: ...nishing Transport is built to support a number of finishing operations ranging from light production print engines to futuristic devices that utilize other communication and physical interfaces Finish...

Страница 259: ...selected such as Automatic sorting Collated Uncollated or Normal Top tray 6 The Stacker Tray is used for offset and or stapled output and can hold up to 2000 sheets of 20 lb 80 gsm paper This tray al...

Страница 260: ...with the Booklet Maker Finisher The C Fold and Z Fold options are available only with the C Z Folder These fold types are available Single Fold Bi Fold A Bi Fold has one fold which creates two panels...

Страница 261: ...s Inserter 1 If necessary remove any remaining media that is currently loaded in Tray 8 T1 2 Hold the center of the paper guides and slide them to their desired paper size 3 Load the paper tabs aligni...

Страница 262: ...the following components Function Component No The Finishing Transport serves as an interface to transfer paper from the Finisher Module and the attached third party output device Finishing Transport...

Страница 263: ...cation The Finishing Transport power is on and functioning properly ON Green Power indicator The Finishing Transport power is off OFF May be one of the following Paper jam indication Open front door O...

Страница 264: ...lways refer to www xerox com for the latest Customer Replaceable Units CRUs part numbers Store supply items and Xerox parts in their original packages in a convenient location Supply Unit Shipped with...

Страница 265: ...the staple cartridge from the unit 5 Push a new staple cartridge into the unit 6 Reinstall the cartridge unit to its original position in the finisher 7 Close the right cover on the finisher Note A me...

Страница 266: ...eplace the container 1 Make sure that the machine has stopped printing 2 Open the right cover on the finisher 3 Locate the Staple Waste Container R5 in the finisher and move the lock lever to the unlo...

Страница 267: ...the R5 handle area and push it into the machine Note To prevent injury do not put your fingers on top of the container 7 Push R5 until the lock lever moves to the locked position 8 Close the right cov...

Страница 268: ...the system is powered ON If you switch off the power when emptying the container the machine cannot detect that the container was emptied 1 Make sure that the machine has stopped printing 2 Open the...

Страница 269: ...will not operate if the right cover is open even slightly Problem solving Paper jams in the Finisher Module Paper jams in Tray 8 T1 Post Process Inserter 1 Press the Cover button 2 Open cover 1e and...

Страница 270: ...them again 4 Push cover 1e until you hear it click into place Note A message is displayed and the machine does not operate if the cover is open even slightly Paper jams inside the finisher left cover...

Страница 271: ...t 4 Return lever 1a to the original position 5 Close the finisher left cover completely Note The machine will not operate if the cover is open even slightly Paper jams at lever 1d 1 Make sure that the...

Страница 272: ...ve it 4 Move the lever 1d to the original position 5 Close the finisher left cover completely Note The machine will not operate if the cover is open even slightly Paper jams at lever 1b 1 Make sure th...

Страница 273: ...mpletely Note The machine will not operate if the cover is open even slightly Paper jams inside the finisher right cover Paper jams at lever 3b and 3d Tip Always ensure that all paper jams including a...

Страница 274: ...If paper is torn check inside the machine and remove it 4 Return the levers 3b and 3d to their original positions 5 Close the right cover on the finisher Note A message will display and the machine wi...

Страница 275: ...ith your print jobs 1 Make sure that the machine has stopped printing 2 Open the right cover on the finisher 3 Move the lever 3e and turn the knob 3c remove the jammed paper Note If paper is torn chec...

Страница 276: ...ays ensure that all paper jams including any small ripped pieces of paper are cleared before proceeding with your print jobs 1 Make sure that the machine has stopped printing 2 Open the right cover on...

Страница 277: ...per jams at lever 4b and knob 3a Tip Always ensure that all paper jams including any small ripped pieces of paper are cleared before proceeding with your print jobs 1 Make sure that the machine has st...

Страница 278: ...es how to remedy paper jams that occur at the following locations Paper jams at lever 2a and knob 3a Paper jams at lever 2b and knob 2c Remove jams at knob 2c levers 2e and 2f and the folder output tr...

Страница 279: ...paper is torn check inside the machine and remove it 4 Return the lever 2a to its original position 5 Close the right cover on the finisher Note A message will display and the machine will not operat...

Страница 280: ...proceeding with your print jobs 1 Make sure that the machine has stopped printing 2 Open the right cover on the finisher 3 Move the lever 2b and turn the knob 2c remove the jammed paper Note If paper...

Страница 281: ...s including any small ripped pieces of paper are cleared before proceeding with your print jobs 1 Make sure that the machine has stopped printing 2 Open the right cover on the finisher 3 Pull out the...

Страница 282: ...e to its original position and close the output tray 2d 6 Close the right cover on the finisher Note A message will display and the machine will not operate if the right cover is open even slightly Pa...

Страница 283: ...torn check inside the machine and remove it 4 Return the opened lever 2g to its original position and close the output tray 2d 5 Close the right cover on the finisher Note A message will display and...

Страница 284: ...rinting 2 Open the right cover on the finisher 3 Move the levers 4b and 4c remove the jammed paper Note If paper is torn check inside the machine and remove it 4 Return the opened levers 4b and 4c the...

Страница 285: ...finisher stacker tray Note Remedies differ according to the paper jam location Follow the instructions displayed to remove the jammed paper Paper jams at finisher top tray 1 Make sure that the machine...

Страница 286: ...check inside the machine and remove it 3 Open and close the finisher right cover Note The machine will not operate if the cover is open even slightly Paper jams in the Finishing Transport Paper jams i...

Страница 287: ...emove the jammed paper For a paper jam at the exit of the Finisher Module and the entry of the Finishing Transport remove it by pulling the paper towards the Finishing Transport 4 Return the green han...

Страница 288: ...Finishing Transport and remove it 1 Open the Finishing Transport front door 2 Grasp the green handle 2 and gently pull down and toward the right 3 Remove the jammed paper 4 If necessary rotate the gre...

Страница 289: ...jobs If paper is torn check inside the Finishing Transport and remove it 1 Open the Finishing Transport front door 2 Grasp the green handle 3 and gently pull toward the left 3 Remove the jammed paper...

Страница 290: ...Transport and remove it 1 Open the Finishing Transport front door 2 Grasp the green handle 4 and gently pull toward the right 3 Remove the jammed paper 4 Check for and remove any jammed paper between...

Страница 291: ...shown in the figure above contact our Customer Support Center Note Depending on the type of paper that is being stapled the stapled nails may be bent If the bent nails are stuck inside the machine the...

Страница 292: ...idge from the finisher 4 Check the inside of the finisher for any remaining staples and if necessary remove them 5 Open the staple cartridge unit as shown and remove the jammed staple Warning To avoid...

Страница 293: ...Remedy Perform the following Check for any obstructions or paper jams in the Finishing Module and Finishing Transport paper paths and clear them If necessary power Off On the machine and if necessary...

Страница 294: ...e Customer Support Center 013 911 Cause Paper jam at the transport exit sensor Finishing Transport Remedy Perform the following Check for any obstructions or paper jams in the Finishing Module and Fin...

Страница 295: ...jam Remedy Perform the following Check for any obstructions or paper jams in the Finishing Module and Finishing Transport paper paths and clear them If necessary power Off On the machine and if neces...

Страница 296: ...necessary power Off On the machine and if necessary resend restart your print job If the fault persists contact the Customer Support Center 051 108 Cause Paper jam Remedy Perform the following Check f...

Страница 297: ...stration clutch solenoid fault Remedy Perform the following If necessary power Off On the machine and if necessary resend restart your print job If the fault persists contact the Customer Support Cent...

Страница 298: ...ollowing Refer to any user documentation that came with your DFA device and follow the instructions to bring the device back online If necessary power Off On the machine and if necessary resend restar...

Страница 299: ...e System Administration Guide Profiles chapter for more information If necessary refer to the DFA user documentation for setting changing profile values If necessary power Off On the machine and if ne...

Страница 300: ...ive 7 25 x 10 5 in Booklet Tray optional Booklet Maker Finisher only Maximum 13 x 18 in SRA3 Minimum A4 SEF 8 5 x 11 in SEF Optional C Z Folder tray Supports A4 SEF and 8 5 x 11 in SEF Delivery to a s...

Страница 301: ...an A4 or 8 5 x 11 in the maximum number of sheets that can be stapled is 65 Staple nails may bend when using certain paper types Paper size Maximum A3 11 x 17 in Minimum B5 Executive 7 25 x 10 5 in St...

Страница 302: ...Capacity 64 80 gsm Uncoated 25 sheets 81 90 gsm Uncoated 20 sheets 91 105 gsm Uncoated 10 sheets 106 128 gsm Uncoated 10 sheets Coated 10 sheets 129 150 gsm Uncoated 10 sheets Coated 10 sheets 151 17...

Страница 303: ...ded 1 sheet Capacity Minimum 30 sheets When using Xerox 20 lb 75 gsm paper Paper type 16 24 lb 64 90 gsm Output tray C Z Folder tray C Fold Z Fold Finishing Transport specifications Specification Item...

Страница 304: ...User Guide 18 48 Standard Finisher Plus...

Страница 305: ...lt codes F Fault codes 12 10 Interface Module fault codes 14 9 OHCF fault codes SquareFold Trimmer Module 17 16 Fault History 8 3 Faults 8 3 Current Faults 8 3 Current Messages Fault History Current M...

Страница 306: ...intenance 9 1 replacing consumable supplies Customer Replaceable Units CRUs Media loading media in the optional OHCF 13 4 loading media in Trays 1 2 3 and 4 3 1 O Optional feeding devices 1 6 Optional...

Страница 307: ...13 9 SquareFold Trimmer Module 17 12 Standard Finisher Plus 18 13 R Replacing consumable supplies S Secure Print Jobs More tab Charge Print 7 4 Skew adjustment levers for trays 1 and 2 for trays A1 1...

Страница 308: ...2 Standard Booklet Maker Finisher 16 1 components 16 1 Stored Programming Supplies T Tab stock loading in the OHCF Trays 6 7 13 4 loading in Trays 3 and 4 3 4 Third party finishing devices 1 12 Tools...

Страница 309: ......

Страница 310: ......

Отзывы: