background image

Settings


102


Mobile hotspot and tethering 

Use the device as a mobile hotspot to share the device’s mobile data connection with 

other devices when the network connection is not available. Connections can be made 
via Wi-Fi, USB, or Bluetooth. 

On the Settings screen, tap Mobile hotspot and tethering

  You may incur additional charges when using this feature. 


Mobile hotspot: Use the mobile hotspot to share the device’s mobile data 
connection with computers or other devices. 


Bluetooth tethering: Use Bluetooth tethering to share the device’s mobile data 
connection with computers or other devices via Bluetooth. 


USB tethering: Use USB tethering to share the device’s mobile data connection with 
a computer via USB. When connected to a computer, the device is used as a 
wireless modem for the computer. 

Using the mobile hotspot


Use your device as a mobile hotspot to share your device’s mobile data connection with 

other devices. 

On the Settings screen, tap Mobile hotspot and tethering 

 Mobile 

hotspot

Tap the switch to activate it. 

The   icon appears on the status bar. Other devices can find your device in the Wi-

Fi networks list. 

To set a password for the mobile hotspot, tap MORE 

 Configure Mobile hotspot 

and select the level of security. Then, enter a password and tap SAVE

On the other device’s screen, search for and select your device from the Wi-Fi 
networks list. 

On the connected device, use the device’s mobile data connection to access the 
Internet. 

Содержание S7

Страница 1: ...ebsite www westech media user manuals If you would like any advice or assistance with regard to any part of your device please contact WESTECH via their website or by email email westechmediatechnologies com All WESTECH products come with a 1 year warranty This means that if your product becomes faulty within one year of purchase we will repair or replace your product Full details of our warranty ...

Страница 2: ... account 48 Transferring data from your previous device 51 Device and data management 53 Quick connect 57 Sharing features 58 Emergency mode Applications 59 Installing or uninstalling apps 61 Phone 65 Contacts 68 Messages 71 Internet 73 Email 74 Camera 95 Gallery 94 Blank 101 WESTECH Gear 102 Game Launcher 105 S Planner 106 S Health 109 S Voice 111 Voice Recorder 113 My Files 113 Memo 114 Clock 11...

Страница 3: ...134 Notifications 134 Do not disturb 135 Display 136 Advanced features 137 Wallpaper 138 Themes 138 Home screen 138 Lock screen and security 143 Privacy and safety 147 Easy mode 147 Accessibility 148 Accounts 148 Backup and reset 149 Language and input 150 Battery 150 Storage 151 Date and time 151 User manual 151 About device Appendix 152 Accessibility 167 Troubleshooting ...

Страница 4: ...ating system software Attempting to customise the operating system may cause the device or apps to work improperly Software sound sources wallpapers images and other media provided with this device are licensed for limited use Extracting and using these materials for commercial or other purposes is an infringement of copyright laws Users are entirely responsible for illegal use of media You may in...

Страница 5: ...upplied items are designed only for this device and may not be compatible with other devices Appearances and specifications are subject to change without prior notice You can purchase additional accessories from your local WESTECH retailer Make sure they are compatible with the device before purchase Use only WESTECH approved accessories Using unapproved accessories may cause the performance probl...

Страница 6: ...Basics 5 ...

Страница 7: ...lic material to the device If you cover the device s antenna area with your hands or other objects while using certain features such as calls or the mobile data connection Using a WESTECH approved screen protector is recommended Unapproved screen protectors may cause the sensors to malfunction Keys Key Function Power Press and hold to turn the device on or off Press to turn on or lock the screen ...

Страница 8: ... to adjust the device volume Battery Charging the battery Charge the battery before using it for the first time or when it has been unused for extended periods Use only WESTECH approved chargers batteries and cables Unapproved chargers or cables can cause the battery to explode or damage the device 1 Connect the USB cable to the USB power adaptor and then plug the end of the USB cable into the mul...

Страница 9: ...ning charging time may not be displayed when you charge the device in very cold or very hot conditions Reducing the battery consumption Your device provides various options that help you conserve battery power Optimise the device using the Smart manager When you are not using the device switch to sleep mode by pressing the Power key Activate power saving mode Close unnecessary apps Deactivate the ...

Страница 10: ...he device while the multipurpose jack is wet the device may be damaged Thoroughly dry the multipurpose jack before charging the device If the device is not charging properly contact WESTECH While charging the battery when the device is turned off the icon appears on the screen You cannot use the built in fast charging feature when you charge the battery using a standard battery charger If the devi...

Страница 11: ...ut Usage time left may vary depending on your device settings and operating conditions SIM or USIM card nano SIM card Installing the SIM or USIM card Insert the SIM or USIM card provided by the mobile telephone service provider Use caution not to lose or let others use the SIM or USIM card WESTECH is not responsible for any damages or inconveniences caused by lost or stolen cards Dual SIM models I...

Страница 12: ...Basics 11 Dual SIM models ...

Страница 13: ... damaged 2 Pull out the tray gently from the tray slot 3 Single SIM models Place the SIM or USIM card on the tray with the gold coloured contacts facing downwards Dual SIM models Place the SIM or USIM card on the tray with the gold coloured contacts facing downwards Place the primary SIM or USIM card on the tray 1 1 and the secondary SIM or USIM card on the tray 2 2 ...

Страница 14: ...ay is wet your device may be damaged Always make sure the tray is dry Fully insert the tray into the tray slot to prevent liquid from entering your device Correct card installation Single SIM models Nano SIM card microSD card Use only a nano SIM card You cannot insert a nano SIM card and a microSD card in tray 2 at the same time If you have any trouble inserting your Nano SIM or Memory card contac...

Страница 15: ... Removing the SIM or USIM card 1 Insert the ejection pin into the hole on the tray to loosen the tray 2 Pull out the tray gently from the tray slot 3 Remove the SIM or USIM card Single SIM models Dual SIM models ...

Страница 16: ...o specific cards On the Home screen tap Apps Settings SIM card manager and set the feature preferences for your cards in Preferred SIM card Memory card microSD card Installing a memory card Your device accepts memory cards with maximum capacities of 200 GB Depending on the memory card manufacturer and type some memory cards may not be compatible with your device Some memory cards may not be fully ...

Страница 17: ...Basics 16 When inserting a memory card into the device the memory card s file directory appears in the My Files SD card folder ...

Страница 18: ...he ejection pin is perpendicular to the hole Otherwise the device may be damaged 2 Pull out the tray gently from the tray slot When you remove the tray from the device the mobile data connection will be disabled 3 Place a memory card on the tray 2 with the gold coloured contacts facing downwards ...

Страница 19: ...ngs Storage SD card Unmount 1 Insert the ejection pin into the hole on the tray to loosen the tray 2 Pull out the tray gently from the tray slot 3 Remove the memory card 4 Insert the tray back into the tray slot Do not remove the memory card while the device is transferring or accessing information Doing so can cause data to be lost or corrupted or damage to the memory card or device WESTECH is no...

Страница 20: ...ata via a USB connection for more information Connecting a USB peripheral device Plug the USB connector into the multipurpose jack of your device and connect the USB peripheral device to the USB connector Some USB peripheral devices may not be compatible with your device Turning the device on and off Press and hold the Power key for a few seconds to turn on the device When you turn on your device ...

Страница 21: ...se to the edges of the screen which are outside of the touch input area Leaving the touchscreen idle for extended periods may result in afterimages screen burn in or ghosting Turn off the touchscreen when you do not use the device It is recommended to use fingers when you use the touchscreen Tapping To open an app to select a menu item to press an on screen button or to enter a character using the...

Страница 22: ...position Double tapping Double tap on a webpage or image to zoom in Double tap again to return Swiping Swipe to the left or right on the Home screen or the Apps screen to view other panels Swipe upwards or downwards to scroll through a webpage or a list of items such as contacts ...

Страница 23: ...t Pinch to zoom out Home screen Home screen The Home screen is the starting point for accessing all of the device s features It displays widgets shortcuts to apps and more To view other panels swipe to the left or right The Home screen may appear differently depending on the region or service provider ...

Страница 24: ... add widgets to the Home screen and more Wallpapers Change the wallpaper settings for the Home screen and the locked screen Widgets Add widgets to the Home screen Widgets are small apps that launch specific app functions to provide information and convenient access on your Home screen Themes Change the device s theme Visual elements of interface such as colours icons and wallpapers will change dep...

Страница 25: ...ps to the shortcuts area at the bottom of the Home screen To move the item to another panel drag it to the side of the screen To move an item more easily tap and hold an item and drag it to Move apps at the top of the screen The item will move to the panel at the top of the screen Swipe to the left or right to move to another panel and drag the item to a new location Removing items Tap and hold an...

Страница 26: ...lder to the Home screen tap the folder and then drag an app to the Home screen To delete apps in a folder tap the folder and then drag the app you want to delete to Remove at the top of the screen Managing panels On the Home screen tap and hold an empty area to add move or remove a panel To add a panel swipe to the left and then tap To move a panel tap and hold a panel preview and then drag it to ...

Страница 27: ... panel drag it to the side of the screen Creating folders Create folders and gather similar applications to quickly access and launch apps you want This feature may not be available depending on the region or service provider 1 On the Apps screen tap EDIT 2 Tap and hold an app and then drag it over another app 3 Drop the app when a folder frame appears around the apps A new folder containing the s...

Страница 28: ...ARCH and enter characters The device will search for and display the items containing the characters you entered Indicator icons Indicator icons appear on the status bar at the top of the screen The icons listed in the table below are most common The status bar may not appear at the top of the screen in some apps To display the status bar drag down from the top of the screen Icon Meaning No signal...

Страница 29: ... if the device is not used for a specified period The screen is locked with Swipe the default screen lock method Press the Power key or the Home key and swipe in any direction to unlock the screen To change the screen lock method on the Apps screen tap Settings Lock screen and security Screen lock type and then select a method When you set a pattern PIN or password for the screen lock method you c...

Страница 30: ...unlock code incorrectly several times in a row and reach the attempt limit On the Apps screen tap Settings Lock screen and security Secure lock settings and tap the Auto factory reset switch to activate it Notification panel Using the notification panel When you receive new notifications such as messages or missed calls indicator icons appear on the status bar To see more information about the ico...

Страница 31: ...ons Clear all notifications Access the notification settings Dual SIM models View more quick setting buttons Quick setting buttons Launch Settings Adjust the brightness Launch Quick connect SIM and USIM card feature preferences Tap to access the SIM card manager Tap a notification and perform various actions Clear all notifications Access the notification settings ...

Страница 32: ... in the search field or tap and say a keyword To get more refined results tap Filter under the search field and then select filter details Setting search categories You can set search categories to search for content in specific search fields Tap MORE Select search locations and select categories Entering text Keyboard layout A keyboard appears automatically when you enter text to send messages cr...

Страница 33: ...board layout to On 3x4 keyboard a key has three or four characters To enter a character tap the corresponding key repeatedly until the desired character appears Additional keyboard functions Tap and hold to use various functions Other icons may appear instead of the icon depending on the last function that was used Enter text by voice Open the keyboard Add an item from the clipboard Enter emoticon...

Страница 34: ...nload it 3 View the definition in the dictionary pop up window To switch to the full screen view tap Tap the definition on the screen to view more definitions In the detailed view tap to add the word to your favourite words list or tap Search Web to use the word as a search term Screen capture Capture a screenshot while using the device Capturing screenshots Press and hold the Home key and the Pow...

Страница 35: ...web page The screen will automatically scroll down and more content will be captured Share Share the screenshot Crop Crop a portion from the screenshot Opening apps On the Home screen or the Apps screen select an app icon to open it To open an app from the list of recently used apps tap and select a recent app window Closing an app Tap and drag a recent app window to the left or right to close it ...

Страница 36: ...pen the list of recently used apps 2 Swipe upwards or downwards and tap on a recent app window The selected app will launch in the upper window 3 Swipe to the left or right to select another app to launch You can also launch the split screen view by tapping and holding ...

Страница 37: ...he app windows to access the following options Switch locations between app windows Drag and drop text or copied images from one window to another Tap and hold an item in the selected window and drag it to a location in another window Some apps may not support this feature Minimise the window Maximise the window Close the app ...

Страница 38: ...ize of the windows Pop up view 1 On the Apps screen launch an app to use in the pop up view 2 Drag down diagonally from either end of the top edge The app screen will appear in the pop up view Moving pop up windows To move a pop up window tap and hold the circle on a window and drag it to a new location ...

Страница 39: ...nts WESTECH account Help Registering your WESTECH account Registering a new WESTECH account If you do not have a WESTECH account you should create one 1 On the Apps screen tap Settings Accounts Add account 2 Tap WESTECH account CREATE ACCOUNT 3 Follow the on screen instructions to complete creating your account Registering an existing WESTECH account If you already have a WESTECH account register ...

Страница 40: ...appears tap Smart Switch START Your device will recognise the previous device and a list of data you can transfer will appear 4 Follow the on screen instructions to transfer data from the previous device Do not disconnect the USB cable or USB connector from the device when you are transferring files Doing so may cause data loss or device damage Transferring data with the USB connector increases th...

Страница 41: ...nd reset Open Smart Switch 4 On your device select the previous device type from the list and tap START 5 Follow the on screen instructions to transfer data from your previous device Transferring backup data from a computer Back up data from your previous device to a computer and import the data to your device 1 On the computer visit www WESTECH com smartswitch to download Smart Switch 2 On the co...

Страница 42: ...ter for data transfer Move audio video image or other types of files from the device to the computer or vice versa Do not disconnect the USB cable from the device when you are transferring files Doing so may cause data loss or device damage The devices may not connect properly if they are connected via a USB hub Directly connect the device to the computer s USB port 1 Connect the device to the com...

Страница 43: ...oad and install Smart Switch 2 On the computer launch Smart Switch 3 Connect the device to the computer using a USB cable 4 If a software update is available follow the on screen instructions to update the device Do not turn off the computer or disconnect the USB cable while the device is updating While updating the device do not connect other media devices to the computer Doing so may interfere w...

Страница 44: ...ation On the Apps screen tap Settings Backup and reset Factory data reset RESET DEVICE ERASE EVERYTHING The device automatically restarts Quick connect Introduction Quickly search for and connect with nearby devices such as Bluetooth headsets or TVs using the Quick connect feature If the device you want to connect does not support the Quick connect feature activate its Wi Fi Direct or Bluetooth fe...

Страница 45: ...p Scan for nearby devices 3 Select a device from the list of detected devices 4 Tap Share content and select a media category 5 Follow the on screen instructions to send content to the connected device The next steps may vary depending on the selected media category Connecting to a TV Connect your device and a TV to view the device s content on the larger screen You may be able to use more feature...

Страница 46: ...cording to the preset time set on your device and to display the time weather and your schedule information on the screen To use this feature your device and the TV must be connected to the same access point Register TV Deregister TV Register the TV to your device to use additional features such as Control TV and Briefing on TV Some files may be buffered during playback depending on the connection...

Страница 47: ...ne numbers or if their devices do not support the feature a link to the files will be sent to them via text message The link will expire after a certain period Smart View View your device s displayed content on a larger screen via a wireless connection Nearby sharing Share content with nearby devices via Wi Fi Direct Bluetooth and more Print Print content using the printer plug ins installed on th...

Страница 48: ...all information in a message Browse the Internet Add more apps to use Remaining battery power and usage time left Make an emergency call The usage time left shows the time remaining before the battery power runs out Usage time left may vary depending on your device settings and operating conditions Deactivating emergency mode To deactivate emergency mode tap MORE Disable Emergency mode Alternative...

Страница 49: ... information about it To download free apps tap INSTALL To purchase and download apps where charges apply tap the price and follow the on screen instructions To change the auto update settings tap MORE Settings Auto update apps and then select an option Play Store Purchase and download apps Tap Play Store on the Apps screen Installing apps Browse apps by category or search for apps by keyword Sele...

Страница 50: ...n tap ENABLE Setting app permissions For some apps to operate properly they may need permission to access or use information on your device When you open an app a pop up window may appear and request access to certain features or information Tap ALLOW on the pop up window to grant permissions to the app To view your app permission settings open the Apps screen and tap Settings Applications Applica...

Страница 51: ...hone on the Apps screen 2 Enter a phone number If the keypad does not appear on the screen tap to open the keypad 3 Single SIM models Tap to make a video call Access additional options Add the number to the contacts list Preview the phone number Delete a preceding character ...

Страница 52: ...speed dial number on the keypad For speed dial numbers 10 and up tap the first digit s of the number and then tap and hold the last digit For example if you set the number 123 as a speed dial number tap 1 tap 2 and then tap and hold 3 Making calls from the locked screen On the locked screen drag outside the large circle Making calls from call logs or contacts list Tap LOG or CONTACTS and then swip...

Страница 53: ...a call comes in drag outside the large circle To send a message when rejecting an incoming call drag the reject message bar upwards To create various rejection messages open the Apps screen tap Phone MORE Settings Call blocking Call reject messages enter a message and then tap Missed calls If a call is missed the icon appears on the status bar Open the notification panel to view the list of missed...

Страница 54: ... a call Tap RESUME CALL to retrieve the held call Add call Dial a second call Extra volume Increase the volume Bluetooth Switch to a Bluetooth headset if it is connected to the device Speaker Activate or deactivate the speakerphone When using the speakerphone speak into the microphone at the top of the device and keep the device away from your ears Keypad Hide Open or close the keypad Mute Turn of...

Страница 55: ...g contacts manually 1 Tap Contacts on the Apps screen 2 Tap and select a storage location 3 Enter contact information Add an image Add or delete a contact field 4 Tap SAVE To add a phone number to the contacts list from the keypad open the Apps screen and tap Phone If the keypad does not appear on the screen tap to open the keypad Enter the number and tap Add to Contacts To add a phone number to t...

Страница 56: ...urite contacts Make a voice or video call Compose a message Compose an email Sharing profile Share your profile information such as your photo and status message with others using the profile sharing feature This feature may not be available depending on the region or service provider This feature is only available for contacts who have activated the profile sharing feature on their device On the ...

Страница 57: ... screen 2 Tap MORE Share 3 Tick contacts and tap SHARE 4 Select a sharing method Messages Introduction Send and view messages by conversation Sending messages You may incur additional charges for sending messages when you are roaming 1 Tap Messages on the Apps screen 2 Tap 3 Add recipients and enter a message Single SIM models ...

Страница 58: ...Select contacts from the contacts list Send the message Enter emoticons Dual SIM models Access additional options Select contacts from the contacts list 4 Single SIM models Tap SEND to send the message Dual SIM models Tap or to send the message ...

Страница 59: ...ck list 1 Tap Messages on the Apps screen 2 Tap MORE Settings Block messages 3 Tap Block list To add phrases to block tap Blocked phrases 4 Tap INBOX or CONTACTS to select contacts and tap To manually enter a number tap Enter number and then enter a phone number When you receive messages from the blocked numbers or messages including blocked phrases you will not be notified To view blocked message...

Страница 60: ...minder You can set an alert at an interval to let you know that you have unchecked notifications If this feature is not activated open the Apps screen tap Settings Accessibility Notification reminder and then tap the switch to activate it Then tap the Messages switch to activate it Internet Introduction Browse the Internet to search for information and bookmark your favourite webpages to access th...

Страница 61: ...ng secret mode In the toolbar at the bottom of the screen tap Tabs ENABLE SECRET If you are using this feature for the first time set whether to use a password for secret mode In secret mode you cannot use some features such as screen capture In secret mode the device will change the colour of the toolbars Changing security settings You can change your password or the lock method Tap MORE Settings...

Страница 62: ...nt you can set one as the default account Tap MORE Settings MORE Set default account Sending emails 1 Tap to compose an email 2 Add recipients and enter an email text 3 Tap SEND to send the mail Reading emails When Email is open the device will automatically retrieve new emails To manually retrieve emails swipe downwards on the screen Tap an email on the screen to read it If email syncing is disab...

Страница 63: ...iew screen where the camera should focus 2 Tap to take a photo or tap to record a video To take a series of photos tap and hold Spread two fingers apart on the screen to zoom in and pinch to zoom out To adjust the brightness of photos or videos tap the screen When the adjustment bar appears drag the adjustment bar towards or To capture an image from the video while recording tap Capture To change ...

Страница 64: ...ag outside the large circle This feature may not be available depending on the region or service provider Some camera features are not available when you launch Camera from the locked screen while the security features are activated Launching Camera quickly Press the Home key twice quickly to launch Camera Some camera features are not available when you launch Camera from the locked screen or when...

Страница 65: ...it to a new location To add mode shortcuts to the Home screen tap MORE Add shortcut on home screen Auto mode Auto mode allows the camera to evaluate the surroundings and determine the ideal mode for the photo On the preview screen tap MODE Auto Pro mode Take photos while manually adjusting various shooting options such as exposure value and ISO value On the preview screen tap MODE Pro Select optio...

Страница 66: ...e a higher exposure If the shutter speed is set manually you cannot change the exposure value The exposure value will change and be displayed based on the shutter speed setting Saving the current setting as a custom setting On the preview screen tap Custom Save current settings select a name and then tap SAVE To apply the saved settings to the camera open the preview screen tap Custom and then sel...

Страница 67: ... focus area Selective focus Use the out of focus effect to make specific objects stand out in a photo 1 On the preview screen tap MODE Selective focus 2 Tap the image on the preview screen where the camera should focus 3 Tap to take a photo 4 Tap the preview thumbnail 5 Tap and select one of the following ...

Страница 68: ... affected in the following conditions The device or the subject is moving There is strong background light low levels of light or you are taking photos indoors The subject or background has no pattern or consists of a plain colour Panorama Take a series of photos horizontally or vertically and then stitch them together to create a wide scene On the preview screen tap MODE Panorama To take a motion...

Страница 69: ...o save the motion panorama as a video file tap SAVE VIDEO Video Collage Record videos to create a unique video collage You can edit the videos and share them with others 1 On the preview screen tap MODE Video Collage 2 Tap and select a collage type under the screen ratio you want to use To record a video to view it in a slow motion video collage select a collage type under Slow motion collage You ...

Страница 70: ...Live broadcast Record and share live videos of your special moments Invite your family and friends to watch your live broadcast For more information about the YouTube broadcast feature refer to YouTube s help menu This feature may not be available depending on the region or service provider You may incur additional charges for broadcasting via the mobile network Before you start You must sign into...

Страница 71: ...new name 4 To set your broadcast as public or private tap Settings Privacy 5 Tap Invite and select contacts or manually enter phone numbers When the broadcast starts the video link will be sent to the selected contacts via message The invited contacts can watch the broadcast by tapping the link 6 Tap to start broadcasting To invite more people during your broadcast tap Share and select a sharing m...

Страница 72: ...d in slow motion 1 On the preview screen tap MODE Slow motion 2 Tap to start recording 3 When you are finished recording tap to stop 4 On the preview screen tap the preview thumbnail 5 Tap The video will start playing with a randomly set slow motion section Editing slow motion sections 1 On the preview screen tap the preview thumbnail 2 Tap The video will start playing with a randomly set slow mot...

Страница 73: ...e video 8 Tap EXPORT to save the video Virtual shot Take a series of photos while circling a subject to create a view of the subject from multi angles You can view the subject from different angles by dragging your finger left or right on the photo 1 On the preview screen tap MODE Virtual shot 2 Place a subject in the centre of the preview screen and tap 3 Move the device around the subject slowly...

Страница 74: ... slowly swivel the device left or right to view the subject from different angles Food Take photos of food with more vibrant colours 1 On the preview screen tap MODE Food 2 Tap the screen and drag the circular frame over the area to highlight The area outside the circular frame will be blurred To resize the circular frame drag a corner of the frame ...

Страница 75: ...ate 1 On the preview screen tap MODE Hyperlapse 2 Tap and select a frame rate option If you set the frame rate to Auto the device will automatically adjust the frame rate according to the changing rate of the scene 3 Tap to start recording 4 Tap to finish recording 5 On the preview screen tap the preview thumbnail and tap to view the video Selfie Take self portraits with the front camera You can p...

Страница 76: ...ie flash When taking self portraits with the front camera in low light situations the touchscreen can serve as a flash On the preview screen tap repeatedly until you reach On When you take a photo the touchscreen will flash Applying beauty effects You can apply the spotlight effect or modify facial features such as your skin tone or face shape before taking self portraits This feature is available...

Страница 77: ...ude more people in the photo and avoid leaving people out 1 On the preview screen tap to switch to the front camera for self portraits 2 Tap MODE Wide selfie 3 Face the front camera lens 4 When the device detects your face tap the sensor on the back of the device to take a photo of yourself Alternatively show your palm to the front camera After recognising your palm a countdown timer will appear W...

Страница 78: ...n tap MODE DOWNLOAD Some downloaded shooting modes do not have access to every feature Camera settings Quick settings On the preview screen use the following quick settings The available options may vary depending on the shooting mode and which camera is being used Select a filter effect to use when taking photos or recording videos To set whether to display certain effects on the list or rearrang...

Страница 79: ...lages featuring the slow motion effect Select a frame rate Select the length of the delay before the camera automatically takes a photo Activate or deactivate the flash Select a resolution for photos Using a higher resolution will result in higher quality photos but they will take up more memory The resolution of a photo may be affected by lighting conditions when taking photos with the front came...

Страница 80: ...rs or patterns on the subject and the background are the same The subject includes horizontal patterns such as blinds The camera shakes excessively The video resolution is high Video stabilisation Activate anti shake to reduce or eliminate blurry image resulting from camera shake while recording a video Grid lines Display viewfinder guides to help composition when selecting subjects Location tags ...

Страница 81: ...ved in two formats DNG and JPG Burst shot photos are only saved as JPG files You can view JPG files in Gallery DNG files can be viewed or deleted in the DCIM Camera folder Storage location Select the memory location for storage Volume keys function Set the device to use the Volume key to control the shutter or zoom function Reset settings Reset the camera settings Gallery Introduction View and man...

Страница 82: ...previous screen Access additional options Add the image to favourites Share the image with others Modify the image Automatically adjust the image Delete the image To hide or show the menus tap the screen Viewing videos options 1 2 ...

Страница 83: ...eleting images or videos Deleting an image or a video Select an image or a video and tap Delete at the bottom of the screen Deleting multiple images and videos 1 On the main Gallery screen tap and hold an image or a video to delete 2 Tick the images or videos to delete 3 Tap DELETE Sharing images or videos Select an image or a video tap Share at the bottom of the screen and then select a sharing m...

Страница 84: ...ink to the files will be sent to them via text message Link recipients may not be able to use some features The link will expire after a certain period Gear WESTECH S7 is compatible with some Gear devices You will need the Gear app that allows you to manage your Gear wearable device When you connect your device to the Gear you can customise the Gear s settings and apps On the Apps screen tap WESTE...

Страница 85: ...s Game Launcher and tap the switch to activate it Game Launcher will be added to the Home screen and the Apps screen When you deactivate the feature Game Launcher will be removed from the Home screen and the Apps screen 2 On the Apps screen tap Game Launcher 3 Tap a game from the games list Games downloaded from Play Store and Galaxy Apps will be automatically shown on the game launcher screen If ...

Страница 86: ...he resolution and frame rate Battery power efficiency may vary by game Using Game Tools You can set the Game Tools icon to be displayed as a floating icon on game screens On the Apps screen tap Settings Advanced features Games Game Tools and tap the switch to activate it While playing a game tap to display the game tools To move the icon tap and drag it to a new location To remove the icon from th...

Страница 87: ...n enjoy your games without being disturbed If you receive an incoming call a small notification will appear at the top of the screen S Planner Introduction Manage your schedule by entering upcoming events or tasks in your planner Creating events 1 Tap S Planner on the Apps screen 2 Tap or double tap a date If the date already has saved events or tasks in it tap the date and tap 3 Enter event detai...

Страница 88: ... service and then tap the Sync Calendar switch to sync events and tasks with the account To add accounts to sync with open the Apps screen and tap S Planner MORE Manage calendars Add account Then select an account to sync with and sign in When an account is added it will appear on the list S Health Introduction S Health helps you manage your wellness and fitness Set fitness goals check your progre...

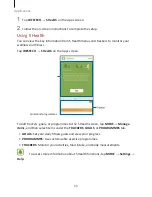
Страница 89: ...CH S Health on the Apps screen Goals and programmes To add trackers goals or programmes to the S Health screen tap MORE Manage items and then select items under the TRACKERS GOALS or PROGRAMMES tab GOALS Set your daily fitness goals and view your progress PROGRAMMES Use customisable exercise programmes TRACKERS Monitor your activities food intake and body measurements To access more information ab...

Страница 90: ...ion may be stored until the completion of such purposes You can delete personal data stored by S Health by using the Reset data option in the Settings menu To delete any data you have shared with social networks or transferred to storage devices you must delete them separately You may share and or sync your data with additional WESTECH services or compatible third party services that you select as...

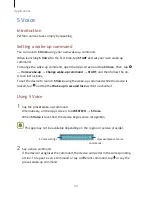
Страница 91: ...vice to launch S Voice using the wake up command while the device is locked tap and tap the Wake up in secured lock switch to activate it Using S Voice 1 Say the preset wake up command Alternatively on the Apps screen tap WESTECH S Voice When S Voice is launched the device begins voice recognition This app may not be available depending on the region or service provider S Voice settings View examp...

Страница 92: ...ndings or how you speak Setting the language On the Apps screen tap WESTECH S Voice Language and then select a language The selected language is applied to S Voice only not to the language displayed on the device Voice Recorder Introduction Use different recording modes for various situations such as in an interview The device can convert your voice to text and distinguish between sound sources Ma...

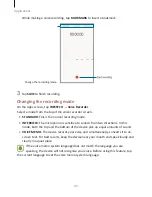
Страница 93: ...rophone is sensitive to sounds from two directions In this mode both the top and the bottom of the device pick up equal amounts of sound VOICE MEMO The device records your voice and simultaneously converts it to on screen text For best results keep the device near your mouth and speak loudly and clearly in a quiet place If the voice memo system language does not match the language you are speaking...

Страница 94: ...ound sources tap for the corresponding direction that sound is to be muted The icon will change to Muted sound source Unmuted sound source My Files Access and manage various files stored in the device or in other locations such as cloud storage services On the Apps screen tap WESTECH My Files View files by category or view files stored in the device or a cloud storage service To check the status o...

Страница 95: ...t You can select pen thickness and colour Voice Make a voice recording to insert To save the memo tap SAVE To edit a memo tap a memo and then tap the content of the memo Searching for memos Tap SEARCH on the memos list and enter a keyword to search for memos that include the keyword Clock Introduction Set alarms check the current time in many cities around the world time an event or set a specific...

Страница 96: ... SNOOZE to repeat the alarm after a specified length of time Deleting alarms Tap on an alarm in the list of alarms World clock On the Apps screen tap Clock World clock Creating clocks Enter a city name or select a city from the globe and then tap Deleting clocks Tap on a clock Stopwatch 1 On the Apps screen tap Clock Stopwatch 2 Tap START to time an event To record lap times while timing an event ...

Страница 97: ...play the scientific calculator To see the calculation history tap HISTORY To close the calculation history panel tap KEYPAD To clear the history tap HISTORY CLEAR HISTORY Google apps Google provides entertainment social network and business apps You may require a Google account to access some apps Refer to Accounts for more information To view more app information access each app s help menu Some ...

Страница 98: ...y Movies TV Download videos to watch from Play Store Drive Store your content on the cloud access it from anywhere and share it with others YouTube Watch or create videos and share them with others Photos Search for manage and edit all your photos and videos from various sources in one place Hangouts Chat with your friends individually or in groups and use images emoticons and video calls while yo...

Страница 99: ...our device uses a non harmonised frequency and is intended for use in all European countries The WLAN can be operated in the EU without restriction indoors but cannot be operated outdoors Turn off Wi Fi to save the battery when not in use 1 On the Settings screen tap Wi Fi and then tap the switch to activate it 2 Select a network from the Wi Fi networks list Networks that require a password appear...

Страница 100: ...vices will be connected when the other device accepts the Wi Fi Direct connections request Sending and receiving data You can share data such as contacts or media files with other devices The following actions are an example of sending an image to another device 1 Tap Gallery on the Apps screen 2 Select an image 3 Tap Share Wi Fi Direct and select a device to transfer the image to 4 Accept the Wi ...

Страница 101: ...th feature for illegal purposes for example pirating copies of files or illegally tapping communications for commercial purposes WESTECH is not responsible for the repercussion of illegal use of the Bluetooth feature Pairing with other Bluetooth devices 1 On the Settings screen tap Bluetooth and then tap the switch to activate it The detected devices are listed 2 Select a device to pair with If th...

Страница 102: ...e auto generated passkey If the device you want to pair with is not in the list request that the device turns on its visibility option 4 Accept the Bluetooth connection request on the other device Unpairing Bluetooth devices 1 Tap Bluetooth on the Settings screen The device displays the paired devices in the list 2 Tap next to the device name to unpair 3 Tap Unpair Flight mode This disables all wi...

Страница 103: ...SB tethering to share the device s mobile data connection with a computer via USB When connected to a computer the device is used as a wireless modem for the computer Using the mobile hotspot Use your device as a mobile hotspot to share your device s mobile data connection with other devices 1 On the Settings screen tap Mobile hotspot and tethering Mobile hotspot 2 Tap the switch to activate it Th...

Страница 104: ...et mobile data limit switch to activate it 2 Drag the limit adjustment bar upwards or downwards to set the limit 3 Drag the warning adjustment bar upwards or downwards to set a data usage alert level The device will alert you when the warning level is reached SIM card manager dual SIM models Activate your SIM or USIM cards and customise the SIM card settings Refer to Using dual SIM or USIM cards d...

Страница 105: ... Your device allows you to read near field communication NFC tags that contain information about products You can also use this feature to make payments and buy tickets for transportation or events after downloading the required apps The device contains a built in NFC antenna Handle the device carefully to avoid damaging the NFC antenna Using the NFC feature Use the NFC feature to send images or c...

Страница 106: ...vice s NFC antenna 1 On the Settings screen tap NFC and payment and then tap the switch to activate it 2 Tap Android Beam and tap the switch to activate it 3 Select an item and touch the other device s NFC antenna to your device s NFC antenna 4 When Touch to beam appears on the screen tap your device s screen to send the item If both devices try to send data simultaneously the file transfer may fa...

Страница 107: ...es larger than 30 MB faster via Wi Fi and mobile networks simultaneously Refer to Download booster for more information VPN Set up and connect to virtual private networks VPNs Printing Configure settings for printer plug ins installed on the device You can connect the device to a printer via Wi Fi or Wi Fi Direct and print images or documents Some printers may not be compatible with the device Add...

Страница 108: ...e via MirrorLink When using this feature for the first time connect the device to a Wi Fi or mobile network 1 Pair your device with a vehicle via Bluetooth Refer to Pairing with other Bluetooth devices for more information 2 Connect your device to the vehicle using a USB cable When they are connected access your device s MirrorLink apps on the head unit monitor Ending the MirrorLink connection Unp...

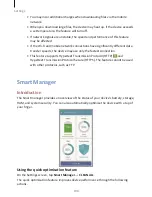
Страница 109: ...device may use only the fastest connection This feature supports Hypertext Transmission Protocol HTTP 1 1 and Hypertext Transmission Protocol Secure HTTPS The feature cannot be used with other protocols such as FTP Smart Manager Introduction The Smart manager provides an overview of the status of your device s battery storage RAM and system security You can also automatically optimise the device w...

Страница 110: ...the battery To save battery power by setting whether to optimise the battery usage for each app tap DETAILS for the app power saving and tap the App power saving switch to activate it You can set the device to charge the battery more quickly Tap the Fast cable charging switch to activate it Storage Check the status of the used and available memory On the Settings screen tap Smart Manager Storage M...

Страница 111: ...e device to use sound mode or silent mode Vibrate while ringing Set the device to vibrate and play a ringtone for incoming calls Volume Adjust the volume level for call ringtones music and videos system sounds and notifications Vibration intensity Adjust the force of the vibration notification Ringtone Change the ringtone settings Vibration pattern Select a vibration pattern Notification sounds Se...

Страница 112: ...e allowed list when Do not disturb is activated Previews in pop ups Display notification previews in pop up windows Hide on lock screen Hide notifications from the selected app when the device is locked Hide content on lock screen Hide the content of notifications from the selected app when the device is locked More settings Customise additional notification settings for the selected app Do not di...

Страница 113: ... indicator while the battery is charging when you have notifications or when you make voice recordings Keep screen turned off Set the device to prevent the screen from turning on when it is in a dark place such as a pocket or bag Screensaver Set the device to launch a screensaver when the device is charging or connected to a dock Always on display You can set the device to display information such...

Страница 114: ...p view for more information Smart capture Set the device to capture content that continues across multiple screens and crop and share the screenshot immediately Refer to Smart capture for more information Palm swipe to capture Set the device to capture a screenshot when you swipe your hand to the left or right across the screen You can view the captured images in Gallery It is not possible to capt...

Страница 115: ...urity Options Change the settings for securing the device and the SIM or USIM card On the Settings screen tap Lock screen and security The available options may vary depending on the screen lock method selected Screen lock type Change the screen lock method Info and app shortcuts Change settings for the items displayed on the locked screen Notifications on lock screen Set whether or not to show no...

Страница 116: ...able this setting before resetting the device Other security settings Configure additional security settings Privacy and safety Options Change the settings for maintaining your privacy and safety On the Settings screen tap Privacy and safety Location Change settings for location information permissions App permissions View the list of features and apps that have permission to use them You can also...

Страница 117: ... Hiding content 1 On the Apps screen launch an app to hide items 2 Select an item and tap MORE Move to Private If private mode is not activated follow the on screen instructions to enter the preset private mode access code The selected items will be moved to the private folder Viewing hidden content You can view hidden items only when private mode is activated 1 On the Settings screen tap Privacy ...

Страница 118: ...isable option is enabled the device will fail to transfer files to the private folder if the screen turns off during transfer Send SOS messages In an emergency situation quickly press the Power key three times The device sends messages to your emergency contacts The messages include your location information 1 On the Settings screen tap Privacy and safety Send SOS messages and then tap the switch ...

Страница 119: ...ings screen tap Easy mode Easy mode 2 Select apps under Easy applications to apply a simpler layout 3 Tap DONE Returning to standard mode Swipe to the left on the Home screen and tap Settings Easy mode Standard mode DONE Managing shortcuts To add a shortcut to an app to the Home screen swipe to the left tap and then select an app To add a shortcut to a contact on the Home screen swipe to the right...

Страница 120: ...ount Backup and reset Change the settings for managing settings and data On the Settings screen tap Backup and reset Open Smart Switch Launch Smart Switch and transfer data from your previous device Refer to Transferring data from your previous device for more information Back up my data Back up your personal information and app data to the WESTECH server You can also set the device to automatical...

Страница 121: ...WESTECH keyboard Change the WESTECH keyboard settings Google voice typing Change the voice input settings Text to speech Change the text to speech settings Pointer speed Adjust the pointer speed for the mouse or trackpad connected to your device Battery View battery power information and change power saving options On the Settings screen tap Battery The usage time left shows the time remaining bef...

Страница 122: ...ormation for your device On the Settings screen tap Storage The actual available capacity of the internal memory is less than the specified capacity because the operating system and default apps occupy part of the memory The available capacity may change when you update the device Date and time Access and alter the following settings to control how the device displays the time and date On the Sett...

Страница 123: ...Settings 122 On the Settings screen tap User manual About device Access device information edit the device name or update device software On the Settings screen tap About device ...

Страница 124: ...activate it Then select an accessibility menu to open when you press the Home key three times quickly You can access the following accessibility menus Accessibility Voice Assistant Universal switch Magnifier window Negative colours Greyscale Colour adjustment Interaction control Voice Assistant Voice feedback Activating or deactivating Voice Assistant When you activate Voice Assistant the device w...

Страница 125: ...elected items are read aloud when you hear the item you want release your finger from the item Then tap anywhere on the screen twice quickly Double tapping and holding the screen Move an item or access an available option Swiping to the left Move to the previous item Swiping to the right Move to the next item Swiping upwards or downwards Change the most recent contextual menu settings In text sele...

Страница 126: ...ed screen Unlock the screen Swiping downwards from the top of the screen Open the notification panel Three finger gestures Tapping Start reading items aloud from the top Tapping twice Start reading from the next item Tapping three times Read the last selected text and copy it to the clipboard Swiping to the left or right Open the contextual menu and scroll through the options Swiping upwards or do...

Страница 127: ...n altered pitch while using a keyboard Keyboard feedback Set the device to read aloud the item under your finger while using a keyboard Speak while screen off Set the device to read aloud notifications when the screen is turned off Use proximity sensor Set the device to pause voice feedback when you place your hand over the sensor at the top of the device Shake to continue reading Set the device t...

Страница 128: ...ap the screen three times with two fingers Developer options Set options for app development Using the device with the screen turned off For privacy you can set the device to function normally with the screen off The screen does not turn on when you press the Home key or tap the screen Currently activated features do not turn off when the screen is off On the Apps screen tap Settings Accessibility...

Страница 129: ... release your finger from the screen to select it The character is entered and the device reads the text aloud If Rapid key input is not activated release your finger from the character you want and then tap anywhere on the screen twice quickly Entering additional characters Tap and hold a key on the keyboard to enter additional characters available for the key A pop up window appears above the ke...

Страница 130: ...ge the font size may not be applied to some apps Using the high contrast font Adjust the colour and outline of fonts to increase the contrast between the text and the background On the Apps screen tap Settings Accessibility Vision and tap the High contrast fonts switch to activate it Using the high contrast keyboard Increase the size of the WESTECH keyboard and change the key colours to increase t...

Страница 131: ... Drag two or more fingers across the magnified screen Adjusting zoom ratio Pinch two or more fingers on the magnified screen or spread them apart You can also temporarily magnify the screen by tapping the screen three times and holding While holding the screen drag your finger to explore the screen Release your finger to return to the normal view Keyboards on the screen cannot be magnified When th...

Страница 132: ...ors will not operate Baby crying detector On the Apps screen tap Settings Accessibility Hearing Sound detectors and then tap the Baby crying detector switch to activate it The device will vibrate when it detects sound and the alert will be saved as a log Doorbell detector 1 On the Apps screen tap Settings Accessibility Hearing Sound detectors and then tap the Doorbell detector switch to activate i...

Страница 133: ... Accessibility Hearing WESTECH subtitles CC or Google subtitles CC and then tap the switch to activate it Select an option for configuring the caption settings Adjusting the sound balance Set the device to adjust the sound balance when using a headset 1 Connect a headset to the device and wear it 2 On the Apps screen tap Settings Accessibility Hearing 3 Drag the adjustment bar under Left right sou...

Страница 134: ...ssistant menu Displaying the assistive shortcut icon Set the device to display the assistive shortcut icon for accessing apps features and settings You can easily control the device by tapping the assistive menus in the icon 1 On the Apps screen tap Settings Accessibility Dexterity and interaction Assistant menu 2 Tap the switch to activate it The assistive shortcut icon appears at the bottom righ...

Страница 135: ...ve menus Set the device to display enhanced assistive menus for selected apps On the Apps screen tap Settings Accessibility Dexterity and interaction Assistant menu Assistant plus tap the switch to activate it and then select apps Easy screen turn on Turn on the screen by moving your hand above the sensor at the top of the device You can turn on the screen without pressing a key When you use this ...

Страница 136: ...the frame or draw a line around an area that you want to restrict 5 Tap DONE The device displays the restricted area The restricted area will not react when you touch it and the device s hard keys will be disabled However you can enable functions for the Power key Volume key and keyboard in interaction control mode To deactivate interaction control mode press and hold the Home key and the Volume k...

Страница 137: ...ering or ending calls Change the method of answering or ending calls On the Apps screen tap Settings Accessibility Answering and ending calls Select the desired method Using single tap mode When an alarm sounds or a call comes in tap the button to stop the alarm or answer the call instead of dragging the button On the Apps screen tap Settings Accessibility and then tap the Single tap mode switch t...

Страница 138: ...ce or while you are using the device it prompts you to enter one of the following codes Password When the device lock feature is enabled you must enter the password you set for the device PIN When using the device for the first time or when the PIN requirement is enabled you must enter the PIN supplied with the SIM or USIM card You can disable this feature by using the Lock SIM card menu PUK Your ...

Страница 139: ...ction The touchscreen may malfunction in humid conditions or when exposed to water Restart your device to clear any temporary software bugs Ensure that your device software is updated to the latest version If the touchscreen is scratched or damaged visit a WESTECH Service Centre Your device freezes or encounters a fatal error Try the following solutions If the problem is still not resolved contact...

Страница 140: ... is close to your mouth If using a headset ensure that it is properly connected Sound echoes during a call Adjust the volume by pressing the Volume key or move to another area A cellular network or the Internet is often disconnected or audio quality is poor Ensure that you are not blocking the device s internal antenna When you are in areas with weak signals or poor reception you may lose receptio...

Страница 141: ...touch This is normal and should not affect your device s lifespan or performance If the device overheats or feels hot for a prolonged period do not use it for a while If the device continues to overheat contact a WESTECH Service Centre Error messages appear when launching the camera Your device must have sufficient available memory and battery power to operate the camera app If you receive error m...

Страница 142: ...om Your device supports photos and videos captured with the device Photos and videos captured by other devices may not work properly Your device supports multimedia files that are authorised by your network service provider or providers of additional services Some content circulated on the Internet such as ringtones videos or wallpapers may not work properly Another Bluetooth device is not located...

Страница 143: ...d in the device A small gap appears around the outside of the device case This gap is a necessary manufacturing feature and some minor rocking or vibration of parts may occur Over time friction between parts may cause this gap to expand slightly There is not enough space in the device s storage Delete unnecessary data such as cache using the Smart manager or manually delete unused apps or files to...

Страница 144: ...any information storage and retrieval system without the prior written permission of WESTECH Media Technologies Ltd Trademarks and Trading Names WESTECH and westechmedia are the trading names of WESTECH Media Technologies Ltd Bluetooth is a registered trademark of Bluetooth SIG Inc worldwide Wi Fi Wi Fi Protected Setup Wi Fi Direct Wi Fi CERTIFIED and the Wi Fi logo are registered trademarks of th...

Отзывы: