4
ENGLISH
•
Do not disassemble the unit by yourself, if any
malfunction is detected or after it was dropped,
apply to the nearest authorized service center.
•
Transport the unit in the original package only.
•
Keep the unit out of reach of children and dis-
abled persons.
THE UNIT IS INTENDED FOR HOUSEHOLD USAGE
ONLY
BEFORE THE FIRST USE
After unit transportation or storage at low
temperature, it is necessary to keep it for at
least two hours at room temperature before
switching on.
•
Unpack the air humidifier, remove any stick-
ers and package materials that can prevent unit
operation. Check the unit for damages. In case of
damages do not switch the unit on.
Note:
Use the humidifier at the room temperature
from +5° С to +40°С, and at relative humidity
less than 80%.
Water temperature should not 40°С.
•
Before plugging the unit in, make sure that your
home mains voltage corresponds to unit operat-
ing voltage.
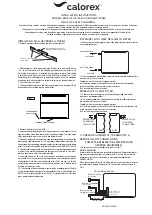
Usage of the unit
1. Remove the lid (6) from the water tank (7).
2. Remove the water tank (7) from the unit body.
3. Turn over the tank (7), unscrew the lid (10) with
the cartridge filter by rotating it counterclock-
wise.
4. Fill the tank (7) with necessary amount of water,
insert the lid (10) with the cartridge filter and
screw it rotating it clockwise.
5. Place the filled water tank (7) on the unit body.
6. Insert the power plug into the mains socket.
7. Switch the humidifier on, turning the knob (2)
clockwise, the operation indicator (11) will light
up blue and the mist will be released intensively
from the lid nozzle (6). The nozzle rotates by 180°
around its axis, which allows to change the mist
flow direction without relocating the air humidi-
fier.
8. Set the mist release intensity by turning the knob
(3). Increase it by turning the knob clockwise,
decrease by turning it counterclockwise.
9. To switch the ionization mode on, press the but-
ton (4), the indicator (1) will light up. To switch
the ionization mode off, press the button (4)
again, the indicator (1) will go out.
10. If the water tank (7) is empty, the indicator (11)
will light up red.
11. Switch the air humidifier off, turning the knob (2)
counterclockwise till clicking, the indicator (11)
will go out; after that unplug the unit. Fill the tank
(7) with water, install it to its place and switch
the unit on.
12. After the unit operation, switch the air humidi-
fier off by turning the knob (2) counterclockwise.
Cleaning and care
Warning! Always switch the unit off and unplug
it before cleaning.
•
Hard water causes the appearance of mineral
scale on the sprayer, on the inner parts of the
body and in the water tank; it leads to improper
operation of the humidifier and appearance of
white deposits on interior objects.
•
To avoid this, it is necessary to clean the sprayer
weekly and to change water as often as possible,
as well as to clean the cartridge filter.
•
If you are not going to use the humidifier for
a long time, pour out water from the tank and
the operating chamber of the sprayer, wash the
water tank, wash and clean the operating cham-
ber of the sprayer and the sprayer itself, dry the
unit thoroughly and take it away for storage.
Weekly care
1. Once a week wash the water tank (7) and the
process chamber under the tank (12) thoroughly
with a neutral detergent solution.
2. Then carefully rinse them with water.
3. Add 5-10 drops of the detergent on the sprayer
(12); wait for about 2-5 minutes. Remove the
deposit from the sprayer (12) surface with the
brush (14).
Note:
- As a cleaning agent for the sprayer you can
use a descaling agent for kettles.
•
Do not immerse the air humidifier body into water
or other liquids.
Filter cleaning
1. Clean the cartridge filter (9) after passing of
about 200 l water through it, and more often
when using hard water or if a white deposit
appears on the furniture.
2. Remove the lid (6) from the water tank (7) and
remove the tank from the unit body (13).
VT1763.indd 4
20.02.2014 14:16:58
Содержание VT-1763 BK
Страница 1: ...1 3 6 10 13 16 19 22 25 28 Air humidifier VT 1763 W BK VT1763 indd 1 20 02 2014 14 16 57...
Страница 2: ...VT1763 indd 2 20 02 2014 14 16 58...
Страница 10: ...10 50 60 1 2 3 4 5 6 7 8 9 10 11 12 13 14 30 30 8 8 VT1763 indd 10 20 02 2014 14 16 59...
Страница 13: ...13 50 60 1 2 i 3 4 5 6 7 8 9 10 11 12 13 14 30 30 8 8 VT1763 indd 13 20 02 2014 14 16 59...
Страница 22: ...22 I 50 60 1 2 3 4 5 6 7 8 9 10 11 12 13 14 30 30 8 8 VT1763 indd 22 20 02 2014 14 17 00...
Страница 25: ...25 50 60 1 I 2 3 4 I 5 6 7 8 9 10 11 12 13 14 30 30 i 8 8 VT1763 indd 25 20 02 2014 14 17 00...
Страница 32: ...2013 GOLDER ELECTRONICS LLC 2013 VT1763 indd 32 20 02 2014 14 17 01...