Vintage Revolution PedalPro Скачать руководство пользователя страница 63

63

Rev. 2.0 - EN EU - fw 5.22

Appendix

A

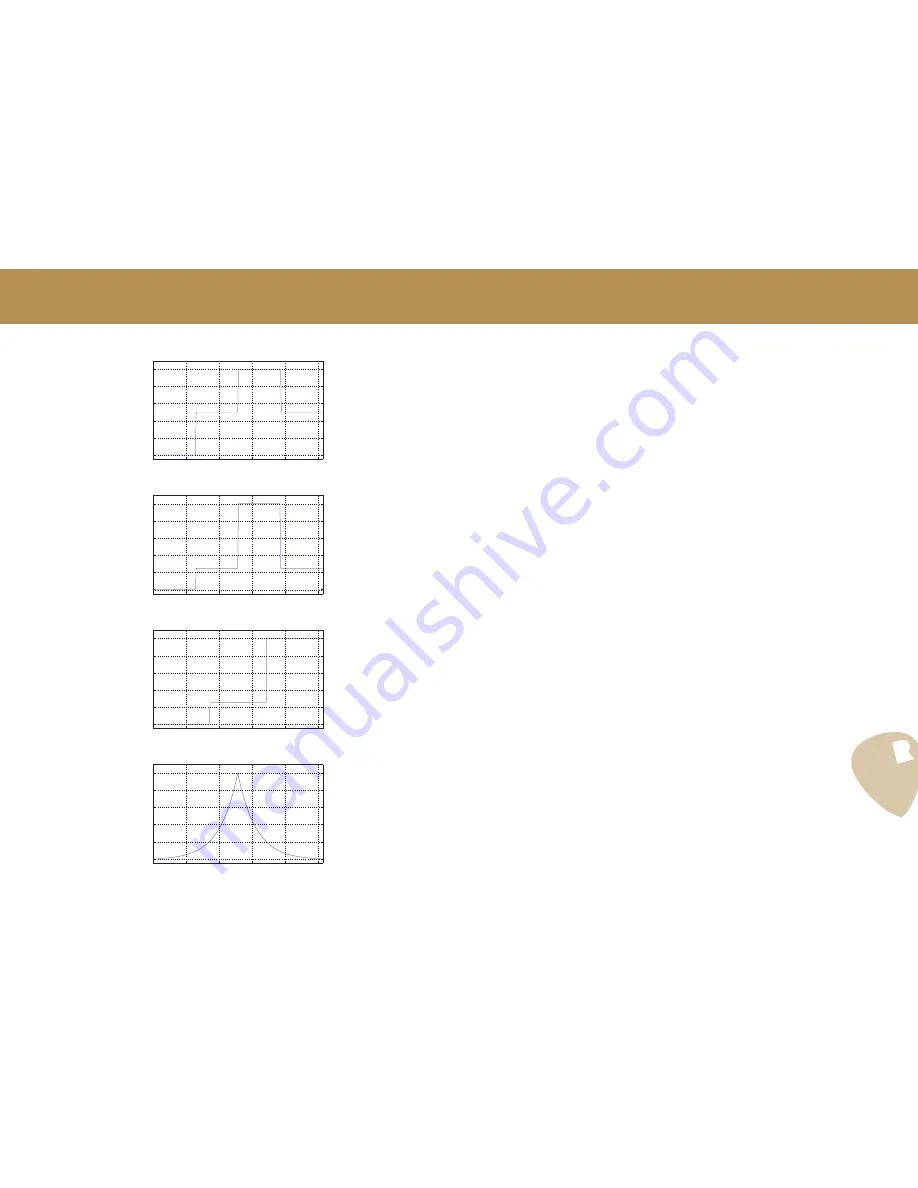
8.  shl1 (filter shelf waveform 1) - 

Filters, Chorus*, Vibe*, Flanger*.

9.  shl2 (filter shelf waveform 2) - 

Filters, Chorus*, Vibe*, Flanger*.

10.  shl3 (filter shelf waveform 3) - 

Filters

11.  expo (filter exponential waveform) - 

Filters, Chorus*, Vibe*, Flanger*.

0

50

100

150

200

250

0

20

40

60

80

100

Amplitude [Depth,

 %]

Time [Tempo, ms]

0

50

100

150

200

250

0

20

40

60

80

100

Amplitude [Depth,

 %]

Time [Tempo, ms]

0

50

100

150

200

250

0

20

40

60

80

100

Amplitude [Depth,

 %]

Time [Tempo, ms]

0

50

100

150

200

250

0

20

40

60

80

100

Amplitude [Depth,

 %]

Time [Tempo, ms]

Содержание PedalPro

Страница 1: ...PedalProTM Owner s Manual firmware rev 5 22 OMPP003A Rev 2 0 EN EU Copyright 2012 Vintage Revolution B V ...

Страница 2: ... add features via USB or VR firmware upgrades 2 1 1 MESSAGE TO THE USERS Thank you from all of us at Vintage Revolution for purchasing the PedalPro a multi effect platform we hope will prove to be the best investment of your musical career Our objective in designing the PedalPro was simple to eliminate compro mise No more knobs and sliders No more DSPs We wanted a complete solution that seamlessly...

Страница 3: ...he power outlet socket Appliance coupler is considered as disconnect device It shall remain readily operable 10 Power cord protection Power supply cords should be routed so that they are not likely to be walked on bent stretched or pinched by items placed upon or against them paying particu lar attention to cords plugs convenience receptacles and the point where they exit from the apparatus 11 Gro...

Страница 4: ...bsite hyperlinks to an internet website are followed by the symbol They are also obviously better for the environ ment and mean no bulky paper manuals gathering dust in your studio For updates to the manual or latest versions add ons and manuals of related products check the Vintage Revolution website 4 2 BOX CONTENT The following items should be included in your PedalPro package The PedalProTM di...

Страница 5: ...itialising Your Presets p 15 9 1 7 Restoring the Default Preset List p 15 5 Table of Contents 9 2 Working with Favourite Presets p 16 9 2 1 Adding Replacing a Preset from the Favourite List p 16 9 2 2 Recalling a Favourite Preset p 16 9 2 3 Editing a Favourite Preset p 16 9 2 4 Deleting a Favourite Preset p 16 9 3 Working with PedalPro s Effects p 17 9 3 1 Compressor p 18 9 3 2 Distortion p 20 9 3...

Страница 6: ...ss EXIT USB to exit from the Edit mode When navigating menus press EXIT USB to go one level up in the menu structure Hold the Overview Front Panel EXIT USB for 2 seconds to enter the USB communication mode 8 Power switch Turns the power on and off 9 Soft Mute key Press the Soft Mute key before switching guitar The button will light up to indicate that the output is muted and you can now change the...

Страница 7: ... into the presets of your PedalPro 20 OUTPUT connectors Use mono jack cables to connect these 1 4 out puts into guitar amplifiers inputs of mixers or recording device For mono rigs use the LEFT connector only see Setup Guide on page 8 21 EXTERNAL EFFECT pre loop connectors To connect an external effect i e a stompbox into the PedalPro effects chain connect the SEND con nector 21b to the input conn...

Страница 8: ...ce in your rack and use the mounting screws provided On a flat surface You can also rest your PedalPro on a flat dry solid surface of sufficient size Avoid resting your PedalPro on the floor its mechanical and electrical com ponents may not withstand shocks from inadvertently kicking or stepping on it 7 7 2 CONNECTING TO THE MAIN Use the power cord supplied to connect your PedalPro to the main Plu...

Страница 9: ...ource is properly rated to handle this amount of gear or you could overload it In situations where your amplifiers and PedalPro must be connected to different sockets you may need an audio isolation transformer 7 5 CONNECTING PEDALINO FOOT CONTROLLER Pedalino Foot Controller is the revolutionary foot controller that operates the PedalPro and is designed specifically for operating your PedalPro whi...

Страница 10: ...ps that allow you to include external effects in your rig By connecting to the EXT EFFECT SEND 21b and RETURN 21a jacks you will place your external pedal in the pre loop as indicated in Fig 8 1 See chap ter 8 Signal Flow or the section Routing Options An Overview on page 28 for details on where the external effects is located in the effect chain To connect an external pedal in the pre loop of you...

Страница 11: ...onary feature of your PedalPro are shown below Please see the filters routing section on page 28 for more information and for a complete overview of the effect chain configurations or Route types available filter F2 noise gate LEFT RIGHT buffer compressor envelope detector envelope detector external pedal pre amp distortion panner tremolo phaser noise gate IN volume control volume control OUTPUT L...

Страница 12: ...et or re load the original factory presets you will find them available on the USB drive that comes with your PedalPro See the section Restoring your default preset list on page 15 9 1 1 Saving a preset Once you are happy with the sound you ve created and want to store it for future use you re ready to save it as a preset Press EDIT SAVE 5 The screen will show the current preset location and the n...

Страница 13: ...Using the appropriate multifunction key 10 select one of the effects and enter the effect s menu You will now see the settings for the effect of the preset you are currently playing See the section Working with PedalPro s effects on page 17 for more details on the effects param eters Some of the effects for instance the filters have more than one page of settings This is indicated on the top right...

Страница 14: ...s the multifunction key 10 corresponding to the effect you want to modify to enter the effect s menu To change the parameters of that effect press EDIT 5 You are now in Edit Mode È1 4 Edi t 0 0 0 C mp o Dist Ng e t em Tr P s rePh u a er The header Edit and the asterisk after the preset s number indicate that the PedalPro configuration for the loaded preset has been modified but not yet saved in a ...

Страница 15: ...ed any presets you want to keep in your com puter using the PedalManager software This procedure will also reset the settings on page 2 of the MIDI menu Switch off the PedalPro and wait until the display backlight is off Now switch on the PedalPro while pressing the BYPASS key 1 on the unit keeping it pressed until the Initialise message appears on the dis play it takes about 5 seconds Press ENTER...

Страница 16: ...de Press the RIGHT arrow key 3d to enter the favourite list and therefore Favourite List Mode Scroll through the favourites list with the UP and DOWN arrow keys 3b 3c or using the selection dial 4 Press the ENTER 6 to load the selected favourite preset QUICK TIP Your favourites list can be accessed directly via the Pedalino Foot Controller using the button on the Pedalino labelled Favourites See P...

Страница 17: ...0 h u a C mp o Dist Ng e t em Tr er Compressor Distortion and Pre amp Noise Gate Tremolo Panner are on page 1 4 1 of 4 the main menu È2 4 Play 0Ç 0 0 P as h Fltr Lev r Ext l P s rePh u a er Phaser Filters Volume controls and External effect loops controls are on page 2 4 of the main menu È3 4 Play 0Ç 0 0 C Fl h Dly P s rePh u a er Chorus Flanger and Delay can be accessed on page 3 4 of the main me...

Страница 18: ...35 30 25 20 15 10 5 10 5 0 5 10 15 20 Vin dBm Vout dB Compression curve comparison PedalPro vs Vari Mu PedalPro Vari Mu tube compressor PARAMETERS To enter the Compressor configuration page press the multifunction key 10a labelled Comp on page 1 of the main menu The diagram below shows you the screen of the Compressor configuration page È1 1 tubeg e T n e yp A tc t 03 Rels s C mp o ÇÁ Sens 8 8 0 2...

Страница 19: ...s compression from 1 3 to 1 22 For medium strong compression that gives a medium amount of sus tain use the vary mu tube compressor that produces compression from 1 4 to 1 30 For strong compression or limiter that provides long sustains use the limiter compressor that produces compression from 1 12 to 1 40 Preventing loud peaks tube compression To prevent loud peaks due to excessive pick striking ...

Страница 20: ...se and unwanted op amp processing are una voidable stages of the distortion process The blues sound has never been as warm and clear as it should have been due to these unnecessary electronics inherent problems with every distortion on the market The PedalPro makes it possible for the first time to bypass the Boost pre am plifier and drive the Distortion by only the guitar signal With the guitar s...

Страница 21: ...with the selection dial 4 TIPS TRICKS DISTORTION It s generally considered best practice to search for the right sound start ing from a neutral distortion point which will also depend on your pick ups and amplifier Start with the following parameter configuration Brgt Á on Tone 50 1 LP 1 Adjust the Brgt Tone and LP parameters to find the sound you are looking for Keep in mind that the low pass fil...

Страница 22: ...alone Boost is to use it to overdrive your tube amplifier To produce a rich warm tube blues distortion activate the Boost set the Boost parameter to Á and adjust the amount of gain by acting on the G dB parameter Turn off all other effects when in this configu ration The quality of the distortion will also depend on your amplifier as well as your cabinet Keep in mind that while the Boost does not ...

Страница 23: ...SWITCH key 10b TIPS TRICKS NOISE GATE One of the best ways to use the Noise Gate is to start by dialling in the following settings NoiseGate Á on Sustain  off NoiseLv 050 0 Release 000 0 This configuration reduces the amount of noise to half its value Decrease the NoiseLv till the audible noise level is acceptable or totally inaudible To avoid the Noise Gate affecting the natural decay of your su...

Страница 24: ...hlf vntg The tremolo panner modulating waveform parameter allows you to select from among the available modulating waveforms All the classic waveforms are included along with some exclusive VR designed waveforms Available waveforms include sine triangle trapeze rectangle pcal phaser calibrated curve shlf shelf vntg vintage see Appendix A at the end of this manual for more details on the modulating...

Страница 25: ...an now be controlled using the expression pedal con nected to your Pedalino Foot Controller This feature is handy for situa tions such as when playing with the attack of the guitar sound in order to produce a violin like sound When your Tremolo Panner effect is configured in Panner mode a moving sound image can be created by operating the Panner with an expression pedal manual panner See the Pedal...

Страница 26: ...ection dial 4 Tempo Speed of the modulator Range 3 BPM 20 s 550 BPM 9 16 Hz To change the Tempo of the modulating waveform press EDIT 5 and use the arrow keys 3 to position the blinking cursor next to Tempo Ad just the value with the selection dial 4 Wv Modulating waveform Range sine trig trap rect pcal shlf vntg The Phaser has many modulating waveforms from which you can choose All the classic wa...

Страница 27: ... produce a medium fast phaser e g with a Tempo greater than 120 BPM and with a low depth less than 60 use a combination of Manual level and Depth The Phaser will produce time varying phase shift according to the Depth and the Manual settings When working using this configuration set the level of Depth to between 30 and 60 and adjust the Manual level according to the effect you want to cre ate Whic...

Страница 28: ...and other parameters you ve never had access to before When playing in Manual Mode the filter frequency can be controlled in real time using an expression pedal to produce a sound very similar to a Crybaby È1 6 Route ype F l i te t FL Â o t u ng i r r 00 FR Â Optional Pedalino Foot Controller required ROUTING OPTIONS AN OVERVIEW This section introduces the nine routing options for the analogue eff...

Страница 29: ...OUTPUT RIGHT post effects L post effects R Route type 05 È1 6 Route ype F l i te t FL o t u ng i r r 05 FR F1 Â dist Pre Filter F1 F1 is placed just after the Com pressor When used in combination with the Distortion it produces the same sound as if you plugged your Wah into your distor tion a sound widely used by musicians filter F1 noise gate LEFT RIGHT OUTPUT LEFT mono OUTPUT RIGHT buffer compre...

Страница 30: ...d over six menu pages as follows Page 1 6 Routing defines the position of the filter s in the effect chain Page 2 6 Configuration defines the general control parameter of both filters F1 and F2 Page 3 6 Auto F1 defines the parameters of filter F1 when F1 is in auto mode e g auto wah vowel generator Page 4 6 Auto F2 defines the parameters of filter F2 when F2 is in auto mode e g auto wah vowel gene...

Страница 31: ... 10b QUICK TIP HSync With HSync engaged if you assign the adjustable threshold parameter Fsync_th to an expression pedal via the ADES page you can control the number of wah vowel cycles that you are going to produce and these cycles are always synchronised with your strumming action If you set the correct Tempo parameter in the filter configuration page 3 6 for F1 or 4 6 for F2 the filter sweeping...

Страница 32: ...es see Ap pendix A on page 62 for more details on the modulating waveforms 1 sine sinusoidal 2 trig triangle 3 trap trapezoidal 4 rect symmetric square waveform 5 expo exponential 6 shl1 shelf waveform 1 7 shl2 shelf waveform 2 8 shl3 shelf waveform 3 To change or select a modulating waveform for F1 press EDIT 5 Use the arrow keys 3 to position the blinking cursor next to WaveF1 Adjust the value w...

Страница 33: ...Phaser Fil ters in auto mode and Chorus when used simultaneously For more details refer to the QUICK TIP box Phase of the modulating waveforms on page 25 To alter the phase of the F2 modulator press EDIT 5 Use the arrow keys 3 to position the blinking cursor next to Ph Adjust the value with the selection dial 4 Fmin2 F2 minimum frequency Range 150 Hz to 2697 Hz Fmax2 F2 maximum frequency Range 370...

Страница 34: ...on for F2 press EDIT 5 Use the arrow keys 3 to position the blinking cursor next to Fx on the fourth line of page 5 6 Adjust the value with the selection dial 4 PAGE 6 6 MANUAL MODE OR FIXED MODE SETTINGS FOR F1 AND F2 On this page you can configure filters F1 and F2 when in manual mode F1Md and or F2Md set to manu on page 2 6 F1 Hz 3 0 Q1 5 0 0 7 È6 6 M n a fi u l a lters F2 Hz 1 0 Q2 1 0 5 5 F1 ...

Страница 35: ...lope filter the force you put into your strumming action will directly influence the frequency displacement sweeping action of the filter How do I create this sound Choose your routing configuration by switching on the filters and choosing between the different routing options on page 1 6 of the filter configuration menu Adjust the ranges of the parameters according to the mode of the filter If th...

Страница 36: ...output level on the left channel To change the total output level of PedalPro s left channel press EDIT 5 Use the arrow keys 3 to position the blinking cursor next to LvL Adjust the value with the selection dial 4 LvR Volume control right channel Range 0 100 This parameter controls the total output level on the right channel To change the total output level of PedalPro s right left channel press E...

Страница 37: ...ays preserved The post effects include the following effects modules 1 Chorus 2 Flanger 3 Chorus and Vibe 4 Delay with left right routing options 5 De tuner for modulating the delay 6 Auxiliary AUX mixer providing additional loop options noise gate LEFT RIGHT OUTPUT LEFT mono OUTPUT RIGHT buffer compressor envelope detector envelope detector external pedal pre amp distortion panner tremolo phaser ...

Страница 38: ...lation type Type chor 1 4 M d o io u a l t n È us Type Modulation type selector Range none chorus ch vib flanger To change the modulation type press EDIT 5 The cursor will immediate ly blink next to the modulation type Adjust the value with the selection dial 4 PAGE 2 4 CHORUS CONFIGURATION To use the Chorus of the Expansion Board set the parameter Type on page 1 4 to either chorus or ch vibe Adju...

Страница 39: ...ting waveform press EDIT 5 Use the arrow keys 3 to position the blinking cursor next to Wv Adjust the value with the selection dial 4 Wt Wet dry ratio control Range 0 100 The Wet parameter allows you to control the ratio between Chorus signal wet and input signal dry in the Chorus output signal To alter the wet dry ratio of the Chorus press EDIT 5 Use the arrow keys 3 to position the blinking curs...

Страница 40: ...mong the Boost Range on Á off  Press the PARAM SWITCH key 10b to turn the Boost on Á or off  Tempo Speed of the Vibe modulator Range 3 BPM 20 sec 550 BPM 9 16 Hz To change the Tempo of the Vibe modulating waveform press EDIT 5 Use the arrow keys 3 to position the blinking cursor next to Tempo Ad just the value with the selection dial 4 Depth Depth of the Vibe modulation Range 0 100 To alter the ...

Страница 41: ...amount of Depth will produce a sound with a higher frequency content Even harmonics Harm ÇÁ produce a jet like sound Odd harmonics Harm ÇÂ produce a watery sound When using a highly rhythmic modulating waveform for instance when Wv is set to rect or one of the shlf waveforms use a small Depth value below 40 and find the sweet spot by adjusting the Mn parameter 9 4 2 Delay and Detuner PARAMETERS Be...

Страница 42: ...evel selector Range 0 100 The Inp input parameter controls the level of the signal at the input of the Delay effect To adjust the input signal level press EDIT 5 Use the arrow keys 3 to position the blinking cursor next to Inp Adjust the value with the selection dial 4 Wet Wet dry ratio control Range 0 100 The Wet parameter allows you to control the ratio between delayed signal wet and input signa...

Страница 43: ...ith the selection dial 4 9 4 3 AUX Connections Post loop On page 2 of the main menu the user can access the configuration for the external effects loop pre loop see section 7 6 on page 10 or the AUX loop post loop The AUX SEND and AUX RETURN 16a to 16d jack connectors can be used for connecting either up to two external stomp box pedals see Fig 9 8 Fig 9 9 and Fig 9 10 or a DSP effect unit see Fig...

Страница 44: ... the output level control and the Noise Gate see section 9 4 This makes the AUX loops ideal for connecting reverberation effects and other modulation effects The routing options are shown in the next page To set the available delay range press EDIT 5 The cursor will blink di rectly next to AUX type Adjust the value with the selection dial 4 AUX LOOPS ROUTING OPTIONS AN OVERVIEW This figures below ...

Страница 45: ... 2 2 A x u m È WtL 0 0 tR 5 2 0 5 DrL 015 rR 0 1 0 2 1 0 W D i e x r GsL 030 sR 0 3 0 1 1 G 5 GsL Gain level send left channel Range 0 100 The GsL Gain send left parameter controls the level of gain applied to the signal sent to the external effect via the AUX SEND LEFT jack 16a To adjust the amount of gain on the left send channel press EDIT 5 Use the arrow keys 3 to position the blinking cursor ...

Страница 46: ...lly processed signal Use instead the high quality AUX Mixer to mix the dry signal with the wet signal coming from your external digital effects In this way the dry signal will bypass the digital effect conserv ing the crystal clear characteristic typical of the PedalPro Remember that the parameters on the Ext AUX loops menu pages 1 2 and 2 2 including the AUX Mixer parameters are preset parameters...

Страница 47: ...Foot Controller See the Pedalino Owner s Manual for information on how to connect an expression pedal to the Pedalino Foot Controller By assigning a parameter of an effect to an expression pedal you can then sweep through the predefined range of that parameter in real time fluidly modifying your sounds while you play Unlike a MIDI CC however there s no convoluted programming process needed to achi...

Страница 48: ...tinuous controller the Expression Parameter Control assignment located in the menu of the PedalPro allows you to as sign one of the parameters of PedalPro s effects to your expression pedal However unlike a MIDI CC there s no convoluted programming needed in order to achieve a smooth sound control Once you have selected it you are ready to play The ADES protocol also offers a much higher resolutio...

Страница 49: ...ultra narrow range 37 2 100 32 Chrs_dep Chorus depth 0 100 33 Chrs_wet Chorus wet dry ratio 0 100 Parameter name Description Range Unit 34 Ch_tempo Chorus tempo 40 320 BPM 35 Vibe_dep Vibe depth 0 100 36 Flng_reg Flanger regen 0 100 37 Flng_dep Flanger depth 0 100 38 Flng_man Flanger manual 0 100 39 Flng_wet Flanger wet dry ratio 0 100 40 Fl_tempo Flanger tempo 28 160 BPM 41 Dely_wet Delay wet dry...

Страница 50: ...th the Tap Tempo You can subdivide the Delay tempo in 1 4 note 1 8 note or 1 8 note 1 8note 3 16 note To change the Delay division parameter press EDIT 5 Use the arrow keys 3 to position the blinking cursor next to Delay division Adjust the value with the selection dial 4 After selecting the parameter exit the ADES configuration page by press ing EXIT 7 and save the Preset Use the ADES ON OFF swit...

Страница 51: ...BOARD MODE PAGE 3 3 ADES MENU The Virtual Board feature turns the Pedalino into a fully functional pedalboard with a huge range of possibilities Effects and combinations of effects within a single preset can be turned On or Off separately and you can instantly switch between four different functions for the expression pedal Tap Tempo Wah a user defined parameter and Volume Each preset can be assig...

Страница 52: ...ext to MIDI PCHg2 Adjust the value with the selection dial 4 On page 2 2 of the MIDI configuration menu you can configure on which MIDI OUT channels the program changes will be sent The default value as signed to the parameters is OFF represented by the symbol  È2 2 S nd e ch 2 M D I IO CC11 h C P g1 ch 05 c a h ne g UT l 01 PCh n CC11 PChg1 Selects on which MIDI channel the MIDICC11 expression a...

Страница 53: ...ilable as a free download together with its up grades and new releases on the VR website To run the PedalManager copy it into any directory on your computer There is no need to perform any installation and no drivers are needed For your convenience you might want to create a short cut on an ac cessible location in your computer eg the desktop Connect the PedalPro to your computer using the USB cab...

Страница 54: ...cation between the computer and the PedalPro can now take place W up e d oo V2 a l 4 gr t F SB K Y OK E U er a 0 0 00 0 l 0 S i 0 This screen shows the following important information about your PedalPro Serial this is the 8 digit serial number unique to your PedalPro assigned by VR USB this field shows the status of the USB connection with your PC Mac computer KEY this field shows whether or not ...

Страница 55: ...Attack Time 3 ms 8 ms 13 ms 22 ms 31 ms 40 ms 57 ms 83 ms Release Time 0 1 s 0 2 s 0 3 s 0 5 s 0 7 s 0 8 s 1 s 1 8 s Specs Noise performance Typical noise level 1kHz 110 dBV input shorted preset VarymuComp loaded Typical noise level 1kHz 102 dBV input shorted preset SustComp loaded Technology Ultra low noise matched pair transistors PRE AMPLIFIER Parameters Gain 0 dB to 25 dB resolution 1 dB Specs...

Страница 56: ...0 Hz 1968 Hz resolution 1 56 Hz Q resonance 1 to 18 resolution 0 5 Parameters in Envelope mode Positive and Negative Start cut off frequency 370 Hz 1968 Hz resolution 1 56 Hz Sensitivity 0 100 resolution 0 39 Transfer curves available linear positive exponential negative expo nential Q resonance 1 to 18 resolution 0 5 Parameters in configuration Fixed Frequency mode Fixed cut off frequency 370 Hz ...

Страница 57: ...0 100 resolution 0 39 Technology 1 BBD Bucket Brigade Delay FLANGER Parameters Modulating waveform Sine trig rect trap expo shl1 shl2 shl3 Modulation speed range Temp 3 BPM 20 s to 550 BPM 9 16 Hz Phase control of modulating waveform 4 values 0 90 180 270 Harmonics switch ON OFF Manual 0 100 resolution 0 39 Depth 0 100 resolution 0 39 Wet 0 100 resolution 0 39 Regen 0 100 resolution 0 39 Technolog...

Страница 58: ...50 dB after 5 s Technology Opto resistor and digital potentiometer VOLUME CONTROL L R Parameters Output level 0 100 resolution 0 39 Specs Bandwidth 10 Hz to 20 kHz Noise 124 dBV input shorted Technology Digital potentiometer EMC SAFETY Complies with EN 55103 1 and 55103 2 Certified to IEC 60065 EN 60065 MISC Chassis Front Painted Aluminium Other parts galvanised painted steel Display 20 x 4 charac...

Страница 59: ...59 Rev 2 0 EN EU fw 5 22 13 Technical Specs ...

Страница 60: ... 0 5 1 F ax m Hz 1 1 0 0 3 F Tempo 07 Ph 0 0 0 Ì 6 4 È3 6 W v a in e 1 s e F in m Hz 0 1 0 7 4 F ax m Hz 0 1 0 9 8 F È2 6 F Md 1 M F l i te Q1 05 0 d a a n i F r m 2 env uto typeÇ Ñ Ï Q2 01 5 F2 HSyncÇÂ 2 2 A x u m È WtL 0 0 tR 5 2 0 5 DrL 015 rR 0 1 0 2 1 0 W D i e x r GsL 030 sR 0 3 0 1 1 G 5 È1 2 _ E t x ÇÂ e t f f ec A x u oo t L p y e p_L OutL È1 1 P a h s r a M ua n ÇÁ l D pt e 06 2 s Tempo ...

Страница 61: ... e a È Range 23 0 9ms 9 y e t l f È1 3 ExprC l t D r t A E D S Ç Ton controls is e 27 È1 2 MIDI h 2 1 C P 0 M D I I g MIDI h C P g2 00 C a h ge n P g 4 1 r E e ur S Enter Y es e re et s s ra p 0 P s reP 0 0 h u a er Type chor 1 4 M d o io u a l t n È us È2 2 S nd e ch 2 M D I IO CC11 h C P g1 ch 05 c a h ne g UT l 01 PCh n Assign master 2 3 TapTempo È Division 1 4 Delay division 1 4 Type 00ÇRock1 ...

Страница 62: ...llowing diagrams show models of the modulating waveforms available on PedalPro s analogue effects The parameters amplitude Depth period Tempo and relative phase Ph see Phase of the modulating waveforms on p 25 of these model waveforms can be adjusted on the effect s configura tion pages In the examples below Depth 100 Tempo 235 BPM 1 sine sinusoid Tremolo Panner Phaser Filters Chorus Vibe Flanger ...

Страница 63: ...er shelf waveform 3 Filters 11 expo filter exponential waveform Filters Chorus Vibe Flanger 0 50 100 150 200 250 0 20 40 60 80 100 Amplitude Depth Time Tempo ms 0 50 100 150 200 250 0 20 40 60 80 100 Amplitude Depth Time Tempo ms 0 50 100 150 200 250 0 20 40 60 80 100 Amplitude Depth Time Tempo ms 0 50 100 150 200 250 0 20 40 60 80 100 Amplitude Depth Time Tempo ms ...

Отзывы: