background image

Viasat Business Hotspots Installation Guide 

Page | 19 


9


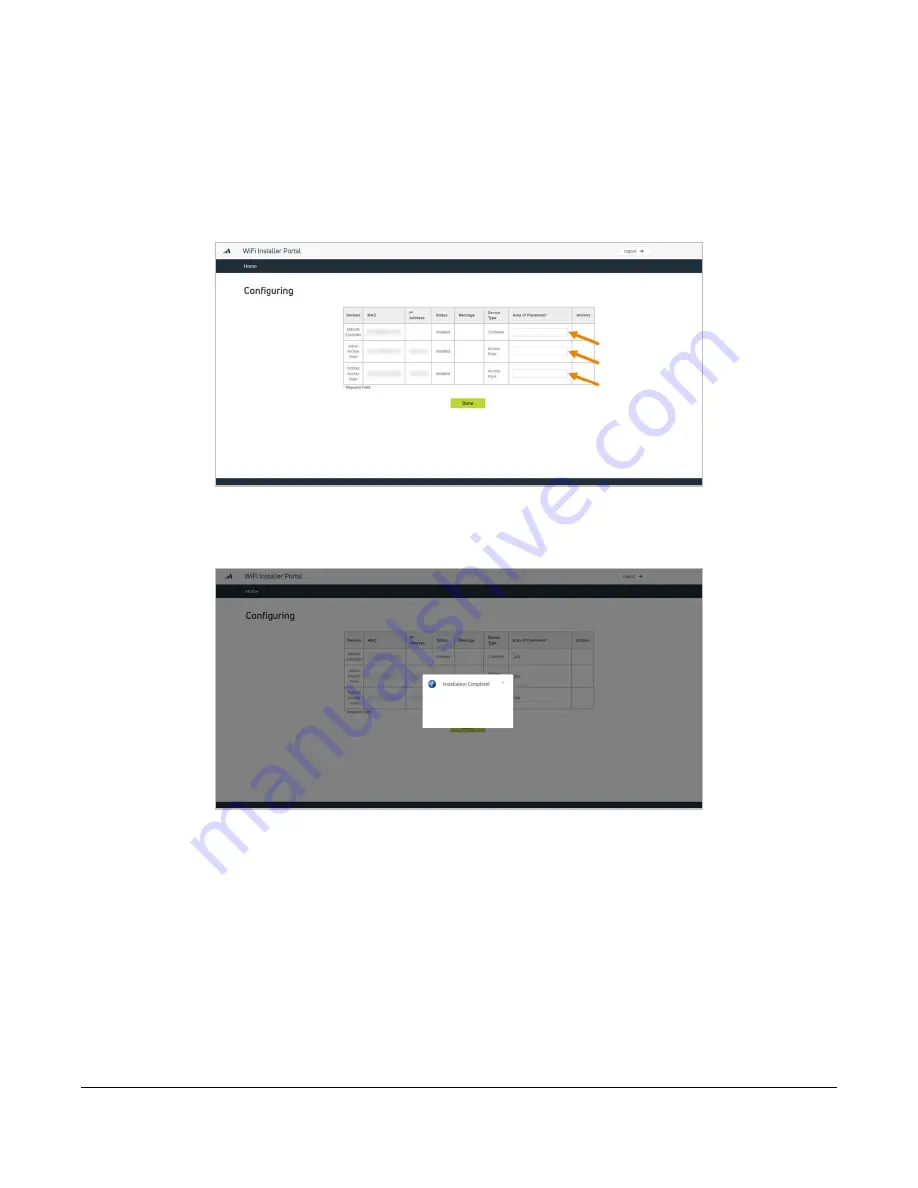
After checking the Wi-Fi signal, enter the 

area of placement

 for each device.


The area of placement is the physical location where the equipment was installed (i.e., “next to 
modem” or “ceiling mount”).


This information


must

 be entered to complete the installation, otherwise the customer’s 

management portal will not work correctly. 


10


Click 

done

 when finished, and then a confirmation message will display indicating the installation is 

complete. Close the message and log out to exit the portal, or simply close the browser.


Step 7 | Tie down outdoor cables 

After testing the equipment, tie down the cables for the satellite antenna and outdoor AP/s. Remember to 
ensure any holes penetrating the building are sealed. 

Содержание Business Hotspots

Страница 1: ...Business Hotspots Installation Guide August 2019 ...

Страница 2: ...all CAT5e cable 7 Step 3 Mount outdoor AP 7 Step 4 Mount indoor AP 10 Step 5 Install inside network equipment 11 Step 6 Auto configure equipment 12 Step 7 Tie down outdoor cables 19 Step 8 Basic network troubleshooting 20 Step 9 Complete documentation 20 Step 10 Review Quick Start Guide with customer 21 Ruckus outdoor AP installation 23 Ruckus indoor AP installation 30 Low profile stub mount insta...

Страница 3: ...Viasat Business Hotspots Installation Guide Page 3 Wi Fi Network Installation ...

Страница 4: ...s Voice and is adding Business Hotspots the Hotspots service will use the same controller and only the PoE injector s AP s and Ethernet cables will be installed The customer is responsible for providing the power strip Controller PoE injector Outdoor AP Indoor AP Indoor AP mount kit Blue Ethernet patch cable Yellow Ethernet patch cable Indoor AP mount kit is labeled for easy identification ...

Страница 5: ...usiness Internet the satellite modem used will be determined by the satellite beam for the area The VHG modem will be used for Viasat 2 beams and the SB2 modem is used for Viasat 1 beams The diagrams below indicate how to connect the Hotspots network equipment using either modem VHG modem SB2 modem ...

Страница 6: ...d Ethernet cable Torque wrench CAT5e standard Ethernet cable Flat head screwdriver RJ45 connectors and cable clips 13mm open ended wrench Pass through bushings Cable strip tool Silicone sealant and Bishop tape CAT5e crimping tool Outdoor UV rated zip ties Cable snips Pole for outdoor AP if needed with lags anchors screws CAT5e LAN cable continuity tester 10 ground wire Laptop or smartphone require...

Страница 7: ... CAT5e cable tester Install the cable ensuring any holes that penetrate the building are sealed For each indoor AP cut to length 1 standard CAT5e Ethernet cable no more than 300 cable feet from the location where the controller will be installed to the location where the AP will be mounted Terminate the ends and test each cable with a CAT5e cable tester NOTE Wait to tie down the cables until after...

Страница 8: ...r and concrete High Metal Very high Ground the AP Using the factory supplied ground wire and ground screw connect a good earth ground to the AP chassis ground point The earth ground screw is 9mm Ensure that any replacement screw is no longer than 9mm to prevent damage to the AP chassis WARNING Do NOT run the ground wire to the ground block for the satellite antenna Run it to a separate ground sour...

Страница 9: ... up No clients are associated Green Solid WLAN is up and at least one client is associated 4 AIR N A Not used 5 DIR Off Indicates AP is not being managed by the Ruckus management platform Contact Viasat installer support Green Flashing slow every 2 seconds Network problem Cannot contact Ruckus management platform AP may still functionif unableto contactthe management platform If problems are exper...

Страница 10: ...door AP installation instructions in this guide for additional information Avoid barriers and signal interference Mount the AP s in an area free from obstructions or sources of interference such as cement brick metal especially large metal objects some appliances analog phones speakers etc Below are examples of barriers that create interference Type of Barrier Interference Wood glass or synthetic ...

Страница 11: ...rk problem Cannot contact Ruckus management platform AP may still function if unable to contact the management platform Green Flashing fast 2x second Receiving configuration or image upgrade Green Solid Connected to the Ruckus management platform Working properly PWR Off No power to AP Red AP is starting up Green Flashing System started no routable IP address detected Green Solid Routable IP addre...

Страница 12: ...port on the PoE injector 2 Then connect the other end of the Ethernet cable into the POE IN Ethernet port on the back of the AP 3 Plug the PoE injector s into the power source 4 After boot up verify that the PWR LED on the AP is a steady green 5 Repeat this step for each additional AP PoE injector to outdoor AP 1 Connect one end of the outdoor rated Ethernet cable into the POE port on the PoE inje...

Страница 13: ... progression appears to have stalled unplug the network cable to the laptop and plug it back in Then log out of the portal and log back in If this does not resolve the issue contact Installer Relations at 888 278 6869 and select Option 1 Hotspots 2 Once logged in the order confirmation appears showing the installation address and order details satellite details will not display on Hotspots orders ...

Страница 14: ...first of the two listed the other will not work with the Installer Portal Click outside the MAC address field and then click next NOTE After entering information in the required field s on each page click outside the field before clicking next to proceed 4 Once auto configuration begins the status changes The controller progression is Discovering Configuring Qoi Configuring Installed ...

Страница 15: ... approximately 2 3 minutes for each device Configuring the controllertakes 5 10 minutes while the APs can take 15 20 minutes each as the firmware updates The AP s will configure while the controller is in qoi status Then the controller will return to configuring status for up to one minute before showing as installed If the configuring phase takes more than 20 minutes begin troubleshooting see 6 b...

Страница 16: ... response Device should respond any minute now 1 min 1 5 mins 1 5 mins 1 5 mins Configuring Getting pptp user entry Get Mikrotik tunnel command Configuring tunnel 10 sec delay Updating pptp entry Getting ros version Upgrading ros version Downgrading ros version Getting firmware version Upgrading firmware version Downgrading firmware version Building rsc file Uploading rsc file Executing rsc file U...

Страница 17: ...Verify it has power check for lights on the AP Test the Ethernet cable Reboot the AP If the controller is stuck in the configuring status and the last message displayed was updating firmware version reboot the controller If the process doesn t start again automatically then log out and log back in to the portal Confirm the order and re enter the MAC address The configuration should resume from the...

Страница 18: ...he error occurred it may successfully configure If not contact Installer Relations for technical assistance 8 When the status for all equipment changes to installed check the Wi Fi signal on a mobile device Both the private and public SSIDs should be visible when selecting a network on the mobile device The SSIDs are set to the following defaults Network Type Network Name Password Public GUEST WIF...

Страница 19: ...red to complete the installation otherwise the customer s management portal will not work correctly 10 Click done when finished and then a confirmation message will display indicating the installation is complete Close the message and log out to exit the portal or simply close the browser Step 7 Tie down outdoor cables After testing the equipment tie down the cables for the satellite antenna and o...

Страница 20: ...e and does not necessitate replacement if the AP is not working properly Full troubleshooting should be completed before requesting replacement of an outdoor AP If you encounter issues that cannot be resolved by the troubleshooting steps listed above contact Viasat Installer Relations at 888 278 6869 Option 1 for Hotspots technical assistance Step 9 Complete documentation The installation is not c...

Страница 21: ...ss Hotspots Quick Start Guide for the customer is included with the network equipment Review the guide with the customer to ensure they are aware of key information about their Wi Fi network How to access the public and private networks How to access the management portal and portal user guide How to secure their private network by changing the network name and password on the management portal Ho...

Страница 22: ...Viasat Business Hotspots Installation Guide Page 22 Access Point mounting instructions ...

Страница 23: ...Viasat Business Hotspots Installation Guide Page 23 Ruckus outdoor AP installation ...

Страница 24: ...ipping and terminal crimping pliers Outdoor rated CAT5e Ethernet cable Electric drill with drill bits and installer supplied wall anchors flat washers and hex nuts for flat surface mount Pipe pole or sturdy flat surface Important safety information Warning Installation of this equipment must comply with local and national electrical codes Warning Ruckus Wireless strongly recommends that you wear e...

Страница 25: ... deployed where internal antenna lateral beamforming can provide the greatest reach and throughput to a wide coverage area or to provide the greatest distance between APs in a connecting mesh device See Figure 2 for optional side view coverage patterns Figure 2 Typical AP Omni coverage side view Option 1 Option 2 ...

Страница 26: ...bly 2 Connect the cable to the Ethernet port in the AP 3 Tighten the cable gland base into the AP chassis until secure 4 Wrap the clamping ring assembly around the rubber O ring Make sure that the clamping ring assembly fully encloses the rubber O ring 5 Seat the clamping ring assembly and rubber O ring in the cable gland base 6 Hand tighten the sealing nut 7 Continue with Step 2a Attach mounting ...

Страница 27: ...nting hardware 6 Using the mounting hardware instructions tighten the hardware to secure the mounting bracket 7 Continue with Step 3 Mounting the AP Step 2b Attach mounting bracket to metal pole 1 The AP mounting bracket attaches to the AP using a captive screw Loosen the screw A in Figure 4 and pull up on the end of the bracket to remove the bracket from the AP B in Figure4 2 Insert the open end ...

Страница 28: ...nhead security screw through the mounting bracket and into the AP chassis CAUTION Ensure the locking security screw is no longer than 6mm otherwise it can damage the AP chassis Figure 8 Locking the mounting bracket to the AP Step 4 Earth ground the AP Make sure that earth grounding is available and that it meets local and national electrical codes Before completing this step check your local wirin...

Страница 29: ...Viasat Business Hotspots Installation Guide Page 29 Figure 9 Connect good earth ground to AP ...

Страница 30: ...Viasat Business Hotspots Installation Guide Page 30 Ruckus indoor AP installation ...

Страница 31: ... Setup requirements One or more of the following Modem Controller Two CAT5e Ethernet cables PoE injector Access point coverage The location and orientation of the AP play a critical role in the performance of the wireless network In general Ruckus Wireless recommends installing the AP away from obstructions and sources of interference and ensuring that the top of the AP is pointing in the general ...

Страница 32: ...Viasat Business Hotspots Installation Guide Page 32 When wall mounted the APs should be staggered to maximize coverage Figure 2 Recommended wall mounting orientation ...

Страница 33: ...Viasat Business Hotspots Installation Guide Page 33 Figure 3 Recommended wall mounting in a corridor top view ...

Страница 34: ...g the AP so that the T bar clips disengage the T bar Mount the AP on a flat surface Figure 5 Flat surface mount 1 Use the Mounting Template located at the end of the Indoor AP section of this guide tomark the locations for two drill holes on the mountingsurface 2 Use a 4 75mm 3 16 drill bit to drill holes approximately25mm 1 deep into the mounting surface 3 Insert the factory supplied anchors A an...

Страница 35: ...four screw holes available on the secure mounting bracket Fasten the bracket to the flat surface using four mounting screws and plastic wall anchors Continue with Step 3 2 If you are mounting the AP on a pipe or pole then feed the two installer supplied stainless steel clamps through the slots on the secure mounting bracket Use common hand tools to tighten the clamps around the pipe or pole After ...

Страница 36: ...Viasat Business Hotspots Installation Guide Page 36 Mounting template ...

Страница 37: ...Viasat Business Hotspots Installation Guide Page 37 Low profile stub mount installation ...

Страница 38: ...tural elements for a low profile sloped roof mount are rafters or trusses The two center 5 16 x 3in lag screws in the footplate must be secured in the structural elements The outside corner flanged lag screws must be secured in the roof Step 3 Important considerations DANGER Locate power lines before you start the installation These include overhead and underground power lines electric lights and ...

Страница 39: ...on the mark Step 3 Mark and predrill remaining holes Use a level to verify that the center line of the footplate defined by the footplate s center holes is level Mark and predrill the bottom center hole Mark and predrill the remaining four 1 8in holes one in each outside corner Always fill any unused holes with tar based sealant Step 4 Secure lag screws Cover the bottom of the entire footplate wit...

Страница 40: ...the mast tube Step 2 Level mount tube and tighten bolts Swing the mount tube up and use a level to level the mount tube Tighten the footplate carriage bolts to ensure the mount is plumb Complete final mount tube leveling after installing the monopoles Once the mast tube is level perform a quick tug test on the mount to verify that it is stable Now the outdoor AP can be attached ...

Страница 41: ...Viasat Business Hotspots Installation Guide Page 41 Terminating Ethernet cable ...

Страница 42: ...er conducting wires strip off approximately 1 inch of the cable s jacket using a modular crimping tool or cable stripper Step 3 Separate wires Separate the 4 twisted wire pairs from each other and then unwind each pair so that you end up with 8 individual wires Flatten the wires out as much as possible since they ll need to be very straight for proper insertion into the connector Step 4 Arrange wi...

Страница 43: ...rder if not remove them from the connector rearrange into proper formation and re insert Remember once the connector is crimped onto the cable it s permanent If you realize that a mistake has been made in wire order after termination you ll have to cut the connector off and start over Step 7 Crimp plug Insert the prepared connector cable assembly into the RJ45 slot in your crimping tool Firmly squ...

Отзывы: