


VEMCO - VR2C Manual
9
Jul 2018
21
3.1.6
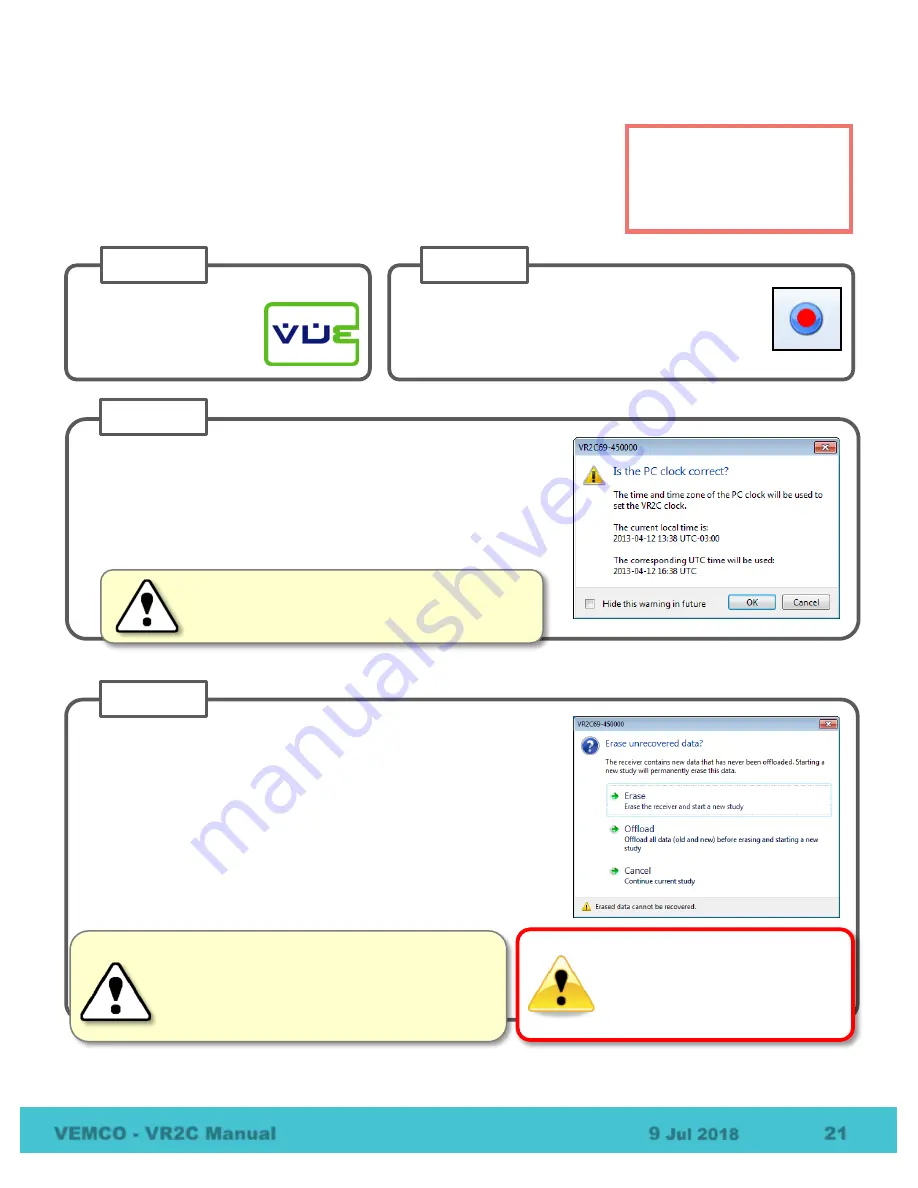
Start a Study
Setting up a study allows you to enter information in the VR2C, such as
deployment location, a description of the study, or other helpful information
that can be very useful when data is being organized in the VUE software.
Start a study using VUE by following the steps below.
Start a study to remove a
VR2C from Suspend mode.
VR2C receivers are shipped
in Suspend mode.
Click the circular
red and blue “Start Recording”
icon on the VR2C Receiver T
ab’s ribbon. This
icon is not available if communication between the
receiver and VUE is not established.
STEP 2
Review the PC clock time listed in the dialogue box that opens. The
PC time and UTC offset
must
be correct as the VR2C will be set to
UTC time based on these settings. If the PC time and UTC offset are
correct, then click the
“OK” button to continue. If the PC time and
UTC offset are not correct, then click “Cancel” and make the
necessary corrections before returning to start a study.
STEP 3
CAUTION:
It is vital that the PC clock and time
zone must be correctly set to your local
time
before the VR2C is initialized
.
Select one of the three options displayed.
1.
ERASE:
use when the data stored in the VR2C has already been
offloaded and securely backed up and you wish to erase the data
and begin a new study.
2.
OFFLOAD:
use if there is
any
uncertainty about whether the data
has been offloaded and securely backed up.
3.
CANCEL
: use when you wish to continue the study that is
currently running in the VR2C receiver. No changes to the
current study will be made.
STEP 4
WARNING
Initializing the VR2C will erase the
receiver’s memory.
Offload
detection logs before the VR2C
is initialized.
CAUTION:
Verify you are communicating with
the
intended receiver
before initializing/erasing
receiver or data could be lost. Communication
can occur with any receiver that is connected to
the PC (including through
Bluetooth®
).
Continued…
Establish communication
between the VR2C and
the VUE software
(section 3.1.2).
STEP 1


